-
-
-
Configure Windows Defender Access Control related to VDA Installation
-
Generate custom script to install or upgrade VDA via command-line
-
-
Cloud Connector Standalone Citrix Secure Ticketing Authority (STA) service
-
-
-
-
-
This content has been machine translated dynamically.
Dieser Inhalt ist eine maschinelle Übersetzung, die dynamisch erstellt wurde. (Haftungsausschluss)
Cet article a été traduit automatiquement de manière dynamique. (Clause de non responsabilité)
Este artículo lo ha traducido una máquina de forma dinámica. (Aviso legal)
此内容已经过机器动态翻译。 放弃
このコンテンツは動的に機械翻訳されています。免責事項
이 콘텐츠는 동적으로 기계 번역되었습니다. 책임 부인
Este texto foi traduzido automaticamente. (Aviso legal)
Questo contenuto è stato tradotto dinamicamente con traduzione automatica.(Esclusione di responsabilità))
This article has been machine translated.
Dieser Artikel wurde maschinell übersetzt. (Haftungsausschluss)
Ce article a été traduit automatiquement. (Clause de non responsabilité)
Este artículo ha sido traducido automáticamente. (Aviso legal)
この記事は機械翻訳されています.免責事項
이 기사는 기계 번역되었습니다.책임 부인
Este artigo foi traduzido automaticamente.(Aviso legal)
这篇文章已经过机器翻译.放弃
Questo articolo è stato tradotto automaticamente.(Esclusione di responsabilità))
Translation failed!
Configure Windows Defender Access Control related to VDA Installation
Customers configure Windows Defender Access Control (WDAC) settings to prohibit loading of unsigned binaries. The unsigned binaries distributed through VDA installers are thus prohibited which restricts the VDA installation.
Citrix® now signs all Citrix-generated binaries with a Citrix code signing certificate. Additionally, Citrix also signs the third-party binaries which are distributed along with our product with a certificate that authenticates those third-party binaries as trusted binaries.
Important:
Upgrading from an older VDA with unsigned third-party binaries to a newer VDA version with signed binaries may not always place the signed binaries on the upgraded machine. This is due to a mechanism within the OS where upgrade of the system does not replace binaries with the same version. Although the third-party binaries have been signed, their versions, which are controlled by third parties, are not able to be updated by Citrix, resulting in these binaries not being updated. To avoid this limitation:
- Include the binaries in an allow list. This eliminates the need for signing the binaries.
- Uninstall the older VDA and install the new VDA. This resembles a fresh VDA install and the signed versions will be installed.
Create a new Base Policy with the Wizard
The WDAC allows you to add trusted binaries to run on your system. After the installation of WDAC, the Windows Defender Application Control Policy Wizard opens automatically.
To add the binaries, a new base WDAC policy must be created. Citrix-recommended guidelines for creating a base policy are provided in this section.
- Select Signed and Reputable Mode as the base template because it authorizes Windows operating components, apps installed from the Microsoft Store, all Microsoft-signed software, and third-party Windows hardware-compatible drivers.
- Enable Audit Mode because it allows you to test new Windows Defender Application Control policies before you enforce them.
- Add Custom Rule for File Rules to specify the level at which applications are identified and trusted and provide a reference file. By selecting “Publisher” as the rule type, a reference file that is signed by one of the Citrix certificates can be selected.
- After the rules are added, navigate to the folder where
.XMLand.CIPfiles are saved. The.XMLfile has all the rules defined in the policy. It can be configured to change, add, or remove any rules. - Before deploying the WDAC policies, the
.XMLfile must be converted to its binary form. The WDAC file converts the.XMLfile to.CIPfile. - Copy and paste the
.CIPfile to: C:\WINDOWS\System32\CodeIntegrity\CiPolicies\Active and reboot the machine. The generated policy will be applied in audit mode. - For a step-by-step process to create a base policy, see Creating a new Base Policy with the Wizard.
When this policy is applied, WDAC does not give warnings about any Citrix files that are signed by the specified publisher/CA authority.
Similarly, we can create a publisher-level rule for the files that have been signed by the third party.
Verify the applied policy
- After the machine has been rebooted, open the Event Viewer and go to Applications and Services Logs > Microsoft > Windows > CodeIntegrity > Operational.
-
Make sure the applied policy is activated.
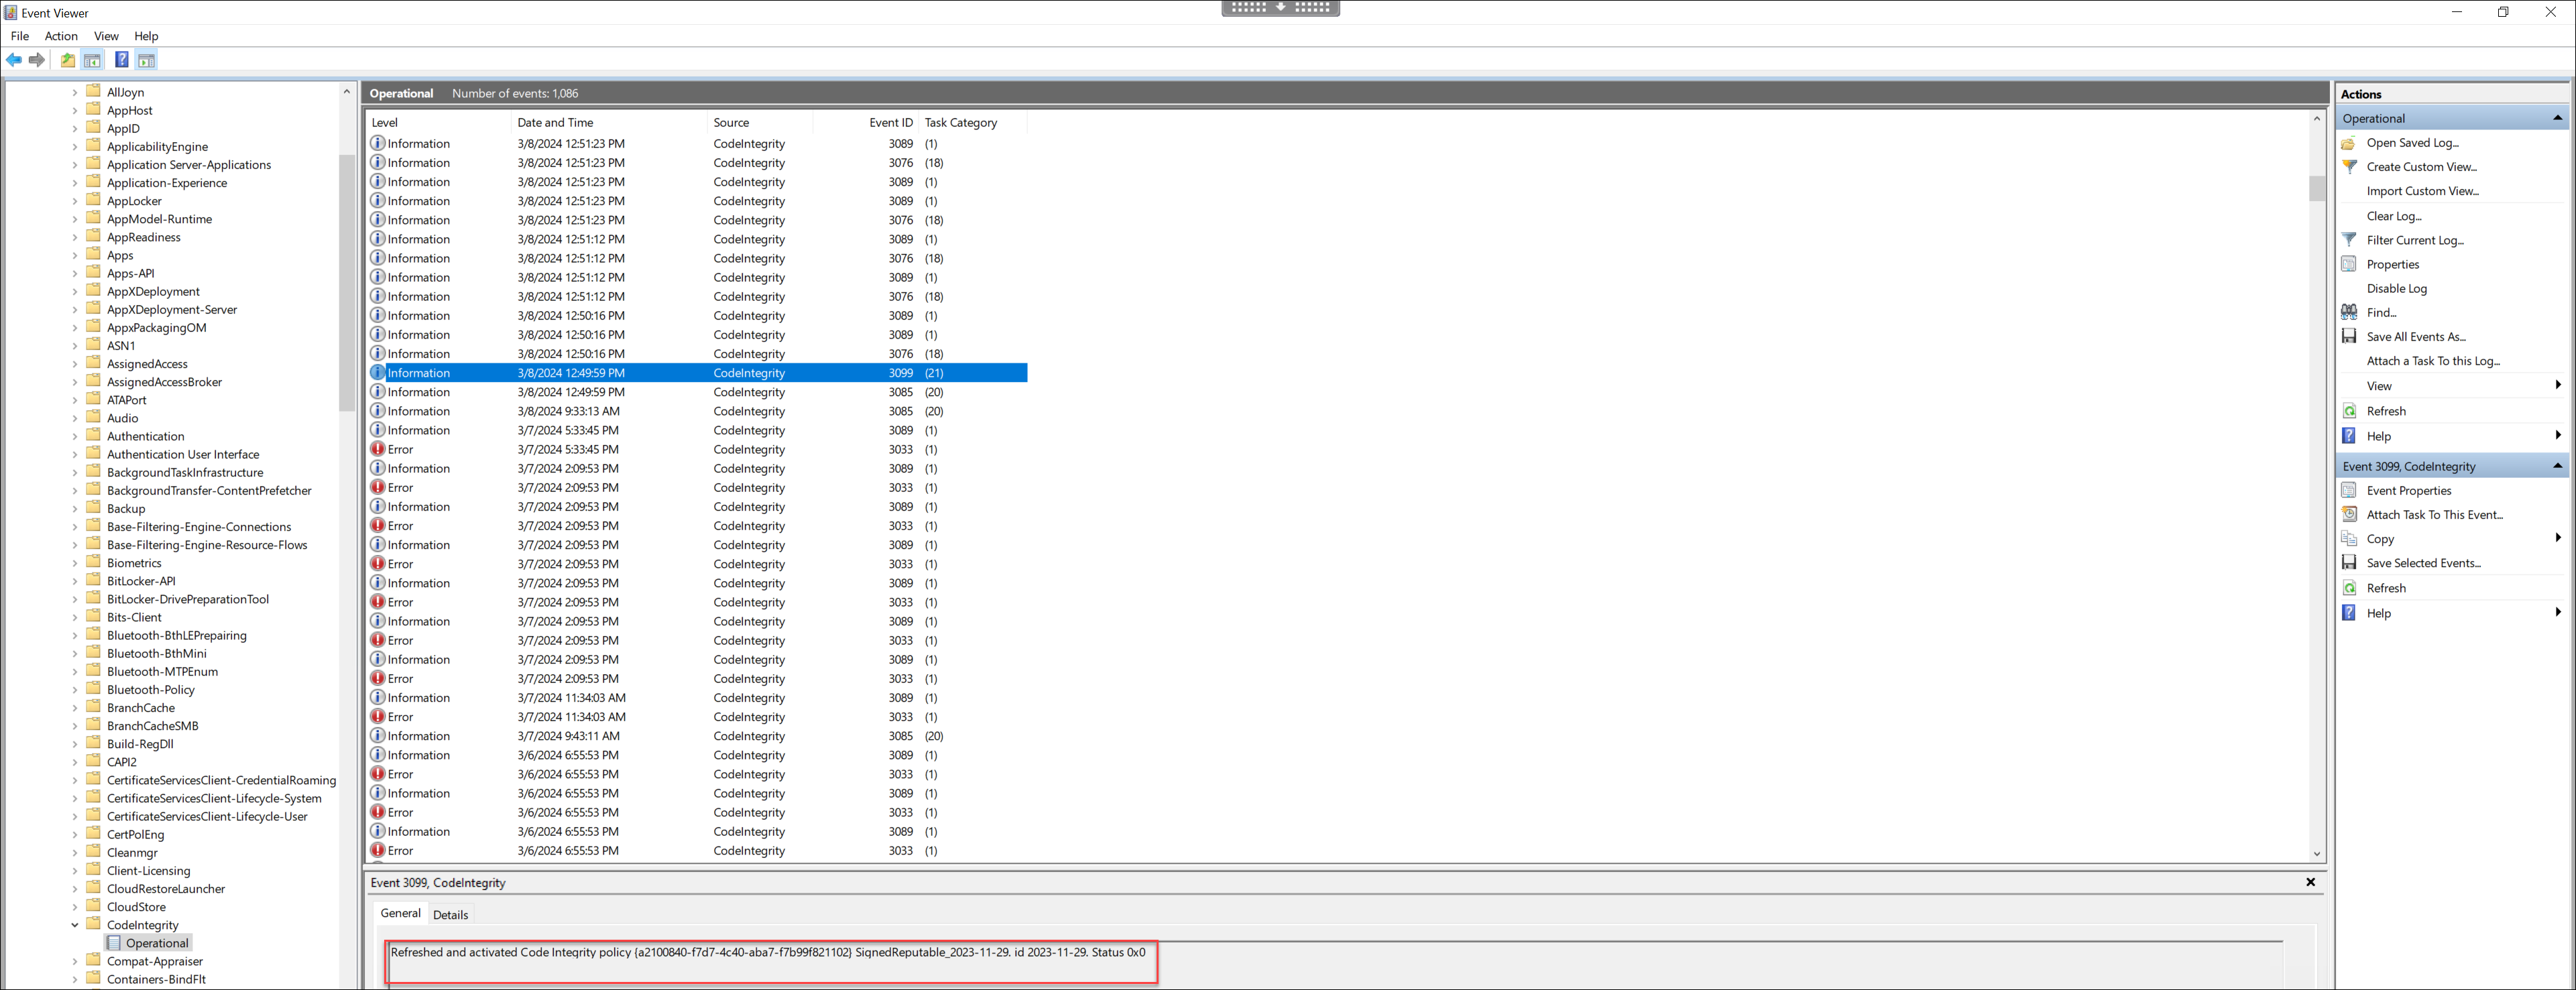
- Look for logs that have violated the policy and check the properties of that file. First, confirm it has been signed. If not and this machine has gone through a VDA upgrade, this most likely is the case described in the limitation above. If signed, this file is potentially signed with the alternate certificate, as described previously.
An example of a Citrix-generated file signed with a Citrix certificate is C:\Windows\System32\drivers\picadm.sys.
An example of a third-party binary signed with the Citrix third-party certificate is C:\Program Files\Citrix\IcaConfigTool\Microsoft.Practices.Unity.dll.
Share
Share
In this article
This Preview product documentation is Citrix Confidential.
You agree to hold this documentation confidential pursuant to the terms of your Citrix Beta/Tech Preview Agreement.
The development, release and timing of any features or functionality described in the Preview documentation remains at our sole discretion and are subject to change without notice or consultation.
The documentation is for informational purposes only and is not a commitment, promise or legal obligation to deliver any material, code or functionality and should not be relied upon in making Citrix product purchase decisions.
If you do not agree, select I DO NOT AGREE to exit.