Create a Google Cloud Platform catalog
Create machine catalogs describes the wizards that create a machine catalog. The following information covers details specific to Google cloud environments.
Note:
Before creating a Google cloud platform (GCP) catalog, you need to finish creating a connection to GCP. See Connection to Google cloud environments.
Prepare a master VM instance and a persistent disk
Tip:
Persistent disk is the Google Cloud term for virtual disk.
To prepare your master VM instance, create and configure a VM instance with properties that match the configuration you want for the cloned VDA instances in your planned machine catalog. The configuration does not apply only to the instance size and type. It also includes instance attributes such as metadata, tags, GPU assignments, network tags, and service account properties.
As part of the mastering process, MCS uses your master VM instance to create the Google Cloud instance template. The instance template is then used to create the cloned VDA instances that comprise the machine catalog. Cloned instances inherit the properties (except the VPC, subnet, and persistent disk properties) of the master VM instance from which the instance template was created.
After configuring the properties of the master VM instance to your specifics, start the instance and then prepare the persistent disk for the instance.
We recommend that you manually create a snapshot of the disk or an image of the disk. Doing so lets you use a meaningful naming convention to track versions, gives you more options to manage earlier versions of your master image, and saves time for machine catalog creation. If you do not create your own snapshot, MCS creates a temporary snapshot for you (which is deleted at the end of the provisioning process). Manually creating a multi-regional snapshot of the OS disk or image also allows you to use the same master image for machine catalogs in different GCP regions.
Create a machine catalog
You can create a machine catalog in two ways:
Create a machine catalog using Web Studio
Note:
Create your resources before you create a machine catalog. Use the naming conventions established by Google Cloud when configuring machine catalogs. See Bucket and object naming guidelines for more information.
Follow the guidance in Create machine catalogs. The following description is unique to Google Cloud catalogs.
-
Sign in to Web Studio and select Machine Catalogs in the left pane.
-
Select Create Machine Catalog in the action bar.
-
On the Operating System page, select Multi-session OS and then select Next.
- Citrix Virtual Apps and Desktops™ also supports single-session OS.
-
On the Machine Management page, select the Machines that are power managed and the Citrix Machine Creation Services™ options and then select Next. If there are multiple resources, select one from the menu.
-
On the Image page, complete these steps as needed, and then click Next.
- Select the master image. You can select the following image types:
- Virtual Machine (whose regions are the same as the selected hosting units).
- Snapshots (support multi-region snapshots).
- OS image (support multi-region public and non-public images). If you want to use the sole tenancy functionality, be sure to select an image whose node group property is correctly configured. See Enable zone selection.
-
To inherit machine properties from a machine profile, select Use a machine profile and select a profile from Virtual machine tab or from Instance templates tab.
Note:
- Currently, VMs in this catalog inherit the storage, machine type, and disk encryption, settings from the selected machine profile.
- If you select an instance template as the machine profile, then all zones are selected by default. You can select the zones as required.
- Select the minimum functional level for the catalog.
- Select the master image. You can select the following image types:
-
On the Storage Types page, select the type of storage used to contain the operating system for this machine catalog. Each of the following storage options has unique price and performance characteristics. (An identity disk is always created using the zonal standard persistent disk.)
- Standard persistent disk
- Balanced persistent disk
- SSD persistent disk
For details about Google Cloud storage options, see https://cloud.google.com/compute/docs/disks/.
-
On the Virtual Machines page, specify how many VMs you want to create, view the detailed specification of the VMs, and then select Next. If you use sole tenant node groups for machine catalogs, be sure to select only the zones where reserved sole tenant nodes are available. See Enable zone selection.
-
On the Disk Settings page, you can configure the following settings:
-
Choose whether to enable write-back cache. After enabling write-back cache, you can do the following:
- Configure the size of the disk and RAM used for caching temporary data. For more information, see Configure cache for temporary data.
- Select the storage type for the write-back cache disk. The following storage options are available to use for the write-back cache disk:
- Standard persistent disk
- Balanced persistent disk
- SSD persistent disk
For details about Google Cloud storage options, see Storage options.
- Select the type for the write-back cache disk.
- Use non-persistent write-back cache disk. If selected, the write-back cache disk does not persist for the provisioned VMs. The disk is deleted during power cycles and any data redirected to the disk will be lost.
- Use persistent write-back cache disk. If selected, the write-back cache disk persists for the provisioned VMs. Enabling this option increases your storage costs.
- When MCS storage optimization (MCS I/O) is enabled, you can do either of the following:
- Choose whether to retain system disks for VDAs during power cycles. For more information, see Enabling MCS storage optimization updates.
- Update the memory and disk cache sizes.
-
Choose whether to use your own key to protect disk contents. To use the feature, you must first create your own Customer Managed Encryption Keys (CMEKs). For more information, see Use Customer Managed Encryption Keys (CMEK).
Note:
It is available only in the Studio interface.
After creating the keys, you can select one of those keys from the list. You cannot change the key after you create the catalog. Google Cloud does not support rotating keys on existing persistent disks or images. Therefore, after you provision a catalog, the catalog is tied to a specific version of the key. If that key is disabled or destroyed, the instances and disks encrypted with it become unusable until the key is reenabled or restored.
-
-
On the Computer Accounts page, select an Active Directory account and then select Next.
- If you select Create new Active Directory accounts, select a domain and then enter the sequence of characters representing the naming scheme for the provisioned VM computer accounts created in the Active Directory. The account naming scheme can contain 1–64 characters, and cannot contain blank spaces, or non-ASCII or special characters.
- If you select Use existing Active Directory accounts, select Browse to navigate to the existing Active Directory computer accounts for the selected machines.
-
On the Domain Credentials page, select Enter credentials, type the user name and password, select Save, and then select Next.
- The credential you type must have permissions to perform Active Directory account operations.
-
On the Summary page, confirm the information, specify a name for the catalog, and then select Finish.
Note:
Starting with version 2402, GCP catalog names must comply with these rules:
- Start with a lowercase letter.
- Include only lowercase letters (a-z), numbers, and hyphens.
- End with either a lowercase letter or a number.
When you attempt to rename existing GCP catalogs that don’t comply with these rules, error messages appear and guide you to rename them according to the updated rules.
Machine catalog creation might take a long time to complete. To verify that the machines are created on the target node groups, go to the Google Cloud console.
Import manually created Google Cloud machines
You can create a connection to Google Cloud and then create a catalog containing Google Cloud machines. Then, you can manually power cycle Google Cloud machines through Citrix Virtual Apps™ and Desktops. With this feature, you can:
- Import manually created Google Cloud multi-session OS machines into a Citrix Virtual Apps and Desktops machine catalog.
- Remove manually created Google Cloud multi-session OS machines from a Citrix Virtual Apps and Desktops catalog.
- Use existing Citrix Virtual Apps and Desktops power management capabilities to power manage Google Cloud Windows multi-session OS machines. For example, set a restart schedule for those machines.
This functionality does not require changes to an existing Citrix Virtual Apps and Desktops provisioning workflow, nor the removal of any existing feature. We recommend that you use MCS to provision machines in Web Studio instead of importing manually created Google Cloud machines.
Shared Virtual Private Cloud
Shared Virtual Private Clouds (VPCs) comprise a host project, from which the shared subnets are made available, and one or more service projects that use the resource. Shared VPCs are desirable options for larger installations because they provide centralized control, usage, and administration of shared corporate Google cloud resources. For more information, see the Google Documentation site.
With this feature, Machine Creation Services (MCS) supports provisioning and managing machine catalogs deployed to Shared VPCs. This support, which is functionally equivalent to the support currently provided in local VPCs, differs in two areas:
- You must grant extra permissions to the Service Account used to create the Host Connection. This process allows MCS to access and use Shared VPC Resources.
- You must create two firewall rules, one each for ingress and egress. These firewall rules are used during the image mastering process.
New permissions required
A Google Cloud service account with specific permissions is required when creating the host connection. These additional permissions must be granted to any service accounts used to create Shared VPC based host connections.
Tip:
These additional permissions are not new to Citrix Virtual Apps and Desktops. They are used to facilitate the implementation of local VPCs. With Shared VPCs, these additional permissions allow access to other shared VPC resources.
A maximum of four extra permissions must be granted to the service account associated with the host connection to support Shared VPC:
- compute.firewalls.list - This permission is mandatory. It allows MCS to retrieve the list of firewall rules present on the Shared VPC.
- compute.networks.list - This permission is mandatory. It allows MCS to identify the Shared VPC networks available to the service account.
- compute.subnetworks.list – This permission is optional depending on how you use VPCs. It allows MCS to identify the subnets within the visible Shared VPCs. This permission is already required when using local VPCs but must also be assigned in the Shared VPC host project.
- compute.subnetworks.use - This permission is optional depending on how you use VPCs. It is necessary to use subnet resources in the provisioned machine catalogs. This permission is already required for using local VPCs but must also be assigned in the Shared VPC host project.
When using these permissions, consider that there are different approaches based on the type of permission used to create the machine catalog:
- Project-level permission:
- Allows access to all Shared VPCs within the host project.
- Requires the permissions #3 and #4 must be assigned to the service account.
- Subnet-level permission:
- Allows access to specific subnets within the Shared VPC.
- Permissions #3 and #4 are intrinsic to the subnet level assignment and therefore do not need to be assigned directly to the service account.
Select the approach that matches your organizational needs and security standards.
Tip:
For more information about the differences between project-level and subnet-level permissions, see the Google Cloud documentation.
Firewall Rules
During the preparation of a machine catalog, a machine image is prepared to serve as the master image system disk for the catalog. When this process occurs, the disk is temporarily attached to a virtual machine. This VM must run in an isolated environment that prevents all inbound and outbound network traffic. This is accomplished through a pair of deny-all firewall rules; one for ingress and one for egress traffic. When using Google Cloud local VPCs, MCS creates this firewall in the local network and applies it to the machine for mastering. After mastering completes, the firewall rule is removed from the image.
We recommend keeping the number of new permissions required to use Shared VPCs to a minimum. Shared VPCs are higher-level corporate resources and typically have more rigid security protocols in place. For this reason, create a pair of firewall rules in the host project on the shared VPC resources, one for ingress and one for egress. Assign the highest priority to them. Apply a new target tag to each of these rules, using the following value:
citrix-provisioning-quarantine-firewall
When MCS creates or updates a machine catalog, it searches for firewall rules containing this target tag. It then examines the rules for correctness and applies them to the machine used to prepare the master image for the catalog. If the firewall rules are not found, or the rules are found but the rules or their priorities are incorrect, a message similar to the following appears:
"Unable to find valid INGRESS and EGRESS quarantine firewall rules for VPC <name> in project <project>. " Please ensure you have created 'deny all' firewall rules with the network tag 'citrix-provisioning-quarantine-firewall' and proper priority." "Refer to Citrix Documentation for details."
Configuring the shared VPC
Before adding the Shared VPC as a host connection in Web Studio, complete the following steps to add service accounts from the project you intend to provision into:
- Create an IAM role.
- Add the service account used to create a CVAD host connection to the Shared VPC host project IAM role.
- Add the Cloud Build service account from the project you intend to provision into to the Shared VPC host project IAM role.
- Create firewall rules.
Create an IAM role
Determine the access level of the role — project level access or a more restricted model using subnet level access.
Project level access for IAM role. For the project level IAM role, include the following permissions:
- compute.firewalls.list
- compute.networks.list
- compute.subnetworks.list
- compute.subnetworks.use
To create a project level IAM role:
- In the Google Cloud console, navigate to IAM & Admin > Roles.
- On the Roles page, select CREATE ROLE.
- On the Create Role page, specify the role name. Select ADD PERMISSIONS.
- On the Add permissions page, add permissions to the role, individually. To add a permission, type the name of the permission in the Filter table field. Select the permission and then select ADD.
- Select CREATE.
Subnet-level IAM role. This role omits the addition of the permissions compute.subnetworks.list and compute.subnetworks.use after selecting CREATE ROLE. For this IAM access level, the permissions compute.firewalls.list and compute.networks.list must be applied to the new role.
To create a subnet level IAM role:
- In the Google Cloud console, navigate to VPC network > Shared VPC. The Shared VPC page appears, displaying the subnets of the Shared VPC networks that the host project contains.
- On the Shared VPC page, select the subnet that you want to access.
- In the top-right corner, select ADD MEMBER to add a service account.
- On the Add members page, complete these steps:
- In the New members field, type the name of your service account and then select your service account in the menu.
- Select the Select a role field and then Compute Network User.
- Select SAVE.
- In the Google Cloud console, navigate to IAM & Admin > Roles.
- On the Roles page, select CREATE ROLE.
- On the Create Role page, specify the role name. Select ADD PERMISSIONS.
- On the Add permissions page, add permissions to the role, individually. To add a permission, type the name of the permission in the Filter table field. Select the permission, and then select ADD.
- Select CREATE.
Add a service account to the host project IAM role
After creating an IAM role, do the following steps to add a service account for the host project:
- In the Google Cloud console, navigate to the host project and then to IAM & Admin > IAM.
- On the IAM page, select ADD to add a service account.
- On the Add members page:
- In the New members field, type the name of your service account and then select your service account in the menu.
- Select a role field, type the IAM role you created, and then select the role in the menu.
- Select SAVE.
The service account is now configured for the host project.
Add the cloud build service account to the shared VPC
Every Google Cloud subscription has a service account that is named after the project ID number, followed by cloudbuild.gserviceaccount. For example: 705794712345@cloudbuild.gserviceaccount.
You can determine what the project ID number is for your project by selecting Home and Dashboard in the Google Cloud console:
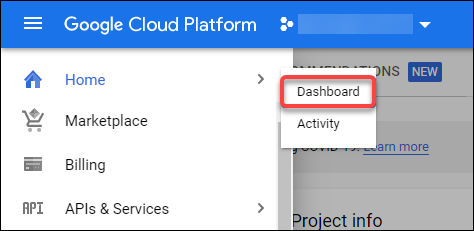
Find the Project Number below the Project Info area of the screen.
Perform the following steps to add the Cloud Build service account to the Shared VPC:
- In the Google Cloud console, navigate to the host project and then to IAM & Admin > IAM.
- On the Permissions page, select ADD to add an account.
- On the Add members page, complete these steps:
- In the New members field, type the name of the Cloud Build service account and then select your service account in the menu.
- Select the Select a role field, type
Computer Network User, and then select the role in the menu. - Select SAVE.
Create firewall rules
As part of the mastering process, MCS copies the selected machine image and uses it to prepare the master image system disk for the catalog. During mastering, MCS attaches the disk to a temporary virtual machine, which then runs preparation scripts. This VM must run in an isolated environment that prohibits all inbound and outbound network traffic. To create an isolated environment, MCS requires two deny all firewall rules (an ingress rule and an egress rule). Therefore, create two firewall rules in the Host Project as follows:
- In the Google Cloud console, navigate to the host project and then to VPC network > Firewall.
- On the Firewall page, select CREATE FIREWALL RULE.
- On the Create a firewall rule page, complete the following:
- Name. Type a name for the rule.
- Network. Select the Shared VPC network to which the ingress firewall rule applies.
- Priority. The smaller the value is, the higher the priority of the rule is. We recommend a small value (for example, 10).
- Direction of traffic. Select Ingress.
- Action on match. Select Deny.
- Targets. Use the default, Specified target tags.
-
Target tags. Type
citrix-provisioning-quarantine-firewall. - Source filter. Use the default, IP ranges.
-
Source IP ranges. Type a range that matches all traffic. Type
0.0.0.0/0. - Protocols and ports. Select Deny all.
- Select CREATE to create the rule.
- Repeat steps 1–4 to create another rule. For Direction of traffic, select Egress.
Add a connection
Add a connection to the Google cloud environments. See Add a connection.
Enable zone selection
Citrix Virtual Apps and Desktops supports zone selection. With zone selection, you specify the zones where you want to create VMs. With zone selection, administrators can place sole tenant nodes across zones of their choice. To configure sole tenancy, you must complete the following on Google Cloud:
- Reserve a Google Cloud sole-tenant node
- Create the VDA master image
Reserving a Google Cloud sole-tenant node
To reserve a sole-tenant node, refer to the Google Cloud documentation.
Important:
A node template is used to indicate performance characteristics of the system that is reserved in the node group. Those characteristics include the number of vGPUs, the amount of memory allocated to the node, and the machine type used for machines created on the node. For more information see the Google Cloud documentation.
Creating the VDA master image
To deploy machines on the sole-tenant node successfully, you need to take extra steps when creating a master VM image. Machine instances on Google Cloud have a property called node affinity labels. Instances used as master images for catalogs deployed to the sole-tenant node require a node affinity label that matches the name of the target node group. To achieve this, keep the following in mind:
- For a new instance, set the label in the Google Cloud console when creating an instance. For details, see Provision a sole-tenant VM.
- For an existing instance, set the label by using the gcloud command line. For details, see Configure node affinity labels.
Note:
If you intend to use sole tenancy with a shared VPC, see Shared Virtual Private Cloud.
Create a machine catalog
After setting the node affinity label, configure the machine catalog.
Customer Managed Encryption Keys (CMEK)
You can use Customer Managed Encryption Keys (CMEK) for MCS catalogs. When using this functionality, you assign the Google Cloud Key Management Service CryptoKey Encrypter/Decrypter role to the Compute Engine Service Agent. Citrix Virtual Apps and Desktops account must have the correct permissions in the project where the key is stored. Refer to Helping to protect resources by using Cloud KMS keys for more information.
Your Compute Engine Service Agent is in the following form: service-<Project _Number>@compute-system.iam.gserviceaccount.com. This form is different than the default Compute Engine Service Account.
Note:
This Compute Engine Service Account might not appear in the Google Console IAM Permissions display. In such cases, use the
gcloudcommand as described in Helping to protect resources by using Cloud KMS keys.
Assign permissions to Citrix Virtual Apps and Desktops account
Google Cloud KMS permissions can be configured in various ways. You can either provide project level KMS permissions or resource level KMS permissions. See Permissions and roles for more information.
Project level permissions
One option is to provide Citrix Virtual Apps and Desktops account with project-level permissions to browse Cloud KMS resources. To do this, create a custom role, and add the following permissions:
cloudkms.keyRings.listcloudkms.keyRings.getcloudkms.cryptokeys.listcloudkms.cryptokeys.get
Assign this custom role to your Citrix Virtual Apps and Desktops. This allows you to browse regional keys in the relevant project in the inventory.
Resource Level Permissions
For the other option, resource level permissions, in the Google Cloud console, browse to the cryptoKey you use for MCS provisioning. Add Citrix Virtual Apps and Desktops account to a key ring or a key that you use for catalog provisioning.
Tip:
With this option, you cannot browse regional keys for your project in the inventory because Citrix Virtual Apps and Desktops account does not have project-level list permissions on the Cloud KMS resources. However, you can still provision a catalog using CMEK by specifying the correct
cryptoKeyIdin theProvSchemecustom properties, described below.
Provisioning with CMEK using custom properties
When creating your Provisioning Scheme via PowerShell, specify a CryptoKeyId property in ProvScheme CustomProperties. For example:
'<CustomProperties xmlns="http://schemas.citrix.com/2014/xd/machinecreation" xmlns:xsi="http://www.w3.org/2001/XMLSchema-instance">
    <Property xsi:type="StringProperty" Name="CryptoKeyId" Value="<yourCryptoKeyId>" />
</CustomProperties>'
<!--NeedCopy-->
The cryptoKeyId must be specified in the following format:
projectId:location:keyRingName:cryptoKeyName
For example, if you’d like to use the key my-example-key in key ring my-example-key-ring in the region us-east1 and project with ID my-example-project-1, your ProvScheme custom settings would resemble:
'<CustomProperties xmlns="http://schemas.citrix.com/2014/xd/machinecreation" xmlns:xsi="http://www.w3.org/2001/XMLSchema-instance">
    <Property xsi:type="StringProperty" Name="CryptoKeyId" Value="my-example-project-1:us-east1:my-example-key-ring:my-example-key" />
</CustomProperties>'
<!--NeedCopy-->
All MCS provisioned disks and images related to this provisioning scheme use this customer managed encryption key.
Tip:
If you use global keys, the customer properties location must say
globaland not the region name, which in the example above is us-east1. For example:<Property xsi:type="StringProperty" Name="CryptoKeyId" Value="my-example-project-1:global:my-example-key-ring:my-example-key" />.
Rotating customer managed keys
Google Cloud does not support rotating keys on existing persistent disks or images. Once a machine is provisioned it is tied to the key version in use at the time it was created. However, a new version of the key can be created and that new key is used for newly provisioned machines or resources created when a catalog is updated with a new master image.
Important considerations about key rings
Key rings cannot be renamed or deleted. Also, you might incur unforeseen charges when configuring them. When deleting or removing a key ring, Google Cloud displays an error message:
Sorry, you can't delete or rename keys or key rings. We were concerned about the security implications of allowing multiple keys or key versions over time to have the same resource name, so we decided to make names immutable. (And you can't delete them, because we wouldn't be able to do a true deletion--there would still have to be a tombstone tracking that this name had been used and couldn't be reused).
We're aware that this can make things untidy, but we have no immediate plans to change this.
If you want to avoid getting billed for a key or otherwise make it unavailable, you can do so by deleting all the key versions; neither keys nor key rings are billed for, just the active key versions within the keys.
<!--NeedCopy-->
Tip:
For more information, see Editing or deleting a key ring from the console.
Uniform bucket-level access compatibility
Citrix Virtual Apps and Desktops is compatible with uniform bucket-level access control policy on Google Cloud. This functionality augments the use of IAM policy that grants permissions to a service account to allow for the manipulation of resources, including storage buckets. With uniform bucket level access control, Citrix Virtual Apps and Desktops allows you to use an access control list (ACL) to control access to storage buckets or objects stored in them. See Uniform bucket-level access for overview information about Google Cloud uniform bucket-level access. For configuration information, see Require uniform bucket-level access.
Create a machine catalog using PowerShell
This section details how you can create catalogs using PowerShell:
- Create a catalog with persistent write-back cache disk
- Improve boot performance with MCSIO
- Create a machine catalog using a machine profile
- Create a machine catalog with machine profile as an instance template
- Use PowerShell to create a catalog with shielded VM
- Create Windows 11 VMs on the sole-tenant node
Create a catalog with persistent write-back cache disk
To configure a catalog with persistent write-back cache disk, use the PowerShell parameter New-ProvScheme CustomProperties.
Tip:
Use the PowerShell parameter here only for cloud-based hosting connections. If you want to provision machines using a persistent write-back cache disk for an on-premises solution (for example, XenServer®) PowerShell is not needed because the disk persists automatically.
This parameter supports an extra property, PersistWBC, used to determine how the write-back cache disk persists for MCS provisioned machines. The PersistWBC property is only used when the UseWriteBackCache parameter is specified, and when the WriteBackCacheDiskSize parameter is set to indicate that a disk is created.
Note:
This behavior applies to both Azure and GCP where the default MCSIO write-back cache disk is deleted and re-created when power cycling. You can choose to persist the disk to avoid the deletion and recreation of MCSIO write-back cache disk.
Setting the PersistWBC property to true does not delete the write-back cache disk when the Citrix Virtual Apps and Desktops administrator shuts down the machine from the management interface.
Setting the PersistWBC property to false deletes the write-back cache disk when the Citrix Virtual Apps and Desktops administrator shuts down the machine from the management interface.
Note:
If the
PersistWBCproperty is omitted, the property defaults tofalseand the write-back cache is deleted when the machine is shut down from the management interface.
For example, using the CustomProperties parameter to set PersistWBC to true:
<CustomProperties xmlns="http://schemas.citrix.com/2014/xd/machinecreation" xmlns:xsi="http://www.w3.org/2001/XMLSchema-instance">
<Property xsi:type="StringProperty" Name="UseManagedDisks" Value="true" />
<Property xsi:type="StringProperty" Name="StorageAccountType" Value="Premium_LRS" />
<Property xsi:type="StringProperty" Name="ResourceGroups" Value="benvaldev5RG3" />
<Property xsi:type="StringProperty" Name="PersistWBC" Value="true" />
</CustomProperties>
<!--NeedCopy-->
Note:
The
PersistWBCproperty can only be set using theNew-ProvSchemePowerShell cmdlet. Attempting to alter theCustomPropertiesof a provisioning scheme after creation has no impact on the machine catalog and the persistence of the write-back cache disk when a machine is shut down.
For example, set New-ProvScheme to use the write-back cache while setting the PersistWBC property to true:
New-ProvScheme
-CleanOnBoot
-CustomProperties "<CustomProperties xmlns=`"http://schemas.citrix.com/2014/xd/machinecreation`" xmlns:xsi=`"http://www.w3.org/2001/XMLSchema-instance`"><Property xsi:type=`"StringProperty`" Name=`"UseManagedDisks`" Value=`"true`" /><Property xsi:type=`"StringProperty`" Name=`"StorageAccountType`" Value=`"Premium_LRS`" /><Property xsi:type=`"StringProperty`" Name=`"ResourceGroups`" Value=`"benvaldev5RG3`" /><Property xsi:type=`"StringProperty`" Name=`"PersistWBC`" Value=`"true`" /></CustomProperties>"
-HostingUnitName "adSubnetScale1"
-IdentityPoolName "BV-WBC1-CAT1"
-MasterImageVM "XDHyp:\HostingUnits\adSubnetScale1\image.folder\GoldImages.resourcegroup\W10MCSIO-01_OsDisk_1_a940e6f5bab349019d57ccef65d2c7e3.manageddisk"
-NetworkMapping @{"0"="XDHyp:\HostingUnits\adSubnetScale1\\virtualprivatecloud.folder\CloudScale02.resourcegroup\adVNET.virtualprivatecloud\adSubnetScale1.network"}
-ProvisioningSchemeName "BV-WBC1-CAT1"
-ServiceOffering "XDHyp:\HostingUnits\adSubnetScale1\serviceoffering.folder\Standard_D2s_v3.serviceoffering"
-UseWriteBackCache
-WriteBackCacheDiskSize 127
-WriteBackCacheMemorySize 256
<!--NeedCopy-->
Improve boot performance with MCSIO
You can improve boot performance for Azure and GCP managed disks when MCSIO is enabled. Use the PowerShell PersistOSDisk custom property in the New-ProvScheme command to configure this feature. Options associated with New-ProvScheme include:
<CustomProperties xmlns="http://schemas.citrix.com/2014/xd/machinecreation" xmlns:xsi="http://www.w3.org/2001/XMLSchema-instance">
<Property xsi:type="StringProperty" Name="UseManagedDisks" Value="true" />
<Property xsi:type="StringProperty" Name="StorageAccountType" Value="Premium_LRS" />
<Property xsi:type="StringProperty" Name="Resource <!--NeedCopy-->
``````<!--NeedCopy-->
<!--NeedCopy-->
````````Groups" Value="benvaldev5RG3" />
<Property xsi:type="StringProperty" Name="PersistOsDisk" Value="true" />
</CustomProperties>
<!--NeedCopy-->
To enable this feature, set the PersistOSDisk custom property to true. For example:
New-ProvScheme
-CleanOnBoot
-CustomProperties "<CustomProperties xmlns=`"http://schemas.citrix.com/2014/xd/machinecreation`" xmlns:xsi=`"http://www.w3.org/2001/XMLSchema-instance`"><Property xsi:type=`"StringProperty`" Name=`"UseManagedDisks`" Value=`"true`" /><Property xsi:type=`"StringProperty`" Name=`"StorageAccountType`" Value=`"Premium_LRS`" /><Property xsi:type=`"StringProperty`" Name=`"ResourceGroups`" Value=`"benvaldev5RG3`" /><Property xsi:type=`"StringProperty`" Name=`"PersistOsDisk`" Value=`"true`" /></CustomProperties>"
-HostingUnitName "adSubnetScale1"
-IdentityPoolName "BV-WBC1-CAT1"
-MasterImageVM "XDHyp:\HostingUnits\adSubnetScale1\image.folder\GoldImages.resourcegroup\W10MCSIO-01_OsDisk_1_a940e6f5bab349019d57ccef65d2c7e3.manageddisk"
-NetworkMapping @{"0"="XDHyp:\HostingUnits\adSubnetScale1\\virtualprivatecloud.folder\CloudScale02.resourcegroup\adVNET.virtualprivatecloud\adSubnetScale1.network"}
-ProvisioningSchemeName "BV-WBC1-CAT1"
-ServiceOffering "XDHyp:\HostingUnits\adSubnetScale1\serviceoffering.folder\Standard_D2s_v3.serviceoffering"
-UseWriteBackCache
-WriteBackCacheDiskSize 127
-WriteBackCacheMemorySize 256
<!--NeedCopy-->
Create a machine catalog using a machine profile
When you create a catalog to provision machines using Machine Creation Services (MCS), you can use a machine profile to capture the hardware properties from a virtual machine and apply them to newly provisioned VMs in the catalog. When MachineProfile parameter is not used, the hardware properties are captured from the master image VM or snapshot.
Some properties you define explicitly, for example, StorageType, CatalogZones and CryptoKeyIs are ignored from machine profile.
- To create a catalog with a machine profile, use the
New-ProvSchemecommand. For example,New-ProvScheme –MachineProfile "path to VM". If you do not specify theMachineProfileparameter, hardware properties are captured from the master image VM. - To update a catalog with a new machine profile, use the
Set-ProvSchemecommand. For example,Set-ProvScheme –MachineProfile "path to new VM". This command does not change the machine profile of the existing VMs in the catalog. Only the newly created VMs added to the catalog have the new machine profile. -
You can also update the master image, however, when you update the master image, the hardware properties are not updated. If you want to update the hardware properties, you must update the machine profile using
Set-ProvSchemecommand. These changes will only apply to the new machines in the catalog. For updating the hardware properties of an existing machine, you can use the commandSet-ProvVMUpdateTimeWindowwith-StartsNowand-DurationInMinutes -1parameters.Note:
-
StartsNowindicates that the scheduled start time is the current time. -
DurationInMinuteswith a negative number (for example, –1) indicates no upper bound on the schedule’s time window.
-
Create a machine catalog with machine profile as an instance template
You can select a GCP instance template as an input for the machine profile. Instance templates are lightweight resources in GCP, therefore, are very cost effective.
Create a new machine catalog with machine profile as an instance template
- Open a PowerShell window.
- Run
asnp citrix*to load the Citrix-specific PowerShell modules. -
Find an instance template in your GCP project using the following command:
cd XDHyp:\HostingUnits\<HostingUnitName>\instanceTemplates.folder <!--NeedCopy--> -
Create a new machine catalog with machine profile as an instance template using NewProvScheme command:
New-ProvScheme -ProvisioningSchemeName <CatalogName>  -HostingUnitName <HostingUnitName> -IdentityPoolName <identity pool name> -MasterImageVM
XDHyp:\HostingUnits\<HostingUnitName> \Base.vm\Base.snapshot -MachineProfile XDHyp:\HostingUnits\<HostingUnitName>\instanceTemplates.folder\mytemplate.template
<!--NeedCopy-->
For more information on the New-ProvScheme command, see https://developer-docs.citrix.com/projects/citrix-daas-sdk/en/latest/MachineCreation/New-ProvScheme/.
- Finish creating the machine catalog using PowerShell commands. For information on how to create a catalog using the Remote PowerShell SDK, see https://developer-docs.citrix.com/projects/citrix-virtual-apps-desktops-sdk/en/latest/creating-a-catalog/.
Change the machine profile of an existing machine catalog to be an instance template
The detailed steps to change the machine profile of an existing machine catalog to be an instance template are:
- Open a PowerShell window.
- Run
asnp citrix*to load the Citrix-specific PowerShell modules. -
Run the following command:
Set-ProvScheme -ProvisioningSchemeName  <CatalogName> -MachineProfile XDHyp:\HostingUnits\<HostingUnitName>\instanceTemplates.folder\<TemplateName>.template
<!--NeedCopy-->
For information on the Set-ProvScheme command, see https://developer-docs.citrix.com/projects/citrix-daas-sdk/en/latest/MachineCreation/Set-ProvScheme/.
Use PowerShell to create a catalog with shielded VM
You can create an MCS machine catalog with shielded VM properties. A shielded virtual machine is hardened by a set of security controls that provide verifiable integrity of your Compute Engine instances, using advanced platform security capabilities like secure boot, a virtual trusted platform module, UEFI firmware and integrity monitoring.
MCS supports creating the catalog using the machine profile workflow. If you use machine profile workflow, then you must enable the shielded VM properties of a VM instance. You can then use this VM instance as a machine profile input.
To create an MCS machine catalog with shielded VM using machine profile workflow.
- Enable shielded VM options of a VM instance in Google Cloud console. See Quickstart: Enable Shielded VM options.
-
Create an MCS machine catalog with machine profile workflow by using the VM instance.
- Open a PowerShell window.
- Run
asnp citrix*to load the Citrix-specific PowerShell modules. - Create an identity pool if not already created.
-
Run the
New-ProvSchemecommand. For example:New-ProvScheme -ProvisioningSchemeName <catalog-name> -HostingUnitName gcp-hostint-unit -MasterImageVM XDHyp:\HostingUnits\gcp-hostint-unit\catalog-vda.vm -MachineProfile XDHyp:\HostingUnits\gcp-hostint-unit\catalog-machine.vm <!--NeedCopy-->
- Finish creating the machine catalog.
To update machine catalog with a new machine profile:
-
Run the
Set-ProvSchemecommand. For example:Set-ProvScheme -ProvisioningSchemeName <catalog-name> -MasterImageVM XDHyp:\HostingUnits\<hostin-unit>\catalog-vda.vm -MachineProfile "DHyp:\HostingUnits\<hostin-unit>\catalog-machine.vm <!--NeedCopy-->
To apply the change done in Set-ProvScheme to the existing VMs, run the Set-ProvVMUpdateTimeWindow command.
-
Run
Set-ProvVMUpdateTimeWindowcommand. For example:Set-ProvVMUpdateTimeWindow -ProvisioningSchemeName my-catalog -VMName <List-Of-Vm-Names> -StartsNow -DurationInMinutes -1 <!--NeedCopy--> -
Restart the VMs.
Create Windows 11 VMs on the sole-tenant node
You can create Windows 11 VMs in GCP. However, if you install Windows 11 on the master image, then you must enable vTPM during the master image creation process. Also, you must enable vTPM on the machine profile source (VM or instance template).
The key steps to create Windows 11 VMs on the sole-tenant node are:
- Set up the Google Cloud virtualization environments. For information, see Google Cloud environments.
- Install VDA. See Install VDAs.
- Create a connection to Google cloud environments. For information, see Connection to Google cloud environments.
- Create a Windows 11 Bring Your Own License (BYOL) master image and import the image to Google Cloud. See Create a Windows 11 BYOL master image.
- Create the machine profile source: Provision VM on the sole-tenant node and enable the vTPM of the source machine profile. See Provision VM on sole-tenant node.
- Create an MCS machine catalog using the Windows 11 machine profile source enabled with vTPM. The machine profile source must have the same instance type as described in the sole-tenant node. See Create an MCS machine catalog using the Windows 11 machine profile source.
Create a Windows 11 BYOL master image
There are two option to create a Windows 11 BYOL master image and import the master image to Google Cloud:
- Use Google Cloud Cloud Build Tools
- Create the master image on any other hypervisor
Use Google Cloud Cloud Build Tools
- Upload the Windows 11 ISO, GCP SDK, .NET framework and PowerShell installer files to the GCP storage bucket.
- Provide the file location in the cloud build
.yamlfile as parameter. -
Run the following Cloud Build from the command line to build the final Windows 11 image. GCP bootstraps and creates the master image in the selected project using Daisy workflow in GCP and the master image is imported into GCP.
gcloud compute instances import INSTANCE-NAME--source-uri=gs://BUCKET/IMAGE-OVF-FILE.ovf --guest-os-features=UEFI_COMPATIBLE --byol --machine-type=MACHINE-TYPE --zone=ZONE
<!--NeedCopy-->
Note:
Replace all the capital letter text with the actual resource details.
For the complete information, see Create custom Windows BYOL images.
Create the master image on any other hypervisor
- Create the Windows 11 master image using any other hypervisor.
- Export the master image in an OVF format to the local machine.
-
Upload the OVF files to the GCP storage bucket using the local gcloud CLI.
gsutil cp LOCAL_IMAGE_PATH_OVF_FILES gs://BUCKET_NAME/ <!--NeedCopy--> -
Run the following Cloud Build from the command line to build the final Windows 11 image. GCP bootstraps and creates the master image in the selected project using Daisy workflow in GCP and the master image is imported into GCP.
gcloud compute instances import INSTANCE-NAME --source-uri=gs://BUCKET/IMAGE-OVF-FILE.ovf --guest-os-features=UEFI_COMPATIBLE --byol --machine-type=MACHINE-TYPE --zone=ZONE
<!--NeedCopy-->
Note:
Replace all the capital letter text with the actual resource details.
Provision VM on sole-tenant node
Use sole-tenant nodes to keep your VMs physically separated from VMs in other projects, or to group your VMs together on the same host hardware. For information on the sole-tenant node, see the GCP document Sole-tenancy overview.
For provisioning a VM (machine profile source) on the sole-tenant node, see the GCP document Provision VMs on sole-tenant nodes.
Note:
- Select the same Instance type and region as the node group.
- Enable vTPM in the Shielded VM section. For more information, see Quickstart: Enable Shielded VM options.
- Disable the Bitlocker on the source VM.
Create an MCS machine catalog using the Windows 11 machine profile source
You can create an MCS machine catalog to create Windows 11 VMs using the Web Studio or PowerShell commands.
Note:
- For the master image, select the Windows 11 Snapshot or VM.
- For the machine profile source, select the Windows 11 VM as machine profile. The machine profile source must have the same instance type as described in the sole-tenant node.
For information on using the Web Studio, see Create a machine catalog using Web Studio.
For information on PowerShell commands, see Create a machine catalog using a machine profile
After you create the catalog and power on the VMs, you can see the Windows 11 VMs running on the sole tenant node on the Google Cloud console.
VMs and disks with inherited labels
MCS machine catalog VMs and disks (Identity Disk, Write-cache Back Disk, and OS disk) can inherit the labels of a machine profile source (GCP VM instance or instance template). You can use the labels to distinguish instances owned by different teams ( for example, team:research and team:analytics), and further use it for cost accounting or budgeting. For more information on labels, see the GCP document Organize resources using labels.
You can create a new catalog, update an existing catalog, and update existing VMs to inherit the labels using the machine profile source.
This feature is applicable to persistent and non-persistent MCS machine catalogs.
You can do the following:
- Create a catalog with inherited labels
- Update an existing catalog with inherited labels
- Update existing VMs with inherited labels
- Retrieve information for VM and boot disk labels
- Remove a VM
Create a catalog with inherited labels
To create an MCS machine catalog where VMs and disk inherit labels from the machine profile source, do the following:
- Create a machine profile source (VM instance or instance template) with labels. For information on creating VMs with labels, see the GCP document Create resources with labels. An Instance template is created from the VM and takes the labels defined in the VM.
- Create an MCS catalog using Web Studio or PowerShell commands.
- If using Web Studio, on the Image page, select Use a machine profile, and then select the VM or template.
-
If using PowerShell commands, do the following:
- Open the PowerShell window.
- Run asnp citrix*.
- Create an identity pool. The identity pool is a container for the Active Directory (AD) accounts for the VMs to be created.
- Create the required AD computer accounts in Active Directory.
-
Run the
New-ProvSchemecommand to create a catalog. For example:New-ProvScheme with template as machine profile input (Persistent catalog):
New-ProvScheme `
-ProvisioningSchemeName "catalog-name" `
-HostingUnitUid "xxxxxxxx-xxxx-xxxx-xxxx-xxxxxxxxxxxx" `
-IdentityPoolUid "xxxxxxxx-xxxx-xxxx-xxxx-xxxxxxxxxxxx" `
-MasterImageVM "XDHyp:\HostingUnits\hosting-unit-name\vm-name.vm" `
-MachineProfile "XDHyp:\HostingUnits\hosting-unit-name\instanceTemplates.folder\instance-template-name.template" `
<!--NeedCopy-->
New-ProvScheme with instance template as machine profile input (Non-Persistent catalog):
New-ProvScheme `
-ProvisioningSchemeName "catalog-name" `
-HostingUnitUid "xxxxxxxx-xxxx-xxxx-xxxx-xxxxxxxxxxxx" `
-IdentityPoolUid "xxxxxxxx-xxxx-xxxx-xxxx-xxxxxxxxxxxx" `
-MasterImageVM "XDHyp:\HostingUnits\hosting-unit-name\vm-name.vm" `
-MachineProfile "XDHyp:\HostingUnits\hosting-unit-name\instanceTemplates.folder\instance-template-name.template" `
-CleanOnBoot
<!--NeedCopy-->
New-ProvScheme with VM instance as machine profile input (Persistent catalog):
New-ProvScheme `
-ProvisioningSchemeName "catalog-name" `
-HostingUnitUid "xxxxxxxx-xxxx-xxxx-xxxx-xxxxxxxxxxxx" `
-IdentityPoolUid "xxxxxxxx-xxxx-xxxx-xxxx-xxxxxxxxxxxx" `
-MasterImageVM "XDHyp:\HostingUnits\hosting-unit-name\vm-name.vm" `
-MachineProfile "XDHyp:\HostingUnits\hosting-unit-name\vm-name.vm" `
<!--NeedCopy-->
New-ProvScheme with VM instance as machine profile input (Non-Persistent catalog):
New-ProvScheme ` -ProvisioningSchemeName "catalog-name" ` -HostingUnitUid "xxxxxxxx-xxxx-xxxx-xxxx-xxxxxxxxxxxx" ` -IdentityPoolUid "xxxxxxxx-xxxx-xxxx-xxxx-xxxxxxxxxxxx" ` -MasterImageVM "XDHyp:\HostingUnits\hosting-unit-name\vm-name.vm" ` -MachineProfile "XDHyp:\HostingUnits\hosting-unit-name\vm-name.vm" ` -CleanOnBoot <!--NeedCopy--> - Register provisioning scheme as a broker catalog.
- Add VMs to the catalog.
Update an existing catalog with inherited labels
To update an existing catalog to have a new machine profile, run the Set-ProvScheme command. After you run the command, all the new VMs added to the catalog have the labels of the new machine profile source. The non-persistent catalog is updated on the next power on.
For example:
Set-ProvScheme with instance template as machine profile input:
Set-ProvScheme `
-ProvisioningSchemeName "catalog-name" `
-MachineProfile "XDHyp:\HostingUnits\hosting-unit-name\instanceTemplates.folder\instance-template-name.template" `
<!--NeedCopy-->
Set-ProvScheme with VM instance as machine profile input:
Set-ProvScheme `
-ProvisioningSchemeName "catalog-name" `
-MachineProfile "XDHyp:\HostingUnits\hosting-unit-name\vm-name.vm" `
<!--NeedCopy-->
Update existing VMs with inherited labels
To update existing VMs with the updated machine profile source, run the following commands:
Set-ProvScheme-
Set-ProvVMUpdateTimeWindow. For example:Set-ProvVMUpdateTimeWindow -ProvisioningSchemeName my-catalog -VMName <List-Of-Vm-Names> -StartsNow -DurationInMinutes -1 <!--NeedCopy--> - Restart the VMs.
Retrieve information for VM and boot disk labels
After creating the VMs, you can get the information of the VM and boot disk label using the Get-Item command with the AdditionalData parameter.
For retrieving information of the VM label, run the following command:
(Get-Item XDHyp:\HostingUnits\hosting-unit-name\vm_name.vm).AdditionalData.Tags
<!--NeedCopy-->
For retrieving information of the boot disk label, run the following command:
(Get-Item XDHyp:\HostingUnits\hosting-unit-name\vm_name.vm\bootdisk-name.attacheddisk).AdditionalData.Tags
<!--NeedCopy-->
Note:
To maintain consistency across the various hypervisors, we have used the term Tags to display GCP labels.
Remove a VM
You can choose to remove a VM from a catalog but not delete the VM from the GCP. In this case, the Citrix labels are only removed from the VM. All other added labels are not deleted from the VM. You can remove a VM using Web Studio or use PowerShell commands.
Using Web Studio
- Select and right-click the VM.
- Click Delete.
- Select Remove the virtual machines from the catalog but do not delete the virtual machines.
Using PowerShell commands
Run Remove-ProvVM with ForgetVM parameter. For more information, see the SDK doc Remove-ProvVM.
Google Cloud Marketplace
You can browse and select images offered by Citrix on Google Cloud Marketplace to create machine catalogs. Currently, MCS supports only the machine profile workflow for this feature.
To search for Citrix VDA VM product through Google Cloud Marketplace, go to https://console.cloud.google.com/marketplace.
You can use a custom image or a Citrix ready® image on Google Cloud Marketplace to update an image of a machine catalog.
Note:
If the machine profile does not contain storage type information, the value is derived from custom properties.
The supported Google Cloud Marketplace images are:
- Windows 2019 Single Session
- Windows 2019 Multi Session
- Ubuntu
Example of using a Citrix ready image as a source for creating a machine catalog:
New-ProvScheme -ProvisioningSchemeName GCPCatalog \
-HostingUnitName GcpHu -IdentityPoolName gcpPool -CleanOnBoot \
-MasterImageVM XDHyp:\HostingUnits\GcpHu\images.folder\citrix-daas-win2019-single-vda-v20220819.publicimage \
-MachineProfile XDHyp:\HostingUnits\GcpHu\Base.vm
<!--NeedCopy-->
Where to go next
- If this is the first catalog created, Web Studio guides you to create a delivery group
- To review the entire configuration process, see Install and configure
- To manage catalogs, see Manage machine catalogs and Manage a Google Cloud Platform catalog
More information
In this article
- Prepare a master VM instance and a persistent disk
- Create a machine catalog
- Import manually created Google Cloud machines
- Shared Virtual Private Cloud
- Enable zone selection
- Customer Managed Encryption Keys (CMEK)
- Uniform bucket-level access compatibility
- Create a machine catalog using PowerShell
- Create a catalog with persistent write-back cache disk
- Improve boot performance with MCSIO
- Create a machine catalog using a machine profile
- Create a machine catalog with machine profile as an instance template
- Use PowerShell to create a catalog with shielded VM
- Create Windows 11 VMs on the sole-tenant node
- VMs and disks with inherited labels
- Google Cloud Marketplace
- Where to go next
- More information