Work with policies
Configure Citrix® policies to control user access and session environments. Citrix policies are the most efficient method of controlling connection, security, and bandwidth settings. You can create policies for specific groups of users, devices, or connection types. Each policy can contain multiple settings.
Tools for working with Citrix policies
You can use the following tools with Citrix policies.
- Studio - If you are a Citrix administrator without permission to manage group policy, use Studio to create policies for your site. Policies that are created using Studio are stored in the site database. And the updates are pushed to the virtual desktop either when that virtual desktop registers with the broker or when a user connects to that virtual desktop.
- Local Group Policy Editor (Microsoft Management Console snap-in) - If your network environment uses Active Directory and you have permission to manage group policy, you can use the Local Group Policy Editor to create policies for your Site. The settings you configure affect the Group Policy Objects (GPOs) you specify in the Group Policy Management Console.
Important:
Use the Local Group Policy Editor to configure some policy settings. These policy settings include those settings related to registering VDAs with a controller. Also, those settings related to Microsoft App-V servers.
Policy processing order and precedence
Group policy settings are processed in the following order:
- Local GPO
- XenApp or XenDesktop® Site GPO (stored in the Site database)
- Site-level GPOs
- Domain-level GPOs
- Organizational Units
However, if a conflict occurs, policy settings processed last overwrite the settings processed earlier. This configuration means that policy settings take precedence in the following order:
- Organizational Units
- Domain-level GPOs
- Site-level GPOs
- XenApp® or XenDesktop Site GPO (stored in the Site database)
- Local GPO
For example, a Citrix administrator uses Studio to create a policy (Policy A) that enables client file redirection for the company’s sales employees. Meanwhile, another administrator uses the Group Policy Editor to create a policy (Policy B) that disables client file redirection for sales employees. When the sales employees log on to the virtual desktops, Policy B is applied and Policy A is ignored. The reason is Policy B was processed at the domain level and Policy A was processed at the XenApp or XenDesktop Site GPO level.
However, when a user launches an ICA® or Remote Desktop Protocol (RDP) session, Citrix session settings override the same settings configured in an Active Directory policy or using Remote Desktop Session Host Configuration. This setting includes settings that are related to typical RDP client connection settings. The examples for the RDP client connection settings are Desktop wallpaper, menu animation, and View window contents while dragging.
When using multiple policies, you can prioritize policies that contain conflicting settings. For more information, see Compare, prioritize, model, and troubleshoot policies.
Workflow for Citrix policies
The process for configuring policies is as follows:
- Create the policy.
- Configure policy settings.
- Assign the policy to machine and user objects.
- Prioritize the policy.
-
Verify the effective policy by running the Citrix Group Policy Modeling wizard.
Note:
You open the Citrix Group Policy Modeling wizard by navigating to the Policies > Modeling tab and then clicking Launch Modeling Wizard in the Actions pane. The Modeling tab isn’t available in Studio hosted in Citrix Cloud.
Navigate Citrix policies and settings
In the Local Group Policy Editor, policies and settings appear in two categories: Computer Configuration and User Configuration. Each category has a Citrix Policies node. See the Microsoft documentation for details about navigating and using this snap-in.
In Studio, policy settings are sorted into categories based on the functionality or feature they affect. For example, the Profile Management section includes policy settings for Profile Management.
-
Computer settings (policy settings applying to machines) define the behavior of virtual desktops and are applied when a virtual desktop starts. These settings apply even when there are no active user sessions on the virtual desktop. User settings define the user experience when connecting using ICA. User policies are applied when a user connects or reconnects using ICA. User policies aren’t applied if a user connects using RDP or logs on directly to the console.
To access policies, settings, or templates, select Policies in the Studio navigation pane.
- The Policies tab lists all policies. When you select a policy, tabs to the right display:
- Overview (name, priority, enabled/disabled status, and description)
- Settings (list of configured settings)
- Assigned to (user and machine objects to which the policy is assigned). For more information, see Create policies.
- The Templates tab lists Citrix-provided and custom templates that you created. When you select a template, tabs to the right display:
- Description (why you might want to use the template)
- Settings (list of configured settings). For more information, see Policy templates.
- The Comparison tab enables you to compare the settings in a policy or template with those settings in other policies or templates. For example, you might want to verify setting values to ensure compliance with best practices. For more information, see Compare, prioritize, model, and troubleshoot policies.
-
From the Modeling tab, you can simulate connection scenarios with Citrix policies. For more information, see Compare, prioritize, model, and troubleshoot policies.
Note:
The Modeling tab isn’t available in Studio hosted in Citrix Cloud.
To search for a setting in a policy or template:
- Select the policy or template.
- Select Edit policy or Edit Template in the Actions pane.
- On the Settings page, begin to type the name of the setting.
You can refine your search by selecting:
- A specific product version
- A category (for example, Bandwidth)
- The View selected only check box
- To search only the settings that have been added to the selected policy.
For an unfiltered search, select All Settings.
- The Policies tab lists all policies. When you select a policy, tabs to the right display:
-
To search for a setting within a policy:
- Select the policy.
- Select the Settings tab and type the name of the setting.
You can refine your search by selecting a specific product version or by selecting a category. For an unfiltered search, select All Settings.
A policy, once created, is independent of the template used. You can use the Description field on a new policy to track the source template used.
In Studio, policies and templates are displayed in a single list regardless of whether they contain user, computer, or both types of settings. Also, both policies and templates can be applied using both user and computer filters.
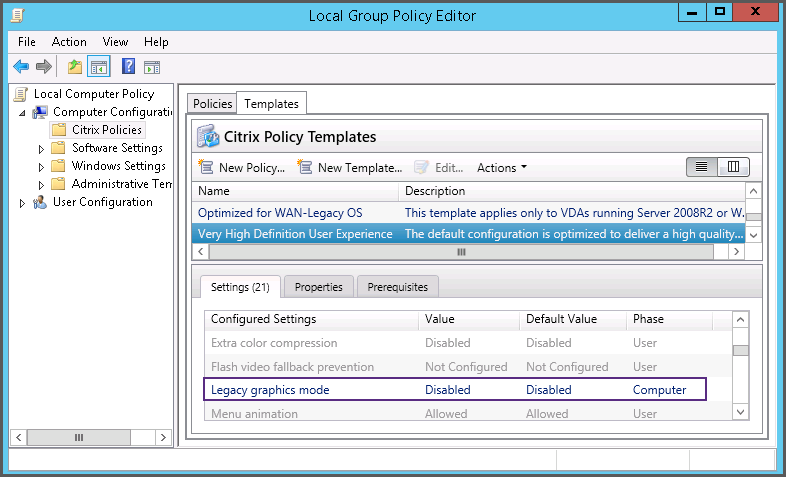
In the Group Policy Editor, computer and user settings must be applied separately, even if created from a template that includes both types of settings. In this example choosing to use Very High Definition User Experience in Computer Configuration:
- Legacy Graphics mode is a Computer setting that is used in a policy created from this template.
- The User settings, grayed out, is not used in a policy created from this template.