Peripherals
USB device redirection
Citrix Workspace app for ChromeOS supports a wide range of USB peripherals. With this added functionality, you can create a Google policy to identify the PID/VID of the device to enable its use in Citrix Workspace. This support extends to new USB devices too.
Important:
YubiKey is not usable in Citrix Session after redirection through USB. For more information, see partner ticket Since FIDO2 redirection is not supported on Citrix Workspace app for ChromeOS, users can use USB redirection as an alternative to access their YubiKey within a session. To enable this, make sure the FIDO2 Redirection policy is set to Prohibited in DDC. Note: There is a known issue ([HDX-92219]) that might prevent YubiKey from functioning as expected when redirected via USB on Server OS VDA. [RFHTMCRM-16502]
How to configure
For information on configuring USB devices, see Knowledge Center article CTX200825.
Automatic redirection of USB devices in Kiosk mode
In kiosk mode, USB devices are redirected automatically inside a session without any manual intervention. In user and public modes, for the first time, you must manually redirect the USB device into the session from the toolbar or the Connection Center. This manual USB redirection is done to grant permission to the Chrome operating system to access the USB device. When a USB device is inserted, it’s redirected into the session automatically.
Important:
- If you insert a USB device when many sessions are running, the USB redirects into the session that is in focus.
- If there are no sessions in focus, the USB device isn’t redirected into any session.
- If a single session is running and if it isn’t in focus when you insert the USB device, the USB device redirection might fail.
To redirect the USB device to a new session
Note:
To redirect the USB device to a new session, it’s required to remove the USB device from the previous session.
- Right-click the Citrix Workspace icon and select Connection Center. The Connection Center window appears.
- Select a session or an application.
- Click Devices.
- Navigate to the USB section.
- Click Release All.
Double hop
Starting with the 2301 version, Citrix Workspace app supports double-hop scenarios. This feature is an enhancement to USB redirection.
For more information, see Double hop in the Citrix Virtual Apps and Desktops documentation.
Composite USB redirection
Previously, when a composite USB device was connected to the local device, it can only be used as a single device through USB redirection. The disadvantage was that the interfaces like audio and video also got redirected through USB, despite optimized channels. The interfaces weren’t separate and due to this incapability, administrators can’t decide which components to redirect through USB and which ones to redirect through the optimized virtual channel (like audio interface) to achieve the best performance.
Starting from the 2211 release, administrators can configure if certain interfaces of the device redirect to the session through USB redirection or not. The end user can now select and redirect a specific constituent interface of a composite USB device to the Citrix Workspace app session through USB redirection.
About composite USB redirection
USB 2.1 and later supports the notion of USB composite devices where many child devices share a single connection with the same USB bus. Such devices employ a single configuration space and shared bus connection where a unique interface number 00-ff is used to identify each child device. Such devices are also not the same as a USB hub which provides a new USB bus origin for other independently addressed USB devices for connection.
Composite devices found on the client endpoint can be forwarded to the virtual host as either:
- a single composite USB device, or
- a set of independent child devices (split devices)
When a composite USB device is forwarded, the entire device becomes unavailable to the local device. Forwarding also blocks the local usage of the device for all applications on the local device, including the Citrix Workspace app.
Consider a USB headset device with both an audio device and the HID button for mute and volume control. If the entire device is forwarded using a generic USB channel, the device becomes unavailable for redirection over the optimized HDX™ audio channel. However, you can achieve a better performance when the audio is sent through an optimized HDX audio channel when compared to a generic channel.
To resolve these issues, Citrix recommends you split the composite device and forward only the child interfaces that use a generic USB channel. Such a mechanism makes sure that the other child devices are available for use by applications on the local device, including the Citrix Workspace app that provides optimized HDX experiences. This method allows the required devices to be forwarded and available to the remote session.
How to enable this feature
You can enable this feature in the following ways:
- Configuration.js
- Global App Configuration service
- Google Admin Policy
Configuration.js
To configure composite USB redirection using the configuration.js file, do the following:
- Locate the configuration.jsfile in the ChromeApp root folder.
-
Edit the configuration.js file to configure the composite USB redirection feature.
Notes:
- Citrix recommends that you back up the configuration.js file before making changes.
- Citrix recommends editing the configuration.js file only if the Citrix Workspace app for ChromeOS is repackaged for users.
- Administrator-level credentials are required to edit the configuration.js file.
- Set enableCompositeDeviceSplit to true.
The following is an example of JSON data:
```
{
    "features": {
        "usb": {
            "enableCompositeDeviceSplit": true
        }
    }
}
<!--NeedCopy--> ```
- Save the changes.
Note:
- To disable the feature, set the enableCompositeDeviceSplit attribute to false.
Global App Configuration service
On the cloud setup, administrators can enable the composite USB redirection feature by setting the enableCompositeDeviceSplit attribute to True in the Global App Configuration service.
For more information, see the Global App Configuration service documentation.
Google admin policy
On the on-premises deployment, administrators can enable the composite USB redirection feature using the Google Admin Policy as follows:
- Sign in to the Google Admin Policy.
- Go to Device management > Chrome Management > User Settings.
-
Add the following strings to the policy.txt file under the engine_settings key. Following is an example of JSON data:
{ "features": { "usb": { "enableCompositeDeviceSplit": true } } } <!--NeedCopy--> - Save the changes.
How to configure
Prerequisites:
- Allow list of USB Devices with VID:PID values and enable policy for USB device redirection on Delivery Controller. For more information, see the knowledge center article CTX200825.
- This feature works on managed devices and not on BYOD.
To enable the auto-detection of the USB:
- Go to Google Admin Policy settings.
- Select the WebUSB API allowed devices option.
- Enter the Citrix Workspace app for the ChromeOS extension ID. For example, chrome-extension
://haiffjcadagjlijoggckpgfnoeiflnem. -
Add the VID and PID of the device as follows:
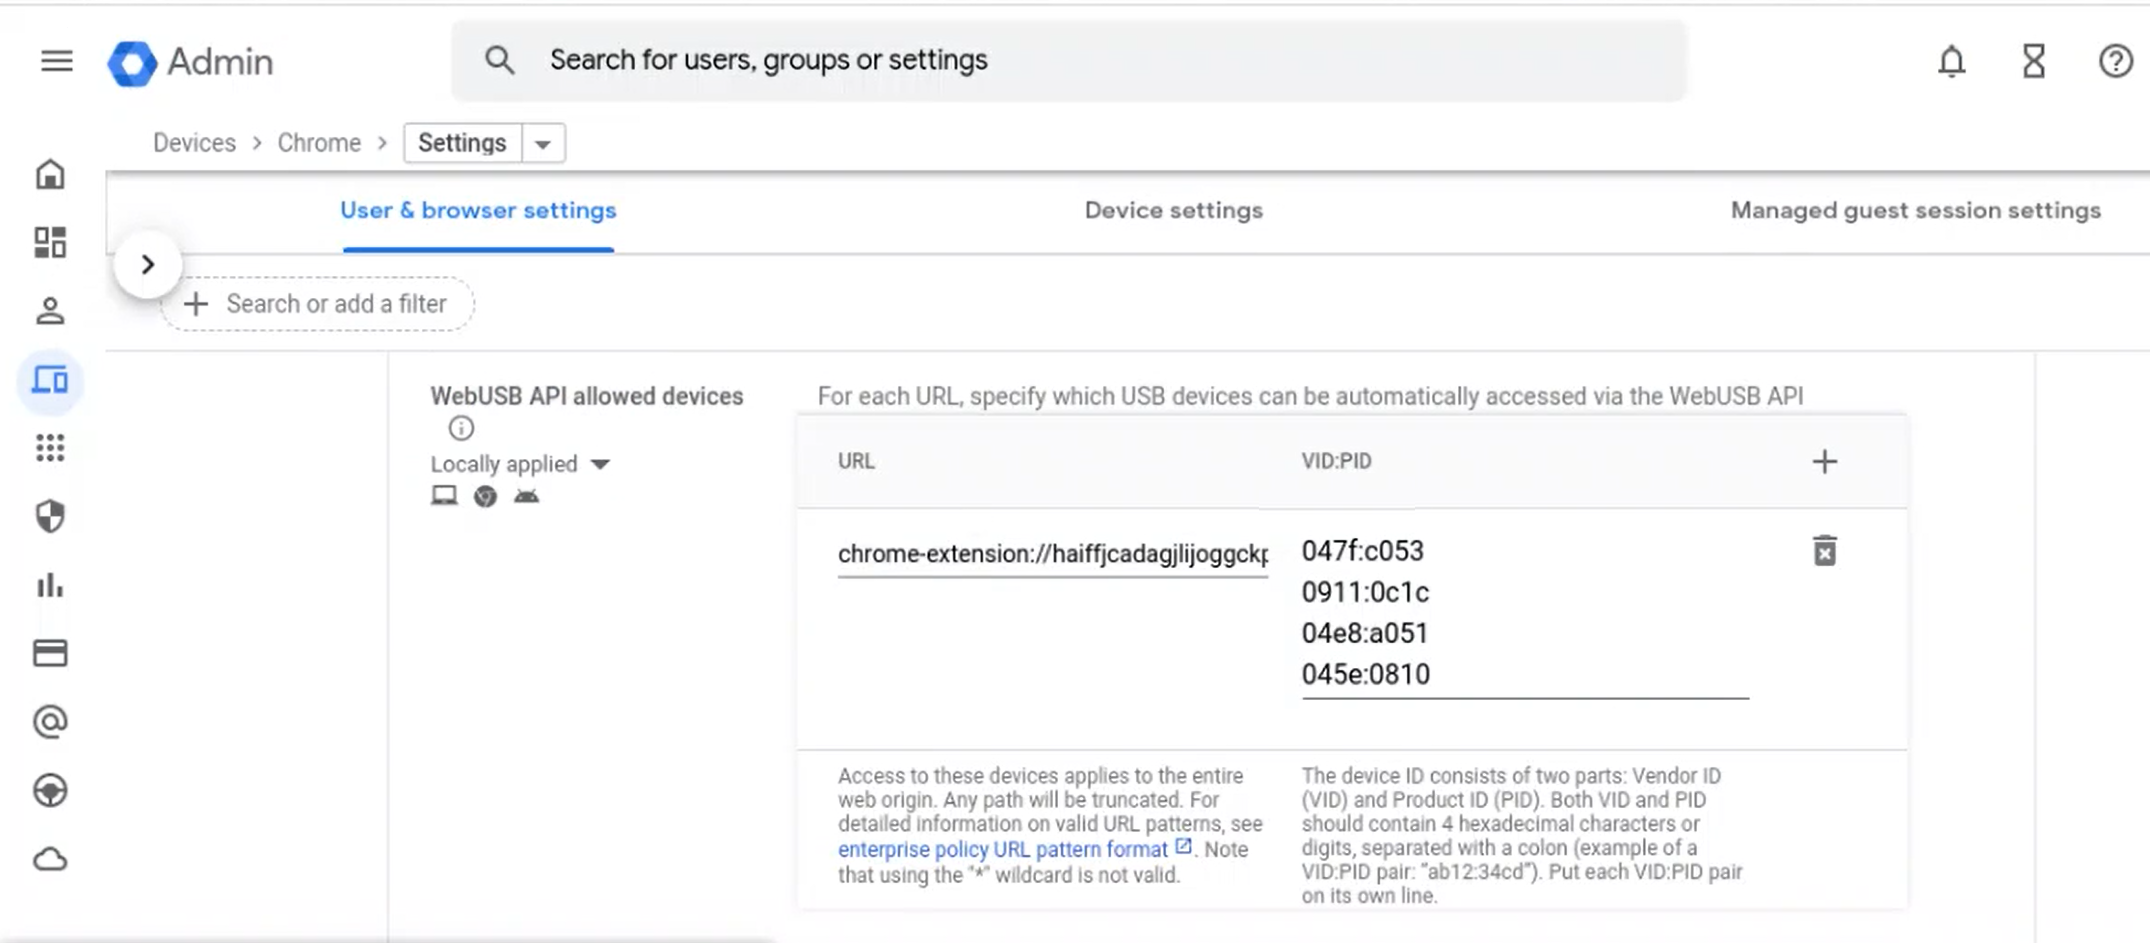
After adding the VID and PID values, the Citrix Workspace app can now automatically detect the devices in the session.
-
Apply the Google Admin Policy. For more information on Device rules and sample JSON data, see the following section.
- Save the changes.
Device rules
Citrix Workspace app uses the device rules to decide, which USB devices to allow or prevent from forwarding to the remote session.
Following are the explanations of the keywords:
- allow: This section includes the list of devices and their child interfaces that can be redirected to the session.
- deny: This section includes the list of devices and their child interfaces that can’t be redirected to the session.
-
autoRedirect: This section includes the list of devices and their child interfaces that can be auto-redirected to the session through USB redirection.
Note:
- Each object represents a device with the mandatory
vidandpidvalues of the USB device. It’s optional to have ‘split’, and ‘interfaceClass’ values.
- Each object represents a device with the mandatory
- vid, pid (mandatory): Represents Vendor ID (VID) and Product ID (PID) of the USB device. Enter the values in Hexadecimal format.
- split (optional): Expects a boolean value that indicates whether the device to be split into child interfaces or not.
- interfaceClass (optional): Represents USB interface class. The allowed values are audio, video, hid, printer, storage, and so on.
The following is an example of JSON data:
{
"settings": {
"value": {
"settings_version": "1.0",
"device_settings": {
"deviceRules": {

    "allow": [
        {"vid": "11","pid": "22",  "split":true, "interfaceClass":["audio","video"]} //split device and allow redirection of 'audio' & 'video' interfaces.
    ],

    "deny": [
        {"vid": "33","pid": "44"},  //deny redirection of this whole device with vid= 33 & pid = 44, including all of its interfaces.
        {"vid": "77","pid": "88","split":true,"interfaceClass":["audio"]}    //split device and deny the redirection of 'audio' interface only; remaining interfaces(if any) are redirected through USB.
    ],

    "autoRedirect": [
    {"vid": "55","pid": "66"}, //auto redirect the device when it's connected.
    {"vid": "55","pid": "66","split":true,"interfaceClass":["hid"]} //split device and auto redirect only the 'hid' interface when the device is connected.
    ]
                }
           }
       }
    }
}
<!--NeedCopy-->
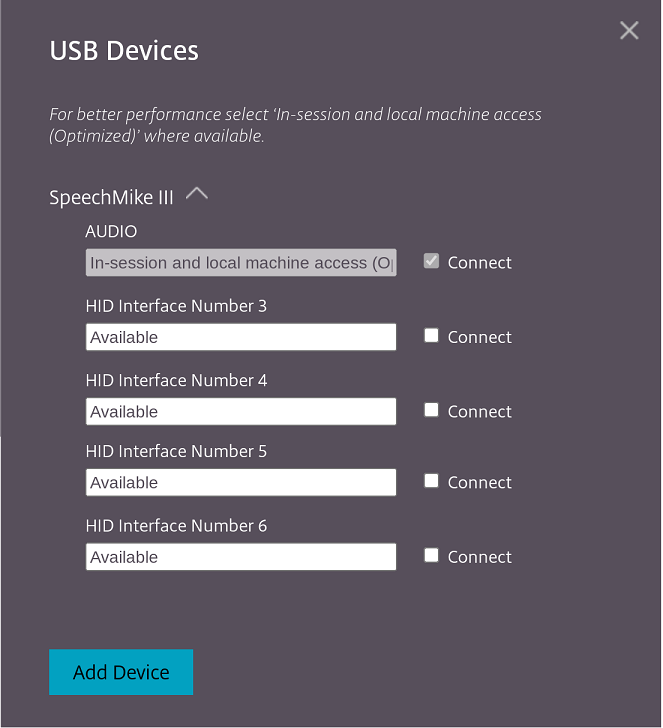
How to use this feature
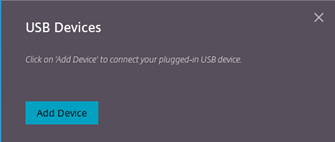
To use the composite USB redirection feature:
-
Click the USB icon from the toolbar.

If there are no USB devices connected, the following pop-up appears:
-
Connect a USB device to your local machine. The following pop-up might appear:
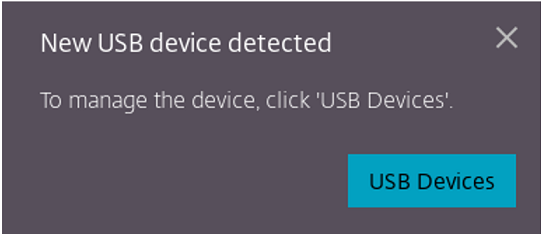
-
Click USB Devices to view and redirect the USB constituent. After a successful connection, the Citrix Workspace app detects the USB. For each USB constituent interface, you see a drop-down menu. The two options are:
- In-session and local machine access (Optimized): select this option if you want to access the USB on your device and in a session.
- In-session access (Generic): select this option if you want to access the USB only in the session. For better performance, select In-session and local machine access (Optimized) option.

-
Select Connect for redirecting the interface.
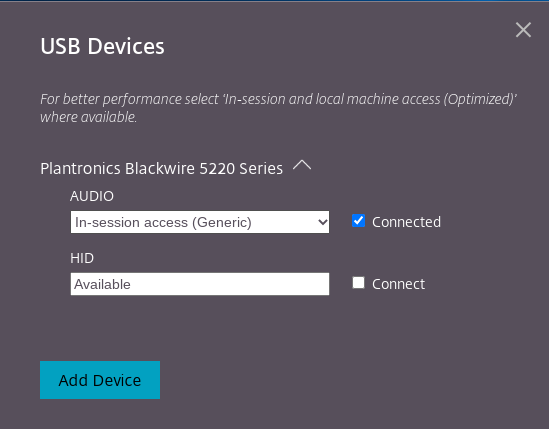
Upon successful redirection, the status changes to Connected.
Notes:
To add a USB device manually, click Add Device. The Chrome picker dialog appears that lists the USB devices. You can select the device from the list.
If a USB device connection is denied, the following error message appears:
“Your administrator has blocked the newly inserted device. Contact your organization’s administrator for assistance.
How to transfer the USB interface between the sessions
When you click the USB icon from the toolbar, a list of USB devices that are connected to your sessions appears. If the USB device is already in use in a different session you can see that the USB constituent shows Connected to another session status.
To redirect to the current session, select Connect which is placed opposite to the USB constituent. The status changes accordingly.
Composite USB automatic redirection settings
Previously, there was no option related to USB automatic redirection settings to set the end user preferences. As administrators control these policies, the end user has to manually redirect required USB devices on every session launch.
Starting with the 2301 version, the end user can select a preference for auto-redirection for any USB device within a Virtual Desktop session. Citrix Workspace app now provides app-level settings, where the end user can control the USB auto-redirection. The end user can set preferences and can save the settings across session launches.
There are two options: one at the session launch and the other while the session is ongoing.
Note:
- This feature supports on-premises and cloud deployments and is available only for managed Chrome users.
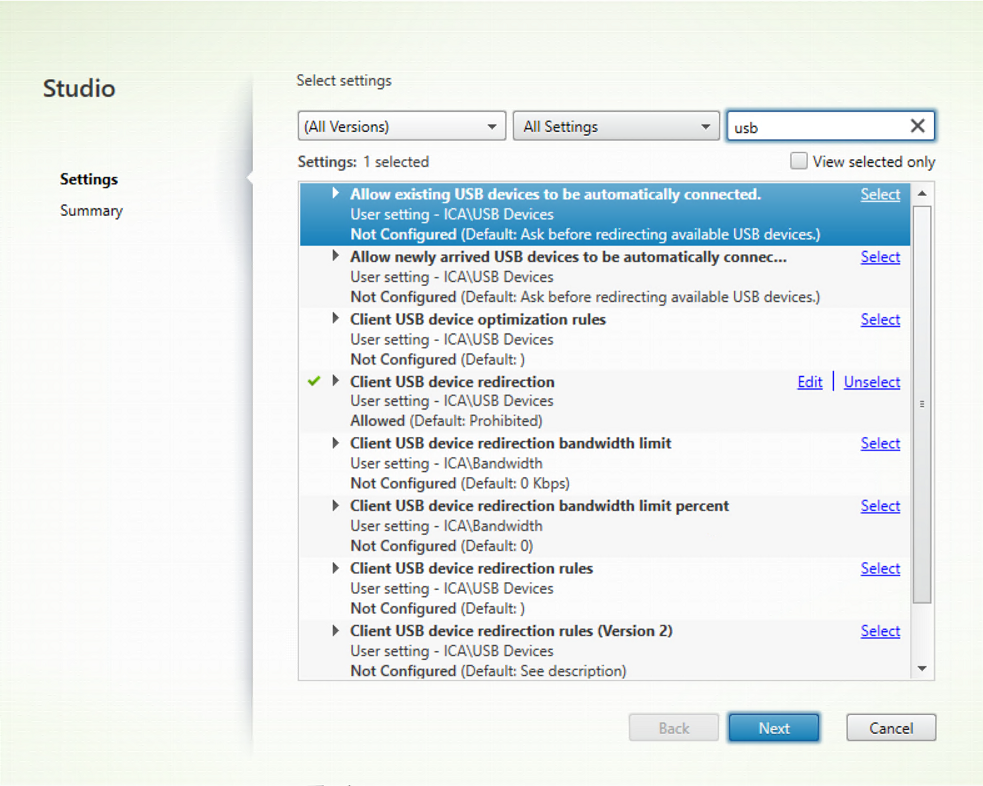
Configure Composite USB Redirection through DDC policies
Previously, administrators used Google Admin policies to configure the client-side USB redirection.
Starting with the 2306 release, you can configure USB redirection through the DDC policies as well. Configurations through DDC policies allow administrators to have a unified and centralized way of defining policies and behavior. These policies are applicable for on-premises and cloud deployments on managed devices and users. This feature is supported on VDA versions 2212 and later.
How to configure
You can configure this feature in one of the following ways:
- Configuration.js
- Google Admin Policy
Note:
- The policy enableDDCUSBPolicy is set to true by default.
Configuration.js
To disable this feature using the configuration.js file, do the following:
- Locate the configuration.js file in the ChromeApp root folder.
-
Edit the file.
Notes:
- Citrix recommends that you back up the configuration.js file before making changes.
- Citrix recommends editing the configuration.js file only if the Citrix Workspace app for ChromeOS is repackaged for users.
- Administrator-level credentials are required to edit the configuration.js file.
-
Set the value of enableDDCUSBPolicy to false. Following is an example of JSON data:
"features" : { "usb" : { "enableDDCUSBPolicy": false } } <!--NeedCopy--> - Save the changes.
Google admin policy
For managed devices and users, administrators can disable this feature using the Google Admin Policy as follows:
-
Sign in to the Google Admin Policy.
-
Go to Device management > Chrome Management > User Settings.
-
Add the following strings to the policy.txt file under the engine_settings key. Following is an example of JSON data:
"features" : { "usb" : { "enableDDCUSBPolicy": false } } <!--NeedCopy--> -
Save the changes.
DDC Policy
The following screenshot displays the DDC policies that are related to USB redirection. This feature is supported on VDA versions 2212 and later.
For more information on the DDC policies that are related to USB redirection, see the following articles in the Citrix Virtual Apps and Desktops documentation:
Auto redirection of USB devices
To redirect USB devices automatically, you must follow the USB device rules. You can configure USB device rules through:
Enhancements to Composite USB device UI
Starting with the 2306 release, when the configuration of a Composite USB device is set to “split”: true, the USB Devices UI displays the components based on interface numbers instead of interface classes.
For more information, see the Composite USB redirection article.
User interface
The following is an example:
Enhancements to Composite USB redirection through DDC policies
Starting with the 2307 version, you can determine if a particular composite USB interface or class can redirect to VDA by default or not. If you have a composite USB connected to the ChromeOS device, then the configuration enableDefaultAllowPolicy helps you decide whether, by default, you can allow USB redirection through DDC policies. VDA versions 2212 and later support this feature.
How to use
When you set the attribute enableDefaultAllowPolicy to true, and if you redirect a particular interface class or interface number to the VDA, then you must add a policy rule to deny the other interface classes or numbers from being redirected. You can configure this feature through the DDC policy Client USB device redirection rules (Version 2).
For more information, see USB device redirection rules (Version 2). In addition, you can configure the denied part through the Google Admin Policy, but only for the interface class level.
For more information, see Enhancements to Composite USB device UI.
Here’s an example configuration through the DDC policy Client USB device redirection rules (Version 2), where you allow the interface number 03 to redirect.
```
"DENY: vid=1188 pid=A301 split=01 intf=00,01,02"
<!--NeedCopy--> ```
Here’s an example configuration through the Google Admin Policy rule, where you allow the HID interface to redirect and deny the audio interface class.
```
"deny": [
    {"vid":"05e9", "pid":"0428", "split":true, "interfaceClass":["audio"]
    }
]
<!--NeedCopy--> ```
How to configure
You can configure this feature in one of the following ways:
- Configuration.js
- Google Admin Policy
Note:
- By default, the policy enableDefaultAllowPolicy is set to true.
Configuration.js
To disable this feature using the configuration.js file, do the following:
- Locate the configuration.js file in the ChromeApp root folder.
-
Edit the file.
Notes:
- Citrix recommends that you back up the configuration.js file before making changes.
- Citrix recommends editing the configuration.js file only if the Citrix Workspace app for ChromeOS is repackaged for users.
- Administrator-level credentials are required to edit the configuration.js file.
-
Set the value of enableDefaultAllowPolicy to false.
The following is an example of JSON data:
"features" : { "usb" : { "enableDefaultAllowPolicy": false } } <!--NeedCopy--> - Save the changes.
Google admin policy
For managed devices and users, administrators can disable this feature using the Google Admin Policy as follows:
- Sign in to the Google Admin Policy.
- Go to Device management> Chrome Management > User Settings.
-
Add the following strings to the policy.txt file under the engine_settings key.
The following is an example of JSON data:
'features' : { 'usb' : { 'enableDefaultAllowPolicy': {"type": "false"} } } <!--NeedCopy--> - Save the changes.
Serial COM port redirection
By default, Citrix Workspace app for ChromeOS maps COM5 as a preferred serial COM port for redirection.
Known limitations
- Real-time input serial devices like signature pads might not get redirected inside Citrix Workspace app for ChromeOS sessions. [CVADHELP-28555]
How to configure
To configure serial COM port redirection, enable the feature by applying Citrix Virtual Apps and Desktops and Citrix DaaS port redirection policy settings. For more information on port redirection, see Port redirection policy settings.
Note:
By default, Citrix Workspace app for ChromeOS maps COM5 as a preferred serial COM port for redirection.
After enabling serial COM port redirection policy settings on the VDA, configure Citrix Workspace app for ChromeOS using one of the following methods:
- Google Admin Policy
- configuration.js file
- Changing the default mapping by issuing a command in an active ICA® session.
Using Google Admin Policy to configure COM port redirection
Use this method to redirect the serial COM port by editing the policy file.
Tip:
Citrix recommends that you configure the COM port using the policy file only when Citrix Workspace app for ChromeOS is repackaged.
Edit the Google Admin Policy by including the following:
    {
      "settings": {
               "Value": {
                "settings_version": "1.0",
                "store_settings": {
                "rf_web": {
                "url": "<http://YourStoreWebURL>"
                 }
                 },
                 "engine_settings":{
                 "features" : {
                 "com" : {
       "portname" : "<COM4>", where COM4 indicates the port number that is set by the administrator.                                                   }
                                      }
                                      }
                                      }
                                      }
                                     }

 <!--NeedCopy-->
List of serial COM port name options and their descriptions:
- “portname”: Port number for the COM (serial) virtual channel. By default, the value is COM5.
Using the configuration.js file to configure COM port redirection
Use this method to redirect the serial COM port by editing the configuration.js file. Locate the portname field in the configuration.js file and edit the value by changing the port number.
For example:
"com" :{

"portname" : "COM4"

}
<!--NeedCopy-->
Note:
Citrix recommends using the configuration.js file method to configure serial port redirection only when Citrix Workspace app for ChromeOS is repackaged and republished from StoreFront.
Issuing a command in an ICA session to configure COM port redirection
Use this method to redirect the serial COM port. Run the following command in an active ICA session:
    net use COM4 : \\Client\COM5
<!--NeedCopy-->
Tip:
In the example above, COM4 is the preferred serial port used for redirection.
Persistent auto USB redirection
Starting with the 2505 version, USB devices now automatically redirect to the preferred virtual apps or desktops based on server policy preferences. The preference persists on the preferred apps or desktops for subsequent launches. This enhancement ensures a consistent and seamless experience for users who rely on USB peripherals.
Note:
This feature is disabled by default.
Benefits
The following are the benefits:
- It improves productivity by ensuring your USB device always connects to the right session, even during multitasking or when launching additional sessions.
- The USB redirection persists, so you don’t have to reconfigure your device each time.
How to configure
This feature is disabled by default. You can enable the feature in the following way.
Google admin policy
For managed devices and users, administrators can enable the feature using the Google Admin Policy as follows:
- Sign in to the Google Admin Policy.
- Go to Device management > Chrome Management > User Settings.
-
Add the following JSON strings to the
policy.txtfile under theengine_settingskey.Note:
You can apply this configuration to the following as well:- Device > Chrome > Apps and extensions > Users and browsers > Search for the extension > Policy for extensions.
- Device > Chrome > Apps and extensions > Managed guest sessions > Search for the extension > Policy for extensions.
-
Make sure you set the attribute
alwaysAutoRedirectOnFirstSessionLaunchtotrue. The following is an example of JSON data:{ "settings": { "Value": ` "settings_version": "1.0", "engine_settings": { "features": { "usb": { "alwaysAutoRedirectOnFirstSessionLaunch": true } } } } } <!--NeedCopy--> - Save the changes.
Scanner redirection support
Starting with the 2411 version, you can connect a scanning device to your local machine and redirect the scanner to a virtual session. This feature enables you to access the scanned files within a Citrix Workspace™ app session and easily upload the documents to any other app accessible through Citrix Workspace app.
With the 2411 version, optimized scanner redirection is generally available. This feature enhances performance and efficiency. For more information, see Scanner redirection in the Citrix Virtual Apps and Desktops documentation.
Notes:
- This feature is enabled by default starting with the Citrix Virtual Apps and Desktops™ 2411 version.
- To enable the feature for Citrix Virtual Apps and Desktops 2407 version, follow the steps provided in the Prerequisites section.
- This feature supports Citrix Virtual Apps and Desktops version 2407 and later.
Feature supportability
Currently, you can connect only two scanner, specifically Fujitsu (fi-7160) and Fujitsu (fi-8170).
Scanner redirection prerequisites
To enable the SANE redirection policy in DDC for Citrix Virtual Apps and Desktops 2407 version, perform the following steps:
- Sign in to the Desktop Delivery Controller™ (DDC) machine, and open Citrix Studio.
-
Click Policies > Create Policy. The Create Policy dialog box appears.
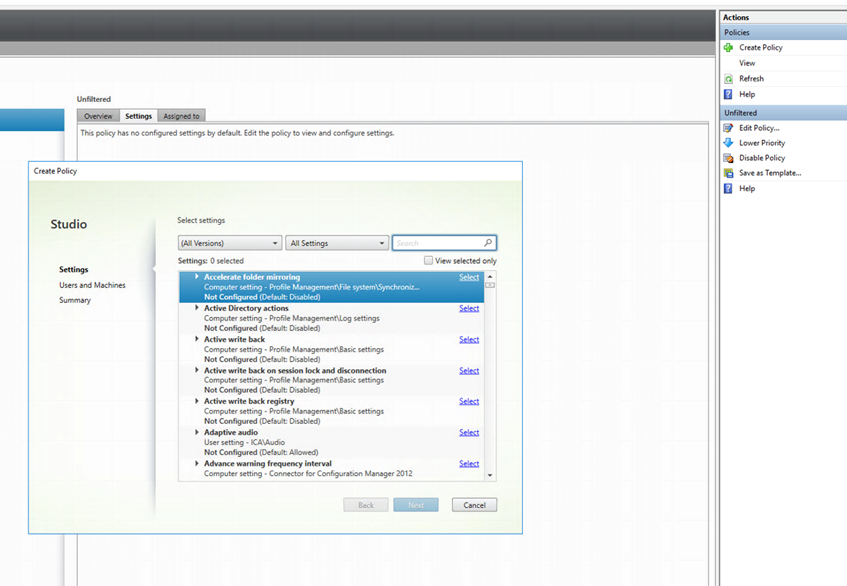
-
Search for SANE scanner redirection as shown.
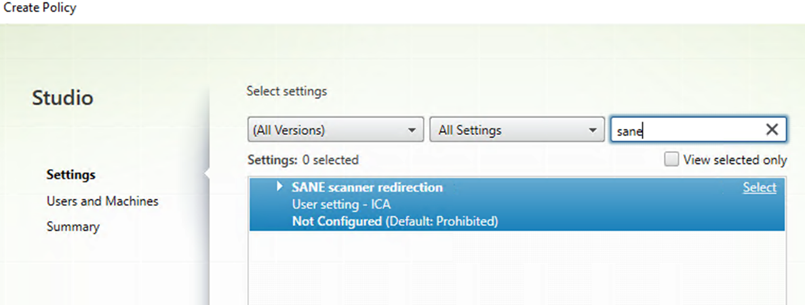
-
Select the SANE scanner redirection option. The Edit Settings dialog box appears. Select the Allowed option.
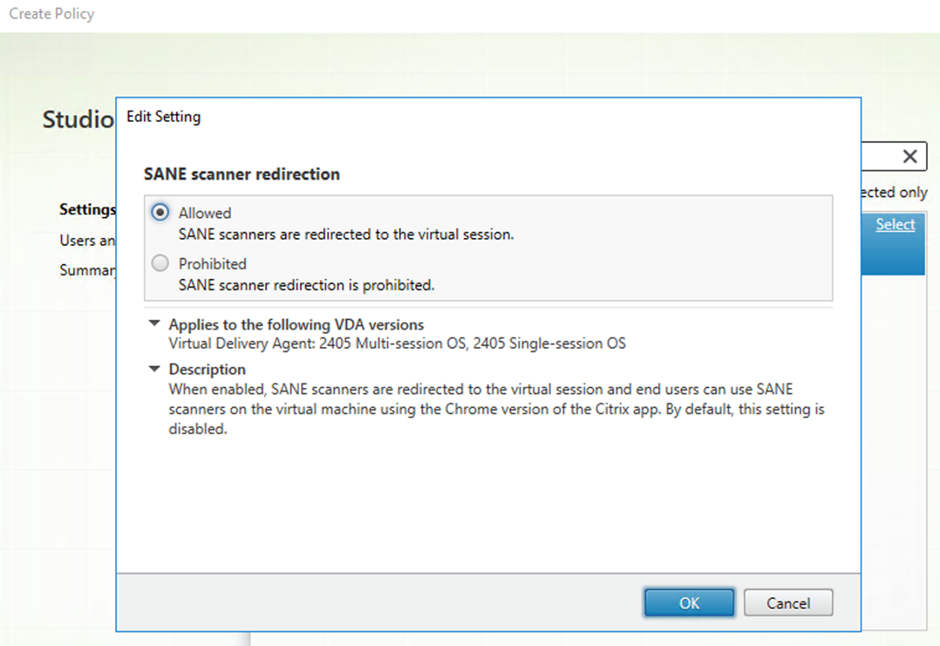
- Click OK.
Known limitations in the feature
- If a session is using the scanner and a scan is in progress, attempting to use the scanner from a second session causes the first session’s scan operation to fail abruptly.
- The Silent scanning option that is used to allow document scanning without user approval isn’t available in Kiosk settings from the Google Admin Console. For more information, see the partner ticket.
- Some of the scanner features might not function as expected. For example, page width, page height, paper size, brightness, and contrast. The issue occurs because of a third-party scanner API bug regarding Option descriptors. [RFHTMCRM-13829]
- When a scanner is connected to the Chromebook, occasionally you might encounter an error message from the ChromeOS “Can’t install scanner software”. Later, the scanning operation might fail. For more information, see the partner ticket. [RFHTMCRM-15966]
Fixed issues since technical preview
-
When you attempt to scan using a redirected scanner on a Chromebook, end users can intermittently encounter the following error hindering the scanning process: “TWAIN session open error: failure”.
The issue occurs even when the scanner is properly connected and the SANE Redirection policy is enabled. [HDX-70122]
- After upgrading the VDA to version 2407, certain scanning apps running inside the Citrix session intermittently become unresponsive when they are opened. [HDX-70280]
- In certain scanning apps, duplex scanning (scanning both sides) and multi-page scanning fail after scanning the first page. For example, a Front office scanning app.
- In certain scanning apps, the color palette is off while scanning a page. For more information, see the Google partner ticket. For example, a Front office scanning app.
- Intermittently, scanning a document fails after attempting to scan with an empty tray. For more information, see the Google partner ticket.
-
Fixed issue in optimized scanner redirection feature:
- Duplex scanning fails because the scanner application UI doesn’t correctly trigger the ADF duplex source selection.
- The multi-page scanning option scans only one page because the scanner application doesn’t correctly handle multiple pages in the tray.
- Skip scanning blank pages fails during duplex scanning because the scanner application doesn’t automatically select this option compared to native settings.
- The scanned page color palette appears incorrect because the scanner application doesn’t accurately reproduce colors.
- When you scan with Citrix Workspace app for ChromeOS on Google Cloud Platform (GCP) VDA servers experiences consistent delay or lag due to platform-specific connectivity issues that affect only ChromeOS endpoints connecting to GCP-hosted VDAs. Fix is avaliable from Citrix Apps and Desktops 2507 CU1 and later.[CVADHELP-29259]
Configurations
For managed users, to allow document scanning without user approval, admins can enable the Silent scanning option from the Google admin console.
To enable silent scanning:
- Navigate to Devices > Chrome > Apps and Extensions.
- Choose the Citrix Workspace app ID.
-
Enable the Silent scanning option available on the right panel.

- Save the changes.
In this article
- USB device redirection
- Automatic redirection of USB devices in Kiosk mode
- Double hop
- Composite USB redirection
- Composite USB automatic redirection settings
- Configure Composite USB Redirection through DDC policies
- Enhancements to Composite USB device UI
- Enhancements to Composite USB redirection through DDC policies
- Serial COM port redirection
- Scanner redirection support