Session experience
Full-screen mode
How to configure
To configure your desktop session to always open in full-screen mode, edit the Google Admin Policy by including the following:
Note:
- By default, desktop sessions open in maximized windows, where the “window state” value is set to “maximized”.
{

      "settings": {

                     "Value": {
                     "settings\_version": "1.0",
                     "engine\_settings": {
                     "ui": {
                     "sessionsize": {
                     "windowstate": "fullscreen"
                              }
                                      }
                                               }
                            }
                }
}
<!--NeedCopy-->
Session size
How to configure
The session size setting lets you customize resolutions for a session. Edit the Google admin policy by including the following:
{
    "settings": {
      "Value": {
            "settings_version": "1.0",
            "engine_settings": {
            "ui": {
                "sessionsize" : {
                    "minwidth" : 240,
                    "minheigh" : 120,
                    "available" : {
                            "default" : "Fit_To_Window",
                            "values" : [
                                            "Fit_To_Window",
                                            "Use_Device_Pixel_Ratio",
                                            "1280x800",
                                            "1440x900",
                                            "1600x1200"
                                       ]
                        }
                    }
                }
            }
        }
    }
}

<!--NeedCopy-->
List of various resolution options and their descriptions:
- minwidth: 240: The minimum width for sessions.
- minheight: 120: The minimum height for sessions.
-
available: Options to set resolution preferences for sessions.
-
default: The value that you set applies to the default resolution. By default, the value is set to “Fit_To_Window”. You can change the default value as follows:
-
values: Other resolution values are:
- Fit_To_Window: The default resolution value available. It matches the window size to emulate various screen resolutions.
- Use_Device_Pixel_Ratio: Scales sessions to match the DPI of the device.
- 1280x800: Sets the session size to 1280 * 800 pixels.
- 1440x900: Sets the session size to 1440 * 900 pixels.
- 1600x1200: Sets the session size to 1600 * 1200 pixels.
-
values: Other resolution values are:
-
Net promoter score
Citrix Workspace app for ChromeOS prompts you periodically for Net Promoter Score (NPS) feedback. The prompt asks you to rate your experience with Citrix Workspace app for ChromeOS. We use NPS feedback as a tool to measure customer satisfaction and to further improve the app.
You can rate your experience on a scale of 1–5, with 5 indicating that you’re satisfied.
How to configure
To configure NPS, use the Google admin policy by including the following. If the option is set to true, the user can provide the rating.
{
    "settings": {
        "Value": {
            "settings_version": "1.0",
                "engine_settings": {
                    "ui": {
                        "netPromoters": true
                          }
                }
        }
    }
}

<!--NeedCopy-->
Auto-launch of ICA® sessions
Citrix Workspace app for ChromeOS supports auto-launch of ICA (Independent computing architecture) sessions on Google managed devices or users.
With this feature, you can access resources remotely from Citrix Workspace for the web. The downloaded ICA file starts automatically, with the Citrix Workspace app for ChromeOS, if it has been installed on the device. Previously, you were able to only download ICA files and open the files manually to start resources. Also, the ICA file wasn’t deleted when opened and remained on the device. Now, the ICA file is automatically deleted from the device - once it’s used to auto-launch the session.
How to configure
To configure the auto-launch of ICA sessions, log in as an administrator and do these steps:
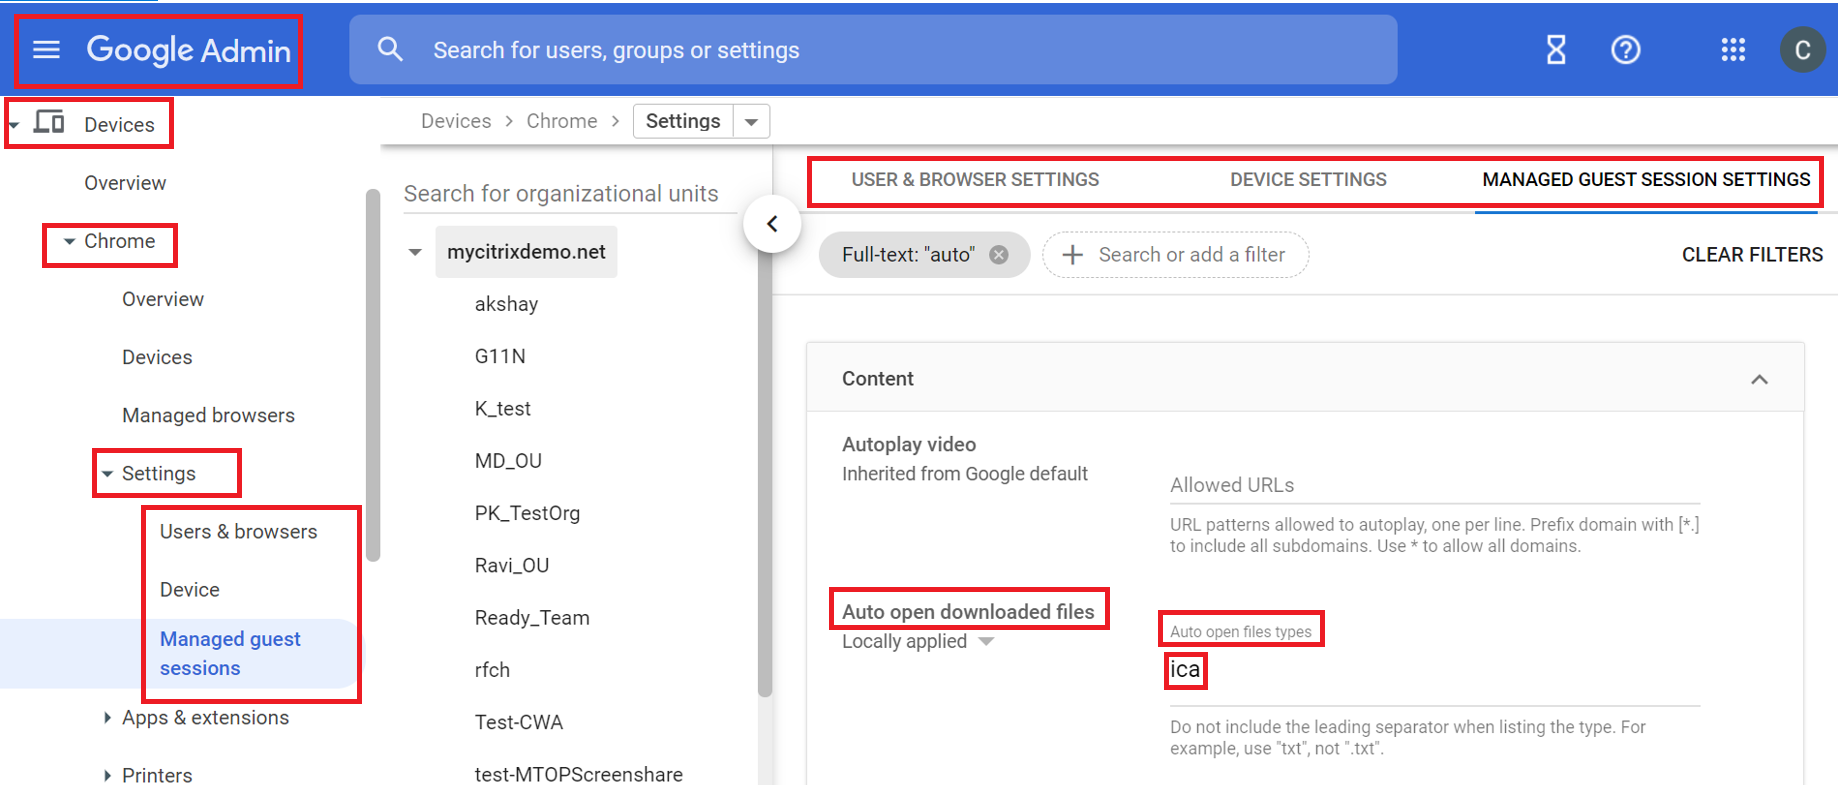
- Log on to the Google Admin console.
- In the Google Admin console, select Devices > Chrome > Settings.
- Then, under Settings, select Users & Browsers, Device, and Managed Guest Session Settings (as appropriate), set Auto-open downloaded files and add ica under Auto-open file types for User & Browser Settings, Device Settings, and Managed Guest Session Settings as appropriate (for managed users and managed devices).
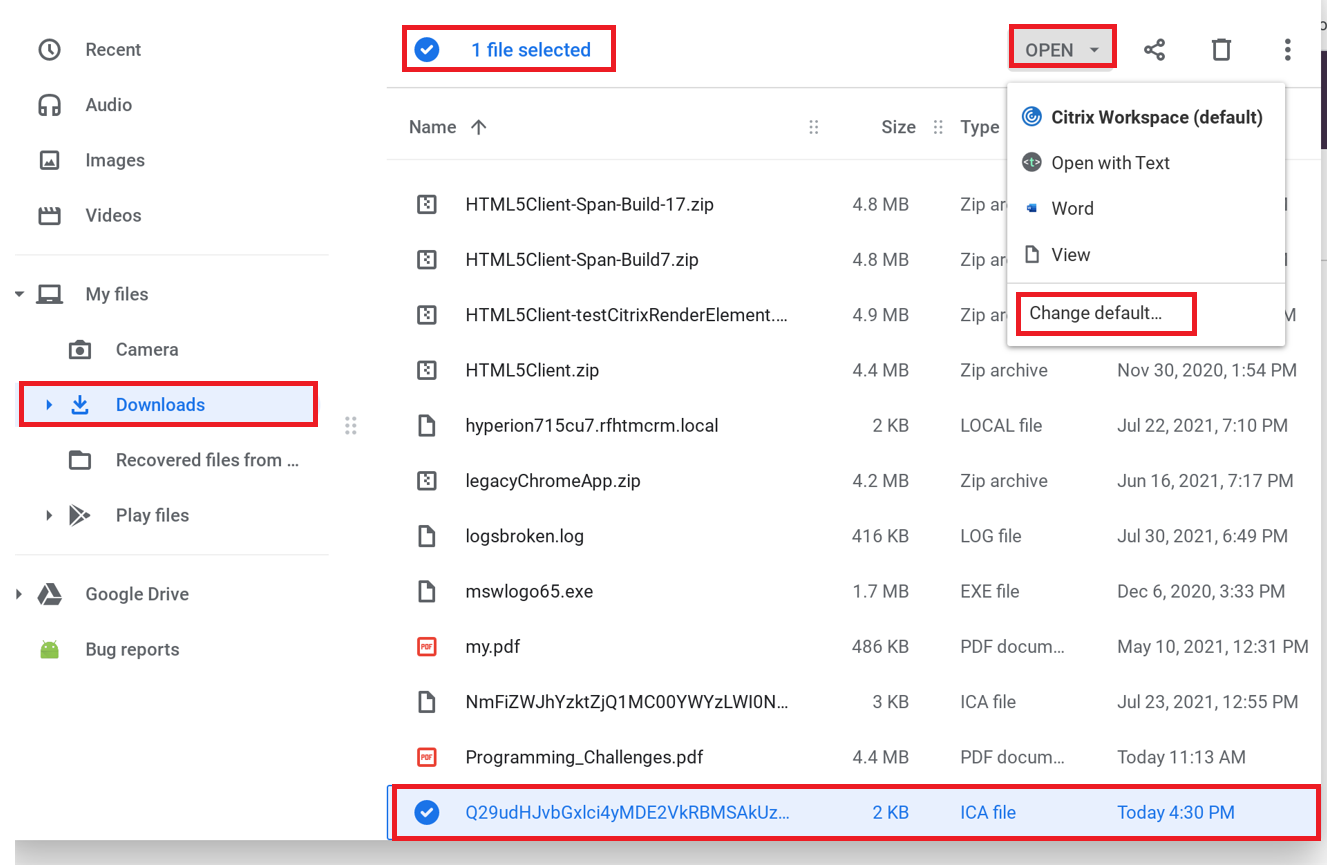
Then, ask your users to associate the ICA file with the Citrix Workspace app for ChromeOS on their ChromeOS devices as follows:
- Open File manager and navigate to the previously downloaded ICA file.
- Click the ICA file.
- On the right side of the navigation bar, click Open and select the arrow beside it.
- Then, select Change default.
- A list of available apps appears.
- Select Citrix Workspace.
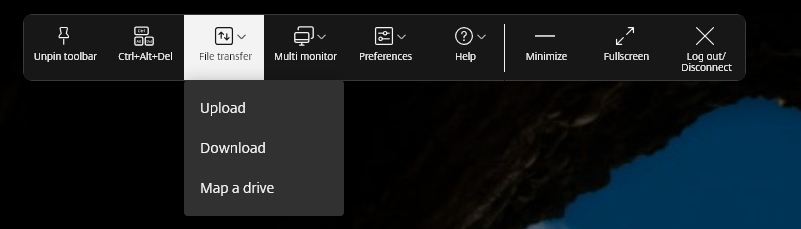
In-session toolbar and dialogs
The in-session toolbar is a floating toolbar that can be moved anywhere on the screen. A customized toolbar improves the user experience. This enhancement provides new options that are accessible from the toolbar to ease common tasks, such as:
- switching to full-screen mode
- uploading or downloading files
- Copy content from an active session to the clipboard to enable sharing between sessions
- accessing more options
Note:
On the touch-enabled devices, the toolbar notch appears at the top center to indicate the floating toolbar during desktop sessions. A menu button indicating the floating toolbar transforms to the Citrix Workspace icon when you move your cursor towards it.
How to configure
The toolbar is enabled by default.
To hide or customize individual toolbar items, edit the Google admin policy by including the following:
{
    "settings": {
        "Value": {
            "settings_version": "1.0",
                "engine_settings": {
                "ui" : {
                    "toolbar" : {
                            "menubar" :true,
                            "usb": true,
                            "fileTransfer":true,
                            "about":true,
                            "lock":true,
                            "disconnect":true,
                            "logoff":true,
                            "fullscreen":true,
                            "multitouch":true,
                            "preferences":true,
                            "gestureGuide":true
                                 }
                     }
                }
        }
    }
}

<!--NeedCopy-->
List of in-session toolbar options and their descriptions:
- menubar: The toolbar appears when set to true, and is hidden when set to false.
- usb: Opens the USB devices dialog box. Contains the list of devices that can be redirected into the session. To redirect a USB device, select an appropriate device and click Connect.
- fileTransfer: Secure file transfer functionality between a user device and a Citrix Virtual Apps and Desktops and Citrix DaaS session. You can upload and download files to and from a session and seamlessly access data.
- about: Displays the third-party licenses page and provides the version number.
- lock: Sends “Ctrl+Alt+Del” to the session.
- disconnect: Disconnects the session.
- logoff: Logs off from the session.
- fullscreen: Adjusts the session to full-screen mode. If the session is connected with multiple monitors, the multi-monitor icon appears on the menu bar rather than a full-screen icon. A Restore icon appears on the menu bar while in full-screen mode. To restore maximized mode, click Restore in the toolbar UI.
- multitouch: Remotes all gestures to the virtual session, and the app behaves based on the gestures it supports.
- preferences: Provides options to customize CEIP and display resolution settings.
- gestureGuide: Provides the guide for gestures in touch mode.
To hide the toolbar configuration using the configuration.js file:
The configuration.js file is in the ChromeApp root folder. Edit this file directly to changes to Citrix Workspace app for ChromeOS.
- Open the configuration.js file and set the menubar attribute to false.
You can also hide an individual icon to prevent it from displaying in the toolbar. For example, to hide the Ctrl+Alt+Del button in the toolbar:
-
Open the configuration.js file and set the lock attribute to false.
Notes:
- Citrix recommends that you back up the configuration.js file before making changes.
- Citrix recommends editing the configuration.js file only if the Citrix Workspace app for ChromeOS is repackaged for users.
- Administrator-level credentials are required to edit the configuration.js file.
Improved in-session toolbar
Starting with the 2411 version, an enhanced toolbar UI appears when you start a desktop session. The look and feel of the in-session toolbar UI has changed. The toolbar UI is designed to enhance the end user experience by organizing the options in a user-friendly manner.
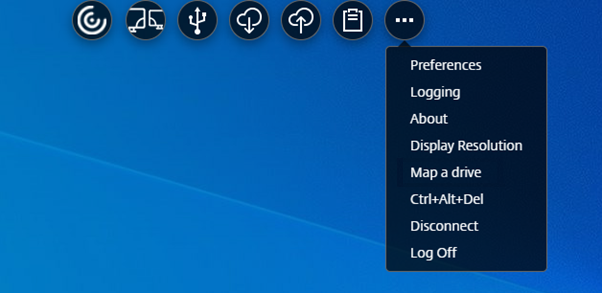
Old toolbar UI
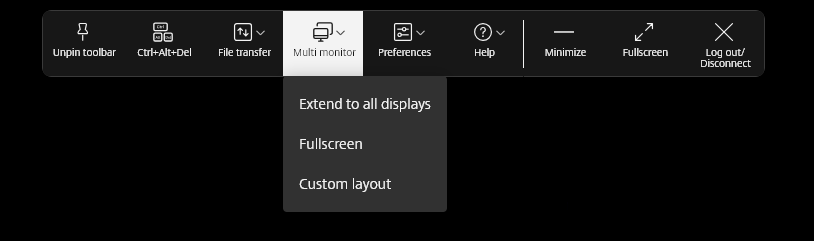
New toolbar UI

Note:
This feature is disabled by default. To enable the feature, follow the configuration steps.
Known issues in the feature
- When you move the toolbar notch in the session, the tooltip for the notch doesn’t appear. [RFHTMCRM-14281]
How to configure
You can enable the new toolbar UI by using:
- Google Admin Policy
- Global App Configuration service
Google Admin Policy
For managed devices and users, administrators can enable the feature using the Google Admin Policy as follows:
- Sign in to the Google Admin Policy.
- Go to Device management > Chrome Management > User Settings.
-
Add the following JSON strings to the
policy.txtfile under theengine_settingskey.Note:
You can apply this configuration on the following as well:
- Device > Chrome > Apps and extensions > Users and browsers > Search for the extension > Policy for extensions.
- Device > Chrome > Apps and extensions > Kiosks > Search for the extension > Policy for extensions.
- Device > Chrome > Apps and extensions > Managed guest sessions > Search for the extension > Policy for extensions.
Make sure you set the attribute switchToNewToolbar to true.
The following is an example of JSON data:
{ "engine_settings": { "ui": { "toolbar": { "switchToNewToolbar": true } } } } <!--NeedCopy--> - Save the changes.
Global App Configuration Service
On the cloud setup, administrators can enable or disable the improved toolbar feature by navigating to Workspace Configuration > App Configuration > Session Experience > Toolbar > New Session Toolbar. Select the checkbox and respective toggle button to enable the feature.

Icons and Actions
Note:
The icons are visible to the end users only if their organization’s admin has enabled the specific feature.
| Icon/Action | Description | ||
|---|---|---|---|
| Toolbar notch | When you start an app or a desktop session, the toolbar notch appears at the top of the screen. When you click the notch, the toolbar appears in the unpinned state. Drag and reposition the toolbar notch onto any side of the screen. After you release the mouse, the notch will automatically align itself with the nearest edge. | ||
| Pin | When you pin it, you can drag and reposition the toolbar onto any side of the screen. After you release the mouse, the toolbar automatically aligns itself with the nearest edge. The advantage of pinning the toolbar is that it doesn’t minimize into a notch after you complete an action that involves toolbar icons. | ||
| Unpin | When you unpin the toolbar, it minimizes into a notch after you complete an action that involves toolbar icons. You can drag and reposition the toolbar notch onto any side of the screen. | ||
| Ctrl+Alt+Del | You can perform the Ctrl+Alt+Del function with the click of a button. This option helps users to sign out, switch users, lock the system, or access the Task Manager. | ||
|
File transfer
|
|||
|
|||
|
|||
|
Multi-monitor
|
The Multi-monitor icon appears only when you connect external monitors. For more information, see Multi-monitor. | ||
 |
|||
|
|||
|
|||
 |
|||
|
|||
|
Devices
|
Click to open the USB Devices dialog box. Click Add to view the USB devices connected to the local device. The dialog box lists the devices that can be redirected to the session. To redirect the USB devices, select an appropriate device and click Connect. For more information, see USB device redirection. | ||
| Note: You can view the Devices icon only if your IT administrator provides access to connect USB devices through policy settings. | |||
| Preferences |
|
||
| <!–
|
|
–> | |
|
|||
|
|||
|
Help
|
|||
|
|||
|
|||
| Minimize | You can minimize the session window. | ||
| Fullscreen | You can switch your screen from windowed mode to full-screen mode. In Citrix Workspace app for ChromeOS, the fullscreen icon action doesn’t span the session across monitors. However, if you select the monitors from the custom layout and the session spans to the respective monitors, then when you restore, the Fullscreen icon gets replaced by the Extend option. When you click the Extend icon, the session spans to the previously selected monitors. | ||
|
Disconnect
|
The disconnect action keeps the virtual desktop running. Log out to save energy. | ||
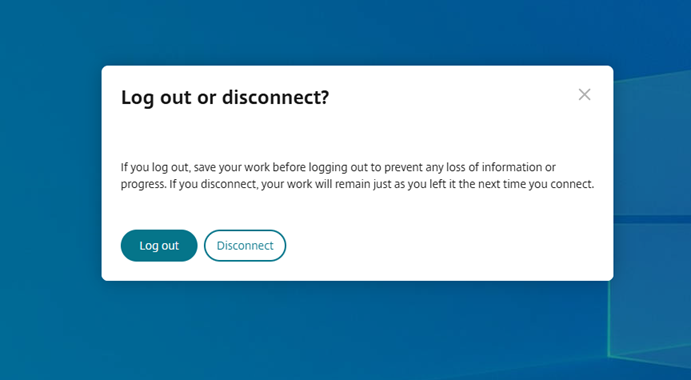
Note: When admin configures both Log out and Disconnect options, the following message appears. 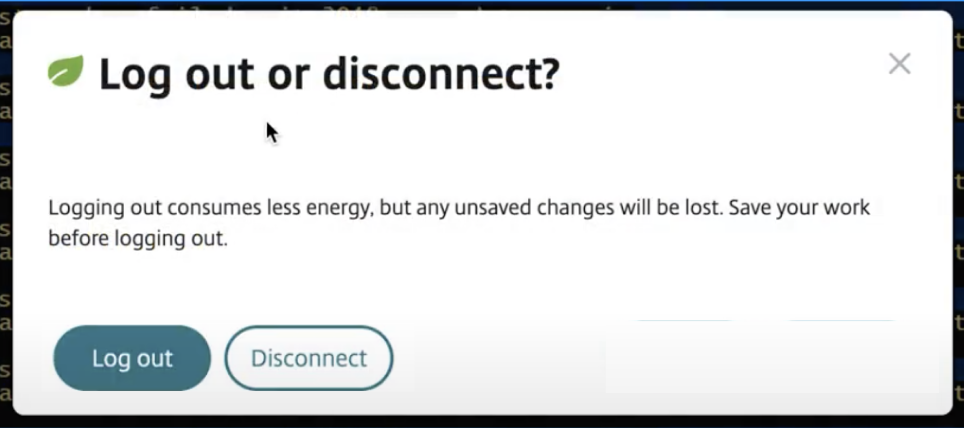
|
|||
| Log out to save energy: the logout action shuts down the virtual machine and conserves energy. End users must make sure to save their work before logging out. | |||
| Disconnect: closes the virtual desktop session window. However, the virtual session remains active until the next sign-in. End users can resume their work easily. The Sustainability leaf icon appears only when the sustainability feature is enabled. For more information, see Sustainability initiative from Citrix Workspace app. |

Sustainability initiative from Citrix Workspace app
Starting from the 2405 version, we have introduced a sustainability initiative that encourages users to conserve energy that might be used due to running unused virtual desktops.
Starting from the 2411 version, admins can customize the sustainability message dialog box contents.
Notes:
- This feature is disabled by default.
- This feature is available on both cloud and on-premises store.
- To use this feature, you must enable the new toolbar feature. To enable, see the configuration section in the Improved in-session toolbar feature.
When this feature is enabled, a prompt is displayed to sign out from the desktop session when a user closes a virtual desktop. This feature might help conserve energy if there are Windows OS policies that are used to shut down VMs when no users are logged in.
To enable this feature, do the following:
- Navigate to Citrix Studio.
- Click Delivery Groups from the left navigation pane.
- Select the required VDA from the Delivery Group section.
- Click the Edit icon. The Edit Delivery Group page appears.
- Click Desktops from the left navigation pane.
- Select the required VDA where you must add the keywords.
- Click Edit. The Edit Desktop page appears.
- Set the
ICA-LogOffOnClosekeyword totruein the Description field. - Click OK. The following dialog box appears when you close the virtual desktop.
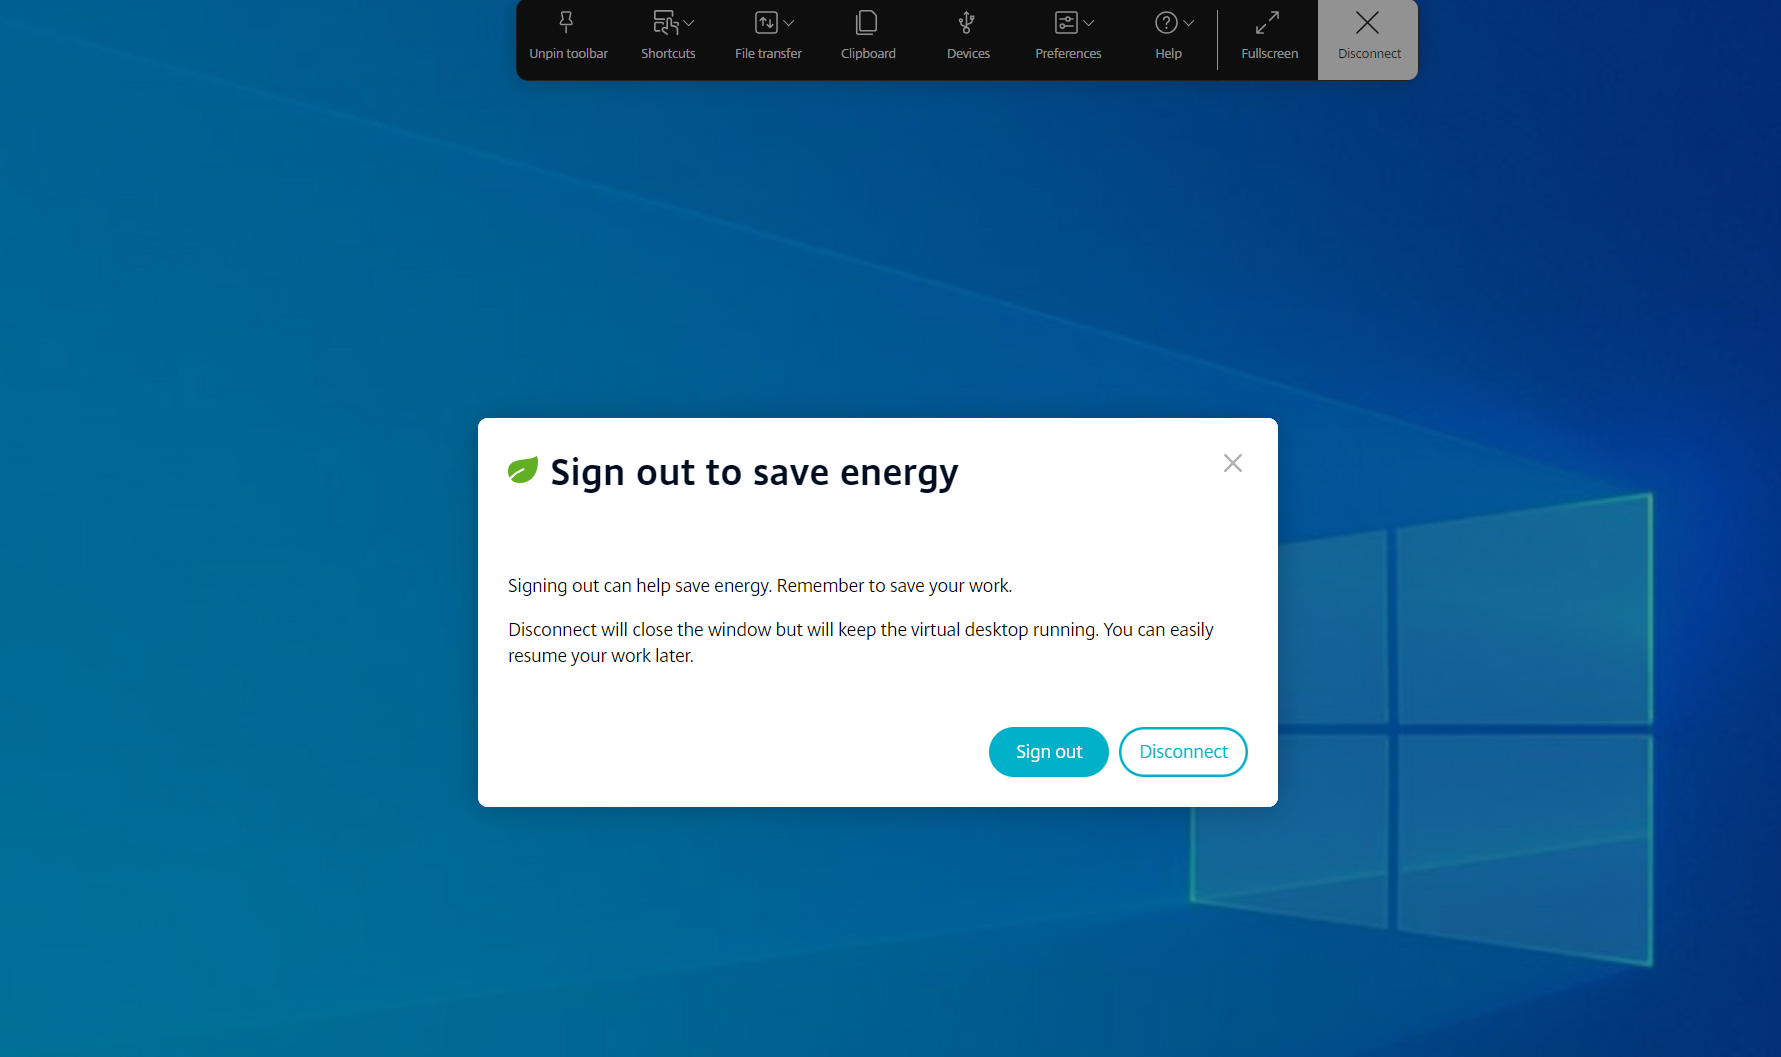
End users can exit from the session in two ways:
Sign out to save energy - This sustainability action shuts down the virtual machine and conserves energy. End users must make sure to save their work before signing out.
Disconnect to close the virtual desktop session window. However, the virtual session remains active until the next sign-in. End users can resume their work easily.
Customizing the text in the Save Energy screen
Starting from the 2411 version, admins can customize the disconnect and log out dialog box contents in the Saved energy screen.
Notes:
- This feature is disabled by default.
- This feature is available on both cloud and on-premises store.
- To use this feature, you must enable the new toolbar feature. To enable, see the configuration section in the Improved in-session toolbar feature.
Prerequisites
The minimum on-prem StoreFront™ version required is 2407.
How to configure
Admins can customize the sustainability dialog box contents using the following keywords in DDC for both on-premises and cloud setup:
Note:
The maximum number of characters allowed in the Description field is 200.
| Keyword | Description |
|---|---|
| ICA-LogOffOnClose | Keyword for enabling/disabling Sustainability. The default value is false. |
| ICA-Icon | Keyword for enabling/disabling Sustainability leaf Icon. Even if this setting is empty, the ICA-LogOffOnClose setting applies. |
| ICA-PromptMessage | Keyword for customizing the prompt message that appears in the dialog box. If you haven’t given a customized message, then the default message applies. |
| ICA-Title | The keyword for customizing the title that appears in the dialog box. If you haven’t given a customized message, then the default message applies. |
Notes:
- The disconnect and log out dialog boxes appear according to the parsed key.
- If you choose not to use the sustainability feature, then the admin can configure the key LogOffOnClose to false. However, the user sees the default dialog box, and can choose to click the “Don’t ask me again” checkbox. When the user clicks this option, the session disconnects, but the dialog box doesn’t appear in subsequent sessions.
Customization:
To customize the text in the Save Energy screen, do the following:
- Follow steps 1–8 from the preceding section.
- Set the
ICA-PromptMessagekeyword to the required text in the Description field. - Set the
ICA-Titlekeyword to the required text in the Description field. -
Set the
ICA-Iconkeyword to true or false.Example:
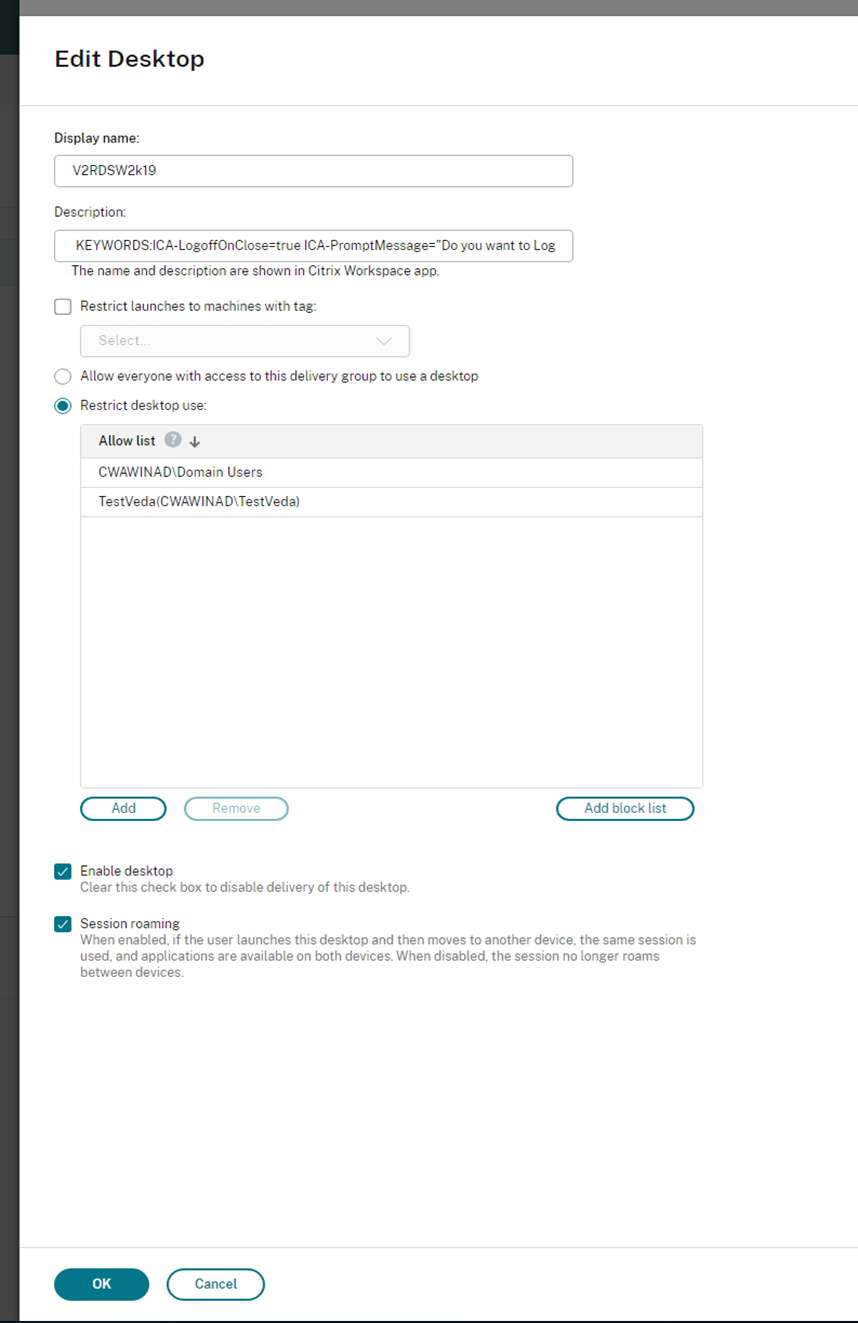
KEYWORDS:ICA-LogOffOnClose=true ICA-PromptMessage="Do you want to sign out from the session?" ICA-Title="Sign out or disconnect" ICA-Icon=true
<!--NeedCopy-->
The following screenshot displays how to edit desktop group dialogs:
For on-premises setups
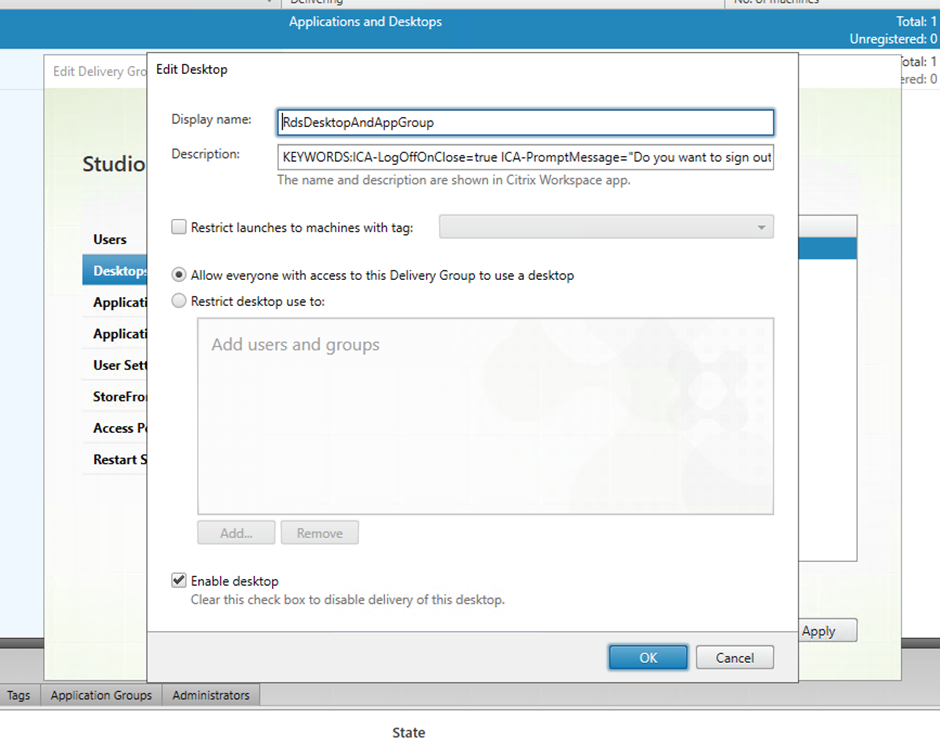
For cloud setups
The keywords are assigned by default for new desktop machines assigned to the group. For existing desktop machines, you must run the following PowerShell commands for changes to apply:
$dg = Get-BrokerDesktopGroup -Name '<group name>' -Property 'Name','Uid'

$apr = @( Get-BrokerAssignmentPolicyRule -DesktopGroupUid $dg.Uid -Property 'Description' )

Get-BrokerMachine -DesktopGroupUid $dg.Uid -IsAssigned $true | Set-BrokerMachine -Description $apr[0].Description
<!--NeedCopy-->
With this PowerShell script, it’s possible to have multiple assignment policy rules for a single Delivery Group. Using Citrix Studio also, you can configure multiple Assignment policy rules, each with a unique description value, and a possible set of different keywords.
-
Click OK. The following dialog box appears when you close the virtual desktop:
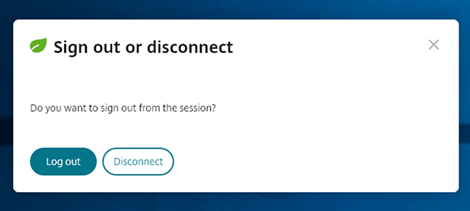
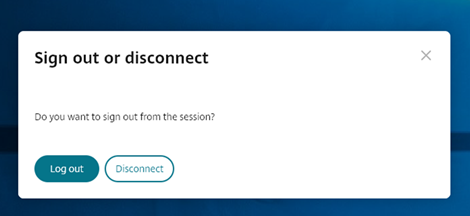
When ICA-Icon=false – Leaf icon will not be shown
End user experience
When users tap on the X icon to disconnect the session, the following prompt appears:
End users can exit from the session in the following two ways:
- Log out to save energy - This sustainability action shuts down the virtual machine and conserves energy. End users must make sure to save their work before logging out.
- Disconnect - click Disconnect to close the virtual desktop session window. However, the virtual session remains active until the next sign-in. End users can resume their work easily.
Note:
The sustainability leaf icon appears only when your admin has enabled the sustainability feature.
Enhancements to the improved in-session toolbar
Starting with the 2502 version, this feature is enabled by default. To disable the feature, follow the configuration steps mentioned in this article.

How to configure
You can disable the new toolbar UI by using:
- Google Admin Policy
- Global App Configuration service
Google Admin Policy
For managed devices and users, administrators can disable the feature using the Google Admin Policy as follows:
- Sign in to the Google Admin Policy.
- Go to Device management > Chrome Management > User Settings.
-
Add the following JSON strings to the
policy.txtfile under theengine_settingskey.Note:
You can apply this configuration to the following as well:
- Device > Chrome > Apps and extensions > Users and browsers > Search for the extension > Policy for extensions.
- Device > Chrome > Apps and extensions > Kiosks > Search for the extension > Policy for extensions.
- Device > Chrome > Apps and extensions > Managed guest sessions > Search for the extension > Policy for extensions.
-
Make sure you set the attribute
switchToNewToolbartofalse. The following is an example of JSON data:{ "engine_settings": { "ui": { "toolbar": { "switchToNewToolbar": false } } } } <!--NeedCopy--> - Save the changes.
Global App Configuration service
Administrators can disable the feature by navigating to Workspace Configuration > App Configuration > Session Experience > Toolbar > New Session Toolbar.
Clear the checkbox and respective toggle button to disable the feature.

Toolbar customization
Admins can customize the toolbar, choosing what options must be viewed by the end user. You can customize it using the Global App Configuration service.
To enable a particular feature, administrators can:
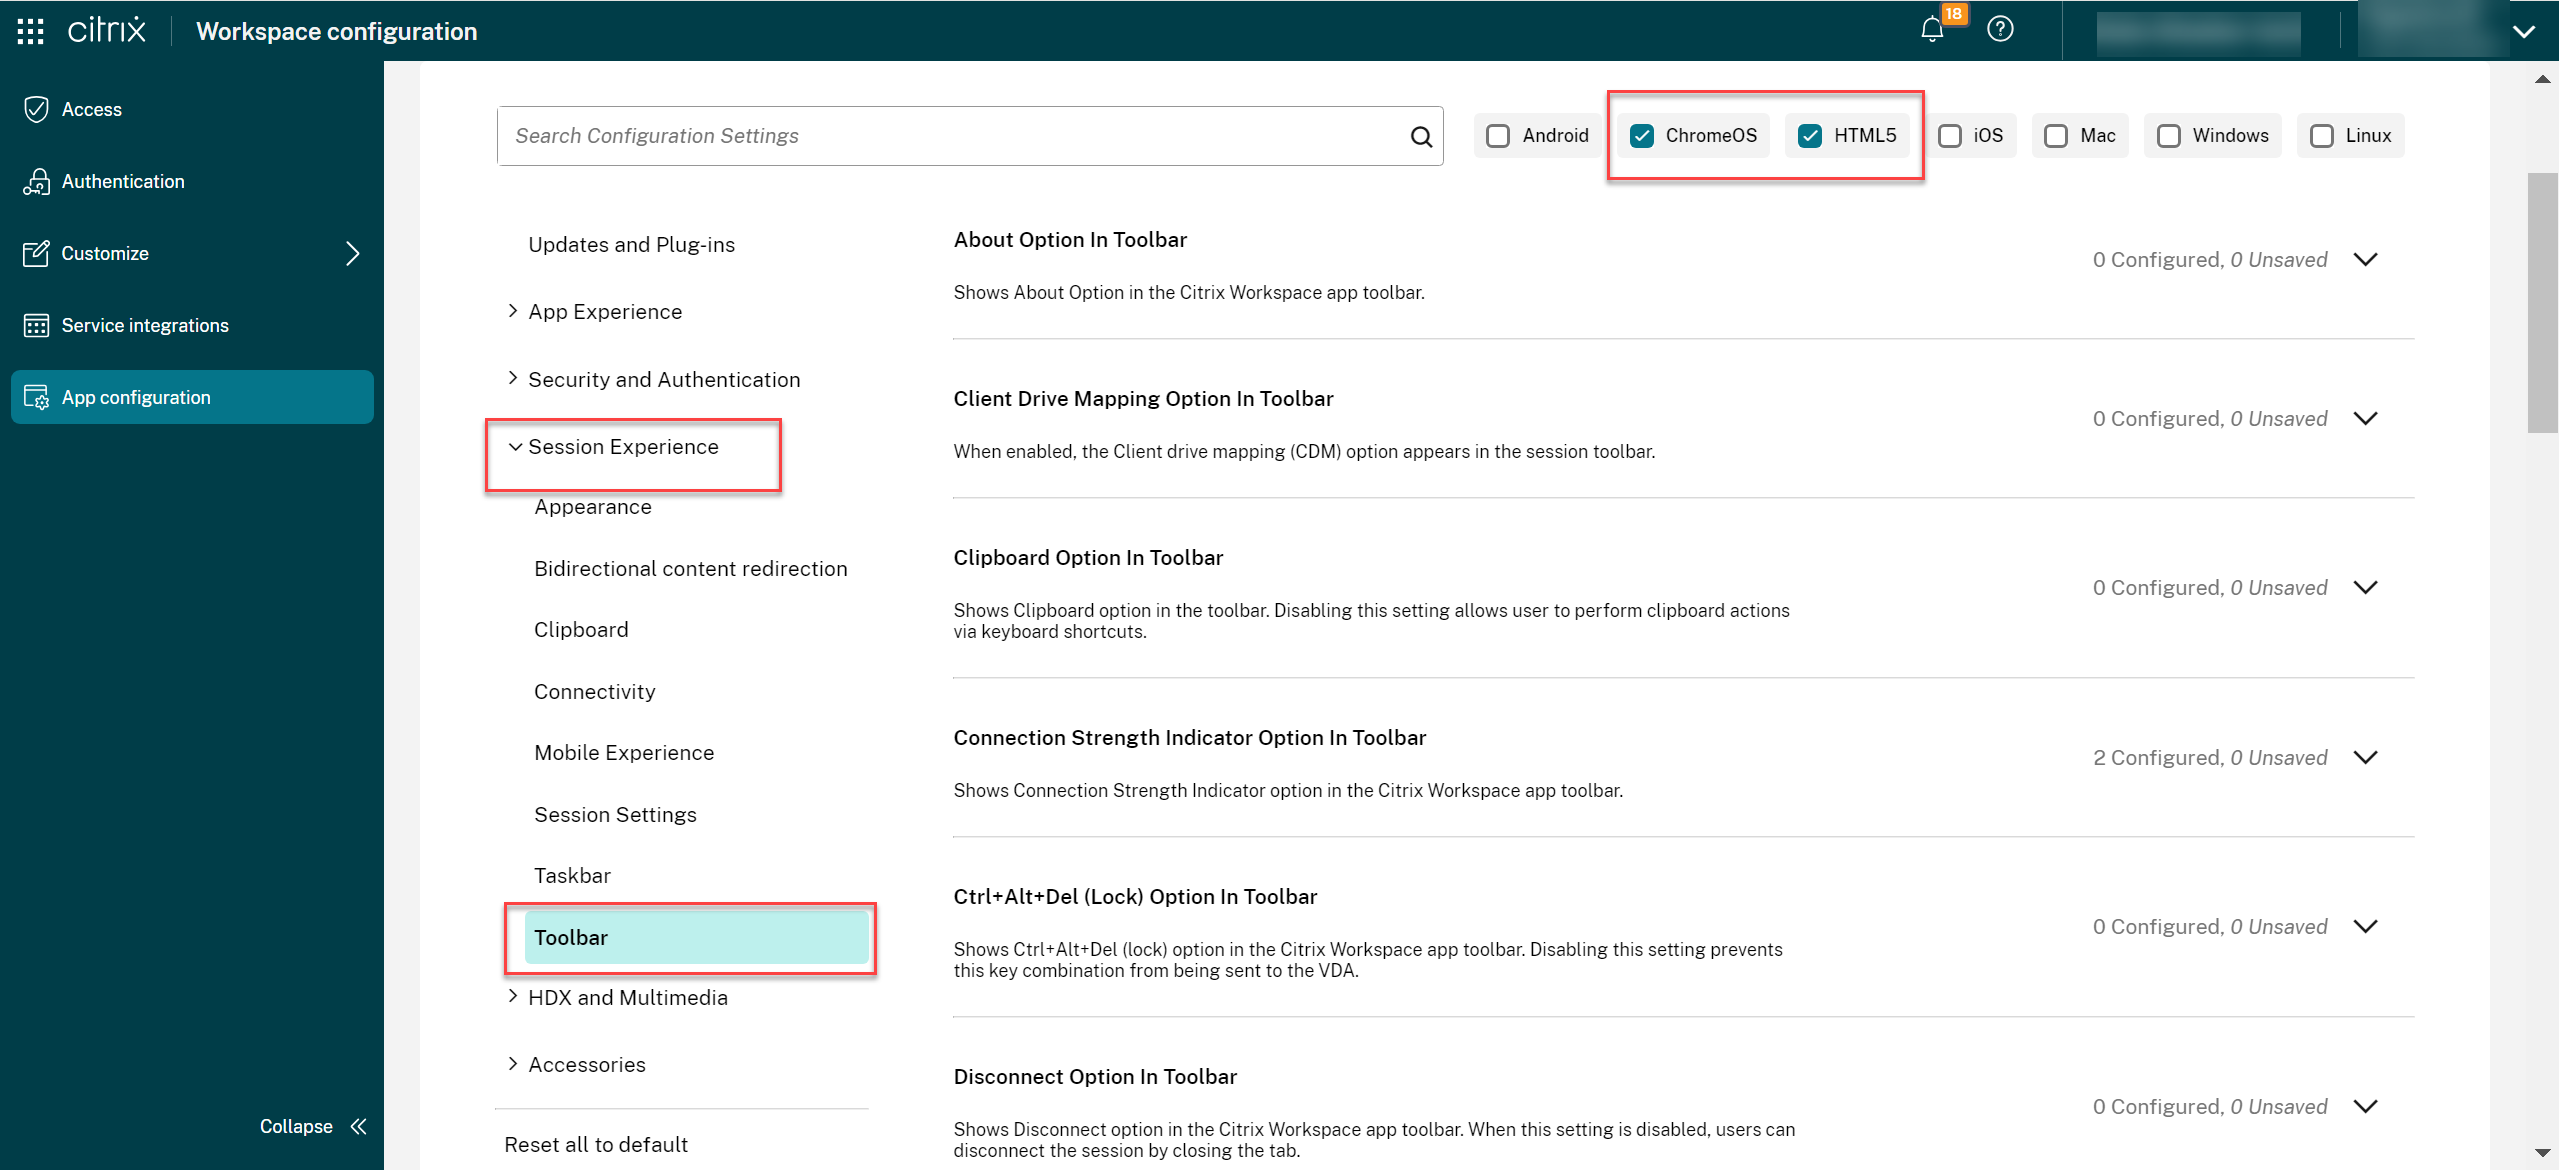
- Navigate to Workspace Configuration > App Configuration > Session Experience > Toolbar.
- Select the checkbox ChromeOS.
- Scroll and click the down arrow.
- Select the platform checkbox and click the toggle button to enable or disable the option in the toolbar
- Save and publish the changes.
The following table displays the toolbar options that the admin can configure:
| Option | Description | ||
|---|---|---|---|
| About Option In Toolbar | Shows About Option in the Citrix Workspace app toolbar. | ||
| Client drive mapping option in toolbar | When enabled, the Client drive mapping (CDM) option appears in the session toolbar. | ||
| Connection Strength Indicator Option In Toolbar | Shows Connection Strength Indicator option in the Citrix Workspace app toolbar. Note: This option applies only to the new toolbar. | ||
| Ctrl+Alt+Del (Lock) Option In Toolbar | Shows Ctrl+Alt+Del (lock) option in the Citrix Workspace app toolbar. Disabling this setting prevents this key combination from being sent to the VDA. | ||
| Disconnect Option In Toolbar | Shows Disconnect option in the Citrix Workspace app toolbar. When this setting is disabled, users can disconnect the session by closing the tab. | ||
| <!– | Display Resolution Option In Toolbar | Shows Display Resolution option in the Citrix Workspace app toolbar that allows users to select different session resolutions. Disabling this setting matches the resolution to the browser tab size. | –> |
| File Upload & Download Options In Toolbar | Shows File Upload and Download option in the Citrix Workspace app toolbar. When this setting is disabled, users can still use drag/drop and Send my device within the VDA. | ||
| Fullscreen Option In Toolbar | Shows Fullscreen option in the Citrix Workspace app toolbar. When this setting is disabled, users can use a browser shortcut to make the session fullscreen. | ||
| Gesture Guide Option In Toolbar | Shows Gesture guide option in the Citrix Workspace app toolbar. | ||
| In-session Toolbar | Enables a floating toolbar within the session. | ||
| Logoff Option In Toolbar | Shows the Logout option in the Citrix Workspace app toolbar. When this setting is disabled, users can Logout via the Start menu or close all the apps within the session. | ||
| Minimize Option In Toolbar | Shows Minimize option in the Citrix Workspace app toolbar. Note: This option applies only to the new toolbar. | ||
| Multi-monitor Option In Toolbar | Shows Multi-monitor option in the Citrix Workspace app toolbar when at least one external monitor is connected. | ||
| Multitouch Option In Toolbar To Allow Switching Between Multitouch And Panning Mode | Shows Multitouch option in the toolbar to allow switch between multitouch and panning mode. Disabling this setting provides only panning mode support. | ||
| Pin option in toolbar | When enabled, the Pin/Unpin option appears in the session toolbar. Note: This option applies only to the new toolbar. | ||
| Preferences Option In Toolbar | Shows Preferences option in the Citrix Workspace app toolbar. | ||
| Switch Apps Option In Toolbar | Shows Switch apps option in toolbar for virtual app session to allow switching between the apps. Disabling this removes the option to switch apps. | ||
| USB Devices Option In Toolbar | Shows USB Devices option in the Citrix Workspace app toolbar. Disabling this setting prevents access to any USB devices within the Citrix Workspace app. |
Connection strength indicator
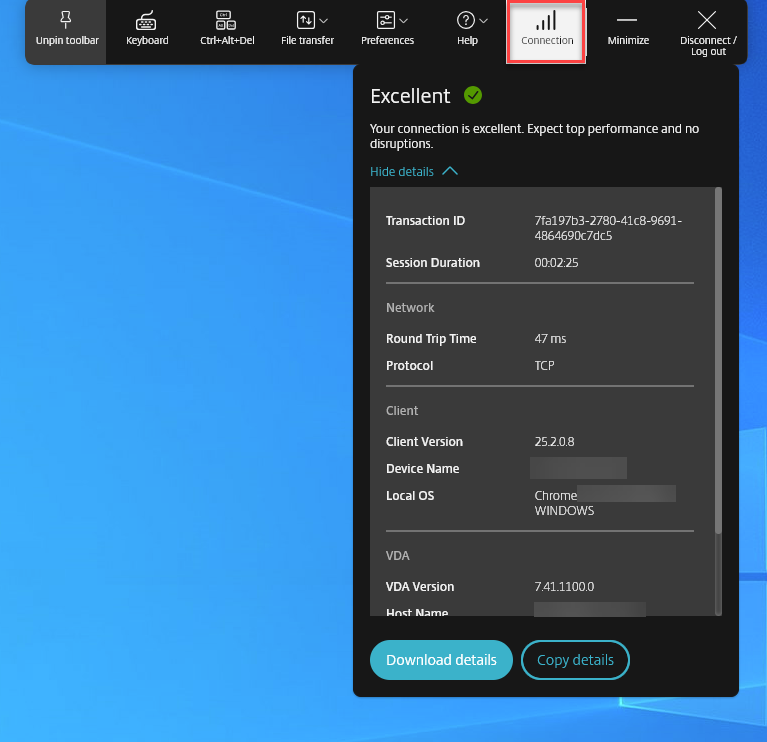
Starting with the version 2502, Citrix Workspace app for HTML5 and Citrix Workspace app for ChromeOS supports the Connection Strength Indicator (CSI) on the in-session toolbar. This feature displays a network strength icon that alerts you of network issues. You can click the indicator to view real-time connection statistics for the client and VDA, and copy (or download) diagnostic information to share with IT for advanced troubleshooting.
Notes:
- This feature is enabled by default.
- When you open the session, you can see the Connection Details icon on the in-session toolbar, provided the new toolbar feature is enabled.
Benefits
- Immediate feedback: The network strength icon gently nudges users when network issues are detected.
- Enhanced troubleshooting: Real-time stats and diagnostics help users and IT teams quickly identify and resolve connectivity issues.
Prerequisites
This feature is available only when a session is opened using:
- Citrix Virtual Apps and Desktops™ version 2407 or later
- Citrix Virtual Apps and Desktops version 2402 LTSR CU1 or later
Known issue in the feature
With Citrix Virtual Apps and Desktops version 2411, the Connection Strength Indicator (CSI) on the in-session toolbar doesn’t display the protocol information such as RTT and Bandwidth (in EDT protocol) [XASUP-6810].
How to configure
You can disable the feature by using:
- Google Admin Policy
- Global App Configuration service
Google Admin Policy
For managed devices and users, administrators can disable the feature using the Google Admin Policy as follows:
- Sign in to the Google Admin Policy.
- Go to Device management > Chrome Management > User Settings.
-
Add the following JSON strings to the
policy.txtfile under theengine_settingskey.Note:
You can apply this configuration to the following as well:
- Device > Chrome > Apps and extensions > Users and browsers > Search for the extension > Policy for extensions.
- Device > Chrome > Apps and extensions > Kiosks > Search for the extension > Policy for extensions.
- Device > Chrome > Apps and extensions > Managed guest sessions > Search for the extension > Policy for extensions.
-
Make sure you set the attribute
connectionStrengthIndicatortofalse. The following is an example of JSON data:{ "engine_settings": { "ui": { "toolbar": { "connectionStrengthIndicator": false } } } } <!--NeedCopy--> - Save the changes.
Global App Configuration service
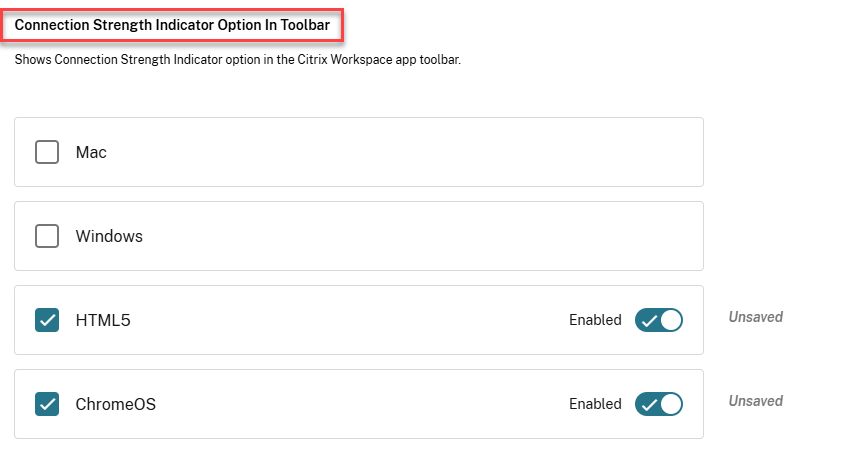
Administrators can disable the feature by navigating to Workspace Configuration > App Configuration > Session Experience > Toolbar > Connection Strength Indicator.
Clear the checkbox and respective toggle button to disable the feature.
Enhanced multi-monitor support with auto-detection and custom display selector
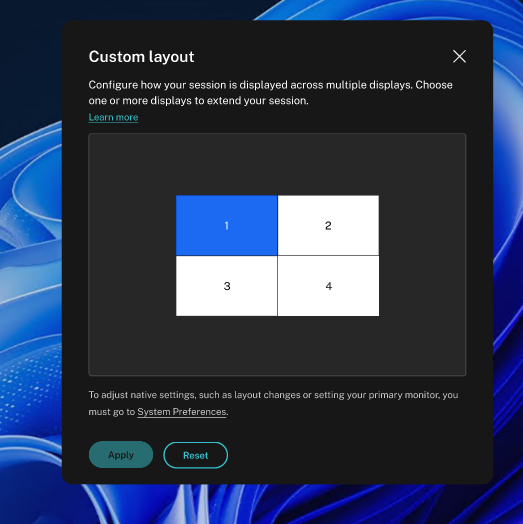
Starting with version 2505, new options are available under multi-monitor in the toolbar, which appears only when more than one screen is connected. The multi-monitor selector allows users to choose which displays to use in full-screen mode for desktop sessions only.
This feature does not apply to seamless sessions or sessions operating in Kiosk mode. As long as the layout remains the same on the client OS, it is remembered when you disconnect and reconnect to the same session.
Note:
This feature is enabled by default.
Prerequisites
Ensure that the new toolbar feature is enabled. For more information, see Improved in-session toolbar.
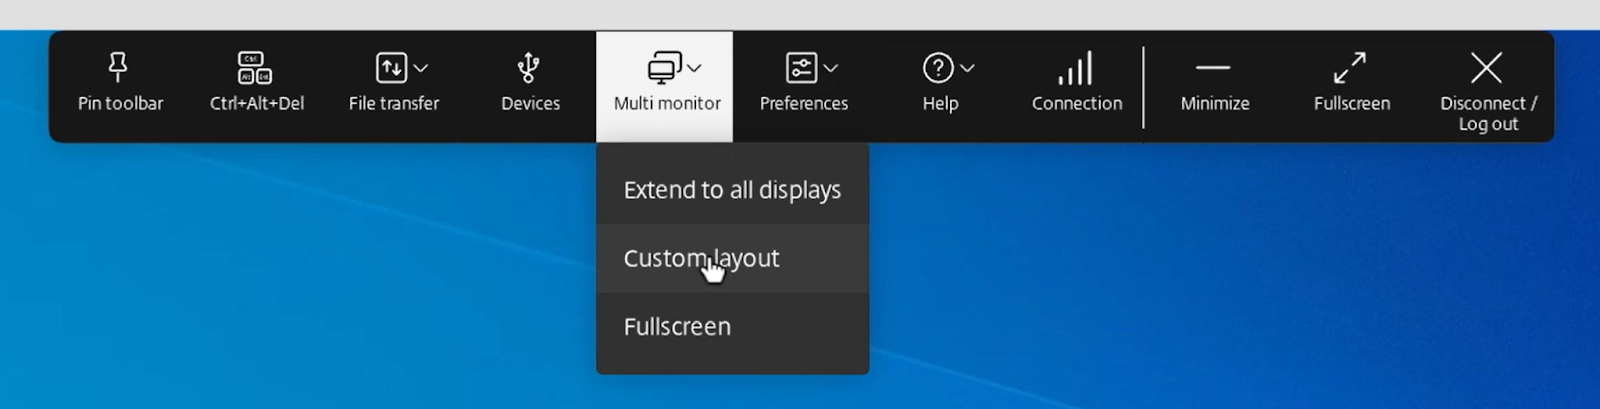
Multi-monitor icon
The Multi-monitor toolbar icon includes three drop-down menu options for desktop sessions in full-screen mode:
- Extend to all displays: The session spans across all available monitors.
-
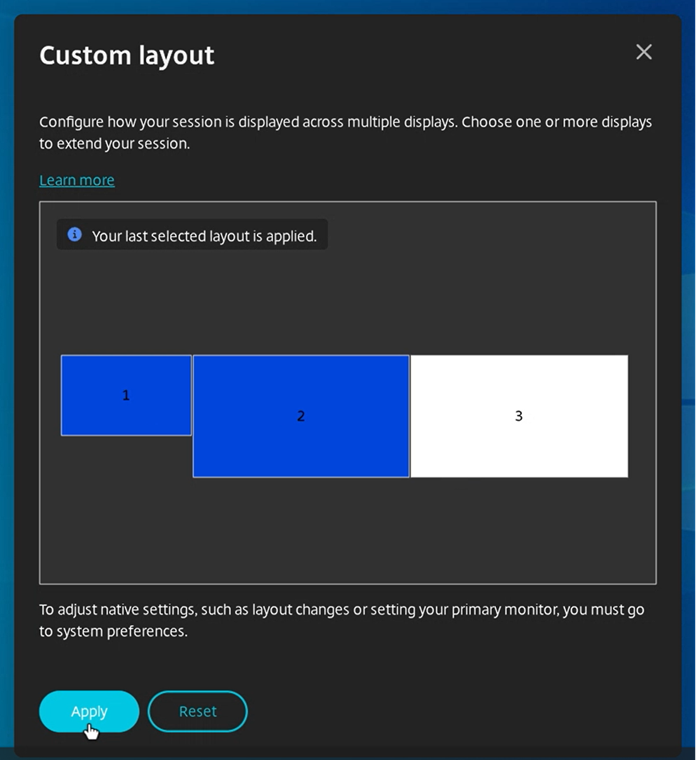
Custom Layout: This option opens a custom monitor selector displaying the monitor layout. You can configure how your session appears across the monitors. Click the rectangles in the selector to choose which screens to use, then click Apply to span the session on those monitors. The layout box arrangement depends on how the monitors are connected.
- Fullscreen: The session layout changes to full-screen mode in the current monitor.
Use case for custom layout
Assume that you have two monitors connected to your ChromeOS device. You can run a video conferencing app on your native device monitor and view your virtual desktop contents in full-screen across your other two monitors during the call.
Fullscreen and Extend options
The Fullscreen or Extend button in the new toolbar is a multi-purpose option. You can switch your screen from windowed mode to full-screen mode.

The Fullscreen icon either takes the session to full-screen mode or if you reposition your virtual desktop between more than one adjacent monitor (a subset of available monitors), the session spans across these monitors.
For more information, see Multi-monitor setups.
Extend option
If you select monitors from the custom layout and the session spans to those monitors, when you restore, the Fullscreen icon is replaced by the Extend option. When you click the Extend icon, the session spans to the previously selected monitors.

Multi-monitor plug and unplug actions
When a new monitor is plugged in (connected), a notification asks the user to make a selection.
Users can select Don’t ask me again to mute this notification.
Known limitations
- When the session is active, the multi-monitor state goes into single monitor fullscreen mode by default when the monitor layout changes.
- This feature is not supported for sessions launched in Kiosk mode.
How to configure
This feature is enabled by default. You can disable the feature in the following way.
Google admin policy
For managed devices and users, administrators can disable the feature using the Google Admin Policy as follows:
- Sign in to the Google Admin Policy.
- Go to Device management > Chrome Management > User Settings.
-
Add the following JSON strings to the
policy.txtfile under theengine_settingskey.Note:
You can apply this configuration to the following as well:
- Device > Chrome > Apps and extensions > Users and browsers > Search for the extension > Policy for extensions.
- Device > Chrome > Apps and extensions > Managed guest sessions > Search for the extension > Policy for extensions.
-
Make sure you set the attribute
enableMultiMonitorCustomLayouttofalse. The following is an example of JSON data:{ "settings": { "Value": { "settings_version": "1.0", "engine_settings": { "features": { "graphics": { "enableMultiMonitorCustomLayout": false } } } } } } <!--NeedCopy--> - Save the changes.
Enhanced session toolbar notch size
The 2509 version of Citrix Workspace app for ChromeOS features a redesigned, smaller notch in the session window that you can drag and drop to any window edge. The notch design provides an optimal size, and the cursor pointer changes when you hover over it. This update addresses user feedback about wasted screen space and replaces the unclear orange indicator with a recognizable warning icon when Connection State Indicator (CSI) detects network issues.
Note:
When you use Citrix Workspace app for ChromeOS version 2509 or later, this feature is automatically enabled for desktop sessions and requires no client-side configuration.
Session sharing
For session sharing, the applications must be hosted on the same machine and must be configured in seamless window mode with the same settings for parameters, such as window size, color depth, and encryption. Session sharing is enabled by default when a hosted application is made available.
Battery status indicator
The battery status of the device appears in the notification area within the virtual desktop session. Previously, the battery status indicator wasn’t visible in the session, which sometimes led to a loss of productivity when the laptop shuts down after the battery runs out.
This feature is supported only on VDA versions 7.18 and later.
Note:
- With Microsoft Windows 10 VDA, the battery status indicator might take about 1 or 2 minutes to appear.
Service continuity
Service continuity removes or reduces the dependency on the availability of components that are involved in the connection process. You can launch the Citrix Virtual Apps and Desktops and Citrix DaaS regardless of the health status of the cloud services. In other words, service continuity allows you to connect to the DaaS apps and desktops during outages. As a prerequisite, your device must maintain a network connection to a resource location.
For more information, see the Service continuity section in the Citrix Workspace documentation.
Notes:
- The service continuity feature is enabled.
- If you previously enabled the service continuity feature and are using an older version of Citrix Workspace app for ChromeOS, you might be unable to use service continuity. To enable this feature, it is recommended that you update the Citrix Workspace app to the latest version, which is 2402.1 or later and follow the instructions in the Knowledge Center article CTX632723.
Enhancements to service continuity
The following are the enhancements:
- Previously, during store sign-in, the connection lease files download was delayed by 10 minutes. Starting with the 2408 release, downloading connection lease files happen immediately after sign-in.
- Connection lease files sync up happens when you click the reload button.
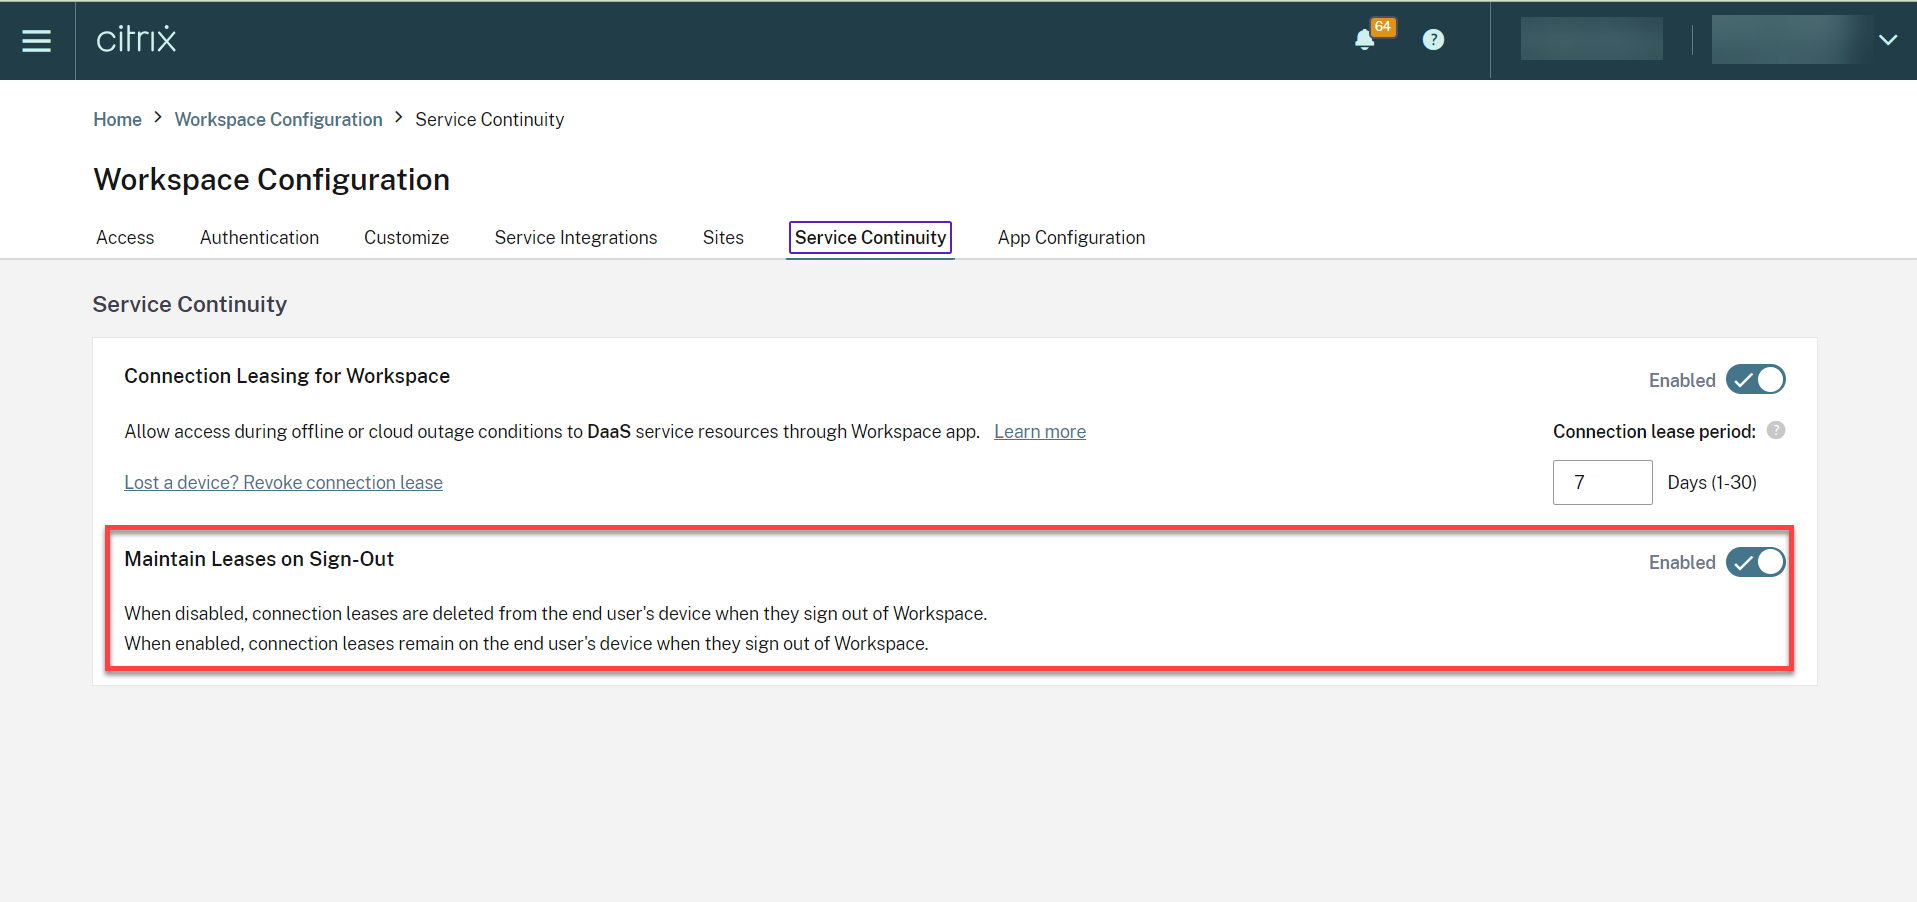
- Added the support for the Maintain Leases on Sign-Out feature from the Workspace configuration. When this feature is enabled, the connection leases remain on the end user’s device when they sign out of Workspace.
For more information, see Service continuity in the Citrix Workspace documentation.
Known issues in the feature
-
When a user exits managed guest session (MGS) mode, the system deletes all lease files. Therefore, in managed guest session, service continuity requires that the first-time user log in successfully to store the URL for fetching lease files, after which offline launch works during outages.
-
The service continuity feature might not work as expected when a custom domain is configured.
-
With the 2502 version, when establishing a direct VDA connection in the cloud, end users might experience a delay of approximately two minutes if any cloud connector is offline. In addition, a secondary window featuring a progress dialog opens and remains visible during the session launch. Users can close this extra window and continue using the session that has been successfully launched.
Note:
The issue doesn’t apply to the connections made through Citrix Gateway Service.
Limitations in the feature
The service continuity feature is not supported in Kiosk mode.
How to configure
You can enable the service continuity feature in the following way:
- Google Admin Policy
Google Admin Policy
For managed devices and users, administrators can enable the service continuity feature using the Google Admin Policy as follows:
- Sign in to the Google Admin Policy.
-
You can apply this configuration to the following:
- Device > Chrome > Apps and extensions > Users and browsers > Search for the extension > Policy for extensions.
- Device > Chrome > Apps and extensions > Kiosks > Search for the extension > Policy for extensions.
- Device > Chrome > Apps and extensions > Managed guest sessions > Search for the extension > Policy for extensions.
The following is an example of JSON data:
{
"settings": {
    "Value": {
        "settings_version": "1.0",
        "engine_settings": {
            "features": {
                "serviceContinuity":{
                    "enable": true
                    }
                }
            }
        }
    }
}

<!--NeedCopy-->
Service Continuity for connectorless workloads
Starting with version 2603, Citrix Workspace app for ChromeOS supports Service Continuity for connectorless workloads that run on compatible VDAs. This enhancement removes the limitation that previously restricted Service Continuity to deployments that rely on cloud connectors. ChromeOS endpoints can now participate in connectorless infrastructure designs while maintaining resilient app and desktop launches during transient Citrix Workspace or Citrix Gateway service outages.
About this feature
This feature delivers enhanced service continuity capabilities with the following key benefits:
- Extended deployment support: The application now supports connectorless workloads in addition to traditional cloud connector deployments.
- Improved resilience: Users can launch and reconnect to virtual apps and desktops even when control plane connectivity becomes temporarily unavailable.
- Modern architecture alignment: The enhancement aligns with modern, connectorless Citrix architectures and deployment patterns.
- Consistent user experience: ChromeOS endpoints maintain the same level of service continuity regardless of the underlying infrastructure design.
For more information about VDA requirements and limitations, see Service Continuity VDA requirements in the Citrix Workspace documentation.
For complete information about Service Continuity, see Service Continuity in the Citrix Workspace documentation.
Browser content redirection
Browser Content Redirection (BCR) redirects the remote browser’s content to the client’s device. BCR is a frameless-borderless web browser that runs within the remote desktop window and covers (overlays) the remote (VDA) browser’s content area.
BCR redirects the contents of a web browser to a client device, and creates a corresponding browser embedded within Citrix Workspace app. This feature offloads network usage, page processing, and graphics rendering to the endpoint. Doing so improves the user experience when browsing demanding webpages, especially webpages that incorporate HTML5 or WebRTC. Only the viewport (the user’s visible area of a webpage) is redirected to the endpoint. Browser content redirection doesn’t redirect the user interface (the address bar, toolbar, and so forth) of the browser on the VDA.
In other words, BCR provides the ability to render webpages in the allow list on the client side. This feature uses Citrix Workspace app to instantiate a corresponding rendering engine on the client side, which fetches the HTTP and HTTPS content from the URL.
For more information on how to set up the allow list see:
Known issues in the feature
- On BCR overlay, when you open a website link in a new tab, it opens in the client browser instead of the session browser. [HDX-43206]
Known limitations in the feature
-
This feature doesn’t support:
- Server fetch and client render scenario.
- Integrated Windows Authentication (IWA) webserver.
- Multimonitor feature.
- When you upload or download a file to some of the BCR-redirected websites, the ChromeOS file picker appears instead of a VDA session file picker. [HDX-43207]
- Printing isn’t supported from BCR-redirected pages.
Improved virtual apps and desktops launch experience
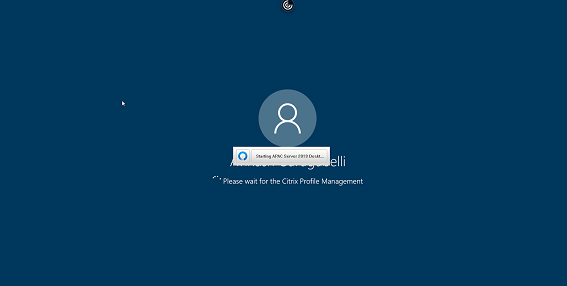
Starting with the 2306 release, the improved app and desktop launch experience provides timely and relevant information about the launch status.
Configure session launch notification display
Starting with 2307, administrators can either enable or disable the display of launch progress notifications using the following configuration.
If this configuration is enabled, you can see the session launch progress notifications on the lower right of the screen. If this configuration is disabled, you can’t see the session launch progress notifications.
Note:
- By default, this configuration is enabled.
When notifications are disabled, end users lack the timely and relevant information about the launch status.
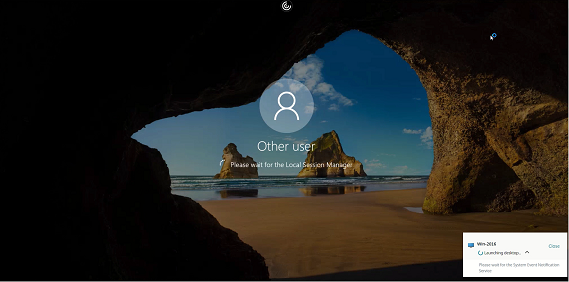
When notifications are enabled, end users see the launch progress in the lower right of the screen.
Configurations
You can configure this feature in one of the following ways:
- Configuration.js
- Google Admin Policy
Configuration.js
To disable this feature using the configuration.js file, do the following:
- Locate the configuration.js file in the ChromeApp root folder.
-
Edit the file.
Notes:
- Citrix recommends that you back up the configuration.js file before making changes.
- Citrix recommends editing the configuration.js file only if the Citrix Workspace app for ChromeOS is repackaged for users.
- Administrator-level credentials are required to edit the configuration.js file.
-
Set the CTXTUI value to false to disable the display of launch progress notifications. Following is an example of JSON data:
{ "vc_channel":{ "CTXTUI": false } } <!--NeedCopy--> - Save the changes.
Google Admin Policy
For managed devices and users, administrators can disable this feature using the Google Admin Policy as follows:
- Sign in to the Google Admin Policy.
- Go to Device management > Chrome Management > User Settings.
-
Add the following strings to the policy.txt file under the engine_settings key.
The following is an example of JSON data:
{ "settings": { "Value": { "settings_version": "1.0", "engine_settings": { "vc_channel": { "CTXTUI": false } } } } } <!--NeedCopy--> - Save the changes.
Session reliability
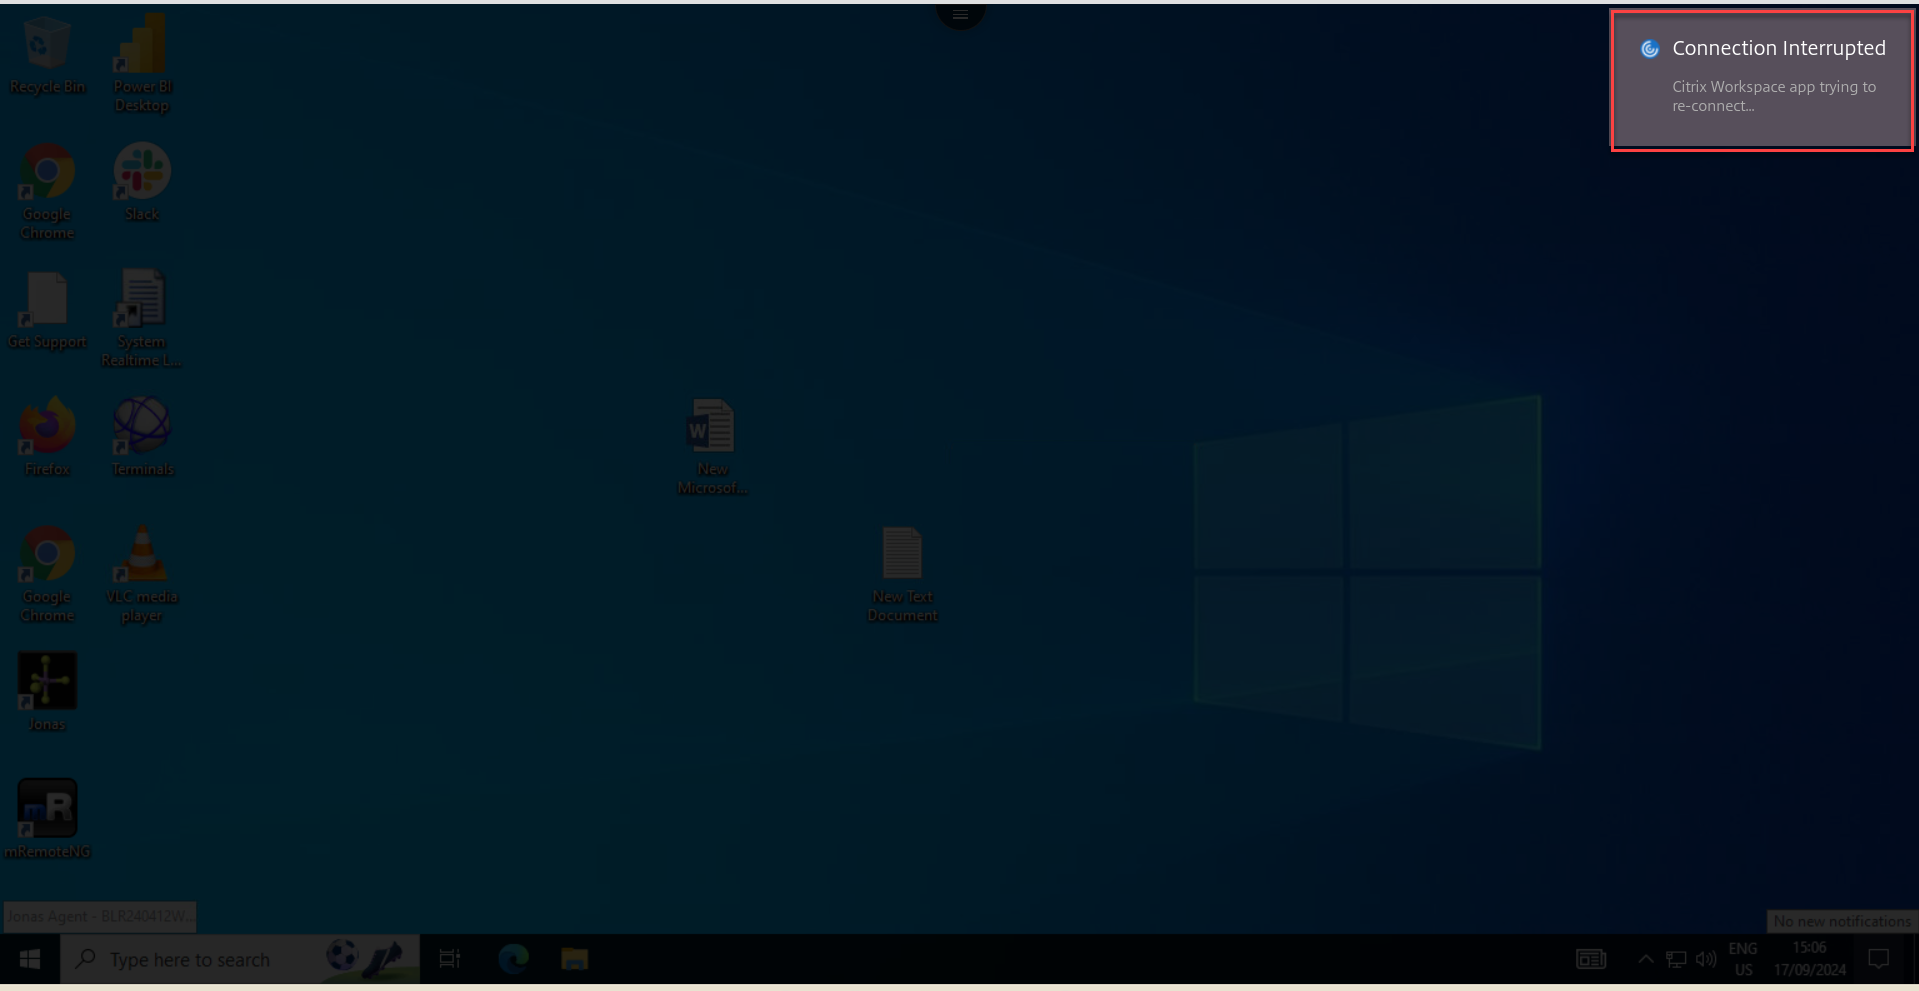
The session reliability feature ensures that sessions remain active on the user’s screen even if there is a disruption in network connectivity. Users continue to see the application they’re using until network connectivity resumes.
When connectivity is lost, the session remains active on the server. To alert the user about the connectivity issue, the display becomes unresponsive and a reconnect overlay screen appears. Until connectivity resumes on the other side of the tunnel, session reliability reconnects users without reauthentication prompts.
Note:
The session reliability timeout policy setting has a default value of 180 seconds or three minutes. Though you can extend the time the session reliability keeps a session open, this feature is convenient to the user.
For more information about the feature, see Session reliability in the Citrix Virtual Apps and Desktops documentation.
Important
With the session reliability feature enabled, the default ports for session communication are 2598 for non-SSL VDA and 443 for SSL VDA.
You can use session reliability with Gateway and SSL VDAs. When using a non-SSL VDA with Citrix Gateway, data encryption happens between the user device and Citrix Gateway. When using SSL VDA with Citrix Gateway, data encryption happens from the user device to VDA.
Using session reliability policies
- The session reliability connections policy setting allows or prevents session reliability.
- The session reliability timeout policy setting has a default value of 180 seconds or three minutes. Though you can extend the time the session reliability keeps a session open, this feature is convenient to the user. Therefore, it does not prompt the user to re-authenticate.
Tips
- Extending session reliability timeouts might cause a user to get distracted and walk away from the device, leaving the session accessible to unauthorized users. By default, incoming session reliability connections use port 2598, unless you change the port number in the session reliability port number policy setting. If you use session reliability, it closes, or disconnects, the user session after the amount of time you specify in the Session reliability timeout policy setting.
- Session reliability is enabled by default on the server. To disable this feature, configure the policy managed by the server.
Configuring session reliability from Citrix Studio
By default, session reliability is enabled.
To disable session reliability:
- Launch Citrix Studio.
- Open the Session Reliability connections policy.
-
Set the policy to Prohibited.
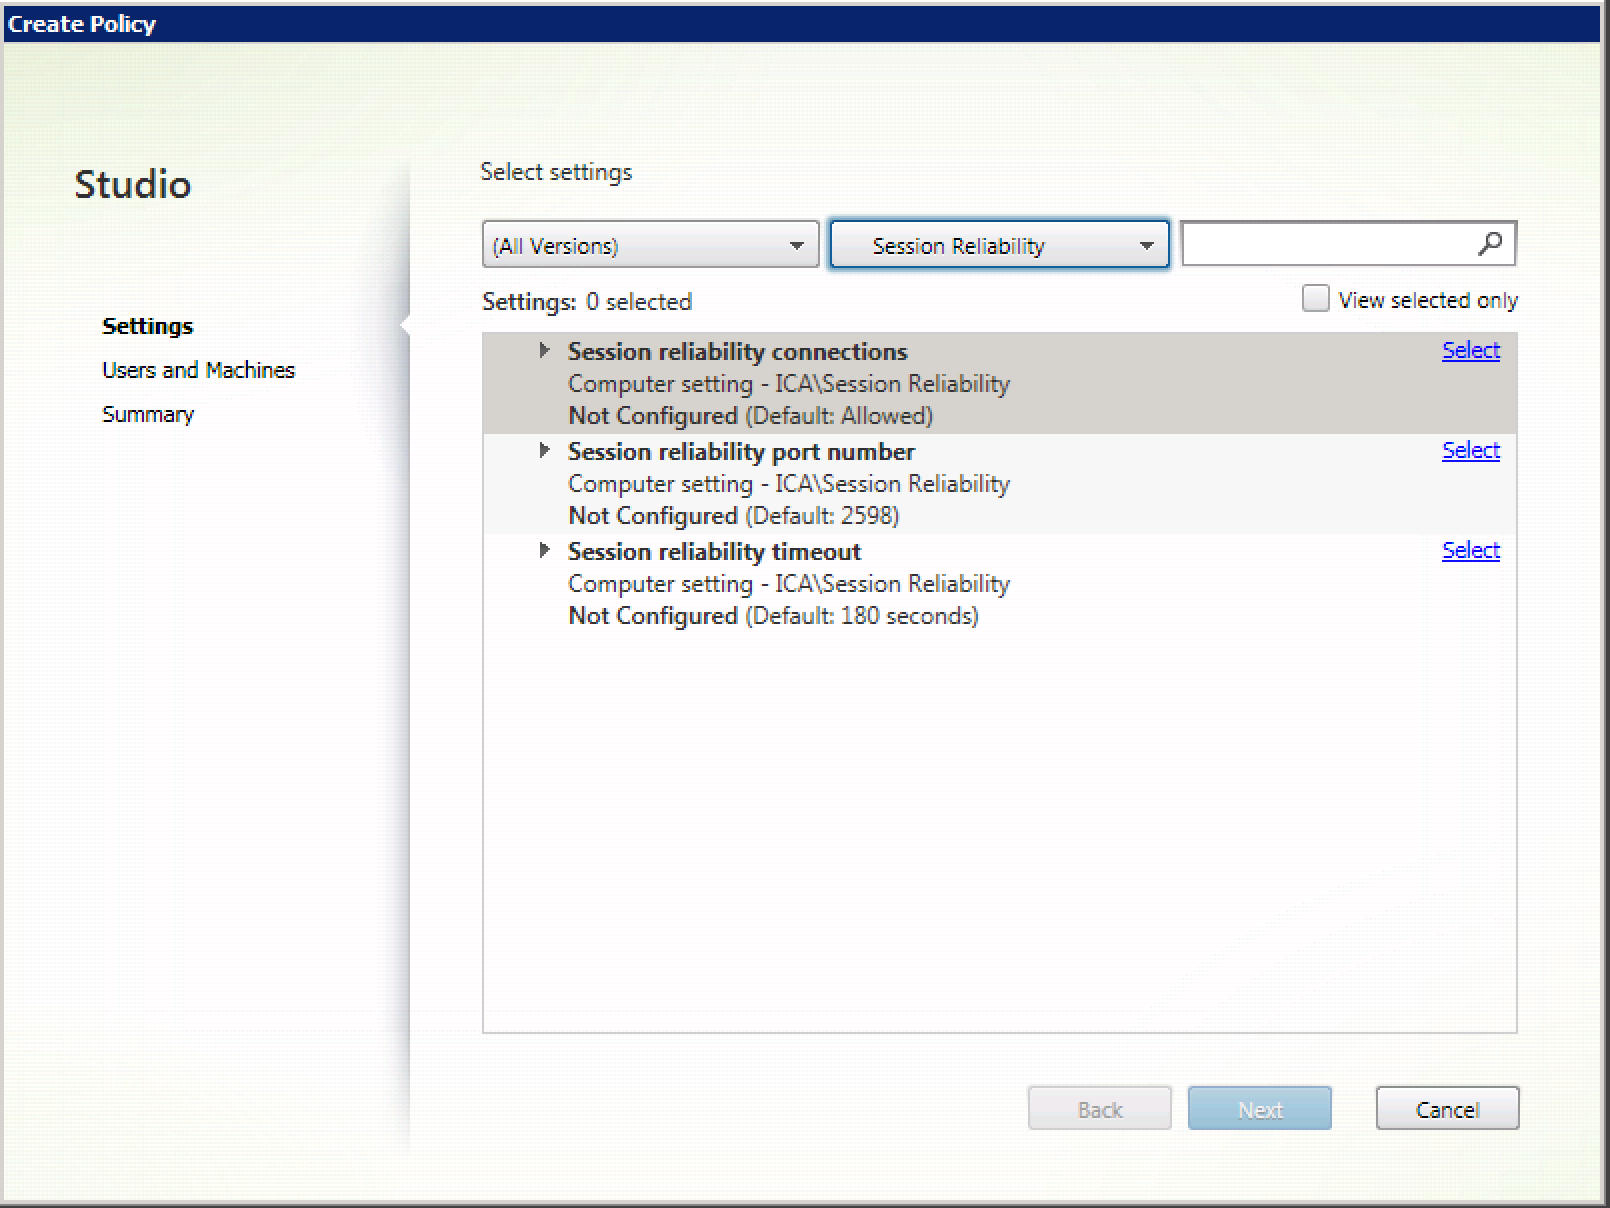
Configuring session reliability timeout
By default, the session reliability timeout is set to 180 seconds.
Note:
Session reliability timeout policy can be configured only with XenApp and XenDesktop 7.11 and later.
To modify session reliability timeout:
- Launch Citrix Studio.
- Open the Session reliability timeout policy.
- Edit the timeout value.
- Click OK.
Enhanced session reliability
The following improvements address network disruptions, ensuring a better user experience by reconnecting the session reliably:
- Sessions now reliably reconnect during point-of-presence (PoPs) outages
- Sessions seamlessly reconnect when you close and reopen the Chromebook lid, without experiencing any time-out issues.
- When you switch between Internet Service Providers (ISP), the session becomes unresponsive. With the fix, you can reconnect to the session during ISP switches.
- When you switch networks and one Wi-Fi connection lacks internet connectivity, the session reliability feature might fail. With the fix, you can now reconnect to the session during a network switch.
Enhanced desktop launch experience
Starting with version 2411, Citrix Workspace app for ChromeOS ensures an enhanced desktop launch experience. You’ll experience a seamless, flicker-free transition to your desktop without intermediate screens. The app also eliminates dark screens and flickering during resizing or stretching, providing a stable and modern interface. This feature is enabled by default.
Enhanced virtual desktop screen resizing experience
Starting with the 2411 version, Citrix Workspace app for ChromeOS ensures a smooth transition and prevents dark screens and flickers when resizing or stretching your virtual desktop screen. This feature is enabled by default.
Enhanced seamless app launch and resizing experience
Starting with the 2502 version, Citrix Workspace app for ChromeOS ensures an enhanced app launch experience. You experience a seamless, flicker-free transition to your apps without intermediate screens. The app also eliminates dark screens and flickering during resizing or stretching, providing a stable and modern interface. This feature is enabled by default.
Support for horizontal scrolling on trackpad
Starting with the 2502 version, horizontal scrolling using the trackpad is supported within the session.
Enhanced EDT lossy connection support with Secure HDX
Starting with version 2603, Citrix Workspace app for ChromeOS includes enhanced logic for EDT (Enlightened Data Transport) lossy connections in direct communication scenarios between the client and the Virtual Delivery Agent (VDA). Previously, enabling EDT lossy for audio required DTLS. Version 2603 removes this requirement, which simplifies configuration and improves flexibility.
With this update, the application recognizes Secure HDX 2.0 as a valid encryption method for lossy packets, which eliminates the dependency on DTLS when you use Secure HDX.
This improvement delivers a more secure and flexible connection experience. The enhancement benefits environments that use Secure HDX configurations, and the application maintains encryption standards without relying solely on DTLS.
In this article
- Full-screen mode
- Session size
- Net promoter score
- Auto-launch of ICA® sessions
- In-session toolbar and dialogs
- Improved in-session toolbar
- Sustainability initiative from Citrix Workspace app
- Customizing the text in the Save Energy screen
- Enhancements to the improved in-session toolbar
- Connection strength indicator
- Enhanced multi-monitor support with auto-detection and custom display selector
- Enhanced session toolbar notch size
- Session sharing
- Battery status indicator
- Service continuity
- Service Continuity for connectorless workloads
- Browser content redirection
- Improved virtual apps and desktops launch experience
- Session reliability
- Enhanced session reliability
- Enhanced desktop launch experience
- Enhanced virtual desktop screen resizing experience
- Enhanced seamless app launch and resizing experience
- Support for horizontal scrolling on trackpad
- Enhanced EDT lossy connection support with Secure HDX