Configure Citrix Workspace app
This article lists tasks that help you configure Citrix Workspace app for iOS.
Auto-launch desktops and apps
Starting with version 25.7.2, you can now experience the automatic launching of either desktop or application.
Note:
The mobile platforms support the launch of only one resource at a time. Marking multiple resources for auto-launch might lead to unexpected behavior.
How to configure
To ensure a core application launch automatically in Citrix Workspace, administrators must append the string KEYWORDS: AutoStartPrimaryApp to the application description. After it is configured, the application will start automatically for all users.
The following steps are for administrators:
-
Open the management console:
Launch Citrix Studio or your organization’s Citrix management portal. Sign in with an account that has permissions to edit published applications. -
Locate the application:
Go to Applications and select the application you want to configure for auto-launch (for example, Notepad). -
Edit application properties:
Select the application, then choose Edit or Properties. Locate the Description field. -
Append the auto-start keyword:
Add a space at the end of the description, then append the following keyword:KEYWORDS:AutoStartPrimaryApp <!--NeedCopy--> -
Save the changes:
Click OK, Save, or Update to apply the changes.
Enhanced audio quality with real-time Echo Cancellation
Starting with version 25.3.0, Citrix Workspace app for iOS introduces the Echo Cancellation feature, delivering crystal-clear audio on mobile devices. This feature actively eliminates echoes in real-time, ensuring smooth and uninterrupted communication during virtual meetings and calls. It enhances productivity, reduces disruptions, and provides a superior user experience, even in challenging mobile network conditions.
Supports GACS authenticated microservices (On-premises)
Starting with version 25.1.0, Citrix Workspace app for iOS supports Authenticated Microservices, enabling GACS to manage User Groups. This feature offers administrators with enhanced control for on-premises environments. For more information, see Manage settings for user group using configuration profile.
Fetching GACS endpoints via email, store URL or domain-based discovery API
Starting with the 24.9.0 release, admins can configure a web store based on email address, domain, and store URL, allowing the Global App Configuration service (GACS) to identify and direct users to the appropriate custom web URL. Citrix Workspace app iOS devices can now fetch GACS endpoints using this discovery API, eliminating the need for hardcoded endpoints and reducing unnecessary calls when not configured. This update benefits both cloud and on-premise stores, and users can configure web stores directly through the store URL, with the option to add custom web stores using GACS. For more information, see Global App Configuration service channel support.
Supports GACS authenticated microservices (Cloud)
As of the 24.9.0 release, Citrix Workspace app for iOS support Authenticated Microservices, enabling GACS to manage User Groups for our customers. This provides greater flexibility and control and is currently supported for cloud stores only. For more information, see Manage settings for user group using configuration profile (Preview).
Feature flag management
Feature flags are used to dynamically enable or disable features. If an issue occurs with Citrix Workspace app in production, the affected feature can be disabled even after the feature has been shipped.
No configuration is required to enable traffic for feature management, unless a firewall or proxy is blocking outbound traffic. In such cases, you must enable traffic to specific URLs or IP addresses based on your policy requirements.
Enable traffic for feature flag management
From Citrix Workspace app version 24.10.0 onwards:
To ensure optimal functionality and access to preview features, you must enable traffic to the following URL:
features.netscalergateway.net
Note:
Starting January 2025, Citrix Workspace app versions below 24.10.0 no longer support preceding features. After this date, this section becomes irrelevant as versions 24.10.0 or higher have these features enabled. To avoid issues, upgrade to Citrix Workspace app Version 24.10.0 or higher. Additionally, ensure that the
features.netscalergateway.netsetting is enabled. Failure to do so might result in issues with version 24.10.0 or higher.
Inactivity timeout for Citrix Workspace app
Admins can specify the amount of idle time that is allowed. After the time-out value, an authentication prompt appears.
The inactivity timeout value can be set starting from 1 minute to 24 hours. By default, the inactivity timeout isn’t configured. Admins can configure the inactivityTimeoutInMinutesMobile property by using a PowerShell module. Click Download PowerShell modules for Citrix Workspace app configuration to download the PowerShell modules for Citrix Workspace app configuration.
When you’ve reached the specified time-out value, the end-user experience is as follows depending on the authentication type configured:
- After the inactivity timeout, you’ll receive a prompt to provide biometric authentication to access the Citrix Workspace app again.
-
If you can cancel the biometric authentication prompt, the following message appears:
Citrix Workspace app is locked.
You must authenticate to continue to use the Workspace app.
If the passcode is not configured on the iOS, you have to sign in with credentials after the inactivity timeout.
Note:
This feature is applicable for customers on Workspace (Cloud) only.
Customer Experience Improvement Program (CEIP)
What is the Citrix Customer Experience Improvement Program (CEIP) for Citrix Workspace app?
The Citrix Customer Experience Improvement Program (CEIP) collects configuration and usage data from the Citrix Workspace app and automatically sends it to Citrix Analytics. This data enables Citrix to analyze the performance and enhance the quality, functionality, and performance of the Citrix Workspace app, optimize resource allocation for product development, and support service levels through effective staffing and infrastructure investment.
All data is used and analyzed solely in aggregate form, ensuring that no individual user or device is singled out or specifically analyzed. Citrix does not collect any Personally Identifiable Information (PII) through CEIP, and all data collection is in accordance with relevant industry data privacy and security standards.
Tools used to gather CEIP Data
Citrix Workspace app for iOS uses Citrix Analytics and Google Firebase to collect the CEIP data.
Data collected
The specific CEIP data elements collected by Citrix Analytics and Google Firebase are:
| Session information and session launch method | Citrix stores and store configuration | Auth type and authentication configuration | ICA® connections |
| HDX™ session launch | Store app session | WebView action open | WebView action copy |
| WebView action share | Workspace app review | Connection status, connection error, connection center usage | External display |
| Socket status | Session duration | HDX over UDP | Session launch time |
| Device information | Device model info | Send usage statistics | App language, Workspace app language |
| Keyboard language | Citrix store type | Citrix store combination | Store protocol type |
| Store count | HDX UDP status | RSA token installations |
Which users is CEIP data collected from?
The Citrix Workspace app collects the CEIP data via Citrix Analytics that is configured to include users from all regions. However, CEIP data collected through Citrix Analytics includes user data from the European Union (EU), European Economic Area (EEA), Switzerland, and the United Kingdom (UK), whereas Google Firebase excludes users located in these regions. To ensure this functionality is in place, please update to the most recent version.
Can users and administrators disable CEIP data collection?
CEIP data collection can be fully disabled in all jurisdictions as per the below configuration.
Starting with version 2205, you can stop sending CEIP data (with the exception of two data elements, as specified in the note below) by following these steps:
- Open Citrix Workspace app for iOS.
- Tap Home > Settings.
- Navigate to the General section, turn off Send Usage Statistics.
Additional information
Citrix handles your data in accordance with the terms of your contract with Citrix. The data is protected as specified in the Citrix Services Security Exhibit. For more information, see the Citrix Trust Center.
Citrix uses Google Firebase to collect certain data from Citrix Workspace app as part of CEIP. Review how Google handles data collected for Google Firebase.
Note:
Google Firebase excludes data collection for users in the European Union (EU), European Economic Area (EEA), Switzerland, and the United Kingdom (UK).
Known limitations
- On VDA 7.18 and earlier, casting to a workspace hub requires the desktop or other resource you’re using to have the h.264 full-screen policy enabled and the legacy graphics policy to be disabled.
Session sharing
If users log off from a Citrix Workspace app account, they can still disconnect or log off from remote sessions.
- Disconnect: Ends the connection on this device, but your session keeps running on the server — you can reconnect later and continue where you left off. The user can then start another device, launch Citrix Workspace app for iOS, and reconnect to the last state before the user disconnects from the iOS device. This option allows users to reconnect from one device to another device and resume working in running applications.
- Log off: Logs off from the account and closes the Windows application. It also logs off from the Citrix Virtual Apps and Desktops, and Citrix DaaS server. This option allows users to disconnect from the server and log off from the account. When they launch Citrix Workspace app for iOS again, it opens in the default state.
Cloud stores
You can access the web, SaaS apps, and websites hosted by your organization regardless of your access location. This feature is available only for customers on cloud stores.
Support for multiple cloud stores
Starting with the 24.1.0 release, you can add multiple cloud store accounts to the Citrix Workspace app for iOS and iPadOS. Now, it’s easy for end users to add and switch between multiple stores. This feature improves the user experience when accessing multiple stores.
To add another account, do the following steps:
- Navigate to Settings > Manage Account. A dialog appears at the bottom of the screen with a list of your accounts.
-
Tap Add new account.
- Type the URL or email address provided by your IT administrator. To optionally use a smart card to log on, tap Use smart card.
- Tap Continue. The Sign in dialog appears with fields for your user name, password, domain, and passcode.
- Type the information. For more information about the fields, contact your IT administrator.
-
Tap Sign in. Your new account is now set up.
Auto-populate store URL
Starting with the 23.2.0 version, when you’re accessing the rebranded Citrix Workspace app for iOS, you can choose to auto-populate the store URL. This capability reduces manual intervention and provides quick access to the app. For more information about app personalization, see App Personalization.
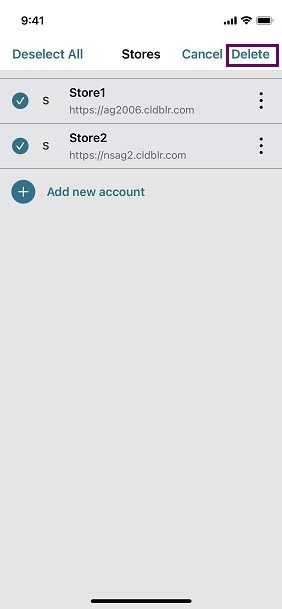
Support for deleting multiple stores at once
Starting with the 24.2.0 version, Citrix Workspace app for iOS supports the selection of multiple stores and deleting them. This feature improves the user experience while working with multiple stores. This feature is enabled by default.
To delete multiple stores at once from the Stores screen, do the following steps:
-
On the Stores screen, tap Select.
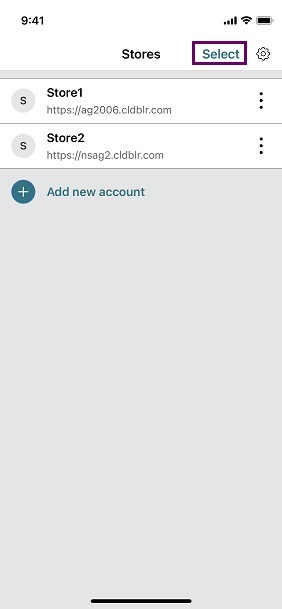
- Select stores to delete. To delete all the stores, tap Select All.
-
Tap Delete.
Support for administrator to restrict the user from changing the store name
Previously, users were able to change the store name by using the Edit Account option.
Starting with 24.2.0, Citrix Workspace app for iOS provides administrators an option to disable the user from changing the store name. With this feature, administrators can easily identify and maintain consistency in the store names.
To allow the end-users to change the store name, do the following steps:
- Sign in to Citrix Cloud with your credentials.
-
Navigate to Workspace Configuration > Access. Under Workspace URL, you can find a list of existing store URLs.
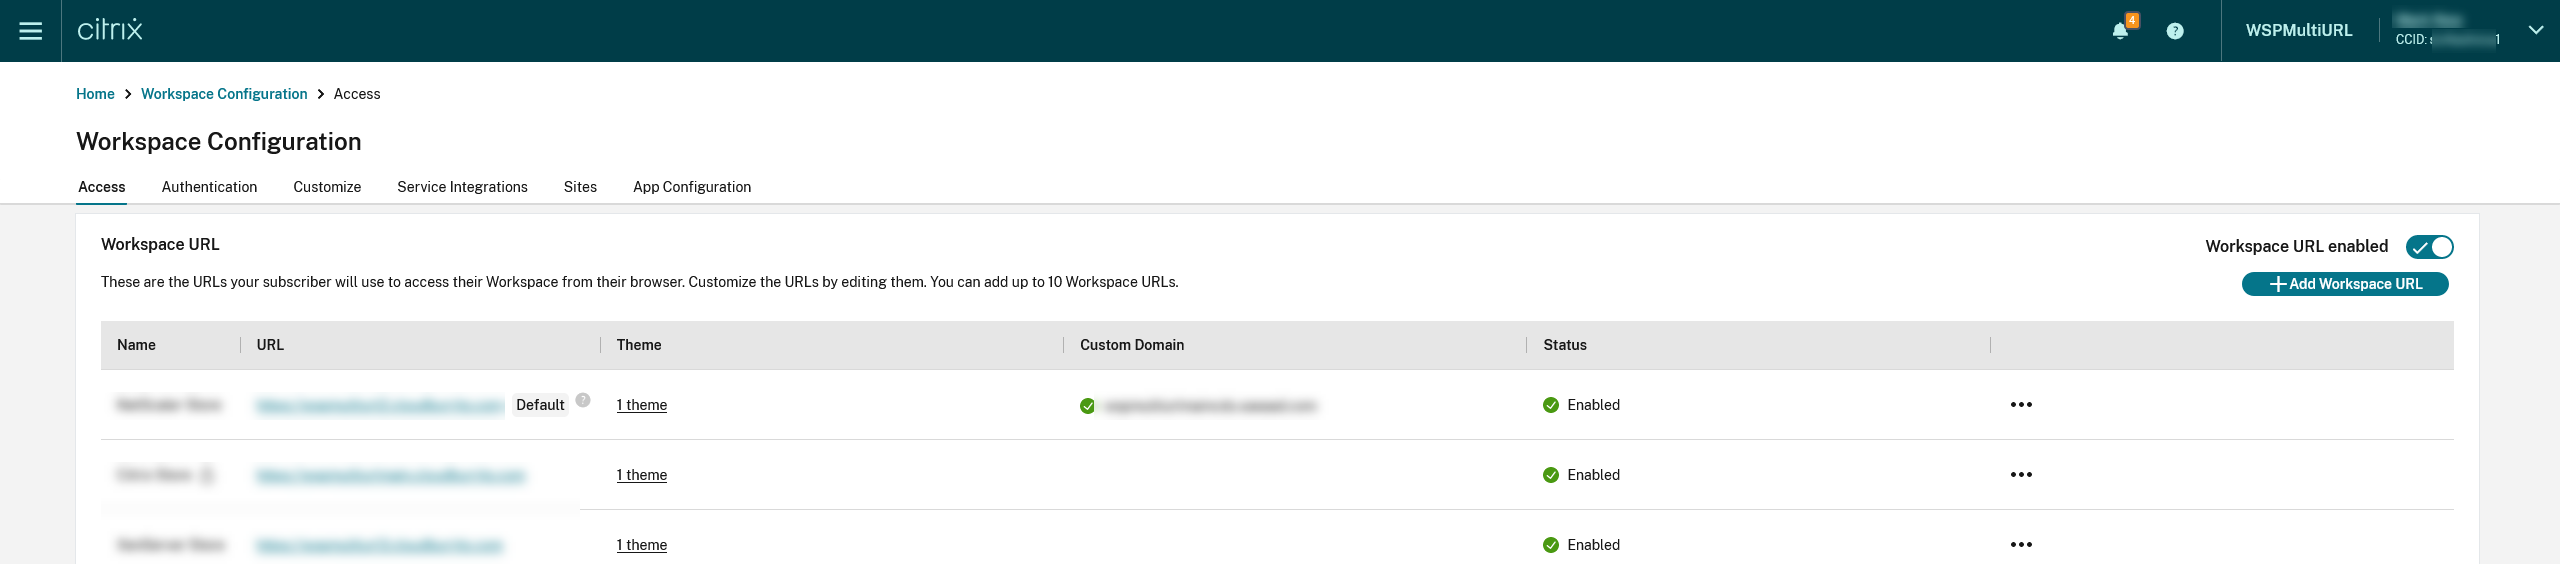
- Click the ellipsis menu for the store that you want to allow end-users to change the store name.
-
Select Edit.

-
On the Edit Workspace URL dialog box, select Allow end-users to change this store name in Workspace (not allowed by default).
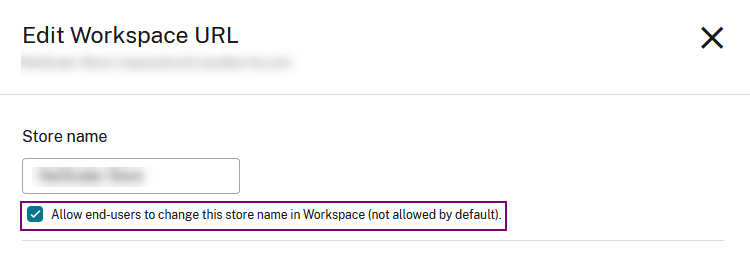
- Click Save.
Auto-populate store name
Starting with the 24.2.0 version, Citrix Workspace app for iOS supports store name updates by the administrator and automatically pushes the updated store names to the user. This feature improves the user experience by eliminating the need for manual intervention when updating the store name.
Note:
This feature can take effect only if the administrator has disabled the user from changing the store name.
End user experience monitoring enhancement
We now support the EUEM (End user experience monitoring) client startup metrics. EUEM helps in collecting highly granular session experience monitoring data in real time. It sends the data to the Director dashboard, so that the administrator can monitor the user experience. The data is collected through the Session experience monitoring service (SEMS) present on the VDA. Client startup metrics data available for monitoring on the dashboard includes:
- ICA file download duration.
- Session creation client duration. Session creation client duration represents the time taken to create a session. It is calculated from the moment that an ICA file is launched till the connection is established.
- Session lookup client duration. Session lookup client duration represents the time taken to query every session for hosting the requested published application. The check is performed on the client to determine whether an existing session can handle the application launch request.
- Citrix real-time recording of the ICA round trip time, also known as ICA RTT. ICA RTT is the time that elapses from when the user presses a key until the response is displayed at the endpoint.
Enhanced the user interface for Service continuity offline mode
Starting with the 24.1.0 release, the Citrix Workspace app for iOS’s user interface has been improved to be more informative, modern, and provide a user-friendly experience during Citrix Workspace outages. The fuzzy search feature is also included for offline mode. With this feature, you can find the results for apps or desktops with closely matching text and misspelled search terms. For more information about the Service continuity, see Service continuity.
Global App Configuration service channel support
Starting with the 23.4.5 release, administrators can now use the Global App Configuration service to define settings and test them before rolling out the configuration to all end users. This process ensures that features and functionalities are well-tested before production.
Note:
- Citrix Workspace app for iOS supports the Default and Test channel configurations. By default, all users are on the Default channel.
For more information, see the Global App Configuration service documentation.
For more information on how to configure, see Global App Configuration service channel support.
Access Global App Configuration service enabled web stores
Starting with the 23.7.5 version, admins can now configure a web store (web interface) for email-based store discovery. Based on the email address entered by the end users while adding a store (on the Welcome screen), the Global App Configuration service helps identify the custom web (web interface) URL defined by the admin. The end user is then directed automatically to the web store configured by the admin. To know more about configuring web store URLs for end-users, see Allowed custom web portal.
In this article
- Auto-launch desktops and apps
- Enhanced audio quality with real-time Echo Cancellation
- Supports GACS authenticated microservices (On-premises)
- Fetching GACS endpoints via email, store URL or domain-based discovery API
- Supports GACS authenticated microservices (Cloud)
- Feature flag management
- Inactivity timeout for Citrix Workspace app
- Customer Experience Improvement Program (CEIP)
- Cloud stores
- Support for multiple cloud stores
- Auto-populate store URL
- Support for deleting multiple stores at once
- End user experience monitoring enhancement