vDisks
Use the information in this article to create a base vDisk image.
A vDisk acts as a hard disk for a target device and exists as disk image files on a Citrix Provisioning™ server or on a shared storage device. A vDisk consists of a VHDX base image file, any associated properties files, such as a .pvp file and if applicable, a chain of referenced VHDX differencing disks, .avhdx.
When creating a vDisk image file, keep the following in mind:
- Create as many vDisk image files as needed, as long as you have enough space available on the provisioning server. Ensure that you have enough available space on the storage device containing the vDisk image files.
- vDisk files use FAT (File Allocation Table) or NTFS (New Technology File System) file systems for Microsoft operating systems.
- Depending upon the file system used to store the vDisk, the maximum size of a VHDX file (vDisk) is 2 terabytes (NTFS) or 4,096 MB (FAT).
- A vDisk can be shared (Standard Image) by one or more target devices, or it can exist for only one target device to access (Private Image).
Note:
The Cache on hard disk feature option currently appears in the product but does not function.
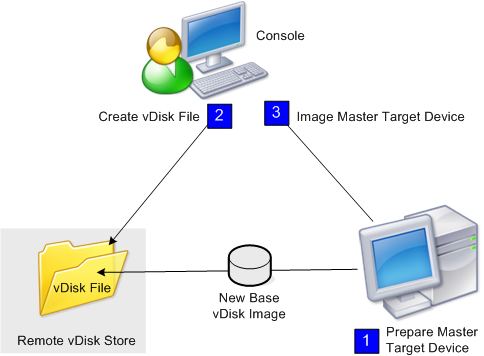
The first stage in the lifecycle of a vDisk is creating one. Creating a vDisk requires preparing the master target device for imaging. Once the image is prepared, create and configure a vDisk file where the vDisk resides. Image the master target device to that file. These steps result in a new base vDisk image. This process can be performed automatically, using the Imaging Wizard, or manually. Citrix Provisioning includes an option to create a common image for a single target platform or for use with multiple target platforms.
Note:
Your administrative role determines what information is displayed and tasks performed in the Citrix Provisioning console. For example, view and manage vDisks in sites in which you are a site administrator. However, unless the farm administrator sets a site as the owner of a store, the site administrator cannot perform store management tasks.
Tip:
Citrix Provisioning only supports automated vDisk capture. More steps require a vDisk attached to the machine being captured, ensuring that a P2PVS switch can be used with P2PVS or the imaging wizard. Use automation steps to accommodate such scenarios.
The following provides an overview of the steps necessary to create a vDisk automatically and manually.
Automatically creating a vDisk image using the imaging wizard
Using the Imaging Wizard is the recommended method for creating vDisk images.
Note:
The master target device, physical or virtual, is prepared by installing and configuring the operating system. Also, configure applications in the base vDisk image. For details, see Preparing the Master Target Device.
To image the master target device, run the Imaging Wizard to automatically create a vDisk file on a server or shared storage. After running the Wizard, image the master target device to that file.
Manually creating a vDisk file then creating the image using Citrix Provisioning imaging
This process is the optional method used to create vDisk images.

- Prepare the master target device, physical or virtual, by installing and configuring the operating system. Prepare applications in the base vDisk image. A vDisk file is then created on a provisioning server or shared storage. Access it using any server providing the vDisk. The file must be mounted, formatted, then unmounted manually using the console or from the target device.
Note:
In the Citrix Provisioning console, a new vDisk file can be created by right-clicking on the vDisk Pool or the Store, and then selecting the Create new vDisk menu option. Once created, vDisks display in the details pane when a site’s vDisk pool is selected, or when a store in the farm is selected.
- The master target device is imaged to the new vDisk file using the Citrix Provisioning imaging utility.
Note:
The imaging utility converts a server or desktop workload from an online physical machine running Windows to a XerServer (formerly Citrix Hypervisor™) virtual machine or provisioned vDisk. The imaging utility converts a server or desktop workload from an offline virtual machine or disk, containing any guest operating system, to a XenServer VM.
Creating vDisk files manually
The following procedure describes how to manually create a vDisk file:
- In the console tree, right-click on the vDisk Pool in the site where you want to add vDisks, then select the Create vDisk menu option. The Create vDisk dialog appears.
- If you accessed this dialog from the site’s vDisk pool, in the menu, select the Store where this vDisk resides. If you accessed this dialog from the store, from the menu, select the site where this vDisk is added.
- In the Server used to create the vDisk menu, select the provisioning server that creates the vDisk.
- Type a file name for the vDisk. Optionally, type a description for this new vDisk in the description textbox.
- In the Size text box, scroll to select the appropriate size to allocate for this vDisk file. If the disk storing the vDisk images is formatted with NTFS, the limit is approximately 2 terabytes. On FAT file systems, the limit is 4,096 MB.
- In the VHDX Format text box, select the format as either Fixed or Dynamic (2,040 GB for VHDX emulating SCSI; 127 GB for VHDX emulating IDE). If the VHDX format is Dynamic, from the VHDX block size menu, select the block size as either 2 MB or 16 MB.
- Click Create vDisk, a progress dialog opens. Depending on the disk size and other factors, it takes several minutes or more to create the vDisk. After the vDisk is successfully created, it displays in the Citrix Provisioning console’s details pane and is ready to be formatted.
- Right-click on the vDisk in the Console, then select Mount vDisk. The vDisk icon displays with an orange arrow if mounted properly.
A vDisk image cannot be assigned to, or boot from a target device until that target device exists in the Citrix Provisioning database. After creating the target device, in the Console, select the Hard Disk boot option.
About the common vDisk image feature
The Common Image feature allows a single vDisk to simultaneously support multiple target device platforms, greatly reducing the number of vDisks an administrator must maintain. The procedure for creating a common image depends on the target device platform.
Supported target device platforms include:
- A combination of XenServer VMs and physical devices (virtual-to-virtual and virtual-to-physical). For details, see vDisks.
- Multiple types of physical devices (different motherboards, network cards, video cards, and other hardware devices). For details, see Creating a Common Image for use with Multiple Physical Device Types.
- Blade servers. For details, see vDisks.
Create common images for use with XenServer® VMs and physical devices, or blade servers
XenServer Platinum Edition enables the provisioning of physical and virtual servers from the same workload image.
Prerequisites:
- Appropriate XenServer Platinum Licensing.
- Support for PXE on the local network.
- DHCP must be installed and configured on the local network.
Select from the following target device platforms:
- Create a common image that boots from a physical or virtual server.
- Create a common image that boots from a blade server.
Create a common image that boots from a physical or virtual server
To create a common image that boots from a physical or virtual machine, complete the procedures as follows.
Prepare the master target device
Install a supported Windows Operating System with the latest patches and device drivers on a physical machine. This physical machine serves as the master target device.
Install the Citrix Provisioning Target Device Software
- Log on to the master target device as a domain administrator, or a domain user (with local install privileges).
- Install the Citrix Provisioning server target device software on the physical machine.
- Follow the onscreen prompts by selecting installation default settings.
- When prompted, reboot the master target device from the hard disk drive.
Install Citrix VM tools
- Log on to the master target device as a domain administrator, or a domain user (with local install privileges).
- Download the Citrix VM tools for Windows installation file
managementagent.msifrom the XenServer downloads page. - Run the
managementagent.msifile to begin Citrix VM Tools installation. The Citrix VM Tools for Windows setup dialog appears. - Click Yes to continue the install.
- Follow the onscreen prompts and select the default settings. At the Choose Install Location dialog box, click Install.
- When prompted by Windows Plug and Play dialogs, select the option to find drivers automatically.
- When prompted select Yes for any unsigned driver dialog.
- When prompted, restart the master target device.
- Verify that Citrix Provisioning successfully binds to the XenServer NIC and the physical systems NIC.
Image the Provisioning Server master target device
Use Citrix Provisioning Imaging Wizard to create the XenServer vDisk image. When creating the vDisk image, you must select to optimize target device settings. Otherwise the VM fails to start.
After successfully creating the XenServer vDisk image, boot both the physical and virtual machines in standard image mode.
For details on using the Citrix Provisioning Imaging Wizard, see Using the Imaging Wizard.
Create a common image that boots from a blade server
To create a common image using the common hard drive method that boots from heterogeneous Blade servers, complete the following steps:
- Use the Console to create a vDisk file.
-
Log on to the blade server to create a system:
a. Install the OS on the new machine.
b. Install HP System Pack. This process installs all drivers.
c. Install all necessary Windows updates.
d. Install Citrix Provisioning target device software.
- PXE boot from the new system’s hard disk drive, then verify that the system can recognize the vDisk. The vDisk is shown from “My Computer” as a partition.
- Physically move the HDD or HDDs in a RAID system to the other system (usually the older system).
- Boot from the new systems hard disk drive.
- After Windows installs the driver’s, reboot when prompted.
- Verify that NIC drivers installed correctly.
- PXE boot from the hard disk drive on the second system.
- Use Citrix Provisioning Imaging Wizard to create the vDisk image.
- After imaging completes, shut down the system.
- Set both systems to boot from the vDisk.
- On the Citrix Provisioning console, change the vDisk mode to standard cache on local hard disk drive.
Create a common image for use with multiple physical device types
Using the common NIC method, a single vDisk can simultaneously support different motherboards, network cards, video cards, and other hardware devices. The result is a vDisk capable of being used by heterogeneous target devices, greatly reducing the number an administrator must maintain. Use the information in this article to create a common image for physical devices.
Prerequisites
-
Make sure all target devices using the common image have a consistent HAL; they must have the same number of logical processors.
Tip:
A single processor, hyper-threading capable system is considered to have two logical processors when hyper-threading is enabled in the UEFI.
- The BIOS structure, presented to the OS during the boot process, must be of the same format for all target devices that share a Standard Image. BIOS structure contains a list of all the components connected to the motherboard so that the appropriate drivers are loaded. This configuration allows the components to function properly.
- Have either a 3Com Managed PC Boot Agent (MBA) or a PXE-compliant NIC available. This card is the common NIC that is inserted into each target device during the Common Image build process.
- Install all the latest device drivers on each target device.
- Device drivers are missing if devices do not respond after you configure the common image. For example, if a target device’s USB mouse and keyboard do not respond after you assign the common image to the target device, the drivers for that target device’s chipset have not been installed. Go to device manager and check to insure no yellow exclamation mark appears on any devices, especially USB root HUBs and controllers.
- Determine which target device contains the latest motherboard chipset. This target device is used as the first target device in the common image build process. The latest Intel chipset driver contains all the drivers for the previous chipset. It is not necessary to install as many drivers when you build the common image.
- Except on the first target device, disable built-in NICs on all target devices using the common image. Leave the built-in NIC on the first target device enabled. Disabling the NICs prevents confusion about which NIC to use during the common image building process.
- Install Citrix Provisioning components.
Building the common image
To build a common image:
- Configure the master target device
- Export specific data files
- Boot the master target device
- Add extra target devices to the common image
Important:
When building the common image, create a vDisk that has enough space to accommodate additional information added by the common image build process.
Configuring the master target device
- Insert the common NIC into the Master Target Device.
- Install the target device software on the Master Target Device. Select both the common NIC and built-in NICs during the installation process.
- Create a vDisk, then mount, format, and unmount it. Create a vDisk that has enough space to accommodate additional information added by the common image build process.
- Run the Imaging Wizard on the target device to build the vDisk.
- Citrix recommends making a copy of the original vDisk created in Step 3 and save it in the vDisk directory on the provisioning server.
- On the first target device, copy CIM.exe from C:\Program Files\Citrix\Provisioning Services to a removable storage device, such as a USB flash drive. This utility is used to include disparate target devices in the common image.
- Shut down the Master Target Device and remove the common NIC.
Exporting specific data files
-
Insert the common NIC into a target device added to the common image, then boot the target device from its local hard drive.
Note:
Although the Windows OS must be installed on this target device, the target device software does not have to be installed.
-
Copy CIM.exe from the removable storage device to this target device.
-
At a command prompt, navigate to the directory in where CIM.exe is located. Run the following command to extract the information from the target device into the .dat file:
CIM.exe e targetdeviceName.dat
where targetdeviceName identifies the first target device that uses the common image. For example, TargetDevice1.dat.
Copy the .dat file created in Step 3 to the removable storage device.
-
Shut down the target device and remove the common NIC.
Note:
To include more target devices with disparate hardware in the common image, repeat this procedure for each device, giving each .dat file a unique name.
Booting the master target device
-
Reinsert the common NIC into the Master Target Device. Insert the NIC into the same slot from which it was removed during the Configuring the Master Target Device procedure. Before booting the Master Target Device, enter the UEFI setup and verify that the common NIC is the NIC used in the boot process.
-
Using the common NIC, boot the Master Target Device from the vDisk, in Private Image mode.
-
Copy the
CIM.exeand the.datfile associated with the first target device from the removable storage device to the master target device. -
At a command prompt, navigate to the directory where the CIM.exe and the .dat file are located.
-
Run the following command to merge the information from the .dat file into the common image:
CIM.exe m targetdeviceName.dat
-
Shut down the Master Target Device.
Adding more target devices to the common image
-
Insert the common NIC into more target devices included in the Common Image. Insert the NIC into the same slot from which it was removed in the Exporting Specific Data Files procedure.
-
Using the common NIC, boot the target device off the vDisk in Private Image mode.
-
Allow Windows time to discover and configure all the device drivers on the target device. If prompted by the “Found New Hardware Wizard” to install new hardware, cancel the wizard and proceed to Step 4.
Note:
Sometimes, Windows can’t install drivers for the built-in NIC on a target device, and the drivers cannot be installed manually. The common NIC and the target device’s built-NIC are similar to each other. As a result, the driver installation program tries to update the driver for both NICs. For example, if the common NIC is an Intel Pro 100/s and the target device’s built-in NIC is an Intel Pro 100+. To resolve this conflict, open System Properties. On the Hardware tab, click the Device Manager button. In the Device Manager list, right-click the built-in NIC and click Update Driver to start the Hardware Update Wizard. Choose Install from a list or specific location and specify the location of the NIC’s driver files.
-
Open Network Connections. Right-click the connection for the built-in NIC and click Properties in the menu that appears. The icon for the built-in NIC is marked with a red X.
-
Under This connection uses the following items, select Network Stack and click OK.
-
From a command prompt, run the following command:
C:\Program Files\Citrix\Provisioning Server\regmodify.exeNote:
After completing Steps 4–6, reboot the target device and allow Windows to discover and configure any remaining devices. If prompted by the “Found New Hardware Wizard” to install new hardware, proceed through the Wizard to complete the hardware installation.
-
Using the original vDisk, repeat Step 1 through Step 6 for each of the additional target devices you want to include in the Common Image.
-
Once target devices have been included in the Common Image, open the Console. Set the disk access mode for the Common Image vDisk to Standard Image mode, then boot the devices.
Deployments using Device Guard
Device Guard represents a combination of enterprise and software security features. It can be used to provide a highly secure environment which allows you to configure systems so that only trusted applications can be used. See the Microsoft site for more information about Device Guard deployments.
When using Device Guard, consider the following:
- Device Guard is a property of an individual VM. This functionality is configured on the Hyper-V host where the VM resides, after the VM is created.
- Enable Device Guard in the master image prior creating the image. Once enabled, you can image the vDisk.
Also:
- See the Microsoft documentation site to configure Device Guard.
- See the Microsoft documentation site to configure nested virtualization.
- Once the vDisk is created, use the Citrix Virtual Apps and Desktops™ Setup Wizard to provision the VMs.
- Once the VMs are provisioned, manually enable nested virtualization for each VM on the Hyper-V host on which it has been provisioned.
Citrix Provisioning supports the following enabled with Device Guard using Hyper-V 2016 and newer, or ESX 6.7 and above:
- Targets running on Windows 10, Windows 2016, or Windows 2019.
- Citrix Provisioning server on Windows Server 2016, 2019, or 2022.
Consider also the following restrictions for Hyper-v 2016 in a Citrix Provisioning target device:
- The hyper-v network must not be created if the client is running one NIC.
- The hyper-v network can be created using any other NICs other than the streaming NIC.
In this article
- Automatically creating a vDisk image using the imaging wizard
- Manually creating a vDisk file then creating the image using Citrix Provisioning imaging
- Creating vDisk files manually
- About the common vDisk image feature
- Create common images for use with XenServer® VMs and physical devices, or blade servers
- Create a common image that boots from a blade server
- Create a common image for use with multiple physical device types
- Prerequisites
- Building the common image
- Configuring the master target device
- Exporting specific data files
- Booting the master target device
- Adding more target devices to the common image
- Deployments using Device Guard