Network components
This article describes the tasks necessary to carry out to manage the network components within your streaming implementation.
Preparing network switches
Network switches provide more bandwidth to each target device and are common in networks with large groups of users. The use of Citrix Provisioning™ in the network might require changes to switch configurations. When planning an implementation, give special consideration to managed switches.
Note:
For Citrix Provisioning networks, you must specify all network switch ports to which target devices are connected as edge-ports.
Managed switches usually offer loop detection software. This software turns off a port until the switch is certain the new connection does not create a loop in the network. While important and useful, the delay prevents your target devices from successfully performing a PXE boot.
This problem manifests itself in one of the following ways:
- Target device (not Windows) login fails.
- Target device appears to hang during the boot process.
- Target device appears to hang during the shutdown process.
To avoid this problem, you must disable the loop detection function on the ports to which your target devices are connected. Specify all ports to which target devices are connected as edge-ports. Specifying all ports has the same effect as enabling the fast link feature in older switches (disables loop detection).
Note:
A network speed of at least 100 MB is highly recommended. If using a 10 MB hub, check whether your network card allows you to clear auto-negotiation. Turning auto-negotiation off can resolve potential connection problems.
Switch manufacturers
This feature is given different names by different switch manufacturers. For example:
- Cisco; PortFast, Spanning Tree Protocol (STP) Fast Link, or switch port mode access
- Dell; STP Fast Link
- Foundry; Fast Port
- 3COM; Fast Start
Using Uniform Naming Convention (UNC) names
A Universal Naming Convention (UNC) format name defines the location of files and other resources that exist on a network. UNC provides a format so that each shared resource can be identified with a unique address. Windows and many network operating systems (NOSs) support UNC.
With Citrix Provisioning, UNC format names can be used to specify the location of the OS Streaming database for all provisioning servers. UNC format also specifies the location of a particular virtual disk.
Syntax
UNC names conform to the \SERVERNAME\SHARENAME syntax, where SERVERNAME is the name of the provisioning server and SHARENAME is the name of the shared resource.
UNC names of directories or files can also include the directory path under the share name, with the following syntax:
\SERVERNAME\SHARENAME\DIRECTORY\FILENAME
For example, to define the folder that contains your configuration database file in the following directory:
C:\Program Files\Citrix\Provisioning Services
On the shared provisioning server (server1), enter:
\server1\Citrix Provisioning
Note:
UNC names do not require that a resource is a network share. UNC can also be used to specify local storage for use by only a local machine.
Accessing a remote network share
To access a remote network share using a UNC format name, the Stream Service must have a user account name and password on the remote system.
To use a UNC name to access a remote network share:
- On the provisioning server, create a user account under which the stream service runs. This account must have a password assigned, otherwise the stream service fails to log in correctly. Your stream service shares the user account and password, or separate user accounts and passwords can be set up for each service.
- Share the virtual disk and configuration database folders. In Windows Explorer, right-click on the folder, then select Properties. Click the Sharing tab, then select the Share this folder radio button. Enter or select a share name.
- Make sure permissions are set to allow full control of all files in the virtual disk folder and database folder. Click the Permissions button on the Sharing tab, or click the Security tab, then set the correct permissions.
- For the Stream Service:
- Go to Control Panel > Computer Management > Component Services, right-click the Stream Service, and select Properties.
- Click the Log On tab. Change the Logon to: setting to This Account, and set up the service to log in to the user and password configured in Step 1.
- Verify that all Stream Services are restarted. The Configuration Wizard performs this step automatically. Stream services can also be started from the console or from the Control Panel.
Note:
Do not use a mapped drive letter to represent the virtual disk or database location directories when configuring Stream Services. The Stream service cannot access folders using a mapped drive letter for the directory because the mapped drives did not exist when the services started at boot time.
Reducing network utilization
Windows provides several features that presume the use of a large, fast hard-disk. While many of these features are useful on a diskless system where the disk is on the network, using them decreases cache effectiveness and increases network utilization. In environments that are sensitive to network utilization, consider reducing the effect of these features by disabling them or adjusting their properties.
In particular, offline folders are not useful on a diskless system and can be detrimental to the performance of Windows on a diskless system. Offline folders cache network files — a feature that is not applicable to a system where all files are on the network.
All of these features are configurable through the target device itself. The following features are configurable in the Windows Group Policy.
- Offline Folders
- Event Logs
Configure Windows features on a standard virtual disk
- Prepare a Standard Image virtual disk for configuration.
- Shut down all target devices that use the Standard Image virtual disk.
- In the Citrix Provisioning console, change the Disk Access Mode to Private Image.
- Boot one target device.
- Configure one or more features.
- Prepare the Standard Image virtual disk for use
- Shut down the target device previously used to configure the virtual disk.
- From the Console, change the Disk Access Mode to Standard Image.
- Boot one or more target devices.
Configure the recycle bin
If you disable the recycle bin, files are deleted immediately. Therefore, the file system reuses respective disk sectors and cache entries sooner.
To configure the recycle bin:
- From the target device, or Windows Explorer, right-click the Recycle Bin.
- Select Properties.
- Select Global.
- Select from the following settings:
- Use one setting for all drives
- Do not move files to the Recycle Bin. Remove files immediately when deleted.
Configure offline folders
Disabling offline folders is recommended to prevent Windows from caching network files on its local disk – a feature with no benefit to a diskless system. Configure this feature from the target device or using Windows Group Policy.
To configure from the target device:
- Open Windows Explorer.
- Select Tools > Folder Options.
- Select Offline Folders.
- Clear Enable Offline Folders.
To configure using the Windows Group Policy:
On the domain controller, use the Microsoft Management Console with the Group Policy snap-in to configure the domain policies for: administration templates, network, or offline files. Policy setting objects include:
- Policy setting object: Disable user configuration of offline files (Enabled).
- Policy setting object: Synchronize all offline files before logging off (Disabled).
- Policy setting object: Prevent use of the Offline Files folder (Enabled).
Configure event logs
Reduce the maximum size of the Application, Security, and System Logs. Configure this feature using the target device or Windows Group Policy.
To configure event logs, on the target device:
- Select Start > Settings > Control Panel.
- Open Administrative Tools > Event Viewer.
- Open the properties for each log.
- Set the Maximum log size to a relatively low value. Consider 512 kilobytes.
To configure using the Windows Group Policy:
On the domain controller, use the Microsoft Management Console with the Group Policy snap-in to configure the domain policies for the following object:
- Policy setting: Policy Maximum Application Log Size. Relatively low value. Consider 512 kilobytes.
- Policy setting: Policy Maximum Application Log Size. Relatively low value. Consider 512 kilobytes.
- Policy setting: Policy Maximum Application Log Size. Relatively low value. Consider 512 kilobytes.
Disable Windows automatic updates
If you have the Windows automatic updates service running on your target device, Windows periodically checks a Microsoft website and looks for security patches and system updates. Uninstalled updates are downloaded and installed automatically. Normally, an automatic update is a useful feature for keeping your system up-to-date. However, in a Citrix Provisioning implementation using standard image mode, this feature can decrease performance, or even cause more severe problems. Performance degradations occur because the Windows automatic updates service downloads programs that fill the write cache. When using the target device’s RAM cache, filling the write cache can cause your target devices to stop responding.
Rebooting the target device clears both the target device and Citrix Provisioning write cache. Rebooting after an auto-update means that the automatic update changes are lost, which defeats the purpose of running automatic updates.
Tip:
To make Windows updates permanent, apply them to a virtual disk while it is in Private Image mode.
To prevent filling your write cache, disable the Windows Automatic Updates service for the target device used to build the virtual disk.
To disable the Windows automatic updates feature:
- Select Start > Settings > Control Panel > Administrative Tools.
- Select System.
- Click the Automatic Updates tab.
- Select the Turn Off Automatic Updates radio button.
- Click Apply.
- Click OK.
- Select Services.
- Double-click the Automatic Updates service.
- Change the Startup Type by selecting Disabled from the menu.
- If the Automatic Updates service is running, click Stop to stop the service.
- Click OK to save your changes.
To make Windows updates permanent:
- Shut down all target devices that share the virtual disk.
- Change the virtual disk mode to Private image.
- Boot one target device from that virtual disk.
- Apply Windows updates.
- Shut down the target device.
- Change virtual disk mode to Standard image.
- Boot all target devices that share this virtual disk.
Managing roaming user profiles
A Roaming User Profile is a user profile that resides on a network share. It consists of files and folders containing the user’s personal settings and documents. When a user logs on to a target device system in the domain, Windows copies the respective profile from a network share to the target device’s disk. When logging off, Windows synchronizes the user profile on the target device’s hard disk with the user profile on the network share.
For a diskless target device, its disk is actually a virtual disk residing in shared storage. Therefore, the profile returns back to the shared storage containing the virtual disk. Since the persistent user data always resides on shared storage, Windows does not need to download the profile, saving time, network bandwidth, and file cache. Since some of the files included in the profile can grow large, the savings can be significant.
Using Roaming User Profiles with diskless systems involves configuring relevant policies and using Folder Redirection.
Although unrelated to Roaming User Profiles, the Offline Folders feature affects diskless systems similarly. Disabling this feature avoids the same effects.
On the domain controller, use the Microsoft Management Console with the Group Policy snap-in to configure the domain policies for the following objects.
Configuring roaming user profiles
Configuring Roaming User Profiles for diskless systems enables roaming without having to download potentially large files in the profile.
On the domain controller, use the Microsoft Management Console with the Group Policy snap-in to configure the domain policies for the following objects.
To prevent the accumulation of Roaming User Profiles on a virtual disk:
| Object | Computer configuration\Administrative templates\System\Logon |
|---|---|
| Policy | Delete cached copies of roaming profiles. |
| Setting | Enabled |
To exclude directories with potentially large files from download:
| Object | User configuration\Administrative templates\System\Logon, Log off |
|---|---|
| Policy | Exclude directories in roaming profile |
| Setting | Enabled |
| Properties | Prevent the following directories from roaming with the profile: Application Data; Desktop; My Documents; Start Menu. |
Configure folder redirection with roaming user profiles
Using Folder Redirection with Roaming User Profiles and diskless systems retains the availability of user documents.
On the domain controller, use the Microsoft Management Console with the Group Policy snap-in to configure the domain policies for the objects that follow.
To configure folder redirection:
- Create a network share (\ServerName\ShareName) to contain the redirected user folders.
- Give Full Control permission to everyone for the network share.
- Enable Folder Redirection.
| Object | Configuration\Administrative templates\System\Group policy |
|---|---|
| Policy | Folder Redirection policy processing |
| Setting | Enabled |
Redirect the Application Data folder.
| Object | Users configuration\Windows settings\Folder redirection\Application data |
|---|---|
| Properties | Basic or Advanced. Target folder location: \ServerName\ShareName\%username%\Application Data |
Redirect the desktop folder.
| Object | Users configuration\Windows settings\Folder redirection\Desktop |
|---|---|
| Properties | Basic or Advanced. Target folder location: \ServerName\ShareName\%username%\Desktop |
Redirect the My Documents folder.
| Object | Users configuration\Windows settings\Folder redirection\Desktop |
|---|---|
| Properties | Basic or Advanced. Target folder location: \ServerName\ShareName\%username%\My Documents |
Redirect the Start Menu folder.
| Object | Users configuration\Windows settings\Folder redirection\Desktop |
|---|---|
| Properties | Basic or Advanced. Target folder location: \ServerName\ShareName\%username%\Start Menu |
Disable offline folders
Disabling Offline Folders avoids the unnecessary caching of files on diskless systems with network shares.
On the domain controller, use the Microsoft Management Console with the Group Policy snap-in to configure the domain policies for the object that follows.
To disable offline folders:
| Object | Users configuration\Windows settings\Folder redirection\Desktop |
|---|---|
| Policy setting | Disable user configuration of Offline Files (Enabled). |
| Policy setting | Synchronize all Offline Files before logging off (Disabled). |
| Policy setting | Prevent use of Offline Files folder (Enabled). |
Booting through a router
You can boot target devices through a network router. This allows the provisioning server to exist on a different subnet from the target device. Since conditions vary from customer to customer, adjustments are be needed for different network configurations.
The following configuration diagram separates the Provisioning Server from the target device by using a Windows 2000 Server platform acting as a router.
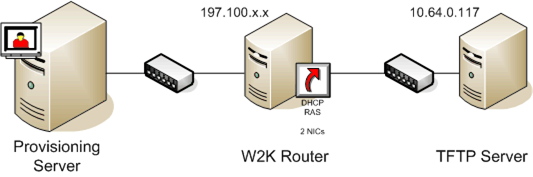
Configuring for DHCP
In this configuration, a DHCP server must be active on the local subnet, 197.100.x.x, of the target device. In the configuration example above, the DHCP service is running on the same machine acting as a router between the two subnets. It is not mandatory that the DHCP service actually runs on the router itself. This DHCP server provides the IP address and the PXE boot information to the target device.
Configure the DHCP service to provide valid IP addresses to any target device booting on the local subnet, 197.100.x.x.
To provide the PXE boot information to the target device, configure the following options in your DHCP server:
- DISABLE Option 60 (Class ID)
- Enable Option 66 (Boot Server Host Name) – Enter the IP address of the TFTP Server. In this configuration, the value is 10.64.0.10.
- Enable option 67 (Boot file name) – Enter the name of the boot file. For a standard configuration, the file name is ARDBP32.bin.
Configure Provisioning Services for PXE
Using the console, configure the bootstrap settings to use the Gateway and Subnet mask fields. These fields reflect the gateway and subnet to be used by the target device. In this case, they are 197.100.x.x for the gateway, and 255.255.255.0 for the netmask.
Verify the TFTP service is running on the Provisioning Server.
The PXE service on the provisioning server is not necessary since options 66 and 67 in the router’s DHCP service provide the same information to the target device. Stop the PXE service on the provisioning server if you have no target devices on the server subnet needing the functionality. The same is true for any DHCP service running on the provisioning server itself.
Running PXE and DHCP on the same computer
If PXE and DHCP are running on the same provisioning server, an option tag must be added to the DHCP configuration. When both are running on the same server, the target devices that the DHCP server is also the PXE boot server. Verify that option tag 60 is added to your DHCP scope. Citrix Provisioning setup automatically adds this tag to your scope as long as the Microsoft DHCP server is installed and configured before installing provisioning. The Configuration Wizard sets-up the Tellurian DHCP Server configuration file if you use the wizard to configure provisioning.
The following is an example Tellurian DHCP Server configuration file which contains the option 60 tag:
`max-lease-time 120;


default-lease-time 120;


option dhcp-class-identifier "PXEClient";


subnet 192.168.4.0 netmask 255.255.255.0 {


option routers 192.168.123.1;


range 192.168.4.100 192.168.4.120;


}`
Managing multiple Network Interface Cards (NICs)
Citrix Provisioning can run redundant networks between the servers and the target devices. Redundant networks require both the servers and the target devices be equipped with multiple NICs.
Configure multiple NICs on the target device into a virtual team by using Manufacturer’s NIC teaming drivers, or into a failover group using the provisioning NIC failover feature.
NIC Teaming and NIC Failover features provide resilience to NIC failures that occur after the system is up and running. It is only after the OS has loaded that the actual NIC Team or NIC Failover group is established. If NIC failure occurs after being established:
- The NIC Teaming feature allows the system to continue to function because the virtual MAC address is the same as the physical MAC address of the primary boot NIC.
- The NIC Failover feature allows the system to continue to function because it automatically fails over to another NIC that was previously configured for this system.
When using a template with multiple NICs, Citrix Provisioning overwrites the network configuration of the first NIC. All the other NICs’ configurations are not changed. For hosts with multiple network resources, the Citrix Virtual Apps and Desktops™ Setup wizard displays available network resources available to the host. It allows you to select the network resource to associate with the first NIC.
Tip:
When a machine powers up, the BIOS goes through the list of available boot devices and the boot order. Boot devices can include multiple PXE-enabled NICs. Citrix Provisioning uses the first NIC in the list as the primary boot NIC, the NIC’s MAC address is used as the lookup key for the target device record in the database. If the primary boot NIC is not available at boot time, Citrix Provisioning fails to locate the target device record in the database. Consider that a non-primary NIC only processes the PXE boot phase. A workaround would be to add a separate target device entry for each NIC on each system, and then maintain synchronization for all entries. Citrix does not recommend this process unless the successful startup of a system is considered critical to the continued operation of the system that is already running.
NIC teaming
When configuring NIC teaming, consider the following requirements:
- Citrix Provisioning supports Broadcom, HP branded ‘Moon shot’ Mellanox NICS and Intel NIC teaming drivers. Broadcom NIC Teaming Drivers v9.52 and 10.24b are not compatible with Citrix Provisioning target device drivers.
- A virtual disk that is built after configuring NIC teaming can run Standard or Private Image Mode.
- Native Windows teaming is not supported on target devices, however, it is supported on Citrix Provisioning servers.
- Teaming of multi-port network interfaces is not supported.
- Multi-NIC is supported for Citrix Virtual Apps™ and Desktops virtual machine desktops. Using the wizard, Citrix Provisioning allows you to select the network to associate with the provisioning NIC (NIC 0). The Delivery Controller provides the list of associated network resources for host connections.
- The target device operating system must be a server-class operating system.
- The new virtual team NIC MAC address has to match the physical NIC that performs the PXE boot.
- NIC teaming software is installed and configured before the target device software.
- Configure NIC teaming and verify that the selected teaming mode is supported by the application and the network topology. It exposes at least one virtual team NIC to the operating system.
- When provisioning machines to an SCVMM server, the setup wizard automatically changes the network configuration of both the first legacy NIC and the second synthetic NIC.
- If changes are required, Citrix Provisioning target device software must be uninstalled before changing the teaming configuration. Reinstall after changes are complete. Changes to teaming configurations on a master target device that has target device software installed results in unpredictable behavior.
- When installing Citrix Provisioning target device software on NT6.x systems within a multi-NIC environment, all available NICs can be used. Therefore bindcfg.exe is no longer required and no longer installed with target device software.
NIC failover
A provisioning target device or server can be configured to support failover between multiple NICs. This feature supports any NIC brand or mixture of brands. Citrix Provisioning supports NIC failover for vDisks in either Standard and Private Image Mode. Consider the following:
- The PXE boot NIC is considered the primary target device MAC address, which is stored in the provisioning database. xxxxx - You define the failover group of NICs when you run the Citrix Provisioning target device installer on the Master Target Device.
- A target device only fails over to NICs that are in the same subnet as the PXE boot NIC.
- Teaming of multi-port network interfaces is not supported with Citrix Provisioning.
- If the physical layer fails, such as when a network cable is disconnected, the target device fails over to the next available NIC. The failover timing is instantaneous.
- The NIC failover feature and Citrix Provisioning high availability feature compliment each other providing network layer failover support. If a failure occurs in the higher network layer, the target device fails over to the next Provisioning Server subject to high availability rules.
- The next available NIC from the failover group is used if the NIC fails and the target device reboots. NICs must be PXE capable and PXE enabled.
- If a virtual NIC (teamed NICs) is inserted into the failover group, the virtual disk becomes limited to Private Image Mode. This functionality is a limitation imposed by NIC teaming drivers.
- By default, Citrix Provisioning automatically switches from legacy Hyper-V NICs to synthetic NICs if both exist in the same subnet. To disable the default behavior (allowing for the use of legacy HyperV NICS even if synthetic NICs exist), edit the target device’s registry settings: [HKEY_LOCAL_MACHINE\SYSTEM\CurrentControlSet\services\BNIStack\Parameters] DisableHyperVLegacyNic”=dword:00000000
- Load balancing is not supported in the NIC failover implementation.
Update NIC drivers
From time to time, upgrade the drivers for your NICs. Follow the guidelines for upgrading NIC drivers.
Upgrade NIC drivers on target devices
To upgrade NIC drivers for target devices:
- Go to the target device with the original hard drive from which you made the virtual disk image.
- Set the system BIOS to boot from the hard drive.
- Reboot the target device directly from the hard drive.
- Uninstall the target device software from this hard drive.
- Upgrade NIC driver as directed by the manufacturer’s instructions.
- Reinstall the target device software on the hard drive.
- Reimage the hard drive to make a new virtual disk image.
Note:
Do not attempt to upgrade a NIC driver on a virtual disk. Do not attempt to upgrade a NIC driver on a hard disk on which the Provisioning Server is installed. Improperly upgrading a NIC makes the hard drive unable to boot.
Upgrade NIC drivers on a provisioning server
To upgrade NIC drivers on any provisioning server, simply follow the manufacturer instructions for upgrading NIC drivers.
In this article
- Preparing network switches
- Switch manufacturers
- Using Uniform Naming Convention (UNC) names
- Syntax
- Accessing a remote network share
- Reducing network utilization
- Configure Windows features on a standard virtual disk
- Configure the recycle bin
- Configure offline folders
- Configure event logs
- Disable Windows automatic updates
- Managing roaming user profiles
- Configuring roaming user profiles
- Configure folder redirection with roaming user profiles
- Disable offline folders
- Booting through a router
- Configuring for DHCP
- Configure Provisioning Services for PXE
- Running PXE and DHCP on the same computer
- Managing multiple Network Interface Cards (NICs)
- NIC teaming
- NIC failover
- Update NIC drivers
- Upgrade NIC drivers on target devices
- Upgrade NIC drivers on a provisioning server