This content has been machine translated dynamically.
Dieser Inhalt ist eine maschinelle Übersetzung, die dynamisch erstellt wurde. (Haftungsausschluss)
Cet article a été traduit automatiquement de manière dynamique. (Clause de non responsabilité)
Este artículo lo ha traducido una máquina de forma dinámica. (Aviso legal)
此内容已经过机器动态翻译。 放弃
このコンテンツは動的に機械翻訳されています。免責事項
이 콘텐츠는 동적으로 기계 번역되었습니다. 책임 부인
Este texto foi traduzido automaticamente. (Aviso legal)
Questo contenuto è stato tradotto dinamicamente con traduzione automatica.(Esclusione di responsabilità))
This article has been machine translated.
Dieser Artikel wurde maschinell übersetzt. (Haftungsausschluss)
Ce article a été traduit automatiquement. (Clause de non responsabilité)
Este artículo ha sido traducido automáticamente. (Aviso legal)
この記事は機械翻訳されています.免責事項
이 기사는 기계 번역되었습니다.책임 부인
Este artigo foi traduzido automaticamente.(Aviso legal)
这篇文章已经过机器翻译.放弃
Questo articolo è stato tradotto automaticamente.(Esclusione di responsabilità))
Translation failed!
Azure AKS
This page prepares the Azure infrastructure Citrix SecurSpaces™ needs: a Kubernetes cluster to run on, a container registry to pull images from, and a MongoDB database to store platform state.
When you have finished, continue with Install with the Strong Installer CLI, which is the same for every platform.
Prerequisites
- An Azure subscription with permissions to create AKS, ACR, and networking resources.
- A MongoDB Atlas subscription, or Azure Cosmos DB for MongoDB.
- Two domain names: a regular one such as
example.com, and a wildcard subdomain for proxy support such as*.proxy.example.com. - TLS certificates for those domains.
- An identity provider, such as Okta, if you intend to use SAML.
- An ingress controller, or a decision about which one to use. SecurSpaces cannot serve traffic without one, and only NetScaler CPX is deployed by the chart. See Ingress.
For sizing and supported versions, see System requirements.
Install the following tools:
Create an AKS cluster
-
Create a resource group. This is the logical container for the deployment, and its location determines where resources run when you do not specify one:
az group create --name $MY_RESOURCE_GROUP_NAME --location $REGION <!--NeedCopy--> -
Create the cluster. The following example creates a cluster with a system-assigned managed identity:
az aks create \
  --resource-group $MY_RESOURCE_GROUP_NAME \
  --name $MY_AKS_CLUSTER_NAME \
  --node-count 1 \
  --generate-ssh-keys
<!--NeedCopy-->
The example creates a single node. Size the cluster for your expected load: the reference sizing for around 500 developers is two
Standard_D8as_v6service nodes (8 vCPU, 32 GiB) and an autoscaling workspace pool ofStandard_D16as_v6(16 vCPU, 64 GiB). See Sizing. -
Download the credentials and point
kubectlat the cluster:az aks get-credentials --resource-group $MY_RESOURCE_GROUP_NAME --name $MY_AKS_CLUSTER_NAME <!--NeedCopy--> -
Verify the connection:
kubectl get nodes
<!--NeedCopy-->
Create an Azure Container Registry
SecurSpaces pulls its service images and your workspace images from a registry you control. The installer pushes them there in the next stage.
-
Create the registry. The name must be unique within Azure and contain 5 to 50 lowercase alphanumeric characters:
az acr create --resource-group myResourceGroup --name mycontainerregistry --sku Basic <!--NeedCopy--> -
Create a service principal with the
AcrOwnerrole. The command returns theappId,displayName,password, andtenant:acr_resource_id=$(az acr show --name <acr-name> --query id --output tsv) az ad sp create-for-rbac --name <service-principal-name> --role AcrOwner --scopes ${acr_resource_id} --sdk-auth <!--NeedCopy--> -
Verify the service principal by signing in to the registry:
docker login <acr-name>.azurecr.io --username <service-principal-id> <!--NeedCopy--> -
Attach the registry to the cluster, so AKS can pull from ACR without further credentials:
az aks update --name myAKSCluster --resource-group myResourceGroup --attach-acr <acr-name>
<!--NeedCopy-->
Create a MongoDB database
SecurSpaces stores its platform state in MongoDB. For what it holds and how large to expect it to grow, see The SecurSpaces database.
-
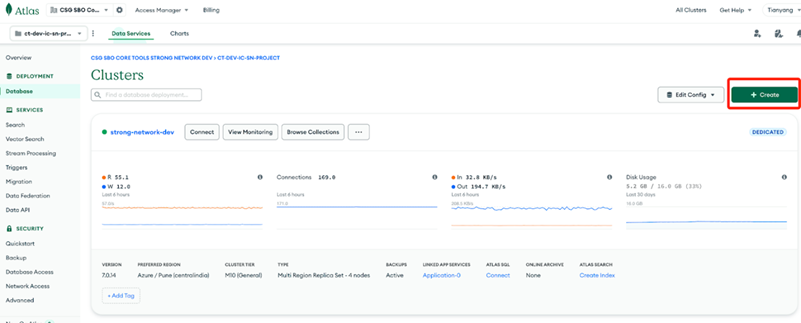
In MongoDB Atlas, open the database page and select Create.
-
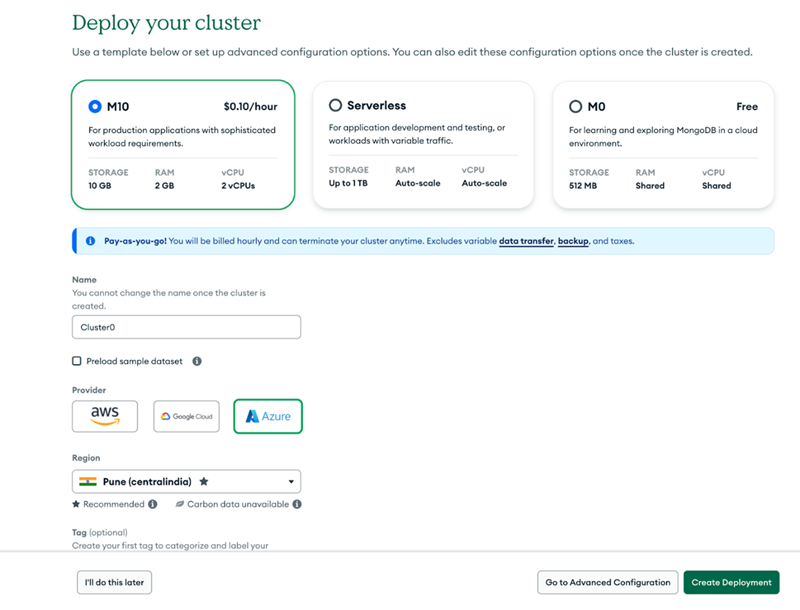
Configure the deployment and select Create Deployment:
- Select Azure as the cloud provider.
- Choose the same region as the AKS cluster.
- Select the M10 tier with autoscaling.
-
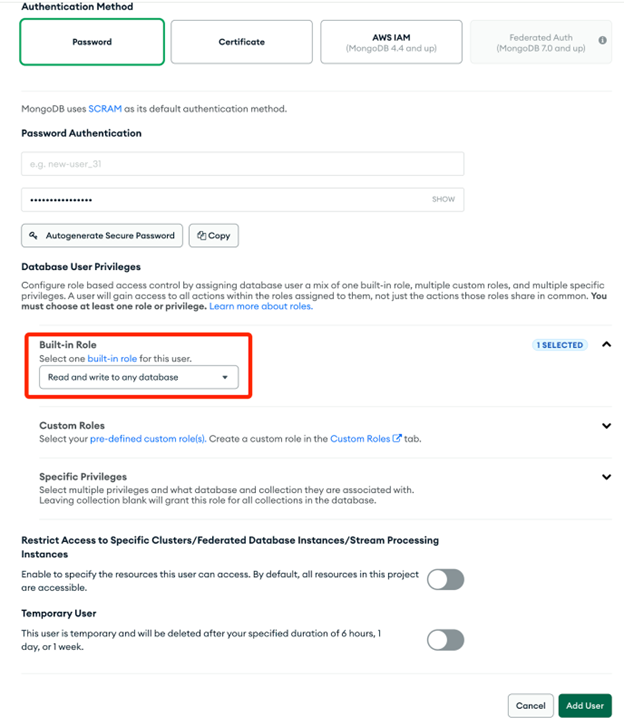
On the Database Access page, add a user.
-
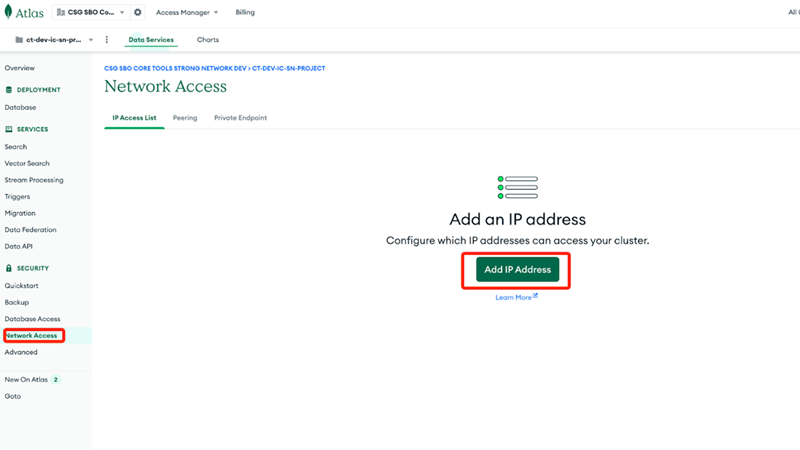
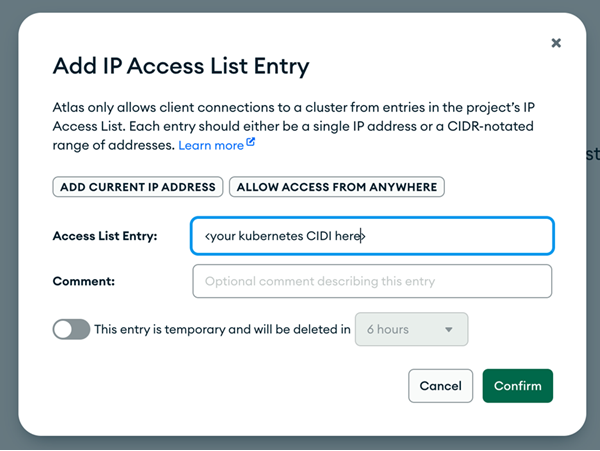
On the Network Access page, allow your AKS cluster to reach the database. Add the cluster’s outbound IP ranges, or use private endpoints, which is the more secure option.
You can also run MongoDB inside the cluster instead of using a hosted service. See Configure an external database.
Next step
Your Azure infrastructure is ready. Continue with Install with the Strong Installer CLI.
During that installation you also set up the ingress controller. If you have not chosen one, do that first — see Ingress.
Related information
Share
Share
This Preview product documentation is Citrix Confidential.
You agree to hold this documentation confidential pursuant to the terms of your Citrix Beta/Tech Preview Agreement.
The development, release and timing of any features or functionality described in the Preview documentation remains at our sole discretion and are subject to change without notice or consultation.
The documentation is for informational purposes only and is not a commitment, promise or legal obligation to deliver any material, code or functionality and should not be relied upon in making Citrix product purchase decisions.
If you do not agree, select I DO NOT AGREE to exit.