Advanced store settings
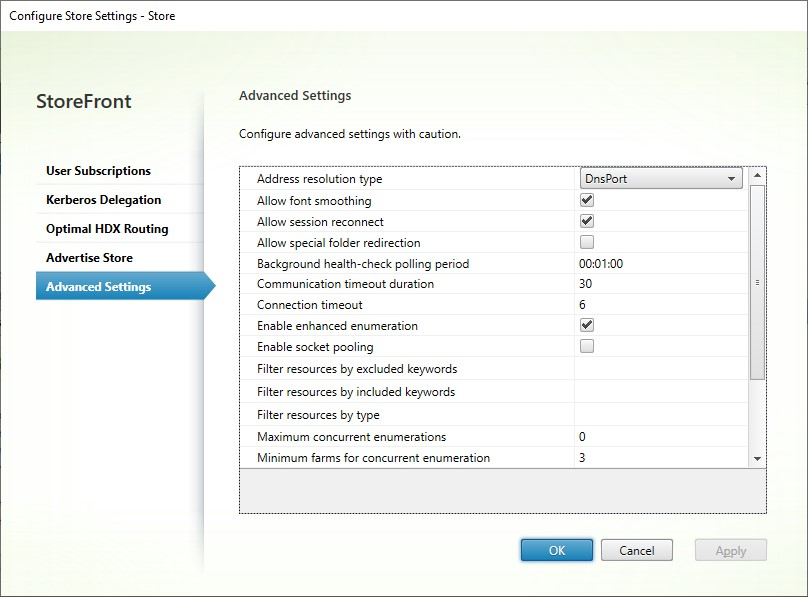
You can configure most advanced store properties by using the Advanced Settings page in the Configure Store Settings. Some settings can only be modified using PowerShell.
Important:
In multiple server deployments, use only one server at a time to make changes to the configuration of the server group. Ensure that the Citrix StoreFront management console is not running on any of the other servers in the deployment. Once complete, propagate your configuration changes to the server group so that the other servers in the deployment are updated.
-
Select the Stores node in the left pane of the Citrix StoreFront management console, select a store in the center pane, and in the Action pane, select Configure Store Settings.
-
On the Configure Store Settings page, select Advanced Settings and make the required changes.
-
Click OK to save your changes.
Address resolution type
You can specify the type of address to request from the server. The default is DnsPort.
From the Advanced Settings window, choose a value from the Address resolution type drop down list.
- Dns
- DnsPort
- IPV4
- IPV4Port
- Dot
- DotPort
- Uri
- NoChange
Allow font smoothing
You can specify if you want font smoothing for HDX sessions. The default is On.
From the Advanced Settings window, select the Allow font smoothing option, and click OK.
Allow session reconnect
You can specify if you want HDX sessions to be reconnected. The default is On.
From the Advanced Settings window, select the Allow session reconnect option.
Allow special folder redirection
With special folder redirection configured, users can map Windows special folders for the server to those on their local computers. Special folders refer to standard Windows folders, such as \Documents and \Desktop, which are always presented in the same way regardless of the operating system.
From the Advanced Settings window, select or clear the Allow special folder redirection option to enable or disable special folder redirection, and click OK.
Advanced health check
StoreFront runs periodic health checks on each Citrix Virtual Apps and Desktops delivery controller, Cloud Connector and Secure Private Access server to reduce the impact of intermittent server availability. With Advanced heath check StoreFront performs a more in-depth check that is more likely to detect any issues.
When connecting to Citrix Desktops as a Service via a Cloud connector, advanced health check has the added benefit that it retrieves additional information about what VDAs are in the same location as the cloud connector. In the the event that the cloud connectors are unable to contact Citrix Desktops as a Service, cloud connectors use their local host cache to facilitate connections to VDAs that are co-located. StoreFront uses the additional information from the advanced health check results to contact the most appropriate online connector to launch apps and desktops.
To ensure resource availability during an outage, without having to publish resources in every zone (resource location), ensure that on all StoreFront servers you configure the resource feed to include all cloud connectors in all resource locations and enable the advanced health check feature.
From StoreFront 2308, Advanced health check is enabled by default for new stores. Advanced health check is enabled for existing stores when upgrading from versions earlier than 2402 to 2402 or higher. To enable or disable advanced health check, use the PowerShell cmdlet Set-STFStoreFarmConfiguration with parameter AdvancedHealthCheck. Disabling advanced health check is not recommended as it would reduce resiliency.
Background health check polling period
StoreFront runs periodic health checks on each Citrix Virtual Apps and Desktops delivery controller, Cloud Connector and Secure Private Access server to reduce the impact of intermittent server availability. The default is every minute (00:01:00). From the Advanced Settings window, specify a time for the Background health-check Polling period, and click OK to control the frequency of the health check. To disable the health check, set the polling period to 00:00:00, this is not recommended. Setting the polling period to a low value is not recommended when the Advanced health check is enabled as it may have an impact on performance.
Communication time-out duration
By default, requests from StoreFront to a server providing resources for a store time out after 30 seconds. The server is considered unavailable after 1 unsuccessful communication attempt. From the Advanced Settings window, make your changes to the default time, and click OK to change these settings.
Connection timeout
You can specify the number of seconds to wait when establishing an initial connection with a Delivery Controller. The default is 6.
From the Advanced Settings window, specify the seconds to wait when establishing the initial connection, and click OK
Enable enhanced enumeration
This option controls whether StoreFront queries Delivery Controllers concurrently or sequentially when enumerating apps and desktops across multiple Citrix Virtual Apps and Desktops Sites. Concurrent enumeration provides faster responses to user queries when aggregating resources across multiple Sites. When this option is selected (the default), StoreFront sends out enumeration requests to all Delivery Controllers at the same time and aggregates responses when they have all responded. You can use the options Maximum concurrent enumerations and Minimum farms for concurrent enumeration to tune this behavior.
From the Advanced Settings window, select (or clear) the Enable enhanced enumeration option, and click OK.
Enable socket pooling
Socket pooling is disabled by default in stores. When socket pooling is enabled, StoreFront maintains a pool of sockets, rather than creating a socket each time one is needed and returning it to the operating system when the connection is closed. Enabling socket pooling enhances performance, particularly for Secure Sockets Layer (SSL) connections. To enable socket pooling, you edit the store configuration file. From the Advanced Settings window select the Enable socket pooling option, and click OK to enable socket pooling.
File type association
By default, file type association is enabled in stores so that content is seamlessly redirected to users’ subscribed applications when they open local files of the appropriate types. To enable disable file type association, use the PowerShell command Set-STFStoreFarmConfiguration. For example:
$storeService = Get-STFStoreService –VirtualPath '/Citrix/Store'
Set-STFStoreFarmConfiguration $storeService -EnableFileTypeAssociation $false
<!--NeedCopy-->
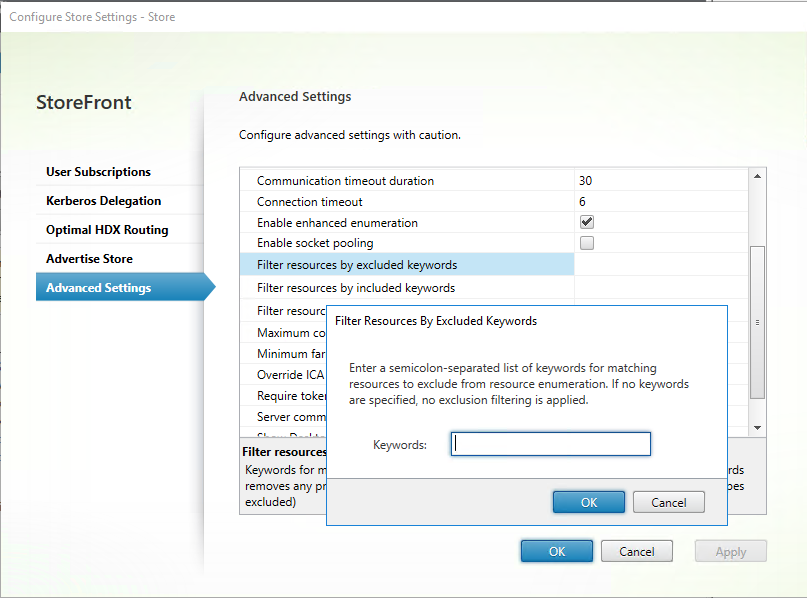
Filter resources by excluded keywords
You can filter matching resources by excluded keywords. Specifying exclusion keywords removes any previously configured inclusion keywords. The default is no filtering (no resource types excluded).
- From the Advanced Settings window, find the Filter resources by excluded keywords row.
- Click in the right hand column to bring up the Filter resources by excluded keywords window.
- Enter a semicolon-separated list of keywords in the enter keywords box
- Click OK.
To change the setting using PowerShell, use cmdlet Set-STFStoreEnumerationOptions with parameter -FilterByKeywordsExclude.
The following keywords are reserved and must not be used for filtering:
- Auto
- Mandatory
Filter resources by included keywords
You can filter matching resources by inclusion keywords. Specifying inclusion keywords removes any previously configured exclusion keywords. The default is no filtering (no resource types excluded).
- From the Advanced Settings window, find the Filter resources by included keywords row.
- Click in the right hand column to bring up the Filter resources by included keywords window.
- Enter a semicolon-separated list of keywords in the enter keywords box
- Click OK.
To change the setting using PowerShell, use cmdlet Set-STFStoreEnumerationOptions with parameter -FilterByKeywordsInclude.
The following keywords are reserved and must not be used for filtering:
- Auto
- Mandatory
Filter resources by type
Choose the resource types to be included in resource enumeration. The default is No filtering (all resource types included).
From the Advanced Settings window, select Filter resources by type, click to the right of it, choose the resource types to include in the enumeration, and click OK.
To change the setting using PowerShell, use cmdlet Set-STFStoreEnumerationOptions with parameter -FilterByTypesInclude, specifying an array of resource types (Applications, Desktops or Documents).
Maximum concurrent enumerations
Specify the maximum number of concurrent requests to send to all Delivery Controllers. This option takes effect when the option Enable enhanced enumeration is enabled. The default is 0 (No Limit).
From the Advanced Settings window, select Maximum concurrent enumerations, enter a number, and click OK.
Minimum farms for concurrent enumeration
Specify the minimum number of Delivery Controllers required to trigger concurrent enumeration. This option takes effect when the option Enable enhanced enumeration is enabled. The default is 3.
From the Advanced Settings window, select Minimum farms for concurrent enumerations, enter a number, and click OK.
Override ICA client name
Overrides the client name setting in the .ica launch file with a unique ID generated by the web browser. When disabled, Citrix Workspace app specifies the client name. The default is Off.
From the Advanced Settings window, select the Override the ICA client name option, and click OK.
Require token consistency
When enabled, StoreFront enforces consistency between the gateway used to authenticate and the gateway used to access the store. When the values are inconsistent, users must reauthenticate. You must enable this for Smart Access. You must disable this if users access the store through a gateway with authentication disabled. The default is On.
From the Advanced Settings window, select the Require token consistency option, and click OK.
Server communication attempts
Specify the number of attempts to communicate with Delivery Controllers before marking them unavailable. The default is 1.
From the Advanced Settings window, select Server communication attempts, enter a number, and click OK.
Show Desktop Viewer for legacy clients
Specify whether to show the Citrix Desktop Viewer window and toolbar when users access their desktop from legacy clients. The default is Off.
From the Advanced Settings window, select the Show Desktop Viewer for legacy clients option, and click OK.
Treat desktops as apps
Specify whether, when the store is accessed, Desktops are displayed in the Apps view rather than in the Desktops view. The default is Off.
From the Advanced Settings window, select the Treat desktops as apps option, and click OK.
In this article
- Address resolution type
- Allow font smoothing
- Allow session reconnect
- Allow special folder redirection
- Advanced health check
- Background health check polling period
- Communication time-out duration
- Connection timeout
- Enable enhanced enumeration
- Enable socket pooling
- File type association
- Filter resources by excluded keywords
- Filter resources by included keywords
- Filter resources by type
- Maximum concurrent enumerations
- Minimum farms for concurrent enumeration
- Override ICA client name
- Require token consistency
- Server communication attempts
- Show Desktop Viewer for legacy clients
- Treat desktops as apps