Bitbucket Cloud Integration as Code Repository Provider
Follow these steps to create an OAuth App in Bitbucket Cloud to connect it to the platform:
- Navigate to OAuth Consumers:
- Using a Bitbucket account, go to the main organization settings and then to “OAuth consumers”.
-
You can follow this
https://bitbucket.org/[YOUR_DOMAIN_NAME]/workspace/settings/apito reach this menu directly. - Add a New Consumer:
- Click on the “Add consumer” button and set the following fields:
- Name: The name you want to give to the application. It will be public.
-
Callback URL: The URL should have a structure similar to
https://example.com/oauth/apps/callback, where “example.com” should be replaced with the proper domain name. This URL can be seen from the admin panel of the Secure Developer Spaces platform. - This is a private consumer: This should already be selected by default; leave it as it is.
- Scopes: Select “Read” under the Account section and “Write” under the Repositories section, and “Read” under the Pull requests section. This can also be checked in the Secure Developer Spaces™ Platform when clicking the “Add Bitbucket” button.
- Complete the Registration:
- After clicking the “Save” button, you will be presented with the Client ID (called Key) and Secret, which you need to enter in the platform configuration.
Bitbucket Server or Data Center Integration as Code Repository Provider
In this section, we will see how to connect the Secure Developer Spaces platform to a self-hosted Bitbucket instance:
- Configure Secure Developer Spaces Platform:
- Go to the Secure Developer Spaces platform settings and open the “Code Repository Applications” menu.
- Click on the “Add Bitbucket” button.
-
Select the checkbox for “Bitbucket Server or Data Center (self-hosted)”.
- Set the Following Fields:
- Bitbucket App Name: It can be anything. This is what users will see when using this Code Repository Provider.
- Custom Domain: Enter the URL where the Bitbucket instance is hosted. If no scheme is given, HTTPS will be chosen by default.
-
Enforce Users to Connect: If selected, users will need to connect to Bitbucket before they can open their workspaces. This can prevent misconfiguration/permission issues on the user side.
- Complete the Registration:
- Click the “Create” button to complete the configuration on the Secure Developer Spaces platform side.
-
Save the “Bitbucket Server Public Key” for later use. This can also be found in the edit menu after clicking the “Create” button.
- Configure Bitbucket Instance (Version 7.20 or Later):
- Go to Administration > Applications > Application Links and click on “Create link”:
- Application Type: External application
- Direction: Incoming
- Click on continue
- Set a unique name
-
Redirect URL: Set to
https://example.com/oauth/apps/callback, where “example.com” should be replaced with the proper domain name. - Application Permissions: Account: Write, Repositories: Admin
- After clicking the “Save” button, enter “strong_network” for both Client ID and Client Secret.
- Configure Bitbucket Instance (Version 7.20 or Earlier):
- Go to Administration > Application Links.
- Enter the platform URL (e.g.,
https://example.com, where “example.com” should be replaced with the proper domain name). - Click on “Create new link”. If you see a “No response received” error, ignore it and click Continue.
- In the following menu, enter:
- Application Name: It can be anything.
- Application Type: Generic Application
- Service Provider Name: It can be anything (recommended: “strong_network”).
- Consumer Key: Set to “strong_network”.
- Shared Secret: Set to “strong_network”.
-
Request Token URL: Set to
http://example.com, where “example.com” should be replaced with the proper domain name. -
Access Token URL: Set to
http://example.com, where “example.com” should be replaced with the proper domain name. -
Authorize URL: Set to
http://example.com, where “example.com” should be replaced with the proper domain name. - Check “Create incoming link” and click Continue.

- In the following menu, enter:
- Consumer Key: Set to “strong_network”.
- Consumer Name: Set to “strong_network”.
-
Public Key: Enter the value that can be seen in the platform.
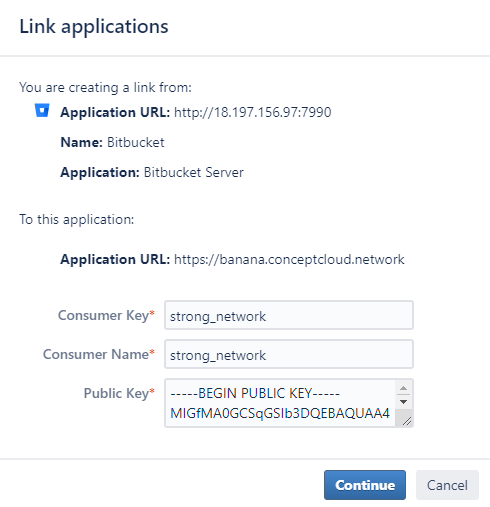
- Complete the Configuration:
- Click on Continue. The configuration is complete.
Bitbucket Cloud Integration as Code Repository Provider
Copied!
Failed!