Director
About Director
Director is a monitoring and troubleshooting console for XenApp and XenDesktop.
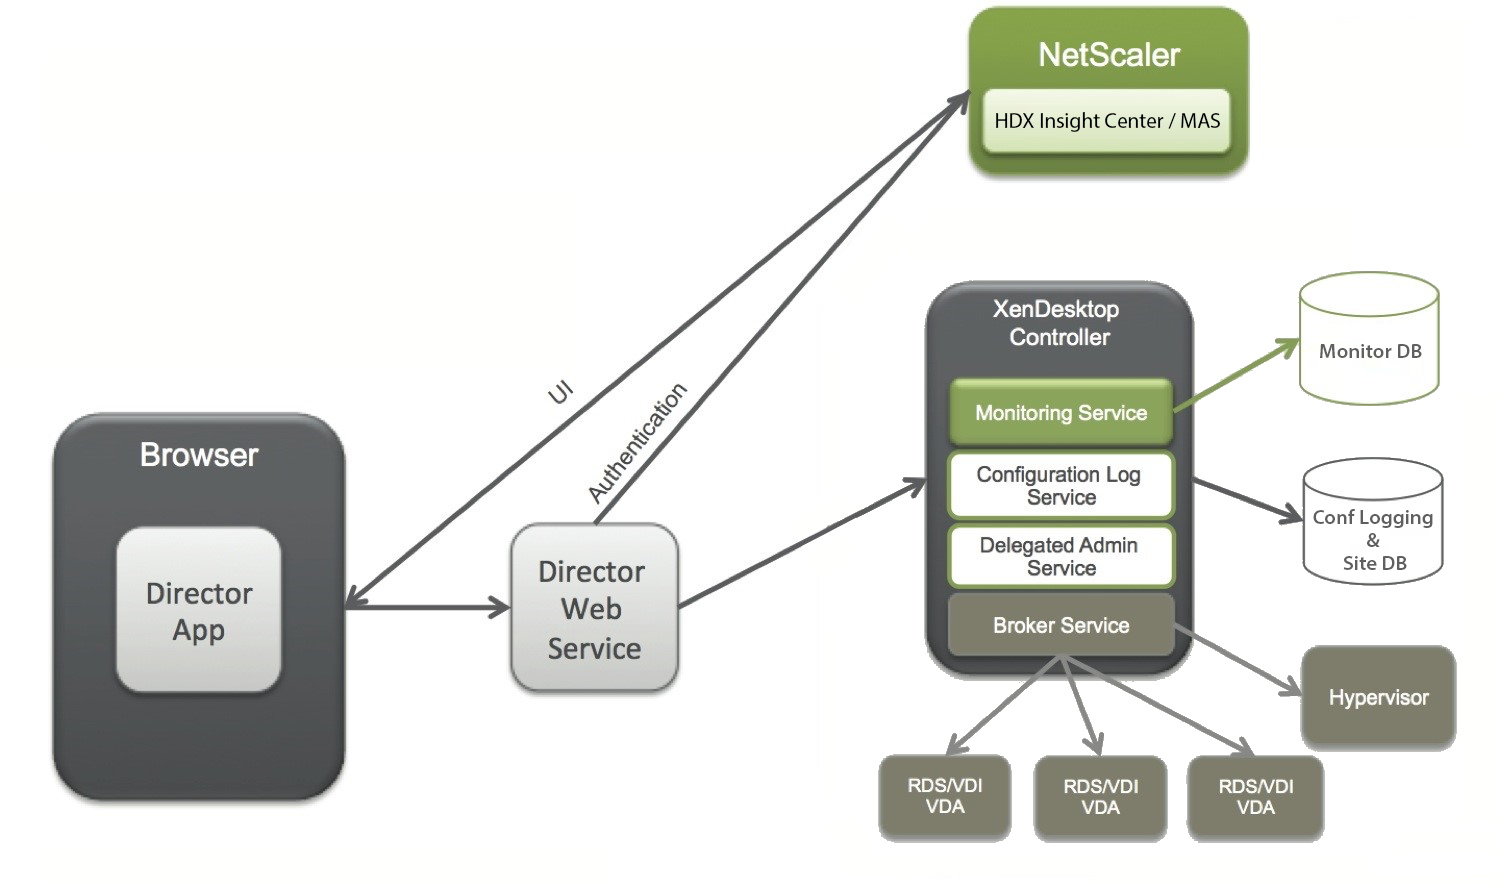
Director can access:
- Real-time data from the Broker Agent using a unified console integrated with Analytics, Performance Manager, and Network Inspector.
- Analytics includes performance management for health and capacity assurance, and historical trending and network analysis, powered by NetScaler® Insight Center or NetScaler MAS, to identify bottlenecks due to the network in your XenApp or XenDesktop environment.
- Historical data stored in the Monitor database to access the Configuration Logging database.
- ICA® data from the NetScaler Gateway using NetScaler Insight Center or NetScaler MAS.
- Gain visibility into end-user experience for virtual applications, desktops, and users for XenApp® or XenDesktop.
- Correlate network data with application data and real-time metrics for effective troubleshooting.
- Integrate with XenDesktop 7 Director monitoring tool.
- Personal vDisk data that allows for runtime monitoring showing base allocation and gives help desk administrators the ability to reset the Personal vDisk (to be used only as a last resort).
- The command line tool CtxPvdDiag.exe is used to gather the user log information into one file for troubleshooting.
Director uses a troubleshooting dashboard that provides real-time and historical health monitoring of the XenApp or XenDesktop Site. This feature allows you to see failures in real time, providing a better idea of what the end users are experiencing.
For more information regarding the compatibility of Director features with Delivery Controller (DC), VDA and any other dependent components, see Feature compatibility matrix.
Interface views
Director provides different views of the interface tailored to particular administrators. Product permissions determine what is displayed and the commands available.
For example, help desk administrators see an interface tailored to help desk tasks. Director allows help desk administrators to search for the user reporting an issue and display activity associated with that user, such as the status of the user’s applications and processes. They can resolve issues quickly by performing actions such as ending an unresponsive application or process, shadowing operations on the user’s machine, restarting the machine, or resetting the user profile.
In contrast, full administrators see and manage the entire Site and can perform commands for multiple users and machines. The Dashboard provides an overview of the key aspects of a deployment, such as the status of sessions, user logons, and the Site infrastructure. Information is updated every minute. If issues occur, details appear automatically about the number and type of failures that have occurred.
Deploy and configure Director
Director is installed by default as a website on the Delivery Controller. For prerequisites and other details, see the System requirements documentation for this release.
This release of Director is not compatible with XenApp deployments earlier than 6.5 or XenDesktop deployments earlier than 7.
When Director is used in an environment containing more than one Site, be sure to synchronize the system clocks on all the servers where Controllers, Director, and other core components are installed. Otherwise, the Sites might not display correctly in Director.
Tip: If you intend to monitor XenApp 6.5 in addition to XenApp 7.5 or XenDesktop 7.x Sites, Citrix recommends installing Director on a separate server from the Director console that is used to monitor XenApp 6.5 Sites.
Important: To protect the security of user names and passwords sent using plain text through the network, Citrix® strongly recommends that you allow Director connections using only HTTPS, and not HTTP. Certain tools are able to read plain text user names and passwords in HTTP (unencrypted) network packets, which can create a potential security risk for users.
To configure permissions
To log on to Director, administrators with permissions for Director must be Active Directory domain users and must have the following rights:
- Read rights in all Active Directory forests to be searched (see Advanced configuration).
- Configure Delegated Administrator roles (see Delegated Administration and Director).
- To shadow users, administrators must be configured using a Microsoft group policy for Windows Remote Assistance. In addition:
- When installing VDAs, ensure that the Windows Remote Assistance feature is enabled on all user devices (selected by default).
- When you install Director on a server, ensure that Windows Remote Assistance is installed (selected by default). However, it is disabled on the server by default. The feature does not need to be enabled for Director to provide assistance to end users. Citrix recommends leaving the feature disabled to improve security on the server.
- To enable administrators to initiate Windows Remote Assistance, grant them the required permissions by using the appropriate Microsoft Group Policy settings for Remote Assistance. For information, see CTX127388: How to Enable Remote Assistance for Desktop Director.
- For user devices with VDAs earlier than 7, additional configuration is required. See Configure permissions for VDAs earlier than XenDesktop 7.
Install Director
Install Director using the full product ISO Installer for XenApp and Desktop, which checks for prerequisites, installs any missing components, sets up the Director website, and performs basic configuration. The default configuration provided by the ISO installer handles typical deployments. If Director was not included during installation, use the ISO installer to add Director. To add any additional components, rerun the ISO installer and select the components to install. For information on using the ISO installer, see Install core components in the installation documentation. Citrix recommends that you install using the full product ISO installer only, not the .MSI file.
When Director is installed on the Controller, it is automatically configured with localhost as the server address, and Director communicates with the local Controller by default.
To install Director on a dedicated server that is remote from a Controller, you are prompted to enter the FQDN or IP address of a Controller.
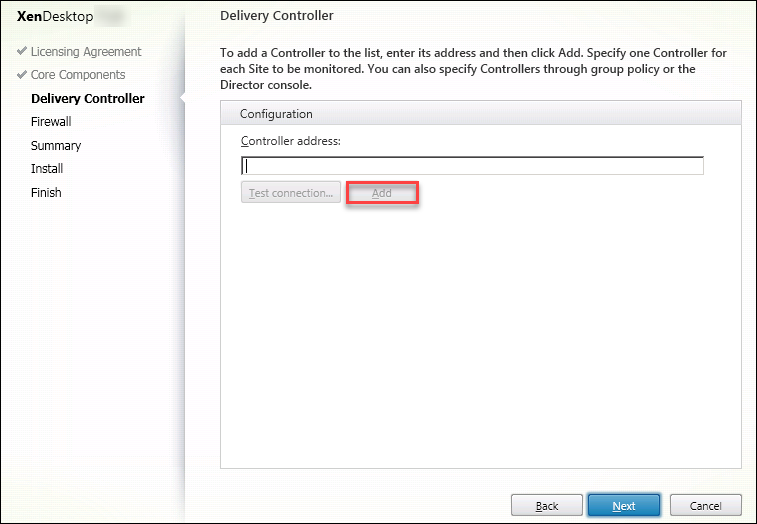
Note: Click Add to add the Controller to be monitored.
Director communicates with that specified Controller by default. Specify only one Controller address for each Site that you monitor. Director automatically discovers all other Controllers in the same Site and falls back to those other Controllers if the Controller you specified fails.
Note: Director does not load balance among Controllers.
To secure the communications between the browser and the Web server, Citrix recommends that you implement TLS on the IIS website hosting Director. Refer to the Microsoft IIS documentation for instructions. Director configuration is not required to enable TLS.
Install Director for XenApp 6.5
To install Director for XenApp 6.5 follow these steps. Typically, Director is installed on a separate computer from the XenApp Controllers.
- Install Director from the XenApp installation media. If Director is already installed for XenDesktop, skip this step and proceed to the next step.
- Use the IIS Manager Console on each Director server to update the list of XenApp server addresses in the application settings as described in the To add Sites to Director section in Advanced configuration.
Supply the server address of one Controller per XenApp Site: any of the other Controllers in a XenApp site are then used automatically for failover. Director does not load balance among Controllers. Important: For XenApp addresses, be sure to use the setting Service.AutoDiscoveryAddressesXA, not the default setting Service.AutoDiscoveryAddresses. - The Director WMI Provider installer is located at the Support\DirectorWMIProvider folder on the DVD. Install it on all appropriate XenApp servers (Controllers and workers where sessions are running). If winrm is not configured, run the winrm qc command.
- Configure each XenApp worker server to accept WinRM queries as described in Configure permissions.
- Configure a firewall exception for port 2513, used for communication between Director and XenApp.
- To secure the communications between the browser and the web server, Citrix recommends that you implement TLS on the IIS website hosting Director.
Refer to the Microsoft IIS documentation for instructions. No Director configuration is required to enable TLS.
Note: To allow Director to find all the XenApp workers in the farm, you must add a reverse DNS zone for the subnets where the XenApp servers reside on the DNS servers used by the farm.
Log on to Director
The Director website is located at https or http://<ServerFQDN>/Director.
If one of the Sites in a multi-site deployment is down, the logon for Director takes a little longer while it attempts to connect to the Site that is down.
Use Director with Integrated Windows Authentication
With Integrated Windows Authentication, domain-joined users gain direct access to Director without re-keying their credentials on the Director logon page. The prerequisites for working with Integrated Windows Authentication and Director are:
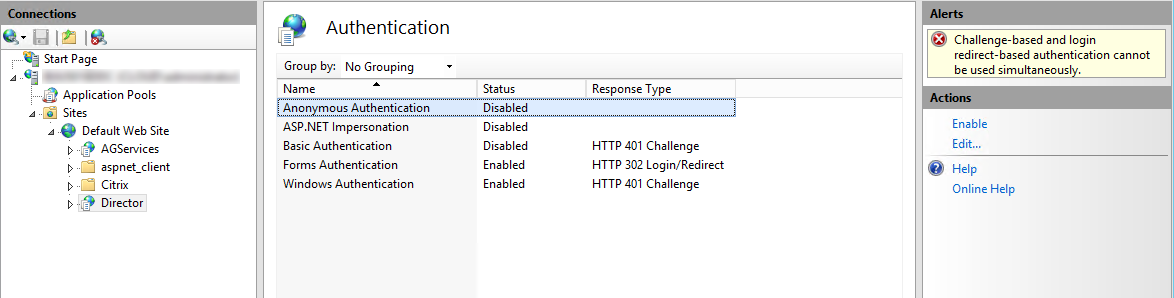
- Enable Integrated Windows Authentication on the IIS website that hosts Director. When you install Director, Anonymous and Forms Authentication are enabled. To work with Integrated Windows Authentication and Director, disable Anonymous Authentication and enable Windows Authentication. Forms Authentication must remain set to Enabled for authentication of non-domain users.
- Start IIS manager.
- Go to Sites > Default Web Site > Director.
- Select Authentication.
- Right-click Anonymous Authentication, and select Disable.
- Right-click Windows Authentication, and select Enable.
- Configure Active Directory delegation permission for the Director machine. This is only required if Director and the Delivery Controller™ are installed on separate machines.
- On the Active Directory machine, open the Active Directory Management Console.
- In the Active Directory Management Console navigate to Domain Name > Computers. Select the Director machine.
- Right-click and select Properties.
- In Properties, select the Delegation tab.
- Select the option, Trust this computer for delegation to any service (Kerberos only).
- The browser that is used to access Director must support Integrated Windows Authentication. This might require additional configuration steps in Firefox and Chrome. For more information, refer to the browser documentation.
- The Monitoring Service must be running Microsoft .NET Framework 4.5.1 or a later supported version listed in the System Requirements for Director. For more information, see System Requirements.
When a user logs off Director or if the session times out, the logon page is displayed. From the logon page, the user can set the Authentication type to Automatic logon or User credentials.
Usage data collection by Google Analytics The Director Service uses Google Analytics to collect usage data anonymously after Director is installed. Statistics and information regarding the usage of the Trends page and its tabs are collected. Data collection is enabled by default when you install Director. To opt out of the Google Analytics data collection, edit the registry key, HKEY_LOCAL_MACHINE\Software\Citrix\MetaInstall on the machine where Director is installed, as described in the Install and upgrade analytics section in Citrix Insight Services.
Note: The HKEY_LOCAL_MACHINE\Software\Citrix\MetaInstall registry key controls the collection of usage data by Citrix Insight Services as well as Google Analytics. Any change to the key value affects collection by both the services.