配置 PIV 智能卡身份验证
本文列出了在 Director 服务器上和 Active Directory 中启用智能卡身份验证功能所需的配置。
注意:
智能卡身份验证仅支持来自相同 Active Directory 域的用户。
Director 服务器配置
请在 Director 服务器上执行以下配置步骤:
-
安装和启用客户端证书映射身份验证。 请按照 Microsoft 文档 Client Certificate Mapping Authentication(客户端证书映射身份验证)中的 Client Certificate Mapping authentication using Active Directory(使用 Active Directory 的客户端证书映射身份验证)。
-
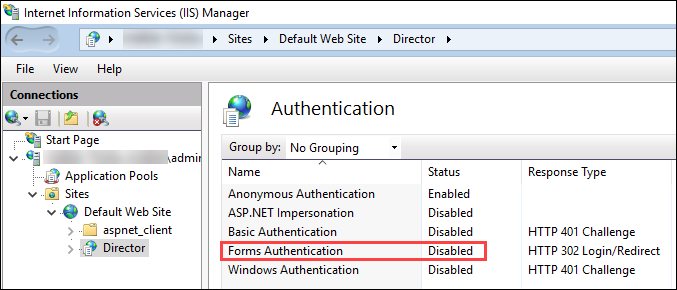
在 Director 站点上禁用表单身份验证。
启动 IIS 管理器。
转至站点 > 默认 Web 站点 > Director。
选择身份验证。
右键单击表单身份验证,然后选择禁用。
-
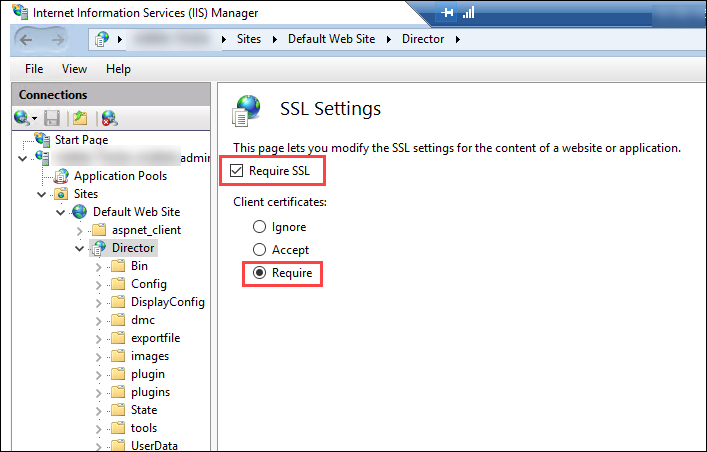
将 Director URL 配置为使用更安全的 https 协议(而非 HTTP)进行客户端证书身份验证。
-
启动 IIS 管理器。
-
转至站点 > 默认 Web 站点 > Director。
-
选择 SSL 设置。
-
选择需要 SSL 和客户端证书 > 需要。
-
-
更新 web.config。 使用文本编辑器打开 web.config 文件(在 c:\inetpub\wwwroot\Director 中提供)。
在 <system.webServer> 父元素下,添加以下代码段作为第一个子元素:
  <defaultDocument>
   <files>
       <add value="LogOn.aspx"/>
   </files>
</defaultDocument>
Active Directory 配置
默认情况下,Director 应用程序使用应用程序池标识属性运行。 智能卡身份验证要求 Director 应用程序标识必须在服务主机上具有可信计算基 (TCB) 权限的委派。
Citrix 建议您为应用程序池标识创建一个单独的服务帐户。 根据 Microsoft MSDN 文章 Protocol Transition with Constrained Delegation Technical Supplement(通过约束委派技术进行的协议转换增补)中的说明创建服务帐户并分配 TCB 权限。
将新创建的服务帐户分配给 Director 应用程序池。 下图显示了示例服务帐户 Domain Pool 的属性对话框。

请为此帐户配置以下服务:
- Delivery Controller™:HOST、HTTP
- Director:HOST、HTTP
- Active Directory:GC、LDAP
要进行配置,请
-
在用户帐户属性对话框中,单击添加。
-
在添加服务对话框中,单击“用户或计算机”。
-
选择 Delivery Controller 主机名。
-
从可用服务列表中,选择“HOST”和 HTTP 服务类型。
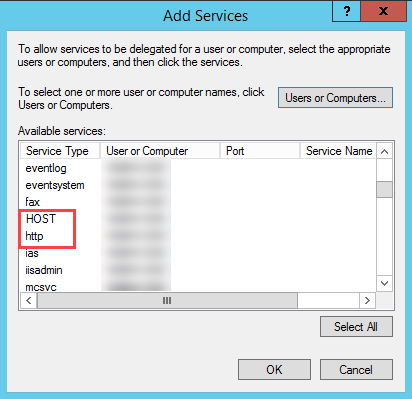
同样,请为 Director 和 Active Directory 主机添加服务类型。
创建服务主体名称记录
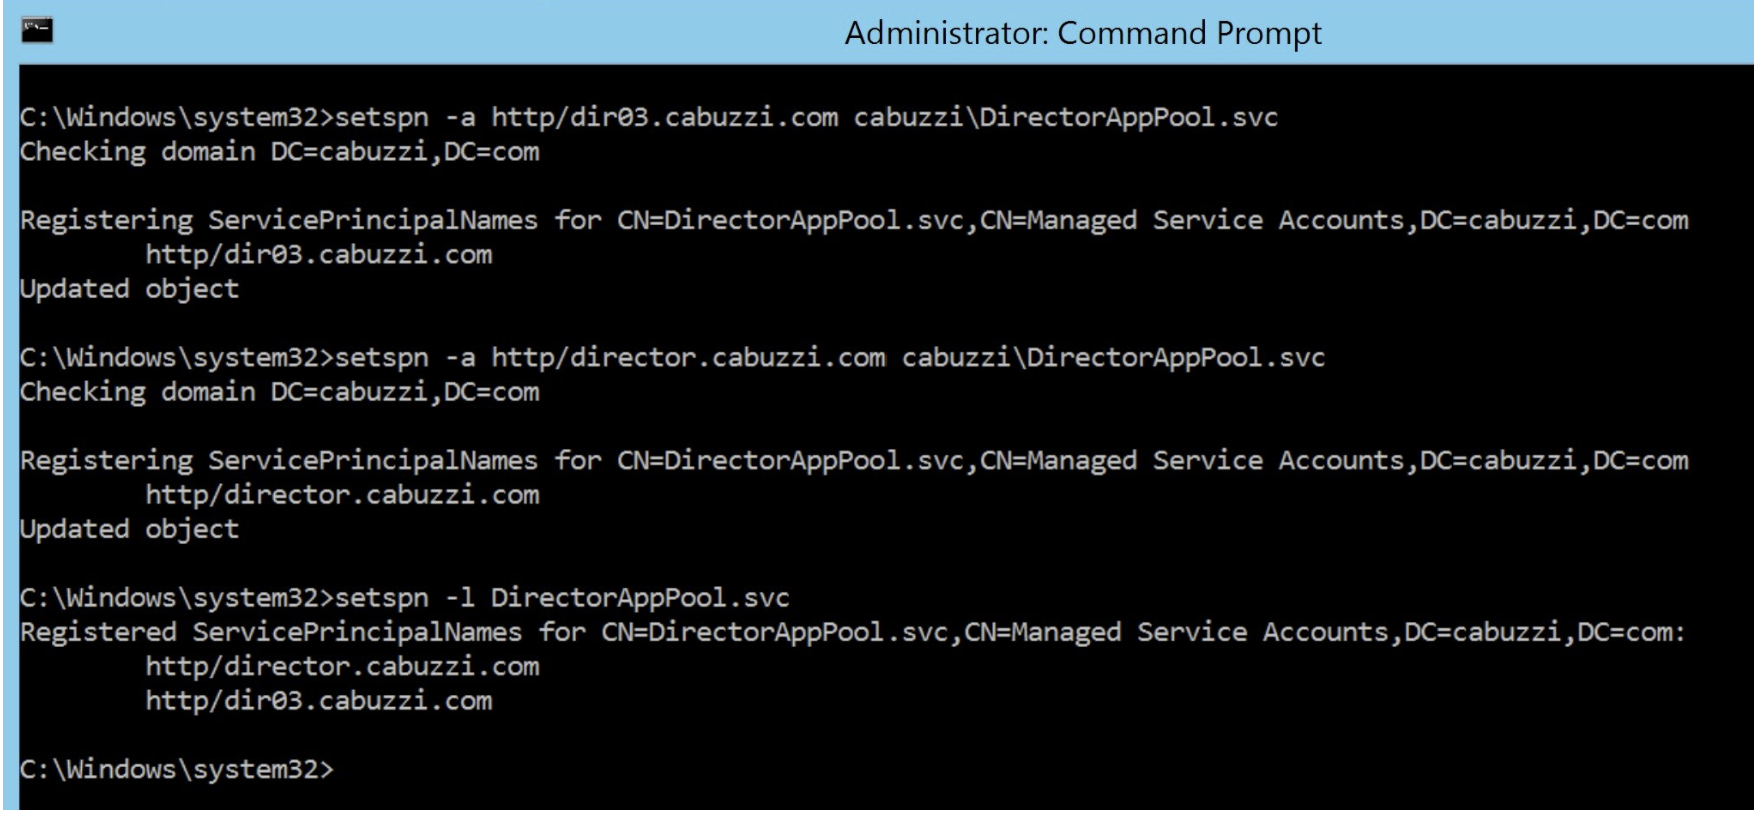
必须为每台 Director 服务器和用于访问 Director 服务器池的负载平衡虚拟 IP (VIP) 创建服务帐户。 必须创建服务主体名称 (SPN) 记录才能配置对新创建的服务帐户的委派。
-
请使用以下命令为 Director 服务器创建 SPN 记录:
setspn -a http/<directorServer>.<domain_fqdn> <domain>\<DirectorAppPoolServiceAcct> <!--NeedCopy--> -
请使用以下命令为负载平衡的 VIP 创建 SPN 记录:
setspn -S http/<DirectorFQDN> <domain>\<DirectorAppPoolServiceAcct> <!--NeedCopy--> -
请使用以下命令查看或测试创建的 SPN:
   setspn –l <DirectorAppPoolServiceAcct>

 <!--NeedCopy-->
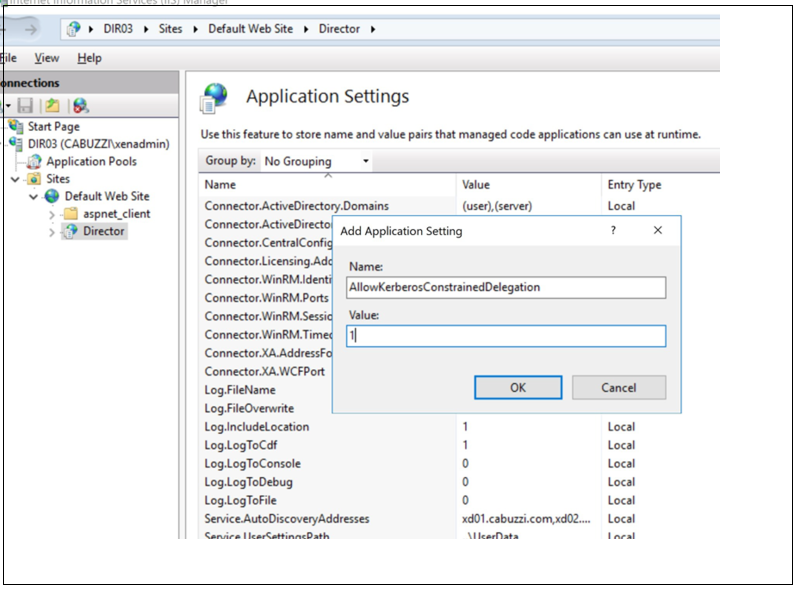
- 在左侧窗格中选择 Director 虚拟目录,然后双击应用程序设置。 在“应用程序设置”窗口中,单击添加并确保 AllowKerberosConstrainedDelegation 设置为 1。
-
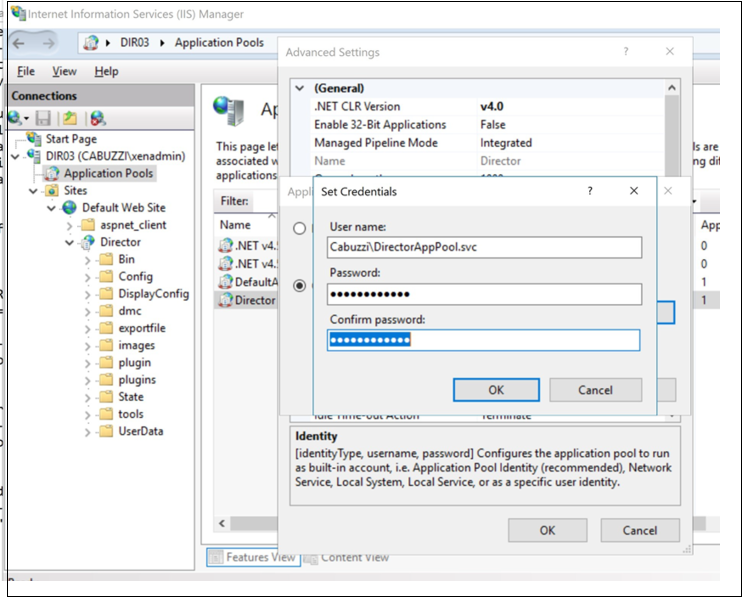
在左侧窗格中选择应用程序池,然后右键单击 Director 应用程序池并选择高级设置。
-
选择身份,单击省略号(“…”) 输入服务帐户域\登录和密码凭据。 关闭 IIS 控制台。
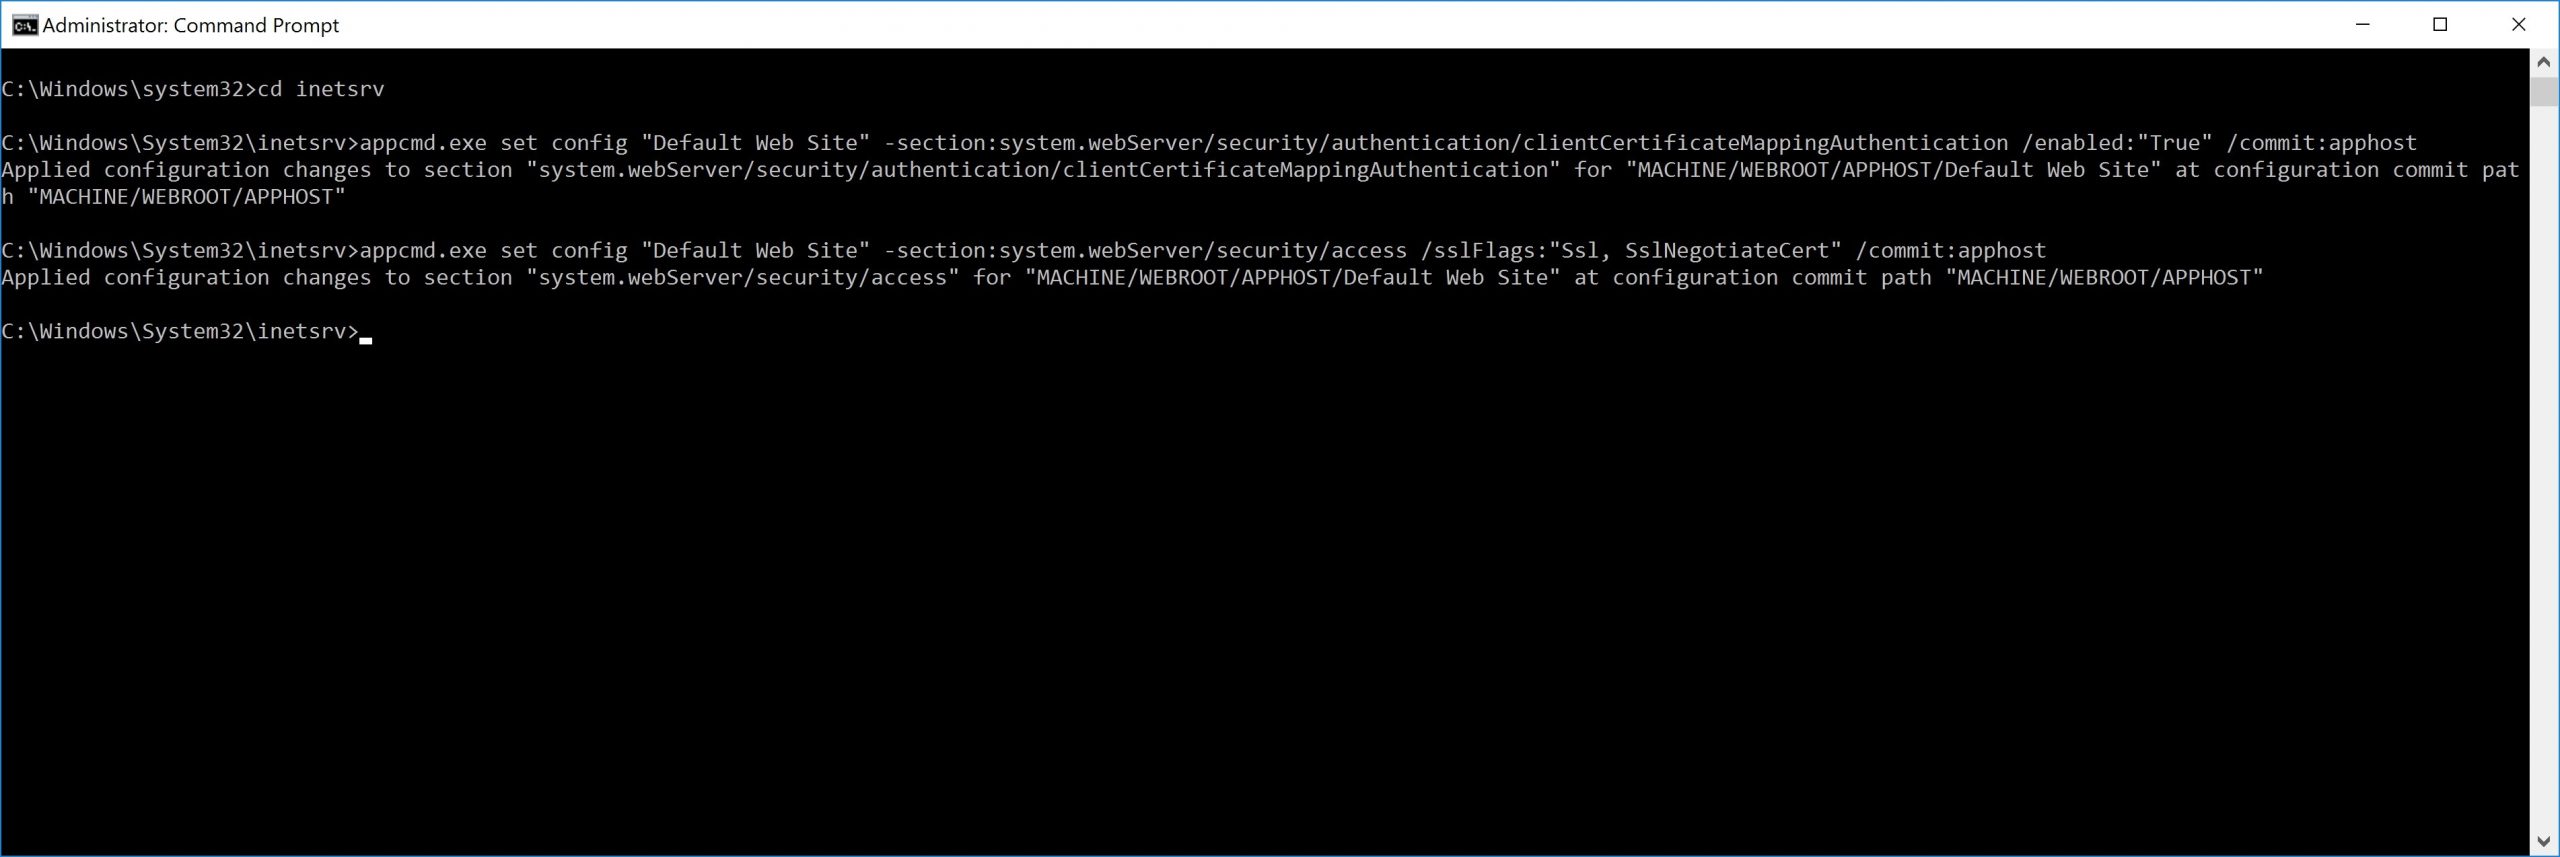
- 从提升的命令提示符处,将目录更改为 C:\Windows\System32\inetsrv 并输入以下命令:
     appcmd.exe set config “Default Web Site” -section:system.webServer/security/authentication/clientCertificateMappingAuthentication /enabled:”True” /commit:apphost

<!--NeedCopy-->
      appcmd.exe set config “Default Web Site” -section:system.webServer/security/access /sslFlags:”Ssl, SslNegotiateCert” /commit:apphost
<!--NeedCopy-->
Firefox 浏览器配置
要使用 Firefox 浏览器,请安装 OpenSC 0.17.0 中提供的 PIV 驱动程序。 有关安装和配置说明,请参阅 Installing OpenSC PKCS#11 Module in Firefox, Step by Step(在 Firefox 中逐步安装 OpenSC PKCS#11 模块)。 有关在 Director 中使用智能卡身份验证功能的信息,请参阅“Director”一文中的在 Director 中使用基于 PIV 的智能卡身份验证部分。