App preferences
Advanced Preferences sheet
You can customize the Advanced Preferences sheet’s availability and contents present in the right-click menu of the Citrix Workspace app icon in the notification area. Doing so ensures that users can apply only administrator-specified settings on their systems. Specifically, you can:
- Hide the Advanced Preferences sheet altogether
- Hide the following, specific settings from the sheet:
- Data collection
- Connection Center
- Configuration checker
- Keyboard and Language bar
- High DPI
- Support information
- Shortcuts and Reconnect
- Citrix Casting™
Hiding Advanced Preferences option from the right-click menu
You can hide the Advanced Preferences sheet by using the Citrix Workspace app Group Policy Object (GPO) administrative template:
- Open the Citrix Workspace app Group Policy Object administrative template by running gpedit.msc.
- Under the Computer Configuration node, go to Administrative Templates > Citrix Workspace > Self Service > Advanced Preferences Options.
- Select the Disable Advance Preferences policy.
- Select Enabled to hide the Advanced Preferences option from the right-click menu of the Citrix Workspace app icon in the notification area.
Note:
By default, the Not Configured option is selected.
Hiding specific settings from the Advanced Preferences sheet
You can hide specific user-configurable settings from the Advanced Preferences sheet by using the Citrix Workspace app Group Policy Object administrative template. To hide the settings:
- Open the Citrix Workspace app Group Policy Object administrative template by running gpedit.msc.
- Under the Computer Configuration node, go to Administrative Templates > Citrix Workspace > Self Service > Advanced Preferences Options.
- Select the policy for the setting you want to hide.
The following table lists the options that you can select and the effect of each:
| Options | Action |
|---|---|
| Not Configured | Displays the setting |
| Enabled | Hides the setting |
| Disabled | Displays the setting |
You can hide the following specific settings from the Advanced Preferences sheet:
- Configuration checker
- Connection Center
- High DPI
- Data collection
- Delete saved passwords
- Keyboard and Language bar
- Shortcuts and Reconnect
- Support information
- Citrix Casting
Hiding the Reset Workspace option from the Advanced Preferences sheet using the Registry editor
You can hide the Reset Workspace option from the Advanced Preferences sheet only using the Registry editor.
- Launch the registry editor.
- Navigate to
HKEY_LOCAL_MACHINE\SOFTWARE\Citrix\Dazzle. - Create a String Value key EnableFactoryReset and set it to any of the following options:
- True - Displays the Reset Workspace option in the Advanced Preferences sheet.
- False - Hides the Reset Workspace option in the Advanced Preferences sheet.
Hiding Citrix Workspace Updates option from the Advanced Preferences sheet
Note:
The policy path for the Citrix Workspace Updates option is different from the other options present in the Advanced Preferences sheet.
- Open the Citrix Workspace app Group Policy Object administrative template by running gpedit.msc.
- Under the Computer Configuration node, go to Administrative Templates > Citrix Components > Citrix Workspace > Workspace Updates.
- Select the Workspace Updates policy.
- Select Disabled to hide the Workspace Updates settings from the Advanced Preferences sheet.
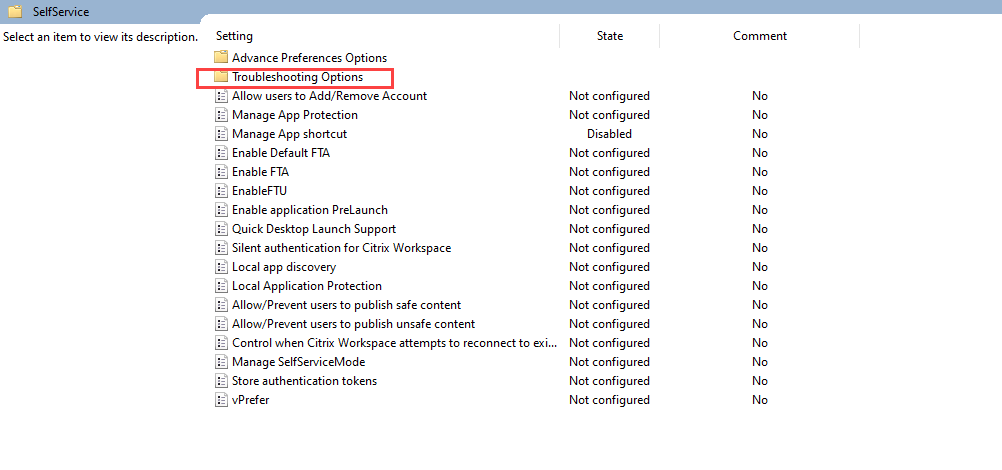
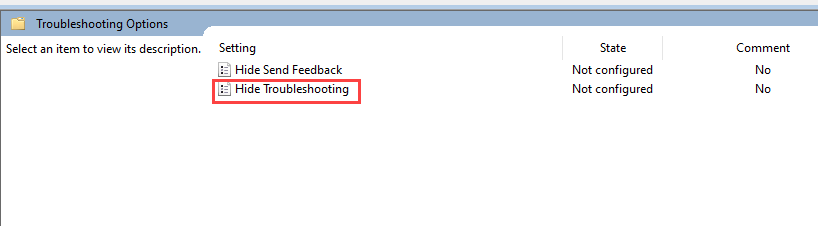
Hide Troubleshooting and Send Feedback options for end-users
Admins can hide the troubleshooting and send feedback options for their end users using the GPO editor. Once this setting is enabled, the Troubleshooting and Send Feedback options which were previously visible to the end users on the system tray is hidden.
Hide Troubleshooting option
- On the GPO editor, navigate to Administrative Templates > Citrix Components > Citrix Workspace > Self Service.
-
Select the Troubleshooting Options folder.
-
Select the Hide Troubleshooting setting.
-
On the Hide Troubleshooting dialog box, select the Enabled checkbox. Selecting this checkbox hides the Troubleshooting option from the end users.
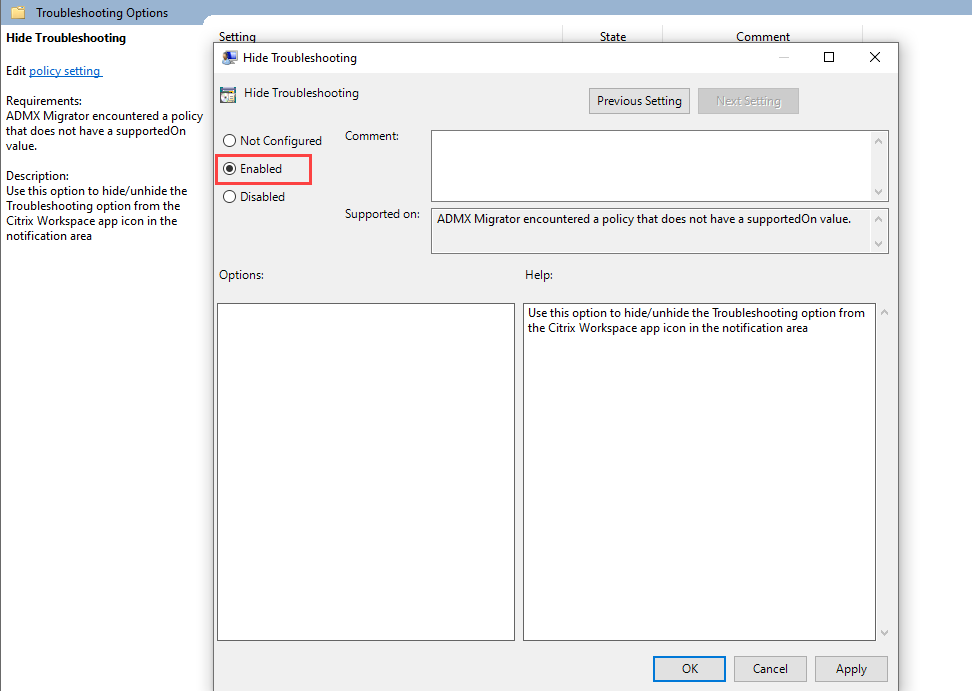
- Click OK to save your settings.
Hide Send Feedback option
- On the GPO editor, navigate to Administrative Templates > Citrix Components > Citrix Workspace > Self Service.
- Select the Troubleshooting Options folder.
-
Select the Hide Send Feedback setting.

-
On the Hide Send Feedback dialog box, select the Enabled checkbox. Selecting this checkbox hides the Send Feedback option from the end users.
- Click OK to save your settings.
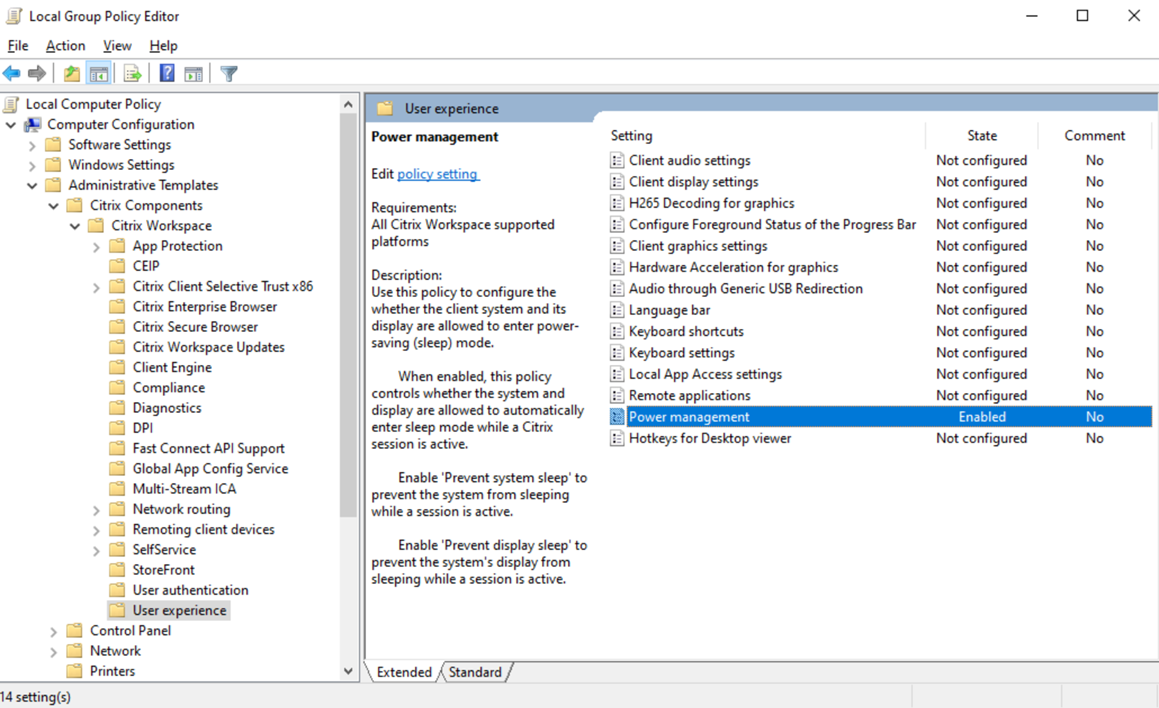
Option to prevent endpoint from going to sleep when a session is active
When a user with an active session stays away from the virtual desktop without any mouse or keyboard activity, the endpoint device might go into sleep mode after completing the set time for Windows sleep mode. As a result, the Citrix® session might be disconnected and when the user returns to the session, the user might be unable to reconnect to the existing session.
With this release, a new policy named Power Management is introduced to prevent the endpoint device from going to sleep when a session is active.
To enable this feature, do the following:
- Open the Citrix Workspace app Group Policy Object administrative template by running
gpedit.msc. -
Under the Computer Configuration node, go to Administrative Templates > Citrix Workspace > User Experience.
 power-management
 -
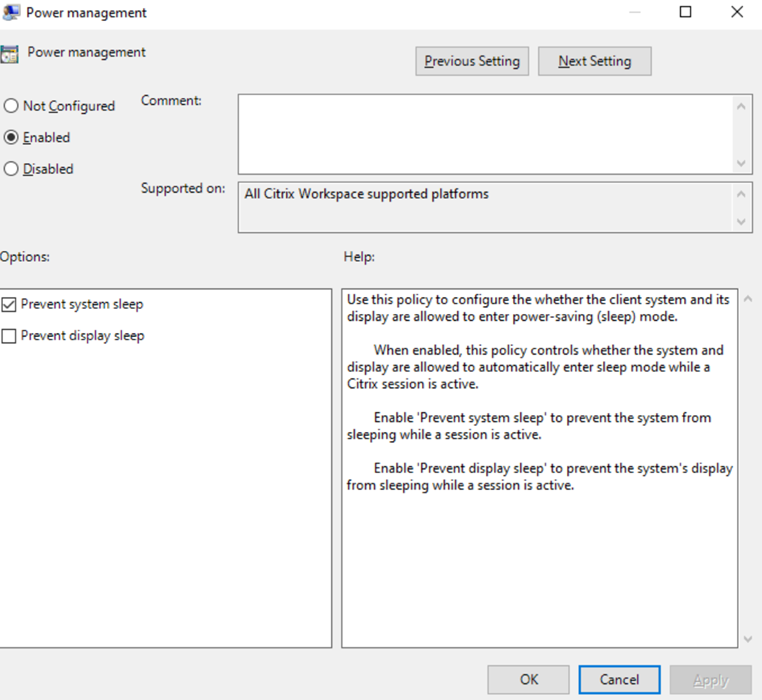
Select Power Management. The Power Management screen appears:{}
-
Select Enabled and the select the following:
- Prevent system sleep - Select this checkbox to prevent the system from sleeping while a session is active
- Prevent display sleep - Select this checkbox to prevent the system’s display from sleeping while a session is active
- Click Apply and then OK.
To make the feature available on a per‑session basis edit the following registry value:
HKEY_LOCAL_MACHINE\SOFTWARE\Policies\Citrix\ICA Client\Engine\Sleep
To make the feature available on a per‑user basis edit the following registry value:
HKEY_CURRENT_USER\Software\Policies\Citrix\ICA Client\Engine\Sleep
Registry values for Prevent system sleep:
- Name: AllowSystemSleep
- Type: REG_DWORD
- Value: 0
Registry values for Prevent display sleep:
- Name: AllowDisplaySleep
- Type: REG_DWORD
- Value: 0
Auto-sync backend resource changes for Start menu and desktop shortcuts
Starting with 2503 version, the auto-sync backend resource changes feature enhances the user experience by automatically synchronizing backend resource changes for start menu and desktop shortcuts.
Key features include:
-
Updating shortcuts with updated resource path:
The shortcut automatically points to the new path when the resource path is updated in the backend, eliminating the need for manual refresh. This feature is enabled by default. -
Option to show disabled shortcuts:
The shortcut remains visible even when a resource is disabled in the backend. Previously, the shortcut was removed when a resource was disabled. This feature is useful for temporary maintenance, allowing users to retain the shortcut. This feature is disabled by default and can be enabled using the Show Disabled Shortcut setting in either the Global App Configuration Service (GACS) or the Group Policy Object template.
Using GACS
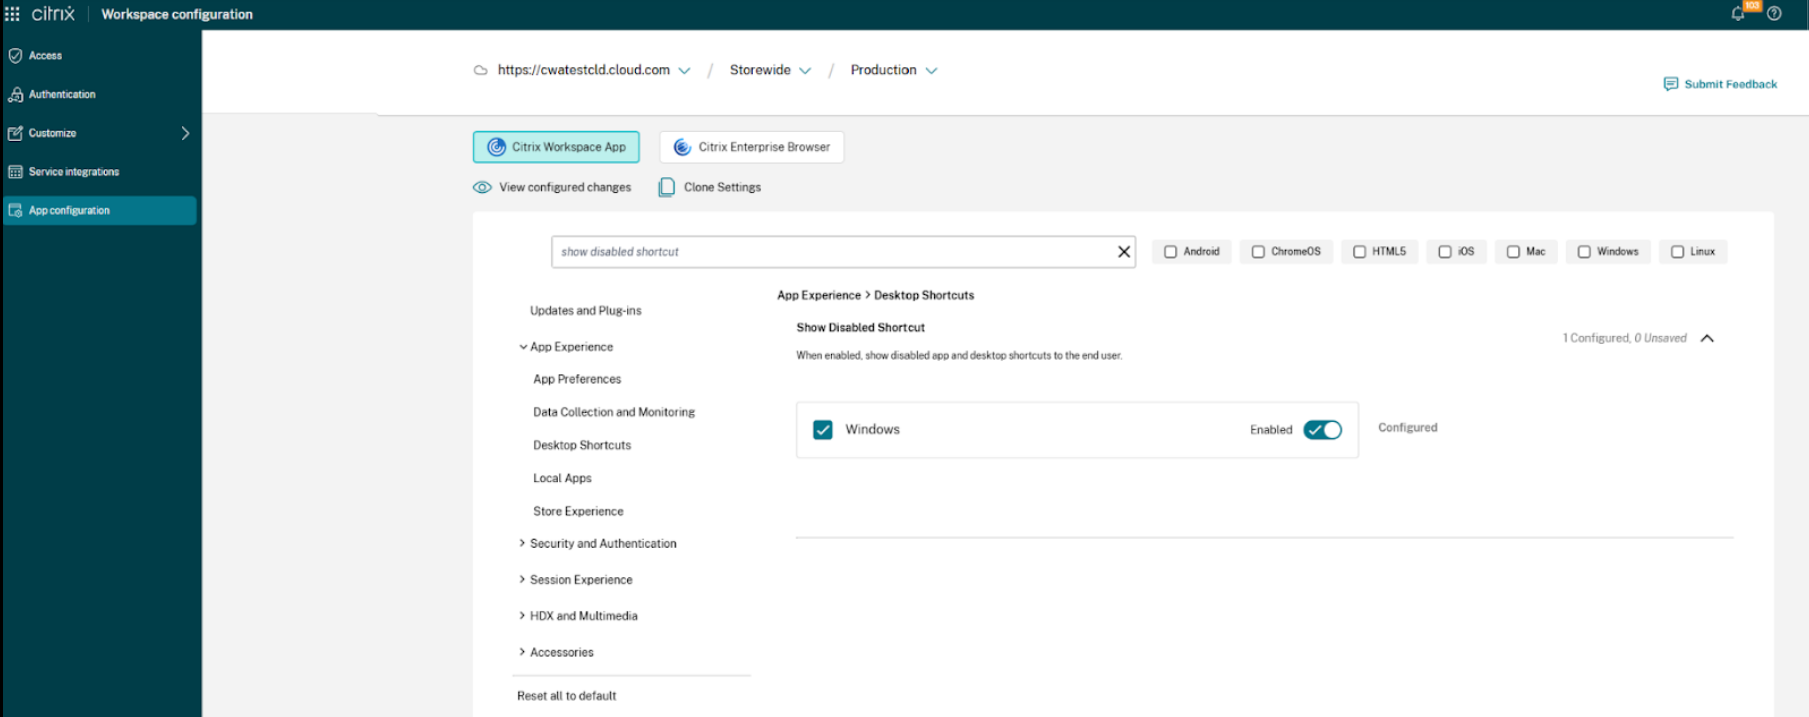
To enable the retention of disabled shortcuts through the GACS Admin UI, do the following:
-
Sign in to citrix.cloud.com with your credentials.
Note:
Refer to the Sign Up for Citrix Cloud article for step-by-step instructions to create a Citrix Cloud account.
- Upon authentication, click the menu button in the top left corner and select Workspace Configuration. The Workspace Configuration screen appears.
- Click App Configuration > Citrix Workspace™ app.
- Select the Windows checkbox.
-
Update the settings under App Experience > Show Disabled Shortcuts.
For more information, see the Global App Configuration Service documentation.
Using Group Policy Editor
To customize the options on the Desktop Viewer toolbar, do the following:
- Open the Citrix Workspace app GPO administrative template by running gpedit.msc.
-
Under the Computer Configuration node, go to Administrative Templates > Citrix Workspace > Self Service and select Show Disabled Shortcut.
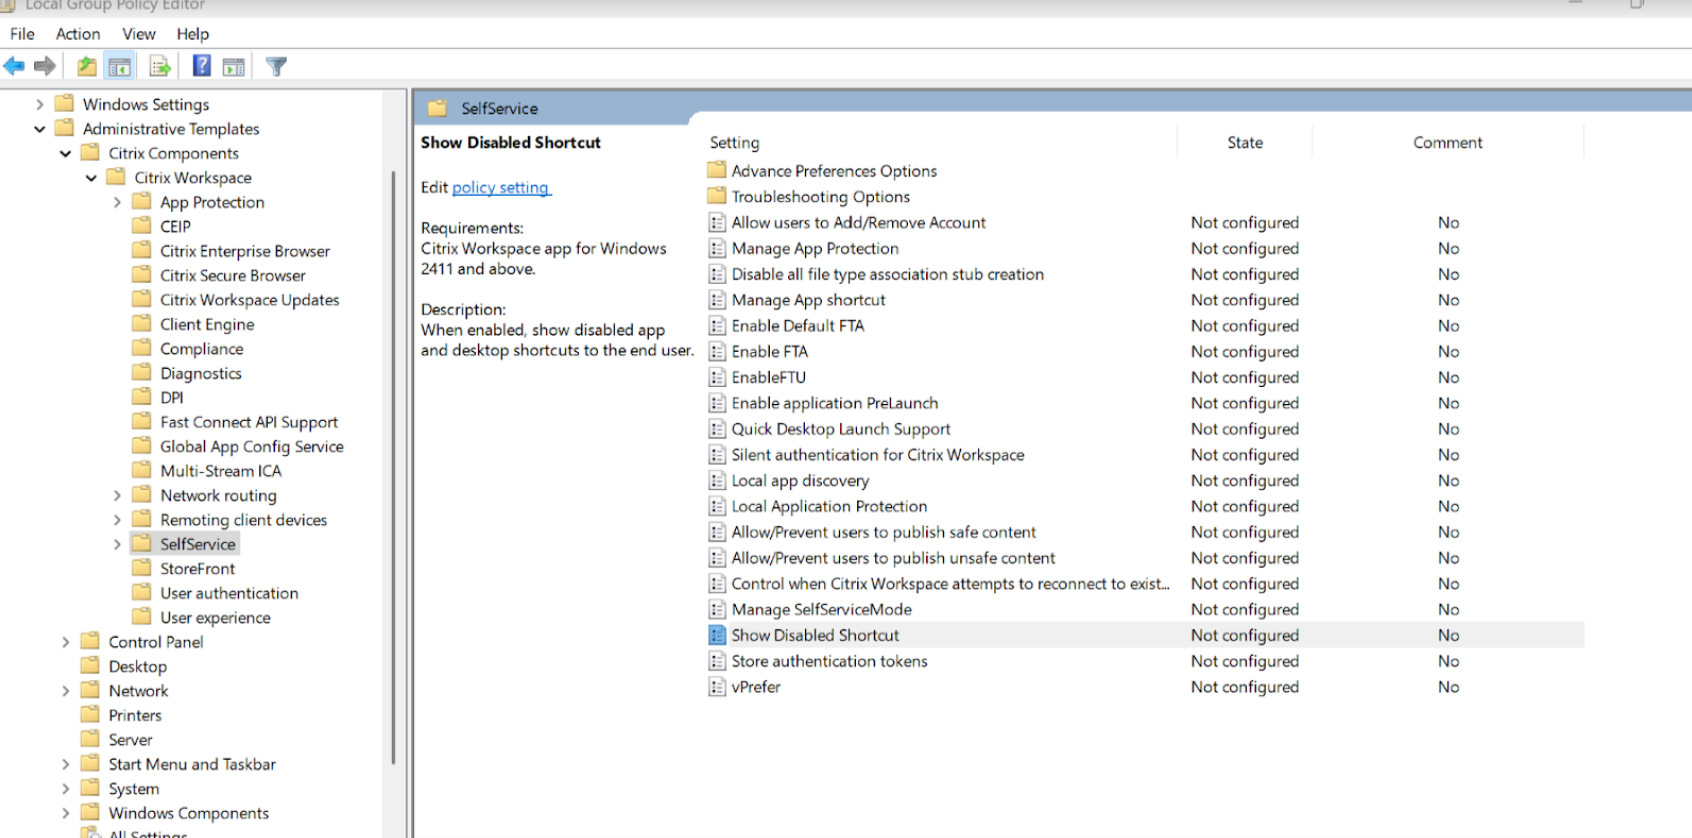
- Select the Enabled checkbox.
- Click OK.
Citrix Casting
The Citrix Ready® workspace hub combines digital and physical environments to deliver apps and data within a secure smart space. The complete system connects devices (or things), like mobile apps and sensors, to create an intelligent and responsive environment.
Citrix Ready workspace hub is built on the Raspberry Pi 3 platform. The device running Citrix Workspace app connects to the Citrix Ready workspace hub and casts the apps or desktops on a larger display. Citrix Casting is supported only on Microsoft Windows 10 Version 1607 and later or Windows Server 2016.
Citrix Casting feature allows instant and secure access of any app from a mobile device and display on a large screen.
Note:
- Citrix Casting for Windows supports Citrix Ready workspace hub Version 2.40.3839 and later. Workspace hub with earlier versions might not get detected or cause a casting error.
- The Citrix Casting feature is not supported on Citrix Workspace app for Windows (Store).
Prerequisites:
- Bluetooth enabled on the device for hub discovery.
- Both Citrix Ready workspace hub and Citrix Workspace app must be on the same network.
- Port 55555 is allowed between the device running Citrix Workspace app and the Citrix Ready workspace hub.
- For Citrix Casting, port 1494 must not be blocked.
- Port 55556 is the default port for SSL connections between mobile devices and the Citrix Ready workspace hub. You can configure a different SSL port on the Raspberry Pi’s settings page. If the SSL port is blocked, users cannot establish SSL connections to the workspace hub.
- Citrix Casting is supported only on Microsoft Windows 10 Version 1607 and later or Windows Server 2016.
- Run
/IncludeCitrixCastingcommand during installation to enable Citrix Casting.
Configure Citrix Casting launch
Note:
You can hide all or part of the Advanced Preferences sheet. For more information, see Advanced Preferences sheet.
-
Right-click the Citrix Workspace app icon from the notification area and select Advanced Preferences.
The Advanced Preferences dialog appears.
-
Select Citrix Casting.
The Citrix Casting dialog appears.
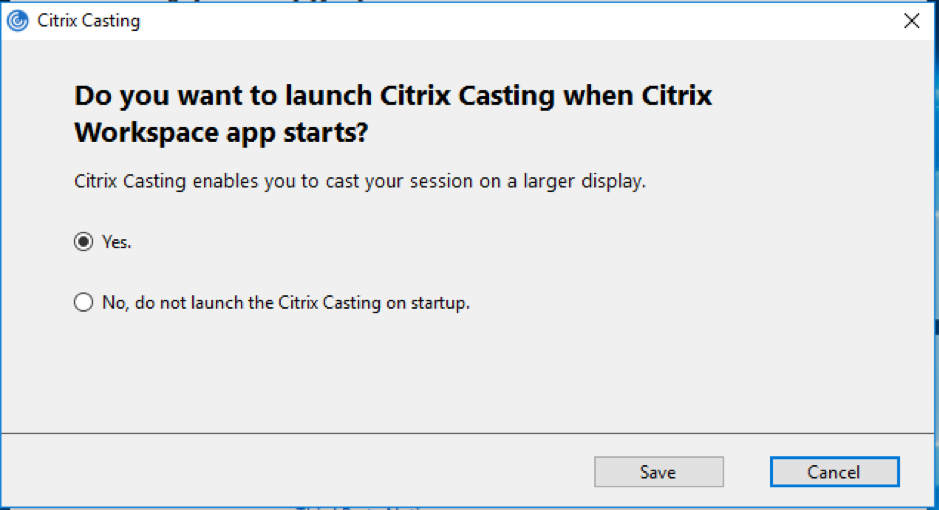
- Select one of the options:
- Yes – Indicates that Citrix Casting is launched when Citrix Workspace app starts.
- No, do not launch the Citrix Casting on startup – Indicates that Citrix Casting does not launch when Citrix Workspace app starts.
Note:
Selecting the option No does not terminate the current screen casting session. The setting is applied only at the next Citrix Workspace app launch.
- Click Save to apply the changes.
How to use Citrix Casting with Citrix Workspace app
-
Log on to Citrix Workspace app and enable Bluetooth on your device.
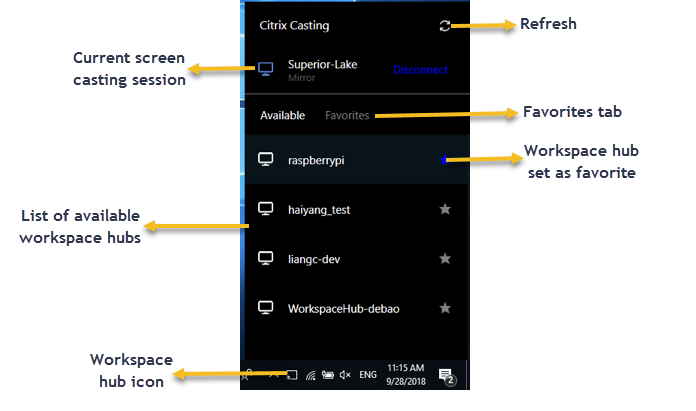
The list of available hubs is displayed. The list is sorted by the RSSI value of the workspace hub beacon package.
-
Select the workspace hub to cast your screen and choose one of the following:
- Mirror to duplicate the primary screen and cast the display to the connected workspace hub device.
- Extend to use the workspace hub device screen as your secondary screen.
Note:
Exiting Citrix Workspace app does not exit Citrix Casting.
In the Citrix Casting notification dialog, the following options are available:
- The current screen casting session displayed at the top.
- Refresh icon.
- Disconnect to stop the current screen casting session.
- Star icon to add the workspace hub to Favorites.
- Right-click the workspace hub icon in the notification area and select Exit to disconnect the screen casting session and to exit Citrix Ready workspace hub.
Self-check list
If Citrix Workspace app cannot detect and communicate with any available workspace hubs in range, ensure that you do the following as part of self-check:
- Citrix Workspace app and Citrix Ready workspace hub are connected to the same network.
- Bluetooth is enabled and working properly on the device where Citrix Workspace app is launched.
- The device where Citrix Workspace app is launched is within range (less than 10 meters and without any obstructing objects such as walls) of Citrix Ready workspace hub.
- Launch a browser in Citrix Workspace app and type
http://<hub_ip>:55555/device-details.xmlto check whether it displays the details of workspace hub device. - Click Refresh in Citrix Ready workspace hub and try reconnecting to the workspace hub.
Change to Citrix Casting
Previously, Citrix Casting was enabled by default during the Citrix Workspace app installation. Starting from the 2205 release, Citrix Casting is enabled only if you run Citrix Workspace app installer with the /IncludeCitrixCasting command during installation.
When you update Citrix Workspace app, the Citrix Casting gets updated automatically. For more information on Citrix Casting, see Citrix Casting.
Known issues and limitations
- Citrix Casting does not work unless the device is connected to the same network as the Citrix Ready workspace hub.
- If there are network issues, there might be a lag in display on the workspace hub device.
- When you select Extend, the primary screen where Citrix Ready workspace app is launched flashes multiple times.
- In Extend mode, you cannot set the secondary display as the primary display.
- The screen casting session automatically disconnects when there is any change in the display settings on the device. For example, change in screen resolution, change in screen orientation.
- During the screen casting session, if the device running Citrix Workspace app locks, sleeps or hibernates, an error appears at login.
- Multiple screen casting sessions are not supported.
- The maximum screen resolution supported by Citrix Casting is 1920 x 1440.
- Citrix Casting supports Citrix Ready workspace hub Version 2.40.3839 and later. Workspace hub with earlier versions might not get detected or cause a casting error.
- This feature is not supported on Citrix Workspace app for Windows (Store).
- On Windows 10, Build 1607, Citrix Casting in Extend mode might not be properly positioned.
For more information about Citrix Ready workspace hub, see the Citrix Ready workspace hub section in the Citrix Virtual Apps and Desktops documentation.
In this article
- Advanced Preferences sheet
- Hiding Advanced Preferences option from the right-click menu
- Hide Troubleshooting and Send Feedback options for end-users
- Option to prevent endpoint from going to sleep when a session is active
- Auto-sync backend resource changes for Start menu and desktop shortcuts
- Citrix Casting