USB
USB support
USB support enables you to interact with a wide range of USB devices when connected to a Citrix Virtual Apps and Desktops™ and Citrix DaaS. You can plug USB devices into their computers and the devices are remote to their virtual desktop. USB devices available for remoting include flash drives, smartphones, PDAs, printers, scanners, MP3 players, security devices, and tablets. Desktop Viewer users can control whether USB devices are available on the Citrix Virtual Apps and Desktops and Citrix DaaS using a preference in the toolbar.
Isochronous features in USB devices, such as webcams, microphones, speakers, and headsets are supported in typical low latency or high-speed LAN environments. Such environment allows these devices to interact with packages, like Microsoft Office Communicator and Skype.
The following types of device are supported directly in a virtual apps and desktops session, and so does not use USB support:
- Keyboards
- Mice
- Smart cards
Specialist USB devices (for example, Bloomberg keyboards and 3-D mice) can be configured to use USB support. For information on configuring Bloomberg keyboards, see Configure Bloomberg keyboards.
For information on configuring policy rules for other specialist USB devices, see Knowledge Center article CTX122615.
By default, certain types of USB devices are not supported for remoting through Citrix Virtual Apps and Desktops and Citrix DaaS. For example, a user might have a NIC attached to the system board by internal USB. Remoting this device would not be appropriate. The following types of USB device are not supported by default in a virtual apps and desktops session:
- Bluetooth dongles
- Integrated NIC
- USB hubs
- USB graphics adapters
USB devices connected to a hub can be remote, but the hub itself cannot be remote.
The following types of USB device are not supported by default for use in a virtual apps session:
- Bluetooth dongles
- Integrated NIC
- USB hubs
- USB graphics adapters
- Audio devices
- Mass storage devices
How USB support works:
When a user plugs in a USB device, it is checked against the USB policy, and, if allowed, remoted to the virtual desktop. If the default policy denies a device, it is available only to the local desktop.
When a user plugs in a USB device, a notification appears to inform the user about a new device. The user can select which USB devices must be remoted to the virtual desktop each time they connect. Alternatively, the user can configure USB support so that all USB devices plugged in both before and/or during a session is automatically remoted to the virtual desktop that is in focus.
USB device classes allowed by default
Default USB policy rules allow different classes of USB device.
Although they are on this list, some classes are only available for remoting in virtual apps and desktops sessions after additional configuration. Such USB device classes are as follows.
- Audio (Class 01)- Includes audio input devices (microphones), audio output devices, and MIDI controllers. Modern audio devices generally use isochronous transfers that XenDesktop® 4 or later supports. Audio (Class01) is not applicable to virtual apps because these devices are not available for remoting in virtual apps using USB support.
Note:
Some specialty devices (for example, VOIP phones) require additional configuration.
-
Physical Interface Devices (Class 05)- These devices are similar to Human Interface Devices (HIDs), but generally provide “real-time” input or feedback and include force feedback joysticks, motion platforms, and force feedback endoskeletons.
-
Still Imaging (Class 06)- Includes digital cameras and scanners. Digital cameras often support the still imaging class which uses the Picture Transfer Protocol (PTP) or Media Transfer Protocol (MTP) to transfer images to a computer or other peripheral. Cameras might also appear as mass storage devices. It might be also possible to configure a camera to use either class, through the setup menus provided by the camera itself.
Note:
If a camera appears as a mass storage device, client drive mapping is used and USB support is not required.
-
Printers (Class 07)- In general most printers are included in this class, although some use vendor-specific protocols (class ff). Multi-function printers might have an internal hub or be composite devices. In both cases the printing element generally uses the Printers class and the scanning or fax element uses another class; for example, Still Imaging.
Printers normally work appropriately without USB support.
Note
This class of device (in particular printers with scanning functions) requires additional configuration.
-
Mass Storage (Class 08)- The most common mass storage devices are USB flash drives; others include USB-attached hard drives, CD/DVD drives, and SD/MMC card readers. There are a wide variety of devices with internal storage that also present a mass storage interface; these include media players, digital cameras, and mobile phones. Mass Storage (Class 08) is not applicable to virtual apps because these devices are not available for remoting in virtual apps using USB support. Known subclasses include:
- 01 Limited flash devices
- 02 Typically CD/DVD devices (ATAPI/MMC-2)
- 03 Typically tape devices (QIC-157)
- 04 Typically floppy disk drives (UFI)
- 05 Typically floppy disk drives (SFF-8070i)
- 06 Most mass storage devices use this variant of SCSI
Mass storage devices can often be accessed through client drive mapping, and so USB support is not required.
-
Content Security (Class 0d)- Content security devices enforce content protection, typically for licensing or digital rights management. This class includes dongles.
-
Video (Class 0e)- The video class cover devices that are used to manipulate video or video-related material. Devices, such as webcams, digital camcorders, analog video converters, some television tuners, and some digital cameras that support video streaming.
Important
Most video streaming devices use isochronous transfers that XenDesktop 4 or later supports. Some video devices (for example webcams with motion detection) require additional configuration.
-
Personal Healthcare (Class 0f)- These devices include personal healthcare devices such as blood pressure sensors, heart rate monitors, pedometers, pill monitors, and spirometry.
-
Application and Vendor Specific (Classes fe and ff)- Many devices use vendor-specific protocols or protocols not standardized by the USB consortium, and such devices usually appear as vendor-specific (class ff).
USB devices classes denied by default
Default USB policy rules don’t allow the following different classes of USB device:
-
Communications and CDC Control (Classes 02 and 0a). The default USB policy doesn’t allow these devices, because one of the devices might be providing the connection to the virtual desktop itself.
-
Human Interface Devices (Class 03). Includes a wide variety of both input and output devices. Typical Human Interface Devices (HIDs) are keyboards, mice, pointing devices, graphic tablets, sensors, game controllers, buttons, and control functions.
Subclass 01 is known as the “boot interface” class and is used for keyboards and mice.
The default USB policy doesn’t allow USB keyboards (class 03, subclass 01, protocol 1), or USB mice (class 03, subclass 01, protocol 2). The reason is most keyboards and mice are handled appropriately without USB support. Also, it is normally necessary to use these devices locally as well remotely when you connect to a virtual desktop.
-
USB Hubs (Class 09). USB hubs allow extra devices to be connected to the local computer. It is not necessary to access these devices remotely.
-
Smart Card (Class 0b). Smart card readers include contactless and contact smart card readers, and also USB tokens with an embedded smart card-equivalent chip.
Smart card readers are accessed using smart card remoting and do not require USB support.
-
Wireless Controller (Class e0). Some of these devices might be providing critical network access, or connecting critical peripherals, such as Bluetooth keyboards or mice.
The default USB policy does not allow these devices. However, there might be particular devices to which it is appropriate to provide access using USB support.
-
Miscellaneous network devices (Class ef, subclass 04)- Some of these devices might be providing critical network access. The default USB policy does not allow these devices. However, there might be particular devices to which it is appropriate to provide access using USB support.
Update the list of USB devices available for remoting
Edit the Citrix Workspace for Windows template file to update the range of USB devices available for remoting to desktops. The update allows you to change the Citrix Workspace for Windows using Group Policy. The file is in the following installed folder:
\C:\Program Files\Citrix\ICA Client\Configuration\en
Alternatively, you can edit the registry on each user device, adding the following registry key:
HKEY_LOCAL_MACHINE\SOFTWARE\Policies\Citrix\ICA Client\GenericUSB Type=String Name=”DeviceRules” Value=
Important
Editing the Registry incorrectly can cause serious problems that might require you to reinstall your operating system. Citrix® cannot guarantee that problems resulting from the incorrect use of the Registry Editor can be solved. Use the Registry Editor at your own risk. Be sure to back up the registry before you edit it.
The product default rules are stored in:
HKEY_LOCAL_MACHINE\SOFTWARE\Citrix\ICA Client\GenericUSB Type=MultiSz Name=”DeviceRules” Value=
Do not edit the product default rules.
For more information about USB devices policy settings, see USB devices policy settings in Citrix Virtual Apps and Desktops documentation.
Composite USB device redirection
USB 2.1 and later supports the notion of USB composite devices where multiple child devices share a single connection with the same USB bus. Such devices employ a single configuration space and shared bus connection where a unique interface number 00-ff is used to identify each child device. Such devices are also not the same as a USB hub which provides a new USB bus origin for other independently addressed USB devices for connection.
Composite devices found on the client endpoint can be forwarded to the virtual host as either:
-
a single composite USB device, or
-
a set of independent child devices (split devices)
When a composite USB device is forwarded, the entire device becomes unavailable to the endpoint. Forwarding also blocks the local usage of the device for all applications on the endpoint, including the Citrix Workspace client needed for an optimized HDX remote experience.
Consider a USB headset device with both audio device and HID button for mute and volume control. If the entire device is forwarded using a generic USB channel, the device becomes unavailable for redirection over the optimized HDX™ audio channel. However, you can achieve the best experience when the audio is sent through the optimized HDX audio channel unlike the audio sent using host-side audio drivers through generic USB remoting. The behavior is because of the noisy nature of the USB audio protocols.
You also notice issues when the system keyboard or pointing device are part of a composite device with other integrated features required for the remote session support. When a complete composite device is forwarded, the system keyboard or mouse becomes inoperable at the endpoint, except within the remote desktop session or application.
To resolve these issues, Citrix recommends that you split the composite device and forward only the child interfaces that use a generic USB channel. Such mechanism ensures that the other child devices are available for use by applications on the client endpoint, including, the Citrix Workspace app that provides optimized HDX experiences, while allowing only the required devices to be forwarded and available to the remote session.
Device Rules:
As with regular USB devices, device rules set in the policy or client Citrix Workspace app configuration on the end point select the composite devices for forwarding. Citrix Workspace app uses these rules to decide which USB devices to allow or prevent from forwarding to the remote session.
Each rule consists of an action keyword (Allow, Connect, or Deny), a colon (:), and zero or more filter parameters that match actual devices at the endpoints USB subsystem. These filter parameters correspond to the USB device descriptor metadata used by every USB device to identify itself.
Device rules are clear text with each rule on a single line and an optional comment after a # character. Rules are matched top down (descending priority order). The first rule that matches the device or child interface is applied. Subsequent rules that select the same device or interface are ignored.
Sample device rules:
- ALLOW: vid=046D pid=0102 # Allow a specific device by vid/pid
- ALLOW: vid=0505 class=03 subclass=01 # Allow any pid for vendor 0505 when subclass=01
- DENY: vid=0850 pid=040C # Deny a specific device (incl all child devices)
- DENY: class=03 subclass=01 prot=01 # Deny any device that matches all filters
- CONNECT: vid=0911 pid=0C1C # Allow and auto-connect a specific device
- ALLOW: vid=0286 pid=0101 split=01 # Split this device and allow all interfaces
- ALLOW: vid=1050 pid=0407 split=01 intf=00,01 # Split and allow only 2 interfaces
- CONNECT: vid=1050 pid=0407 split=01 intf=02 # Split and auto-connect interface 2
- DENY: vid=1050 pid=0407 split=1 intf=03 # Prevent interface 03 from being remoted
You can use any of the following filter parameters to apply rules to the encountered devices:
| Filter parameter | Description |
|---|---|
| vid=xxxx | USB device vendor ID (four-digit hexadecimal code) |
| pid=xxxx | USB device product ID (four-digit hexadecimal code) |
| rel=xxxx | USB device release ID (four-digit hexadecimal code) |
| class=xx | USB device class code (two-digit hexadecimal code) |
| subclass=xx | USB device subclass code (two-digit hexadecimal code) |
| prot=xx | USB device protocol code (two-digit hexadecimal code) |
| split=1 (or split=0) | Select a composite device to be split (or non-split) |
| intf=xx[,xx,xx,…] | Selects a specific set of child interfaces of a composite device (comma-separated list of two-digit hexadecimal codes) |
The first six parameters select the USB devices for which the rule must be applied. If any parameter is not specified, the rule matches a device with ANY value for that parameter.
The USB Implementors Forum maintains a list of defined class, subclass, and protocol values in Defined Class Codes. USB-IF also maintains a list of registered vendor IDs. You can check the vendor, product, release, and interface IDs of a specific device directly in the Windows device manager or using a free tool like UsbTreeView.
When present, the last two parameters apply only to USB composite devices. The split parameter determines if a composite device must be forwarded as split devices or as a single composite device.
- Split=1 indicates that the selected child interfaces of a composite device must be forwarded as split devices.
- Split=0 indicates that the composite device must not be split.
Note:
If the split parameter is omitted, Split=0 is assumed.
The intf parameter selects the specific child interfaces of the composite device to which the action must be applied. If omitted, the action applies to all interfaces of the composite device.
Consider a composite USB headset device with three interfaces:
- Interface 0 - Audio class device endpoints
- Interface 3 - HID class device endpoints (volume and mute buttons)
- Interface 5 - Management/update interface
The suggested rules for this type of device are:
- CONNECT: vid=047F pid=C039 split=1 intf=03 # Allow and auto-connect HID device
- DENY: vid=047F pid=C039 split=1 intf=00 # Deny audio end points
- ALLOW: vid=047F pid=C039 split=1 intf=05 # Allow mgmt intf but don’t auto-connect
Enable Device Rules policy:
Citrix Workspace app for Windows includes a set of default device rules that filters certain undesirable classes of devices and allow one that customers often encounter.
You can check these default device rules in the system registry at either:
-
HKEY_LOCAL_MACHINE\Software\Citrix\ICA Client\GenericUSB(32-bit Windows) or -
HKEY_LOCAL_MACHINE\Software\WOW6432Node\Citrix\ICA Client\GenericUSB(64-bit Windows), in the multistring value named DeviceRules.
However, in the Citrix Workspace app for Window, you can apply USB Device Rules policy to overwrite these default rules.
To enable device rules policy for Citrix Workspace app for Windows:
- Open the Citrix Workspace app Group Policy Object administrative template by running gpedit.msc.
- Under the User Configuration node, go to Administrative Templates > Citrix Components > Citrix Workspace > Remoting client devices > Generic USB Remoting.
- Select the USB Device Rules policy.
- Select Enabled.
- In the USB Device Rules text box, paste (or edit directly) the USB device rules to be deployed.
- Click Apply and OK.
Citrix recommends preserving the default rules shipped with the client when creating this policy by copying the original rules and inserting new rules to alter the behavior as desired.
Connecting USB devices:
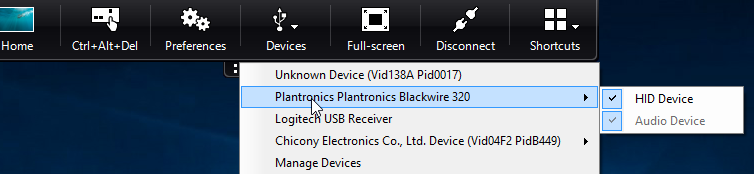
In a desktop session, split USB devices are displayed in the Desktop Viewer under Devices. Also, you can view split USB devices from Preferences > Devices.
Note:
CONNECT keyword enables automatic connection of a USB device. However, if the CONNECT keyword is not used when you split a composite USB device for generic USB redirection, you must manually select the device from the Desktop Viewer or Connection Center to connect an allowed device.
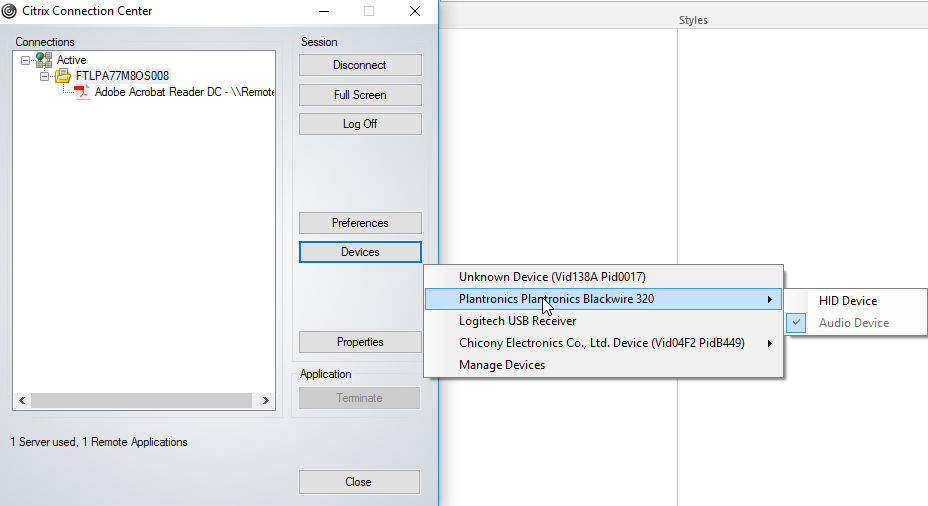
In an application session, split USB devices are displayed in the Connection Center.
To automatically connect an interface:
The CONNECT keyword introduced in Citrix Workspace app for Windows 2109 allows for automatic redirection of USB devices. The CONNECT rule can replace the ALLOW rule if the administrator allows the device or selected interfaces to automatically connect in the session.
- Open the Citrix Workspace app Group Policy Object administrative template by running gpedit.msc.
- Under the User Configuration node, go to Administrative Templates > Citrix Components > Citrix Workspace > Remoting client devices > Generic USB Remoting.
- Select the USB Device Rules policy.
- Select Enabled.
-
In the USB Device Rules text box, add the USB device that you want to auto connect.
For example, CONNECT: vid=047F pid=C039 split=01 intf=00,03 – allows for splitting a composite device and auto connection of interfaces 00 and 03 interface and restriction other interfaces of that device.
- Click Apply and OK to save the policy.
Changing USB device auto-connection preferences:
Citrix Workspace app automatically connects USB devices tagged with CONNECT action based on the preferences set for the current desktop resource. You can change the preferences in the Desktop viewer toolbar as shown in the following image.
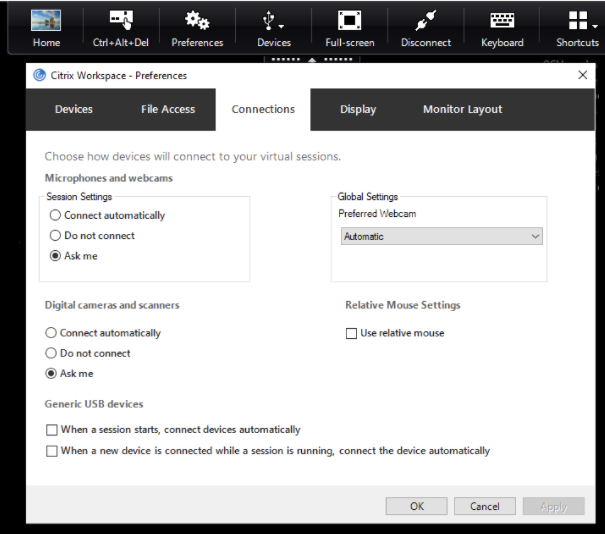
The two check boxes at the bottom of the pane controls if the devices must connect automatically or wait for manual connection in the session. These settings are not enabled by default. You can change the preferences if generic USB devices must be connected automatically.
Alternatively, an administrator can override the user preferences by deploying the corresponding policies from Citrix Workspace app Group Policy Object administrative template. Both machine and user policies can be found under Administrative Templates > Citrix Components > Citrix Workspace > Remoting client devices > Generic USB Remoting. The corresponding policies are labeled as Existing USB Devices and New USB Devices respectively.
Change split device default setting:
By default, the Citrix Workspace app for Windows only splits composite devices that are explicitly tagged as Split=1 in the device rules. However, it is possible to change the default disposition to split all composite devices that are not otherwise tagged with Split=0 in a matching device rule.
- Open the Citrix Workspace app Group Policy Object administrative template by running gpedit.msc.
- Under the User Configuration node, go to Administrative Templates > Citrix Components > Citrix Workspace > Remoting client devices > Generic USB Remoting.
- Select the SplitDevices policy.
- Select Enabled.
- Click Apply and OK to save the policy.
Note:
Citrix recommends using explicit device rules to identify specific devices or interfaces that need to be split instead of changing the default. This setting will be deprecated in a future release.
Limitation:
- Citrix recommends that you do not split interfaces for a webcam. As a workaround, redirect the device to a single device using Generic USB redirection. For a better performance, use the optimized virtual channel.
-
Sometimes, USB composite devices might not be split automatically even though a correct device redirection rule is set to split the device. The issue occurs because the device is in low power mode. In these instances, the child device that enters low power mode might not be present in the device list. You can use one of the following workarounds to overcome this issue:
- Disconnect the session, insert the USB device, and reconnect to the session.
- Unplug the USB device and plug it back in. This action results in the device moving out of low power mode. [HDX-34143]
Bloomberg keyboards
Citrix Workspace app supports the use of Bloomberg keyboard in a virtual apps and desktops session. The required components are installed with the plug-in. You can enable the Bloomberg keyboard feature when installing Citrix Workspace app for Windows or by using the Registry editor.
Bloomberg keyboards provide other functionality when compared to standard keyboards that allow the user to access financial market data and perform trades.
The Bloomberg keyboard consists of multiple USB devices built into one physical shell:
- the keyboard
- a fingerprint reader
- an audio device
- a USB hub to connect all of these devices to the system
- HID buttons, for example, Mute, Vol Up, and Vol Down for the audio device
In addition to the normal functionality of these devices, the audio device includes support for some keys, control of the keyboard, and keyboard LEDs.
To use the specialized functionality inside a session, you must redirect the audio device as a USB device. This redirect makes the audio device available to the session, but prevents the audio device from being used locally. In addition, the specialized functionality can only be used with one session and cannot be shared between multiple sessions.
Multiple sessions with Bloomberg keyboards are not recommended. The keyboard operates in a single-session environment only.
Configuring Bloomberg keyboard 5:
Starting from Citrix Workspace app for Windows 2109 version, a new CONNECT keyword is introduced to allow automatic connection of USB devices at session startup and device insertion. The CONNECT keyword can be used to replace the ALLOW keyword when the user wants a USB device or interface to connect automatically.
Note:
With the introduction of Device redirection rules version 2 in Studio in Citrix Virtual Apps and Desktops 2212 version, it isn’t required to configure the Bloomberg 5 keyboard through client-side group policies in Citrix Workspace app for Windows. For more details, see Client USB device redirection rules (Version 2) in Citrix Virtual Apps and Desktops documentation.
For versions prior to Citrix Workspace app for Windows version 2212, the following example shows how to use the CONNECT keyword:
- Open the Citrix Workspace app Group Policy Object administrative template by running gpedit.msc.
- Under the Computer Configuration node, go to Administrative Templates > Citrix Components > Citrix Workspace > Remoting client devices > Generic USB Remoting.
- Select the SplitDevices policy.
- Select Enabled.
-
In the USB Device Rules text box, add the following rules if it doesn’t exist.
- CONNECT: vid=1188 pid=A101 # Bloomberg 5 Biometric module
- DENY: vid=1188 pid=A001 split=01 intf=00 # Bloomberg 5 Primary keyboard
- CONNECT: vid=1188 pid=A001 split=01 intf=01 # Bloomberg 5 Keyboard HID
- DENY: vid=1188 pid=A301 split=01 intf=02 # Bloomberg 5 Keyboard Audio Channel
- CONNECT: vid=1188 pid=A301 split=01 intf=00,01 # Bloomberg 5 Keyboard Audio HID
Note:
New lines or semicolon can be used to separate rules which allows to read either single line or multi-line registry values.
- Click Apply and OK to save the policy.
- In the Preferences window, select the Connections tab, and select one or both check boxes to the connect devices automatically. The Preferences window is accessible from the Desktop Toolbar or Connection Manager.
This procedure makes the Bloomberg keyboard 5 ready for use. The DENY rules that are mentioned in the steps enforce the redirection of the primary keyboard and audio channel over an optimized channel but not over Generic USB. The CONNECT rules enable automatic redirection of the fingerprint module, special keys on the keyboard, and keys related to audio control.
Configure Bloomberg keyboard 4 or 3:
Caution
Editing the registry incorrectly can cause serious problems that might require you to reinstall your operating system. Citrix cannot guarantee that problems resulting from the incorrect use of the Registry editor can be solved. Use the Registry editor at your own risk. Be sure to back up the registry before you edit it.
-
Locate the following key in the registry:
HKEY_LOCAL_MACHINE\SOFTWARE\Citrix\ICA Client\GenericUSB -
Do one of the following:
- To enable this feature, for the entry with type DWORD and Name EnableBloombergHID, set the value to 1.
- To disable this feature, set the value to 0.
Bloomberg keyboard 3 support is available in the online plug-in 11.2 for Windows and subsequent versions.
Bloomberg keyboard 4 support is available for Windows Receiver 4.8 and later versions.
Determining if Bloomberg keyboards support is enabled:
- To check if Bloomberg keyboard support is enabled in the online plug-in, check how the Desktop Viewer reports the Bloomberg keyboard devices. If the Desktop Viewer isn’t used, you can check the registry on the machine where the online plug-in is running.
-
If support for Bloomberg keyboards is not enabled, the Desktop Viewer shows:
- two devices for the Bloomberg keyboard 3, that appears as Bloomberg Fingerprint Scanner and Bloomberg Keyboard Audio.
- one policy redirected device for Bloomberg keyboard 4. This device appears as Bloomberg LP Keyboard 2013.
- If support for Bloomberg keyboards is enabled, there are two devices shown in the Desktop Viewer. One appears as Bloomberg Fingerprint Scanner as before, and the other as Bloomberg Keyboard Features.
- If the driver for the Bloomberg Fingerprint Scanner device is not installed, the Bloomberg Fingerprint Scanner entry might not appear in the Desktop Viewer. If the entry is missing, the Bloomberg Fingerprint Scanner might not be available for redirection. You can still check the name of the other Bloomberg device where Bloomberg keyboards support is enabled.
-
You can also check the value in the registry to know if the support is enabled:
HKEY_LOCAL_MACHINE\SOFTWARE\Citrix\ICAClient\GenericUSB\EnableBloombergHIDIf the value doesn’t exist or is 0 (zero), support for Bloomberg keyboards is not enabled. If the value is 1, support is enabled.
Enabling Bloomberg keyboard support:
Note:
Citrix Receiver for Windows 4.8 introduced the support for composite devices through the SplitDevices policy. However, you must use the Bloomberg keyboard feature instead of this policy for the Bloomberg keyboard 4.
The support for the Bloomberg keyboard changes the way certain USB devices are redirected to a session. This support is not enabled by default.
-
To enable the support during the installation time, specify the value of the ENABLE_HID_REDIRECTION property as TRUE at the installation command-line. For example:
CitrixOnlinePluginFull.exe /silentADDLOCAL="ICA_CLIENT,PN_AGENT,SSON,USB"ENABLE_SSON="no" INSTALLDIR="c:\test"ENABLE_DYNAMIC_CLIENT_NAME="Yes"DEFAULT_NDSCONTEXT="Context1,Context2"SERVER_LOCATION="http://testserver.net" ENABLE_HID_REDIRECTION="TRUE" -
To enable support after installing the online plug-in, edit the Windows Registry on the system where the online plug-in is running:
- Open Registry Editor.
- Navigate to the following key:
HKEY_LOCAL_MACHINE\SOFTWARE\Citrix\ICA Client\GenericUSB - If the value EnableBloombergHID exists, modify it so that the value data is 1.
- If the value EnableBloombergHID does not exist, create a DWORD value with the name EnableBloombergHID and provide the value data as 1.
Disabling support for the Bloomberg keyboard:
You can disable support for the Bloomberg keyboard in the online plug-in as follows:
- Open Registry Editor on the system running the online plug-in software.
- Navigate to the following key:
HKEY_LOCAL_MACHINE\SOFTWARE\Citrix\ICA Client\GenericUSB -
If the value EnableBloombergHID exists, modify it so that the value data is 0 (zero).
If the value EnableBloombergHID doesn’t exist, it indicates that the support for the Bloomberg keyboard is not enabled. In such case, you don’t have to modify any registry values.
Using Bloomberg keyboards without enabling support:
- You can use the keyboard without enabling the Bloomberg keyboard support in the online plug-in. However, you cannot have the benefit of sharing the specialized functionality among multiple sessions and you might experience increased network bandwidth from audio.
- Bloomberg keyboard ordinary keys are available in the same way as any other keyboard. You don’t have to take any special action.
- To use the specialized Bloomberg keys, you must redirect the Bloomberg keyboard audio device into the session. If you are using the Desktop Viewer, the manufacturer name and device name of the USB devices appears and Bloomberg Keyboard Audio appears for the Bloomberg Keyboard audio device.
- To use the fingerprint reader, you must redirect the device to Bloomberg Fingerprint Scanner. If the drivers for the fingerprint reader are not installed locally, the device only shows:
- if the online plug-in is set to connect devices automatically or
- to let the user choose whether to connect devices.
Also, if the Bloomberg keyboard is connected before establishing the session and drivers for the fingerprint reader doesn’t exist locally, then the fingerprint reader doesn’t appear and isn’t usable within the session.
Note:
For Bloomberg 3, a single session or the local system can use the fingerprint reader, and cannot be shared. Bloomberg 4 is prohibited for redirection.
Using Bloomberg keyboards after enabling support:
-
If you enable support for Bloomberg keyboards in the online plug-in, you have the benefit of sharing the specialized keyboard functionality with multiple sessions. You also experience less network bandwidth from the audio.
-
Enabling support for the Bloomberg keyboard prevents the redirection of the Bloomberg Keyboard audio device. Instead, a new device is made available. If you are using the Desktop Viewer, this device is called Bloomberg Keyboard Features. Redirecting this device provides the specialized Bloomberg keys to the session.
Enabling the Bloomberg keyboard support only affects the specialized Bloomberg keys and the audio device. Because the ordinary keys and fingerprint reader are used in the same way as when the support is not enabled.
HDX Plug and Play USB device redirection
HDX Plug and Play USB device redirection enables dynamic redirection of media devices to the server. The media device includes cameras, scanners, media players, and point of sale (POS) devices. You or the user can restrict the redirection of all or some of the devices. Edit policies on the server or apply group policies on the user device to configure the redirection settings. For more information, see USB and client drive considerations in the Citrix Virtual Apps and Desktops documentation.
Important:
If you prohibit Plug and Play USB device redirection in a server policy, the user can’t override that policy setting.
A user can set permissions in Citrix Workspace app to allow or reject device redirection always or notify each time a device is connected. The setting affects only devices plugged in after the user changes the setting.
To map a client COM port to a server COM port
Client COM port mapping allows devices attached to the COM ports of the user device to be used during sessions. These mappings can be used like any other network mappings.
You can map client COM ports at the command prompt. You can also control client COM port mapping from the Remote Desktop (Terminal Services) Configuration tool or using policies. For information about policies, see the Citrix Virtual Apps and Desktops documentation.
Important:
COM port mapping isn’t TAPI-compatible.
-
For Citrix Virtual Apps and Desktops deployments, enable the Client COM port redirection policy setting.
-
Log on to Citrix Workspace app.
-
At a command prompt, type:
net use comx: \\\\client\\comz:where:
- x is the number of the COM port on the server (ports 1 through 9 are available for mapping) and
- z is the number of the client COM port you want to map
-
To confirm the operation, type:
net useThe prompt displays mapped drives, LPT ports, and mapped COM ports.
To use this COM port in a virtual desktop or application, install your user device to the mapped name. For example, if you map COM1 on the client to COM5 on the server, install your COM port device on COM5 during the session. Use this mapped COM port as you would a COM port on the user device.
Configuring USB audio
Note:
- When you upgrade or install Citrix Workspace app for Windows for the first time, add the latest template files to the local GPO. For more information on adding template files to the local GPO, see Group Policy Object administrative template. For upgrade, the existing settings are retained while importing the latest files.
- This feature is available only on Citrix Virtual Apps server.
To configure USB audio devices:
- Open the Citrix Workspace app Group Policy Object administrative template by running gpedit.msc.
- Under the Computer Configuration node, go to Administrative Templates > Classic Administrative Templates (ADM) > Citrix Components > Citrix Workspace > User experience, and select Audio through Generic USB Redirection.
- Edit the settings.
- Click Apply and OK.
- Open the cmd prompt in administrator mode.
- Run the following command
gpupdate /force.
Mass storage devices
For mass storage devices only, in addition to USB support, remote access is available through client drive mapping. You can configure this through the Citrix Workspace app for Windows policy Remoting client devices > Client drive mapping. When you apply this policy, the drives on the user device automatically map to drive letters on the virtual desktop when users log on. The drives are displayed as shared folders with mapped drive letters.
The main differences between the two types of remoting policy are:
| Feature | Client drive mapping | USB support |
|---|---|---|
| Enabled by default | Yes | No |
| Read-only access configurable | Yes | No |
| Safe to remove device during a session | No | Yes, if the user clicks Safely Remove Hardware in the notification area |
If you enable both Generic USB and the client drive-mapping policies and insert a mass storage device before a session starts, it is redirected using client drive mapping first, before being considered for redirection through USB support. If it is inserted after a session has started, it will be considered for redirection using USB support before client drive mapping.
Remember USB connections
Starting with Citrix Workspace app for Windows version 2409, this feature enhances the user experience when remoting USB devices to a Citrix Virtual Apps and Desktops session. While auto-redirection supports using device rules exists, this feature simplifies the process by remembering manually requested connections and reconnecting them with minimal configuration.
Note:
Devices that have been marked ALLOW by the administrator in the ‘Client USB Device Redirection Rules (Version 2)’ policy of Citrix Studio or through GPO are available for manual-remembered connection to the session. In the absence of the Version 2 policy being enabled, the devices can be marked as ALLOW in the version 1 policy rules as well. Devices marked as CONNECT are always connected, while devices marked as DENY are prohibited from connection.
Key benefits
- Improved auto-redirection: By remembering manual connections and associating them with the desktop resource ID, devices are redirected only in the sessions where they were initially connected.
- Session-specific associations: Different devices can be remembered and associated with specific sessions, providing more convenience.
-
User control: Users can choose to automatically connect remembered devices either at session start or upon device insertion during an active session by selecting the following checkboxes in the Preferences window or by setting the appropriate GPO policy or studio policy:
- When a session starts, connect devices automatically
- When a new device is inserted while a session is running, connect the device automatically
These settings can also be managed using GPO policy or centrally administered through DDC policy.
To enable this feature, follow these steps:
- Open the Registry Editor.
- Navigate to:
Computer\HKEY_LOCAL_MACHINE\SOFTWARE\Citrix\ICA Client\GenericUSB. -
Create a Registry value with the following attributes:
- Registry Key Name: RememberConnections
- Type: DWORD
- Value: 0 (disabled) or 1 (enabled)
- Restart the Citrix Workspace app for the changes to take effect.
Note:
Citrix Workspace app’s default device rules include the CONNECT keyword for child devices of Bloomberg 5 keyboards. These rules are also present in the ‘Client USB Device Redirection Rules (Version 2)’ policy of Citrix Studio. To remember connections for the Bloomberg 5 keyboard, these rules must be modified by replacing the CONNECT keyword with ALLOW.
By enabling this feature, users can enjoy a more seamless and efficient experience with USB device redirection in Citrix Virtual Apps and Desktops sessions.