Graphics and display
Multi-monitor support
You can use up to eight monitors with Citrix Workspace app for Windows.
Each monitor in a multiple monitor configuration has its own resolution designed by its manufacturer. Monitors can have different resolutions and orientations during sessions.
Sessions can span multiple monitors in two ways:
-
Full screen mode, with multiple monitors shown inside the session; applications snap to monitors as they would locally.
Citrix Virtual Apps and Desktops™ and Citrix DaaS: To display the Desktop Viewer window across any rectangular subset of monitors, resize the window across any part of those monitors and click Maximize.
-
Windowed mode, with one single monitor image for the session, applications do not snap to individual monitors.
Citrix Virtual Apps and Desktops and Citrix DaaS: When any desktop in the same assignment (formerly “desktop group”) is launched then, the window setting is preserved and the desktop is displayed across the same monitors. Multiple virtual desktops can be displayed on one device provided the monitor arrangement is rectangular. If the primary monitor on the device is used by the virtual apps and desktops session, it becomes the primary monitor in the session. Otherwise, the numerically lowest monitor in the session becomes the primary monitor.
To enable multi-monitor support, check the following:
- The user device is configured to support multiple monitors.
- The operating system can detect each of the monitors. On Windows platforms, to verify that this detection occurs, go to Settings > System and click Display and confirm that each monitor appears separately.
- After your monitors are detected, ensure the Display memory limit policy is set on VDA:
- Citrix Virtual Desktops™: Configure the graphics memory limit using the Citrix Machine Policy setting Display memory limit.
- Citrix Virtual Apps: Depending on the version of the Citrix Virtual Apps server, you’ve installed configure the graphics memory limit using the Citrix Computer Policy setting Display memory limit.
For more information, see Display memory limit documentation.
Check if the setting is large enough (in kilobytes) to provide sufficient graphic memory. If this setting isn’t high enough, the published resource is restricted to the subset of the monitors that fits within the size specified.
Using Citrix Virtual desktops on dual monitor:
- Select the Desktop Viewer and click the down arrow.
- Select Window.
- Drag the Citrix Virtual Desktops screen between the two monitors. Ensure that about half the screen is present in each monitor.
-
From the Citrix Virtual Desktop toolbar, select Full-screen.
The screen is now extended to both the monitors.
For calculating the session’s graphic memory requirements for Citrix Virtual Apps and Desktops and Citrix DaaS, see Knowledge Center article CTX115637.
Multi-monitor layout selection
Starting with version 2503, the Multi-Monitor Selector (MMS) allows users to choose which displays to use in full-screen mode for desktop sessions only, not for seamless sessions. A new Multi-Monitor button has been added to the toolbar, which appears only when more than one screen is connected. This feature enhances the flexibility and usability of multi-monitor setups in desktop sessions, providing a more tailored and efficient user experience.
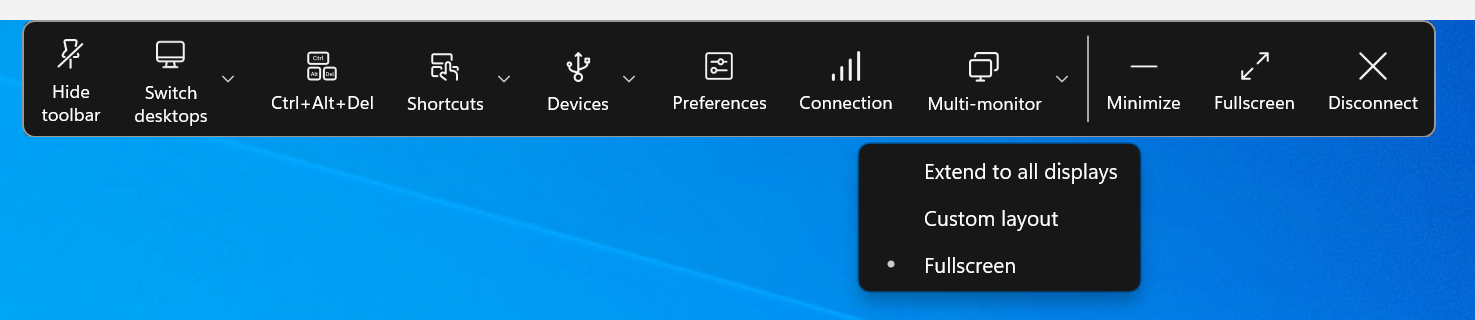
Multi-monitor menu options
The toolbar button includes three drop-down menu options for desktop sessions in full-screen mode:
- Extend to All Displays: The session switches to full-screen mode on all connected screens.
-
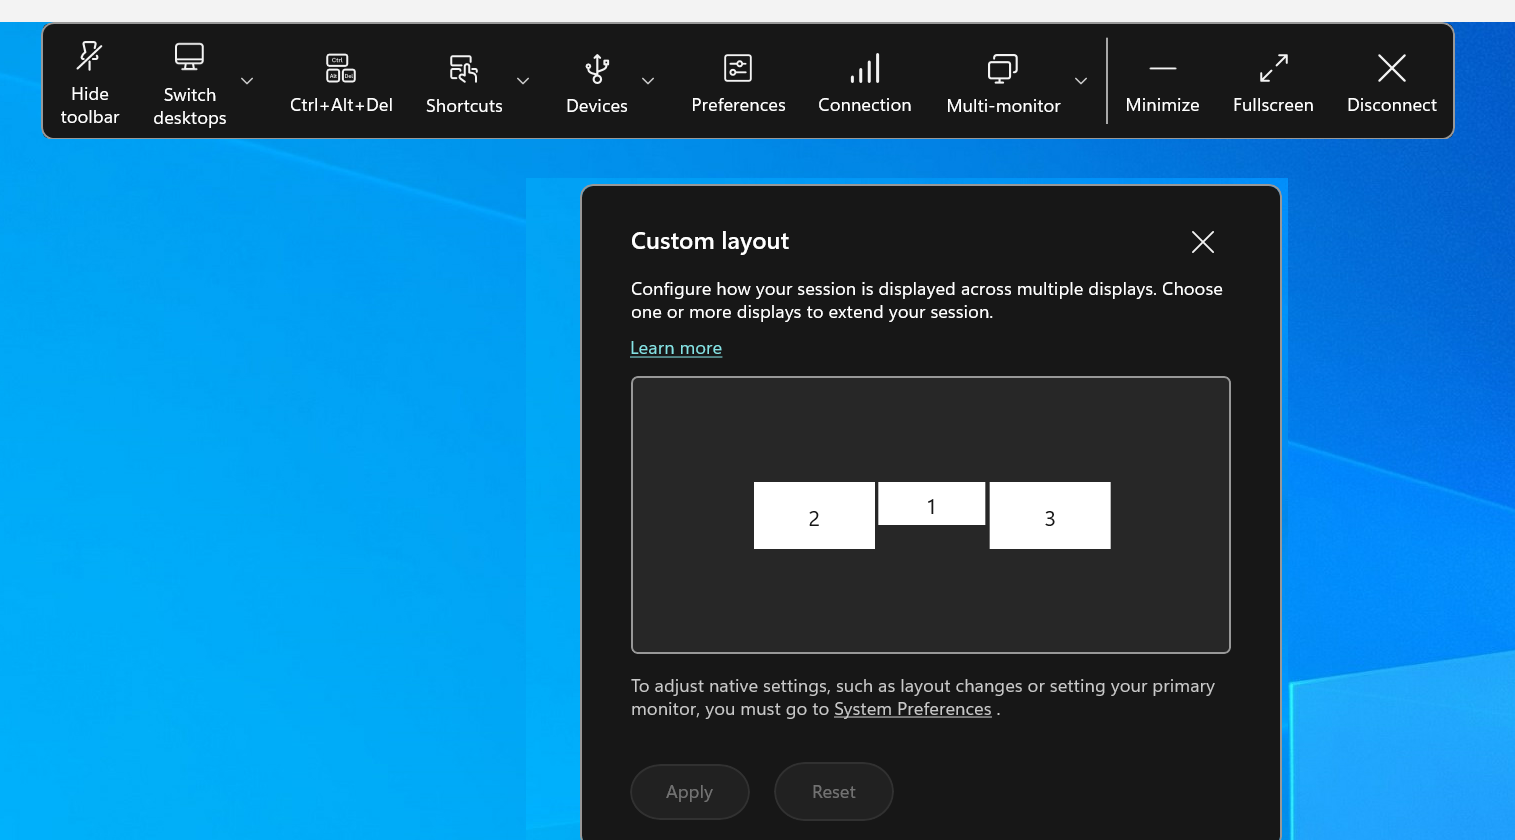
Custom Layout: This option opens a custom monitor selector displaying the layout of the Windows system. Users can click the rectangles in the selector to choose which screens to use and then click Apply. The session then uses the selected screens in full-screen mode.
-
Fullscreen: The session switches to full-screen mode on whichever monitor the session is currently active on. For example:
- If your session is active on one monitor, it will be full screen on that monitor.
- If your session is active on two monitors, it will be full screen on those two monitors.
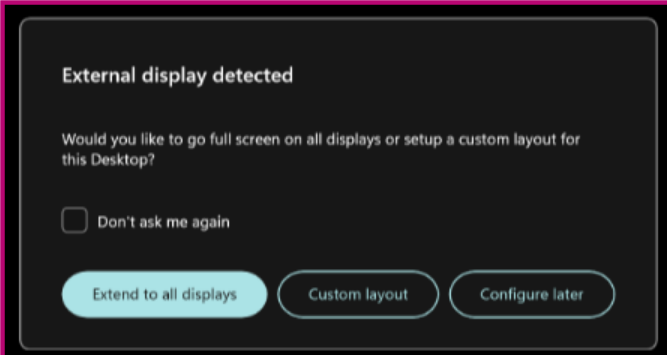
When a new monitor is plugged in, a notification appears for the user to make a selection. Users can check Remember my preference to mute this notification.
Hardware decoding
When using Citrix Workspace app (with HDX engine), the GPU can be used for video decoding wherever it’s available at the client. This feature is enabled by default.
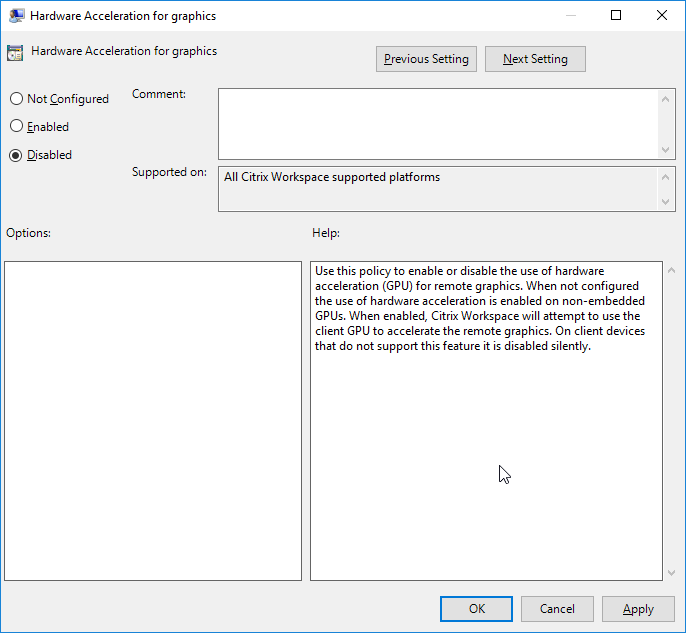
To disble hardware decoding using Citrix Workspace app Group Policy Object administrative template:
- Open the Citrix Workspace app Group Policy Object administrative template by running gpedit.msc.
- Under the Computer Configuration node, go to Administrative Templates > Citrix Workspace >User Experience.
- Select Hardware Acceleration for graphics.
- Select Disabled and click Apply and OK.
When using the hardware decoding feature, consider the following limitations:
- If the client has two GPUs and if one of the monitors is active on the second GPU, CPU decoding is used.
- When connecting to a Citrix Virtual Apps server running on Windows Server 2008 R2, don’t use hardware decoding on the user’s Windows device. If enabled, issues like slow performance while highlighting text and flickering issues are seen.
Virtual display layout
This feature lets you define a virtual monitor layout that applies to the remote desktop. You can also split a single client monitor virtually into up to eight monitors on the remote desktop. You can configure the virtual monitors on the Monitor Layout tab in the Desktop Viewer. There, you can draw horizontal or vertical lines to separate the screen into virtual monitors. The screen is split according to specified percentages of the client monitor resolution.
You can set a DPI for the virtual monitors that is used for DPI scaling or DPI matching. After applying a virtual monitor layout, resize or reconnect the session.
This configuration applies only to full-screen, single-monitor desktop sessions, and does not affect any published applications. This configuration applies to all subsequent connections from this client.
Starting from Citrix Workspace app for Windows 2106, virtual display layout is also supported for full-screen and multi-monitor desktop sessions. Virtual display layout is enabled by default. In a multi-monitor scenario, the same virtual display layout is applied to all the session monitors if the total number of virtual displays doesn’t exceed eight virtual displays. In case this limit is exceeded, the virtual display layout is ignored and not applied to any session monitor.
Multi-monitor enhancement can be disabled by setting the following registry key:
HKEY_CURRENT_USER\Software\Citrix\XenDesktop\DesktopViewer
Name: SplitAllMonitors Type: DWORD
Values:
1 - Enabled
0 - Disabled
DPI scaling
Citrix Workspace app is DPI aware and supports matching display resolution and DPI scale settings on the Windows client to the virtual apps and desktops session.
DPI scaling is mostly used with large size and high-resolution monitors to display applications, text, images, and other graphical elements in a size that can be viewed comfortably.
This feature is enabled by default, and it is the recommended setting for all use cases. However, administrators can still configure the DPI scaling using Group Policy Object (GPO) administrative template (per-machine configuration) if necessary.
To configure DPI scaling using GPO administrative template:
To configure DPI scaling using GPO administrative template:
- Open the Citrix Workspace app Group Policy Object administrative template by running gpedit.msc.
- Under the Computer Configuration node, go to Administrative Templates> Citrix Components > Citrix Workspace > DPI
-
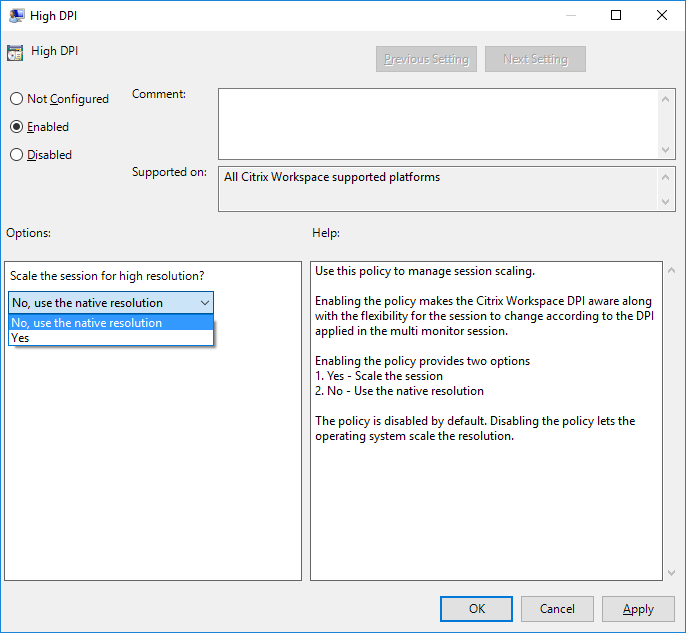
Select High DPI policy.
-
Select from one of the following options:
- Yes - Indicates that the client scale up the session locally.
- No, use the native resolution - Indicates that the Citrix Workspace app detects the DPI on the client and the client applies it to the VDA.
- Click Apply and OK.
- From the command line, run the
gpupdate /forcecommand to apply the changes.
Configure DPI scaling using the graphical user interface:
- Right-click Citrix Workspace app icon from the notification area.
- Select Advanced Preferences and click High DPI setting.
- Select one of the following options:
- Yes - Indicates that the client scale up the session locally.
- No, use the native resolution - Indicates that the Citrix Workspace app detects the DPI on the client and the client applies it to the VDA. By default, this option is selected.
- Let the operating system scale the resolution - It allows the Windows to handle the DPI scaling. This option also means that the High DPI policy is set to disabled.
- Click Save.
- Restart the Citrix Workspace app session for the changes to take effect.
NOTE:
Additional considerations:
- DPI matching requires Citrix Virtual Apps and Desktops versions 1912 LTSR or later.
- The No, use the native resolution (DPI matching) setting is recommended in most cases.
- The Let the operating system scale the resolution setting disables DPI awareness on the Citrix Workspace App. This mode might result in blurry graphics when the Windows client DPI scale is set to anything other than 100%. This mode doesn’t support multiple monitors with different DPI scales.
- The Yes option results in the Citrix Workspace app upscaling the session window to match the DPI scale configured on the Windows client. This is a legacy function recommended only for connections to legacy XenApp and XenDesktop environments when DPI scales above 100% are required on the client. This mode might result in blurry graphics.
For information about troubleshooting issues with DPI scaling, see Knowledge Center article CTX230017.
Enabling DPI matching
Starting with Citrix Workspace app 2206 for Windows, DPI matching is enabled by default. This means Citrix Workspace app attempts to match display resolution and DPI scale settings of the local Windows client to the Citrix session automatically. As part of this change, the High DPI option available under Advance Preferences in Citrix Workspace app is no longer available.
Automatic selection of video codec
Starting with 2311.1 release, Citrix Workspace app for Windows now automatically detects the best video codec to use. During installation of the Citrix Workspace app for Windows, the decoding capabilities of the endpoint are evaluated. Based on this information, Citrix Workspace app for Windows selects the best codec to use with the VDA when the session starts. The order in which the video codecs are evaluated is as follows:
- AV1
- H.265
- H.264
This feature is available when the Use video codec for compression policy is set to one of the following:
- Use when preferred
- For the entire screen
- For actively changing regions
For more information on the Use video codec for compression policy, see Use video codec for compression.
The automatic selection only applies to YUV 4:2:0 variants of these codecs. YUV 4:2:0 uses less bandwidth compromising quality. If the Visual Quality policy setting is set to Build-to-Lossless or Always Lossless and if the Allow Visually Lossless policy is set to enabled, the automatic selection of the video codec is disabled and instead YUV 4:4:4 H.264 or H.265 is used.
For more information on these policies, see the following:
Note:
YUV 4:2:0 is a chroma subsampling and is a color compression technique which lowers overall bandwidth consumption.
When connecting to a resource, Citrix Workspace app tests the endpoint’s capability to decode H.265 and AV1 and save the capabilities in the registry. After that Citrix Workspace app automatically selects the best video codec to use and negotiates this codec with the VDA. If both the VDA and the client can use H.265 and AV1, AV1 is selected as the video codec. If AV1 is not available on either the VDA or on the client, H.265 is selected. If H.265 is also not available on either, the session uses H.264 as the video codec.
This feature is enabled by default.
To disable the automatic selection of the video codec, set DisableDecoderCaps as follows:
-
Open the Registry Editor using
regediton the Run command. -
Navigate to
HKEY_LOCAL_MACHINE\Software\WOW6432Node\Policies\Citrix\ICA Client\Graphics Engine.Or,
Navigate to
HKEY_CURRENT_USER\Software\Policies\Citrix\ICA Client\Graphics Engine -
Create a DWORD key by the name DisableDecoderCaps and set the value of the key to 1.
If the value of DisableDecoderCaps is set to 1 in HKEY_LOCAL_MACHINE or HKEY_CURRENT_USER, the automatic selection of the video codec isn’t used.
H.265 video encoding
Citrix Workspace app supports the use of the H.265 video codec for hardware acceleration of remote graphics and videos. H.265 video codec must be supported and enabled on both the VDA and Citrix Workspace app.
Prerequisites:
- VDA 2203 and later.
- Citrix Workspace™ app for Windows 2305 or later.
- Enable the Use hardware encoding for video codec policy on the VDA (as per default).
-
Citrix Workspace app for Windows has the following client hardware requirements for H.265:
- NVIDIA Pascal generation GPUs or later
- Intel 6th generation GPU or later
- AMD Generation GCN3 or later
Note:
This feature has more VDA requirements such as the following:
- NVIDIA Maxwell generation GPU or later
- Intel 6th generation GPU or later
- AMD Raven generation GPU or later
Starting with Citrix Workspace app 2311.1, this feature is enabled automatically with the introduction of the Automatic selection of video codec feature.
This behavior can be changed by explicitly controlling H.265 decoding with the client-side registry key EnableH265.
Configuring H.265 video encoding using the Registry editor:
Enabling H.265 video encoding on a non-domain joined network on a 32-bit operating system:
- Open the Registry Editor using
regediton the Run command. - Navigate to
HKEY_LOCAL_MACHINE\SOFTWARE\Policies\Citrix\ICA Client\Graphics Engine. - Create a DWORD key by the name EnableH265 and set the value of the key to 1.
Enabling H.265 video encoding on a non-domain joined network on a 64-bit operating system:
- Open the Registry Editor using
regediton the Run command. - Navigate to
HKEY_LOCAL_MACHINE\SOFTWARE\Wow6432Node\Policies\Citrix\ICA Client\Graphics Engine. - Create a DWORD key by the name EnableH265 and set the value of the key to 1.
- Restart the session for the changes to take effect.
The presence of the EnableH265 disables auto-detection. Setting the EnableH265 to 0 disables H.265 decoding. Therefore, the session doesn’t use the H.265 video codec, even if it is configured on the VDA.
With setting EnableH265 to 1, Citrix Workspace app for Windows tries to use H.265 decoding. If H.265 decoding fails, the client and server fall back to H.264 encoding.
Note:
- If the Hardware acceleration for Graphics policy is disabled in the Citrix Workspace app Group Policy Object administrative template, the H.265 Decoding for graphics policy settings is ignored. The feature is then not applied and falls back to using the H.264 video codec.
- The Graphics Status indicator and Citrix HDX™ monitor can be used to validate the video codec usage.
AV1
Citrix Workspace app supports the use of the AV1 video codec for hardware acceleration of remote graphics and videos. AV1 video codec must be supported and enabled on both the VDA and Citrix Workspace app.
Prerequisites for AV1 are as follows:
- VDA 2308 or later.
- Citrix Workspace app for Windows 2305 or later
- Enable the Use hardware encoding for video codec policy on the VDA (as per default).
- Citrix Workspace app for Windows has the following client hardware requirements for AV1:
- NVIDIA Ampere or later
- Intel 11th Gen / Arc or newer
- AMD Radeon RX 6000 / Radeon Pro W6000 series (RDNA2) or later
Note:
AV1 has more VDA requirements, such as the following:
- NVIDIA Lovelace generation GPU or later (for example L4 / L40)
- Intel Arc generation GPU or later
Starting with Citrix Workspace app 2311.1, this feature is enabled automatically with the introduction of the Automatic selection of video codec feature.
This behavior can be changed by explicitly controlling AV1 decoding with the client-side registry key EnableAV1.
Configuring AV1 video encoding using the Registry editor:
Enabling AV1 video encoding on a non-domain joined network on a 32-bit operating system:
- Open the Registry Editor using
regediton the run command. - Navigate to
HKEY_LOCAL_MACHINE\SOFTWARE\Policies\Citrix\ICA Client\Graphics Engine. - Create a DWORD key by the name EnableAV1 and set the value of the key to 1.
- Restart the session for the changes to take effect.
Enabling AV1 video encoding on a non-domain joined network on a 64-bit operating system:
- Open the Registry Editor using
regediton the run command. - Navigate to
HKEY_LOCAL_MACHINE\SOFTWARE\Wow6432Node\Policies\Citrix\ICA Client\Graphics Engine. - Create a DWORD key by the name EnableAV1 and set the value of the key to 1.
- Restart the session for the changes to take effect.
The presence of the EnableAV1 disables auto-detection. Setting EnableAV1 to 0 disables AV1 decoding and therefore, the session doesn’t use the AV1 video codec.
With setting EnableAV1 to 1, Citrix Workspace app for Windows tries to use AV1 decoding. If AV1 decoding fails, the client and server fall back to H.264 encoding.
Note:
If the Hardware acceleration for Graphics policy is disabled in the Citrix Workspace app Group Policy Object administrative template, the AV1 Decoding for graphics policy settings is ignored. The feature is then not applied and falls back to using the H.264 video codec.
The Graphics Status indicator and Citrix HDX monitor can be used to validate the video codec usage.
Improved graphics performance
Citrix Workspace app 2206 introduces significant performance improvements for Intel integrated GPUs:
- Graphics GPU consumption has been reduced, improving overall performance.
The following issues are fixed:
- Low frames per second after playing a video on the Intel 10th Generation GPU or higher.
- Brightness difference in Build-To-Lossless or for Actively Changing Regions on Intel and AMD GPUs.
Limiting video resolutions
Administrators who have users on lower-performance client endpoints can choose to limit incoming or outgoing video resolutions to decrease the impact of encoding and decoding video on those endpoints. Starting from Citrix Workspace app 2010 for Windows, you can limit these resolutions using client configuration options.
Note:
Users running with restricted resolutions impact the overall video quality of the conference because the Microsoft Teams server will be forced to use the lowest-common-denominator resolution for all conference participants.
Call constraints are disabled by default on the client with Citrix Workspace app 2210. To enable, administrators must set the following client-side configurations in the HKEY_CURRENT_USER\SOFTWARE\Citrix\HDXMediaStream:
| Name | Type | Mandatory | Accepted Values |
|---|---|---|---|
| EnableSimulcast | Int | YES | 1–3 (Set it to 1) |
| MaxOutgoingResolution | Int | YES | 180,240,360,540,720,1080 (Microsoft Teams supported Resolutions) |
| MaxIncomingResolution | Int | YES | 180,240,360,540,720,1080 (Microsoft Teams supported Resolutions) |
| MaxIncomingStreams | Int | YES | 1–8 |
| MaxSimulcastLayers | Int | YES | 1–3 (set it to 1) |
| MaxVideoFrameRate | Int | NO | 1–30 |
| MaxScreenshareFrameRate | Int | NO | 1–15 |
All keys are DWORDs.