Keyboard
Keyboard shortcuts
Citrix Workspace app for Windows passes most keys combinations through to the virtual app or desktop. However, by default it uses certain keyboard shortcuts to provide special functionality. These keyboard shortcuts apply to apps and desktops where the Desktop Viewer toolbar is disabled.
Important:
These shortcuts do not apply if the Desktop Viewer is enabled, instead see Keyboard shortcuts for Desktop Viewer.
| Number | Default shortcut | Function | Applies to |
|---|---|---|---|
| 1 | Shift+F1 | Invoke the Windows key locally to bring up the start menu | Apps and desktops |
| 2 | Shift+F3 | Close Citrix® session window | Apps and desktops |
| 3 | Shift+F2 | For apps, toggle between seamless and windowed mode. For desktop toggle between full-screen and windowed mode. | Apps and desktops |
| 4 | Ctrl+F1 | Invoke Ctrl+Alt+Delete | Apps and desktops |
| 5 | Ctrl+F3 | Open task manager | Apps and desktops |
| 6 | Alt+F8 | Invoke Alt+Tab (task switcher). | Desktops |
| 7 | Alt+F9 | Invoke Shift+Alt+Tab (reverse task switcher). | Desktops |
| 8 | Ctrl+F2 | Invoke Ctrl+Esc (in desktops opens the Start menu). | Apps and desktops |
| 9 | Alt+F2 | Invoke Alt+Esc (switch windows). | Apps and desktops |
| 10 | n/a | Previously Ctrl+F5 enabled Latency Reduction. No longer applies. | |
| 11 | n/a | Reserved | |
| 12 | n/a | Reserved | |
| 13 | Shift+F11 | Minimizes the session window. | Desktops |
| 14 | Shift+F4 | Toggle IME mode. Only relevant when IME is configured. | Desktops |
| 15 | Ctrl+F12 | Relative Mouse. | Apps and Desktops |
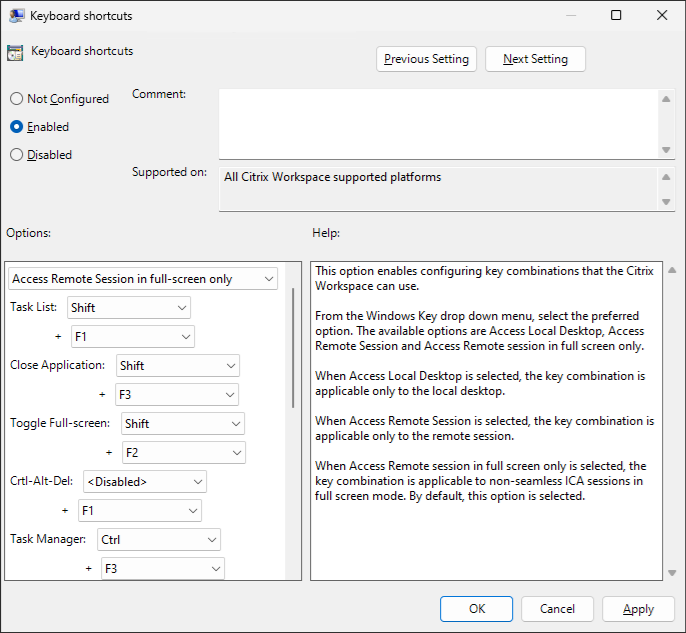
You might find that these shortcuts clash with shortcuts used by your virtual apps. If this happens then you can either assign a different shortcut or disable the shortcut. To configure shortcut keys using Group Policy:
- Open the Citrix Workspace app Group Policy Object administrative template by running gpedit.msc.
- Under the Computer Configuration node, go to Administrative Templates> Citrix Components > Citrix Workspace > User Experience.
- Select the Keyboard shortcuts policy.
- Select Enabled
- Updated the options as required and press OK.
- Restart the Citrix Workspace app session for the changes to take effect.
Alternatively you can configure keyboard shortcuts in StoreFront by editing the Default.ica. See Configure session settings. In the [WFCLIENT] section, for each hotkey add two entries:
| Key | Value |
|---|---|
| Hotkey{n}Char | F1/F2/F3/F4/F5/F6/F7/F8/F9/F10/F11/F12/minus/plus/star/tab |
| Hotkey{n}Shift | Ctrl/Shift/Alt |
For example to configure shortcut 2, which is close Citrix session window, to use Alt+F3 instead of Shift+F3, add:
Hotkey2Char=F3
Hotkey2Shift=Alt
<!--NeedCopy-->
To disable shortcut 2, so the default shortcut Shift+F3 is passed through to the VDA, without an alternative shortcut:
Hotkey2Char=
Hotkey2Shift=
<!--NeedCopy-->
Keyboard shortcuts for Desktop Viewer
Normally Citrix Workspace app passes all keys through to the virtual app or desktop. However, by default certain keyboard shortcuts that provide special functionality. These shortcuts apply only when using the Desktop Viewer. If you have disabled the Desktop Viewer then see Keyboard shortcuts.
| Default shortcut | Function |
|---|---|
| Ctrl+Alt+F1 | Toggle between full-screen and window |
| Ctrl+Alt+Break | Open the context menu of the desktop session |
You can customize (but not remove) the shortcut for the fullscreen toggle by using Group Policy. It is not possible to customize the shortcut for opening the context menu.
- Open the Citrix Workspace app Group Policy Object administrative template by running gpedit.msc.
- Under the Computer Configuration node, go to Administrative Templates> Citrix Components > Citrix Workspace > User Experience.
- Select the Hotkeys for Desktop viewer policy.
- Select Enabled.
- Update the settings as required and press OK.
- Restart the Citrix Workspace app session for the changes to take effect.

Keyboard layout and language bar
Keyboard layout
Note:
You can hide all or part of the Advanced Preferences sheet available from the Citrix Workspace app icon in the notification area. For more information, see Advanced Preferences sheet.
Keyboard layout synchronization enables you to switch among preferred keyboard layouts on the client device. This feature is disabled by default. The keyboard layout synchronization allows the client keyboard layout to automatically synchronize to the virtual apps and desktops session.
To configure keyboard layout synchronization using the GPO administrative template:
Note:
The GPO configuration takes precedence over the StoreFront and the GUI configurations.
- Open the Citrix Workspace app Group Policy Object administrative template by running gpedit.msc.
- Under the Computer Configuration or User Configuration node, go to Administrative Templates > Administrative Templates (ADM) > Citrix Components > Citrix Workspace > User experience.
- Select the Keyboard settings policy.
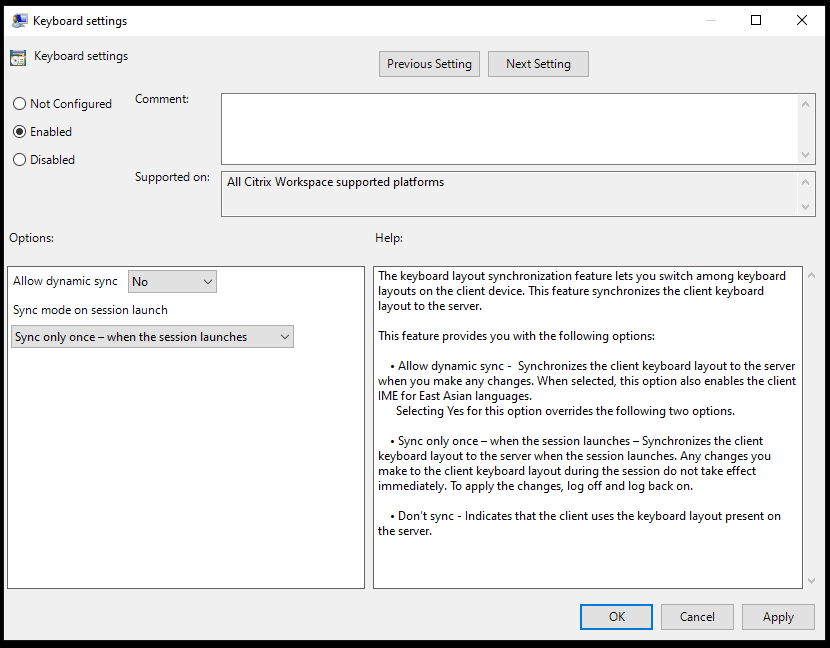
- Select Enabled and select one the following options:
-
Allow dynamic sync - From the drop-down menu, select Yes or No. This option synchronizes the client keyboard layout to the server when you change the client keyboard layout. When selected, this option also enables the client IME for East Asian languages.
Selecting Yes for this option overrides the following two options.
-
Sync mode on session launch - From the drop-down menu, select one of the following options:
- Sync only once - when session launches - Synchronizes the client keyboard layout to the server when the session launches. Any changes you make to the client keyboard layout during the session do not take effect immediately. To apply the changes, log off and log back on.
- Don’t sync - Indicates that the client uses the keyboard layout present on the server.
-
- Select Apply and OK.
To configure keyboard layout synchronization using the graphical user interface:
-
From the Citrix Workspace app icon in the notification area icon, select Advanced Preferences > Keyboard and Language bar.
The Keyboard and Language bar dialog appears.

-
Select from one of the following options:
- Sync only once - when the session launches - Indicates that the keyboard layout is synced from the VDA only once at the session launch.
- Allow dynamic sync - Indicates that the keyboard layout is synced dynamically to the VDA when the client keyboard is changed in a session.
- Don’t sync - Indicates that the client uses the keyboard layout present on the server.
-
Click Save.
To configure keyboard layout synchronization using CLI:
Run the following command from the Citrix Workspace app for Windows installation folder.
Typically, the Citrix Workspace app installation folder is at C:\Program files (x86)\Citrix\ICA Client.
- To enable:
wfica32:exe /localime:on - To disable:
wfica32:exe /localime:off
Using the client keyboard layout option activates the Client IME (Input Method Editor). If users working in Japanese, Chinese, or Korean prefer to use the Server IME, they must disable the client keyboard layout option by selecting No, or running wfica32:exe /localime:off. The session reverts to the keyboard layout provided by the remote server when they connect to the next session.
Sometimes, switching the client keyboard layout does not take effect in an active session. To resolve this issue, log off from Citrix Workspace app and login again.
Configure keyboard layout synchronization using the command-line interface
Previously, it was possible to configure keyboard layout synchronization using the GUI or by updating the configuration file only. With the Citrix Workspace app 2309 version, the following commands are introduced to configure keyboard layout synchronization using the command-line-interface:
| Commands | Description |
|---|---|
wfica32.exe /kbdsyncmode:once |
Sets keyboard sync mode to “Sync only once”. |
wfica32.exe /kbdsyncmode:dynamic |
Sets keyboard sync mode to “Dynamic sync”. |
wfica32.exe /kbdsyncmode:no |
Sets keyboard sync mode to “Don’t sync”. |
Run the preceding commands from the Citrix Workspace app for Windows installation folder.
Typically, Citrix Workspace app installation folder is at C:\Program files (x86)\Citrix\ICA Client.
Configuring keyboard sync on Windows VDA
Note:
The following procedure applies only on Windows server 2016 and later. On Windows Server 2012 R2 and earlier, the keyboard sync feature is enabled by default.
- Launch the Registry editor and navigate to
HKEY_LOCAL_MACHINE\Software\Citrix\IcaIme. - Create the DWORD entry
DisableKeyboardSyncand set its value to0.1disables the keyboard layout sync feature. - Restart the session for the changes to take effect.
After you enable the keyboard layout on both the VDA and Citrix Workspace app, the following window appears when you switch keyboard layouts.

This window indicates that the session keyboard layout is being switched to the client keyboard layout.
Configuring keyboard sync on Linux VDA
Launch the command prompt and run the following command:
/opt/Citrix/VDA/bin/ctxreg update -k "HKEY_LOCAL_MACHINE\System\CurrentControlSet\Control\Citrix\LanguageBar" -v "SyncKeyboardLayout" -d "0x00000001"
Restart the VDA for the changes to take effect.
For more information about the keyboard layout synchronization feature on Linux VDA, see Dynamic keyboard layout synchronization.
Hide the keyboard layout switch notification dialog:
The keyboard layout change notification dialog lets you know that the VDA session is switching the keyboard layout. The keyboard layout switch needs approximately two seconds to switch. When you hide the notification dialog, wait for some time before you start typing to avoid incorrect character input.
Warning
Editing the registry incorrectly can cause serious problems that might require you to reinstall your operating system. Citrix can’t guarantee that problems resulting from the incorrect use of the Registry Editor can be solved. Use the Registry Editor at your own risk. Be sure to back up the registry before you edit it.
Hide the keyboard layout switch notification dialog using the Registry editor:
- Launch the Registry editor and navigate to
HKEY_LOCAL_MACHINE\Software\Citrix\IcaIme. - Create a String Value key by name HideNotificationWindow.
- Set the DWORD value to 1.
- Click OK.
- Restart the session for the changes to take effect.
Limitations:
- Remote applications which run with elevated privilege (for example, right-click an application icon > Run as administrator) cannot be synchronized with the client keyboard layout. As a workaround, manually change the keyboard layout on the server side (VDA) or disable UAC.
- If the keyboard layout on the client is changed to an unsupported layout on the server, the synchronization feature of the keyboard layout is disabled for security reasons. An unrecognized keyboard layout is treated as a potential security threat. To restore the keyboard layout synchronization feature, log off and relog in to the session.
- In an RDP session, you cannot change the keyboard layout using
Alt + Shiftshortcuts. As a workaround, use the language bar in the RDP session to switch the keyboard layout.
Language bar
The language bar displays the preferred input language in a session. The language bar appears in a session by default.
Note:
This feature is available in sessions running on VDA 7.17 and later.
Configure the language bar using the GPO administrative template:
The language bar displays the preferred input language in an application session.
- Open the Citrix Workspace app Group Policy Object administrative template by running gpedit.msc.
- Under the Computer Configuration or User Configuration node, go to Administrative Templates > Administrative Templates (ADM) > Citrix Components > Citrix Workspace > User experience.
- Select the Language bar policy.
- Select Enabled and select one of the following options:
- Yes – Indicates that the language bar appears in an application session.
- No, hide the language bar – Indicates that the language bar is hidden in an application session.
- Click Apply and OK.
Configure language bar using the graphical user interface:
- Right-click the Citrix Workspace app icon from the notification area and select Advanced Preferences.
- Select Keyboard and Language bar.
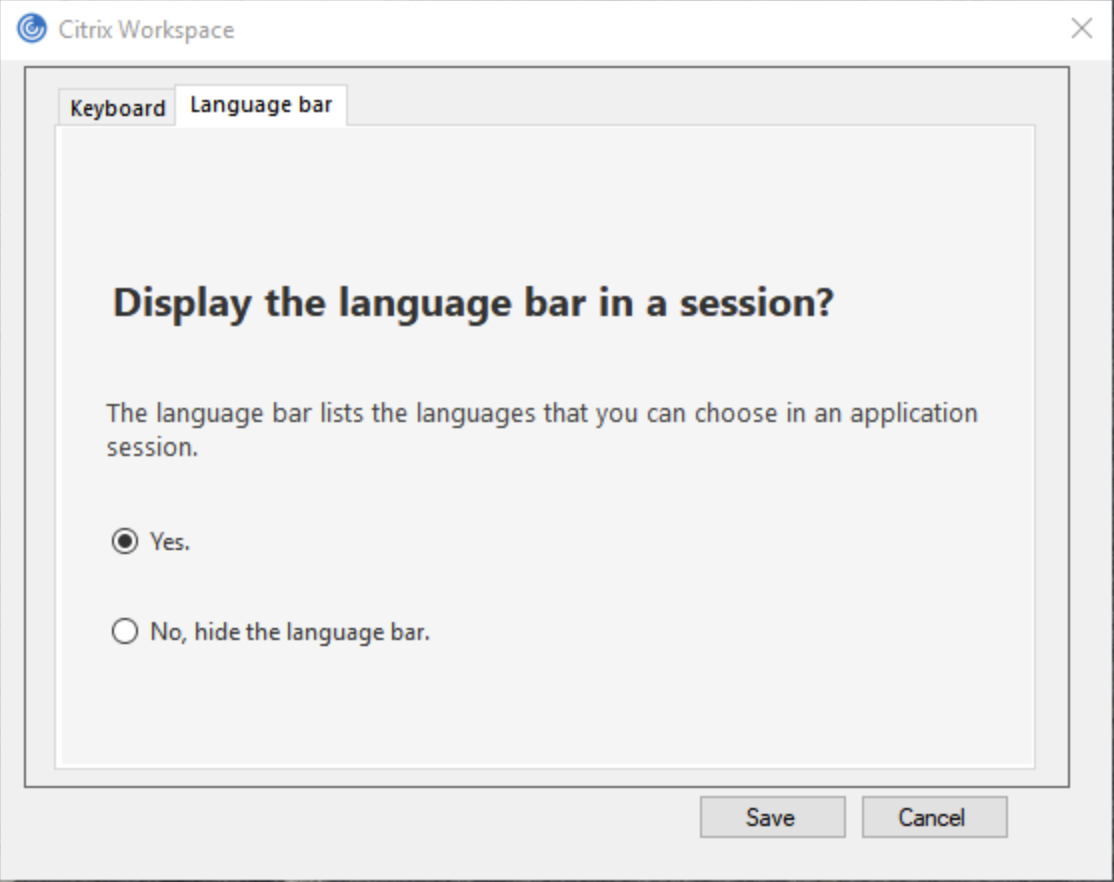
- Select the Language bar tab.
- Select from one of the following options:
- Yes - Indicates that the language bar appears in a session.
- No, hide the language bar - Indicates that the language bar is hidden in a session.
-
Click Save.
The setting changes take effect immediately.
Note:
- You can change the settings in an active session.
- The remote language bar does not appear in a session if there is only one input language.
Hide the language bar tab from the Advanced Preferences sheet:
You can hide the language bar tab from the Advanced Preferences sheet by using the registry.
- Launch the registry editor.
- Navigate to
HKEY_LOCAL_MACHINE\SOFTWARE\Citrix\ICA Client\Engine\Configuration\Advanced\Modules\LocalIME. - Create a DWORD value key ToggleOffLanguageBarFeature, and set it to 1 to hide the Language bar option from the Advanced Preferences sheet.
Generic client Input Method Editors (IME)
Note:
If you’re using a Windows 10 Version 2004 operating system, you might face certain technical issues when using the IME feature in a session. Those issues are the result of a third-party limitation. For more information, see the Microsoft Support article.
Configuring generic client IME using the command-line interface:
-
To enable generic client IME, run the
wfica32.exe /localime:oncommand from the Citrix Workspace app installation folderC:\Program Files (x86)\Citrix\ICA Client.
-
To disable generic client IME, run the
wfica32.exe /localime:offcommand from the Citrix Workspace app installation folderC:\Program Files (x86)\Citrix\ICA Client.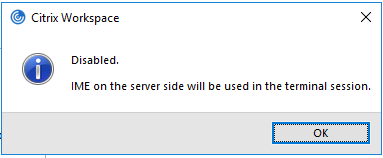
Note:
You can use the command-line switch
wfica32.exe /localime:onto enable both generic client IME and keyboard layout synchronization.
-
To disable generic client IME, run the
wfica32.exe /localgenericime:offcommand from the Citrix Workspace app installation folderC:\Program Files (x86)\Citrix\ICA Client. This command does not affect keyboard layout synchronization settings.
If you have disabled generic client IME using the command-line interface, you can enable the feature again by running the wfica32.exe /localgenericime:on command.

Toggle:
Citrix Workspace app supports toggle functionality for this feature. You can run the wfica32.exe /localgenericime:on command to enable or disable the feature. However, the keyboard layout synchronization settings take precedence over the toggle switch. If the layout synchronization setting is set as Off, toggling does not enable generic client IME.
Configure generic client IME using the graphical user interface:
Generic client IME requires VDA Version 7.13 or later.
The Generic client IME feature can be enabled by enabling keyboard layout synchronization. For more information, see Keyboard layout synchronization.
Citrix Workspace app allows you to configure different options to use generic client IME. You can select from one these options based on your requirements and usage.
- Right-click the Citrix Workspace app icon in the notification area and select Connection Center.
-
Select Preferences and Local IME.
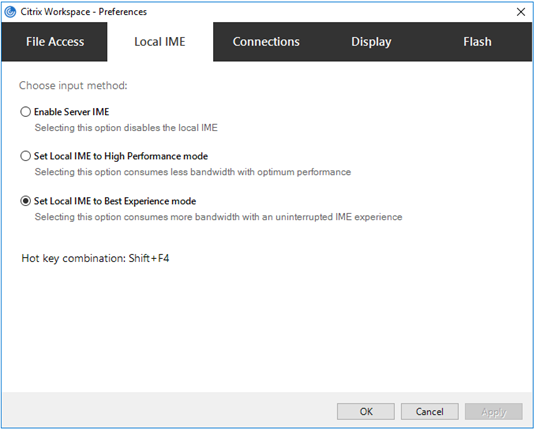
The following options are available to support different IME modes:
- Enable Server IME – Disables local IME and only the languages set on the server can be used.
- Set Local IME to High Performance mode – Uses local IME with limited bandwidth. This option restricts the candidate window functionality.
- Set Local IME to Best Experience mode – Uses local IME with best user experience. This option consumes high bandwidth. By default, this option is selected when generic client IME is enabled.
The changes are applied only for the current session.
Enabling hotkey configuration using a registry editor:
When generic client IME is enabled, you can use the Shift+F4 hotkeys to select different IME modes. The different options for IME modes appear in the top-right corner of the session.
By default, the hotkey for generic client IME is disabled.
In the registry editor, navigate to HKEY_CURRENT_USER\SOFTWARE\Citrix\ICA Client\Engine\Lockdown Profiles\All Regions\Lockdown\Client Engine\Hot Key.
Select AllowHotKey and change the default value to 1.
You can use the Shift+F4 hotkeys to select different IME modes in a session.
The different options for IME modes appear in the top-right corner of the session while switching using these hotkey combinations.

Limitations:
- Generic client IME does not support UWP (Universal Windows Platform) apps such as Search UI, and the Edge browser of the Windows 10 operating system. As a workaround, use the server IME instead.
- Generic client IME is not supported on Internet Explorer Version 11 in Protected Mode. As a workaround, you can disable Protected Mode by using Internet Options. To disable, click Security and clear Enable Protected Mode.
Synchronize multiple keyboards at session start
Previously, only the active keyboard on the client was synchronized with VDA after the session started in full-screen mode. In this scenario, if you configured Sync only once - when session launches on your Citrix Workspace app, and you had to change to a different keyboard, you have to manually install the keyboard on your remote desktop. Similarly, if you configured Allow dynamic sync on your Citrix Workspace app, you have to move to windowed mode, change the keyboard on your client, and then move back to full-screen mode.
Starting with the 2311.1 release, all available keyboards on the client are synchronized with VDA after the session starts in full-screen mode. You can select the required keyboard from the list of installed or available keyboards on the client after the session starts in full-screen mode.
The Synchronize multiple keyboards at session start feature is enabled by default on VDA, and disabled by default on the Citrix Workspace app.
Prerequisites
On Citrix Workspace app for Windows:
Enable Sync only once - when the session launches keyboard layout setting. For more information, see Keyboard layout documentation.
On VDA:
Enable the following VDA policies:
- Unicode Keyboard Layout Mapping. For more information, see Enable Unicode keyboard layout mapping or Keyboard and Input Method Editor (IME)
- Client keyboard layout synchronization and IME improvement. For more information, see Keyboard and Input Method Editor (IME)
Citrix Workspace app configuration:
This feature is applicable only on virtual desktops. This feature is disabled by default. To enable this feature, do the following:
- Navigate to the [Virtual Channels\Keyboard] section of the All_Regions.ini file.
- Add a Boolean registry key
SyncKbdLayoutList to HKEY_CURRENT_USER\SOFTWARE\Citrix\Ica Client\Engine\Lockdown Profiles\All Regions\Lockdown\Virtual Channels\Keyboard. - Set the value to 1.
VDA configuration:
The feature Synchronize multiple keyboards at session start is enabled by default on VDA. To disable this feature, update the VDA registry as follows:
- Open the Registry editor and navigate to
HKEY_LOCAL_MACHINE\Software\Citrix\IcaIme. - Create the DWORD entry
DisableKbdLayoutListand set its value to 0. Setting the value to 1, disables the Synchronize multiple keyboards at session start feature. - Restart the session for the changes to take effect.