Configure settings for on-premises stores
Overview
You can configure the Citrix Workspace™ app settings for on-premises stores using the Global App Configuration service (GACS). It helps you configure and manage Citrix Workspace app for end users on both managed and unmanaged devices. The Global App Configuration service is supported on Windows, Mac, Android, iOS, HTML5, and ChromeOS platforms.
Prerequisites
-
The addresses
<https://discovery.cem.cloud.us>,<https://gacs-discovery.cloud.com>, and<https://gacs-config.cloud.com>must be contactable. It’s required for the functioning of the email-based discovery and Global App Configuration service. -
Verify that you have access to a Citrix Cloud account. If you don’t already have an account, you can create one from https://onboarding.cloud.com/. For more information, refer to Sign up for Citrix Cloud.
-
In an on-premises environment, you must claim a URL before you can configure settings. For more information, see Claim a URL.
Get started with configuration
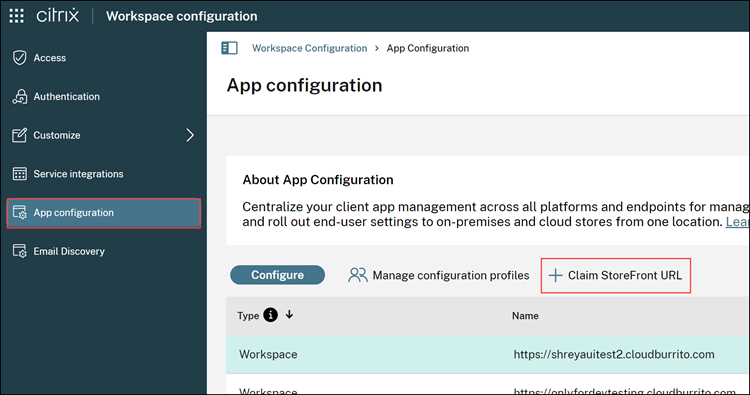
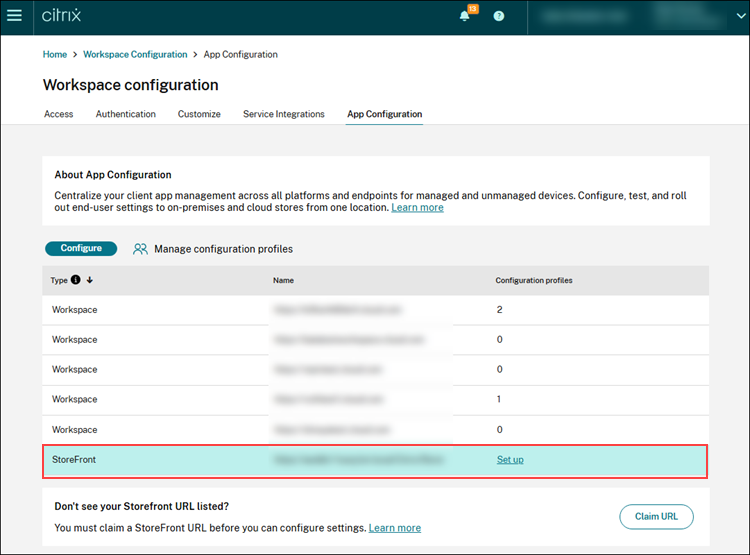
To configure settings for an on-premises store, sign in to your Citrix Cloud account and navigate to StoreFront Cloud > App configuration. If you have claimed ownership for your StoreFront URL, see the Configure settings section for more information.
If you haven’t claimed your StoreFront™ URL yet, you can claim it. For that, click Claim StoreFront URL under the App configuration section to claim your URL. For more information, see the Claim a URL for on-premises stores section.
Claim a URL for on-premises stores
It’s mandatory to establish a claim to your URL before you start configuring the settings for it.
To claim a URL:
- Sign in to Citrix Cloud.
- Navigate to StoreFront Cloud > App configuration.
-
Click Claim StoreFront URL.
-
Select either Add a NetScaler® Gateway URL or Add an internal StoreFront URL based on your organization setup.
-
If you have a NetScaler Gateway installed in your on-premises setup, you can verify your URL using the following steps:
a. Select Add a NetScaler Gateway URL.
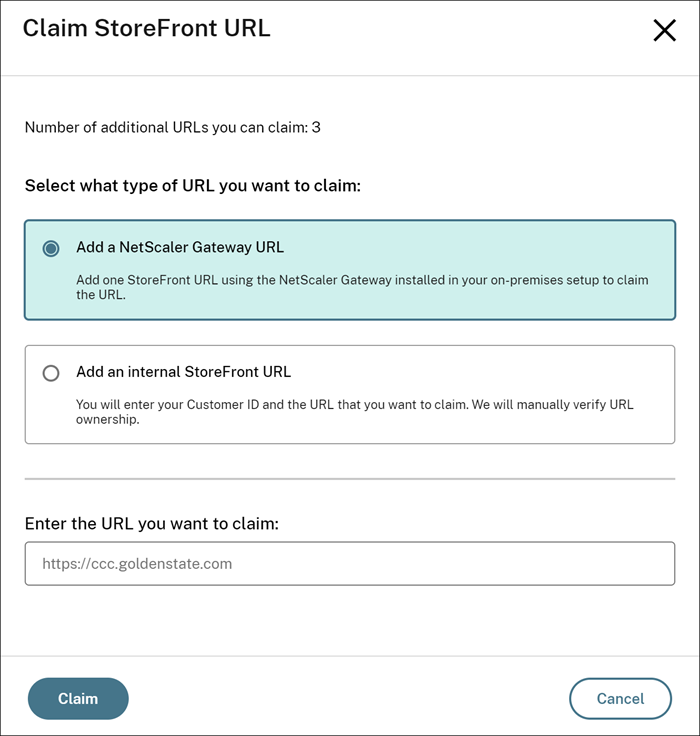
b. Enter the URL in the given text field.
c. Click Claim.
The URL is added, and it is in the ‘Verification not started’ state.
-
If you want to claim a URL that is not NetScaler-based, do the following:
a. Select Add an internal StoreFront URL.
b. Enter your Customer ID (CCID) and the URL you want to claim.
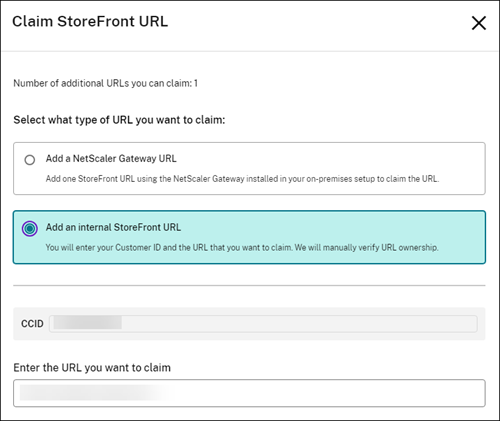
c. Click Claim.
-
-
To verify the URL, select the URL and click Verify URL.

-
The Verify URL screen contains the steps that guide you to create and configure a responder action and responder policy within your NetScaler.
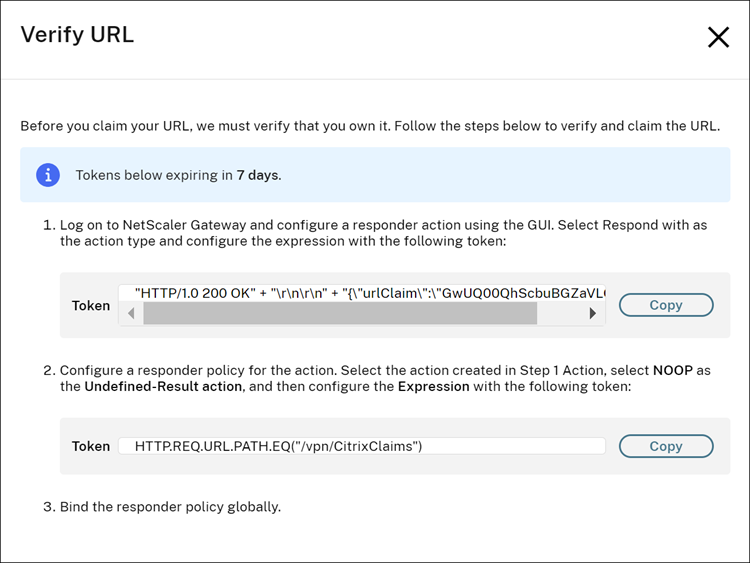
a. Bind your responder policy globally.
b. Go to
https://<customergatewayurl>/vpn/CitrixClaimsto verify if your responder policy is configured correctly.c. Navigate back to StoreFront Cloud > App configuration, and locate the URL that you added.
d. Select the URL and click Verify URL.
e. Click Verify URL to start the verification process.
Note:
The URL verification process is initiated once you click Verify URL and takes approximately 15 minutes to complete.
Configure settings
You can configure settings for Citrix Workspace app, once you’ve claimed the URL. If multiple stores have been configured for your company, you can configure the settings for each of them separately.
- Go to the Citrix Cloud portal and sign in using your credentials.
- Navigate to StoreFront Cloud > App configuration.
-
From the list of configured StoreFront URLs, select the one for which you want to map settings, and then click Configure.
-
Modify the settings for your preferred platforms as per your requirement.
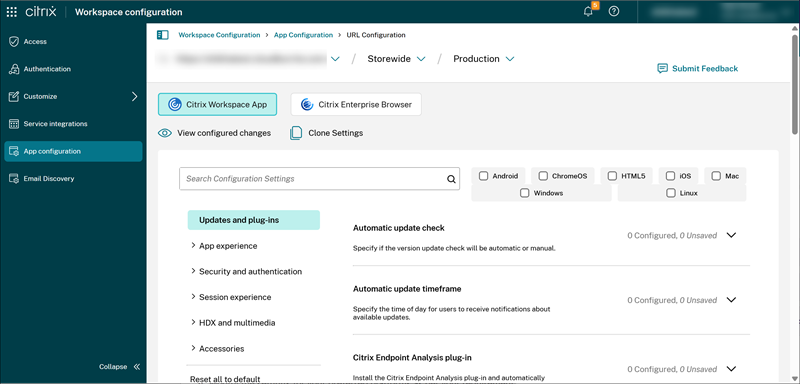
- Click Publish Drafts to save the settings.
Note:
It might take a few hours for the settings to be updated to the Citrix Workspace app clients. For more information, see Frequency of fetching updated settings.
Manage settings for user group using configuration profiles
This section explains how administrators can use the configuration profile feature in the Global App Configuration service (GACS) to configure settings for user groups who use on-premise stores of Citrix Workspace app.
Prerequisites
To get started with this feature, the administrators need to meet the following prerequisites:
- Verify Citrix Workspace app version
- StoreFront server requirement
- Configure Cloud Connector or Connector Appliance for Active Directory Management
- Configure registration tool
Verify Citrix Workspace app version
Verify your Citrix Workspace app version is equal to or higher than the versions specified in the following table.
| Citrix Workspace app platform | Minimum supported version |
|---|---|
| Windows | 2405 |
| Mac | 2405.11 |
StoreFront server requirement
The minimum required version of the StoreFront server is 2203.0.3000.14.
Configure Cloud Connector or Connector Appliance for Active Directory Management
The Citrix Cloud Connector™ and Connector Appliance are citrix components that serve as a channel for communication between Citrix Cloud and your resource locations. It enables the use of Active Directory forests and domains within resource locations, thereby allowing administrators to access the AD group information for managing configuration profiles.
To learn more about Citrix Cloud Connector, see Citrix Cloud Connector in the Citrix Cloud product documentation.
To learn more about Connector Appliance, see Connector Appliance for Cloud Services in the Citrix Cloud product documentation.
Configure registration tool
Administrators need to download and run a registration tool on the StoreFront server. The registration tool installs a certificate that establishes trust between the StoreFront server and GACS. As a result, GACS can collect information about the AD group they belong to for managing configuration profiles.
The process involves the following steps:
Generate registration tool
The registration tool is an executable file that needs to be run on the StoreFront server hosted within the organization. This registers GACS as a trusted service to access AD group information.
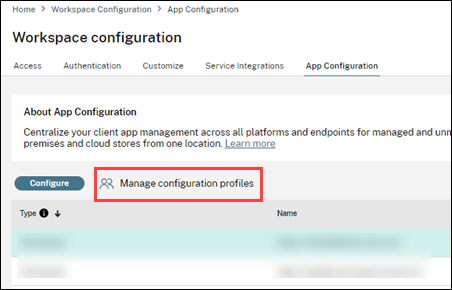
To generate the registration tool, do the following:
- Navigate to StoreFront Cloud > App configuration.
-
Select your StoreFront URL, and click Manage configuration profiles.
-
On the Manage configuration profiles screen, click Generate to generate the registration tool.
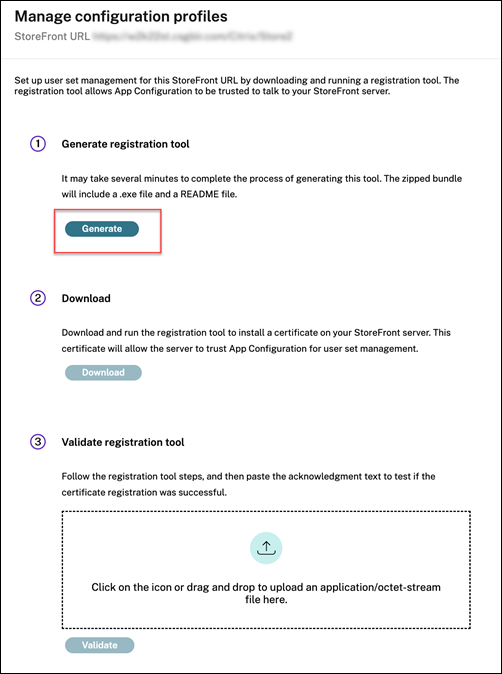
Download and run the registration tool
Download the registration tool: When the registration tool is generated, the Download option becomes enabled, allowing the administrator to download the tool. When the administrator clicks the Download option, the registration tool is downloaded in an executable format.

Note:
The registration tool is downloaded as a .zip file bundled with a README file. The README file provides detailed instructions to download and run the registration tool.
Run the executable file: Once the registration tool is downloaded, the administrator can then run the registration tool to install a certificate on the StoreFront server hosted within the organization. This certificate allows the server to trust GACS for the configuration profile management.
When you run the registration tool, you can decide whether to run the tool on a single store or all stores of the StoreFront server. Once you run the tool, it modifies the web.config file of the StoreFront store’s authentication service, which registers GACS as a trusted service.
Note:
The IIS restarts when the
web.configfile is modified due to the successful execution of the registration tool.
Validate registration tool
Following the successful execution of the registration tool, a .zip file is downloaded containing an acknowledgment file and a text file. The text file provides the following information extracted from the StoreFront server:
-
Public Certificate: The public certificate enables GACS to process incoming secondary tokens issued by the StoreFront server in order to provide authenticated, group-based settings to the client endpoint devices running Citrix Workspace app.
-
Configuration Values: Various configuration values related to the store are extracted to maintain consistency and ensure that the store operates correctly after any changes or recovery steps.

The administrator has to validate whether the certificate registration is successful by following these steps:
- Upload the acknowledgment file.
- Click Validate.
Once the validation of certificate registration is successful, the Registration validated message appears.
- Click the Close button, and you can see the Manage configuration profiles screen.
Configuration
For instructions on leveraging configuration profile to assign settings to a user group, see Manage settings for user group using configuration profile.