Connect existing Session Recording servers to the cloud
You can connect Session Recording servers in a 1912 LTSR, 2203, or later deployment to the Session Recording service.
Before proceeding to the following steps on each server you want to connect, watch the video about connecting Session Recording servers:

Note:
Since July 2023, Microsoft has renamed Azure Active Directory (Azure AD) to Microsoft Entra ID. In this document, any reference to Azure Active Directory, Azure AD, or AAD now refers to Microsoft Entra ID.
Steps
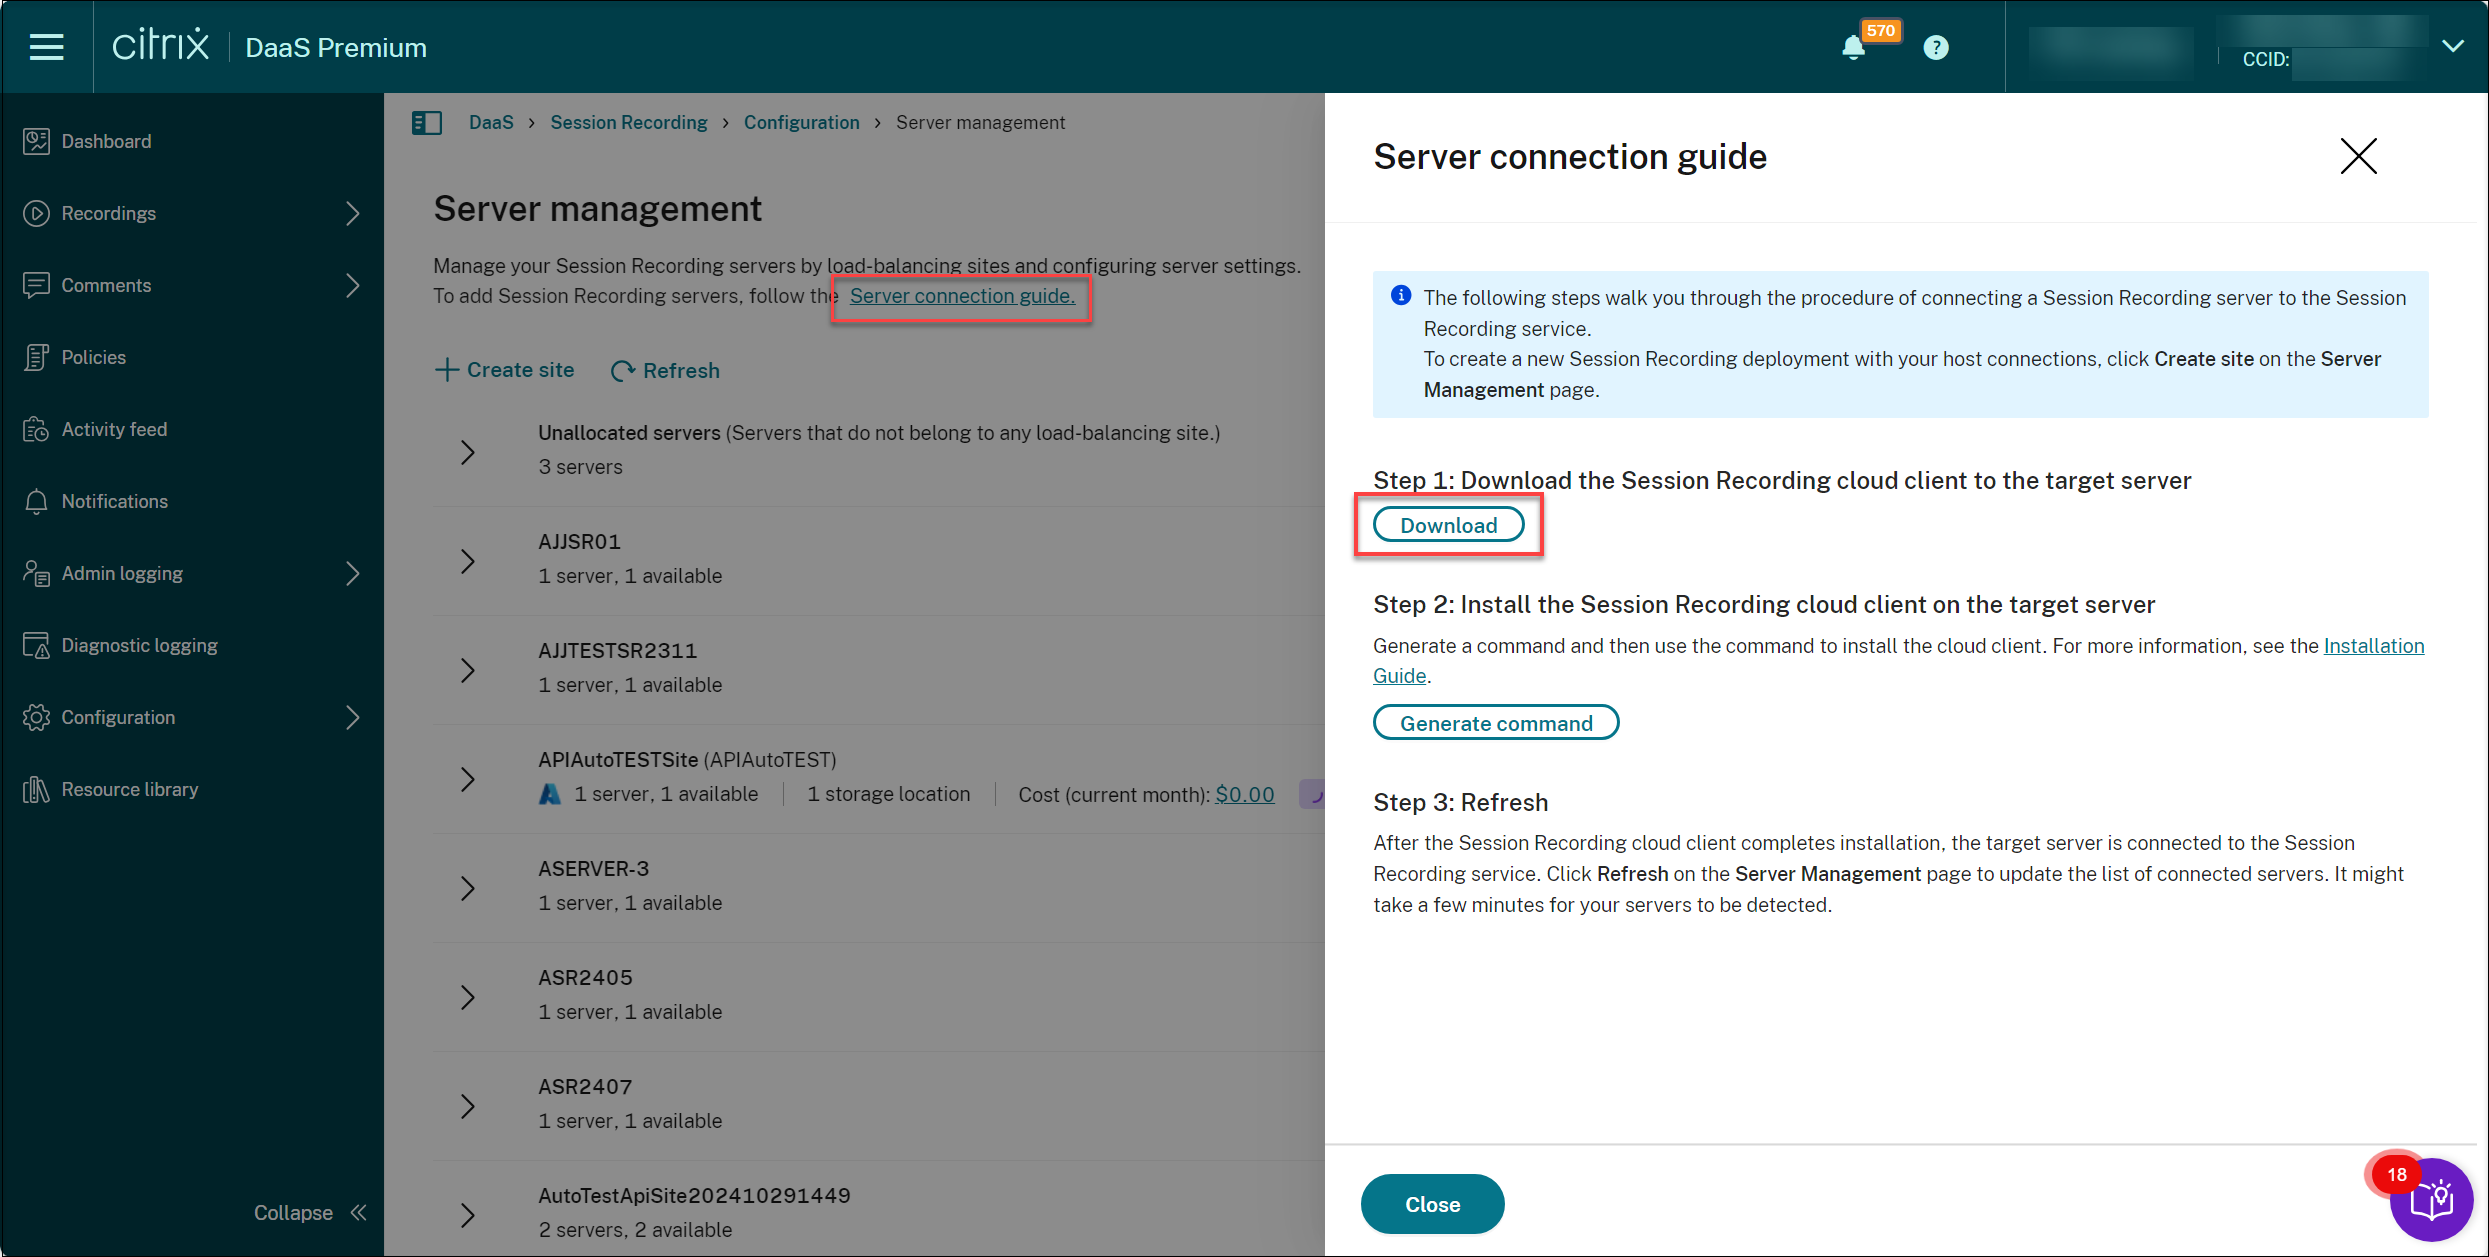
To connect an existing Session Recording server to the Session Recording service, complete the following steps on the server:
-
Allow the outbound ports based on the version of your cloud client.
- If you are using version 7.40.13020.11 or later of the cloud client, allow the outbound port 443 only.
- If you are using a cloud client earlier than version 7.40.13020.11, allow the outbound ports 80, 443, 8088, and 9090–9094.
-
Download and install the Session Recording cloud client. After the Session Recording cloud client completes installation, the target server is connected to the Session Recording service.
Note:
A daemon maintaining the cloud client’s running state is available for versions 7.38.10030.16 and later of the cloud client. The daemon automatically fixes the cloud client when it runs abnormally.
- Sign in to Citrix Cloud.
- In the upper left menu, select My Services > DaaS.
- In the DaaS tile, scroll down in the left navigation pane and select Session Recording. You can hover over and pin the Session Recording menu to the top PINNED section of the navigation pane for quick access. You can reorder pinned menus by dragging them to the desired places.
- In the Session Recording service view, select Configuration > Server Management from the left navigation.
-
Click Download on the Server connection guide page.
Tip:
- The Generate command button for cloud client installation is unavailable for the administrators that are added through Azure AD groups.
- You can also access the Download and Generate command buttons by clicking Continue configuration on the Session Recording service welcome page:
-
Install the cloud client on the Session Recording server. To do that, run a command as an administrator from the location of the cloud client .msi file that you downloaded earlier.
You can enter a command manually or generate a command by clicking Generate command on the Server connection guide page.
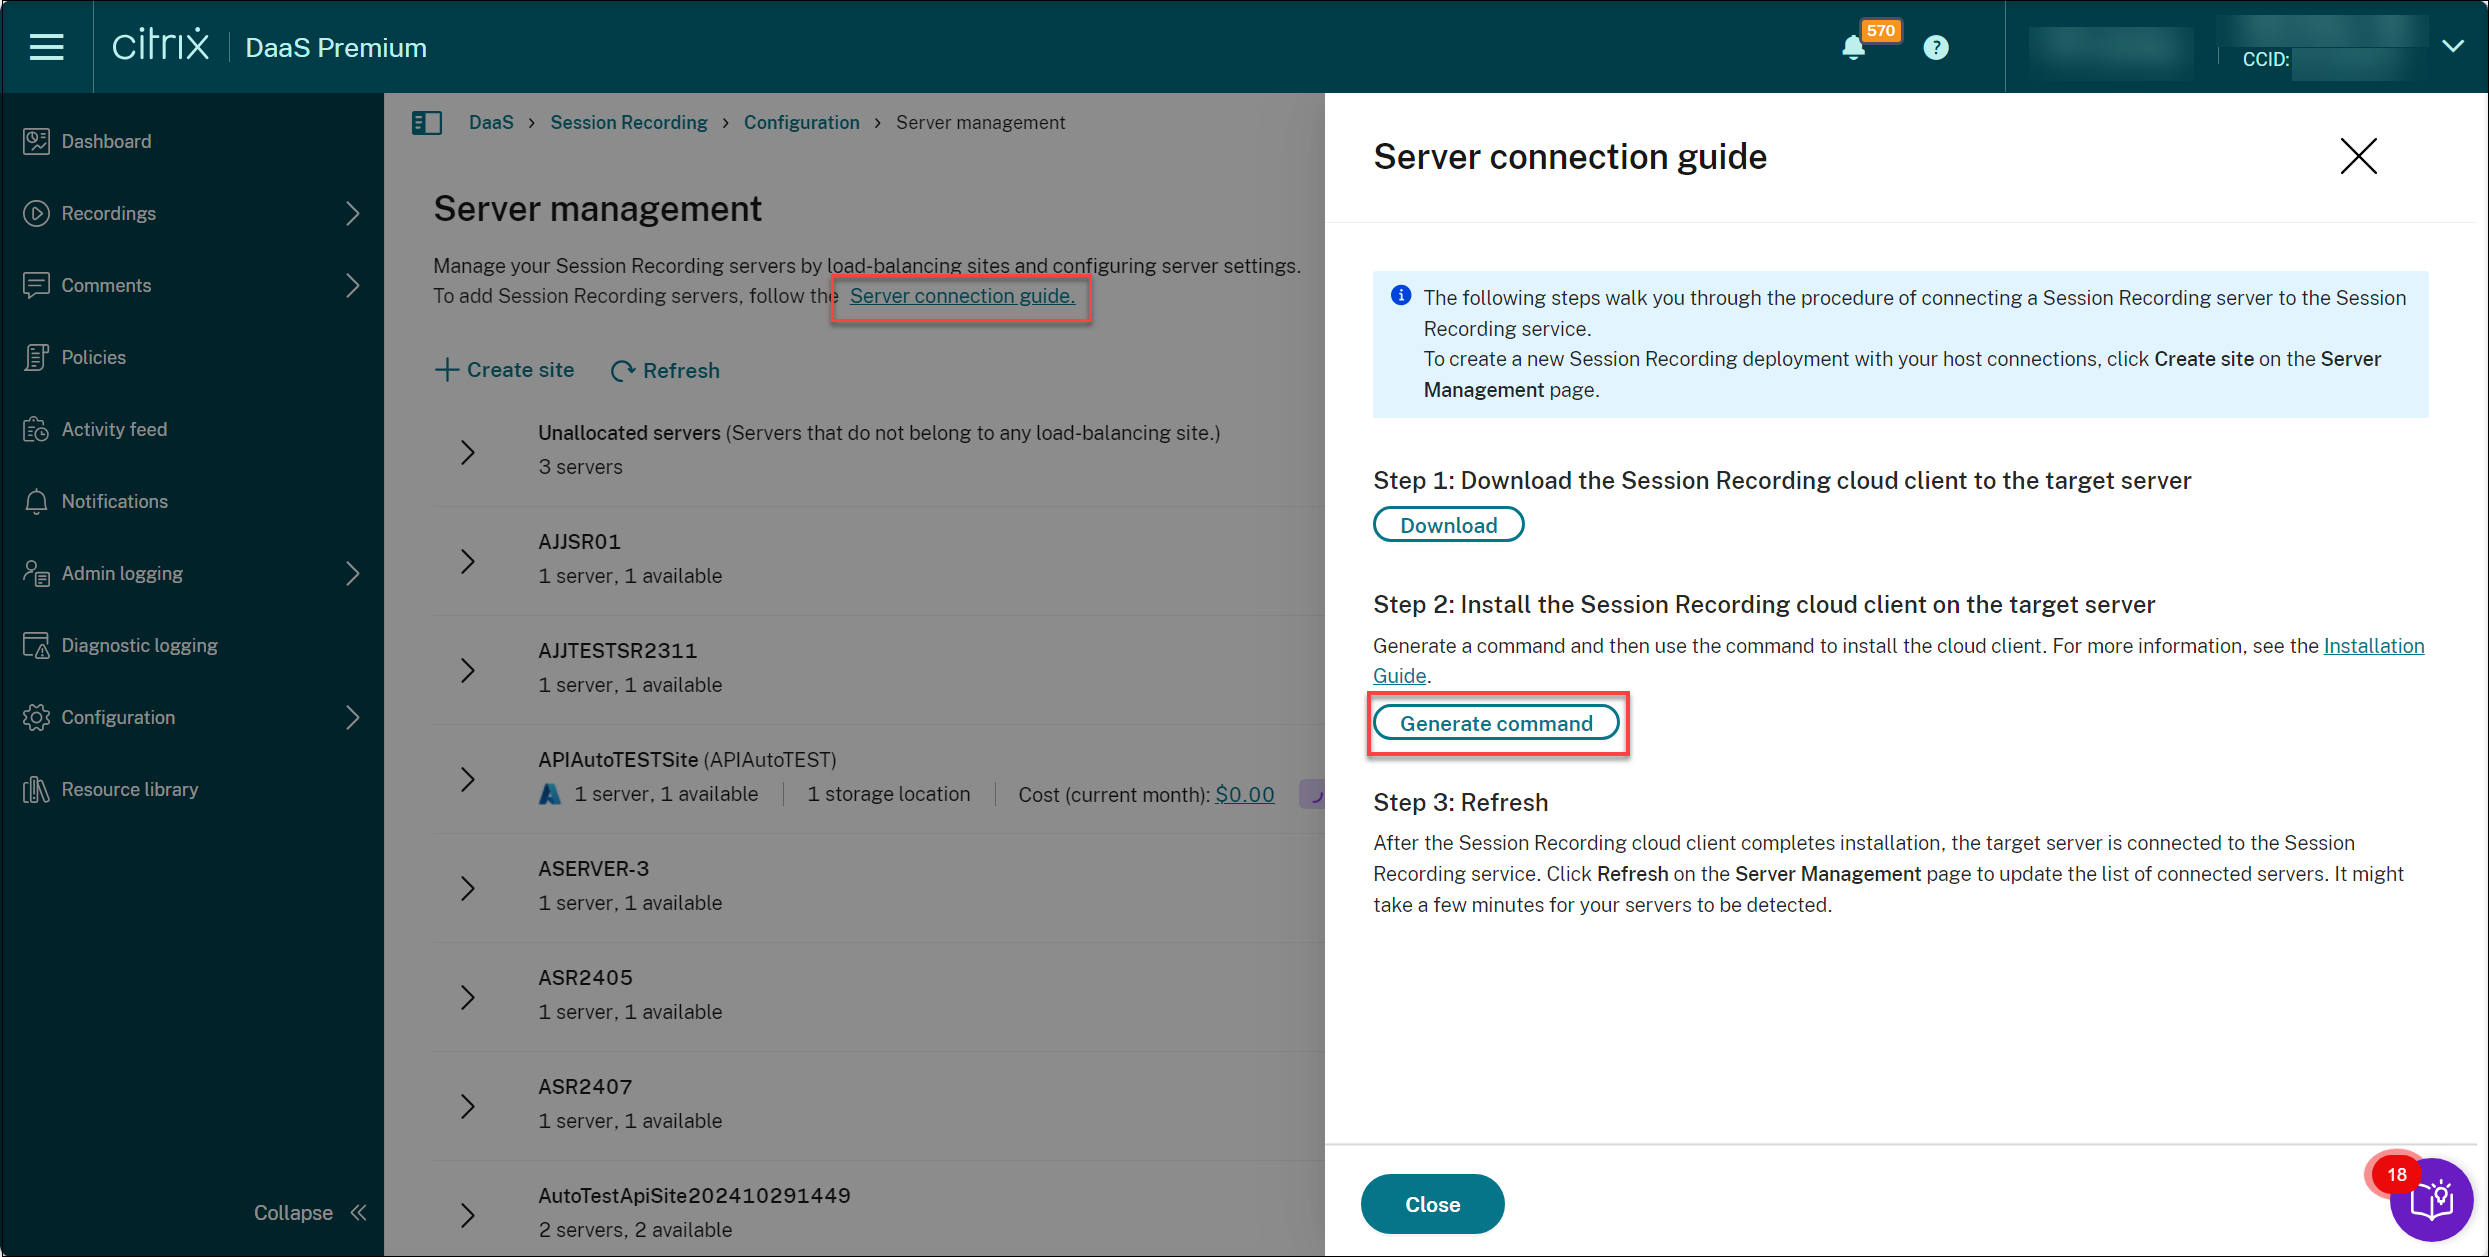
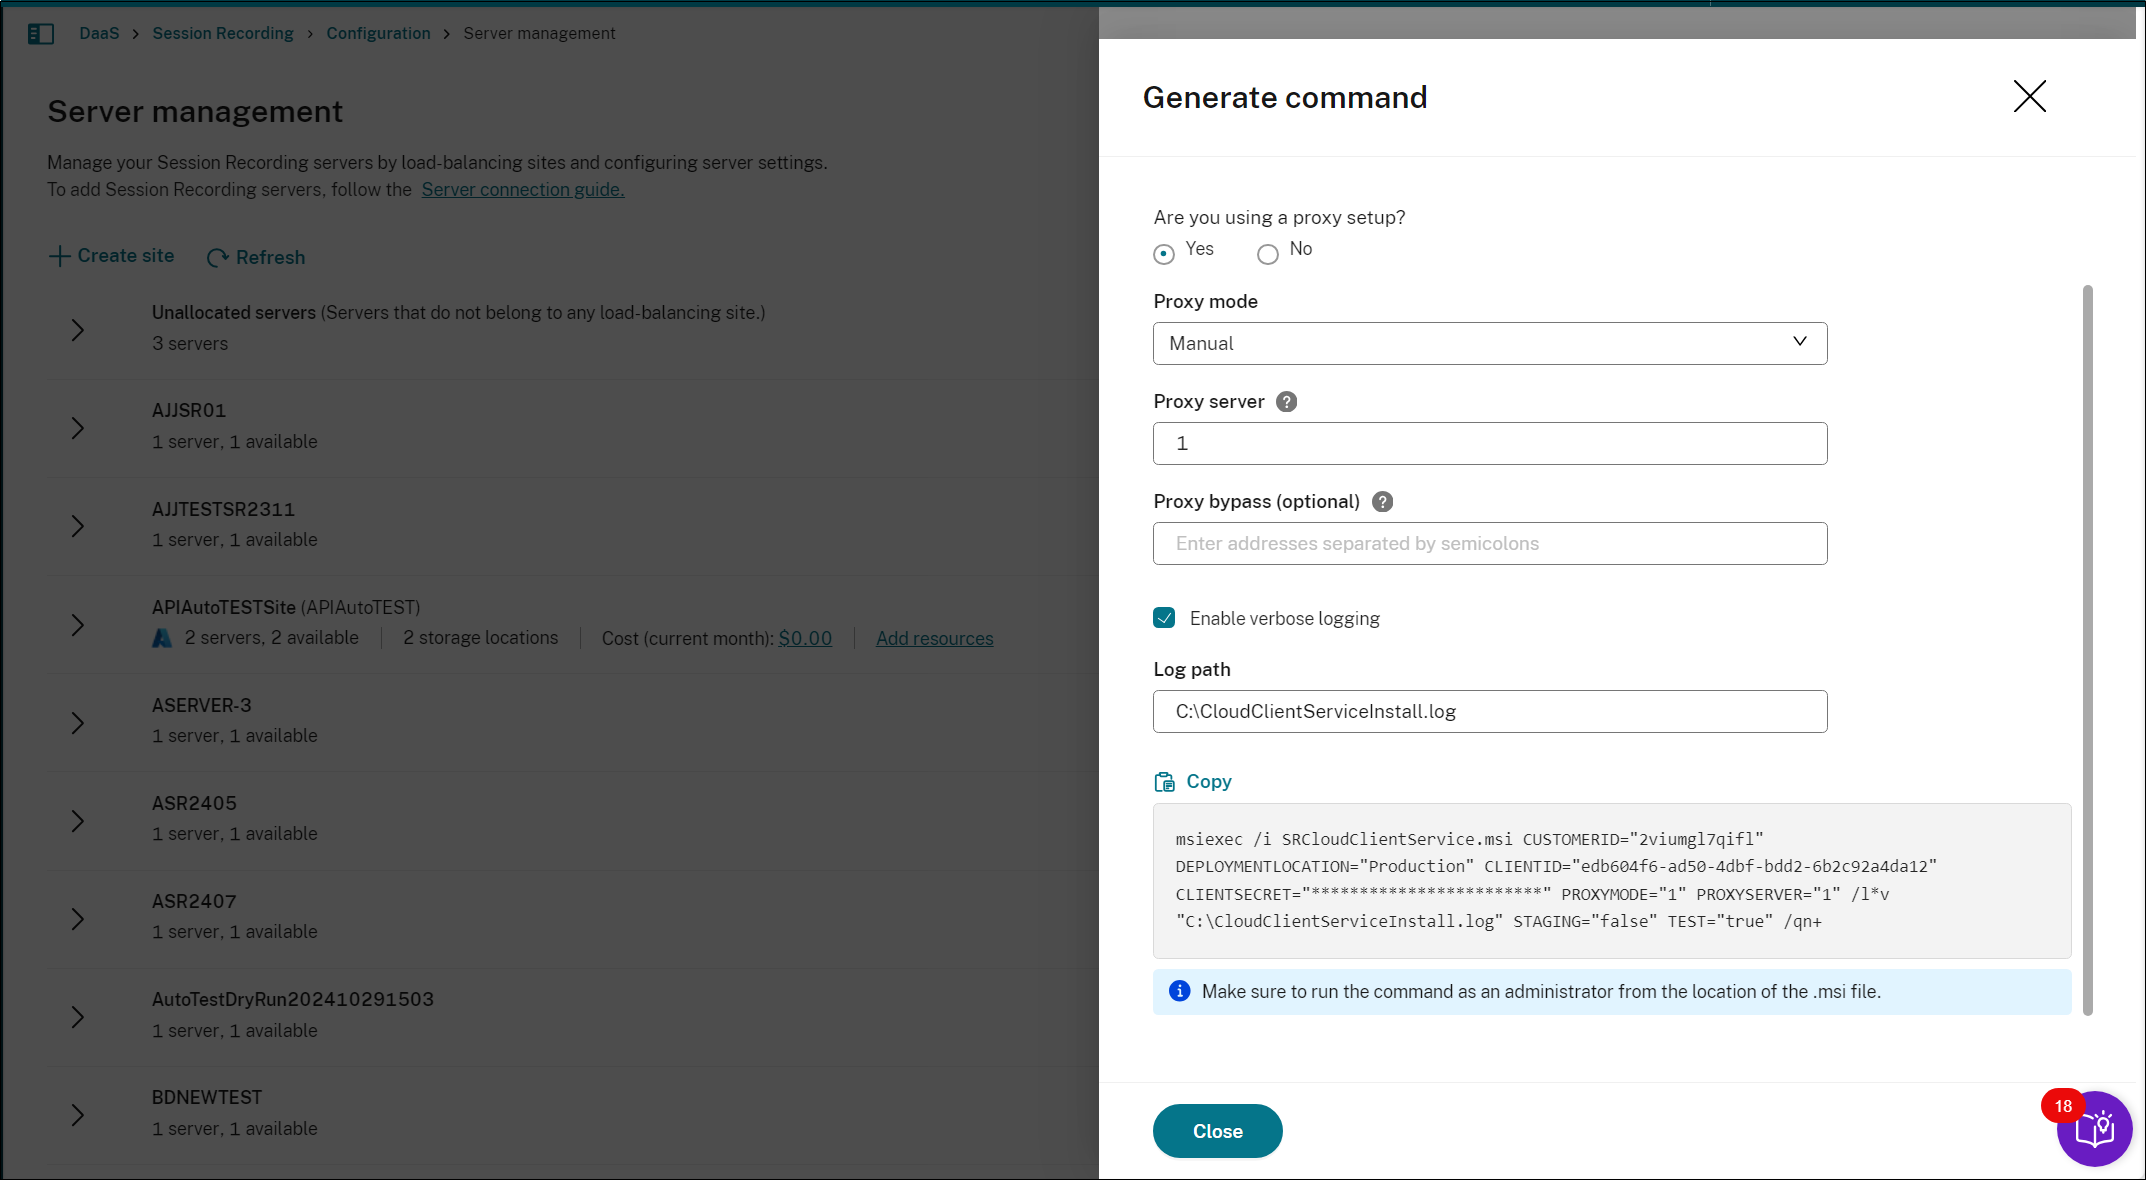
Answer questions and provide information where necessary on the Generate command page. After that, click the Generate command button.
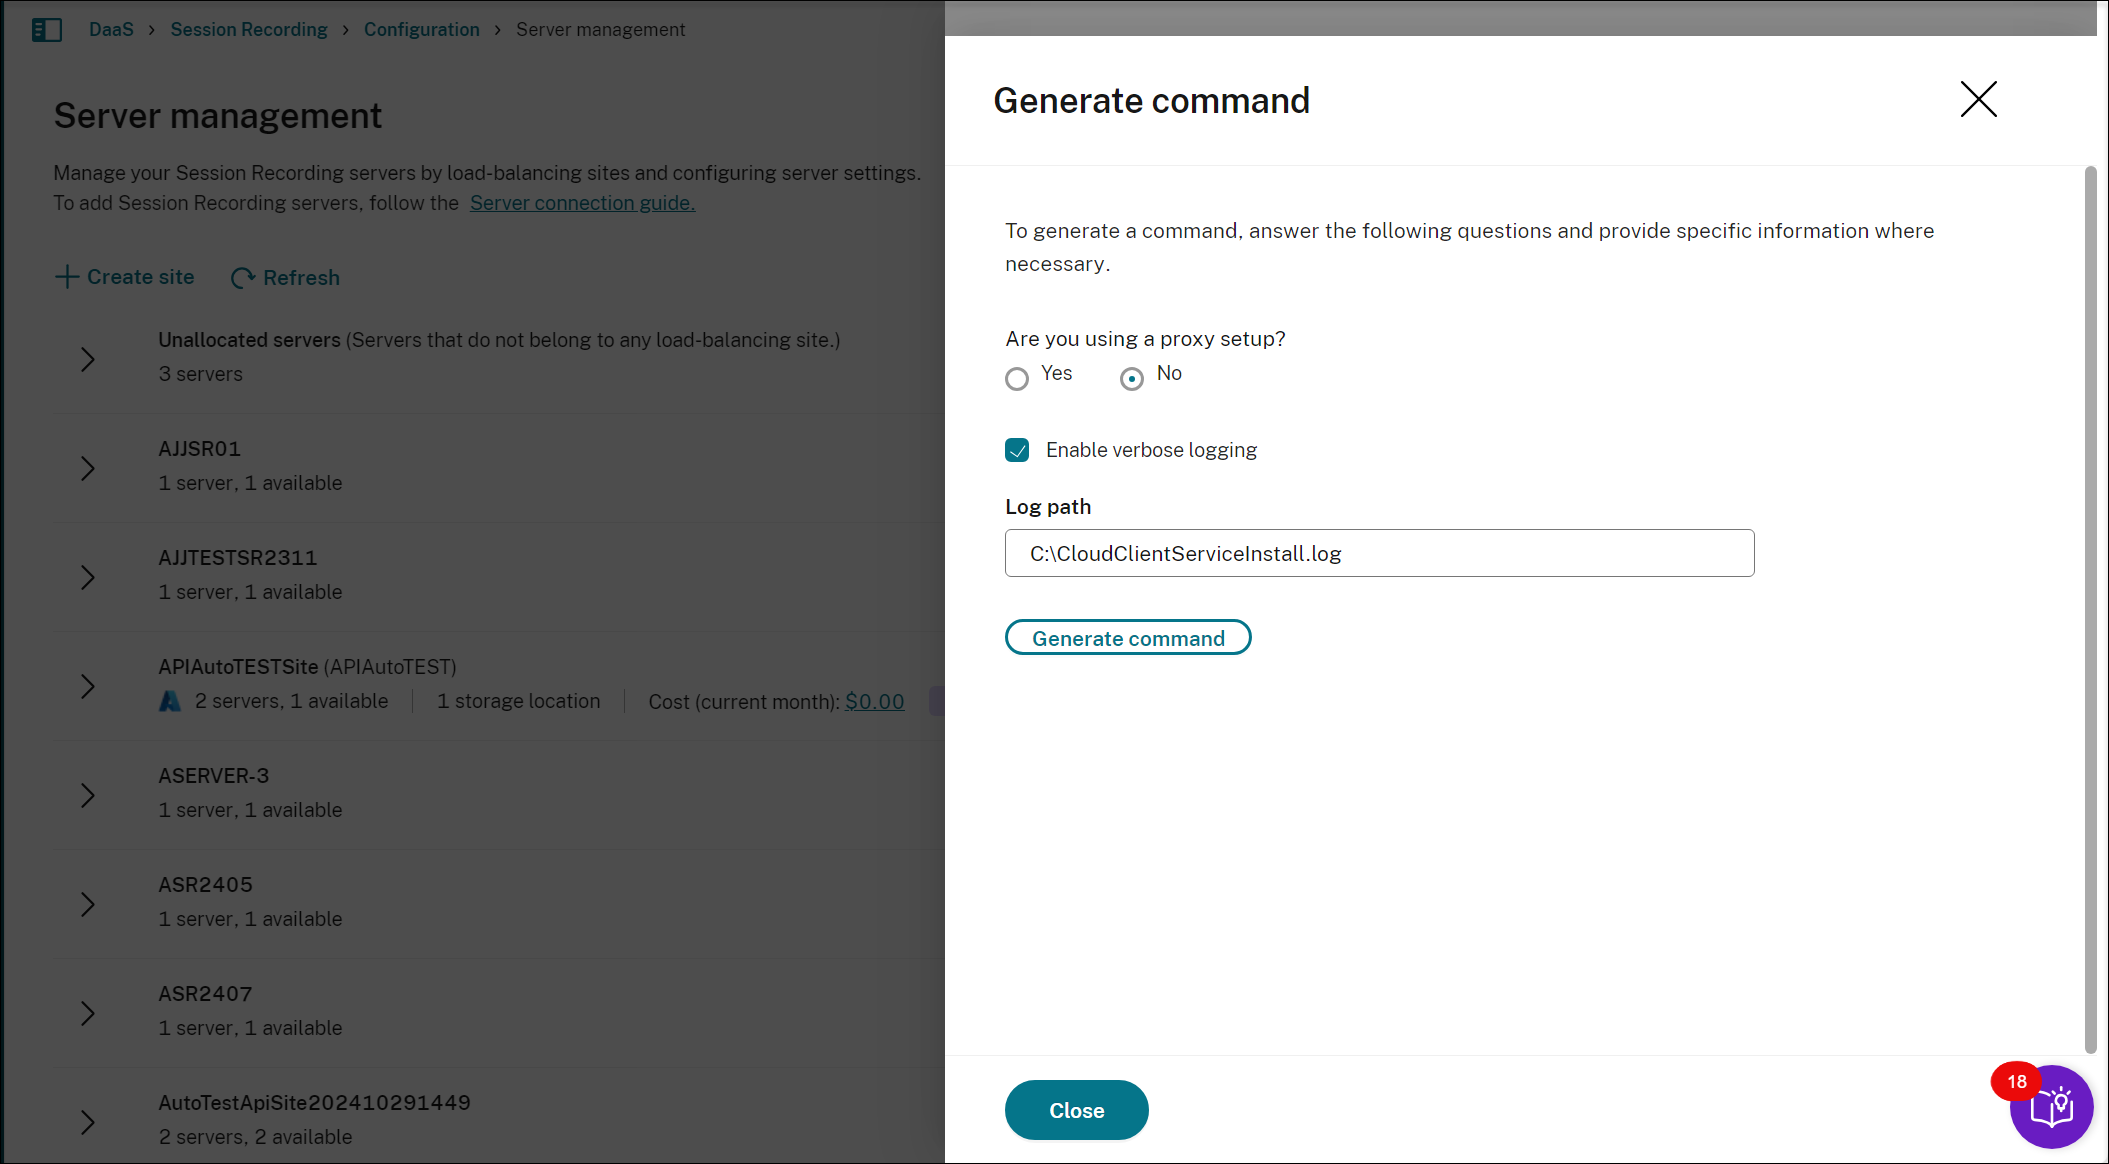
If you modify the answers or provide different information after clicking the Generate command button, the generated command automatically updates accordingly. The Generate command button is available again after you sign out and sign back in to Citrix Cloud.
The command is similar to the following:
msiexec /i SRCloudClientService.msi CUSTOMERID="2viumgl7qifl" DEPLOYMENTLOCATION="Production" CLIENTID="edb604f6-ad50-4dbf-bdd2-6b2c92a4da12" CLIENTSECRET="yPj5zU_BVuo3Od2eZTHaCw==" PROXYMODE="1" PROXYSERVER="1" /l*v "C:\CloudClientServiceInstall.log" STAGING="false" TEST="true" /qn+
<!--NeedCopy-->
Where:
-
SRCloudClientService.msi installs the Session Recording cloud client that enables interaction with Citrix Cloud. Download or copy the .msi file to each Session Recording server you want to connect.
Note:
The status of a Session Recording server might not change to Offline after you stop the cloud client service (CitrixSsRecCloudClientService) on it. For more information, see Configure Session Recording servers.
Citrix® collects traces from the cloud clients installed on on-premises Session Recording servers and uses the traces for troubleshooting.
-
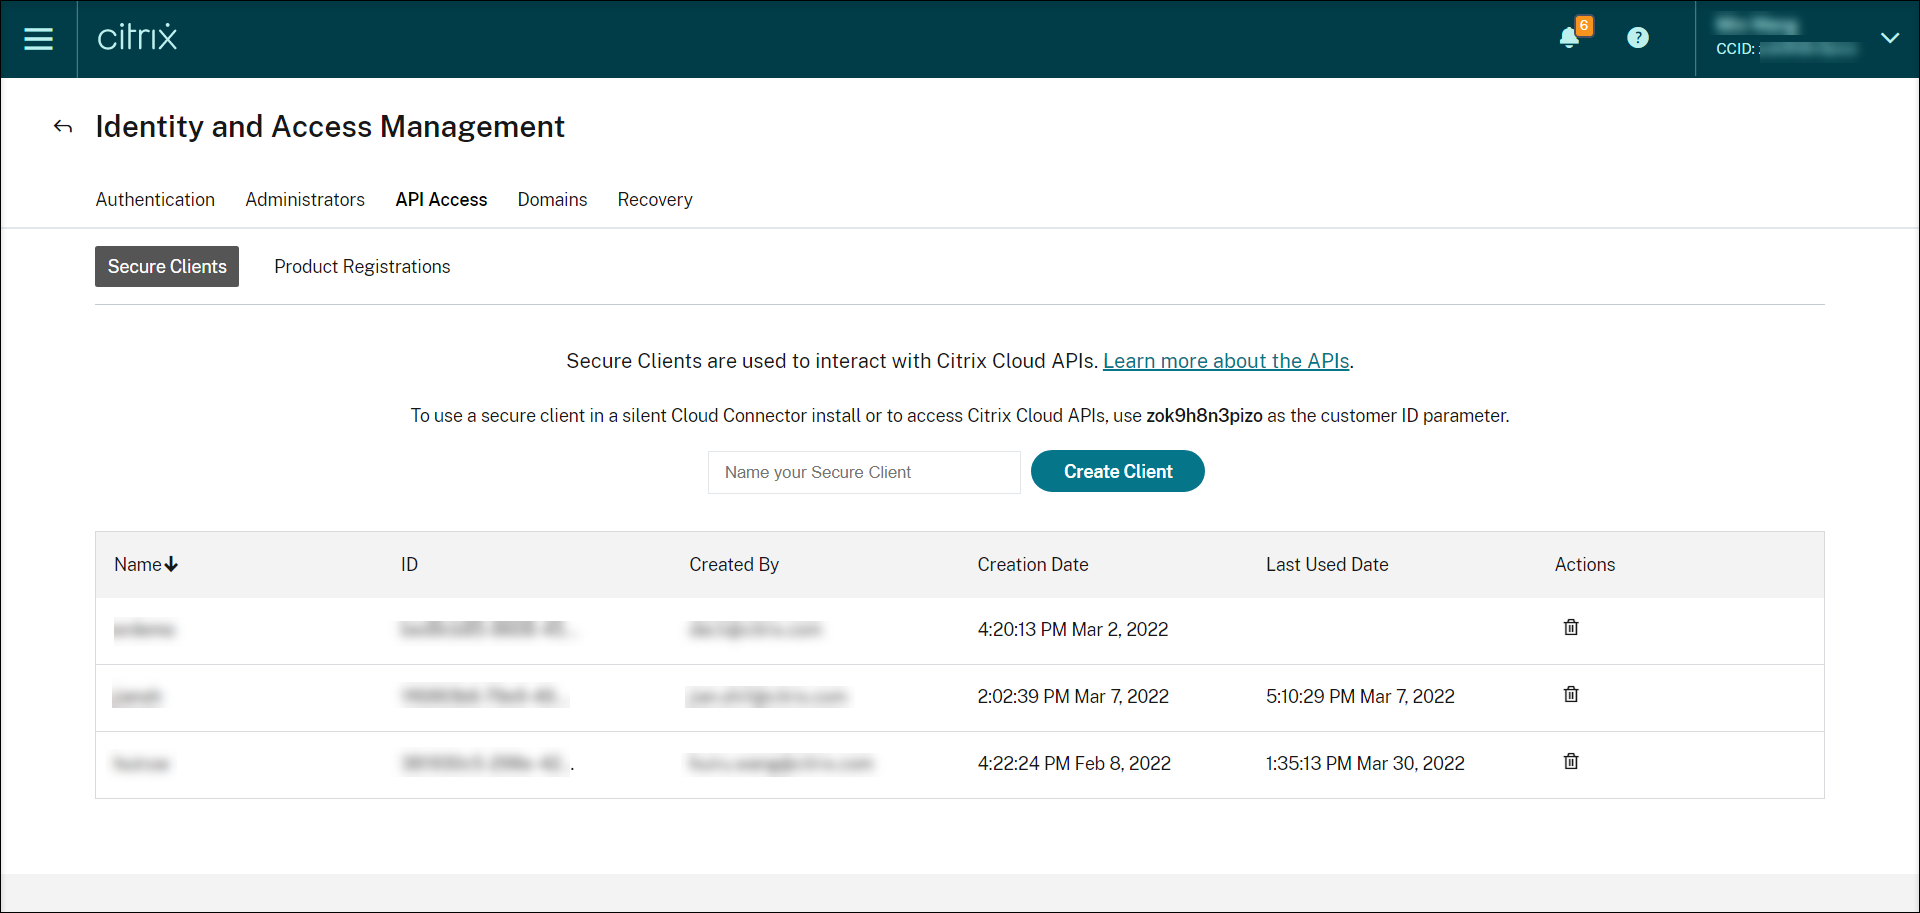
CUSTOMERID is a required parameter. You can find the Citrix Cloud customer ID in the upper right corner of the Citrix Cloud console. You can also find it on the Secure Clients tab (Identity and Access Management > API Access > Secure Clients). For example, see the following screen capture:
-
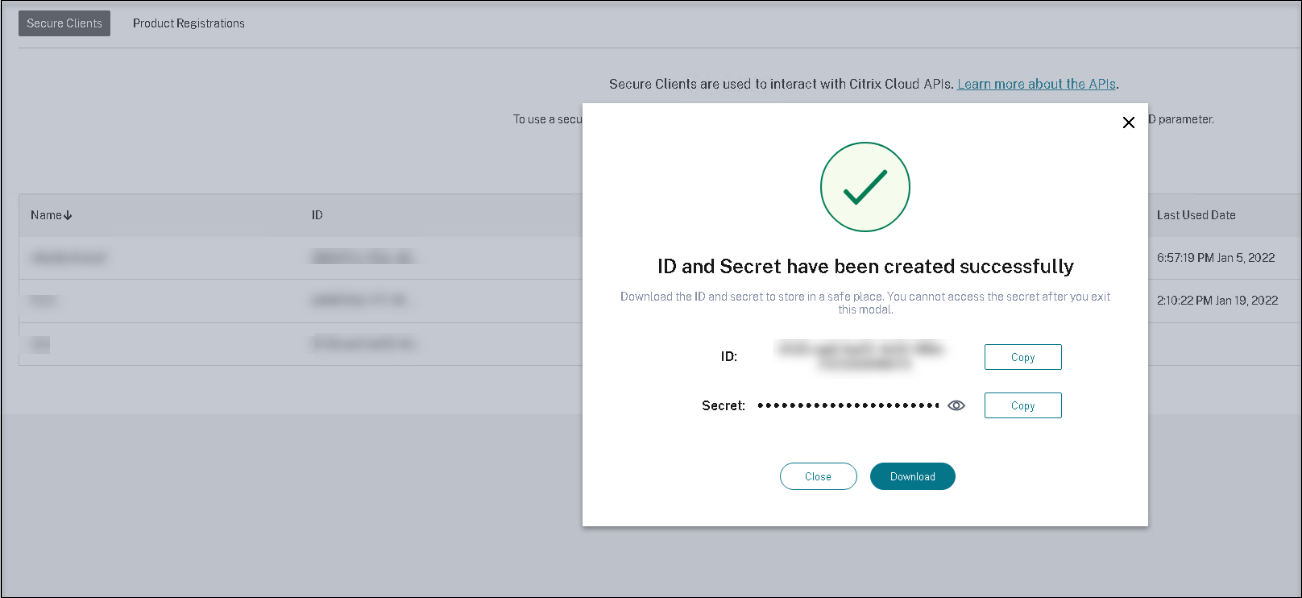
CLIENTID is a required parameter. The secure client ID is a Universally Unique Identifier (UUID) automatically generated when you create the secure client. Secure clients are used to interact with Citrix Cloud APIs.
-
CLIENTSECRET is a required parameter. The secure client secret shows only once — at the client creation time. After the secure client is created, click Download to save both the secure client ID and the secure client secret in a file.
Note:
You need the secure client ID and secure client secret of the secure principal that will be used to install the Session Recording Cloud Client.
To obtain these values, you must first create a secure principal in Citrix Cloud.
Ensure that the secure principal is created with Full Access permissions.
-
PROXYMODE is an optional parameter. Set the value to 1 or 2 to enable a manual or automatic proxy setup for the Session Recording service, respectively. If you leave the parameter unspecified, the default value is 0, which means the proxy is disabled.
-
PROXYSERVER is an optional parameter. However, if you set PROXYMODE to 1, this parameter is required. It specifies the proxy server name or IP address and the proxy port number. For example, http://proxy.example.com:proxy_port_number.
-
/l*v is an optional parameter. It specifies verbose logging.
-
/qn+ is a required parameter. It specifies a silent install with a user prompt at the end.
After the Session Recording cloud client completes installation, the target server is connected to the Session Recording service. Click Refresh on the Server Management page to update the list of connected servers. It might take a few minutes for your servers to be detected.
-
Server management
You can manage Session Recording servers by load-balancing them across multiple sites. A site can contain multiple Session Recording servers that connect to the same Session Recording database.
After you connect a Session Recording server to the Session Recording service, the server is automatically grouped to the site connected to the same Session Recording database. If no such site is available, the server becomes a site itself and the site name is the name of the server.
You can perform the following actions for server management:
- Create and edit sites with custom names and descriptions.
- Expand sites to access Session Recording servers in them.
- Drag and drop Session Recording servers to different sites. You can also change a server’s site by clicking the Settings icon of the server. The Settings icon is present only for available servers.
- Configure server settings. For more information, Configure Session Recording servers.