Deploy Session Recording resources to a cloud subscription
This article provides information on deploying Session Recording resources to an Azure subscription.
You can deploy the following Session Recording resources to an Azure subscription from within the Session Recording service:
- Session Recording servers
- Databases
- Storage
- Load balancer
There are two ways of deploying Session Recording resources to an Azure subscription:
-
Use a host connection that connects to the Azure subscription. Creating a host connection requires you to provide your subscription information. For more information, see Create and deploy a site through a host connection later in this article.
-
If you do not want to provide your subscription information, create an Azure Resource Manager template (ARM template) that contains how and which resources you want to deploy. For more information, see Create and deploy a site through an ARM template later in this article.
Create and deploy a site through a host connection
This section guides you through the procedure of creating and deploying a site through a host connection and the following operations that can be performed on a site deployed this way:
- Add resources to an existing site deployed on Azure
- Change the IP addresses that are allowed to access the load balancer
- View actual costs for using Azure
Create and deploy a site through a host connection
-
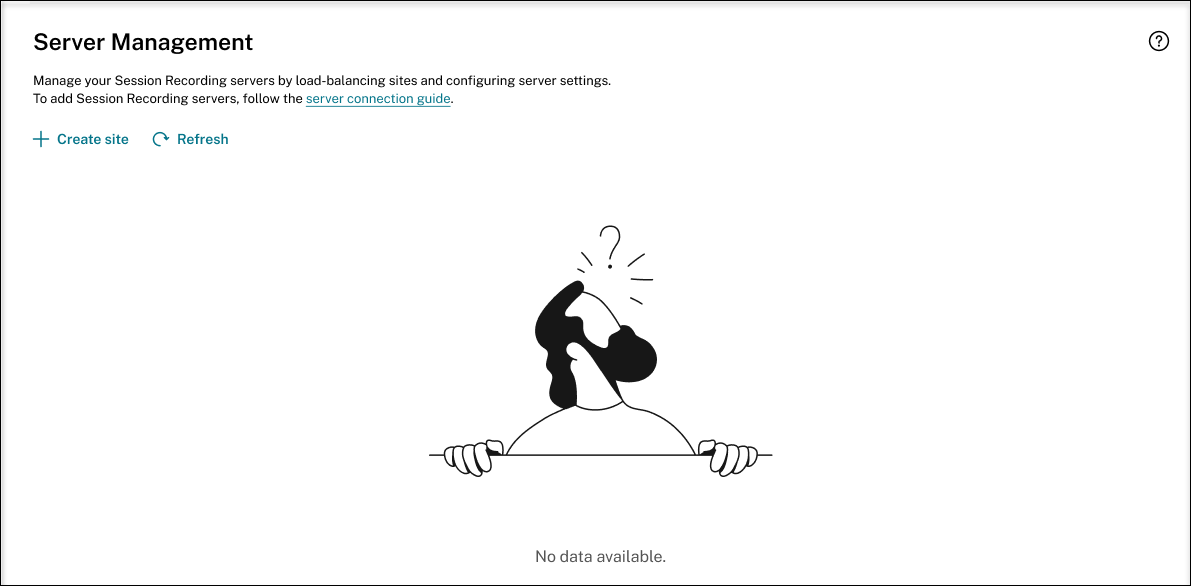
Select Configuration > Server Management from the left navigation of the Session Recording service.
-
On the Server Management page, click Create site. The Create Site page appears.

-
Select Create and deploy a site through a host connection. The main steps are listed in the left navigation.

-
Enter a site name and description, select a host connection that connects to your Azure subscription, and specify a region.
-
If you don’t have a host connection in place, add one by referring to Add a host connection later in this article.
-
Azure Government regions aren’t supported.
-
-
After completing the site information, click Next to continue.
-
(Optional) To get recommendations for VM and storage configurations, provide information about your recording needs.
You can skip this step by clicking I’m good, skip this step or by clicking Next with nothing selected.
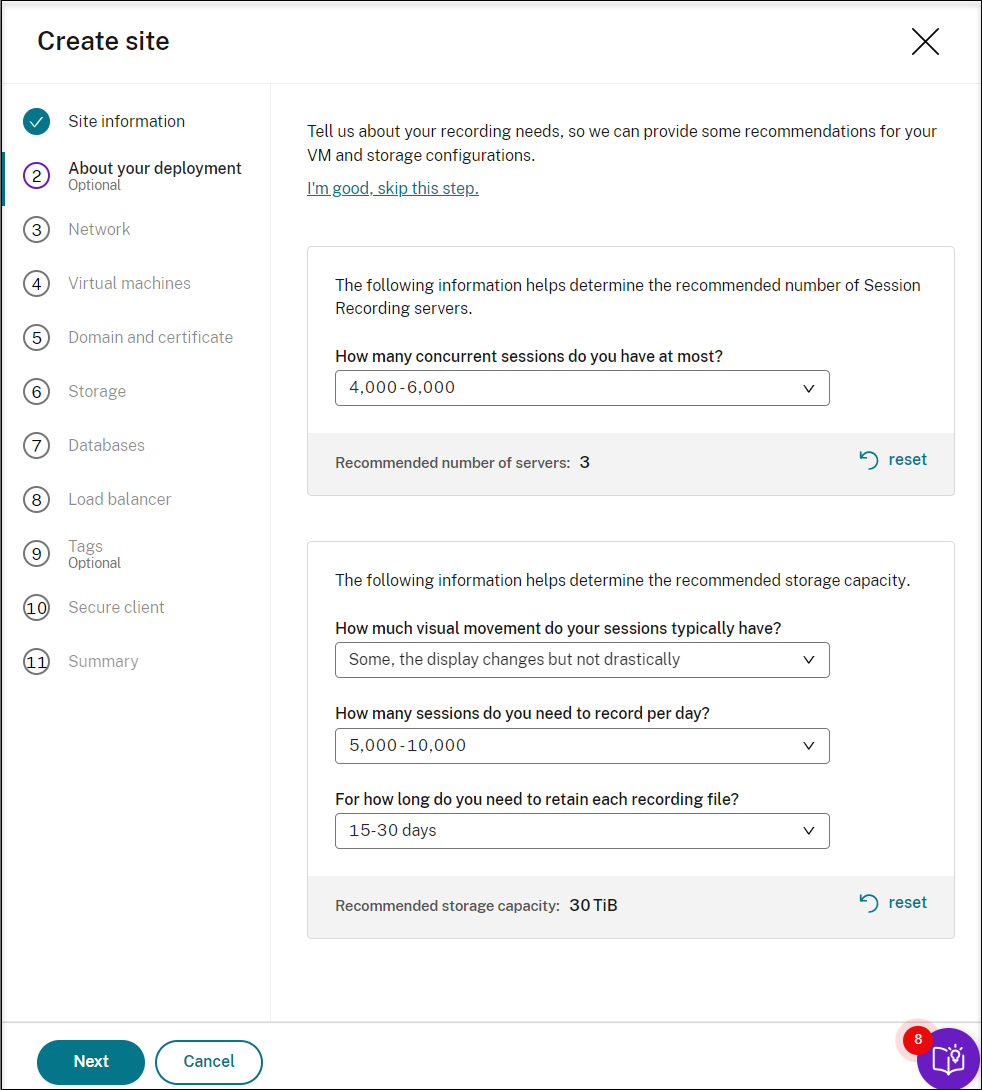
When you select an option from the drop-down list, a recommendation is presented according to your selection. A reset button is available next to the recommendation. It lets you clear your selections and the corresponding recommendation in that section.
-
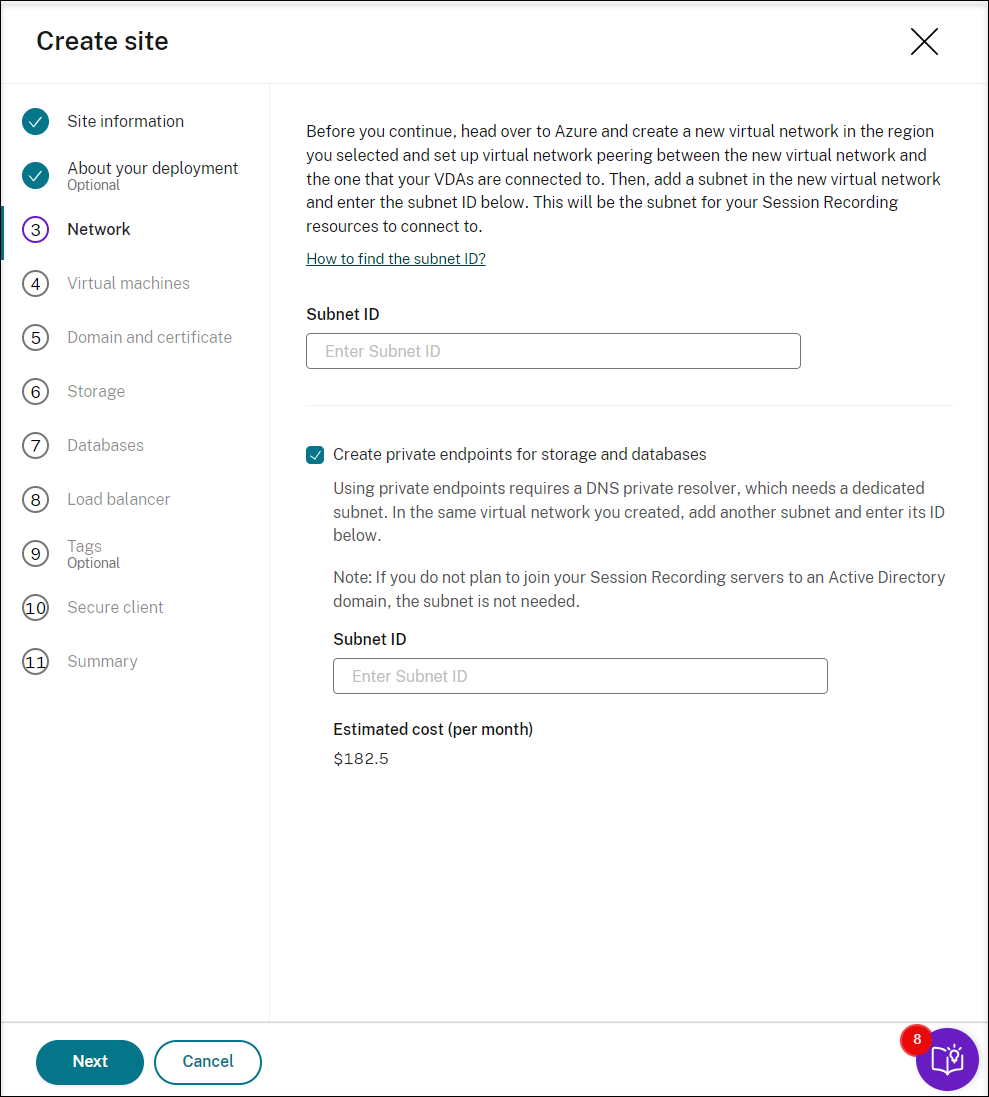
Go to the Azure portal and create a new virtual network in the region you selected and set up virtual network peering between the new virtual network and the one that your VDAs are connected to. Then, add a subnet in the new virtual network. Find and enter the subnet ID below.
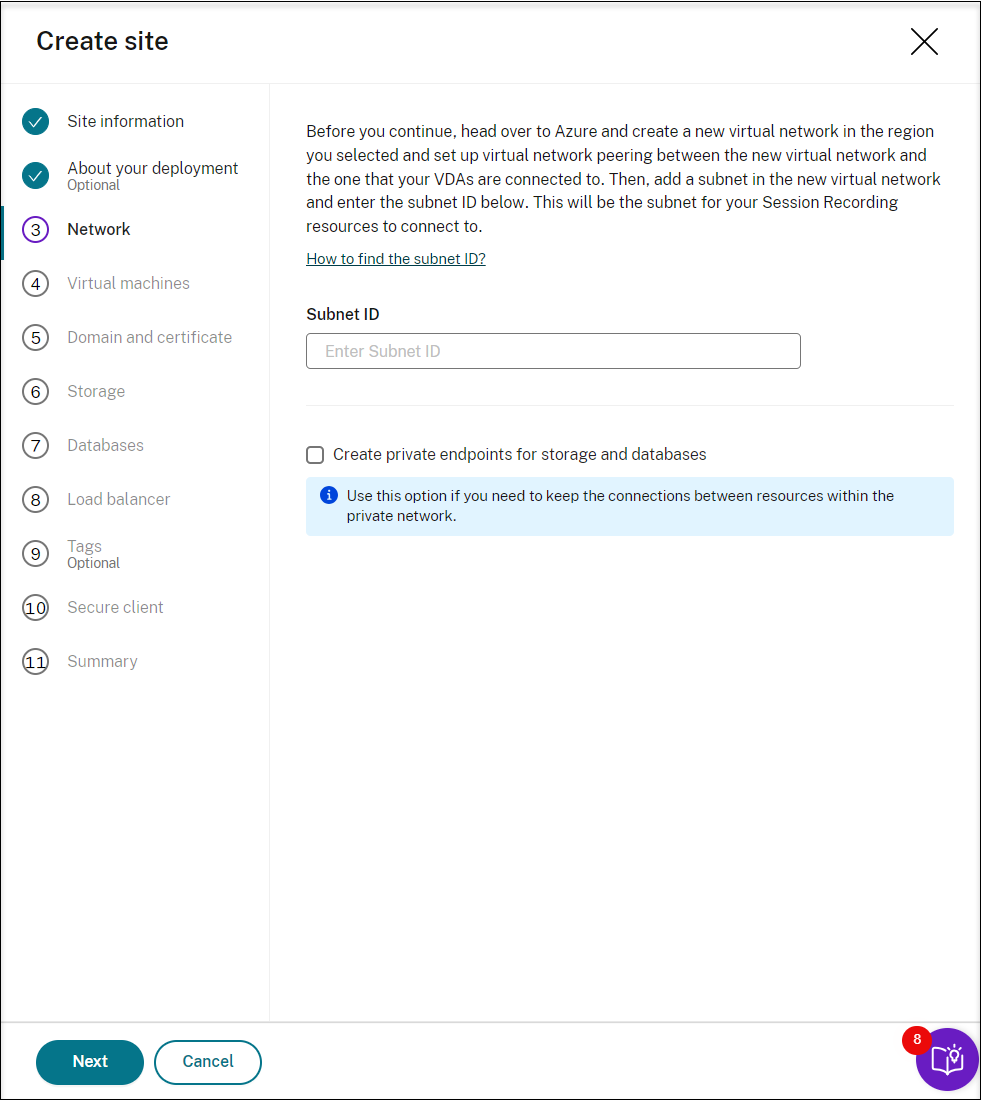
To keep the connections between resources within the private network, select the Create private endpoints for storage and databases check box.
After you select the Create private endpoints for storage and databases check box, decide on whether to enter another subnet ID by taking the following into consideration:
- If you do not plan to join your Session Recording servers to an Active Directory domain, the subnet is not needed and thus leave the subnet ID field empty.
- If you leave the subnet ID field empty, you are joining your Session Recording servers to an Azure Active Directory domain.
-
Create virtual machines (VMs) as your Session Recording servers.
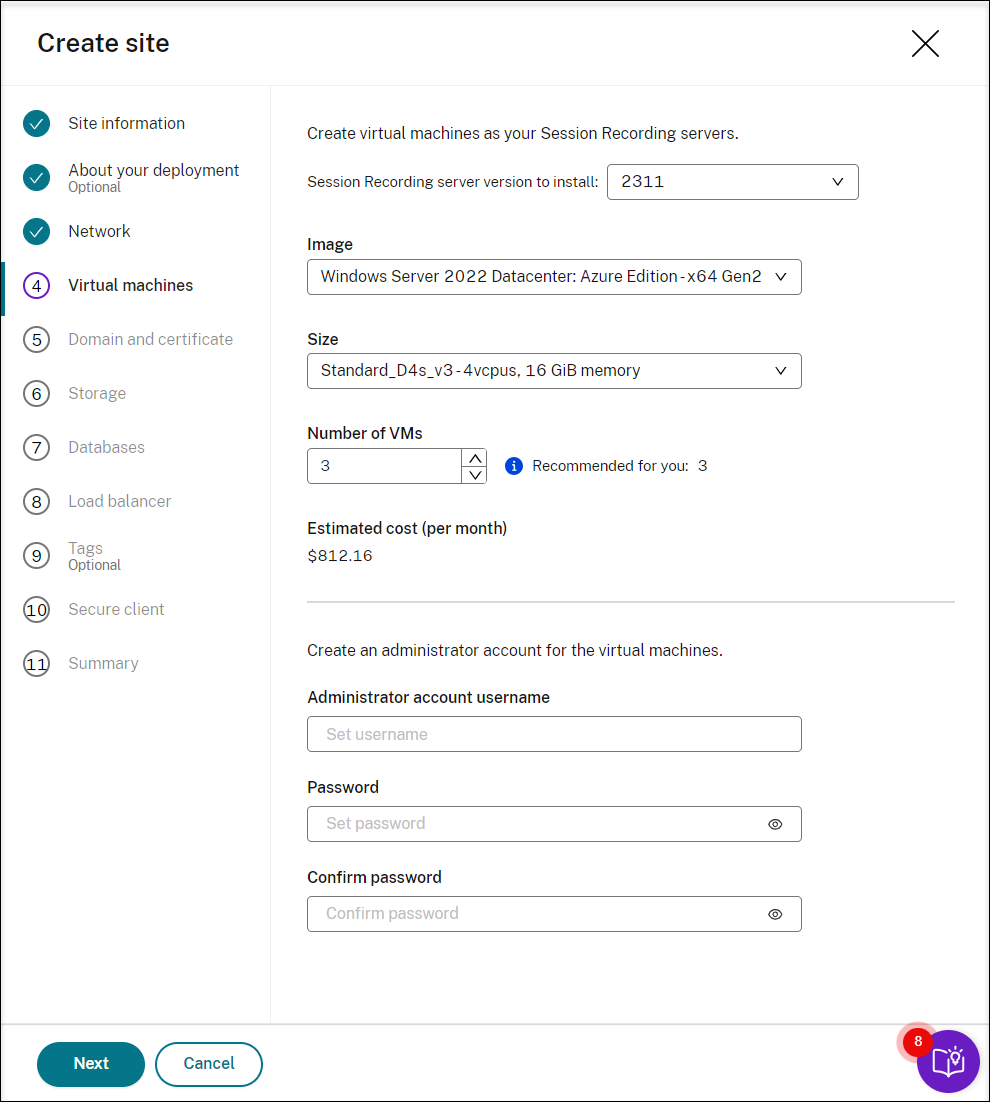
Note:
- The Number of VMs field is prefilled with the recommended number if there’s one. Change the number as needed.
- Estimated costs are based on standard pricing and don’t take discounts into consideration. You can expect lower actual costs than estimated.
-
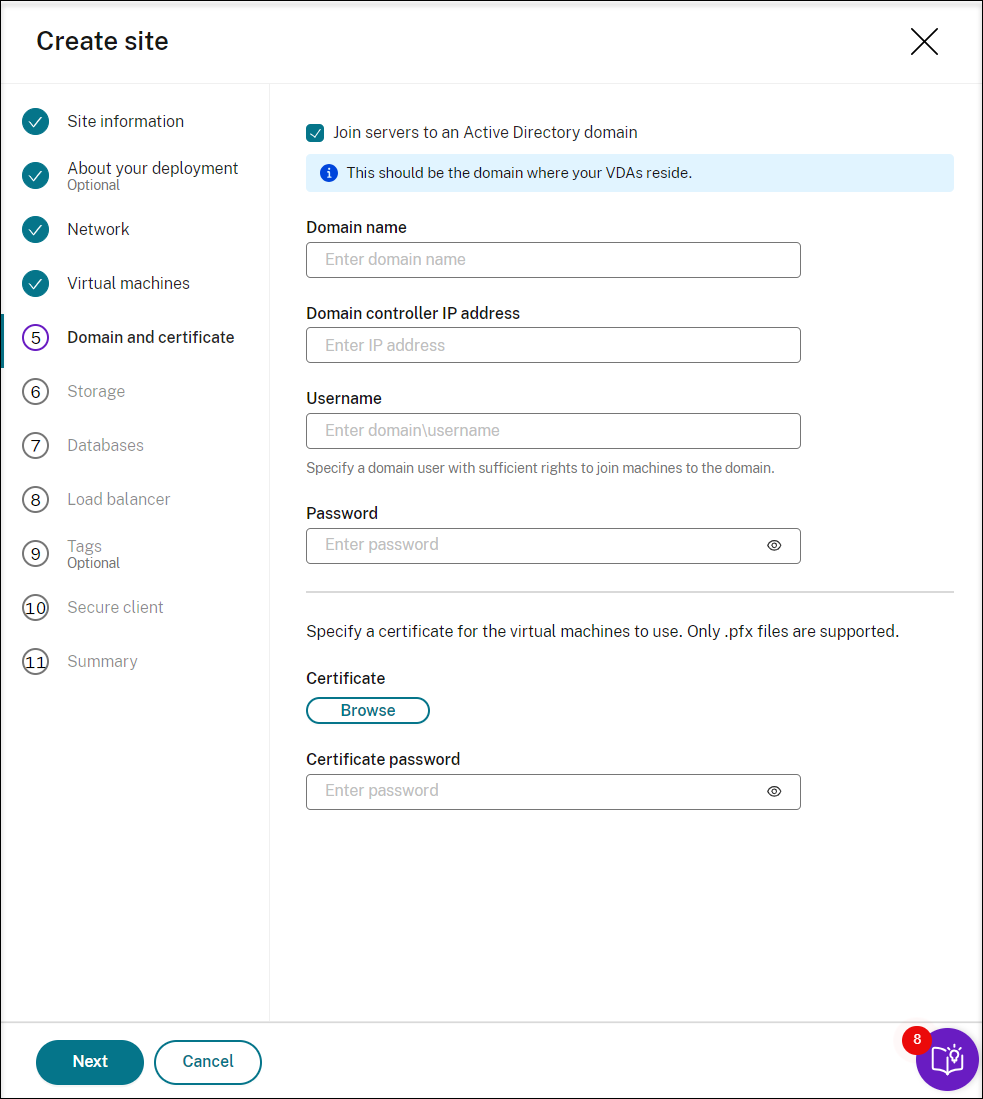
Join the Session Recording servers to the same domain with your VDAs and specify a certificate for the Session Recording servers.
-
If your VDAs connect to an Active Directory domain, select the Join servers to an Active Directory domain check box and enter the relevant information. By selecting the Join servers to an Active Directory domain check box, you are configuring the deployment for a hybrid scenario, integrating on-premises Active Directory with Azure AD.
-
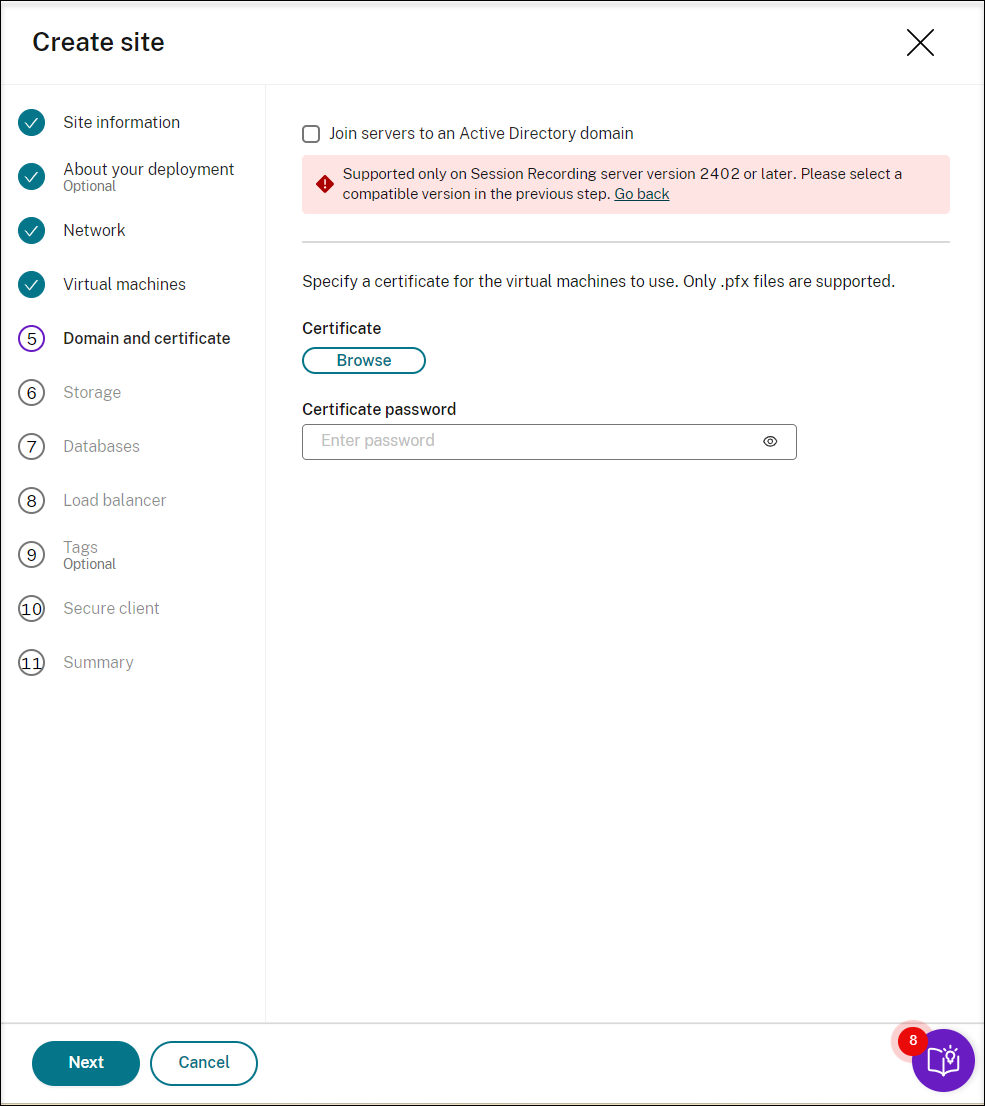
If your VDAs connect to an Azure Active Directory (Azure AD) domain, clear the Join servers to an Active Directory domain check box. After you complete creating the current site, make sure to manually join the Session Recording servers to the same Azure AD domain. Notice that pure Azure AD deployment is available only for Session Recording 2402 and later.
Note:
Since July 2023, Microsoft has renamed Azure Active Directory (Azure AD) to Microsoft Entra ID. In this document, any reference to Azure Active Directory, Azure AD, or AAD now refers to Microsoft Entra ID.
-
-
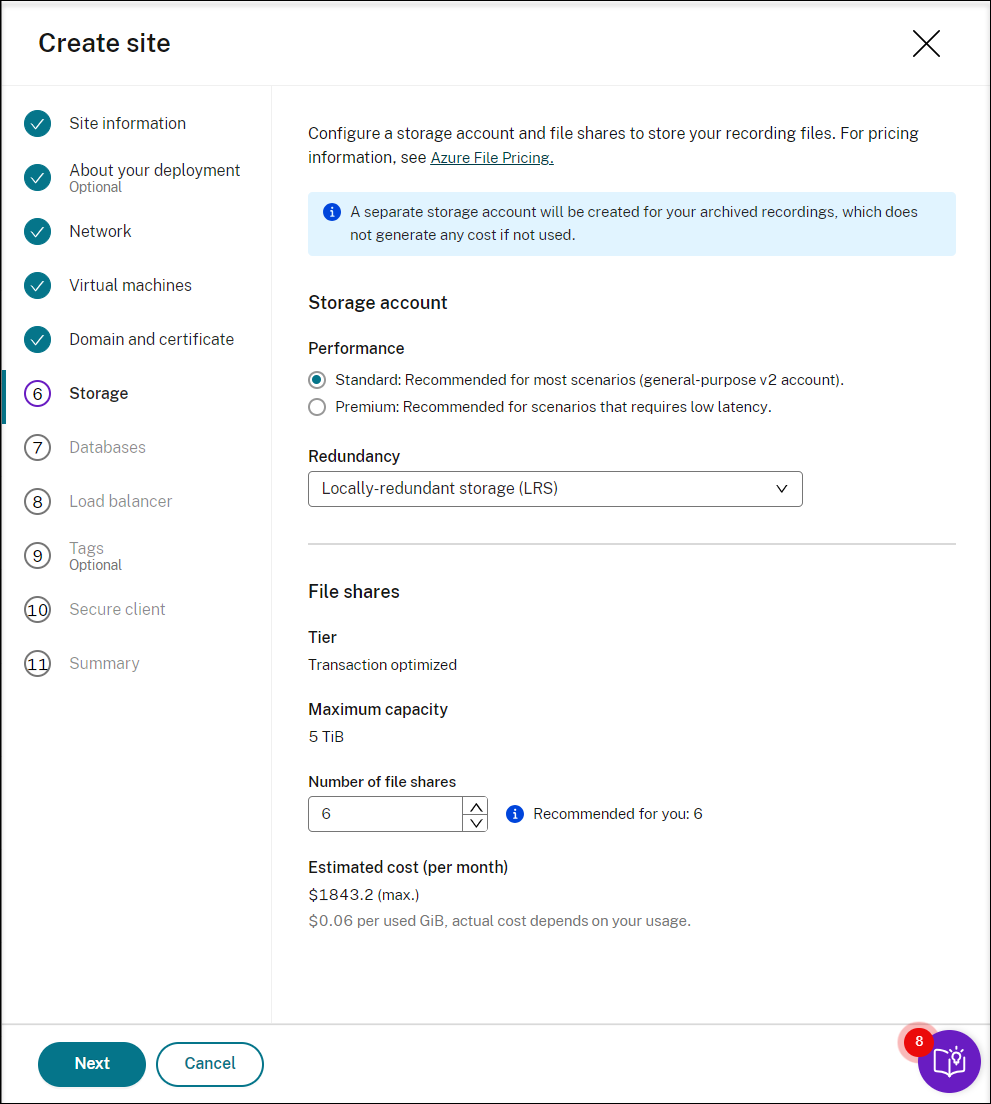
Configure an Azure storage account and file shares to store your recording files. For pricing information, see Azure Files pricing.
-
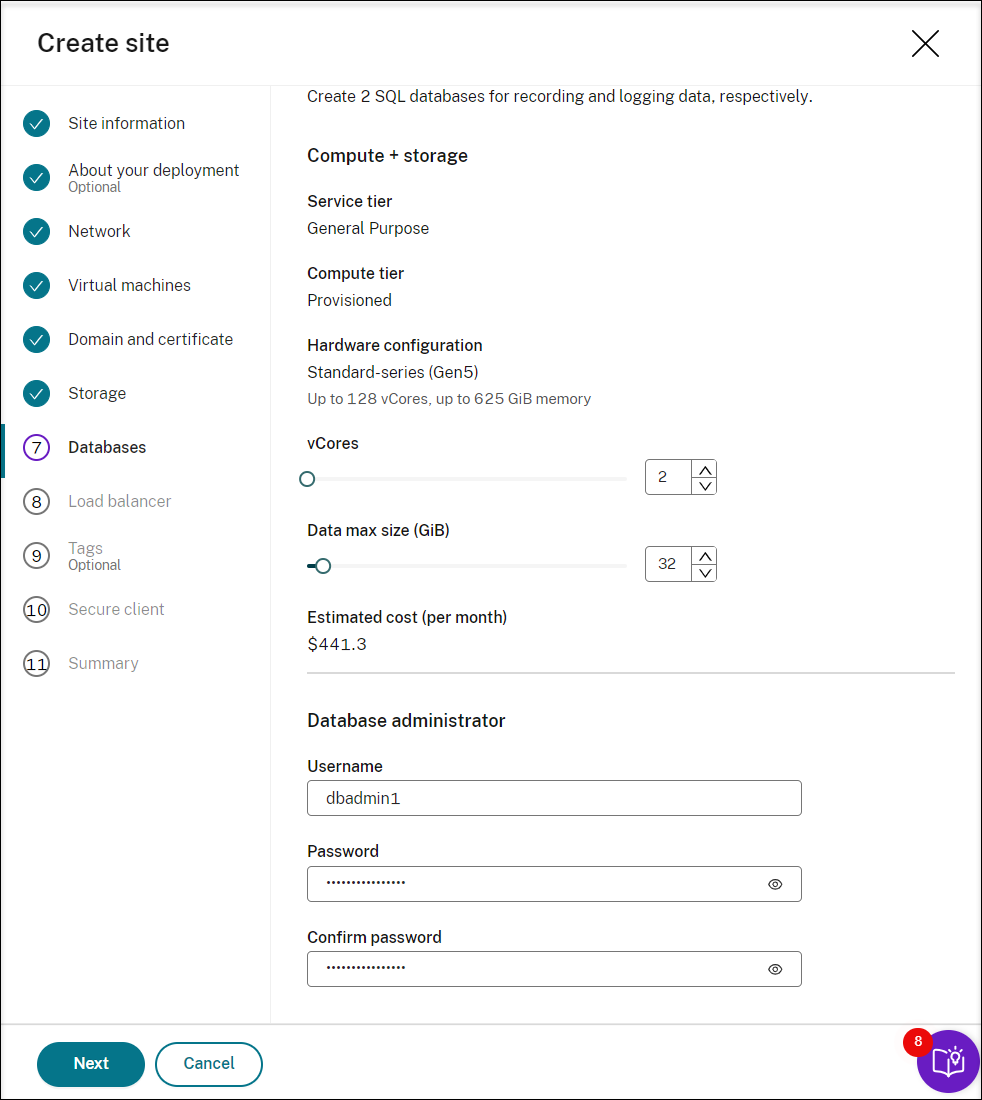
Create two SQL databases in Azure. One is used as the Session recording database (named sessionrecording) and the other as the administrator logging database (named sessionrecordinglogging).
Note:
When adding resources, specifically Session Recording servers, to an existing site deployed through a host connection, you are required to provide the database administrator password set during the site creation.
-
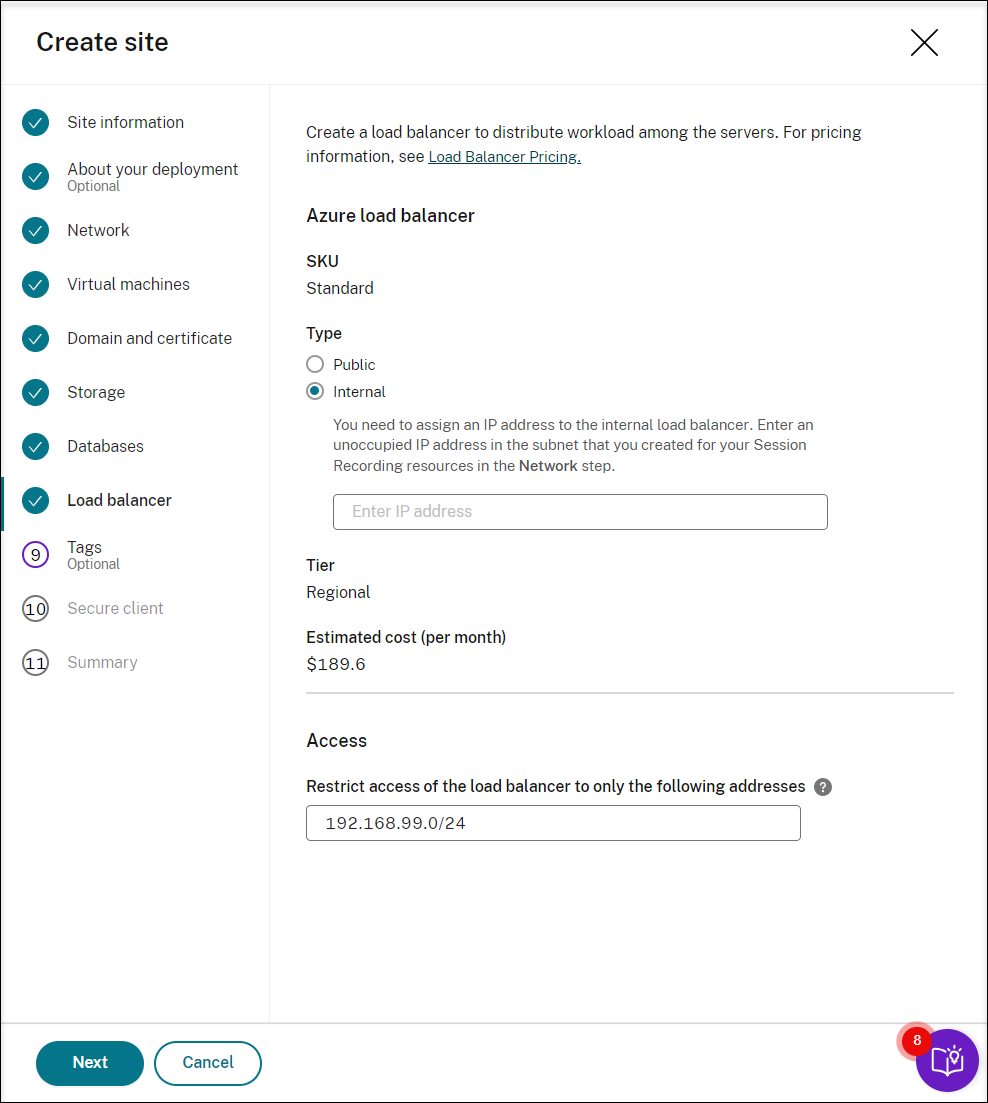
Create a load balancer to distribute workload among the Session Recording servers. Enter the IP addresses or ranges of your VDAs and separate them by a comma (,) in the Restrict access of the load balancer to only the following addresses field. For pricing information, see Load Balancer pricing.
-
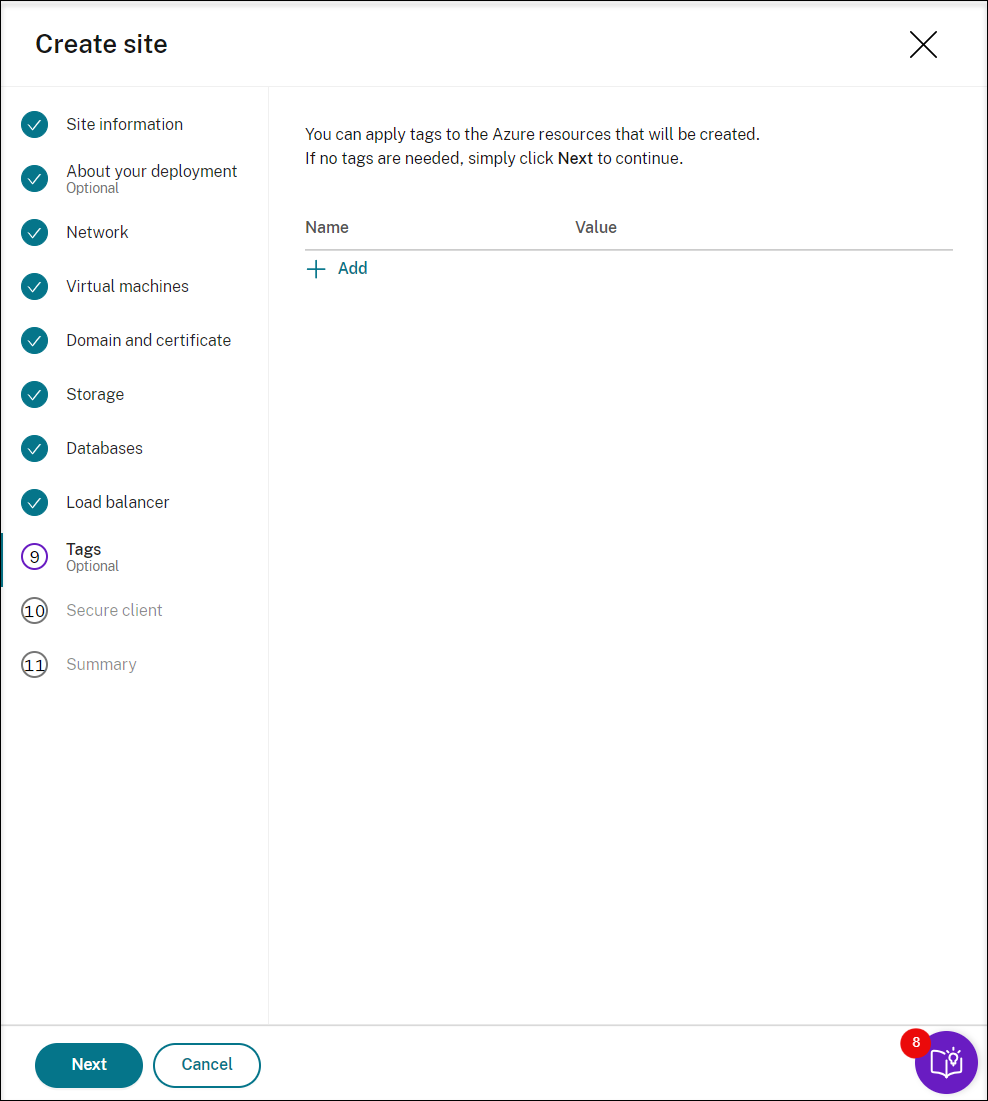
(Optional) Apply tags to the Azure resources to be created.
-
Create a secure client to onboard the Session Recording servers to the Session Recording service.
Click Create client to let Citrix create a secure client on your behalf. Alternatively, you can create a secure client through the Identity and Access Management > API Access tab of the Citrix Cloud™ console and then fill in the information below.

-
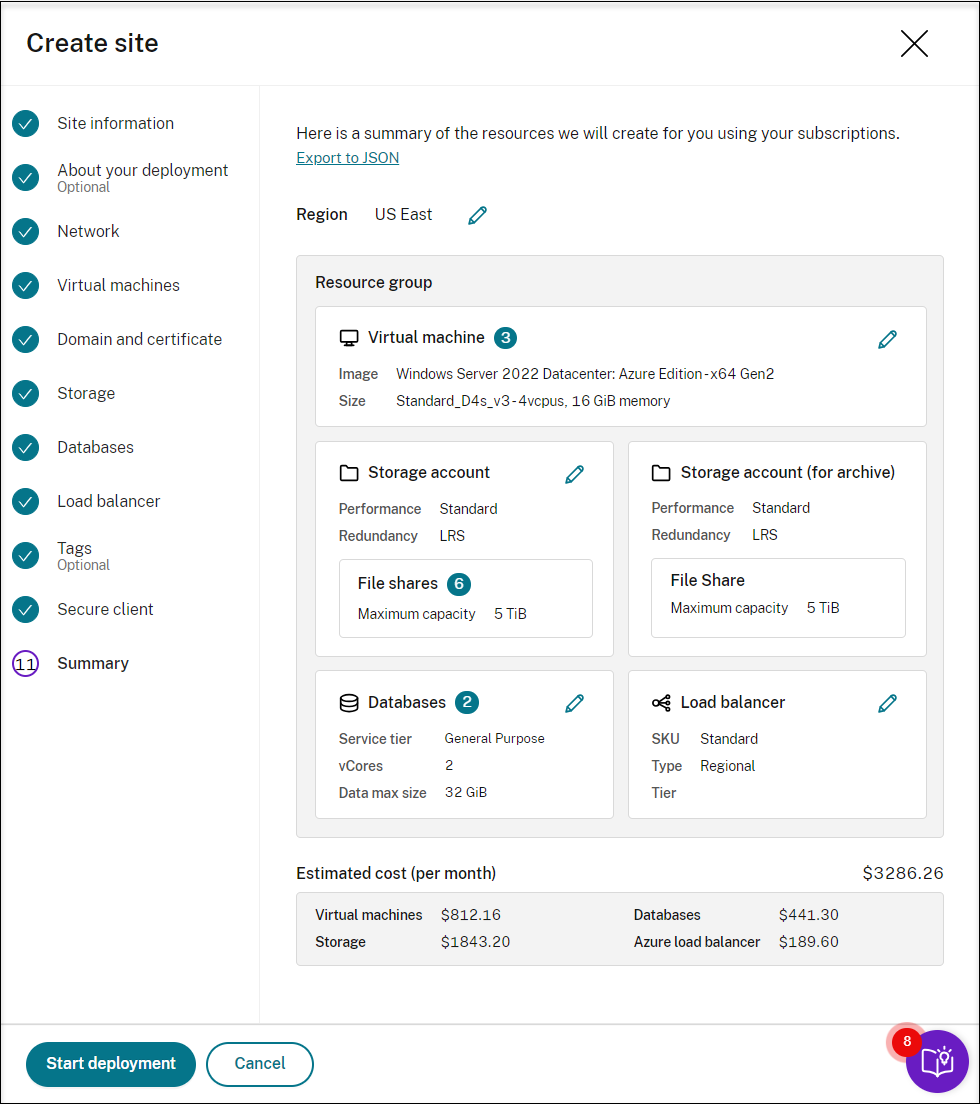
View the summary about the site to be created. Click the pencil icon to edit your settings if needed or click the button to start deployment.
The following are examples of the deployment process:
Deployment in progress:
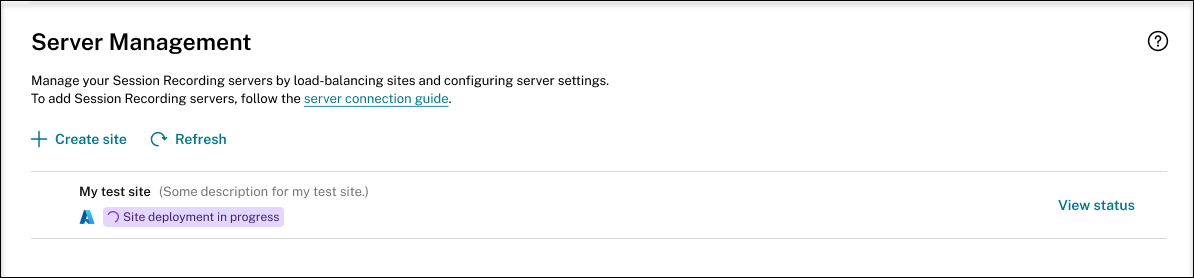
While a site deployment is in progress, you can click View status to view the progress.
Deployment failed:
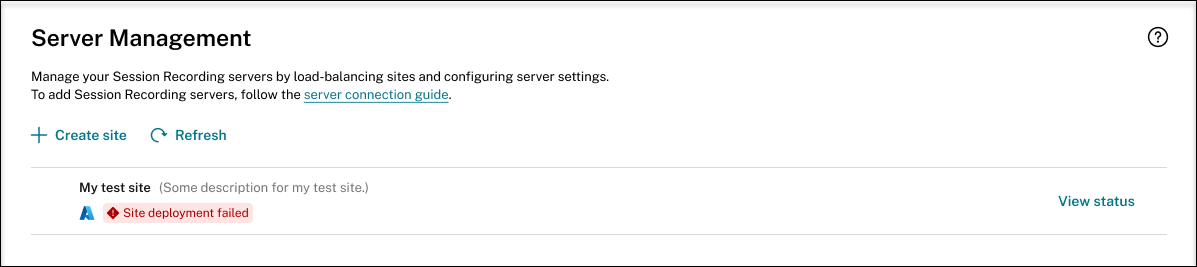
If errors occur during the deployment process, click View status to view the error details. For an example of the error details:
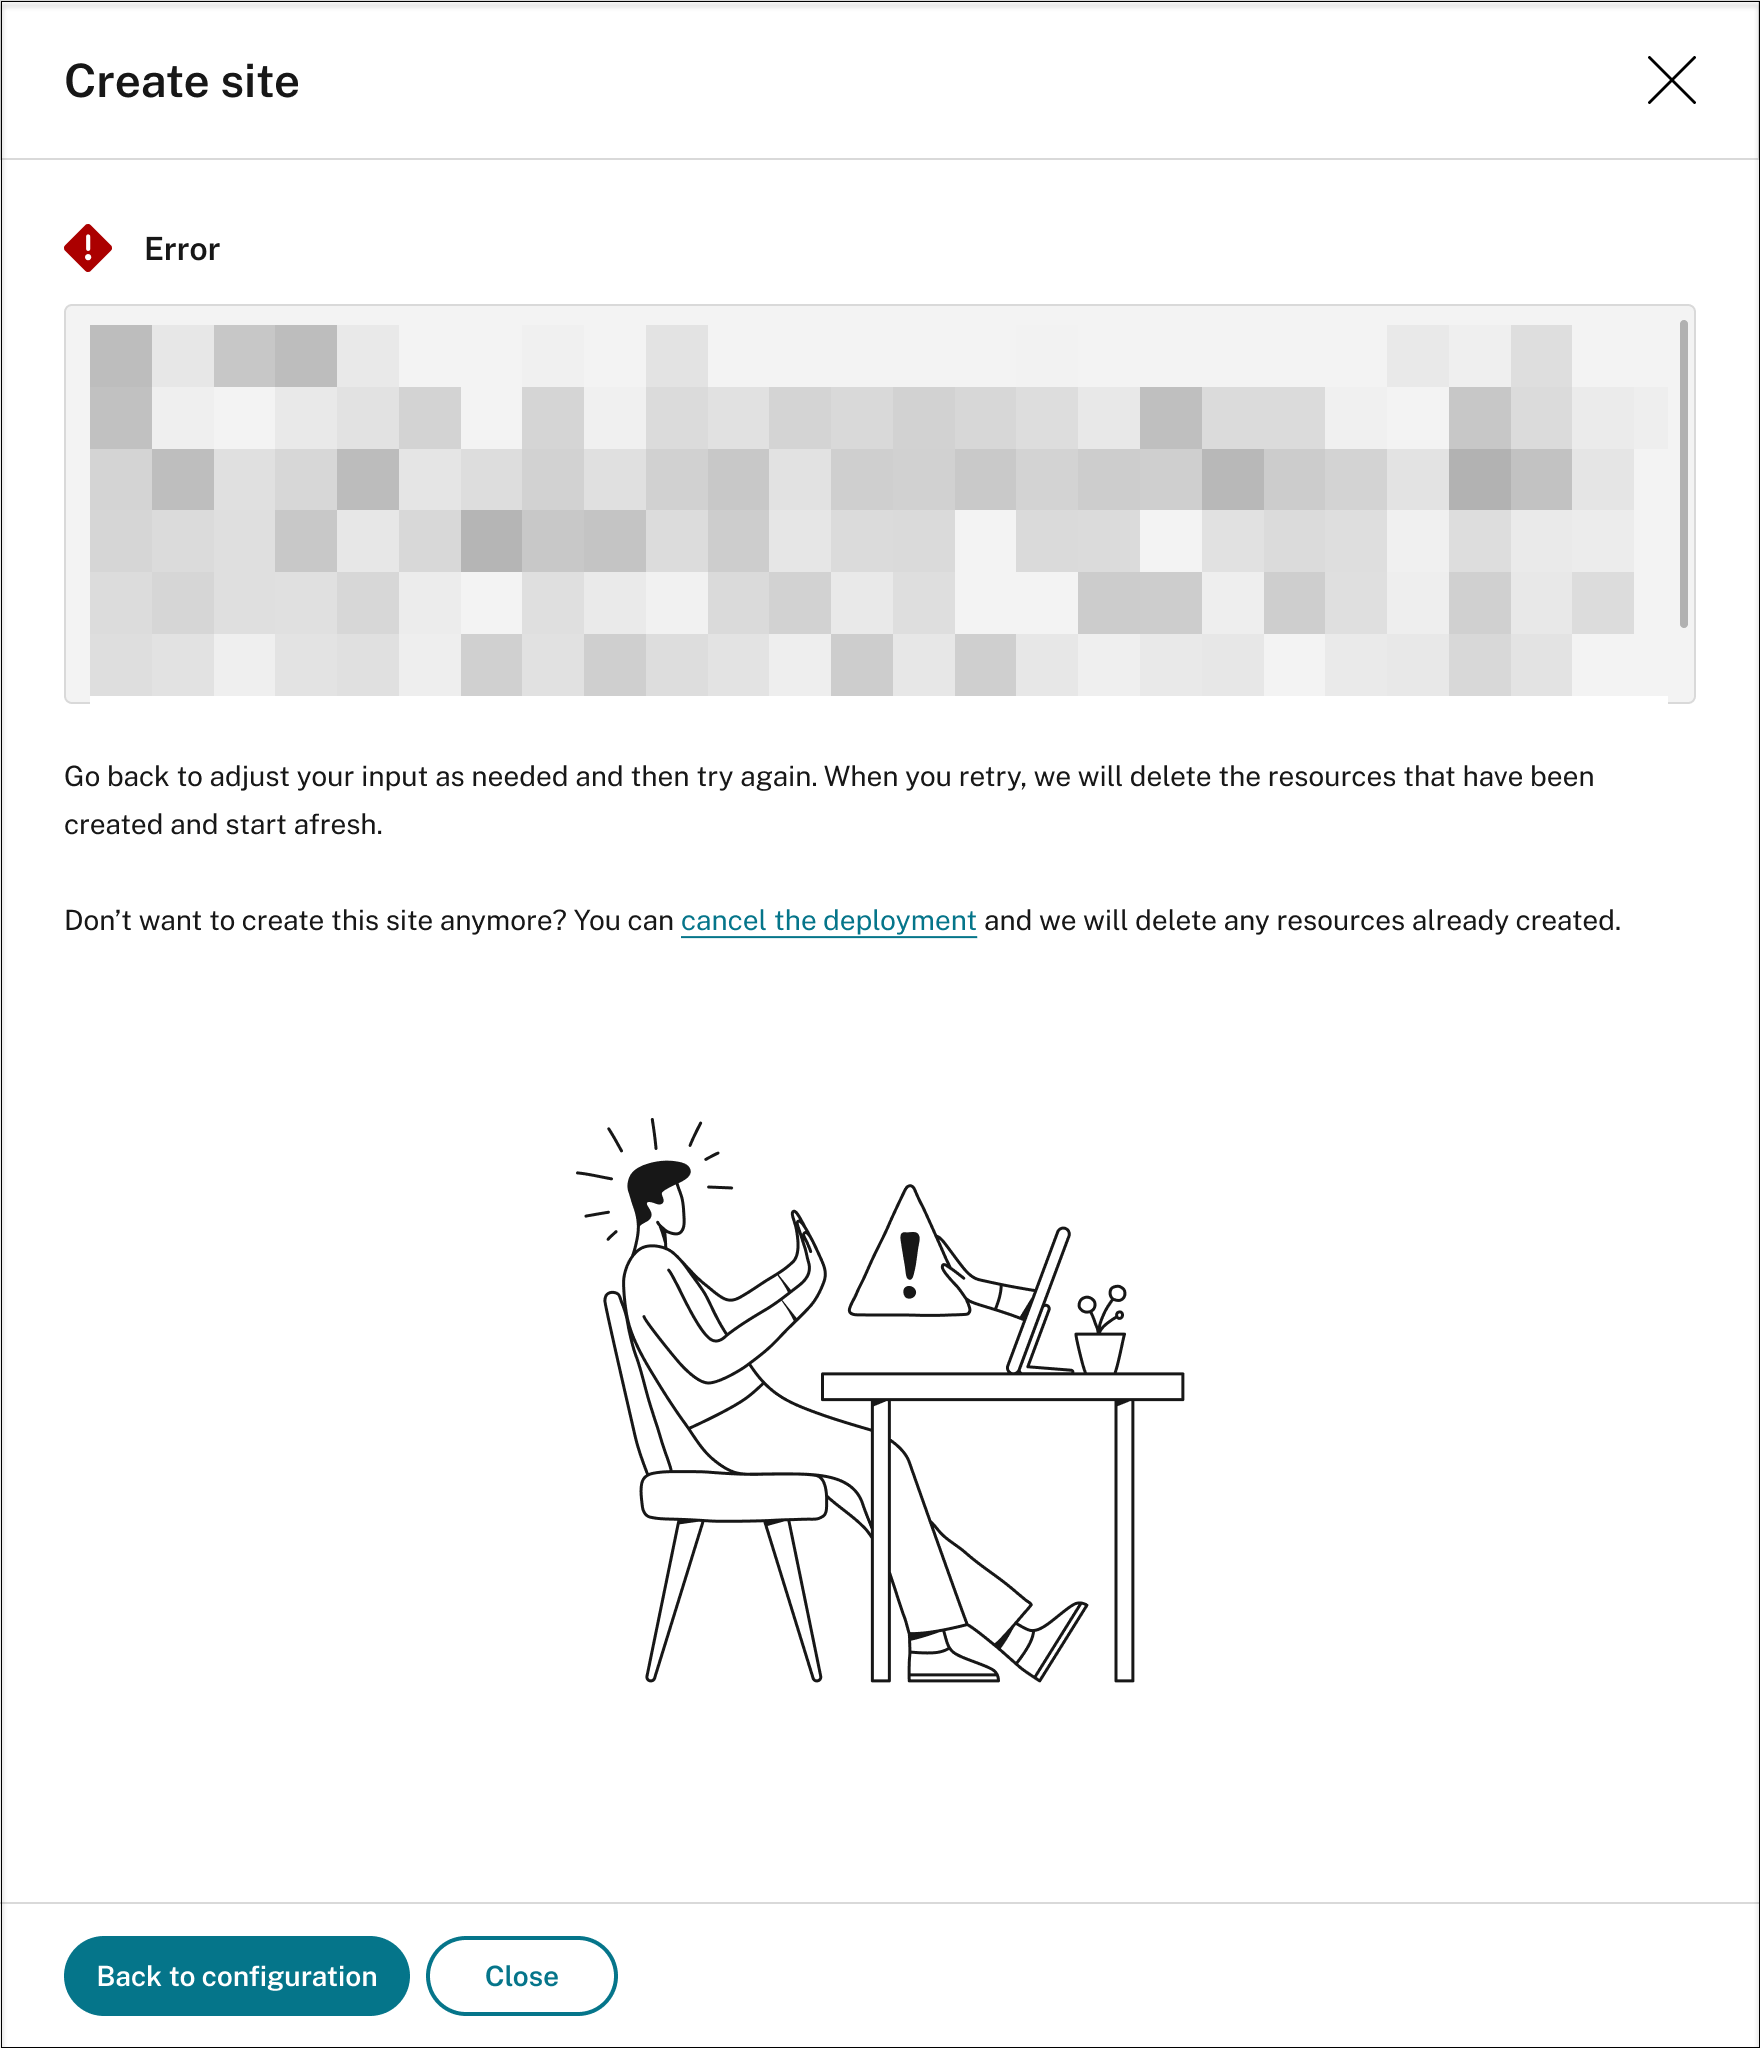
You can click Back to configuration or cancel the deployment. If you click Back to configuration, you’re taken back to the Create Site page where you can alter your configurations and try again. If you’re sure to cancel the deployment, follow the wizard to remove the site and the Azure resources created for the site. For example:

Deployment success:
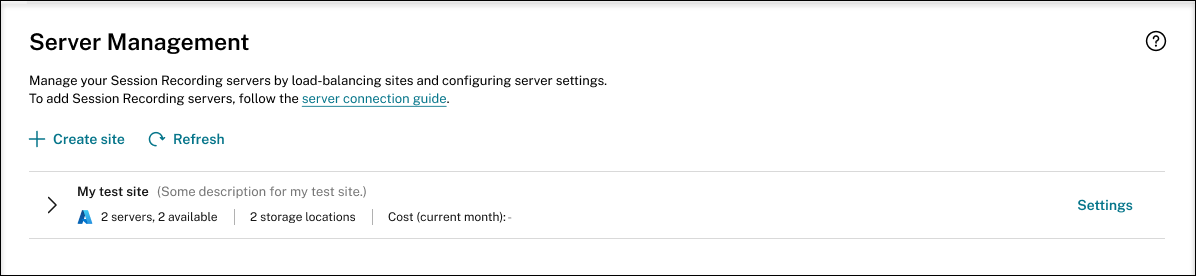
When a site deployment is complete, you can expand the site and view and manage the resources created under it. The View status button changes to Settings. An Azure icon is available to represent sites deployed on Azure. For information about site settings, see Site and server settings.
Add resources to an existing site deployed on Azure
For an existing site that you have deployed on Azure through a host connection, you can add resources including servers and storage to it. To do so, complete the following steps:
- Select Configuration > Server Management from the left navigation of the Session Recording service.
- On the Server Management page, locate and unfold the target site. An Azure icon is available to represent sites deployed on Azure.
-
Click Add resources.
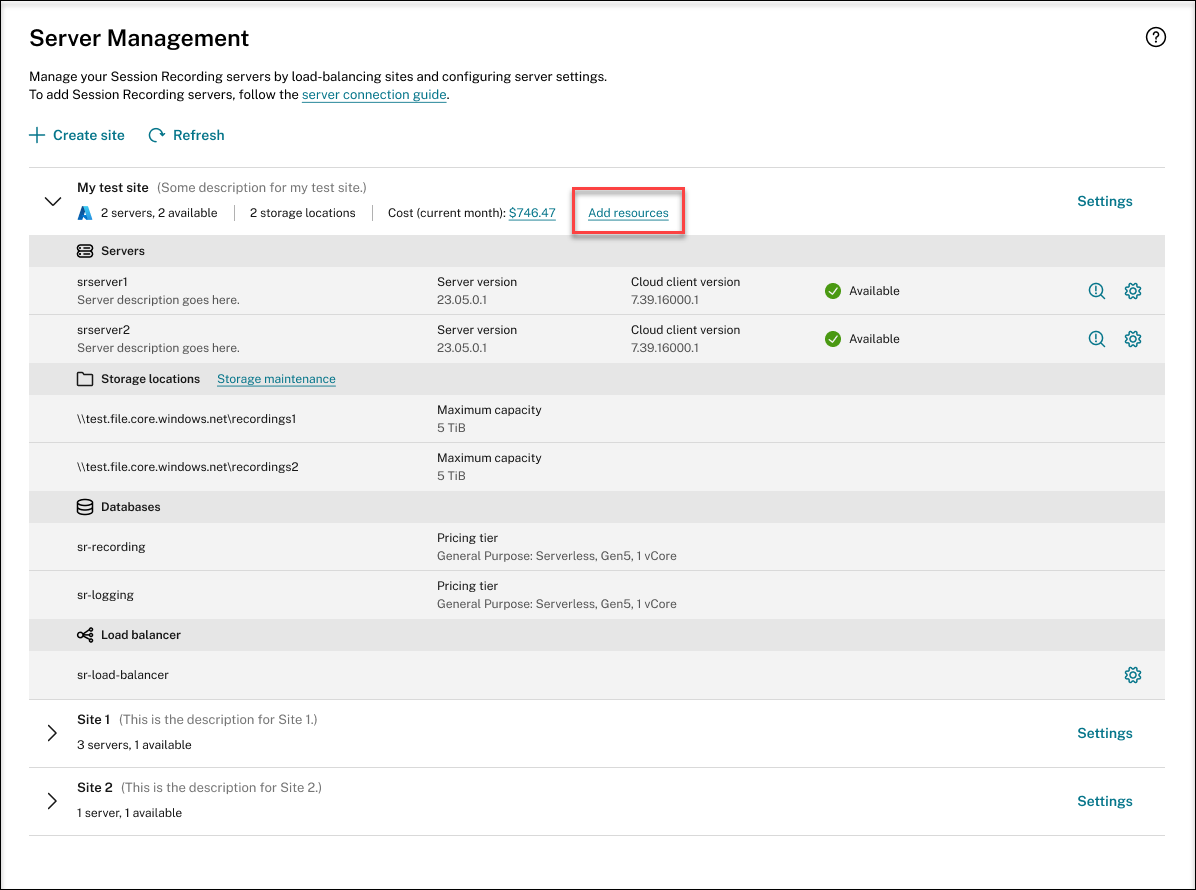
-
On the Add resources page, click Add server and Add storage as needed.
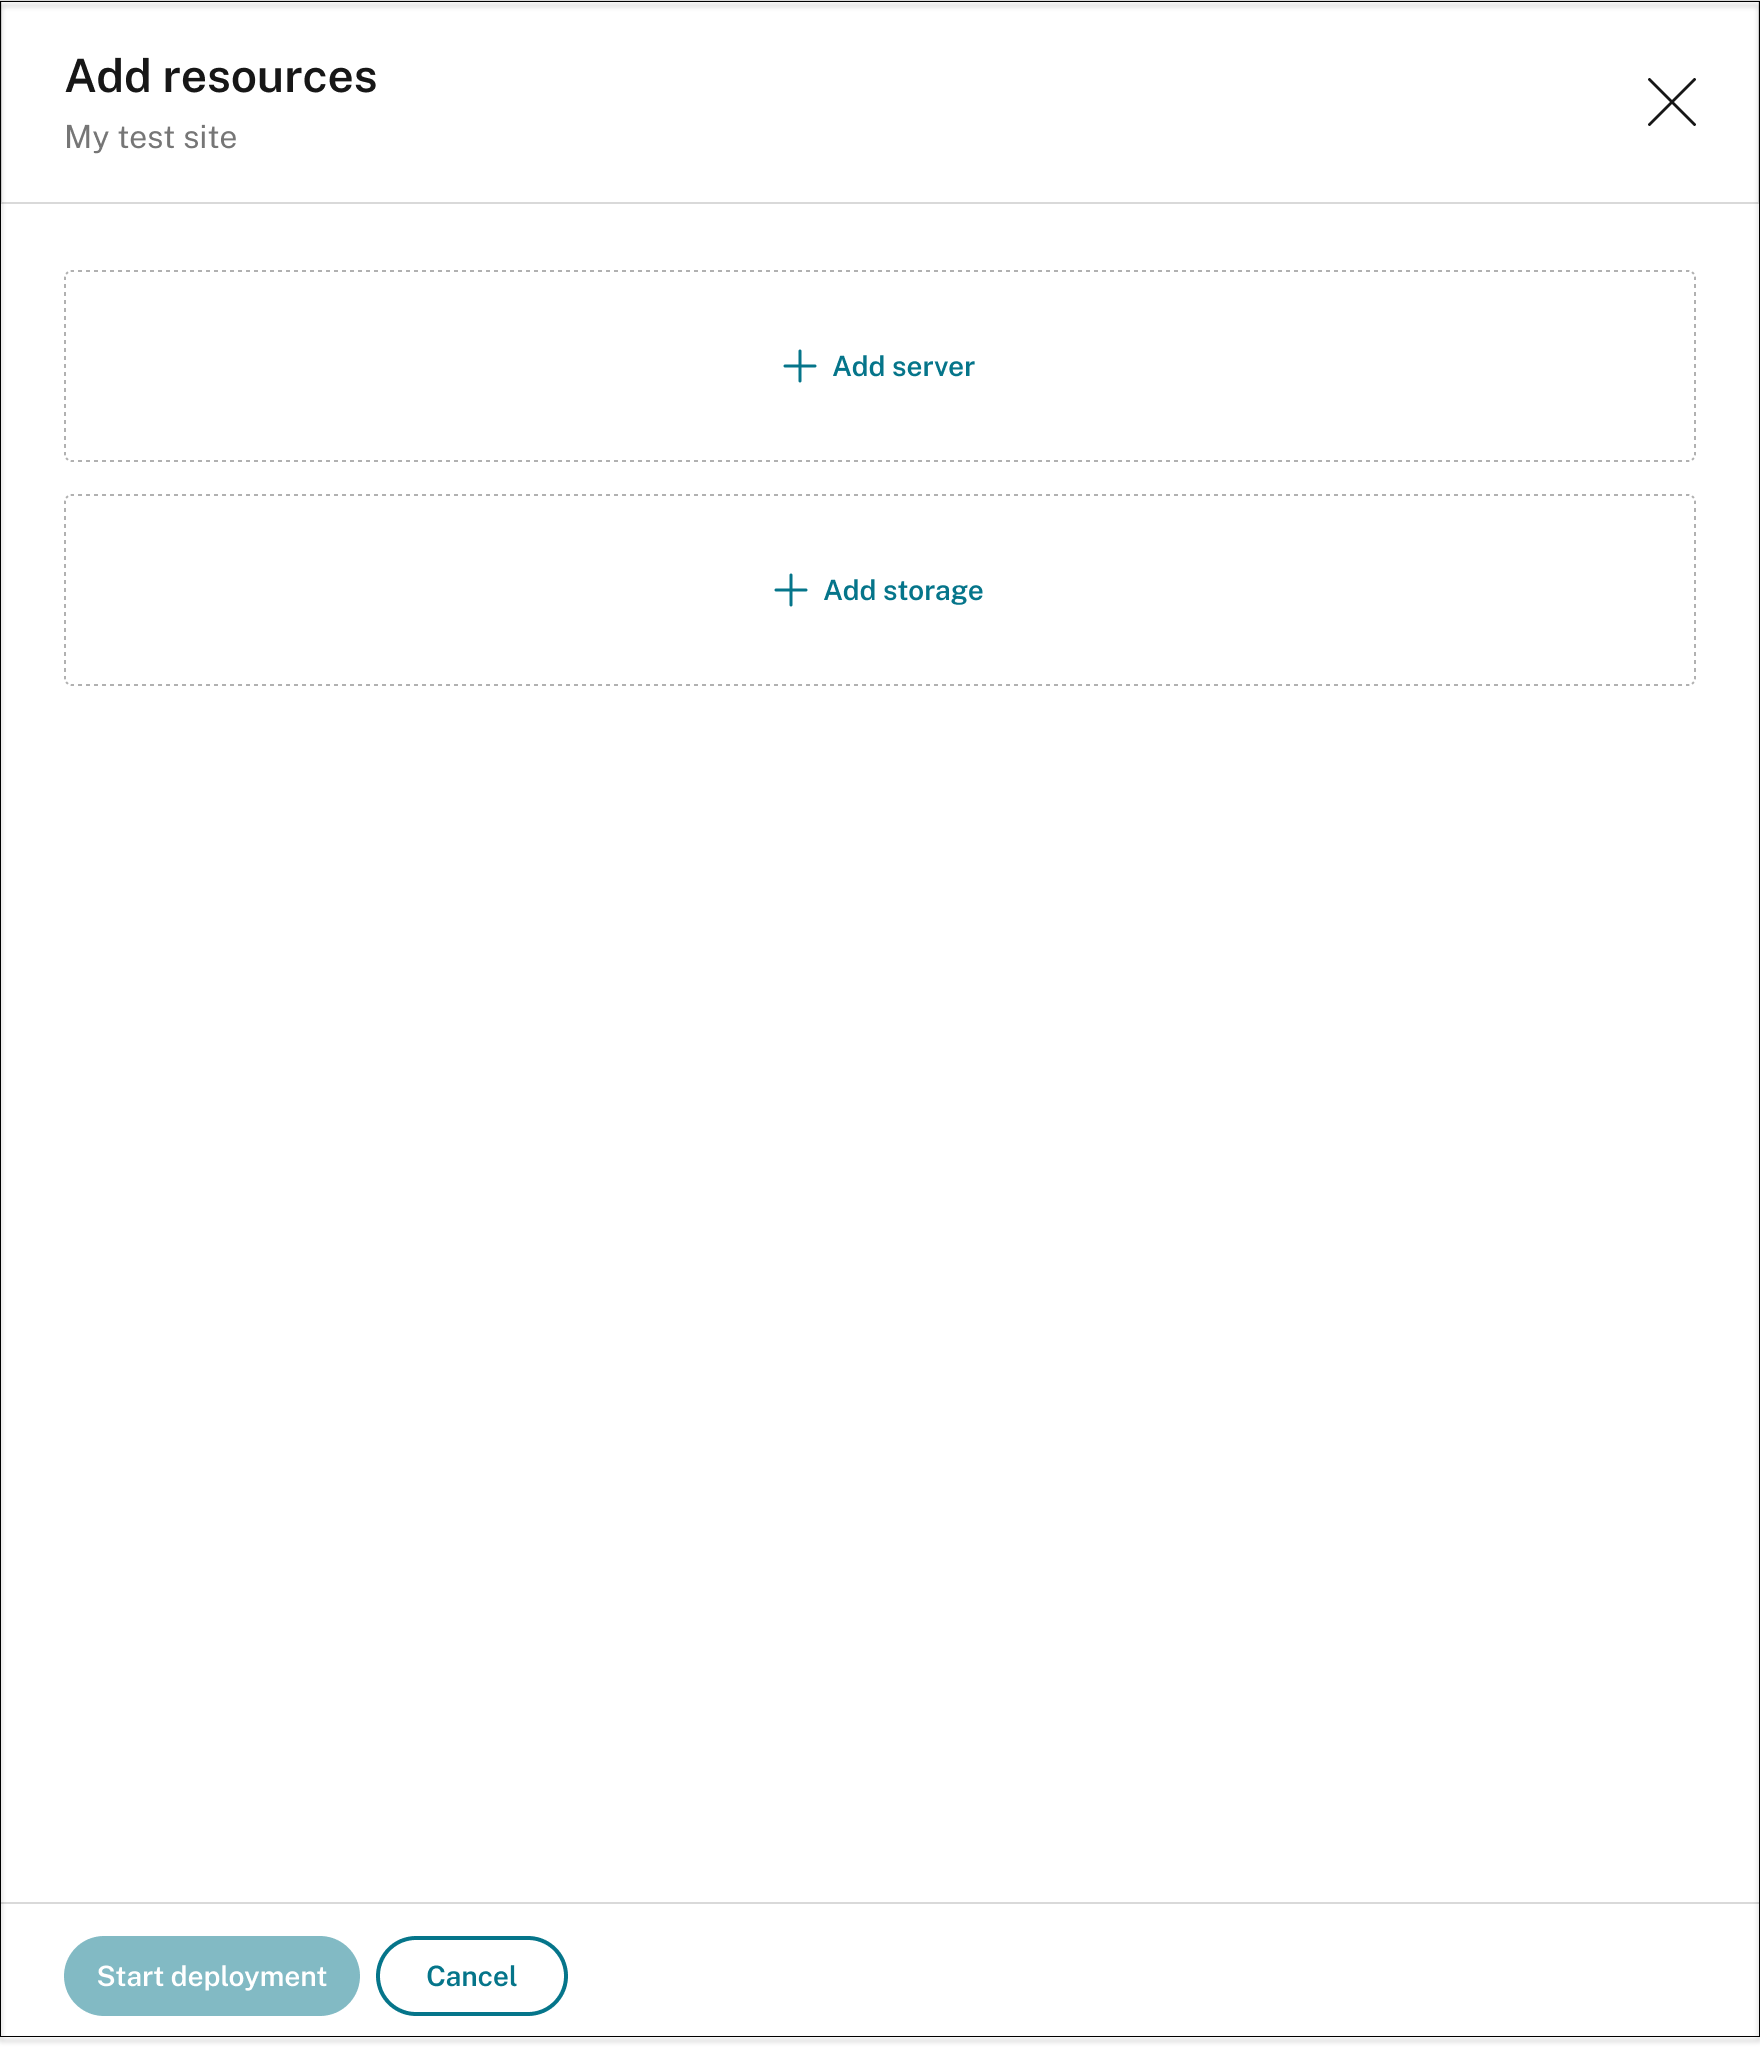
-
To add servers, click Add server and then complete the following steps:
- Specify the number of servers to add.
- Click Provide credentials in the Domain section to join the new servers to the same domain as the existing servers.
- Click Provide credentials in the Administrator accounts section to provide the database administrator password set during the site creation. Additionally, you need to set a password for the administrator account on the server machine(s) being added. We recommend using the same password as the one set during site creation.
- Click Create client to onboard the new servers to the Session Recording service.
- Click Start deployment.
-
To add storage for storing recording files, click Add storage and then complete the following steps accordingly:
-
If your site was created with a standard storage account, you’re prompted to specify the number of file shares to add. For example:

-
If your site was created with a premium storage account, you can specify the number of file shares to add and customize the capacity of each file share. For example:
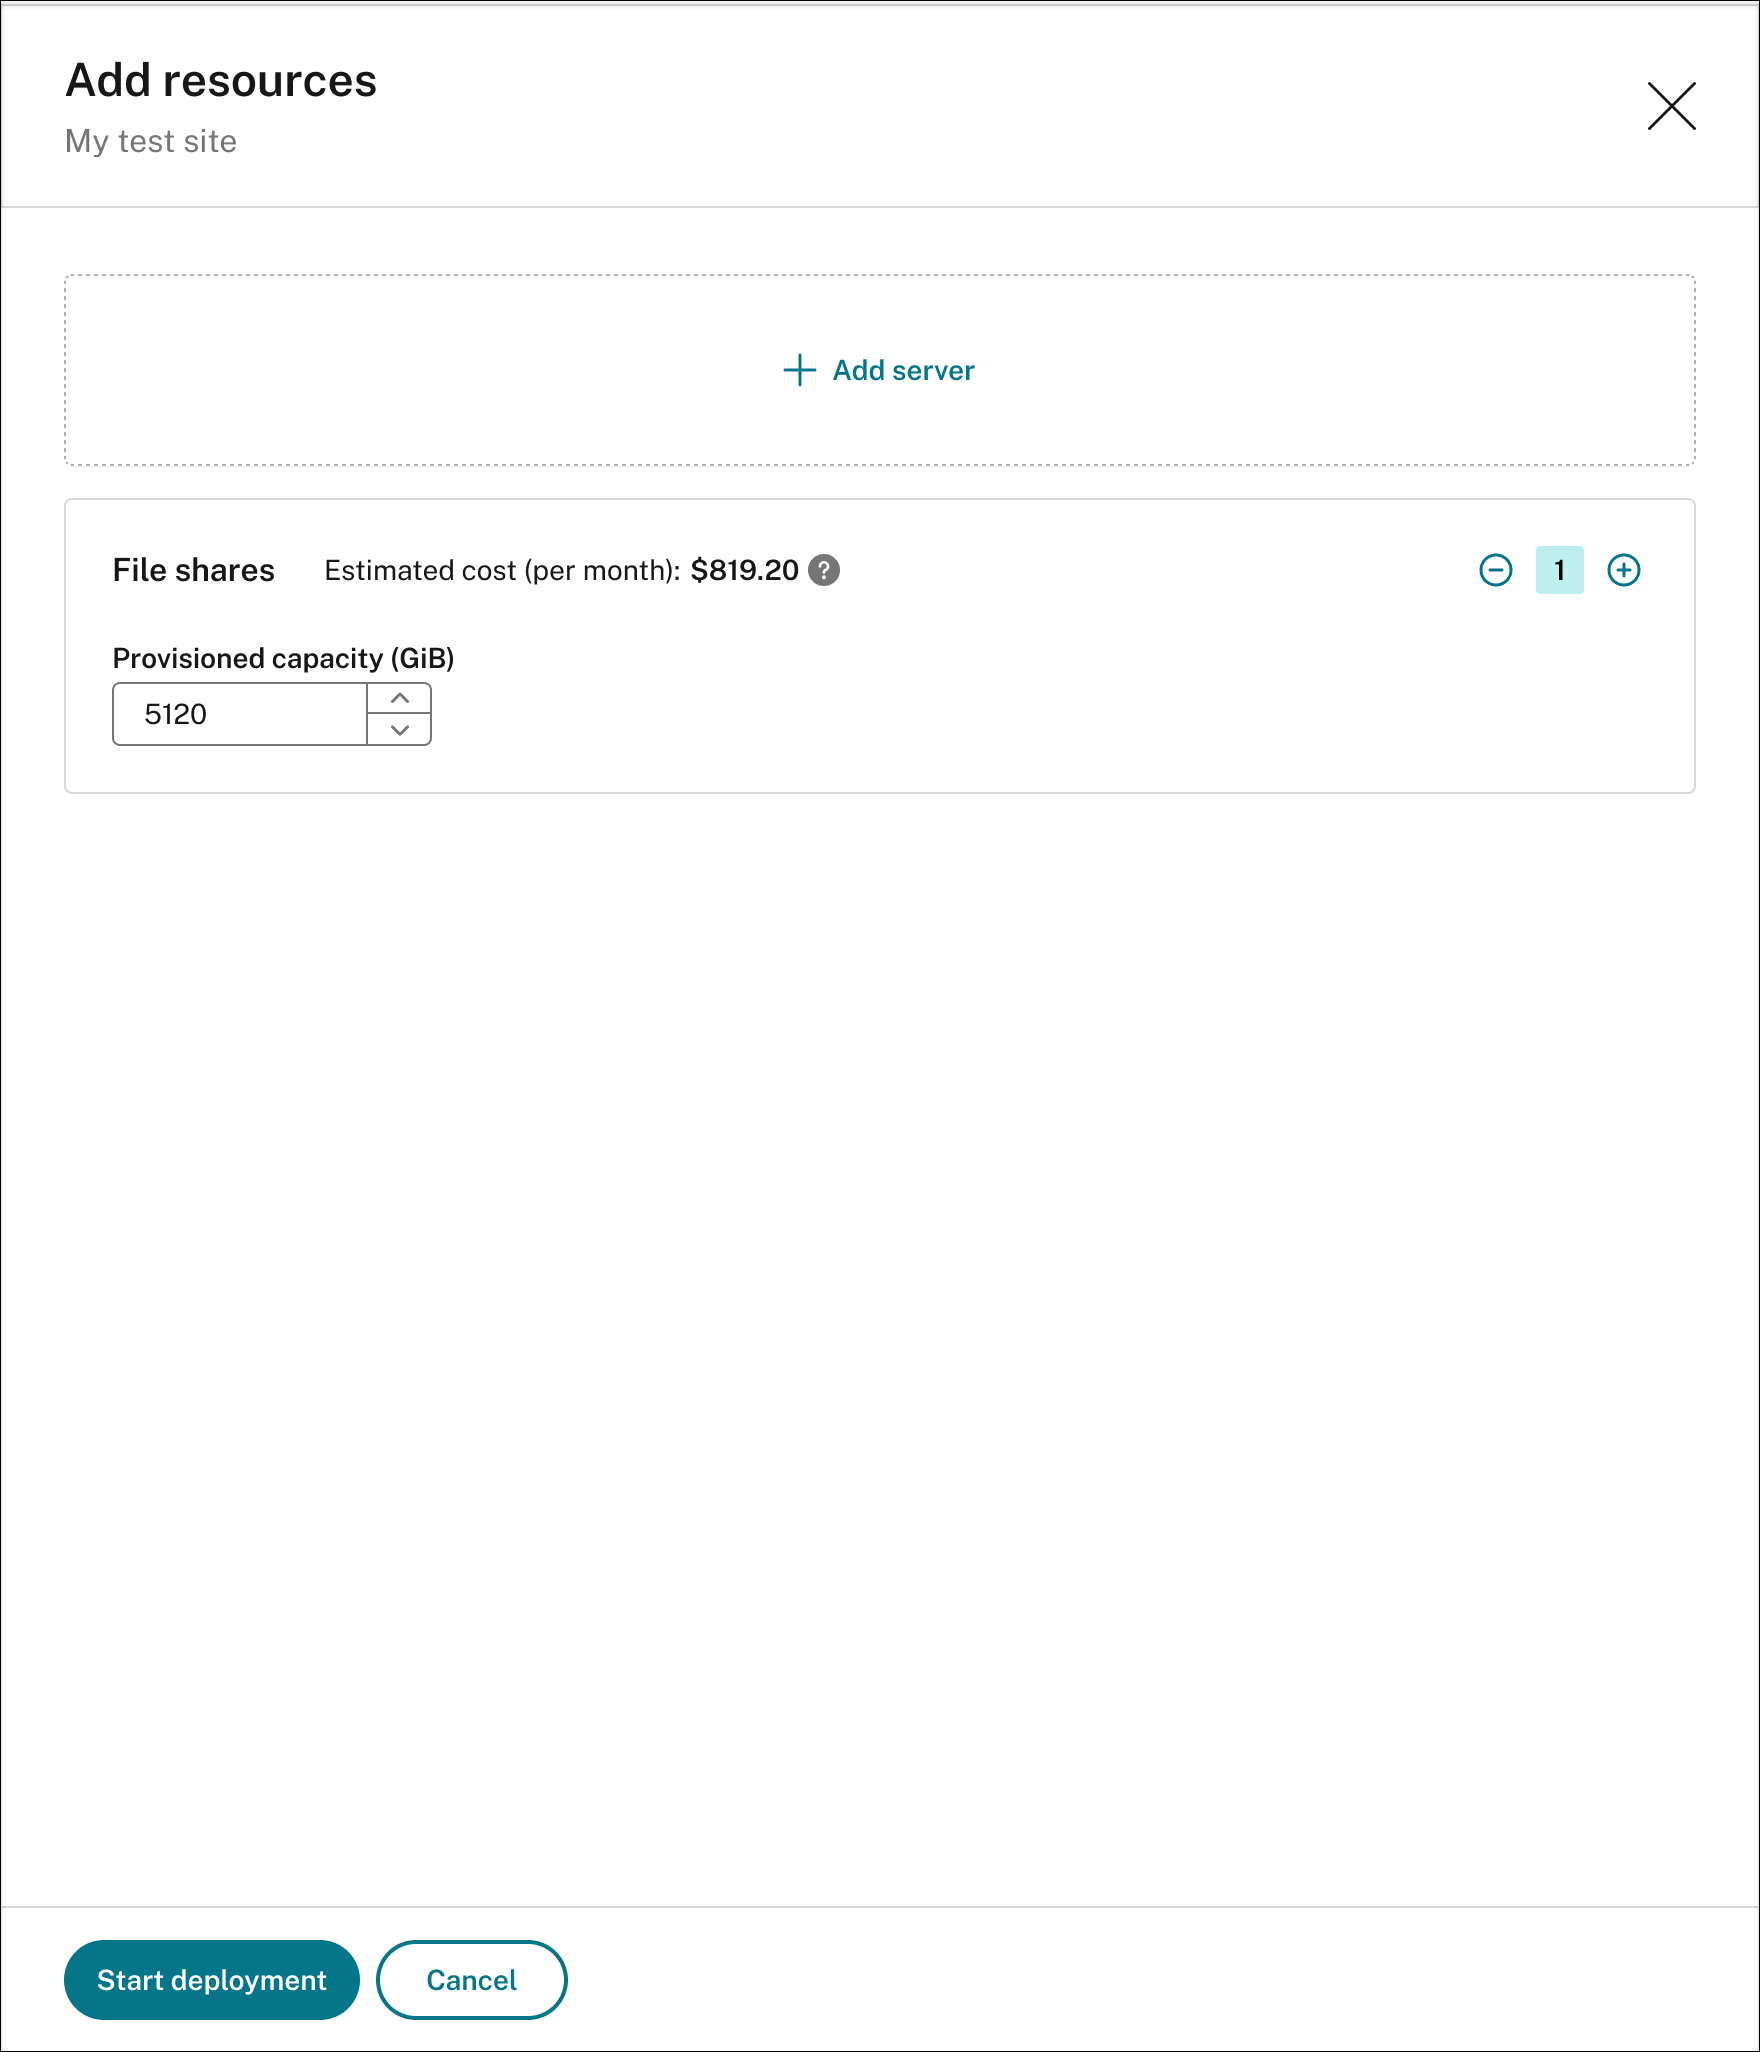
-
Click Start deployment.
Note:
- The Start deployment button is available when either of the following conditions is met:
- At least one server has been specified and the domain and secure client have been configured.
- At least one file share has been specified.
- When resource deployment is in progress, the Settings button for the load balancer is disabled.
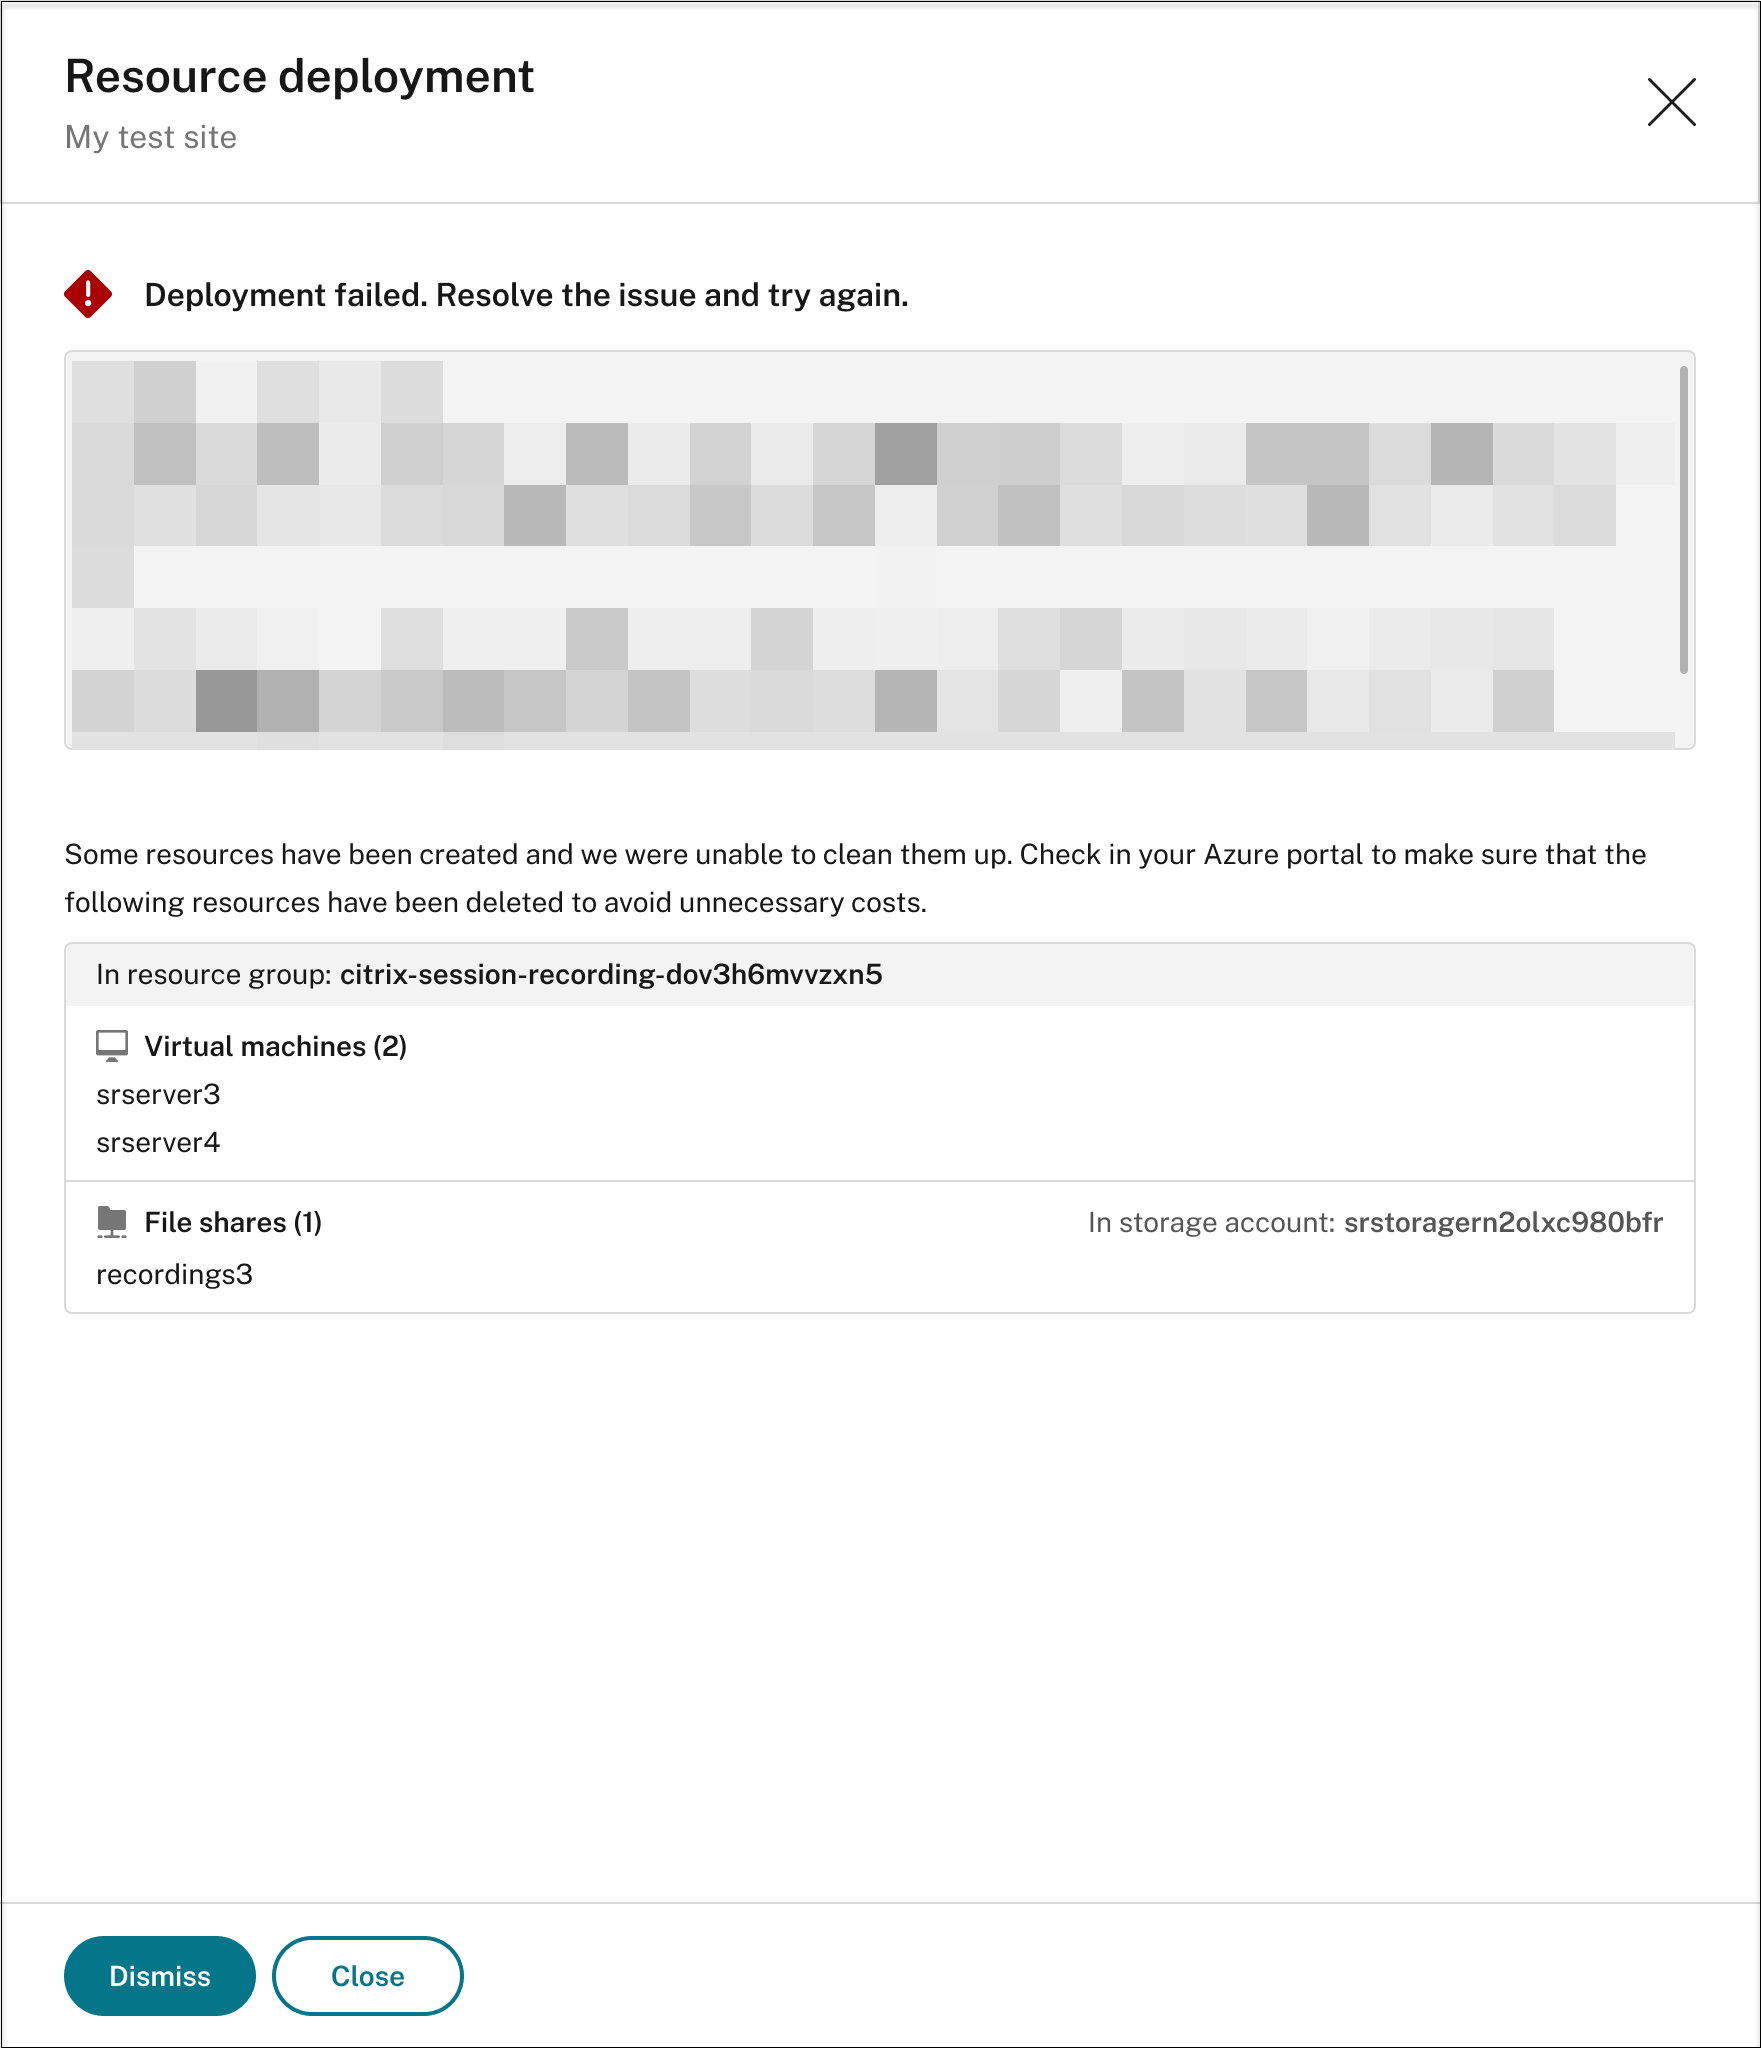
-
The deployment of added resources can fail and the Session Recording service might not be able to remove these resources from your subscription. In this case, a prompt similar to the following is provided for you to take action:
- The Start deployment button is available when either of the following conditions is met:
-
-
Change the IP addresses that are allowed to access the load balancer
For an existing site that you have deployed on Azure through a host connection, you can change the IP addresses that are allowed to access the load balancer. To do so, complete the following steps:
- Select Configuration > Server Management from the left navigation of the Session Recording service.
- On the Server Management page, locate and unfold the target site. An Azure icon is available to represent sites deployed on Azure.
-
Click the Settings button in the Load balancer section.

-
On the Load balancer settings page, enter the new IP addresses or ranges of your VDAs and separate them by a comma (,) in the Restrict access of the load balancer to only the following addresses field.
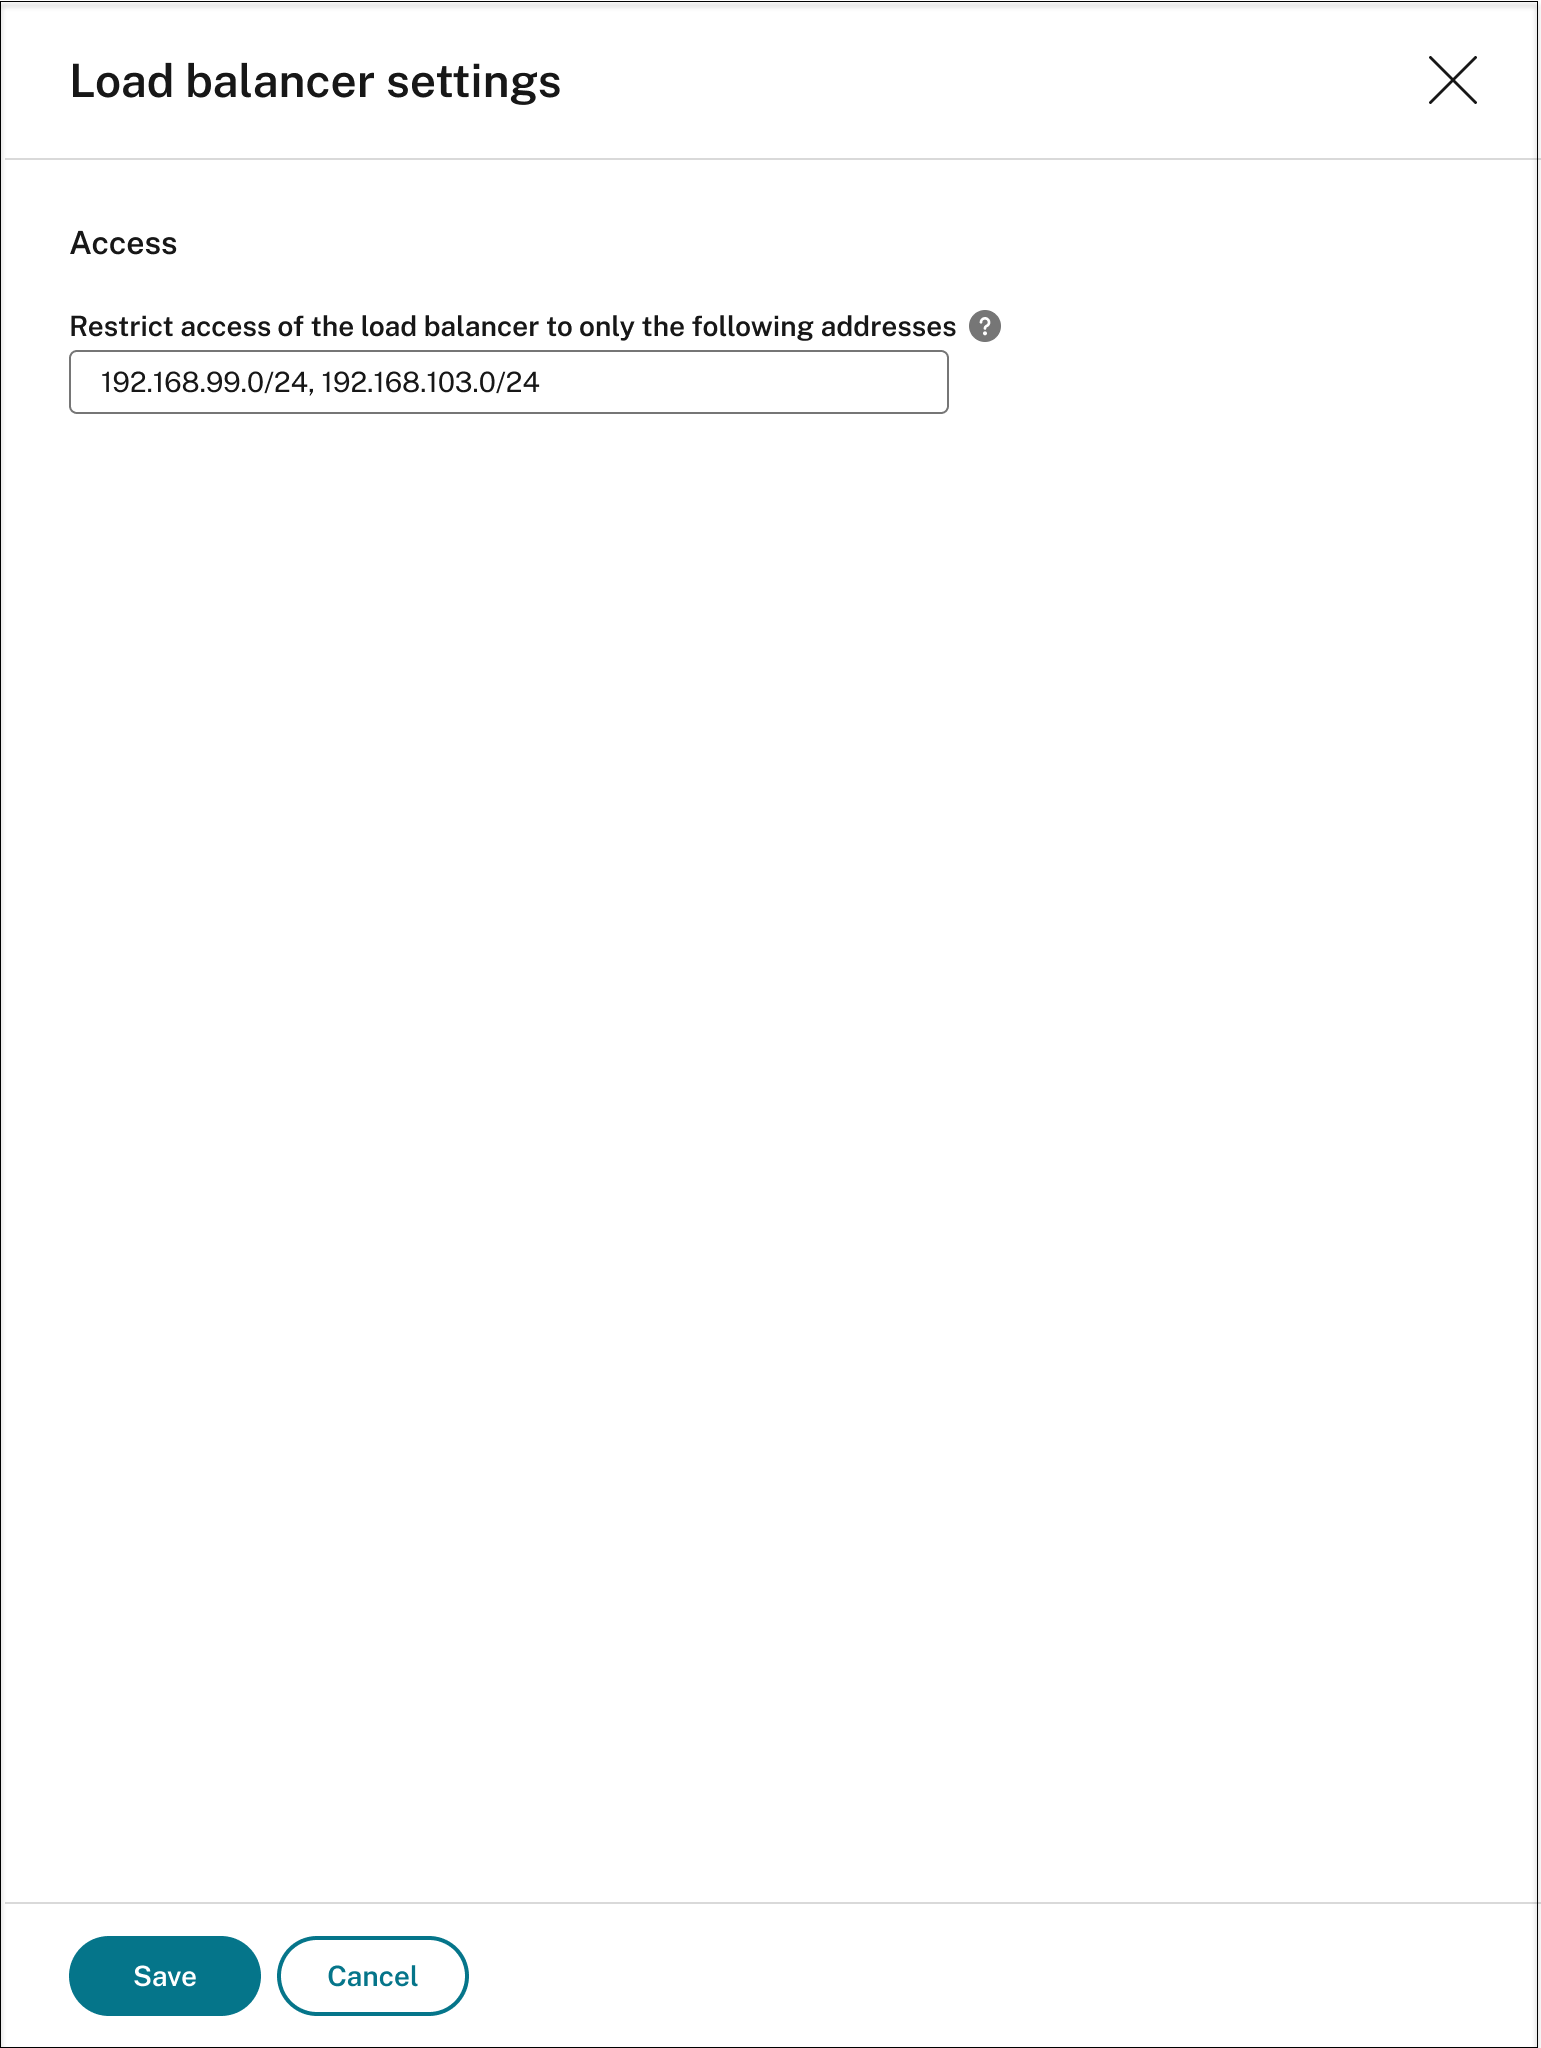
- Click Save.
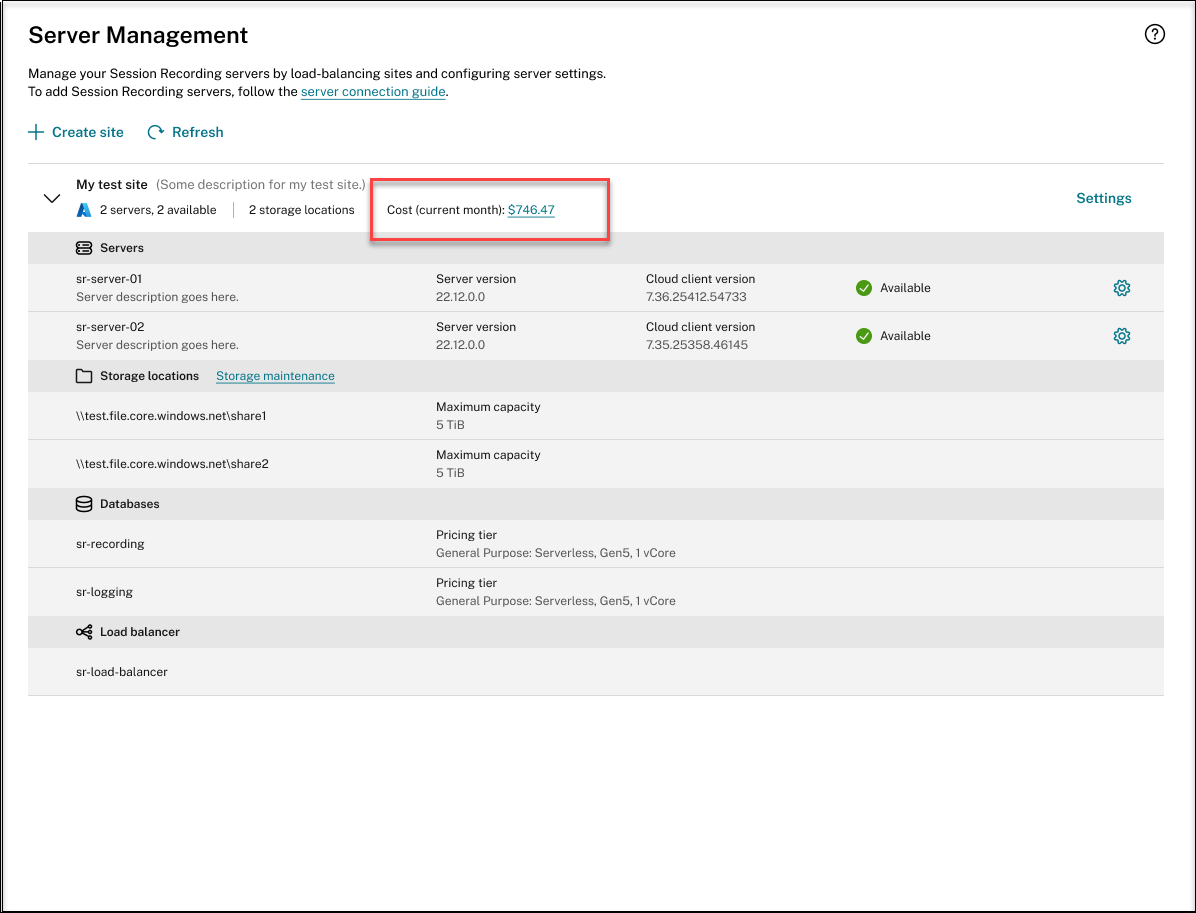
View actual costs for using Azure
For an existing site that you have deployed on Azure through a host connection, click the cost amount to view the cost details. For example:
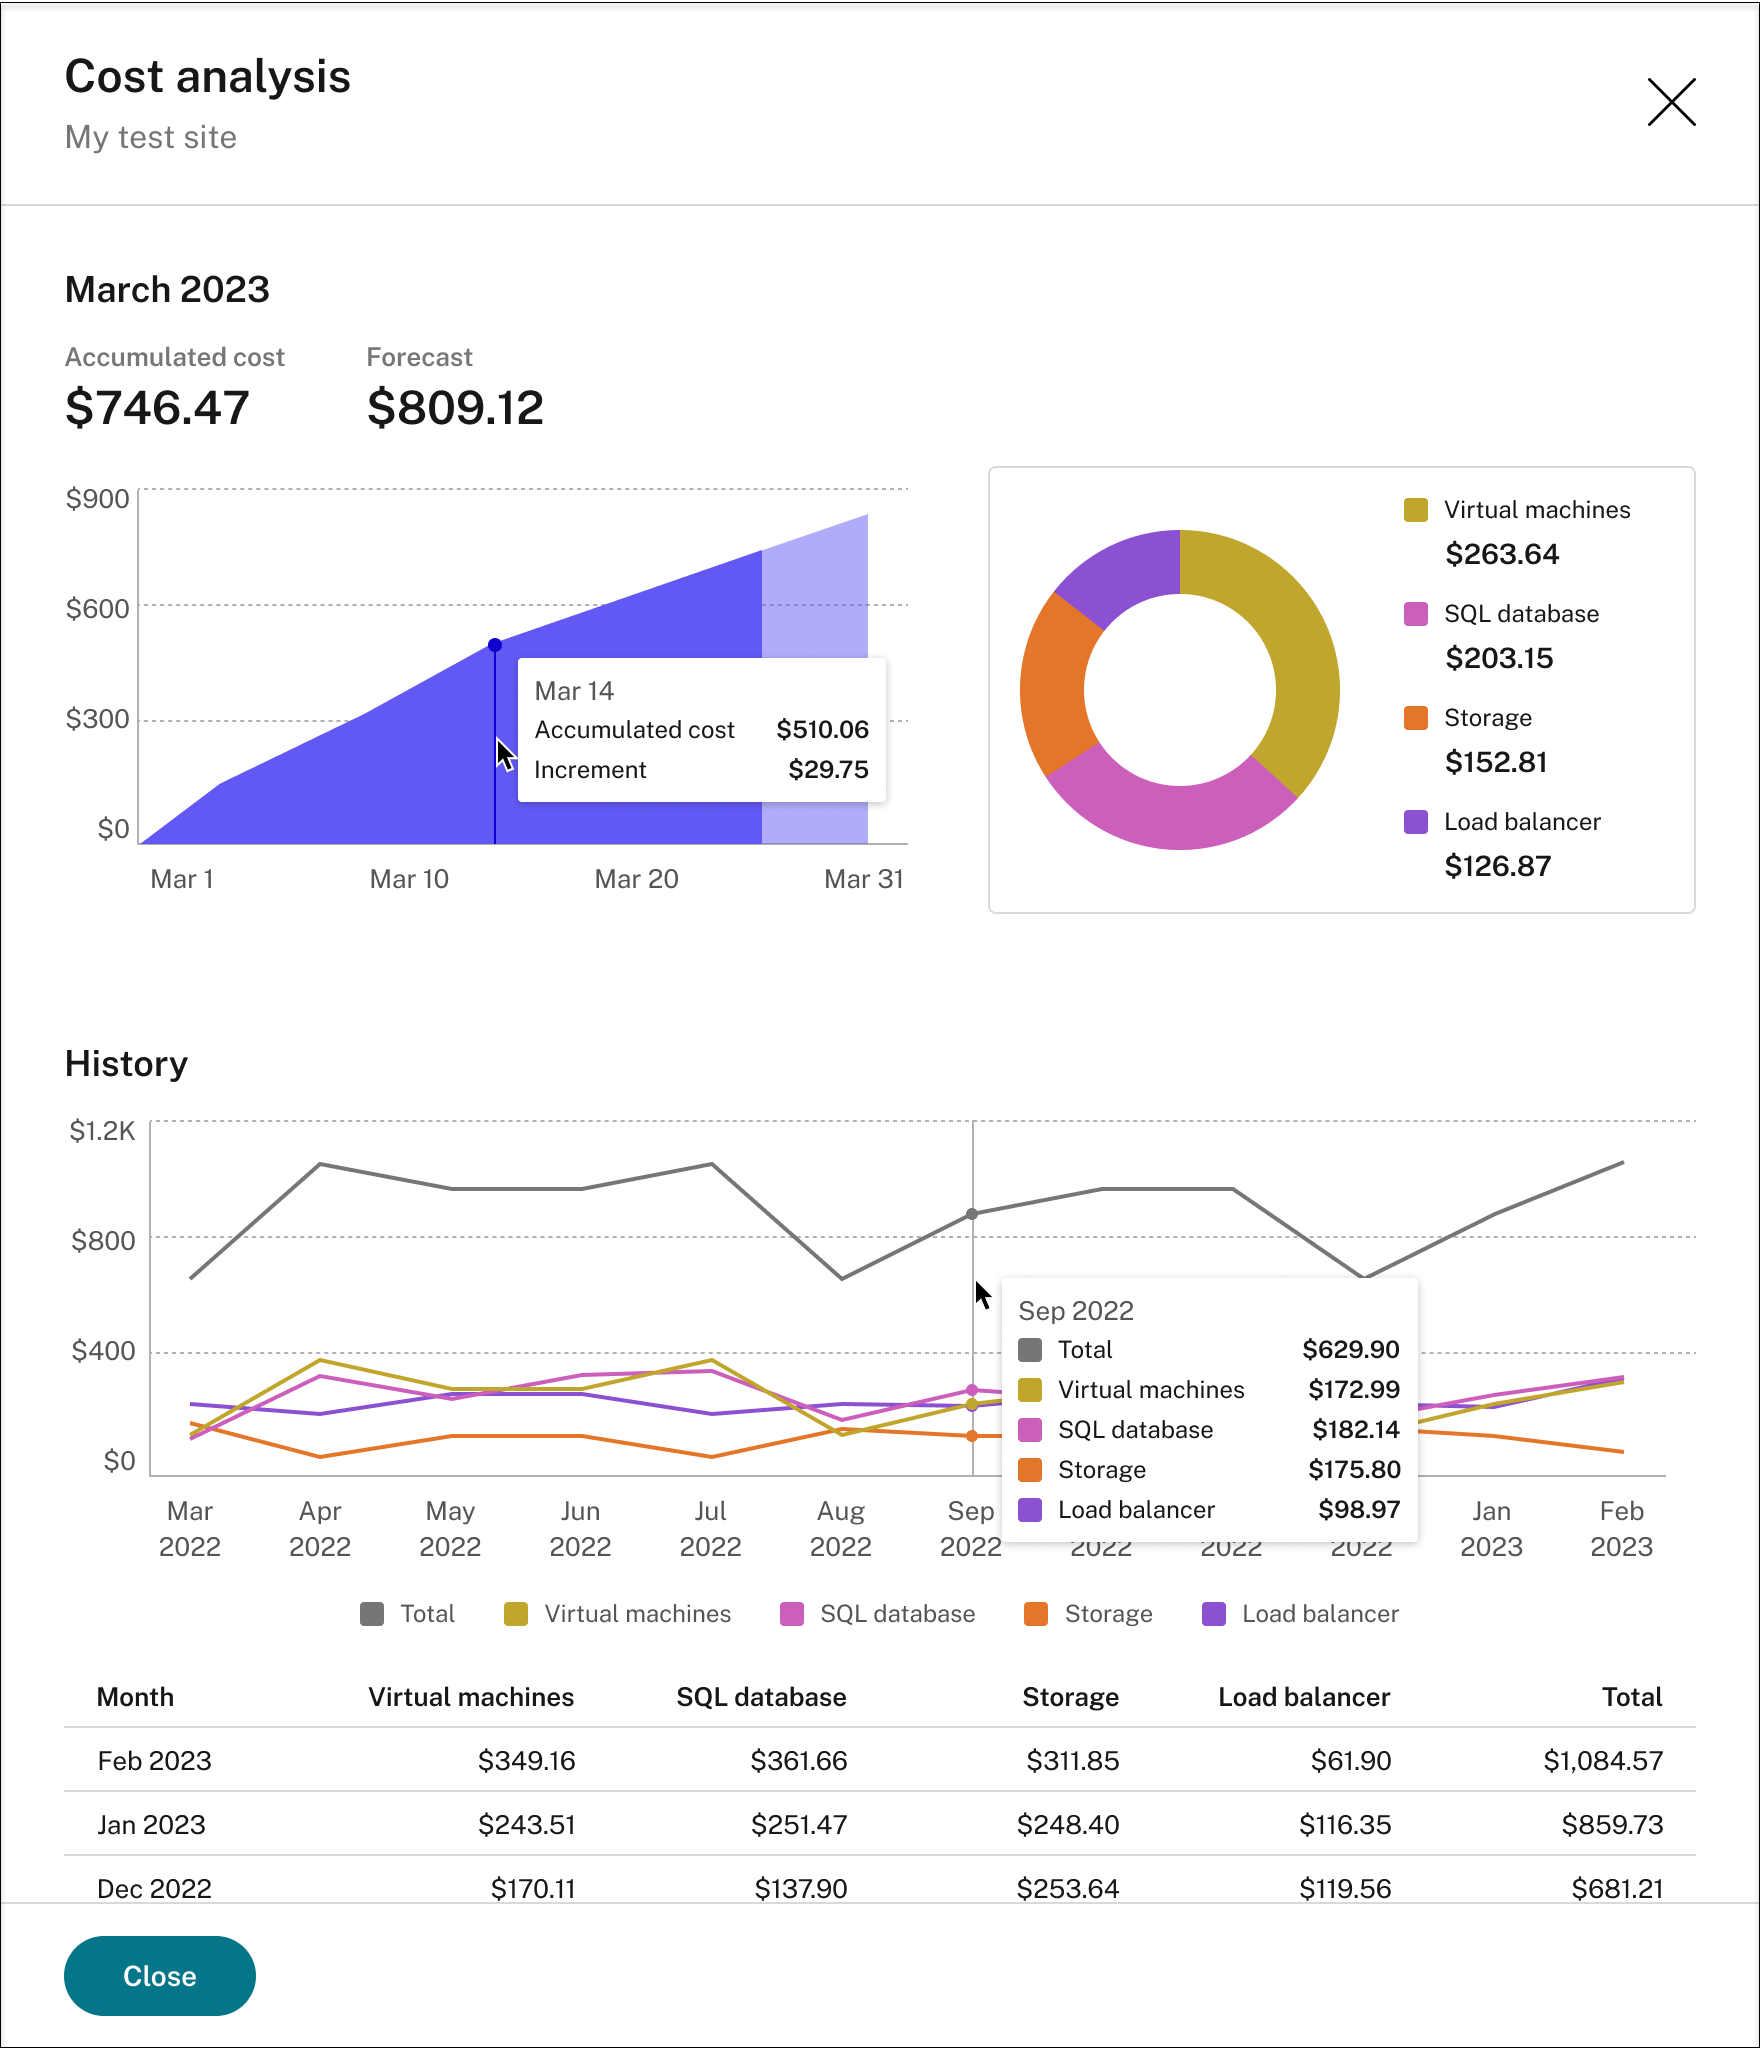
Tips for viewing the actual costs:
- When you hover on the area graph for the current month, a reference line for the date and data from that day appears as an overlay.
- The history costs of different resources are represented by line graphs. Line graphs are available when there are at least two months of data. When you hover on the line graphs, a reference line and cost breakdown from the month appears as an overlay. To view the line graph of only a specific resource, hover on the resource.
Add a host connection
To add a host connection, complete the following steps:
-
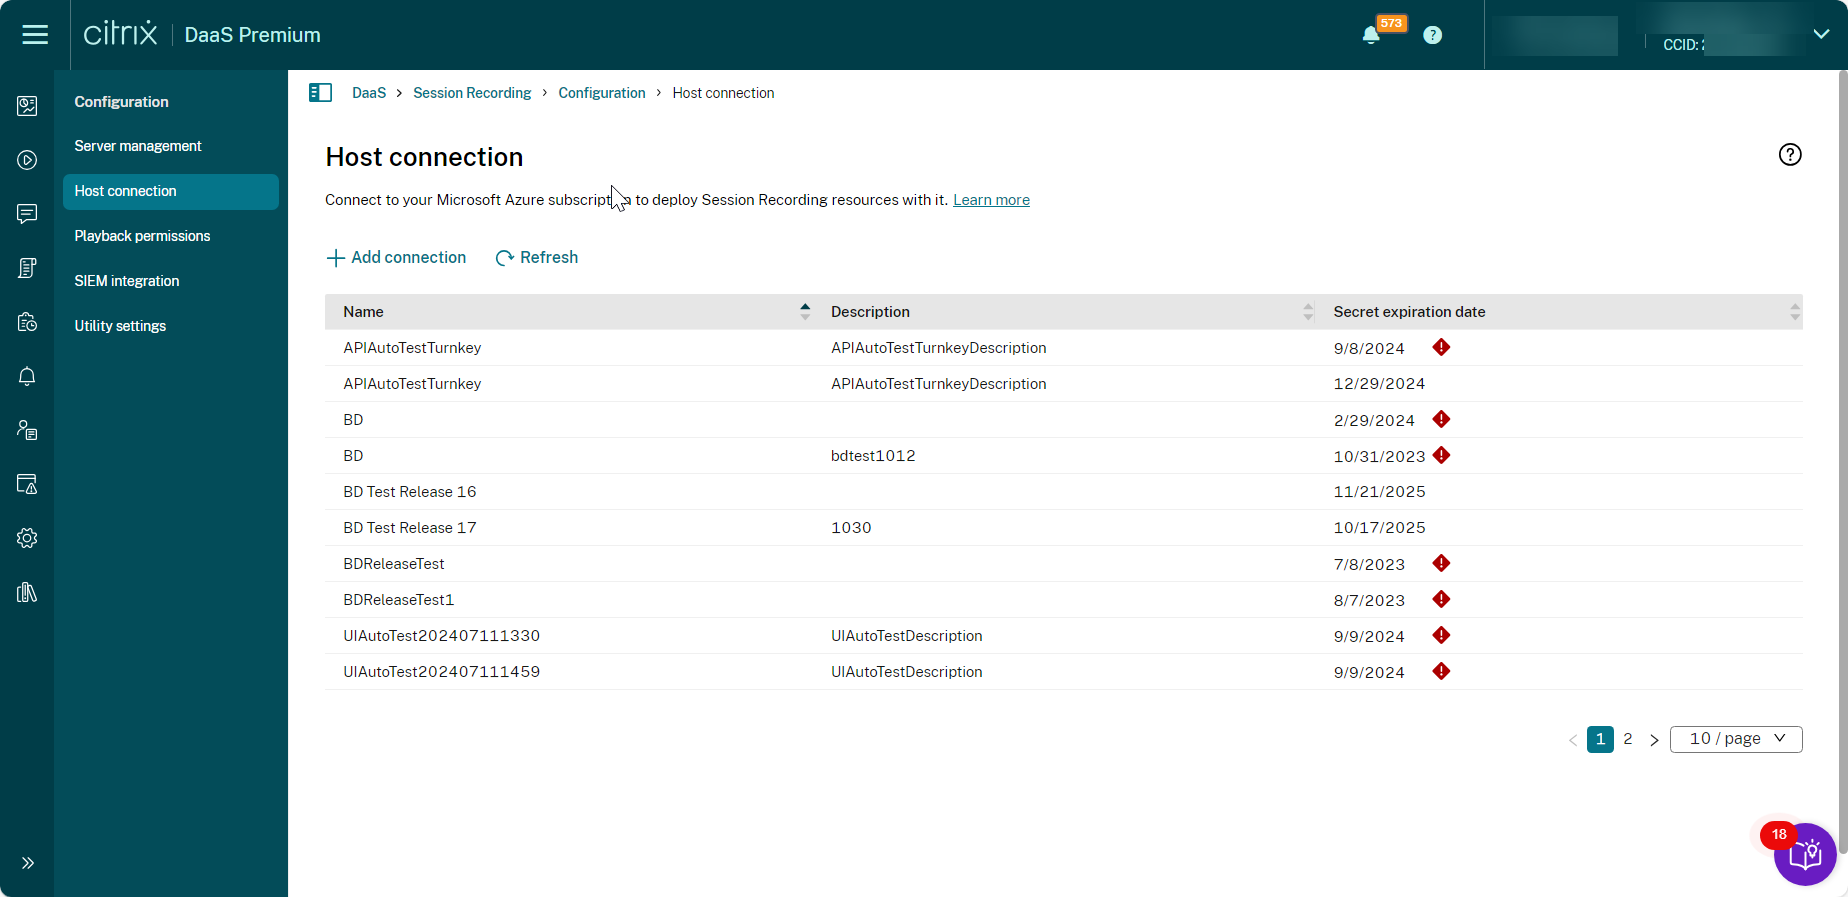
Click Add connection on the Create site page with Create and deploy a site through a host connection selected. Or, click Add connection on the Host Connection page.
To access the Create site page, select Configuration > Server Management from the left navigation of the Session Recording service, and then click Create site.
To access the Host Connection page, select Configuration > Host Connection from the left navigation of the Session Recording service:
-
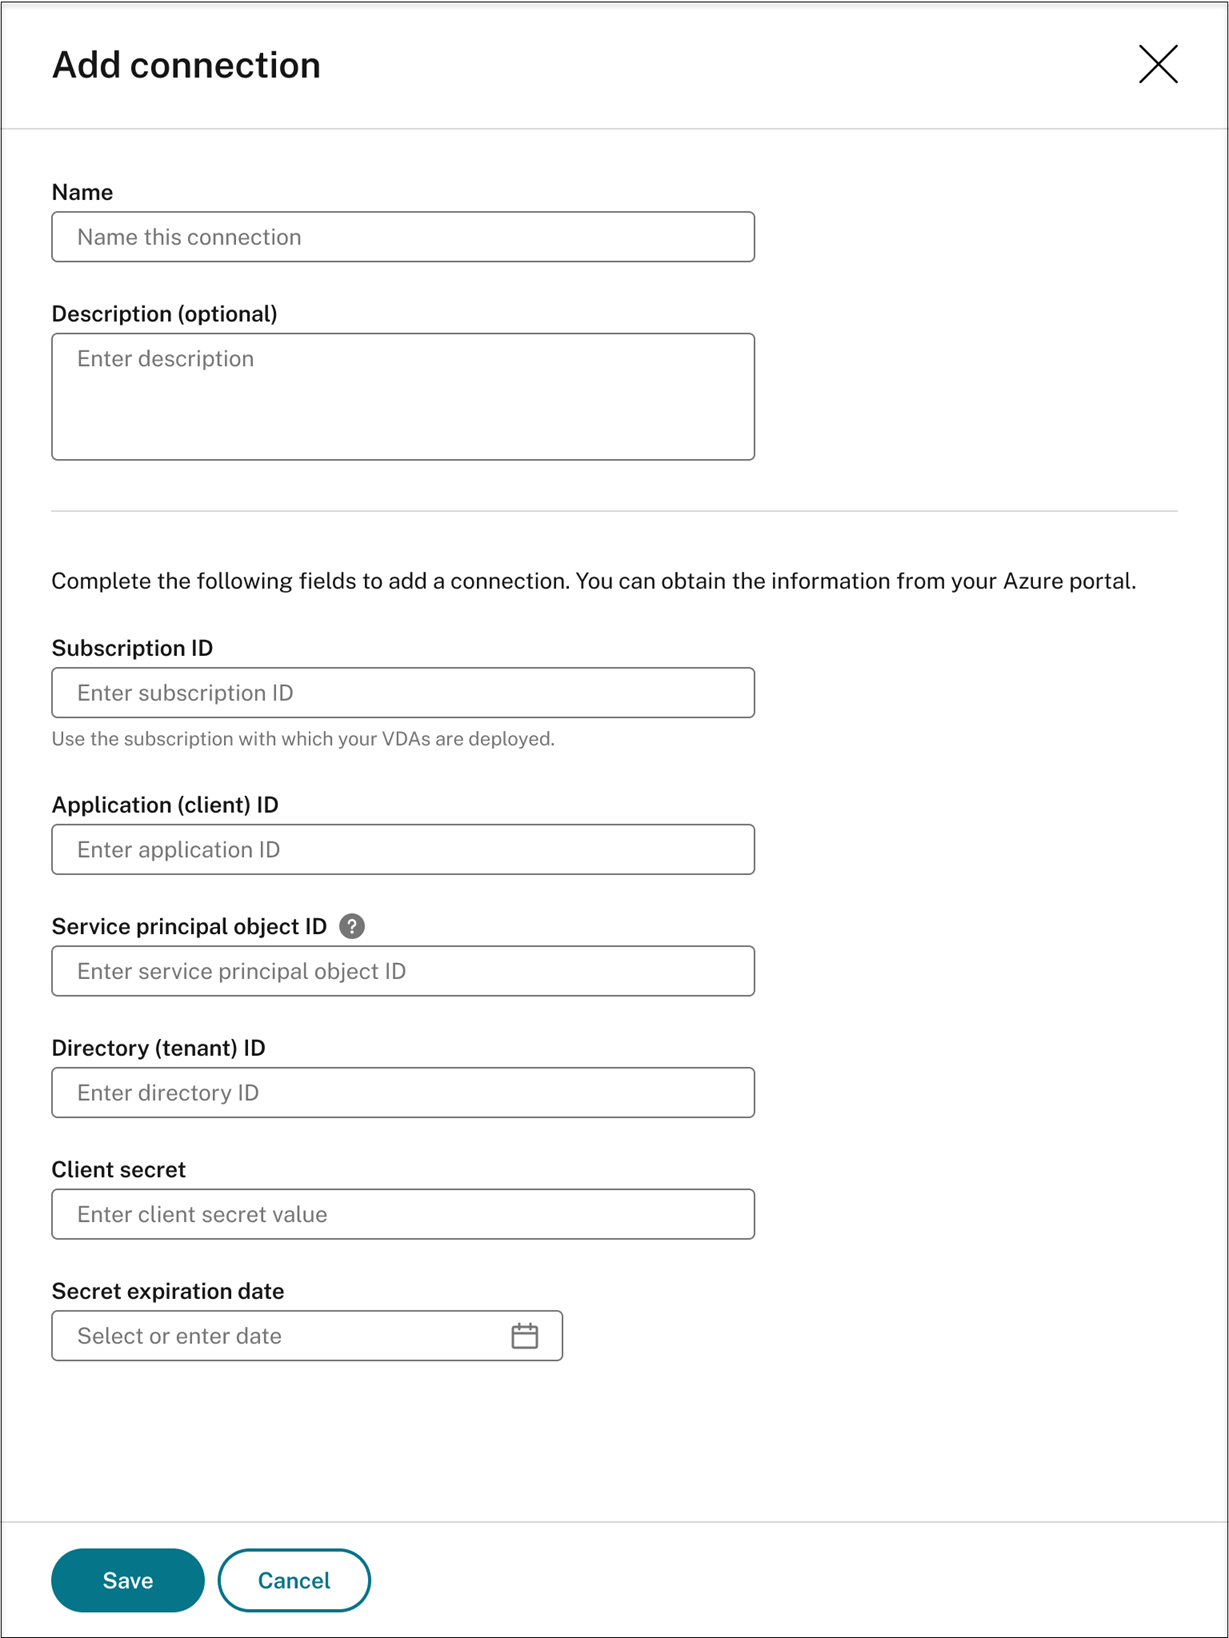
On the Add connection page, give the new host connection a name and a description (optional). Enter your Azure subscription ID and the following required information about your application registration:
- Application (client) ID
- Service principal object ID (ID of the service principal object associated with the application)
- Directory (tenant) ID
- Client secret
- Secret expiration date
To find your Azure subscription ID, do the following:
- Sign in to the Azure portal.
- Under the Azure services section, select Subscriptions.
-
Find your subscription in the list and copy the Subscription ID shown in the second column.

To obtain the required information about your application registration, do the following:
-
(Skip this step if you already have an application registered.) Register an application with your Azure AD tenant. An application must be registered to delegate identity and access management functions to Azure AD.
There are two methods for registering an application.
Method 1:
-
Copy the following Citrix-provided script and name it, for example, AppRegistration.ps1:
<# .SYNOPSIS Copyright (c) Citrix Systems, Inc. All Rights Reserved. .DESCRIPTION Create Azure app registrations and give proper permissions for Citrix Session Recording service deployment .Parameter azureTenantID .Parameter azureSubscriptionID .Parameter appName .Parameter role #> [CmdletBinding()] Param( [Parameter(Mandatory = $true)] [String] $tenantId, [Parameter(Mandatory = $true)] [String] $subscriptionId, [Parameter(Mandatory = $true)] [String] $appName, [Parameter(Mandatory = $true)] [String] $role ) if ($role -ne "Citrix Session Recording service" -and $role -ne "Citrix Session Recording Deployment" -and $role -ne "Contributor") { throw [System.Exception] "Invalid role '$role', only support 'Citrix Session Recording service', 'Citrix Session Recording Deployment', and 'Contributor'." } try { Get-InstalledModule -Name "Az.Accounts" -ErrorAction Stop } catch { Install-Module -Name "Az.Accounts" -Scope CurrentUser -Repository PSGallery -SkipPublisherCheck -Force } try { Get-InstalledModule -Name "Az.Resources" -ErrorAction Stop } catch { Install-Module -Name "Az.Resources" -Scope CurrentUser -Repository PSGallery -SkipPublisherCheck -Force } Connect-AzAccount -TenantId $tenantId -Subscription $subscriptionId try { $azureAdApplication = Get-AzADApplication -DisplayName $appName if ($null -eq $azureAdApplication) { Write-Host "Create a new app registration for Citrix Session Recording" -ForegroundColor Green $azureAdApplication = New-AzADApplication -DisplayName $appName -AvailableToOtherTenants $false } else { Write-Host "App registration '$appName' already exists." -ForegroundColor Yellow } $azureAdApplicationServicePrincipal = Get-AzADServicePrincipal -DisplayName $appName if($null -eq $azureAdApplicationServicePrincipal) { $azureAdApplicationServicePrincipal = New-AzADServicePrincipal -AppId $azureAdApplication.AppId Write-Host "Create a service principal for app registration '$appName'" -ForegroundColor Green }else{ Write-Host "Service principal already exists for app registration '$appName'" -ForegroundColor Yellow } if ($role -eq "Citrix Session Recording service" -or $role -eq "Citrix Session Recording Deployment") { $rootPath = Get-Location $customRolePath = $(Join-Path -Path $rootPath -ChildPath "sessionrecording.json") | Resolve-Path $customRoleJson = Get-Content $customRolePath | ConvertFrom-Json $customRoleJson.AssignableScopes[0] = "/subscriptions/" + $subscriptionId $tmpCustomRolePath = Join-Path -Path $rootPath -ChildPath "sessionrecording_tmp.json" $roleDef = Get-AzRoleDefinition -Name $role if ($null -eq $roleDef) { try { $customRoleJson | ConvertTo-Json -depth 32 | Set-Content $tmpCustomRolePath Write-Host "Create a custom role '$role'" -ForegroundColor Green New-AzRoleDefinition -InputFile $tmpCustomRolePath } catch { Write-Host "Failed to create custom role, error: $_" -ForegroundColor Red throw $_.Exception } } else { try { $customRoleJson | Add-Member -MemberType NoteProperty -Name 'id' -Value $($roleDef.Id) $customRoleJson | ConvertTo-Json -depth 32 | Set-Content $tmpCustomRolePath Write-Host "Upadate the custom role '$role'" -ForegroundColor Green Set-AzRoleDefinition -InputFile $tmpCustomRolePath } catch { Write-Host "Failed to update custom role, error: $_" -ForegroundColor Red throw $_.Exception } } } $roleAssignment = Get-AzRoleAssignment -RoleDefinitionName $role -ObjectId $($azureAdApplicationServicePrincipal.Id) if ($null -eq $roleAssignment) { Write-Host "Assign role '$role' to app '$appName'" -ForegroundColor Green New-AzRoleAssignment -RoleDefinitionName $role -ApplicationId $azureAdApplication.AppId } else { Write-Host "Role '$role' already assigned to app '$appName'" -ForegroundColor Yellow } Write-Host "Tenant ID: $tenantId" -ForegroundColor Green Write-Host "Subscription ID: $subscriptionId" -ForegroundColor Green Write-Host "Application ID: $($azureAdApplication.AppId)" -ForegroundColor Green Write-Host "Service principal object ID: $($azureAdApplicationServicePrincipal.Id)" -ForegroundColor Green } catch { Write-Host "Failed to assign role assignment to this app, error: $_" -ForegroundColor Red Write-Host "Please make sure the current azure admin has permission to assign roles" -ForegroundColor Red } <!--NeedCopy--> -
Copy the following custom role file and name it sessionrecording.json. This custom role file helps to assign least permissions for the application to be registered.
{ "name": "Citrix Session Recording service", "description": "This role has permissions which allow Citrix Session Recording service to deploy Session Recording resources using a host connection.", "assignableScopes": [ "/subscriptions/*" ], "actions": [ "Microsoft.Compute/availabilitySets/write", "Microsoft.Compute/virtualMachines/delete", "Microsoft.Compute/virtualMachines/extensions/read", "Microsoft.Compute/virtualMachines/extensions/write", "Microsoft.Compute/virtualMachines/read", "Microsoft.Compute/virtualMachines/runCommands/read", "Microsoft.Compute/virtualMachines/runCommands/write", "Microsoft.Compute/virtualMachines/write", "Microsoft.CostManagement/forecast/read", "Microsoft.CostManagement/query/read", "Microsoft.KeyVault/locations/deletedVaults/purge/action", "Microsoft.KeyVault/vaults/PrivateEndpointConnectionsApproval/action", "Microsoft.KeyVault/vaults/read", "Microsoft.KeyVault/vaults/secrets/read", "Microsoft.KeyVault/vaults/secrets/write", "Microsoft.KeyVault/vaults/write", "Microsoft.ManagedIdentity/userAssignedIdentities/assign/action", "Microsoft.ManagedIdentity/userAssignedIdentities/read", "Microsoft.ManagedIdentity/userAssignedIdentities/write", "Microsoft.Network/dnsForwardingRulesets/forwardingRules/read", "Microsoft.Network/dnsForwardingRulesets/forwardingRules/write", "Microsoft.Network/dnsForwardingRulesets/read", "Microsoft.Network/dnsForwardingRulesets/virtualNetworkLinks/read", "Microsoft.Network/dnsForwardingRulesets/virtualNetworkLinks/write", "Microsoft.Network/dnsForwardingRulesets/write", "Microsoft.Network/dnsResolvers/outboundEndpoints/join/action", "Microsoft.Network/dnsResolvers/outboundEndpoints/read", "Microsoft.Network/dnsResolvers/outboundEndpoints/write", "Microsoft.Network/dnsResolvers/read", "Microsoft.Network/dnsResolvers/write", "Microsoft.Network/loadBalancers/backendAddressPools/join/action", "Microsoft.Network/loadBalancers/read", "Microsoft.Network/loadBalancers/write", "Microsoft.Network/networkInterfaces/join/action", "Microsoft.Network/networkInterfaces/read", "Microsoft.Network/networkInterfaces/write", "Microsoft.Network/networkSecurityGroups/delete", "Microsoft.Network/networkSecurityGroups/join/action", "Microsoft.Network/networkSecurityGroups/read", "Microsoft.Network/networkSecurityGroups/securityRules/read", "Microsoft.Network/networkSecurityGroups/securityRules/write", "Microsoft.Network/networkSecurityGroups/write", "Microsoft.Network/privateDnsZones/join/action", "Microsoft.Network/privateDnsZones/read", "Microsoft.Network/privateDnsZones/virtualNetworkLinks/read", "Microsoft.Network/privateDnsZones/virtualNetworkLinks/write", "Microsoft.Network/privateDnsZones/write", "Microsoft.Network/privateEndpoints/privateDnsZoneGroups/read", "Microsoft.Network/privateEndpoints/privateDnsZoneGroups/write", "Microsoft.Network/privateEndpoints/read", "Microsoft.Network/privateEndpoints/write", "Microsoft.Network/publicIPAddresses/join/action", "Microsoft.Network/publicIPAddresses/read", "Microsoft.Network/publicIPAddresses/write", "Microsoft.Network/virtualNetworks/join/action", "Microsoft.Network/virtualNetworks/read", "Microsoft.Network/virtualNetworks/subnets/join/action", "Microsoft.Network/virtualNetworks/subnets/read", "Microsoft.Resources/deployments/operationstatuses/read", "Microsoft.Resources/deployments/read", "Microsoft.Resources/deployments/write", "Microsoft.Resources/subscriptions/resourceGroups/delete", "Microsoft.Resources/subscriptions/resourceGroups/read", "Microsoft.Resources/subscriptions/resourceGroups/write", "Microsoft.Sql/servers/auditingSettings/write", "Microsoft.Sql/servers/databases/write", "Microsoft.Sql/servers/firewallRules/write", "Microsoft.Sql/servers/privateEndpointConnectionsApproval/action", "Microsoft.Sql/servers/read", "Microsoft.Sql/servers/write", "Microsoft.Storage/storageAccounts/PrivateEndpointConnectionsApproval/action", "Microsoft.Storage/storageAccounts/fileServices/shares/delete", "Microsoft.Storage/storageAccounts/fileServices/shares/read", "Microsoft.Storage/storageAccounts/fileServices/shares/write", "Microsoft.Storage/storageAccounts/listkeys/action", "Microsoft.Storage/storageAccounts/read", "Microsoft.Storage/storageAccounts/write" ], "NotActions": [], "DataActions": [], "NotDataActions": [] } <!--NeedCopy--> - Put AppRegistration.ps1 and sessionrecording.json in the same folder.
- Run either of the following commands as needed.
To create an application and assign it least permissions with the preceding custom role file (sessionrecording.json), run:
```
.\AppRegistration.ps1 -tenantId <tenant ID> -subscriptionId <subscription ID> -appName <application name> -role "Citrix Session Recording service"
<!--NeedCopy--> ```

To create an application and assign it the Azure built-in **Contributor** role, run:

```
.\AppRegistration.ps1 -tenantId <tenant ID> -subscriptionId <subscription ID> -appName <application name> -role "Contributor"
<!--NeedCopy--> ```
Method 2:
Go to the Azure portal and register an application by yourself. Grant proper permissions to the application. For the least permissions that are required, see the sessionrecording.json file in Method 1.
-
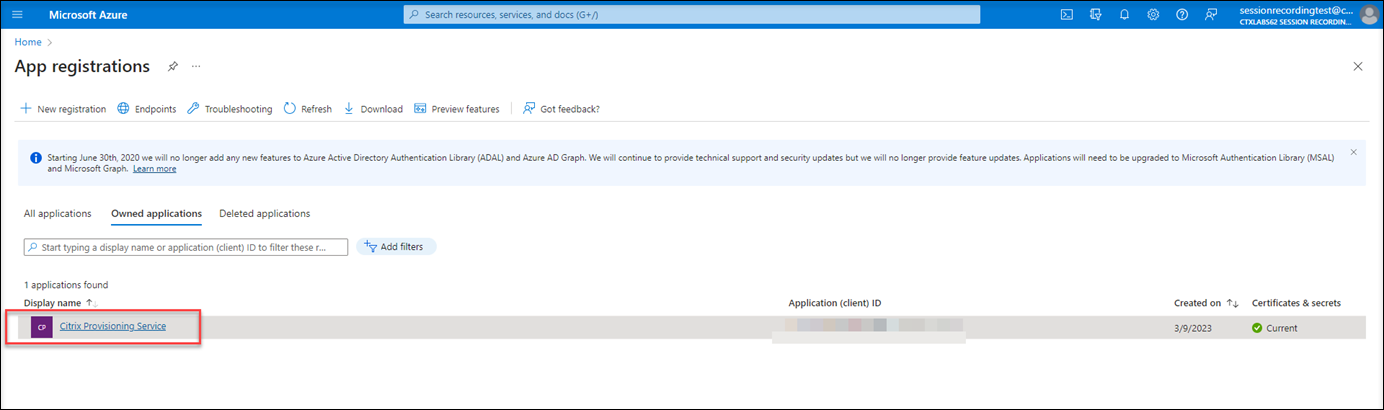
-
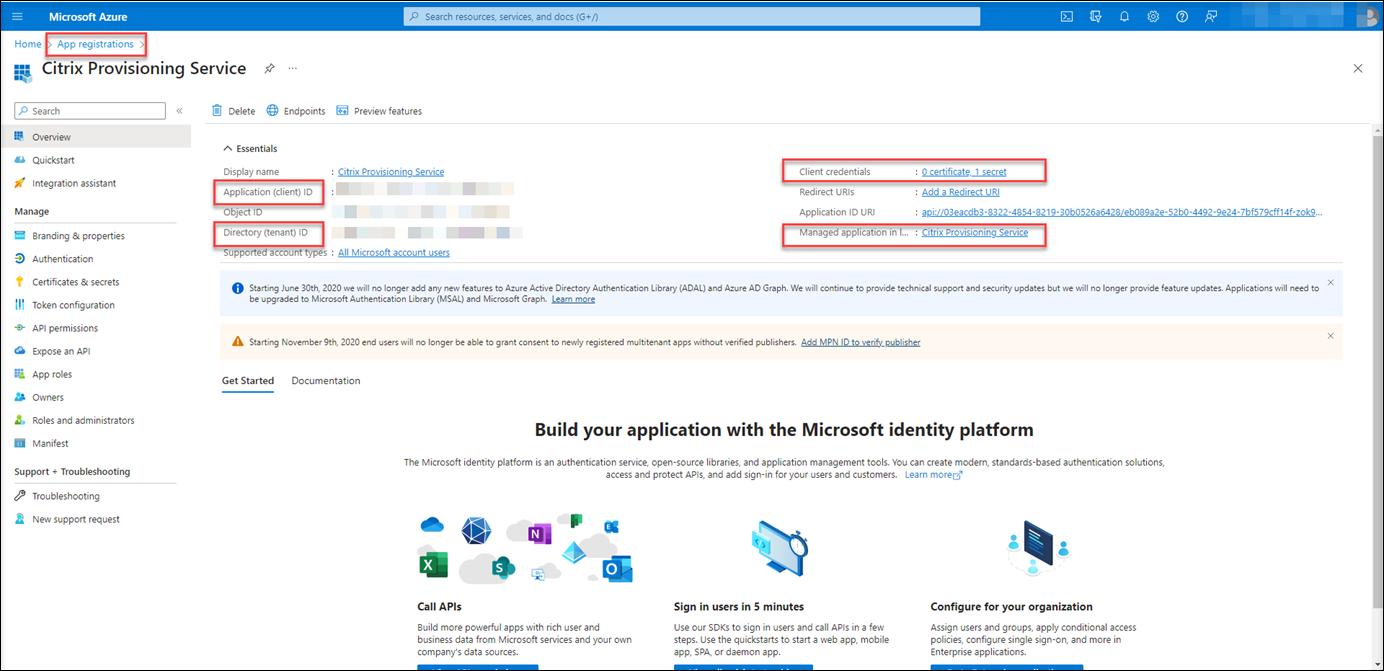
Click the display name of your application.
-
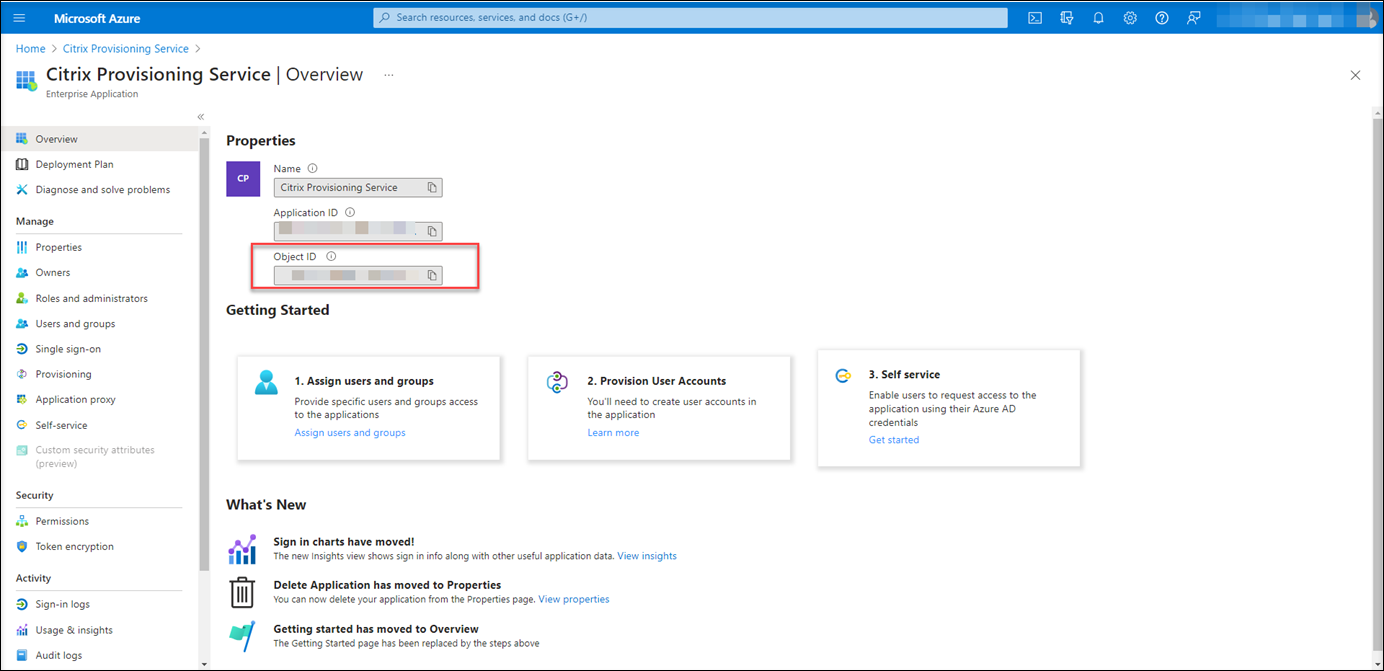
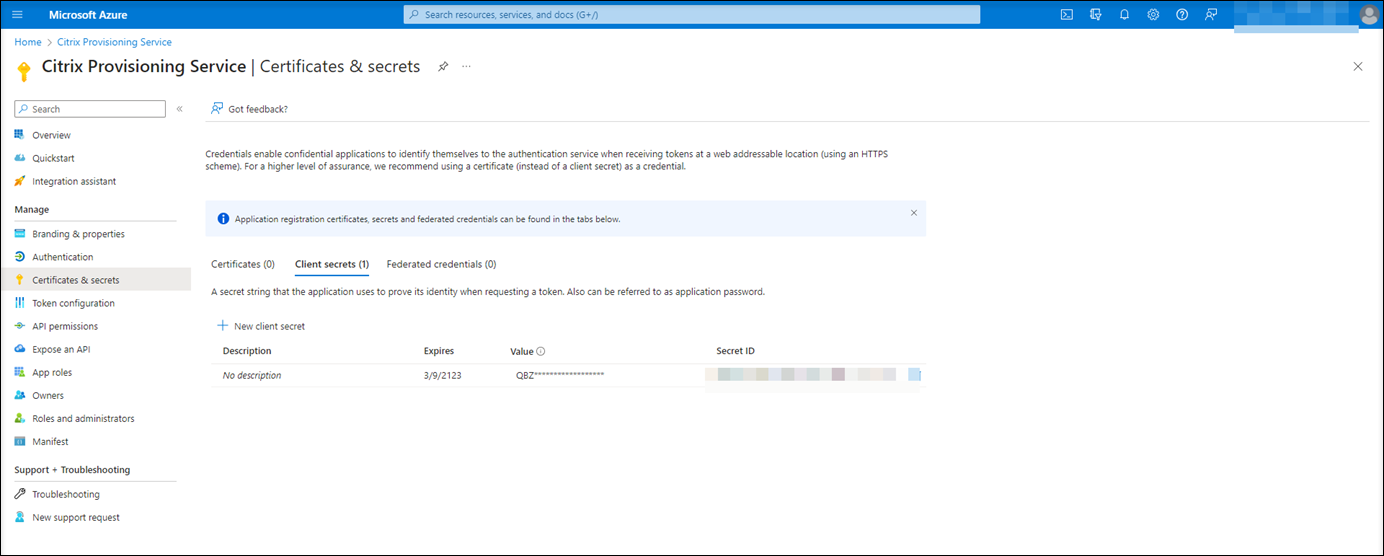
On the overview page, find the application (client) ID and directory (tenant) ID. Click the link next to Managed application in local directory to find the ID of the service principal object associated with the application. Click the link next to Client credentials to find the client secret ID and its expiration date.
For example, the ID of the service principal object associated with the application:
For example, the client secret ID and its expiration date:
-
Click Save to test whether the host connection you specify is available.
If the host connection you specify is available, you’re taken back to the Host Connection page and prompted that the host connection is added successfully.
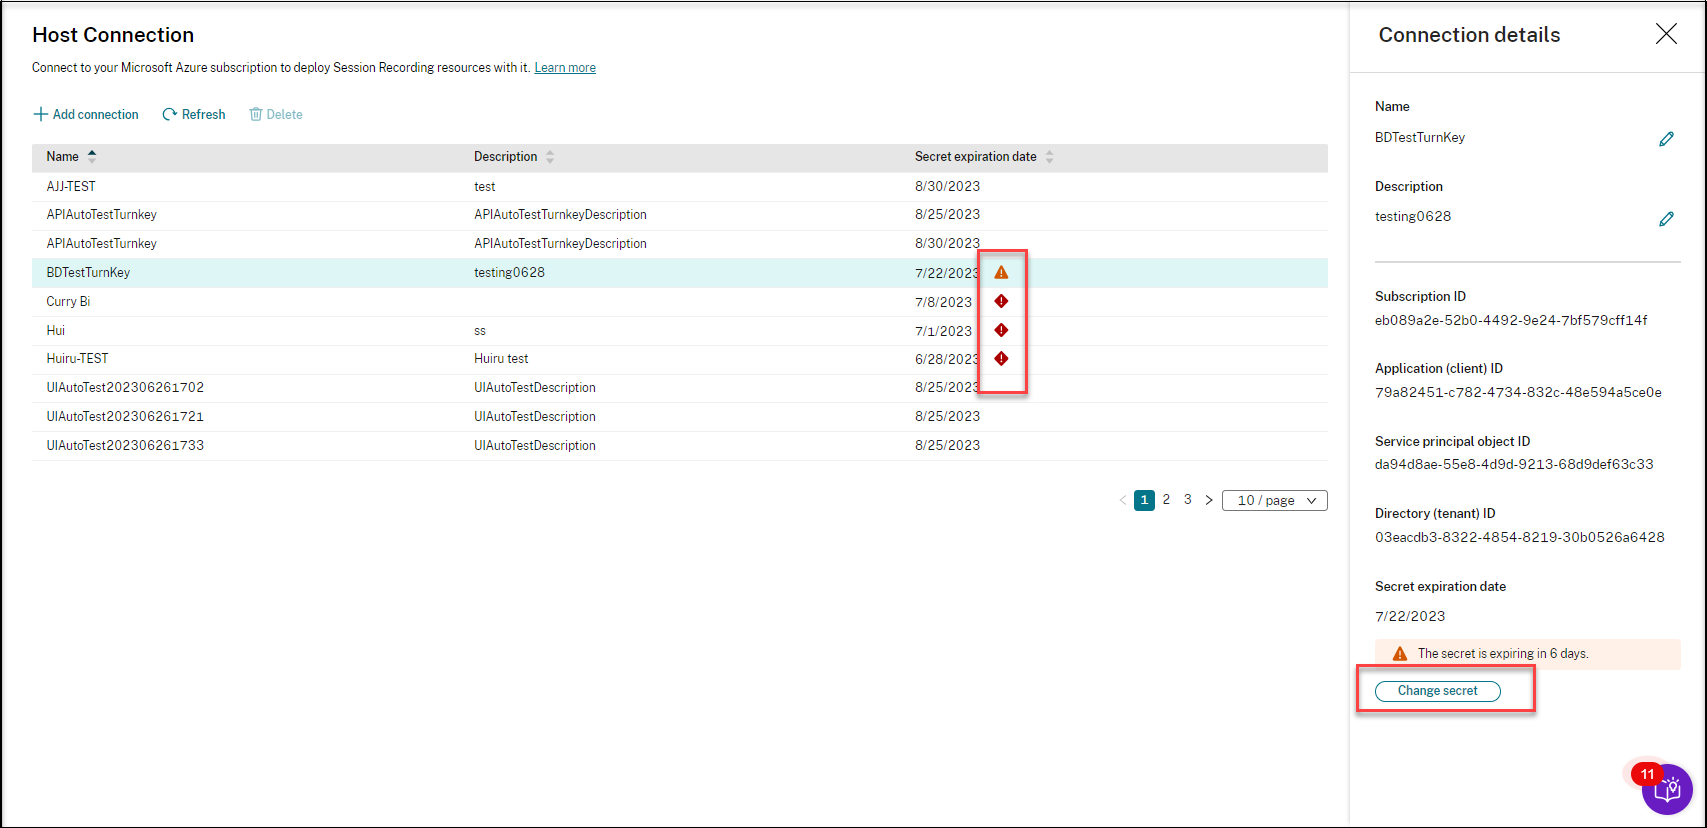
The Session Recording service reminds you of expired and expiring client secrets using error and warning icons, respectively. You can click the corresponding host connection and click Change secret on the Connection details page to update the client secret and its expiration date.
Create and deploy a site through an ARM template
You can create an Azure Resource Manager template (ARM template) to deploy Session Recording resources in Azure. The following are the main steps to achieve this goal:
- Create an ARM template in the Session Recording service. The ARM template is a JavaScript Object Notation (JSON) file that contains how and which resources you want to deploy.
- Download and unzip the ARM template. Run the deployment script in the unzipped template folder to start deploying the recourses specified in the template to Azure.
- Check the deployment progress in Azure. After the deployment is complete, set up Session Recording to get it up and running. To set up Session Recording, you need to specify the version of the Session Recording server to install and upload the resourceInfo.json file.
The specific steps are as follows:
-
Select Configuration > Server Management from the left navigation of the Session Recording service.
-
On the Server Management page, click Create site. The Create Site page appears.
-
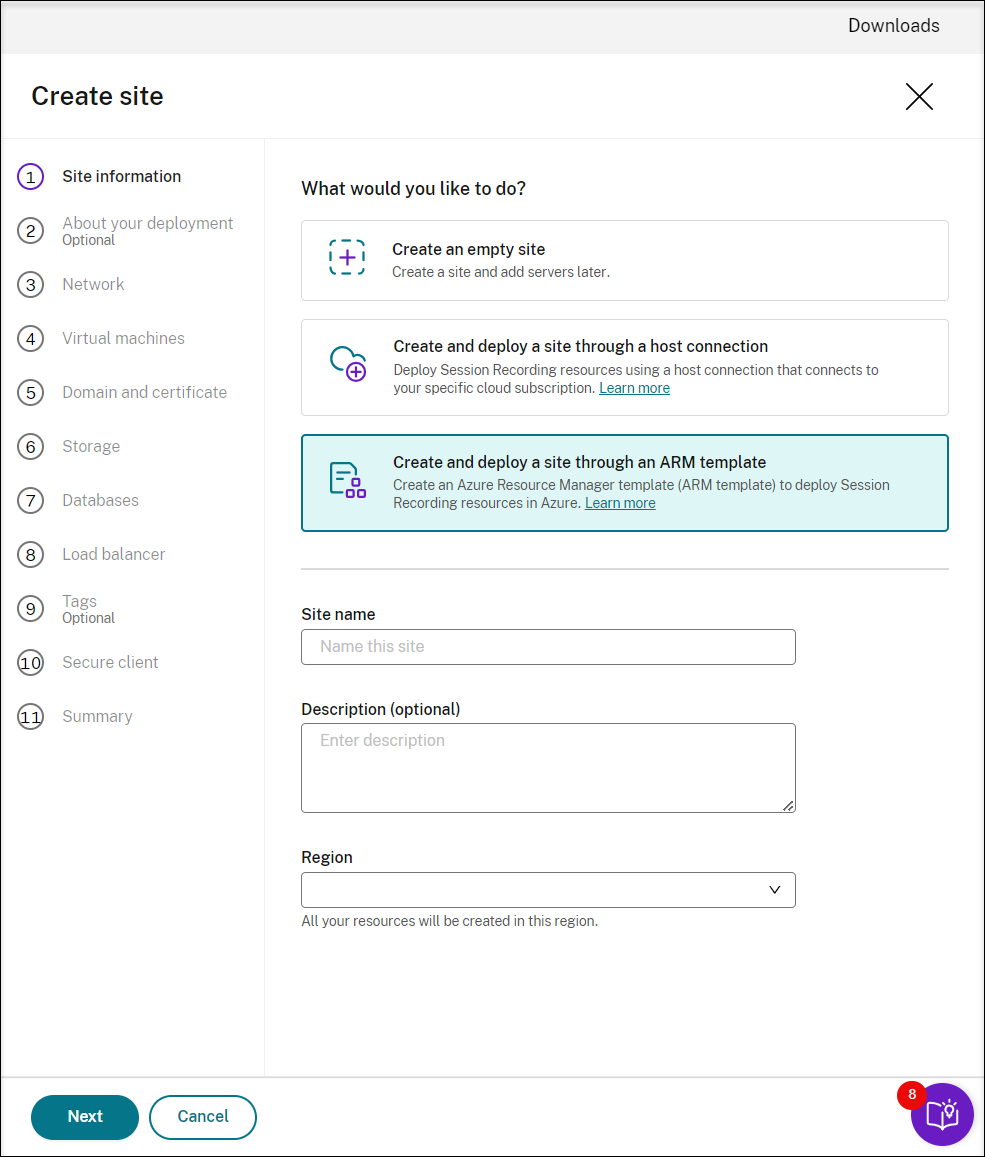
Select Create and deploy a site through an ARM template. The main steps are listed in the left navigation.
-
Enter a site name and description, and then click Next.
-
(Optional) To get recommendations for VM and storage configurations, provide information about your recording needs.
You can skip this step by clicking I’m good, skip this step or by clicking Next with nothing selected.
When you select an option from the drop-down list, a recommendation is presented according to your selection. A reset button is available next to the recommendation. It lets you clear your selections and the corresponding recommendation in that section.
-
Go to the Azure portal and create a new virtual network in the region you selected and set up virtual network peering between the new virtual network and the one that your VDAs are connected to. Then, add a subnet in the new virtual network. Find and enter the subnet ID below.
To keep the connections between resources within the private network, select the Create private endpoints for storage and databases check box.
After you select the Create private endpoints for storage and databases check box, decide on whether to enter another subnet ID by taking the following into consideration:
- If you do not plan to join your Session Recording servers to an Active Directory domain, the subnet is not needed and thus leave the subnet ID field empty.
- If you leave the subnet ID field empty, you are joining your Session Recording servers to an Azure Active Directory domain.
-
(Skip this step if you already have an application registered.) Register an application with your Azure AD tenant. An application must be registered to delegate identity and access management functions to Azure AD.
There are two methods for registering an application.
Method 1:
-
Copy the following Citrix-provided script and name it, for example, AppRegistration.ps1:
<# .SYNOPSIS Copyright (c) Citrix Systems, Inc. All Rights Reserved. .DESCRIPTION Create Azure app registrations and give proper permissions for Citrix Session Recording service deployment .Parameter azureTenantID .Parameter azureSubscriptionID .Parameter appName .Parameter role #> [CmdletBinding()] Param( [Parameter(Mandatory = $true)] [String] $tenantId, [Parameter(Mandatory = $true)] [String] $subscriptionId, [Parameter(Mandatory = $true)] [String] $appName, [Parameter(Mandatory = $true)] [String] $role ) if ($role -ne "Citrix Session Recording service" -and $role -ne "Citrix Session Recording Deployment" -and $role -ne "Contributor") { throw [System.Exception] "Invalid role '$role', only support 'Citrix Session Recording service', 'Citrix Session Recording Deployment', and 'Contributor'." } try { Get-InstalledModule -Name "Az.Accounts" -ErrorAction Stop } catch { Install-Module -Name "Az.Accounts" -Scope CurrentUser -Repository PSGallery -SkipPublisherCheck -Force } try { Get-InstalledModule -Name "Az.Resources" -ErrorAction Stop } catch { Install-Module -Name "Az.Resources" -Scope CurrentUser -Repository PSGallery -SkipPublisherCheck -Force } Connect-AzAccount -TenantId $tenantId -Subscription $subscriptionId try { $azureAdApplication = Get-AzADApplication -DisplayName $appName if ($null -eq $azureAdApplication) { Write-Host "Create a new app registration for Citrix Session Recording" -ForegroundColor Green $azureAdApplication = New-AzADApplication -DisplayName $appName -AvailableToOtherTenants $false } else { Write-Host "App registration '$appName' already exists." -ForegroundColor Yellow } $azureAdApplicationServicePrincipal = Get-AzADServicePrincipal -DisplayName $appName if($null -eq $azureAdApplicationServicePrincipal) { $azureAdApplicationServicePrincipal = New-AzADServicePrincipal -AppId $azureAdApplication.AppId Write-Host "Create a service principal for app registration '$appName'" -ForegroundColor Green }else{ Write-Host "Service principal already exists for app registration '$appName'" -ForegroundColor Yellow } if ($role -eq "Citrix Session Recording service" -or $role -eq "Citrix Session Recording Deployment") { $rootPath = Get-Location $customRolePath = $(Join-Path -Path $rootPath -ChildPath "sessionrecordingdeployment.json") | Resolve-Path $customRoleJson = Get-Content $customRolePath | ConvertFrom-Json $customRoleJson.AssignableScopes[0] = "/subscriptions/" + $subscriptionId $tmpCustomRolePath = Join-Path -Path $rootPath -ChildPath "sessionrecording_tmp.json" $roleDef = Get-AzRoleDefinition -Name $role if ($null -eq $roleDef) { try { $customRoleJson | ConvertTo-Json -depth 32 | Set-Content $tmpCustomRolePath Write-Host "Create a custom role '$role'" -ForegroundColor Green New-AzRoleDefinition -InputFile $tmpCustomRolePath } catch { Write-Host "Failed to create custom role, error: $_" -ForegroundColor Red throw $_.Exception } } else { try { $customRoleJson | Add-Member -MemberType NoteProperty -Name 'id' -Value $($roleDef.Id) $customRoleJson | ConvertTo-Json -depth 32 | Set-Content $tmpCustomRolePath Write-Host "Upadate the custom role '$role'" -ForegroundColor Green Set-AzRoleDefinition -InputFile $tmpCustomRolePath } catch { Write-Host "Failed to update custom role, error: $_" -ForegroundColor Red throw $_.Exception } } } $roleAssignment = Get-AzRoleAssignment -RoleDefinitionName $role -ObjectId $($azureAdApplicationServicePrincipal.Id) if ($null -eq $roleAssignment) { Write-Host "Assign role '$role' to app '$appName'" -ForegroundColor Green New-AzRoleAssignment -RoleDefinitionName $role -ApplicationId $azureAdApplication.AppId } else { Write-Host "Role '$role' already assigned to app '$appName'" -ForegroundColor Yellow } Write-Host "Tenant ID: $tenantId" -ForegroundColor Green Write-Host "Subscription ID: $subscriptionId" -ForegroundColor Green Write-Host "Application ID: $($azureAdApplication.AppId)" -ForegroundColor Green Write-Host "Service principal object ID: $($azureAdApplicationServicePrincipal.Id)" -ForegroundColor Green } catch { Write-Host "Failed to assign role assignment to this app, error: $_" -ForegroundColor Red Write-Host "Please make sure the current azure admin has permission to assign roles" -ForegroundColor Red } <!--NeedCopy--> -
Copy the following custom role file and name it sessionrecordingdeployment.json. This custom role file helps to assign least permissions for the application to be registered.
{ "name": "Citrix Session Recording Deployment", "description": "This role has permissions which allow users to deploy Session Recording resources using an Azure Resource Manager template (ARM template). ", "assignableScopes": [ "/subscriptions/*" ], "actions": [ "Microsoft.Compute/availabilitySets/write", "Microsoft.Compute/virtualMachines/extensions/read", "Microsoft.Compute/virtualMachines/extensions/write", "Microsoft.Compute/virtualMachines/read", "Microsoft.Compute/virtualMachines/runCommands/read", "Microsoft.Compute/virtualMachines/runCommands/write", "Microsoft.Compute/virtualMachines/write", "Microsoft.ContainerInstance/containerGroups/read", "Microsoft.ContainerInstance/containerGroups/write", "Microsoft.KeyVault/vaults/PrivateEndpointConnectionsApproval/action", "Microsoft.KeyVault/vaults/read", "Microsoft.KeyVault/vaults/secrets/read", "Microsoft.KeyVault/vaults/secrets/write", "Microsoft.KeyVault/vaults/write", "Microsoft.ManagedIdentity/userAssignedIdentities/assign/action", "Microsoft.ManagedIdentity/userAssignedIdentities/read", "Microsoft.ManagedIdentity/userAssignedIdentities/write", "Microsoft.Network/dnsForwardingRulesets/forwardingRules/read", "Microsoft.Network/dnsForwardingRulesets/forwardingRules/write", "Microsoft.Network/dnsForwardingRulesets/read", "Microsoft.Network/dnsForwardingRulesets/virtualNetworkLinks/read", "Microsoft.Network/dnsForwardingRulesets/virtualNetworkLinks/write", "Microsoft.Network/dnsForwardingRulesets/write", "Microsoft.Network/dnsResolvers/outboundEndpoints/join/action", "Microsoft.Network/dnsResolvers/outboundEndpoints/read", "Microsoft.Network/dnsResolvers/outboundEndpoints/write", "Microsoft.Network/dnsResolvers/read", "Microsoft.Network/dnsResolvers/write", "Microsoft.Network/loadBalancers/backendAddressPools/join/action", "Microsoft.Network/loadBalancers/write", "Microsoft.Network/networkInterfaces/join/action", "Microsoft.Network/networkInterfaces/read", "Microsoft.Network/networkInterfaces/write", "Microsoft.Network/networkSecurityGroups/join/action", "Microsoft.Network/networkSecurityGroups/read", "Microsoft.Network/networkSecurityGroups/securityRules/read", "Microsoft.Network/networkSecurityGroups/securityRules/write", "Microsoft.Network/networkSecurityGroups/write", "Microsoft.Network/privateDnsZones/join/action", "Microsoft.Network/privateDnsZones/read", "Microsoft.Network/privateDnsZones/virtualNetworkLinks/read", "Microsoft.Network/privateDnsZones/virtualNetworkLinks/write", "Microsoft.Network/privateDnsZones/write", "Microsoft.Network/privateEndpoints/privateDnsZoneGroups/read", "Microsoft.Network/privateEndpoints/privateDnsZoneGroups/write", "Microsoft.Network/privateEndpoints/read", "Microsoft.Network/privateEndpoints/write", "Microsoft.Network/publicIPAddresses/join/action", "Microsoft.Network/publicIPAddresses/read", "Microsoft.Network/publicIPAddresses/write", "Microsoft.Network/virtualNetworks/join/action", "Microsoft.Network/virtualNetworks/read", "Microsoft.Network/virtualNetworks/subnets/join/action", "Microsoft.Network/virtualNetworks/subnets/read", "Microsoft.Resources/deploymentScripts/read", "Microsoft.Resources/deploymentScripts/write", "Microsoft.Resources/deployments/operationstatuses/read", "Microsoft.Resources/deployments/read", "Microsoft.Resources/deployments/validate/action", "Microsoft.Resources/deployments/write", "Microsoft.Resources/subscriptions/resourceGroups/read", "Microsoft.Resources/subscriptions/resourceGroups/write", "Microsoft.Resources/templateSpecs/read", "Microsoft.Resources/templateSpecs/versions/read", "Microsoft.Resources/templateSpecs/versions/write", "Microsoft.Resources/templateSpecs/write", "Microsoft.Sql/servers/auditingSettings/write", "Microsoft.Sql/servers/databases/write", "Microsoft.Sql/servers/firewallRules/write", "Microsoft.Sql/servers/privateEndpointConnectionsApproval/action", "Microsoft.Sql/servers/read", "Microsoft.Sql/servers/write", "Microsoft.Storage/storageAccounts/PrivateEndpointConnectionsApproval/action", "Microsoft.Storage/storageAccounts/blobServices/containers/read", "Microsoft.Storage/storageAccounts/blobServices/containers/write", "Microsoft.Storage/storageAccounts/fileServices/shares/write", "Microsoft.Storage/storageAccounts/listkeys/action", "Microsoft.Storage/storageAccounts/read", "Microsoft.Storage/storageAccounts/write" ], "notActions": [], "dataActions": [], "notDataActions": [] } <!--NeedCopy--> - Put AppRegistration.ps1 and sessionrecordingdeployment.json in the same folder.
-
Run either of the following commands as needed.
To create an application and assign it least permissions with the preceding custom role file (sessionrecordingdeployment.json), run:
.\AppRegistration.ps1 -tenantId <tenant ID> -subscriptionId <subscription ID> -appName <application name> -role "Citrix Session Recording Deployment"
<!--NeedCopy-->
To create an application and assign it the Azure built-in Contributor role, run:
.\AppRegistration.ps1 -tenantId <tenant ID> -subscriptionId <subscription ID> -appName <application name> -role "Contributor"
<!--NeedCopy-->
Method 2:
Go to the Azure portal and register an application by yourself. Grant proper permissions to the application. For the least permissions that are required, see the sessionrecordingdeployment.json file in Method 1.
-
-
Specify configurations for your Session Recording servers to be installed later.
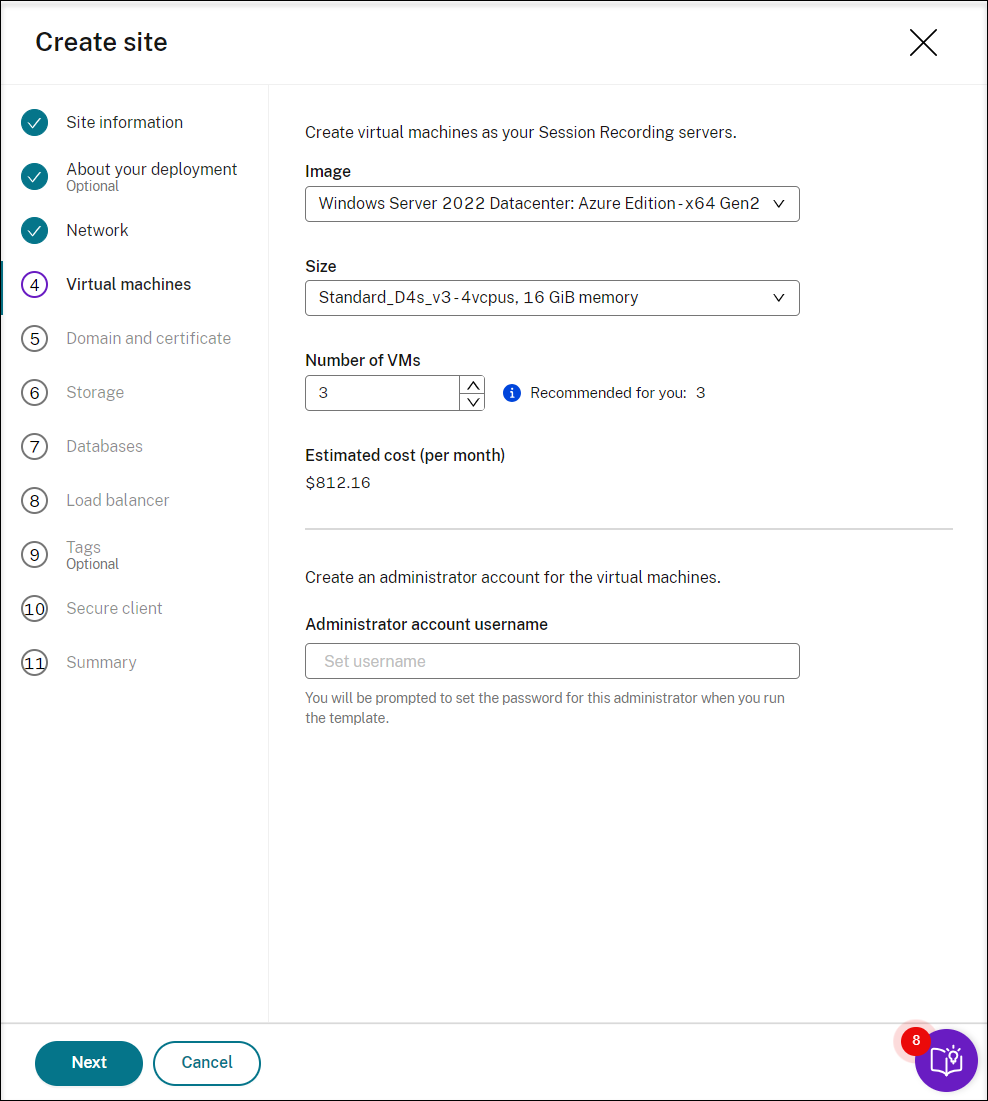
Note:
- The Number of VMs field is prefilled with the recommended number if there’s one. Change the number as needed.
- Estimated costs are based on standard pricing and don’t take discounts into consideration. You can expect lower actual costs than estimated.
-
Join the Session Recording servers to the same domain with your VDAs and specify a certificate for the Session Recording servers.
-
If your VDAs connect to an Active Directory domain, select the Join servers to an Active Directory domain check box and enter the relevant information.
-
If your VDAs connect to an Azure Active Directory (Azure AD) domain, clear the Join servers to an Active Directory domain check box. After you complete creating the current site, make sure to manually join the Session Recording servers to the same Azure AD domain. Notice that pure Azure AD deployment is available only for Session Recording 2402 and later.
-
-
Configure an Azure storage account and file shares to store your recording files. For pricing information, see Azure Files pricing.
-
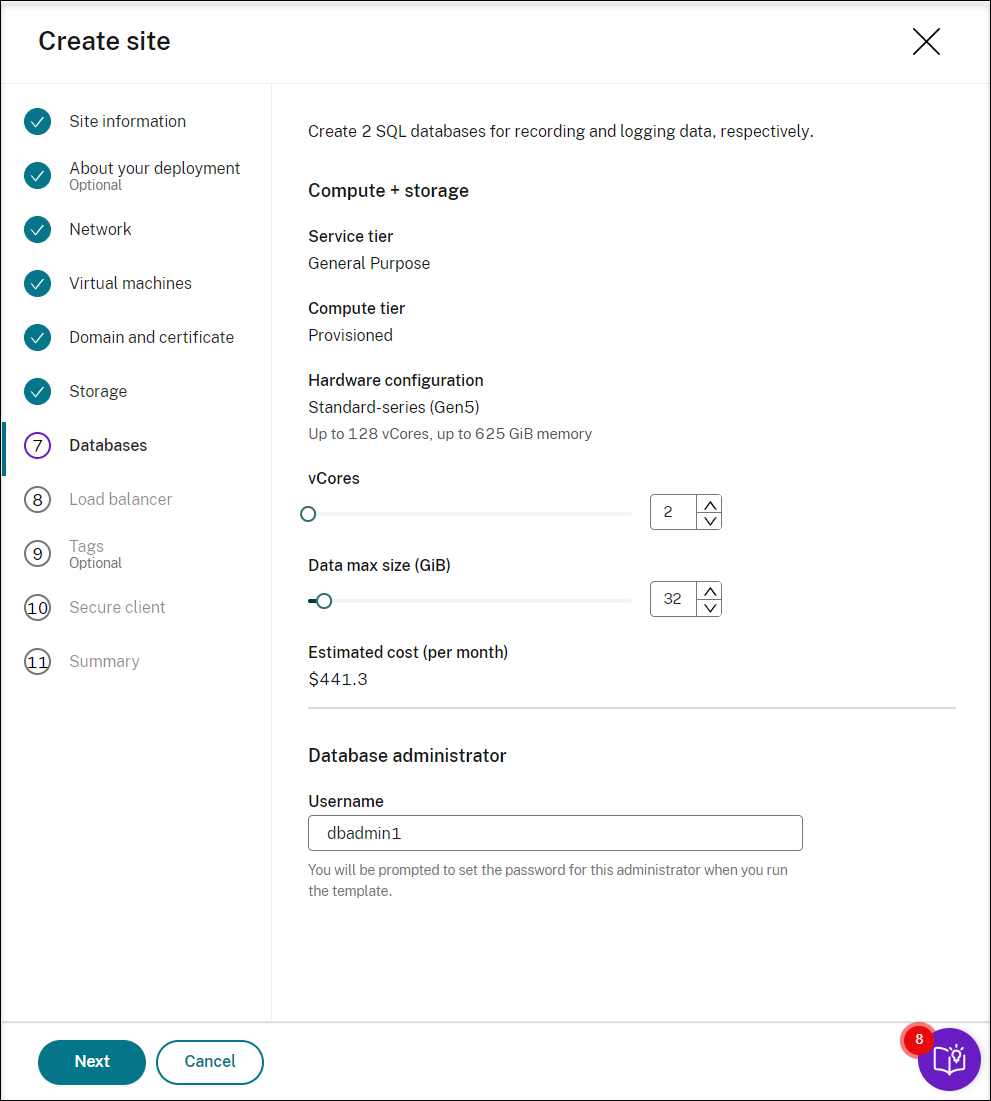
Create two SQL databases in Azure. One is used as the Session recording database (named sessionrecording) and the other as the administrator logging database (named sessionrecordinglogging).
-
Create a load balancer to distribute workload among the Session Recording servers. Enter the IP addresses or ranges of your VDAs and separate them by a comma (,) in the Restrict access of the load balancer to only the following addresses field. For pricing information, see Load Balancer pricing.
-
(Optional) Apply tags to the Azure resources to be created.
-
Create a secure client to onboard the Session Recording servers to the Session Recording service.
Click Create client to let Citrix create a secure client on your behalf. Alternatively, you can create a secure client through the Identity and Access Management > API Access tab of the Citrix Cloud console and then fill in the information below.
-
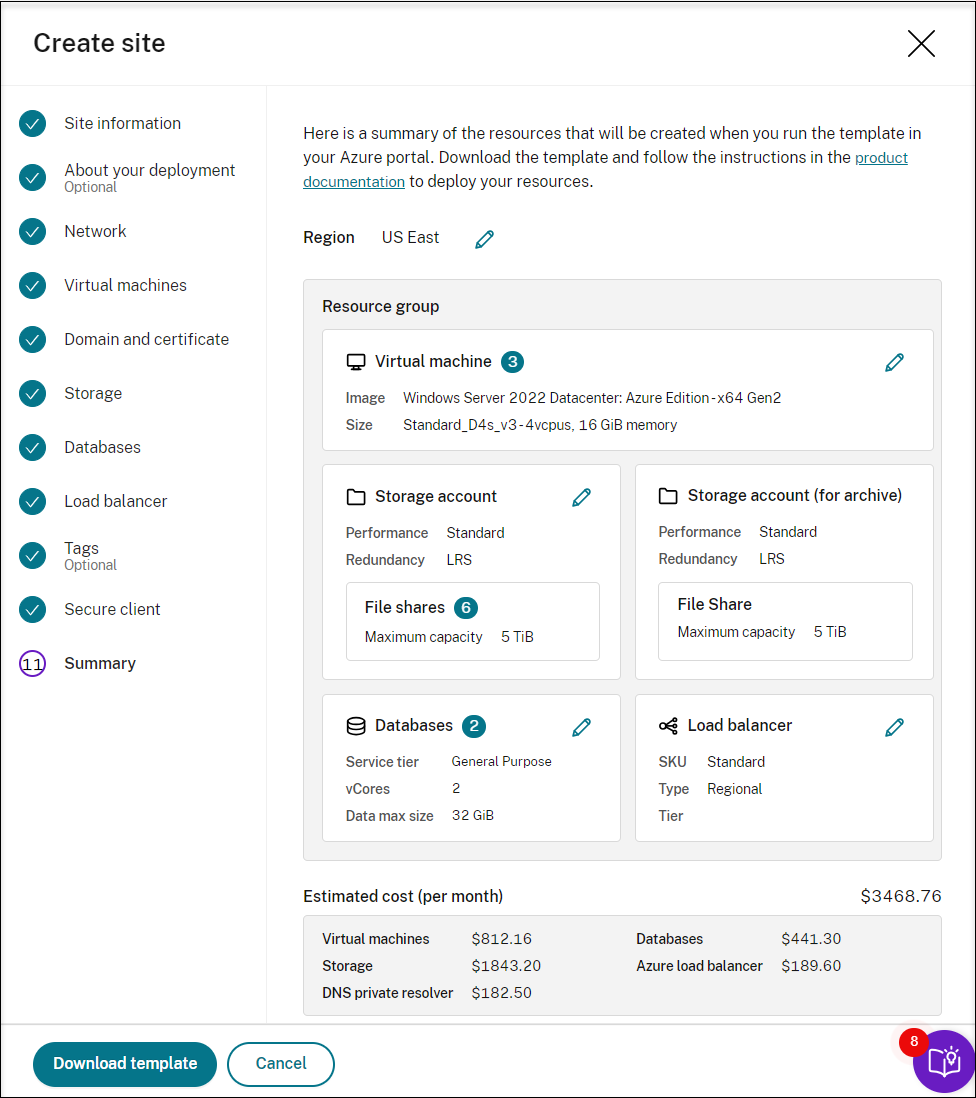
View the summary about the resources to be created and click the pencil icon to edit your settings if needed. After that, click Download template. An AEM template that contains how and which resources you want to deploy is then downloaded to the Downloads folder on your machine. You can also see the newly created site on the Server Management page.
-
Go to the Downloads folder and unzip the ARM template. Open the unzipped file folder, type PowerShell in the address bar, and hit Enter. Wait till a PowerShell window is opened at that folder.
-
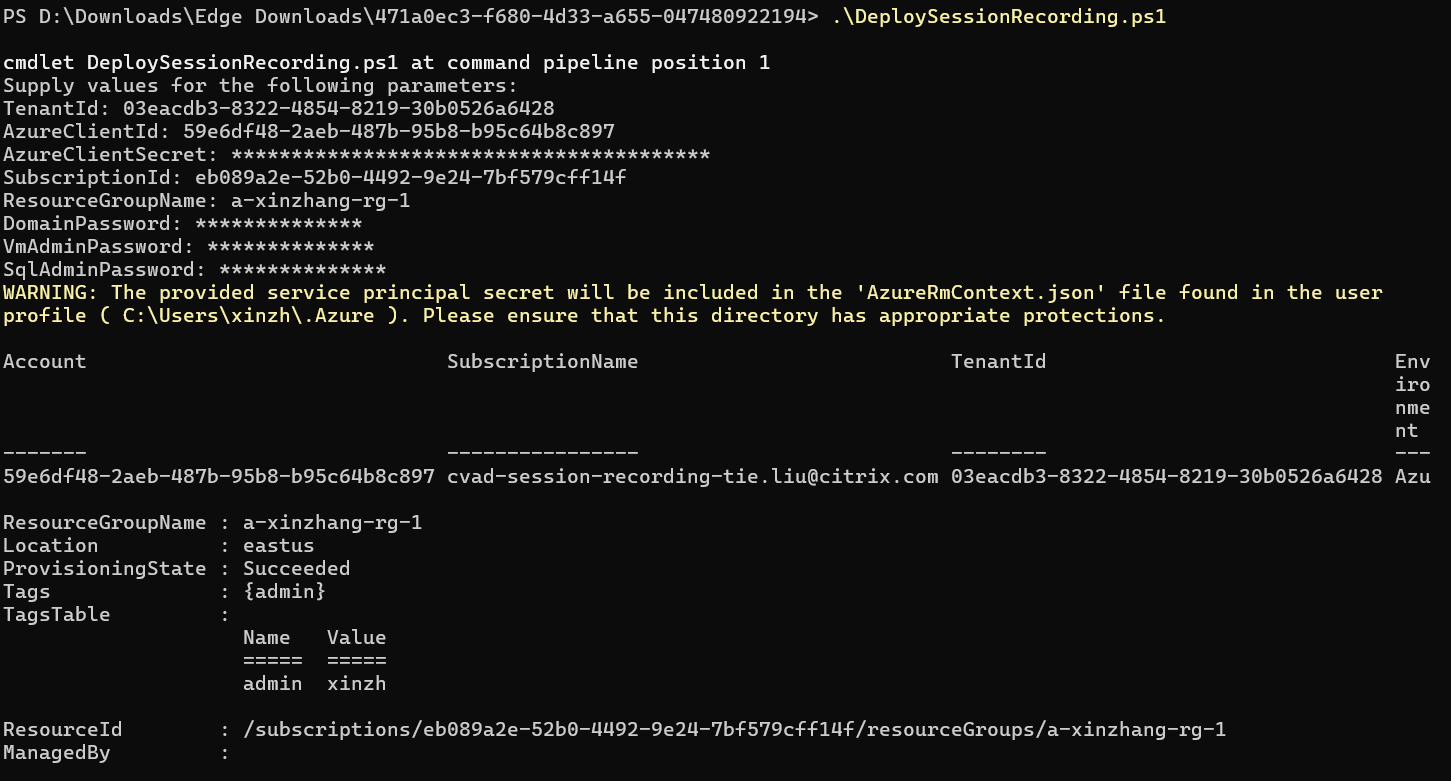
Run the JavaScript Object Notation (JSON) script named DeploySessionRecording.ps1. Provide values for the parameters prompted. The actual parameters vary depending on the settings you specified when creating the template. For example:

-
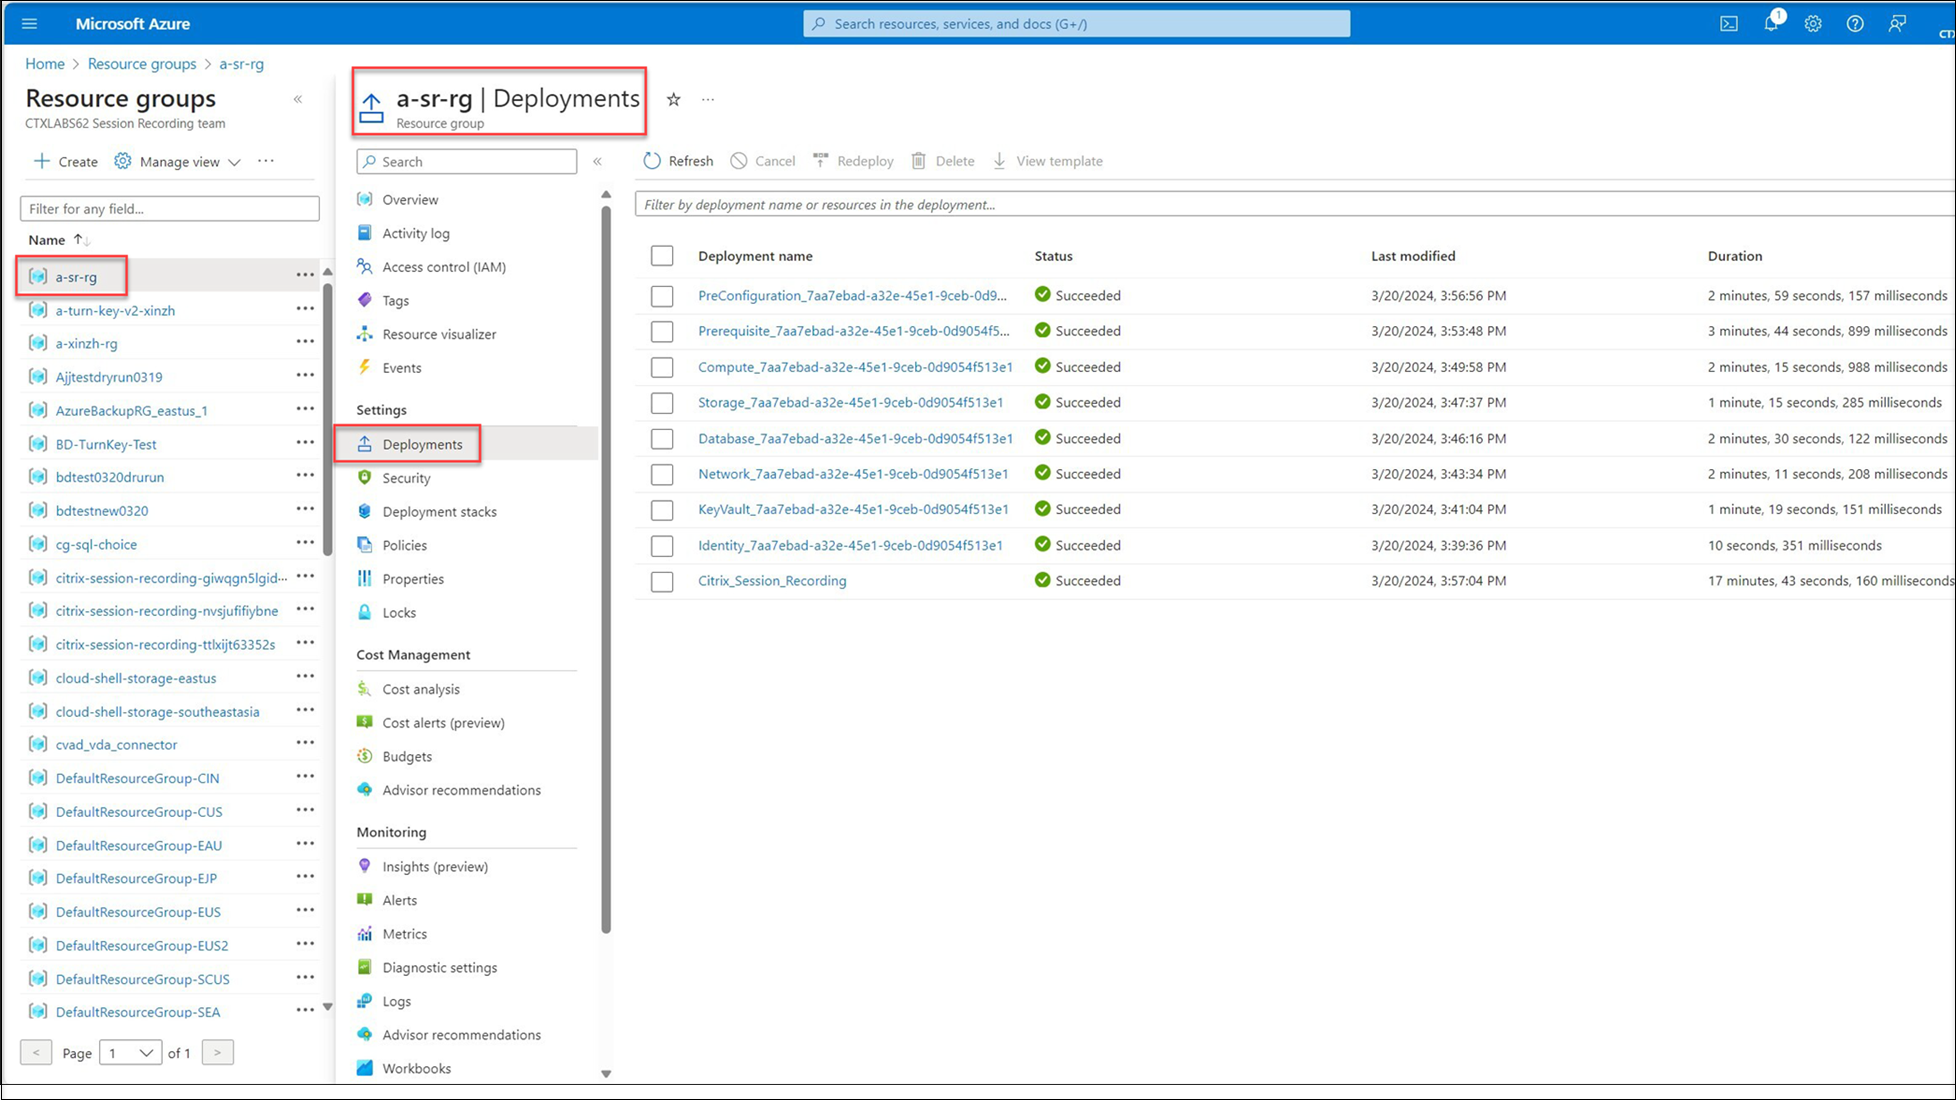
Go to the Azure portal, locate the resource group that contains your deployment, and then check the deployment progress. Wait until the entire deployment shows Succeeded.
-
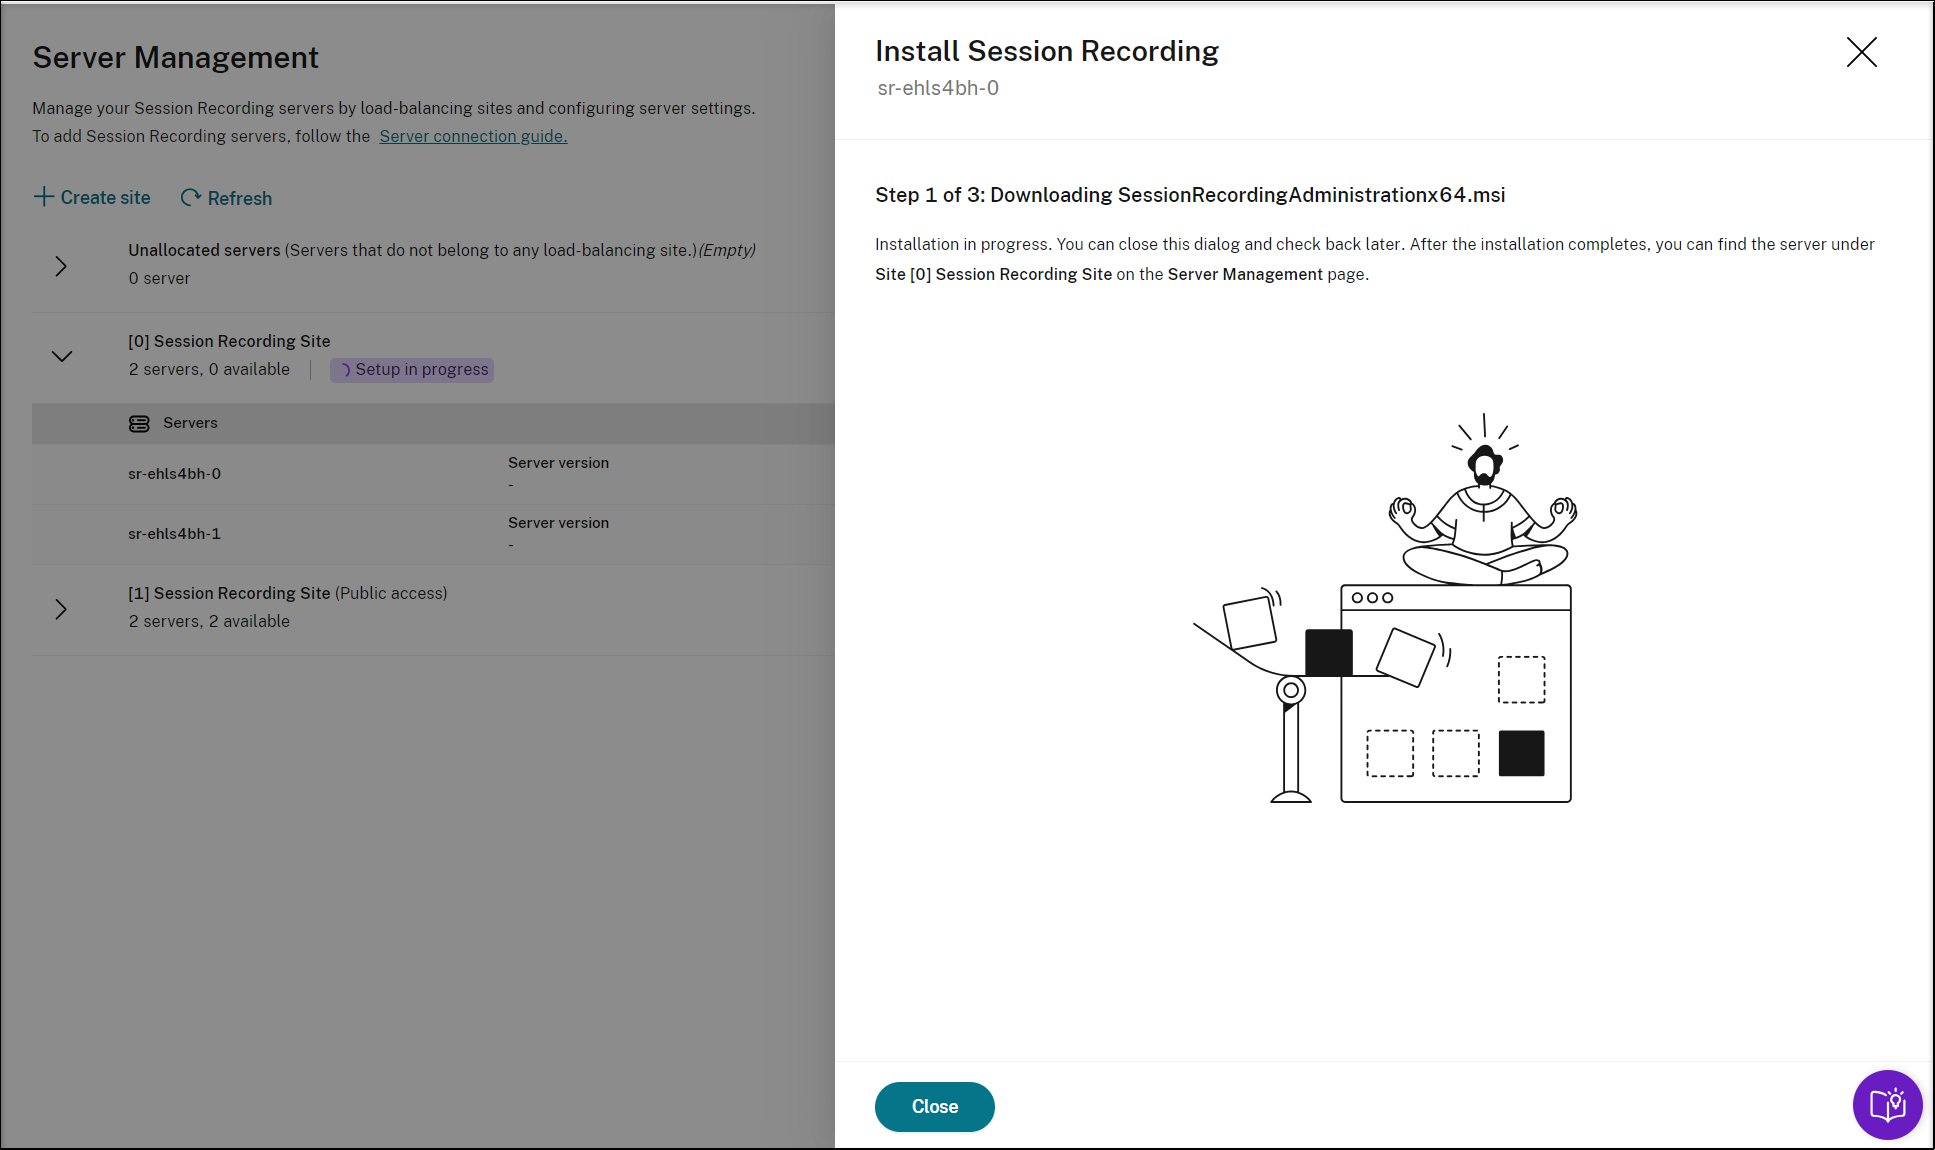
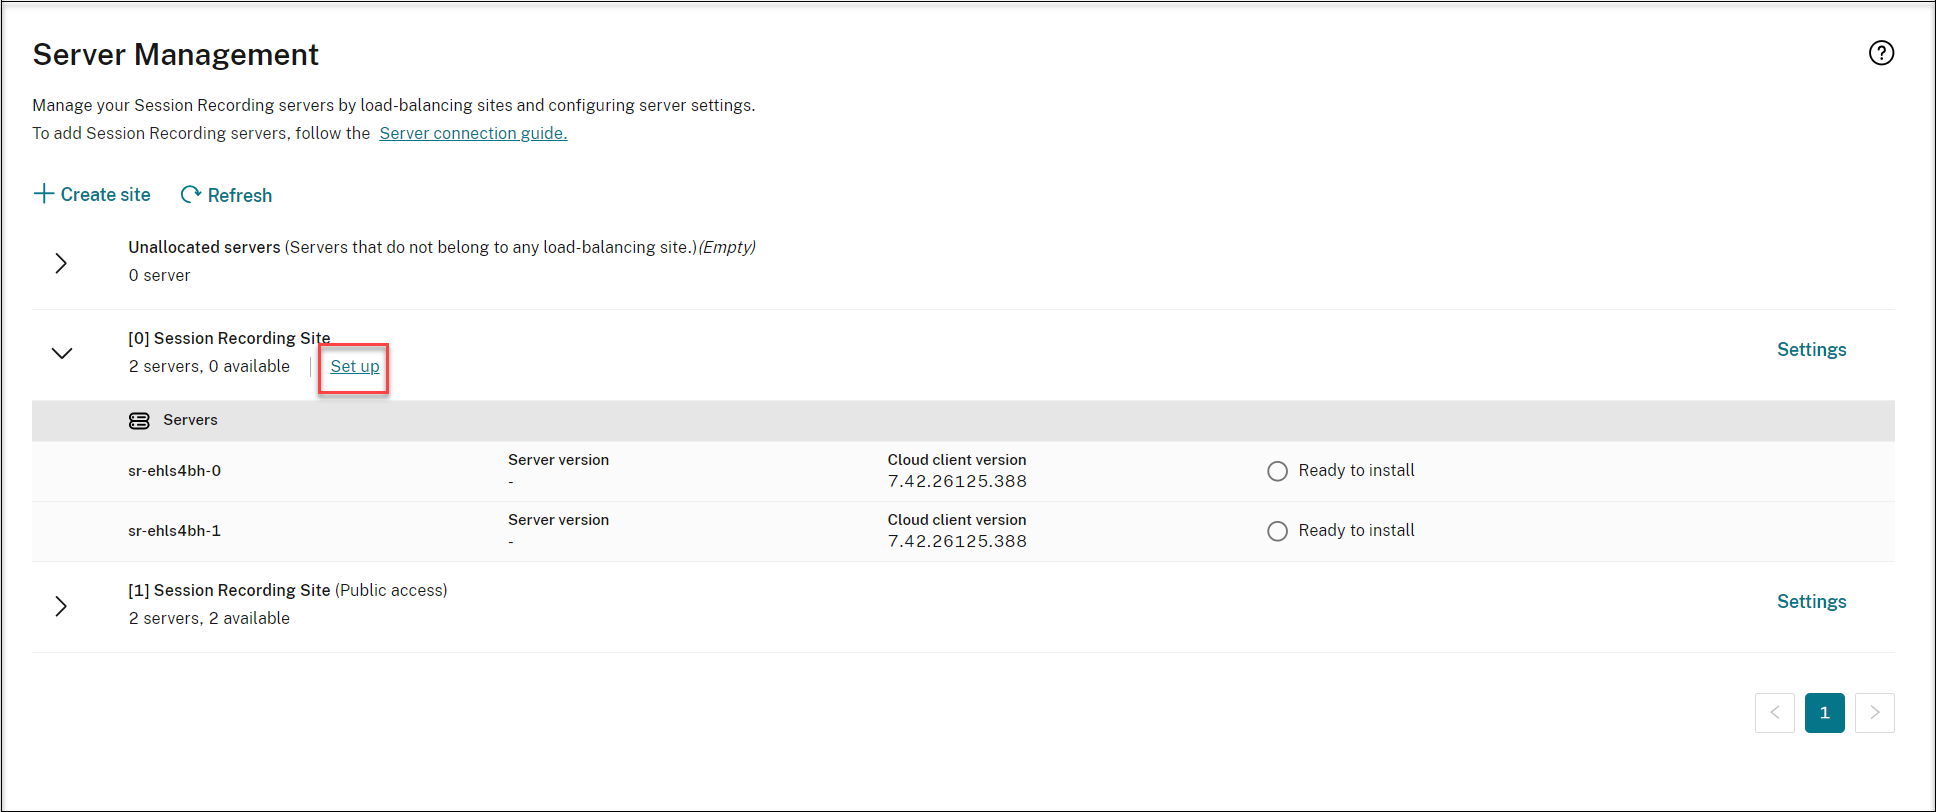
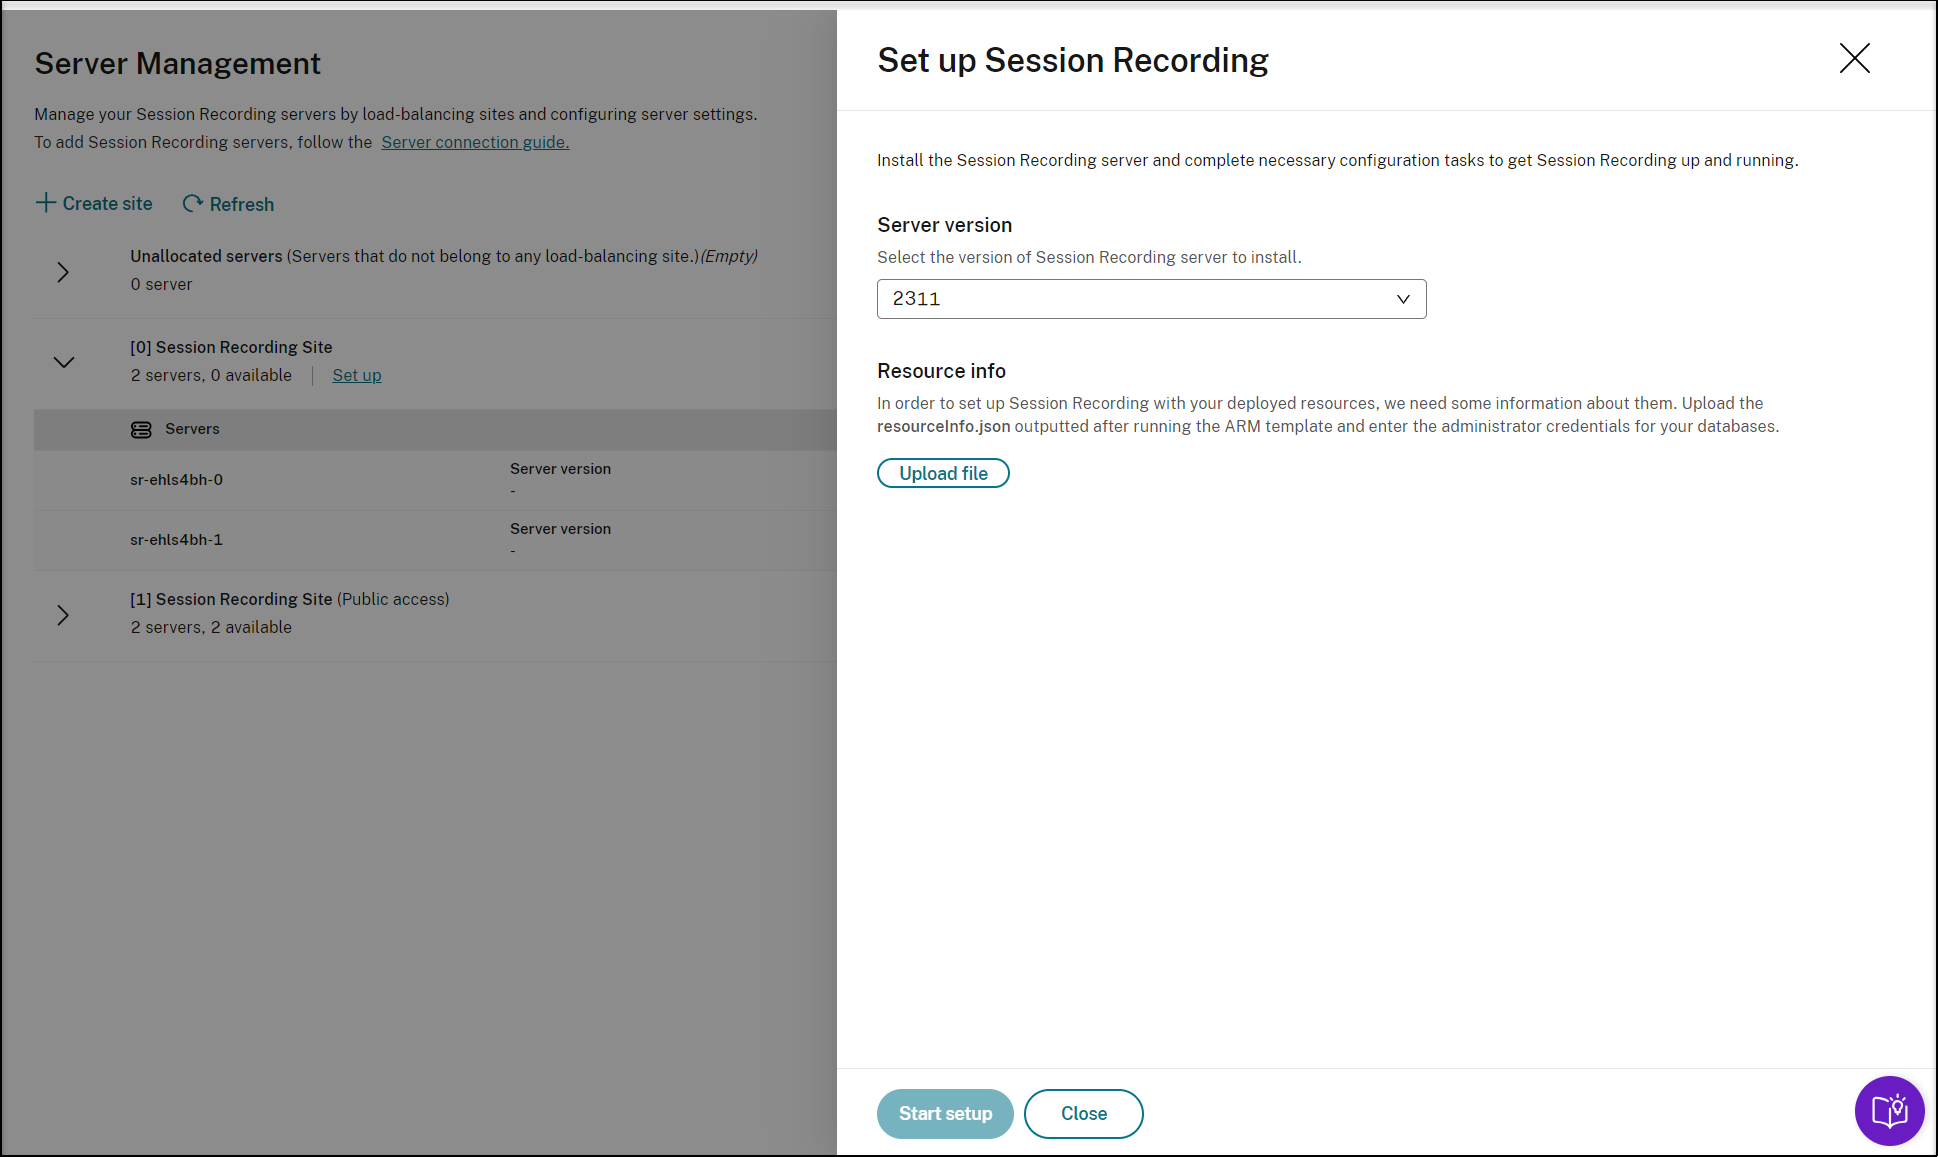
Return to the Server Management page of the Session Recording service. Find the newly created site, and you will see a Set up button available. Click Set up to set up Session Recording to get it up and running.
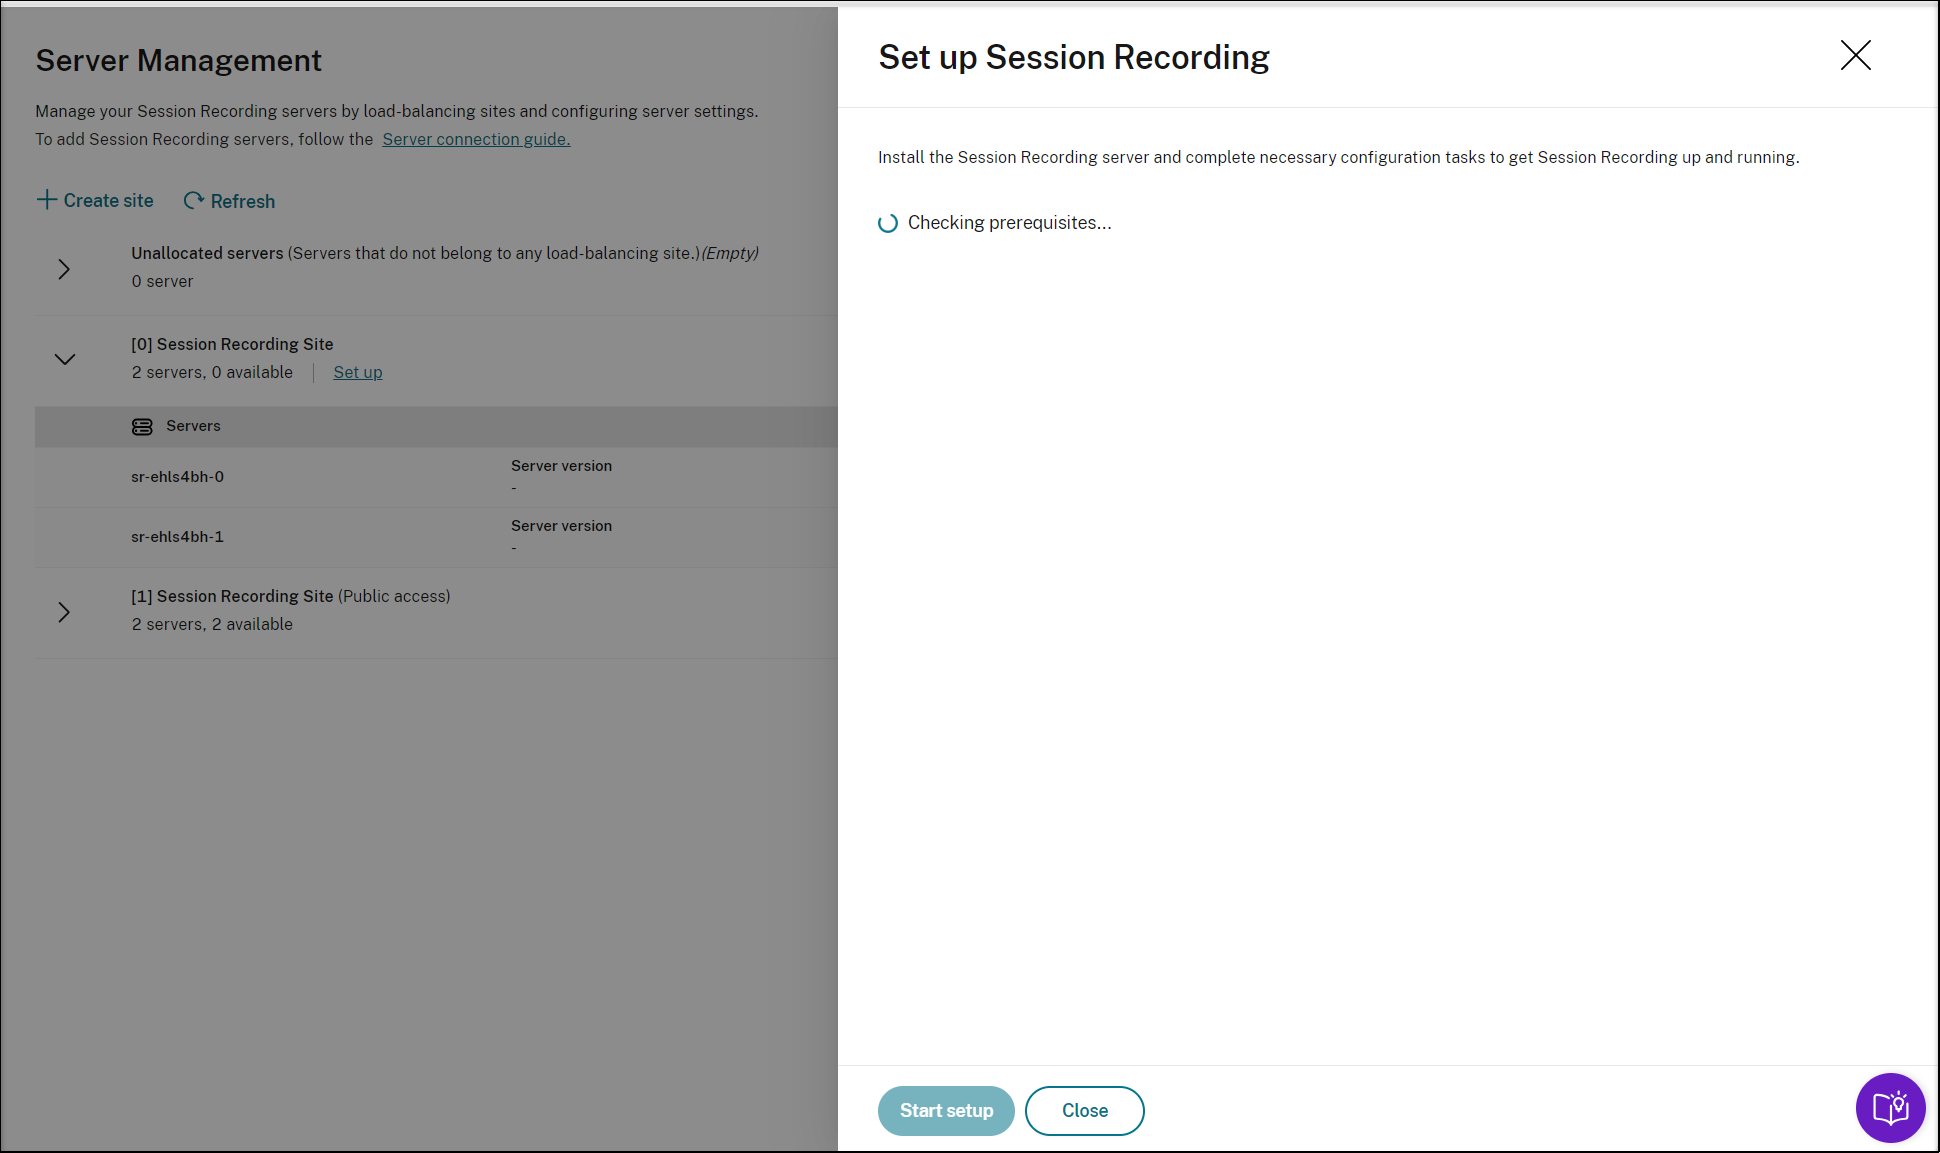
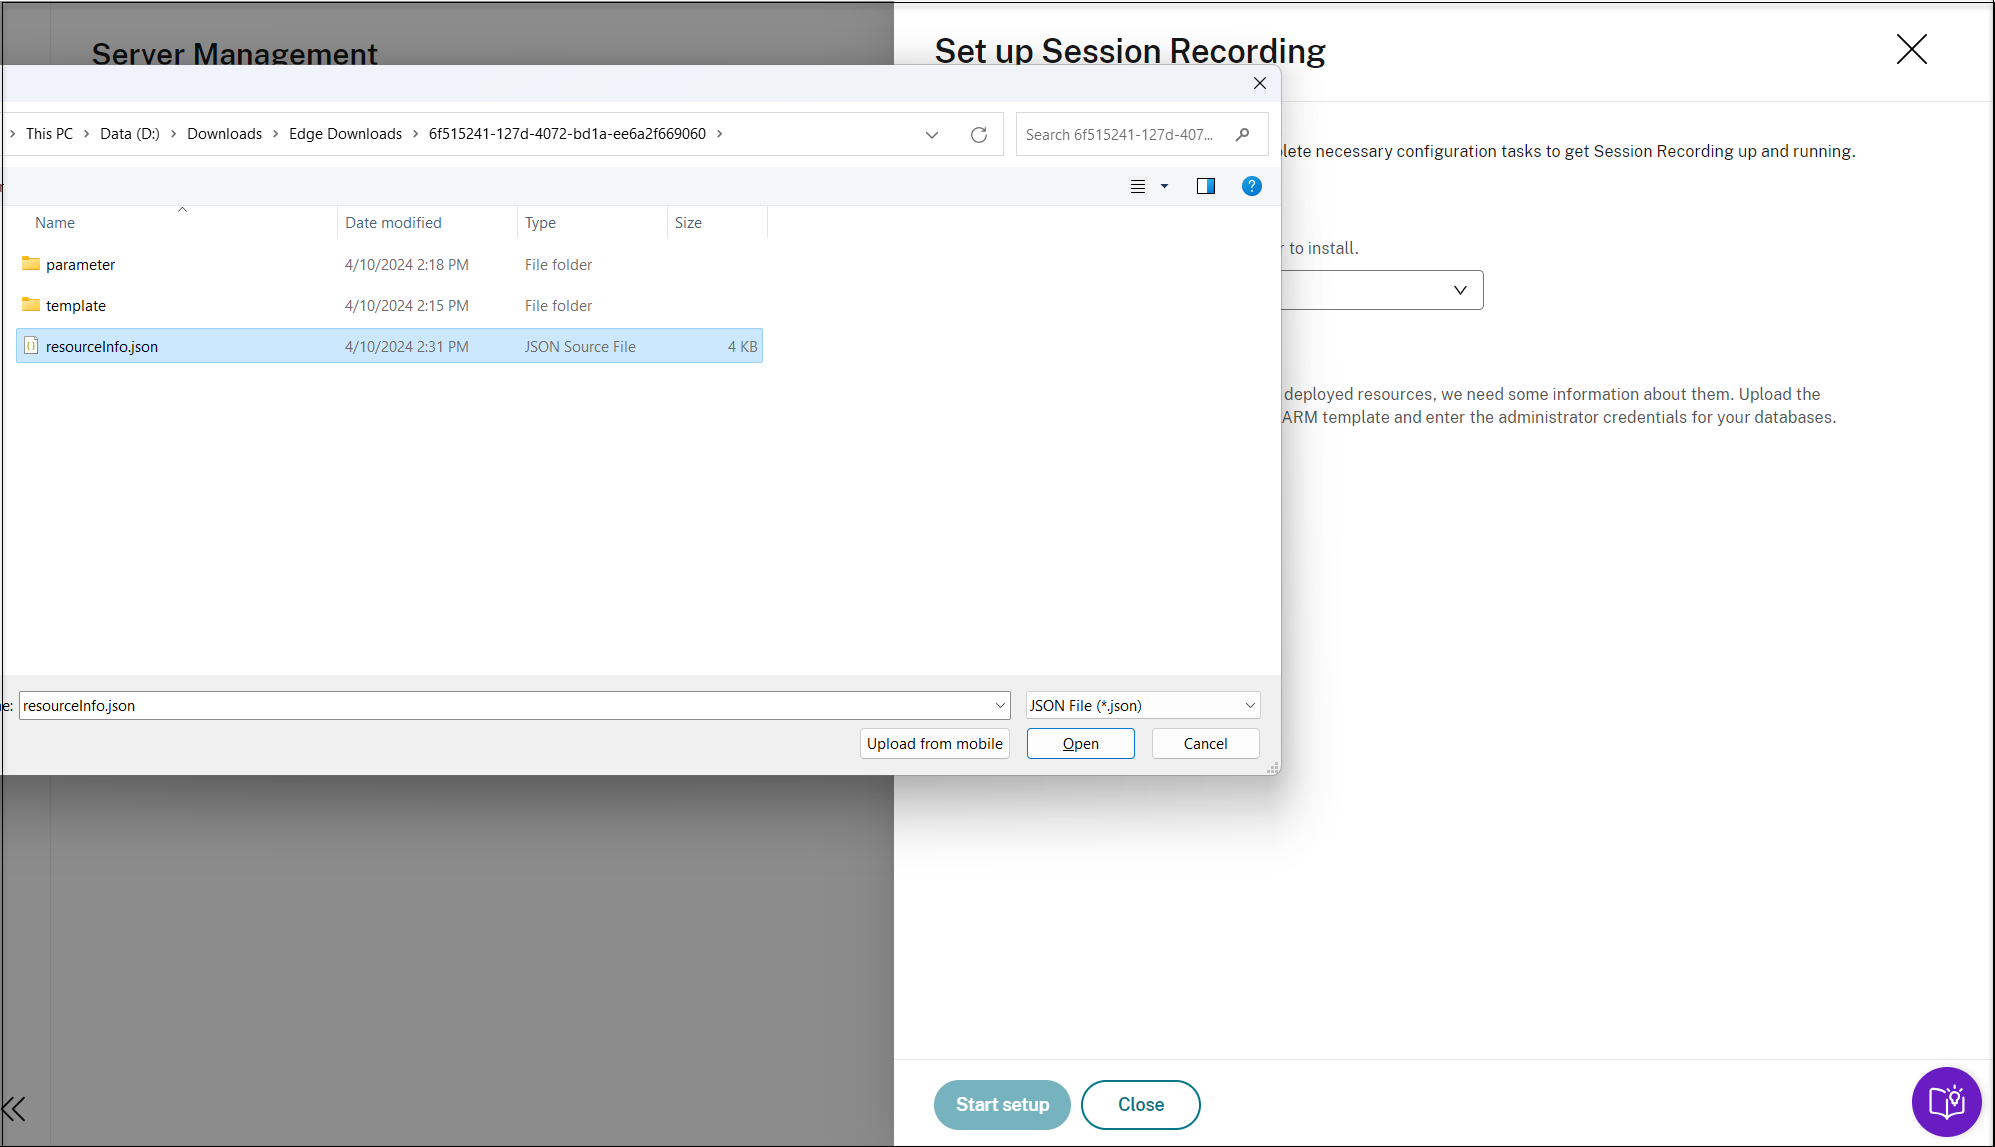
To set up Session Recording, you need to specify the version of the Session Recording server to install and upload the resourceInfo.json file.
Enter the credentials for your databases.
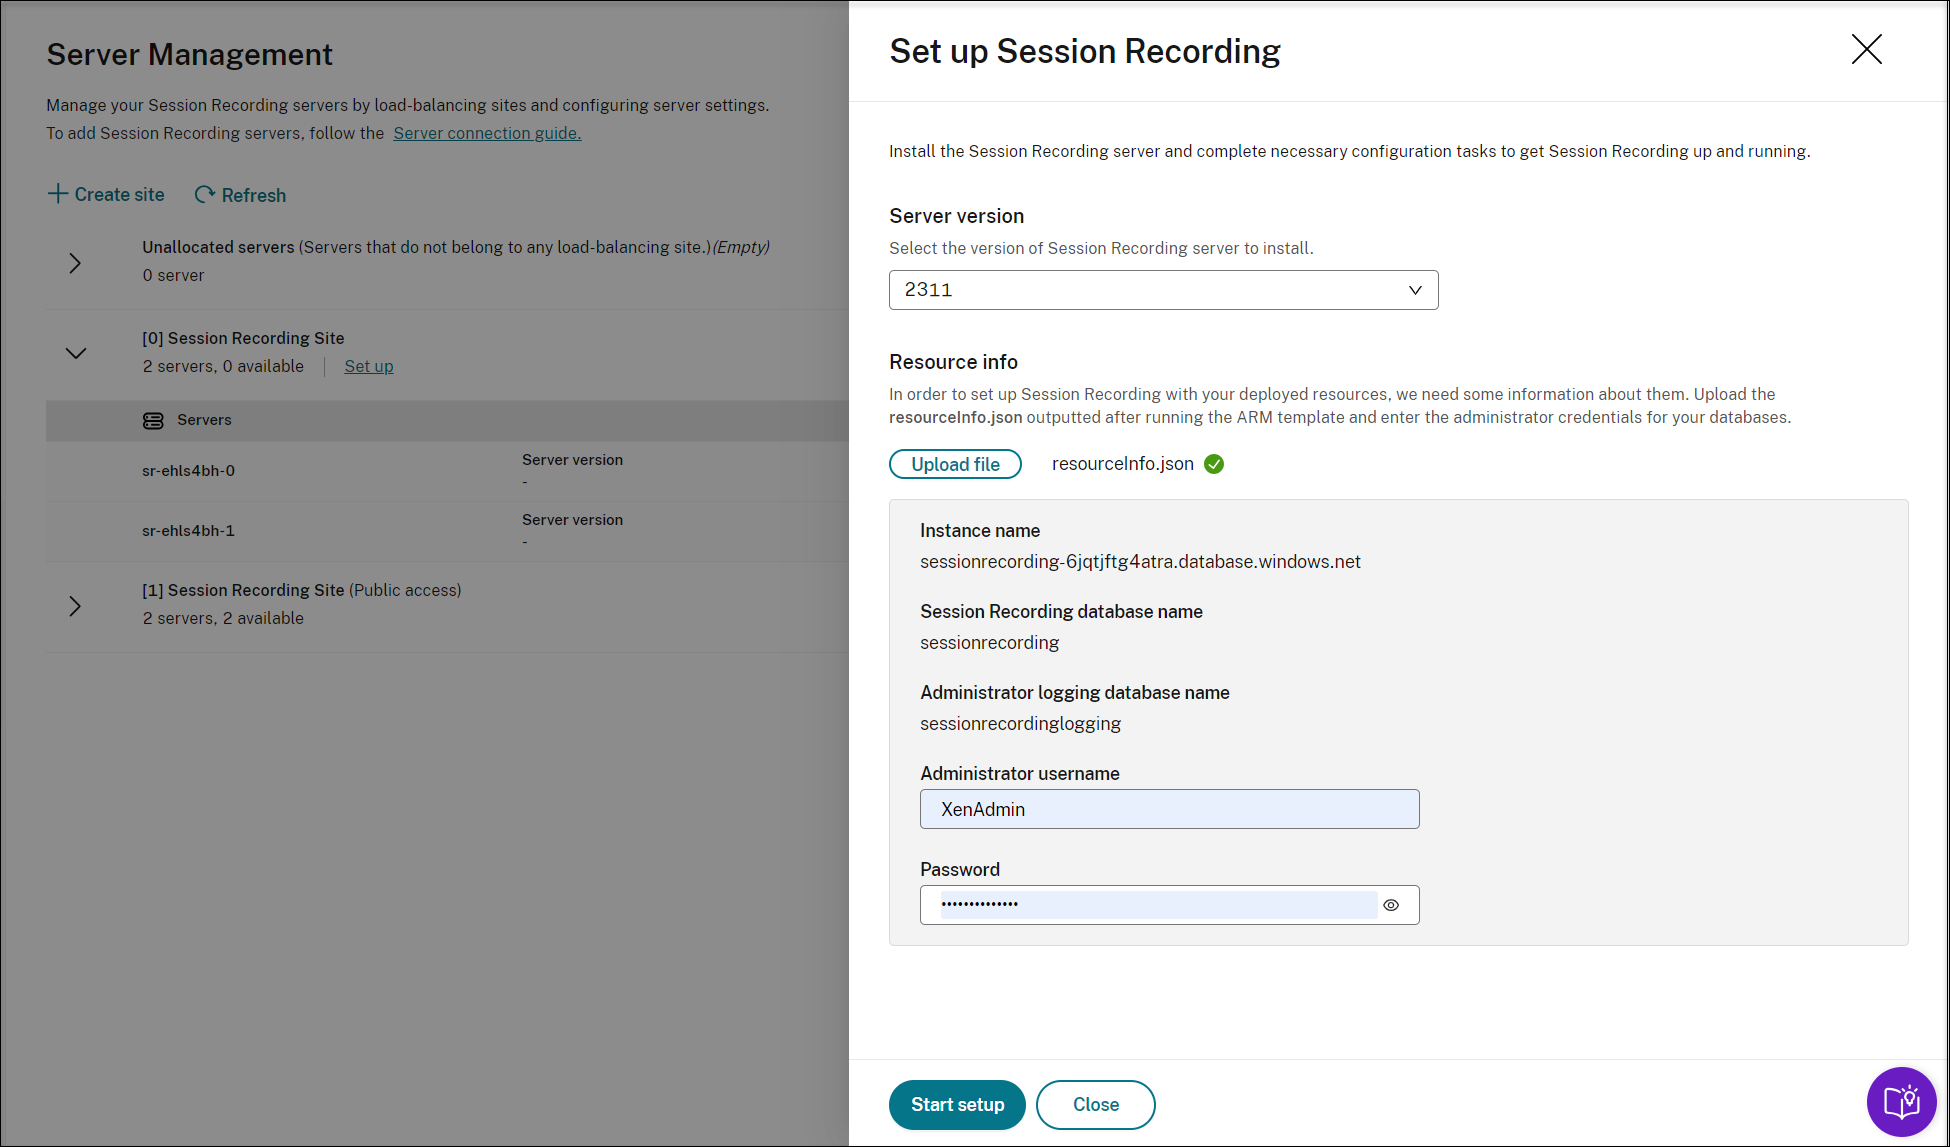
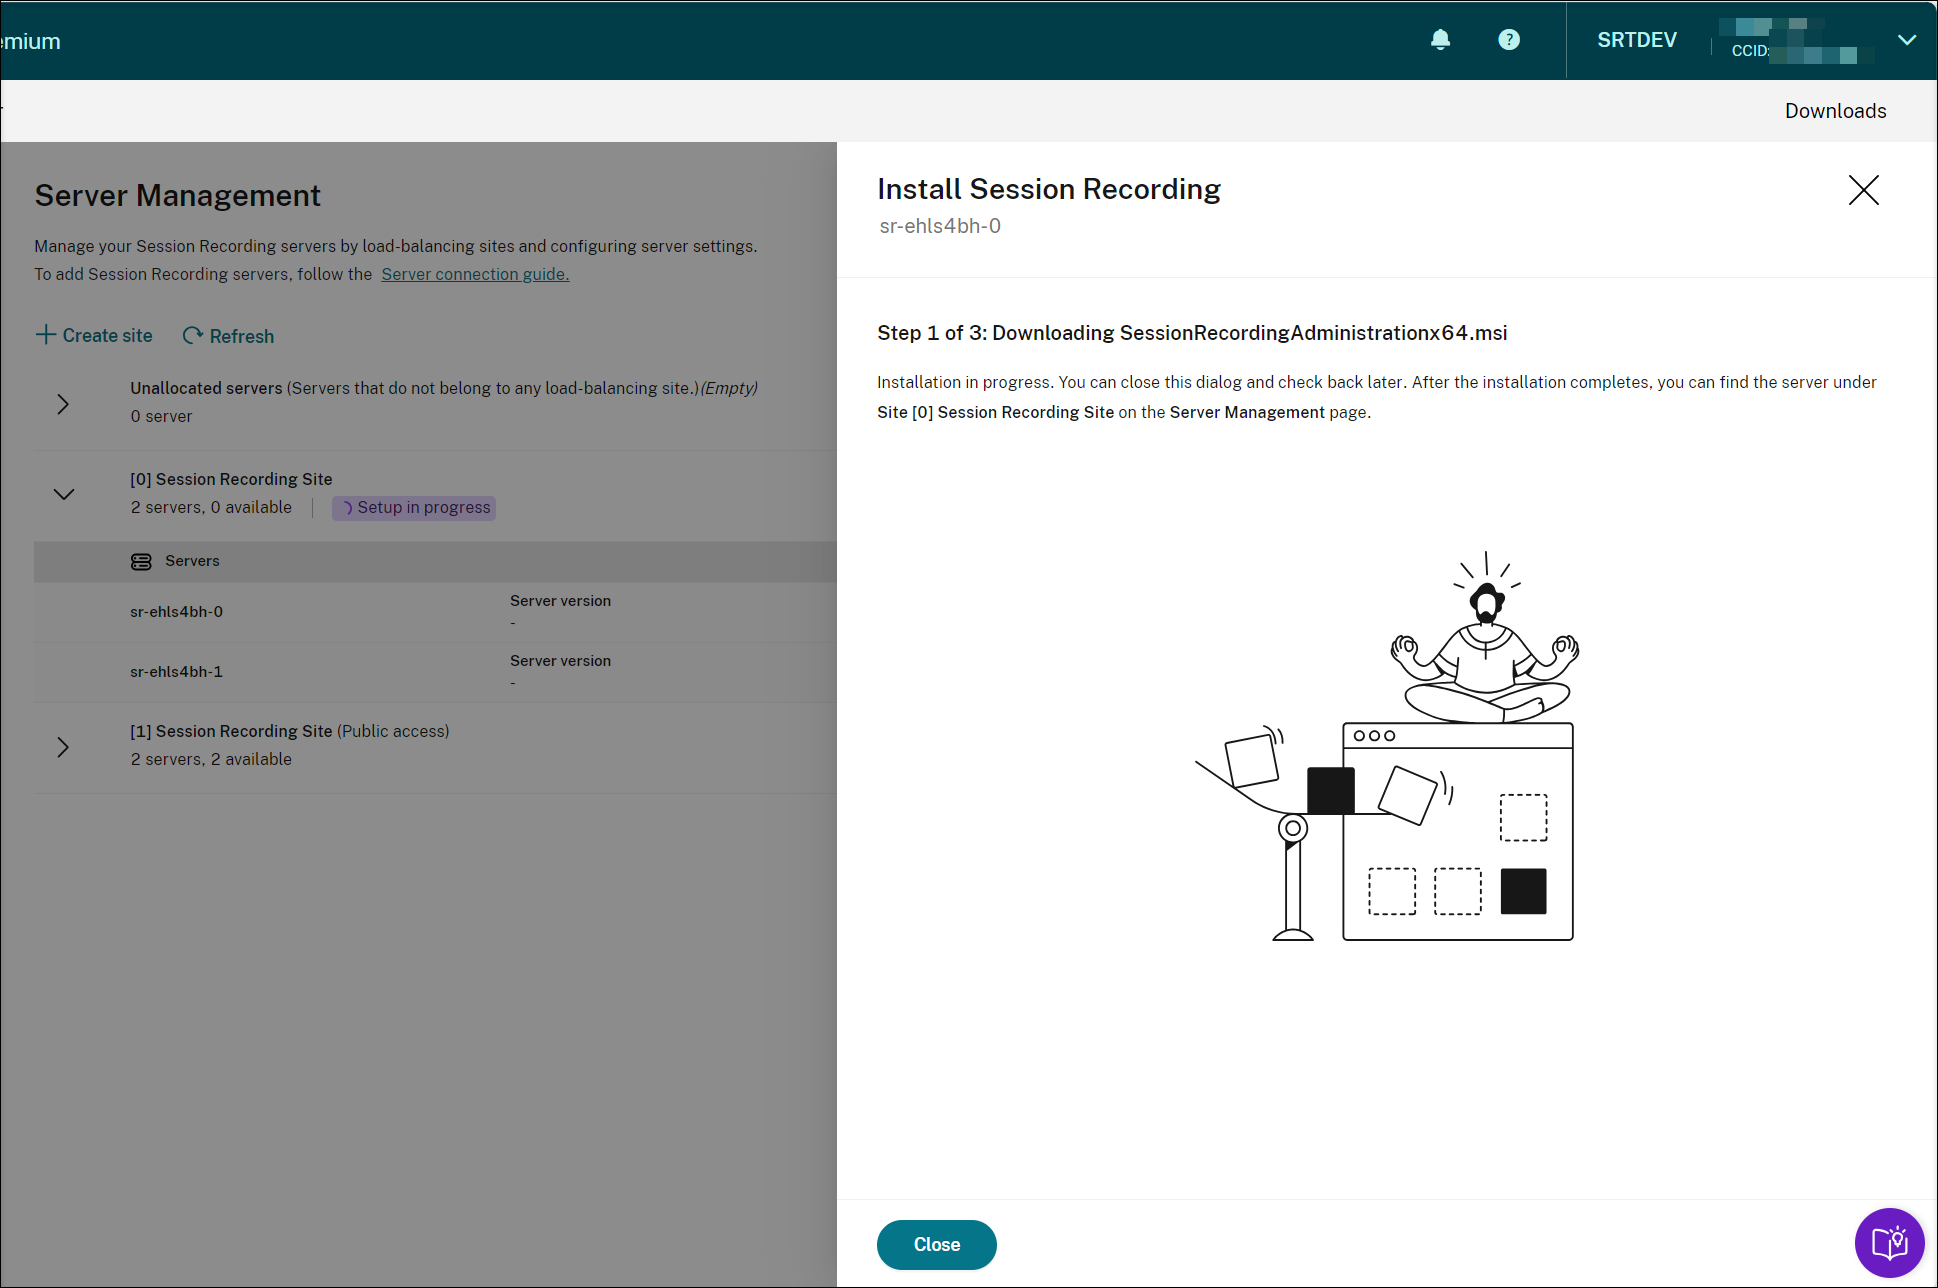
Click Start startup. You can then check the setup progress on the Server Management page.
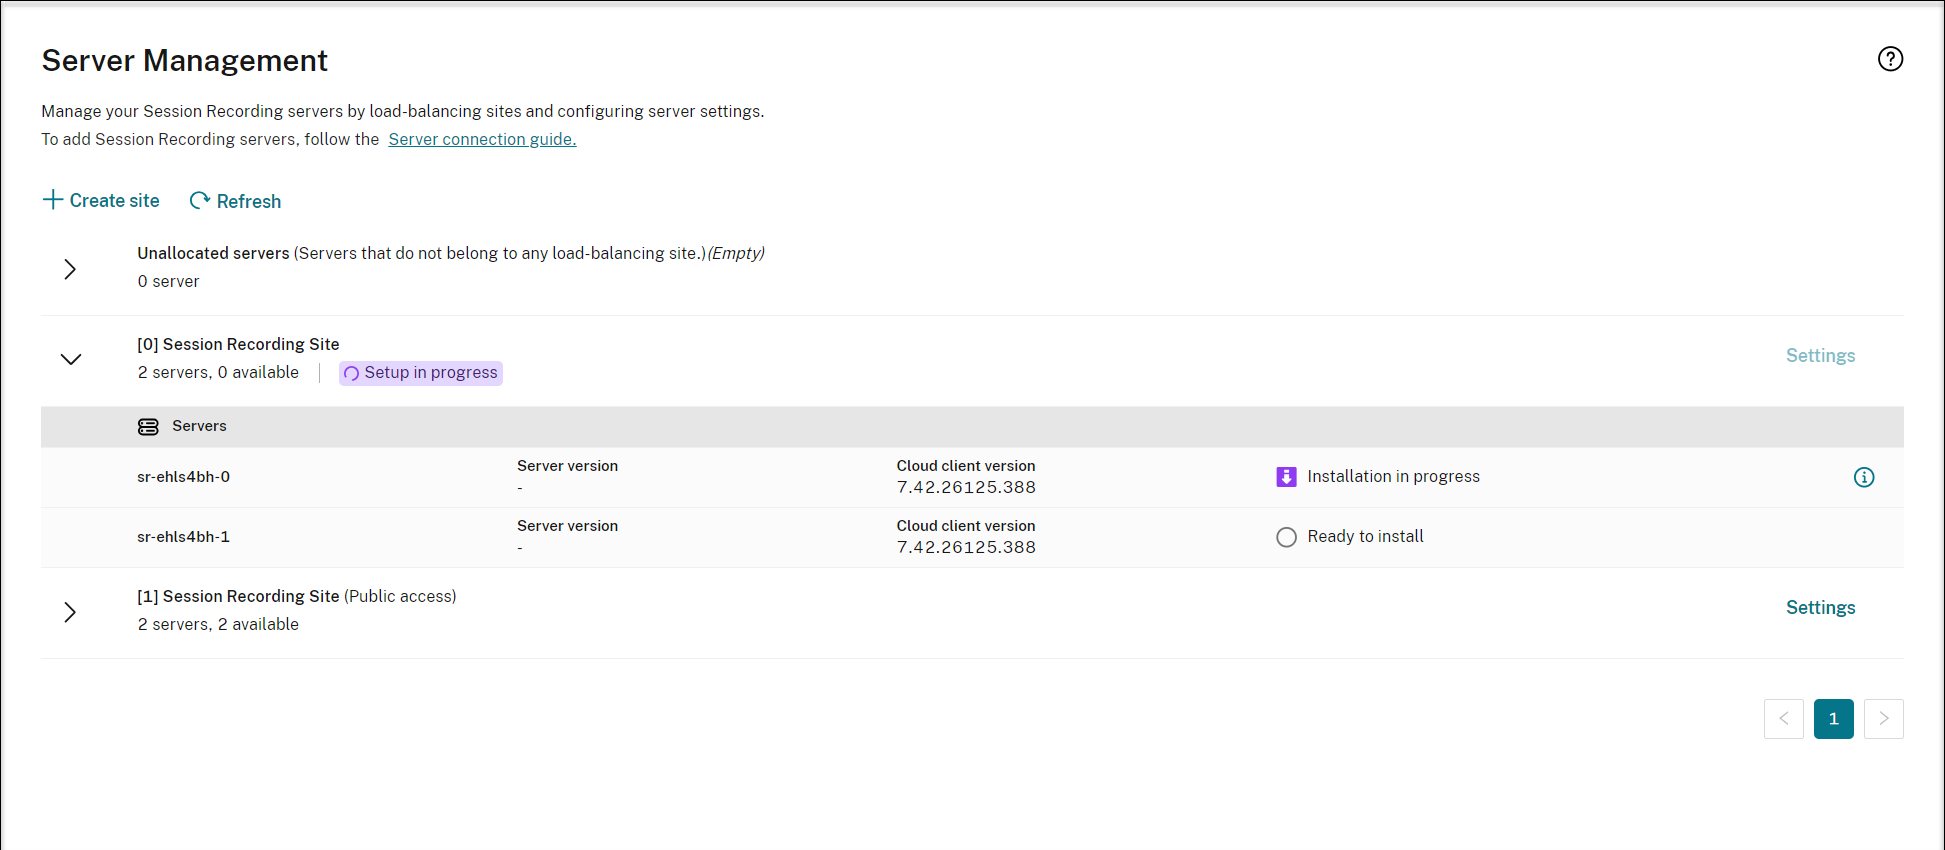
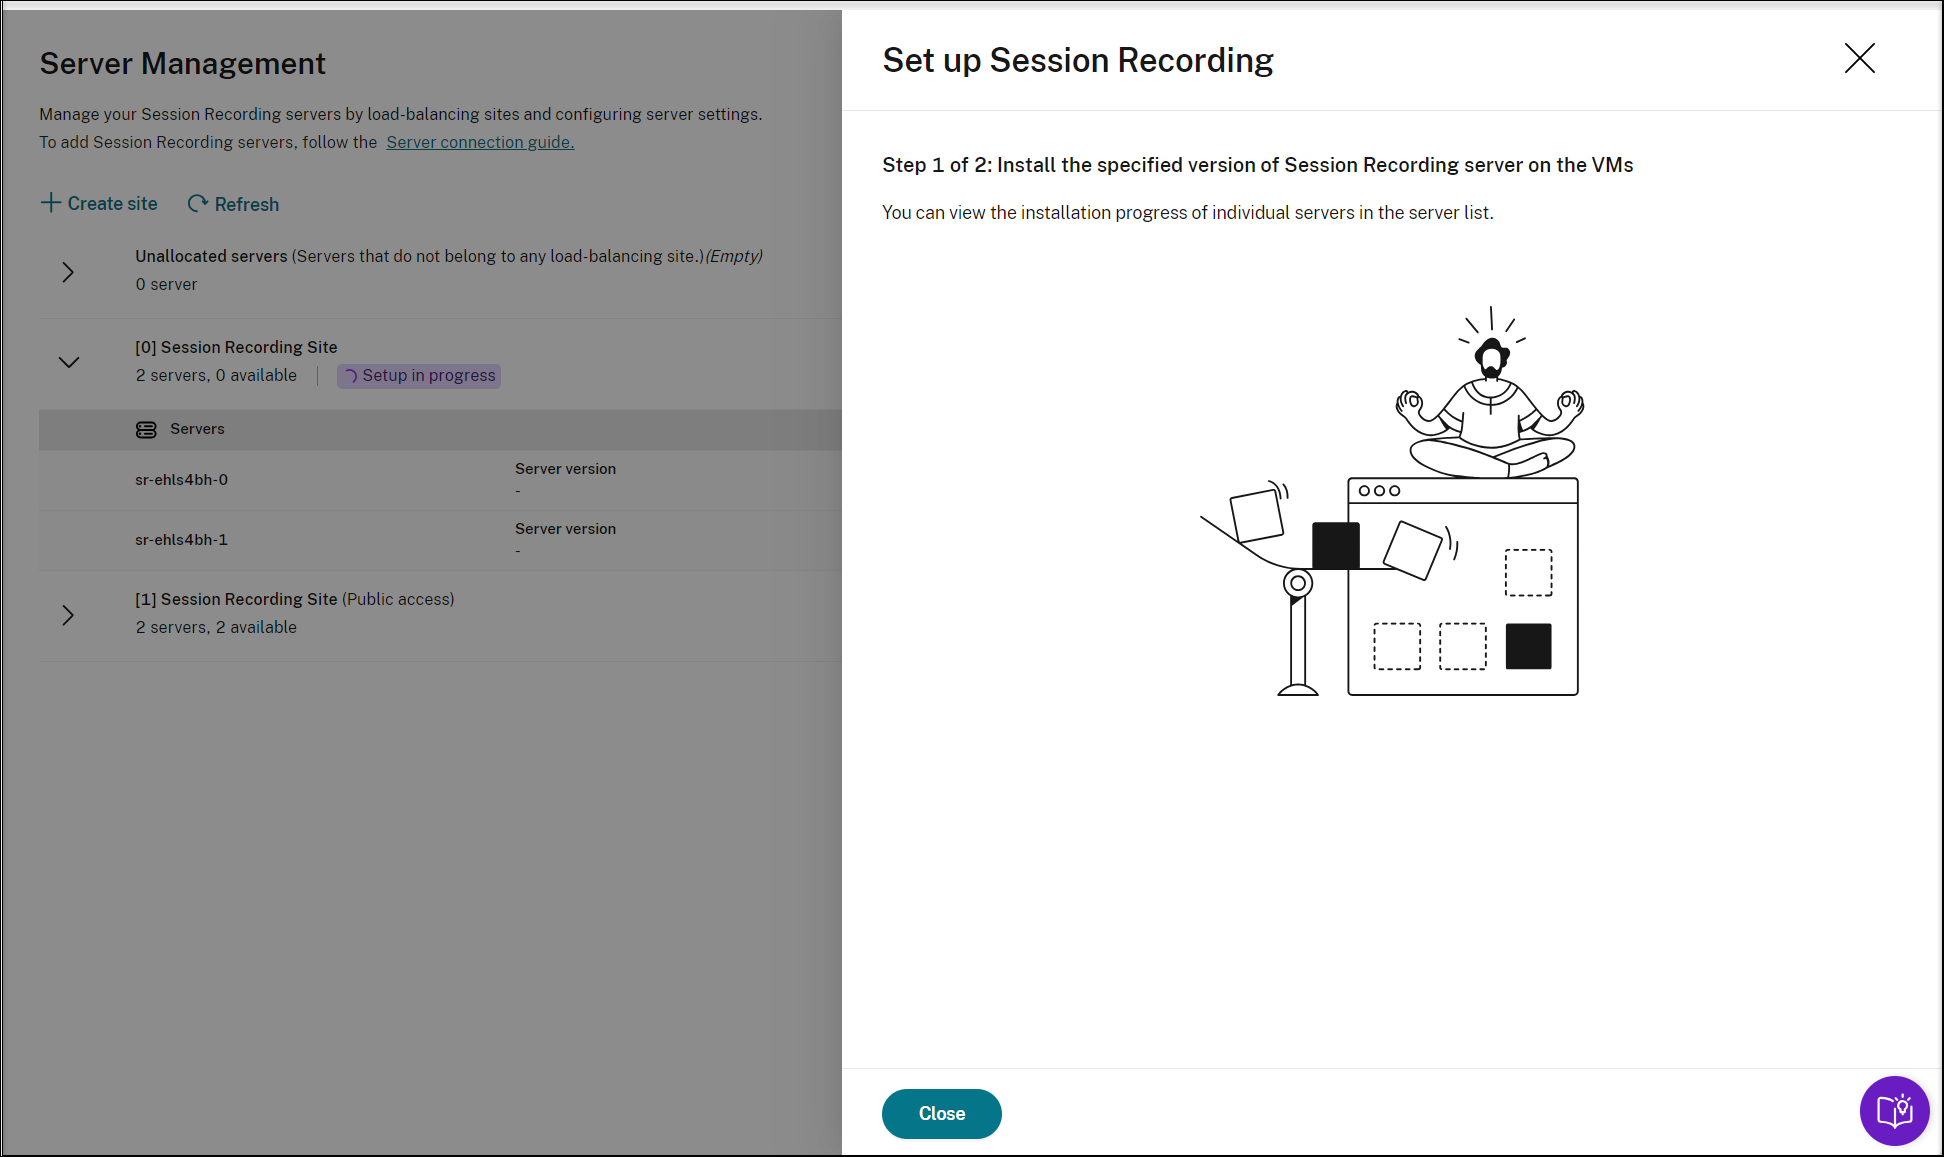
You can view the installation progress of individual servers in the server list.
When all the Session Recording servers show available in the list, your site creation is complete and the specified resources are deployed to Azure.