Load balancing with Citrix ADC
This article provides guidance on how to deploy a StoreFront server group containing two or more StoreFront servers in all active load balanced configuration. The article provides details of how to configure a Citrix ADC appliance to load-balance incoming requests from Citrix Workspace app and web browsers between StoreFront servers in the server group.
Create DNS records for the StoreFront server group load balancer
Create a DNS A and PTR record for your chosen shared FQDN. Clients within your network use this FQDN to access the StoreFront server group using the Citrix ADC appliance load balancer.
Example: storefront.example.com resolves to the load balancing virtual server virtual IP (VIP).
Configure StoreFront Servers
All of the StoreFront servers you wish to load balance between should be configured as part of a StoreFront Server Group which synchronized configuration between servers to ensure they are configured identically. For more details on adding servers to a Server Group see Join an existing server group.
Each server should be configured for HTTPS so that communication between the load balancer and the StoreFront servers is encrypted. See Securing StoreFront with HTTPS. The certificate must contain the load balanced FQDN as a Common Name (CN) or as a Subject Alternative Name (SAN).
Set the Server Group base URL to be the URL of the load balancer. To modify the Base URL, within the Citrix StoreFront management console, in the left hand pane right click Server Group and click Change Base URL. Enter the load balancer virtual server’s URL.
Optionally Configure Citrix Service monitor for HTTPS
A StoreFront installation includes the Citrix Service monitor Windows service. This service has no other service dependencies and monitors the health of critical StoreFront services. This allows the Citrix ADC and other third-party applications to monitor the relative health of a StoreFront server deployment.
By default the monitor uses HTTP on port 8000. You may optionally change this to use HTTPS on port 443.
-
Open the PowerShell Integrated Scripting Environment (ISE) on the primary StoreFront server and run the following commands to change the default monitor to HTTPS 443:
$ServiceUrl = "https://localhost:443/StorefrontMonitor" Set-STFServiceMonitor -ServiceUrl $ServiceUrl Get-STFServiceMonitor -
Once completed, propagate the changes to all other servers in the StoreFront server group.
-
To perform a quick test on the monitor, enter the following URL into the browser on the StoreFront server or any other machine with network access to the StoreFront server. The browser returns an XML summary of the status of every StoreFront service.
https://<loadbalancingFQDN>/StoreFrontMonitor/GetSFServicesStatus<ArrayOfServiceStatus xmlns="http://schemas.datacontract.org/2004/07/Citrix.DeliveryServices.ServiceMonitor.Contract" xmlns:i="http://www.w3.org/2001/XMLSchema-instance"> <ServiceStatus> <name>Citrix Peer Resolution Service</name> <status>running</status> </ServiceStatus> <ServiceStatus> <name>CitrixConfigurationReplication</name> <status>running</status> </ServiceStatus> <ServiceStatus> <name>CitrixCredentialWallet</name> <status>running</status> </ServiceStatus> <ServiceStatus> <name>CitrixDefaultDomainService</name> <status>running</status> </ServiceStatus> <ServiceStatus> <name>CitrixSubscriptionsStore</name> <status>running</status> </ServiceStatus> <ServiceStatus> <name>NetTcpPortSharing</name> <status>running</status> </ServiceStatus> <ServiceStatus> <name>WAS</name> <status>running</status> </ServiceStatus> <ServiceStatus> <name>W3SVC</name> <status>running</status> </ServiceStatus> </ArrayOfServiceStatus>
Configure Citrix ADC Load Balancer
Install Root certificate
If your StoreFront servers use a certificate signed by an internal authority then you must install the root certificate on to the NetScaler. This is required so that NetScaler trusts the StoreFront server’s certificate.
- Log on to the NetScaler ADC appliance management GUI.
- Select Traffic Management > SSL > Certificates > CA Certificates.
- Click Install.
- On the Install CA Certificate page, enter a Certificate-Key Pair Name, click Choose File and browse for the certificate file.
- Click Install.
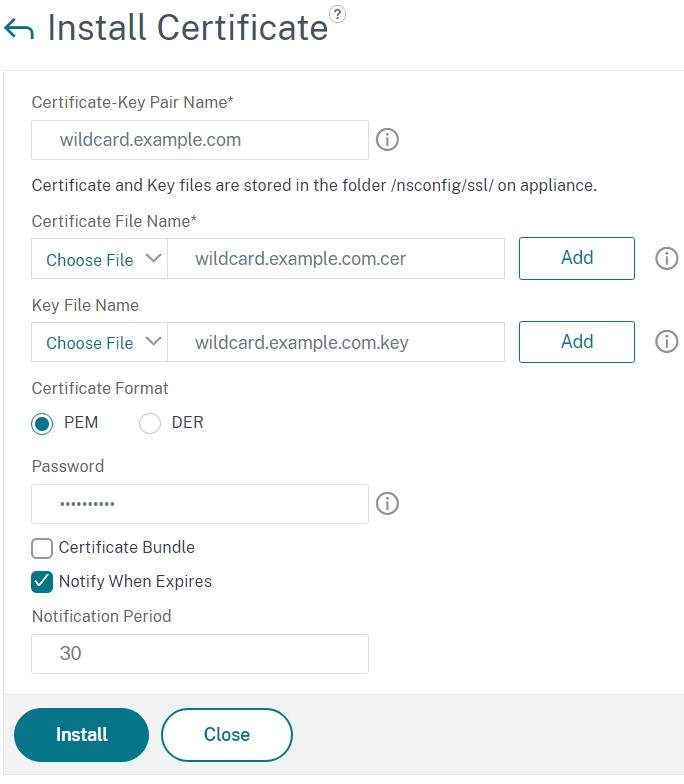
Install the server certificate
To enable HTTPS you need a certificate whose Subject alternate name includes the FQDN of the load balancer. You can sign the certificate with an enterprise or public certificate authority.
You must have separate certificate and key files in PEM format. If you have a certificate containing the private key in PKCS12 format then you can use openssl to convert the file. E.g.:
openssl pkcs12 -in cert.pfx -clcerts -nokeys -out cert.cer
openssl pkcs12 -in cert.pfx -nocerts -out storefrontlbeu.key
A prompt appears to enter the existing password and a new PEM passphrase.
To install the certificate:
- Log on to the NetScaler ADC appliance management GUI.
- Select Traffic Management > SSL > Certificates > CA Certificates.
- Click Install.
- On the Install CA Certificate page:
- Enter a Certificate-Key Pair Name.
- Under Certificate File Name, click Choose File and browse for the certificate file.
- Under Key File Name, click Choose File and browse for the key file.
- Under Password enter the passphrase.
- Click Install.
- Click Link to link the certificate to the root certificate.
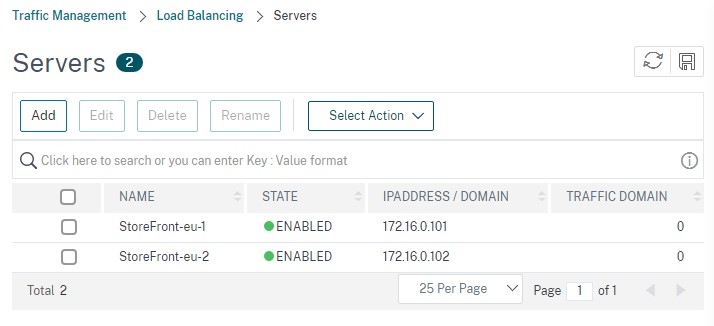
Add individual StoreFront server nodes to the Citrix ADC appliance load balancer
-
Navigate to Traffic Management > Load Balancing > Servers. Click Add and add each of the StoreFront servers to be load balanced.
Example = 2 x StoreFront servers named StoreFront-eu-1 and StoreFront-eu-2
-
Use IP-based server configuration and enter the server IP address for each StoreFront node.
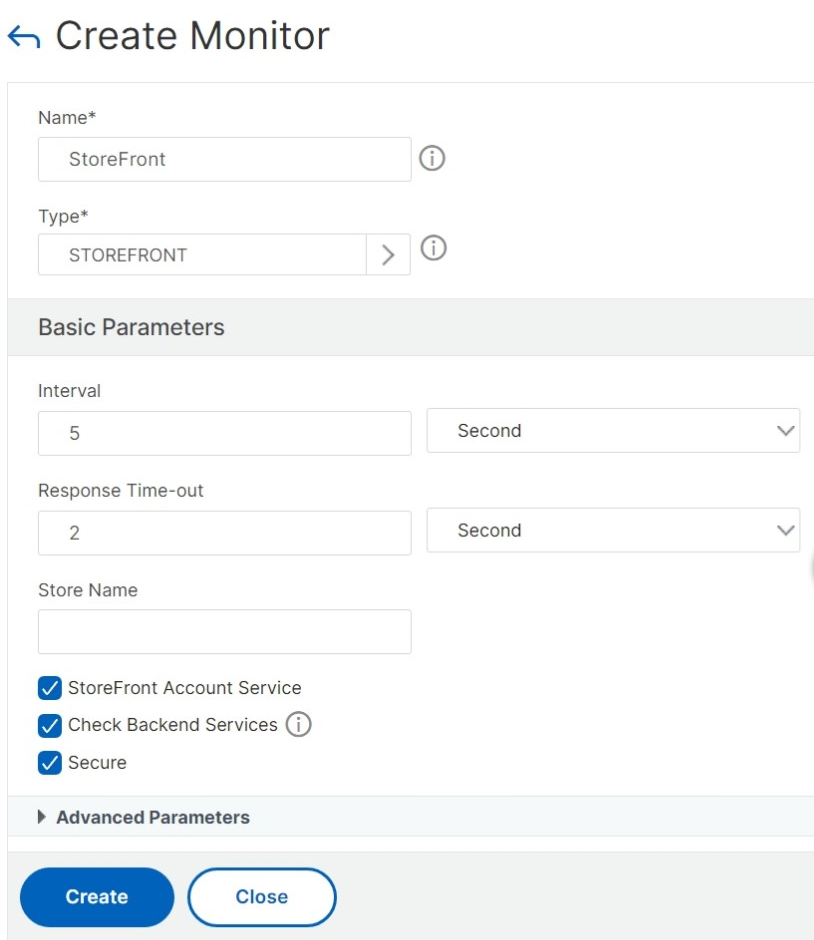
Define a StoreFront monitor to check the status of all StoreFront nodes in the server group
- Log on to the Citrix ADC management GUI.
- Select Traffic Management > Load Balancing > Monitors > Add and add a new monitor called StoreFront and accept all default settings.
- From the Type drop-down menu, select StoreFront.
- If you have configured your StoreFront monitor for HTTPS, then ensure that the Secure option is selected. Else leave this option unselected and enter a port of 8000.
- Select the Check Backend Services option. This option enables monitoring of services running on the StoreFront server. StoreFront services are monitored by probing a Windows service that runs on the StoreFront server, which returns the status of the following services:
- W3SVC (IIS)
- WAS (Windows Process Activation Service)
- CitrixCredentialWallet
- CitrixDefaultDomainService
Create a service group containing all of the StoreFront servers
-
Navigate to Traffic Management > Load Balancing > Service Groups. Press Add. To connect to the StoreFront servers over HTTPS, select a protocol of SSL. Leave other settings as default. Press OK.
-
Within your Service Group, under Service Group Members, click No Service Group Member.
- Click Service Based.
- Select all of the Servers you defined previously.
- To use SSL between the load balancer and the StoreFront server enter port 443. Else enter port 80.

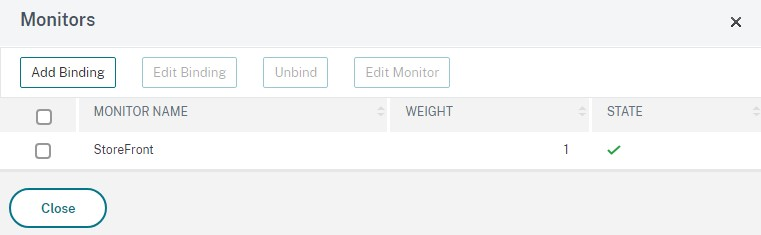
-
Add the Monitors section and select the StoreFront monitor you created earlier.
-
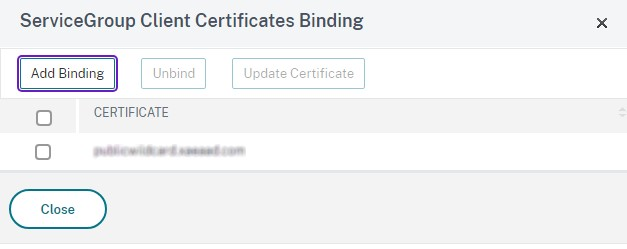
Add the Certificates section.
- Bind the client certificate.
- Bind the CA certificate used to sign the server certificate that you imported earlier, and any other CAs that might be part of the PKI chain of trust.
-
Add the Settings section. Select Insert Client IP Header and enter a header name of X-Forwarded-For. This allows the Client IP Address to be used in Citrix Virtual Apps and Desktops Policies.
Create a load balancing virtual server for user traffic
-
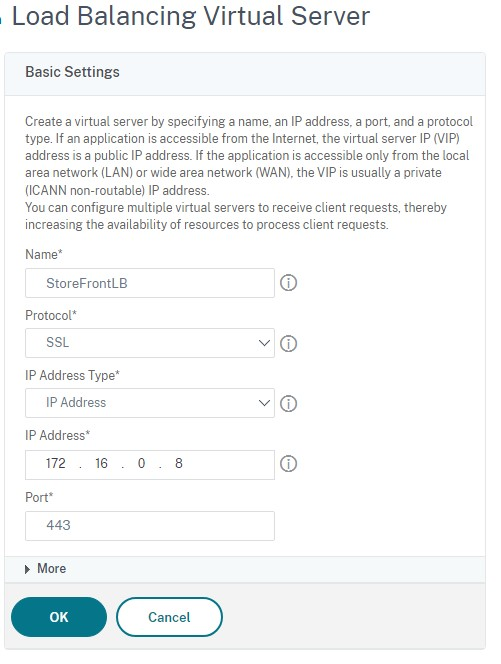
Log on to the Citrix ADC appliance management GUI.
-
Select Traffic Management > Load Balancing > Virtual Servers > Add to create a new virtual server.
-
Enter a name, choose a protocol of SSL and enter the Port. Click OK to create the Virtual Server.
-
Bind the Service Group you created earlier to the load balancing virtual server.
-
Bind the same server and CA certificate you previously bound to the service group.
-
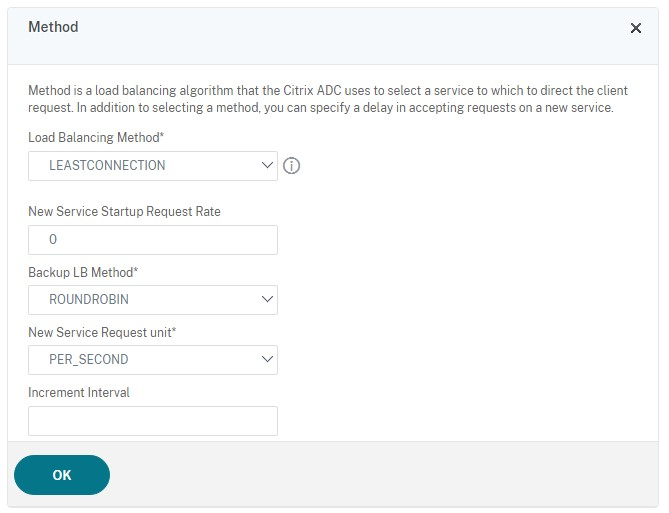
Add the Method section and select the load-balancing method. Common choices for StoreFront load balancing are round robin or least connection.
-
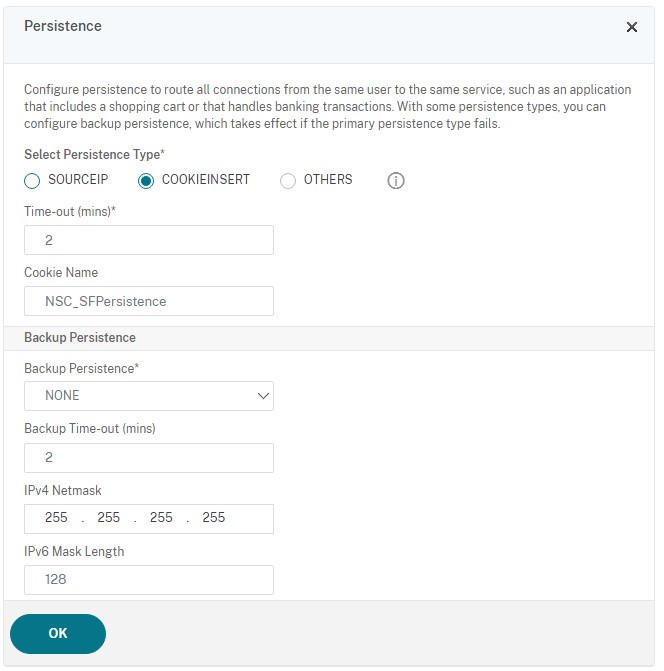
Add the Persistance section.
-
Set the persistence method to be COOKIEINSERT.
-
Set the time-out to be the same as the Session time out within StoreFront which by default is 20 minutes.
-
Name the cookie. For example, NSC_SFPersistence, as this makes it easy to identify during debugging.
-
Set backup persistence to NONE.
Note:
If the client is not allowed to store the HTTP cookie, the subsequent requests don’t have the HTTP cookie, and Persistence is not used.
-
Configure StoreFront Loopback
When the base address is a load balancer, for the internal communication between StoreFront services, it could cause traffic to route to the load balancer and potentially to another server. This results in poor performance and unexpected behaviour. Use the StoreFront setting Enable loopback communication to avoid it. By default this is set to On, meaning it replaces the host part of the service address with the loopback IP address 127.0.0.1, while keeping the schema (HTTP or HTTPS) as-is. This works for a single server deployment and deployments with a non SSL-terminating load balancer.
Where the load balancer is SSL-terminating and communicates with StoreFront over HTTP (not recommended), it’s necessary to configure StoreFront loopback communication to OnUsingHttp, which means that StoreFront will also change the schema from HTTPS to HTTP.
- Open Citrix StoreFront.
- For each Store, go to Manage Receiver for Web Sites. For each Web site go to Configure.
- Go to Advanced Settings
- Change the Enable loopback communication setting to OnUsingHttp.
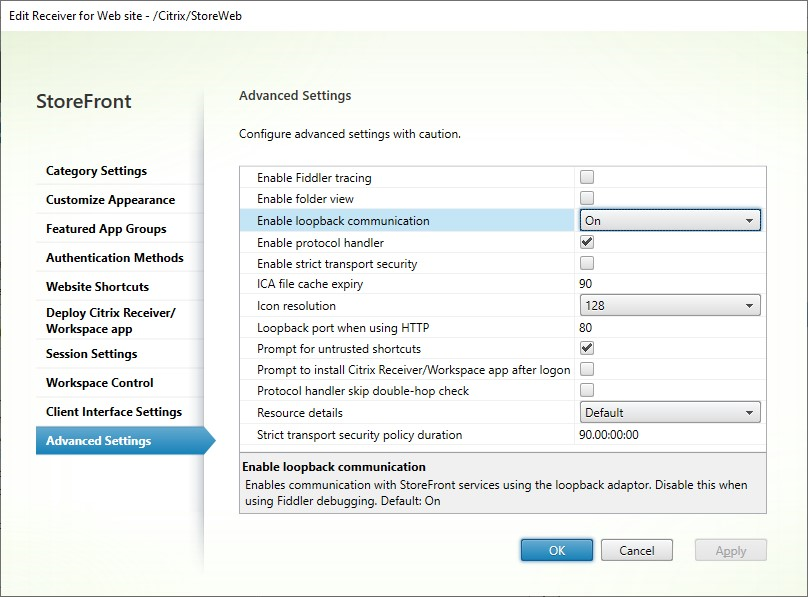
Where the load balancer is SSL-terminating and communicates with StoreFront over HTTP (not recommended), it is necessary to configure StoreFront loopback communication to OnUsingHttp, which means that StoreFront will also change the schema from HTTPS to HTTP.
Configure Citrix ADC load balancer for subscription synchronization between server groups
If you have a multisite deployment consisting of two or more StoreFront server groups, you can replicate subscription data between them using a pull strategy on a repeating schedule. StoreFront subscription replication uses TCP port 808, so using an existing load balancing virtual server on HTTP port 80 or HTTPS 443 fails. To provide high availability for this service, create a second virtual server on each Citrix ADC appliance in your deployment to load balance TCP port 808 for each of the StoreFront server groups.
Configure a service group for subscription synchronization
- Log on to the Citrix ADC appliance management GUI.
- Select Traffic Management > Load Balancing > Service Groups > Add.
- Enter a Service Group name, change the protocol to TCP and click OK to save.
- In the Service Group Members section, add all of the StoreFront server nodes you defined previously in the Servers section and specify Port to 808.
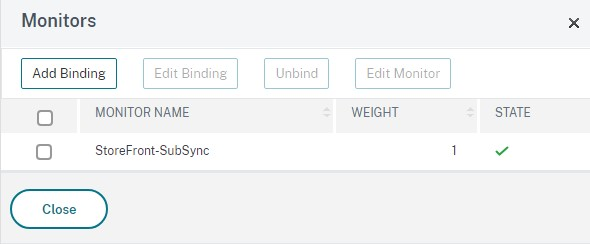
- Add the Monitors section.
- Click where it says No Service Group to monitor Binding.
- Click Add. Enter a monitor Name and set its Type to TCP. Click Create.
- Click Bind.
Create a load balancing virtual server for subscription synchronization
- Log on to the Citrix ADC appliance management GUI.
- Select Traffic Management> Load Balancing > Virtual Servers > Add and add a new service group.
- Enter a Name
- Change the protocol to TCP.
- Enter an IP Address.
-
Enter a Port of 808.
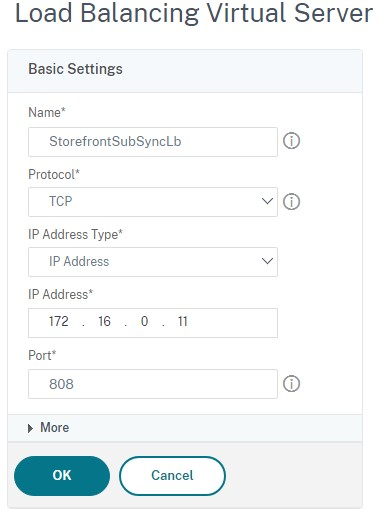
- Click OK.
- Click No Load Balancing Virtual Server ServiceGroup Binding, select the Service Group you created earlier and click Bind.
- Add the Method section and set the Load Balancing Method to ROUNDROBIN
- Click Done to complete your changes.
Configure StoreFront to pull subscription data via load balancer
See Configure subscription synchronization.
When configuring the replication schedule, specify a server group address that matches the subscription syncing virtual server virtual load balancer IP address.