Install agents
This article begins with a description of Workspace Environment Management™ (WEM) agents. The remainder of the article describes the steps in the agent installation wizard. Additional information related to agents is provided.
Introduction
Each machine that WEM manages must have a WEM agent installed on it. WEM agents connect to the WEM service and enforce settings you configure in the administration console. All communications are over HTTPS using the Citrix Cloud™ Messaging Service. All agents use local caching, ensuring that they can continue using existing settings if the network connection is interrupted.
WEM supports managing both domain-joined and non-domain-joined machines.
-
For domain-joined machines, make sure that agent host machines belong to the same Active Directory domain as the configured Cloud Connectors. Also, make sure that the agent host machines in each resource location are joined correctly.
-
The process of installing agents on machines that are non-domain-joined is similar to that of domain-joined machines. However, make sure that you satisfy all requirements and select the correct options throughout the process. For more information, see Manage non-domain-joined machines.
There are three methods to connect the agent to the WEM service:
- Cloud Connector
- Non-domain-joined
- Enrollment
For more information about the methods, see Determine which setup method to use.
Install the agent
Note:
To access resources published in Citrix Workspace as application shortcuts from the administration console, ensure that Citrix Workspace app for Windows is installed on the agent machine. For more information, see System requirements.
Use the following sequence to install your WEM agent.
Step 1: Download the agent
Download the WEM agent package (Citrix-Workspace-Environment-Management-Agent-Setup.zip) from the WEM service Utilities tab and save a copy on each agent host.
Step 2: Configure group policies (optional)
Important:
Skip this step if you choose to use the non-domain-joined or the enrollment method.
Optionally, you can choose to configure the group policies. The Agent Group Policies administrative template, provided in the WEM agent package, adds the Agent Host Configuration policy.
-
Copy the Agent Group Policies folder provided with the WEM installation package to your WEM domain controller.
-
Add the .admx files.
- Go to the Agent Group Policies > ADMX folder.
- Copy the two files (Citrix Workspace Environment Management Agent Host Configuration.admx and CitrixBase.admx).
- Go to the
<C:\Windows>\PolicyDefinitionsfolder and then paste the files.
-
Add the .adml files.
- Go to the Agent Group Policies > ADMX > en-US folder.
- Copy the two files (Citrix Workspace Environment Management Agent Host Configuration.adml and CitrixBase.adml).
- Go to the
<C:\Windows>\PolicyDefinitions\en-USfolder and then paste the files.
-
In the Group Policy Management Editor window, go to Computer Configuration > Policies > Administrative Templates > Citrix Components > Workspace Environment Management > Agent Host Configuration and configure the following settings:
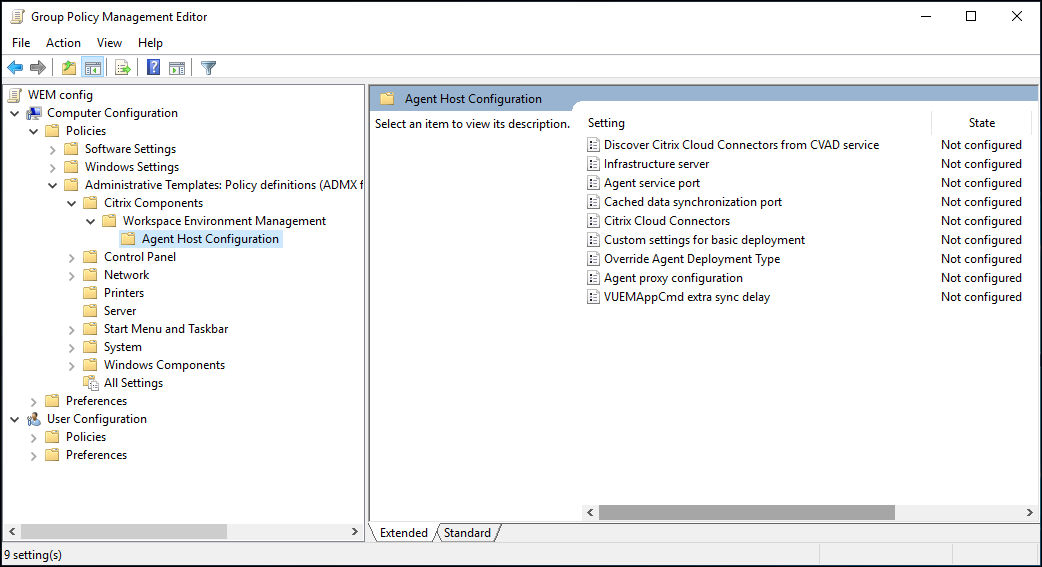 Custom settings for basic deployment. Customized agent settings used for deployment. For more information about available agent settings for basic deployment, see Manage Basic Deployment-agents.
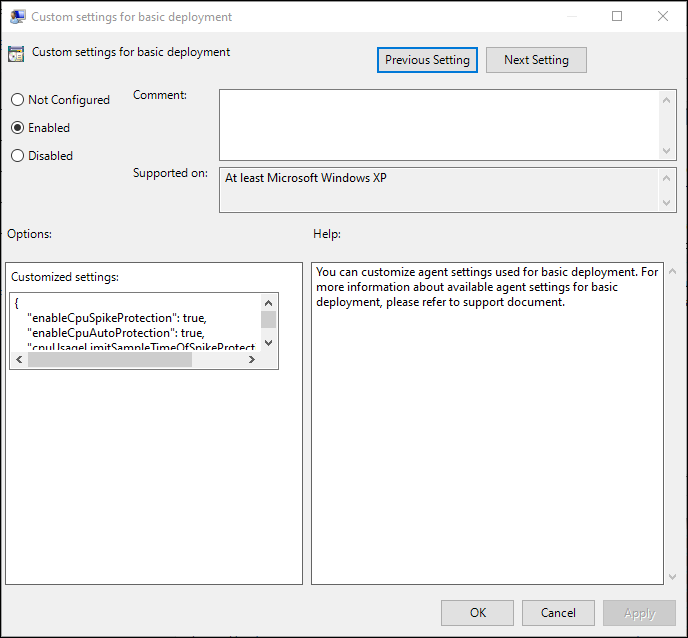
Override Agent Deployment Type. Overrides the WEM agent deployment type. Choose one of the following options:
-
Cloud service deployment: Connects the agent to the WEM service in Citrix Cloud, providing full WEM capabilities.
-
On-premises deployment: Connects the agent to an on-premises WEM deployment, providing full WEM capabilities.
-
Basic deployment: Runs the agent in a single-machine mode with limited functionality, without connecting to a WEM infrastructure.
-
Disabled: Disables all WEM functions on the machine where the agent is installed.
Agent proxy configuration. The WEM agent relies on internet connections to connect to the WEM service in Citrix Cloud. The communication between the agent and the service serves the following purposes:
- Uploading statistics and status to the WEM service
- Keeping the agent cache in sync with the WEM service database
- Retrieving the agent settings and the WEM settings specific to the agent’s configuration set
Optionally, you can choose to configure an HTTPS proxy to define how the agent communicates with the service. To do so, double-click the Agent proxy configuration policy and then type a proxy server address in this format: http://<FQDN or IP address>:<port number>. Example: http://10.108.125.51:8080.
Note:
WEM service does not support proxy servers that require authentication.
Agent service port. Not required for WEM service. Leave state “Not configured.”
Cached data synchronization port. Not required for WEM service. Leave state “Not configured.”
Citrix Cloud Connectors. Configure at least one Citrix Cloud Connector. Agent host machines must be in the same AD domain as the configured Cloud Connector machines.
Discover Citrix Cloud Connector from CVAD service. Lets you control whether the agent discovers Cloud Connector information from the relevant Citrix DaaS (formerly Citrix Virtual Apps and Desktops™ service) deployment if you have not yet configured Cloud Connectors for the agent. The agent then connects to the corresponding Cloud Connector machines.
Note:
- This setting is designed for scenarios where the WEM agent is running in a Citrix DaaS™ deployment.
- This policy setting does not work if Cloud Connectors are configured during agent installation or the Citrix Cloud Connectors policy setting is enabled.
Infrastructure server. Not required for WEM service. Leave state “Not configured.”
VUEMAppCmd extra sync delay. Specifies, in milliseconds, how long the agent application launcher (VUEMAppCmd.exe) waits before published resources are started. This ensures that the necessary agent work completes first. The recommended value is 100 through 200. The default value is 0.
Step 3: Install the agent
Important:
Although the .NET Framework can be automatically installed during agent installation, we recommend that you install it manually before you install the agent. Otherwise, you need to restart your machine to continue with the agent installation, and it might take a long time to complete.
The agent setup program Citrix Workspace™ Environment Management Agent is provided in the agent download. You can choose to install the agent interactively or using the command line. By default, the agent installs into one of the following folders, depending on your operating system (OS):
- C:\Program Files (x86)\Citrix\Workspace Environment Management Agent (on 64-bit OS)
- C:\Program Files\ Citrix\Workspace Environment Management Agent (on 32-bit OS)
To install the agent interactively, complete the following steps:
- Run Citrix Workspace Environment Management Agent.exe on your machine.
- Select “I agree to the license terms and conditions” and then click Install.
-
On the Welcome page, click Next.
Note:
The Welcome page can take some time to appear. This happens when the required software is missing and is being installed in the background.
-
On the Destination Folder page, click Next.
- By default, the destination folder field is automatically populated with the default folder path. If you want to install the agent to another folder, click Change to navigate to the folder and then click Next.
- If the WEM agent is already installed, the destination folder field is automatically populated with the existing installation folder path.
-
On the Deployment Type page, select the applicable type of deployment and then click Next. In this case, select Cloud Service Deployment.
-
You can also select the Basic Deployment type. When you select the Basic Deployment type, the agent turns on the default optimization settings without connecting to the infrastructure service. Basic deployment type is the default deployment type for a fresh install.
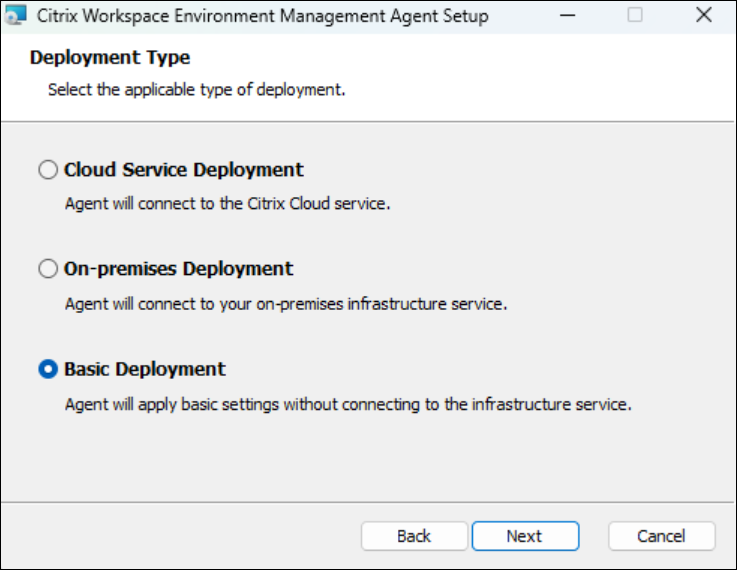
-
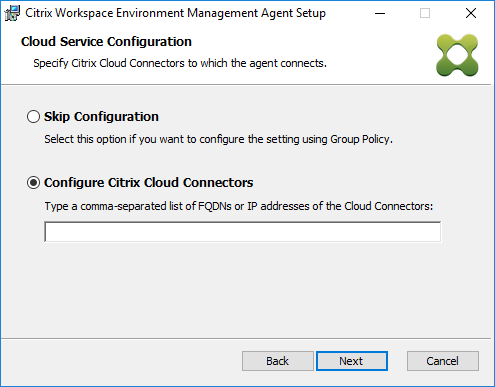
On the Cloud Service Configuration page, specify the Citrix Cloud Connectors to which the agent connects and then click Next.
-
Skip Configuration. Select this option if:
- You have already configured the setting using Group Policy.
- The agent machine is a non-domain-joined machine. See Manage non-domain-joined machines.
- You want to enroll the agent without configuring Cloud Connectors. See Enroll the agent.
-
Configure Citrix Cloud Connectors. Configure the Citrix Cloud Connectors to which the agent connects by typing a comma-separated list of FQDNs or IP addresses of the Cloud Connectors.
Note:
- Type the FQDN or IP address of each Citrix Cloud Connector. Make sure to separate the FQDNs or IP addresses with commas (,).
- In scenarios where multiple Cloud Connectors are configured, the WEM agent randomly selects from the list a Cloud Connector that is reachable. This design intends to distribute traffic across all Cloud Connectors.
-
-
On the Advanced Settings page, configure advanced settings for the agent and then click Next.
-
Alternative Cache Location (Optional). Lets you specify an alternative location for the agent cache. Click Browse to navigate to the applicable folder. Alternatively, you can do that through the registry. To do that, first stop the Citrix WEM Agent Host Service and then modify the following registry key.
HKEY_LOCAL_MACHINE\SYSTEM\CurrentControlSet\Control\Norskale\Agent Host
Name: AgentCacheAlternateLocation
Type: REG_SZ
Value: Empty
By default, the value is empty. The default folder is:
<WEM agent installation folder path>\Local Databases Set. Specify a different folder path if necessary. For the changes to take effect, restart the Citrix WEM Agent Host Service. If the change takes effect, the following files appear in the folder: LocalAgentCache.db and LocalAgentDatabase.db.Caution:
Editing the registry incorrectly can cause serious problems that might require you to reinstall your operating system. Citrix cannot guarantee that problems resulting from the incorrect use of Registry Editor can be solved. Use Registry Editor at your own risk. Be sure to back up the registry before you edit it.
-
VUEMAppCmd Extra Sync Delay (Optional). Lets you specify how long the agent application launcher (VUEMAppCmd.exe) waits before published resources are started. This ensures that the necessary agent work completes first. The default value is 0.
Note:
The value you type for the extra sync delay interval must be an integer greater than or equal to zero.

-
- On the Ready to install page, click Install.
- Click Finish to exit the install wizard.
Alternatively, you can choose a silent installation of the WEM agent using the command line. To do so, use the following command line:
Citrix Workspace Environment Management Agent.exe /quiet Cloud=1
Tip:
- For agents running in a WEM service deployment, enter
Cloud=1. For agents running in an on-premises WEM deployment, enterCloud=0.- You might want to consult the log files to troubleshoot the agent installation. By default, log files recording all actions that occur during installation are created in %TEMP%. You can use the
/log log.txtcommand to designate a specific location for the log files to be saved.
You can also use command-line options to specify custom arguments. Doing so lets you customize agent and system settings during the installation process. For more information, see Good to know.
After installation, the agent runs as the following services: Citrix WEM Agent Host Service and Citrix WEM Agent User Logon Service. The agent runs as LocalSystem. Changing this account is not supported. The agent services require the “log on as a local system” permission.
Step 4: Restart the machine to complete the installations
Uninstall the agent
- On a machine where the agent is installed, open the system’s Control Panel.
- Click Programs and Features.
- Select Citrix Workspace Environment Management Agent and then click Uninstall in the menu.
If you install the agent as an additional component when installing the VDA, use the WEM installer (MSI) available with the VDA installer to uninstall the agent. The WEM installer citrix_wem_agent_core.msi is present in <VDA installer path>\x64\Virtual Desktop Components. To uninstall the agent that was installed as an additional component with the VDA, complete the following steps:
- In the folder, right-click
citrix_wem_agent_core.msi. - Select Uninstall.
Note:
After uninstalling the agent, you can use the VDA installer or the WEM installer to install it. Starting with Citrix Virtual Apps and Desktops 2209, the WEM agent is no longer included as an additional component in the VDA installation. To install it, use the full-product installer on the Citrix Virtual Apps and Desktops product ISO. For more information, see Install core components.
Where to go next
If you want to migrate your existing on-premises WEM database into the WEM service, see Migrate to cloud.
To directly get started with the WEM service, start the administration console and configure settings there as needed. There are two consoles available:
We are in the process of migrating features from the legacy console to the web console. The web console responds faster than the legacy console and provides more functionalities. To see the features available only in the web console, see What’s new.
Prerequisites and recommendations
To ensure that the WEM agent works properly, be aware of the following prerequisites and recommendations:
Prerequisites
Verify that the following requirements are met:
-
The Windows service System Event Notification Service is configured to start automatically on startup.
-
The WEM agent services Citrix WEM Agent Host Service and Citrix WEM User Logon Service are configured to start automatically on startup.
-
The agent cache resides in a persistent location whenever possible. Using a non-persistent cache location can cause potential cache sync issues, excessive network data usage, performance issues, and so on.
-
If you are using Citrix Virtual Apps and Desktops, the WEM agent can automatically detect the persistent system location, eliminating the need for manual configuration.
Recommendations
Follow the recommendations in this section for a successful agent deployment:
-
Do not manually operate Citrix WEM Agent Host Service, for example, using logon or startup scripts. Operations such as stopping or restarting Citrix WEM Agent Host Service can stop the Net Logon service from working, causing issues with other applications.
-
Do not use logon scripts to launch UI-mode or CMD-mode agents. Otherwise, some functionalities might fail to work.
Agent startup behaviors
-
Citrix WEM Agent Host Service automatically reloads Cloud Connector settings configured through Group Policy after the service starts.
-
Citrix WEM Agent User Logon Service automatically starts Citrix WEM Agent Host Service if the agent host service does not start during the first logon. This behavior ensures that user configuration is processed properly.
-
Citrix WEM Agent Host Service automatically performs checks on the following local database files on startup:
LocalAgentCache.dbandLocalAgentDatabase.db. If the virtual machine is provisioned and the local database files are from the base image, the database files are automatically purged. -
When Citrix WEM Agent Host Service starts, it automatically verifies that the agent local cache has been recently updated. If the cache has not been updated for more than two configured cache synchronization time intervals, the cache is synchronized immediately. For example, suppose the default agent cache sync interval is 30 minutes. If the cache was not updated in the past 60 minutes, it is synchronized immediately after Citrix WEM Agent Host Service starts.
-
During installation, the WEM agent installer configures the Windows service System Event Notification Service to start automatically.
-
The WEM agent installer automatically starts the Net Logon service after the WEM agent upgrade completes.
Agent cache utility options
Citrix WEM Agent Host Service handles setting refresh and cache sync automatically. Use the agent cache utility only in scenarios where there is a need to immediately refresh the settings and synchronize the cache.
Use the command line to run AgentCacheUtility.exe in the agent installation folder. The executable accepts the following command-line arguments:
-
-help: Displays a list of allowed arguments. -
-RefreshCacheor-r: Triggers a cache build or refresh is currently obsolete and is available only for agent versions before 2401.1.0.1. -
-RefreshSettingsor-S: Refreshes agent host settings including the agent cache for agent versions 2401.1.0.1 or higher. -
-Reinitializeor-I: Reinitializes the agent cache on the agent, where the agent requests an immediate agent cache sync to get the latest settings from the WEM database directly without any delay.
See the following examples for details about how to use the command line:
- Refresh agent host settings:
AgentCacheUtility.exe -RefreshSettings
- Refresh agent host settings and agent cache simultaneously:
AgentCacheUtility.exe -RefreshSettings -RefreshCache
- Reinitialize the agent cache:
AgentCacheUtility.exe -RefreshCache -Reinitialize
Good to know
The agent executable accepts custom arguments as described below.
Agent settings
See below for the WEM agent settings.
-
AgentLocation. Lets you specify the agent installation location. Specify a valid folder path.
-
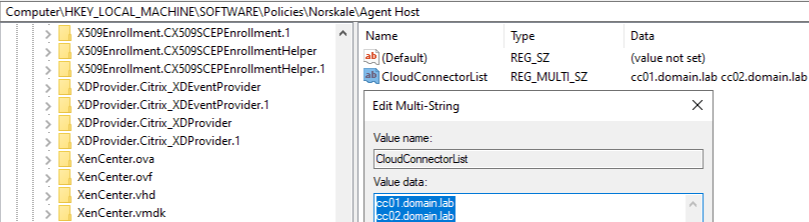
CloudConnectorList. Lets you specify the FQDN or IP address of each Citrix Cloud Connector. Make sure to separate FQDNs or IP addresses with commas (,).
-
VUEMAppCmdDelay. Lets you specify how long the agent application launcher (VUEMAppCmd.exe) waits before Citrix Virtual Apps and Desktops published resources are started. The default value is 0 (milliseconds). The value you type for the extra sync delay interval must be an integer greater than or equal to zero.
-
AgentCacheLocation. Lets you specify an alternative location for the agent cache. If configured, the agent local cache file is saved in the designated location instead of in the agent installation folder.
Consider the following:
-
If the settings are configured through the command line, the WEM agent installer uses the configured settings.
-
If the settings are not configured through the command line and there are previously configured settings, the installer uses the settings that were previously configured.
-
If the settings are not configured through the command line and there are no previously configured settings, the installer uses the default settings.
System settings
See below for the system settings associated with the agent host machine.
-
GpNetworkStartTimeoutPolicyValue. Lets you configure the value, in seconds, of the GpNetworkStartTimeoutPolicyValue registry key created during installation. This argument specifies how long Group Policy waits for network availability notifications during policy processing on logon. The argument accepts any whole number in the range of 1 (minimum) to 600 (maximum). By default, this value is 120.
-
SyncForegroundPolicy. Lets you configure the SyncForegroundPolicy registry value during agent installation. This policy setting determines whether Group Policy processing is synchronous. Accepted values: 0, 1. If the value is not set or you set the value to 0, Citrix WEM Agent User Logon Service does not delay logons, and user Group Policy settings are processed in the background. If you set the value to 1, Citrix WEM Agent User Logon Service delays logons until the processing of user Group Policy settings completes. By default, the value does not change during installation.
Important:
If Group Policy settings are processed in the background, Windows Shell (Windows Explorer) might start before all policy settings are processed. Therefore, some settings might not take effect the first time a user logs on. If you want all policy settings to be processed the first time a user logs on, set the value to 1.
-
WaitForNetwork. Lets you configure the value, in seconds, of the WaitForNetwork registry key created during installation. This argument specifies how long the agent host waits for the network to be completely initialized and available. The argument accepts any whole number in the range of 0 (minimum) to 300 (maximum). By default, this value is 30.
All the preceding three keys are created under HKEY_LOCAL_MACHINE\SOFTWARE\Microsoft\Windows NT\CurrentVersion\Winlogon during installation. The keys serve to ensure that the user environment receives the infrastructure server address GPOs before logon. In network environments where the Active Directory or Domain Controller servers are slow to respond, this might result in extra processing time before the logon screen appears. Citrix recommends that you set the value of the GpNetworkStartTimeoutPolicyValue key to a minimum of 30 for it to have an impact.
-
ServicesPipeTimeout. Lets you configure the value of the ServicesPipeTimeout registry key. The key is created during installation under HKEY_LOCAL_MACHINE\SYSTEM\CurrentControlSet\Control. This registry key adds a delay before the service control manager is allowed to report on the state of the WEM agent service. The delay prevents the agent from failing by keeping the agent service from launching before the network is initialized. This argument accepts any value, in milliseconds. If not specified, a default value of 60000 (60 seconds) is used.
Note:
If the preceding settings are not configured using the command line, they are not processed by the WEM agent installer during installation.
Examples
You can also configure the settings using the following command-line format:
"Citrix Workspace Environment Management Agent.exe" <key=value>
For example:
- Specify the agent installation location and Citrix Cloud Connectors
"Citrix Workspace Environment Management Agent.exe" /quiet AgentLocation="L:\WEM Agent" Cloud=1 CloudConnectorList=cc1.qa.local,cc2.qa.local
- Set user logon network wait time to 60 seconds
"Citrix Workspace Environment Management Agent.exe" WaitForNetwork=60