Advanced settings
Use these settings to control how and when the Workspace Environment Management™ (WEM) agent processes actions.
Agent settings
This page lets you configure the WEM agent behavior.
Agent options
Configure settings for the agent.
Agent launch behavior:
- Launch agent on logon. Controls whether the agent runs on logon.
- Launch agent on reconnection. Controls whether the agent runs when a user reconnects to a machine where the agent is running.
- Launch agent for administrators. Controls whether the agent runs when a user is an administrator.
- Enable desktop compatibility mode. Ensures that the agent is compatible with desktops on which it is running. This setting is necessary for the agent to launch when the user logs on to a session.
- Run only CMD agent in published applications. If enabled, the agent launches in CMD mode rather than in UI mode in published applications. CMD mode displays a command prompt instead of an agent splash screen. For more information about CMD and UI mode, see Agent in CMD and UI mode.
Agent launch exclusions:
- Do not launch agent for specified groups. If enabled, the Citrix WEM Agent Host is not launched for any user belonging to the specified user groups.
- Launch agent only for specified groups. If enabled, the Citrix WEM Agent Host is launched only for users belonging to the specified user groups.
Agent logs:
- Enable agent logging. If enabled, the agent outputs the agent log file.
- Debug mode. Controls whether to enable verbose logging for the agent.
Refresh:
- Refresh environment settings. If enabled, the agent triggers a refresh of user environment settings when an agent refresh occurs. For information about environment settings, see Environment Settings.
- Refresh system settings. If enabled, the agent triggers a refresh of Windows system settings (for example, Windows Explorer and Control Panel) when an agent refresh occurs.
- Refresh when environment settings change. If enabled, the agent triggers a Windows refresh on endpoints when any environment setting changes.
- Refresh desktop. If enabled, the agent triggers a refresh of desktop settings when an agent refresh occurs. For information about desktop settings, see Desktop.
- Refresh appearance. If enabled, the agent triggers a refresh of Windows theme and desktop wallpaper when an agent refresh occurs.
Automatic refresh (UI agent only):
- Enable automatic refresh. If enabled, the Citrix WEM Agent Host refreshes automatically. By default, the refresh delay is 30 minutes.
Offline mode:
- Enable offline mode. If disabled, the agent does not fall back on its cache when it fails to connect to the WEM service.
- Use cache even when online. If enabled, the agent always reads its settings and actions from its cache (which is built whenever the agent service cycles).
-
Use cache to accelerate actions processing. If enabled, the agent processes actions by retrieving relevant settings from the agent local cache instead of from the infrastructure services. Doing so speeds up the processing of actions. By default, this option is enabled. Disable this option if you want to revert to the previous behavior.
Important:
- The agent local cache is synchronized with the WEM service on a periodic basis. Therefore, changes to action settings take some time to take effect, depending on the value that you specified for the Agent cache refresh delay option (in the Advanced Settings > Agent Settings > Agent service options tile).
- To reduce delays, specify a lower value. For the changes to take effect immediately, navigate to Monitoring > Administration > Agents > Statistics , select the target agent, and then select Agent > Refresh cache in More.
- We recommend that you do not disable this setting. Otherwise, users might have a degraded user experience in scenarios with poor network connectivity. If disabled, actions you configured through the administration console might fail to be applied on the agent hosts in scenarios where there is a high volume of traffic to the WEM service.
Agent service options
Configure settings for the agent host service.
Agent cache refresh delay (min). This setting controls how long the Citrix WEM Agent Host Service waits to refresh its cache. The refresh keeps the cache in sync with the WEM service database. The default is 30 minutes. When using this option, keep the following in mind:
- The minimum interval at which the cache synchronizes with the WEM service database is 15 minutes. Type an integer that is equal to or greater than 15 minutes.
- The actual sync interval might vary. Based on the specified value, the WEM agent calculates an interval in which a random value is selected as the actual sync interval each time the agent cache refresh delay times out. For example, you set the value to 30 minutes. The agent selects a random value from this interval: [(30 – 30/2), (30 + 30/2)].
SQL settings refresh delay (min). This setting controls how long the Citrix WEM Agent Host Service waits to refresh its SQL connection settings. The default is 15 minutes. Type an integer that is equal to or greater than 15 minutes.
Agent extra launch delay (ms). This setting controls how long the Citrix WEM Agent Host Service waits to launch the agent host executable. The default is 0.
Tip:
In scenarios where you want the agent host to complete the necessary work first, you can specify how long the agent application launcher (VUEMAppCmd.exe) waits. VUEMAppCmd.exe ensures that the agent host finishes processing an environment before Citrix DaaS (formerly Citrix Virtual Apps and Desktops service) and Citrix Virtual Apps and Desktops published applications are started. To specify the wait time, configure the VUEMAppCmd extra sync delay setting, available in the Agent Host Configuration group policy. For more information, see Install and configure the agent.
Enable debug mode. Controls whether to enable verbose logging for all agents connecting to the configuration set.
Bypass ie4uinit check. By default, the Citrix WEM Agent Host Service awaits ie4uinit to run before launching the agent host executable. This setting forces the Citrix WEM Agent Host service to not wait for ie4uinit.
Agent upgrade
Schedules automatic upgrades for all agents bound to this configuration set.
Upgrading an agent is now done within the new App Package Delivery feature. To configure and schedule agent upgrades, go to App Package Delivery > Delivery tasks and create a WEM agent upgrade delivery task. Settings configured previously are turned into delivery tasks automatically.
Miscellaneous
Configure settings such as notifications, initial environment cleanup, and Wake on LAN.
Notifications:
- Enable notifications for connection state change. If enabled, the agent displays notification messages on the agent host when the connection to the infrastructure service is lost or restored. Citrix recommends that you do not enable this option on poor-quality network connections. Otherwise, connection state change notifications might appear frequently on the endpoint (agent host).
Extra features:
-
Initial environment cleanup. If enabled, the agent cleans up the user environment during the first logon. Specifically, it deletes the following items:
- User network printers.
- With Preserve Auto-created Printers on the Cleanup Actions tab enabled, the agent does not delete auto-created printers.
- With Preserve Specific Printers on the Cleanup Actions tab enabled, the agent does not delete any of the printers specified in the list.
- All network drives except the network drive that is the home drive.
- All non-system desktop, Start menu, Quick Launch, and Start-button-context-menu shortcuts.
- All taskbar and Start menu pinned shortcuts.
- User network printers.
-
Initial desktop UI cleanup. If enabled, the agent cleans up the session desktop during the first logon. Specifically, it deletes the following items:
- All non-system desktop, Start menu, Quick Launch, and Start-button-context-menu shortcuts.
- All taskbar and Start menu pinned shortcuts.
-
Enable cross-domain search for user groups. If enabled, the agent queries user groups in all Active Directory domains. Cross-domain search can be time-intensive. Select this option only if necessary.
-
Enable agent to use cached domain search results. If enabled, the agent uses the cache for domain query results to improve performance and resiliency. The domain query results is cached up to seven days.
-
Check application existence. If enabled, the agent does not create a shortcut unless it confirms that the application exists on the machine the user signs in to.
-
Expand environment variables for applications. Controls whether to expand environment variables in the application target path and working folder before processing them.
-
WEM service timeout (ms). The timeout value after which the agent switches to its own cache, when it fails to connect to the infrastructure service. The default value is 15000 milliseconds.
-
Agent max degree of parallelism. The maximum number of threads that the agent can use. The default value is 0 (as many threads as physically allowed by the processor). 1 is single-threaded, 2 is dual-threaded, and so on. Usually, this value does not need changing.
-
Directory services timeout (ms). The timeout value for directory services on the Agent Host machine, after which the agent uses its own internal cache of user group associations. The default value is 15000 milliseconds.
-
Network resources timeout (ms). The timeout value for resolving network resources (network drives or file/folder resources located on the network), after which the agent considers that the action has failed. The default value is 500 milliseconds.
Wake on LAN:
Use this tab to remotely turn on agent hosts. WEM automatically selects agents that reside on the same subnet as the target agents and uses those agents as Wake on LAN messengers. This feature requires hardware compatible with Wake on LAN. To use this feature, verify that the target machines satisfy the hardware requirements and relevant BIOS settings are configured.
Enable Wake on LAN for agents. Controls whether to configure settings on Windows operating systems to enable Wake on LAN for the agent hosts. If selected, the agents configure the following system settings:
- Disable Energy Efficient Ethernet for the network adapter
- Enable Wake on Magic Packet for the network adapter
- Enable Allow this device to wake the computer for the network adapter
- Enable Only allow a magic packet to wake the computer for the network adapter
- Disable Turn on fast startup
After enabling this option, navigate to Monitoring > Administration > Agents > Statistics, select one or more agents from the list, and then select Power Management > Wake in More to wake up the selected agents.
Action settings
This page lets you configure settings related to action processing and cleanup.
Action processing
Control how and when the agent processes actions, and whether unassigned actions get deleted from desktops.
Action processing on logon and refresh. The following settings control what actions the agent processes when users log on and when the agent refreshes.
- Process applications on logon and refresh
- Process printers on logon and refresh
- Process virtual drives on logon and refresh
- Process registries on logon and refresh
- Process environment variables on logon and refresh
- Process ports on logon and refresh
- Process INI files on logon and refresh
- Process external tasks on logon and refresh
- Process file system operations on logon and refresh
- Process user DSNs on logon and refresh
- Process FTAs on logon and refresh
Other Settings:
- Await policy and JSON file processing on logon. Use this option if you want users to complete logon until all settings (GPOs and JSON objects) are processed.
Action processing on reconnection. The following settings control what actions the agent processes when users reconnect to the agent machine.
- Process applications on reconnection
- Process printers on reconnection
- Process network drives on reconnection
- Process virtual drives on reconnection
- Process registries on reconnection
- Process environment variables on reconnection
- Process ports on reconnection
- Process INI files on reconnection
- Process external tasks on reconnection
- Process file system operations on reconnection
- Process user DSNs on reconnection
- Process FTAs on reconnection
Delete actions when unassigned. If these settings are enabled, the agent deletes any unassigned actions when it next refreshes.
- Delete applications from desktops when unassigned
- Delete printers from desktops when unassigned
- Delete network drives from desktops when unassigned
- Delete virtual drives from desktops when unassigned
- Delete registries from desktops when unassigned
- Delete environment variables from desktops when unassigned
- Delete ports from desktops when unassigned
- Delete file system operations from desktops when unassigned
- Delete user DSNs from desktops when unassigned
- Delete FTAs from desktops when unassigned
Enforce action processing. If these settings are enabled, the agent always refreshes those actions, even if no changes have been made.
- Enforce processing of applications
- Enforce processing of printers
- Enforce processing of network drives
- Enforce processing of virtual drives
- Enforce processing of environment variables
- Enforce processing of ports
Enforce filter processing. If enabled, these options force the agent to reprocess filters on every refresh.
- Enforce processing of filters for applications
- Enforce processing of filters for printers
- Enforce processing of filters for network drives
- Enforce processing of filters for virtual drives
- Enforce processing of filters for registries
- Enforce processing of filters for environment variables
- Enforce processing of filters for ports
- Enforce processing of filters for file system operations
- Enforce processing of filters for user DSNs
- Enforce processing of filters for FTAs
Asynchronous processing:
- Process printers asynchronously. If enabled, the agent processes printers asynchronously, without awaiting the completion of the processing of other actions.
- Process network drives asynchronously. If enabled, the agent processes network drives asynchronously, without awaiting the completion of the processing of other actions.
Action cleanup
Options present on this tile control whether the agent deletes the shortcuts or other items (network drives and printers) on startup. When you assign actions to a user or user group, you might find that you can also control the creation of the shortcuts or items. For example, you can specify where to create the application shortcut when managing assignments for an application. Workspace Environment Management processes these options according to a specific priority:
- The options configured for the assigned actions in Manage assignments.
- The options present on the Action cleanup tile.
For example, suppose you have enabled the Create desktop shortcut option for the assigned application in Manage assignment, and the application shortcut is already created on the desktop. The shortcut is still on the desktop when the agent starts, even though you enabled the Delete desktop shortcuts on startup option on the Action cleanup tile.
Application shortcut. The following settings control what shortcuts to delete on startup.
- Delete desktop shortcuts on startup.
- Delete shortcuts pinned to the taskbar on startup.
- Delete Quick Launch shortcuts on startup.
- Delete the Start menu shortcuts on startup.
- Delete shortcuts pinned to the Start menu on startup.
Network printer:
- Delete network printers on startup. If enabled, the agent deletes all network printers on startup.
Network drive:
- Delete network drives on startup. If enabled, the agent deletes all network drives on startup.
UI agent personalization
This page lets you personalize the appearance of the agent (in UI mode) in the user environment and customize how users interact with it.
Appearance and interaction
Customize UI agent appearance and interactions.
Splash screen and theme:
- Custom logo. By default, when the agent launches or refreshes, users see a splash screen with the Citrix Workspace™ Environment Management logo. You can specify an image accessible from the user environment to replace the logo.
- Loading circle color. Modifies the color of the loading circle to fit your custom logo.
- Text label color. Modifies the color of the loading text to fit your custom logo.
- UI agent theme. Select an appearance theme for dialogs that open from the UI agent.
- Hide agent splash screen. If enabled, hides the splash screen when the agent is loading or refreshing. This setting does not take effect the first time the agent refreshes.
- Hide agent splash screen on reconnection. If enabled, hides the splash screen when users reconnect to the agent machine.
- Hide agent splash screen for published applications. If enabled, hides the agent splash screen for published applications where the agent is running.
- Hide agent icon for published applications. If enabled, published applications do not display the agent icon.
User interaction:
- Only administrators can close agent. If enabled, only administrators can exit the agent. As a result, the Exit option in the agent menu is disabled on endpoints for non-administrators.
- Prohibit administrators from closing agent. If enabled, administrators cannot exit the agent.
- Disable administrative refresh feedback. If selected, no notification appears in the user environment when an administrator refreshes the agent using the administration console.
-
Allow users to reset actions. Controls whether to display the Reset Actions option in the agent menu. By default, the option is disabled. The Reset Actions option lets current users specify what actions to reset in their environment. After a user selects Reset Actions, the Reset actions dialog appears. In the dialog, the user can have granular control over what to reset. The user can select the applicable actions and then click Reset. Doing so purges the corresponding action-related registry entries.
Note:
The following two options are always available in the agent menu: Refresh and About. The Refresh option triggers an immediate update of the WEM agent settings. As a result, settings configured in the administration console take effect immediately. The About option opens a dialog displaying version details about the agent in use.
- Allow users to manage applications. If enabled, the Manage Applications option in the agent menu is available to users on endpoints. Users can click the option to open the Manage applications dialog and configure the following options. By default, the option is enabled.
- Allow users to manage printers. If enabled, the Manage Printers option in the agent menu is available to users on endpoints. Users can click the option to open the Manage printers dialog to configure a default printer and to modify print preferences. By default, the option is enabled.
- Show My Applications in agent menu. If enabled, show the My Applications option in the agent menu. If shown, users can view applications assigned to them.
- Show Agent Insights in agent menu. Shows the Agent Insights option in the agent menu. When visible, users can enable or disable Agent Insights from the menu.
Help desk options
Specify help and support links and configure screen capture options.
Help and support
- Help link. Enter a web link where users can ask for help. If specified, users see the Help option in the agent menu. Clicking it opens the website.
- Support link. Enter a web link where users can access support-related information. If specified, users see the Support option in the agent menu. Clicking it opens the website.
Screen capture
Enable screen capture. Controls whether to display the Capture option in the agent menu. Users can use the option to open a screen capture tool. The tool provides the following options:
- New capture. Takes a screenshot of errors in the user environment.
- Save. Saves the screenshot.
- Send to support. Sends the screenshot to support staff.
Show Send to support option. Controls whether to display the Send to support option in the screen capture tool. If enabled, users can use the option to send screenshots and log files directly to the specified support email address, in the specified format. This setting requires a working, configured email client.
Support email address. Enter an email address.
Email template. Specify an email content template that the screen capture tool uses to send support emails. This field cannot be empty.
Note:
For a list of hash-tags that you can use in the email template, see Dynamic tokens. Users are only presented with the option to enter a comment if the
##UserScreenCaptureComment## hash-tagis included in the email template.
Custom subject. Specify an email subject template that the screen capture tool uses to send support emails.
Use SMTP to send Email. If enabled, sends a support email using SMTP instead of MAPI.
Power saving
Specify when to shut down or suspend the agent machine.
- Shut down at specified time. If enabled, the agent automatically shuts down the machine where it is running at the specified time. The time is based on the agent time zone.
- Shut down when idle. If enabled, the agent automatically shuts down the machine where it is running after the machine remains idle (no user input) for the specified length of time.
- Suspend rather than shutting down. If enabled, the agent instead suspends the machine where it is running at the specified time or after the machine remains idle for the specified length of time.
Monitoring preferences
This page contains the following settings:
-
Action processing results. Lets you collect results of action processing and view a report. Select the actions you want to collect results for.
Note:
Results are uploaded every 4 hours. To immediately upload results from the agents, use the Retrieve statistics from agent option in Monitoring > Administration > Agents.
- Group Policy settings
- External tasks
- JSON files
-
Additional settings. Configure how agent reports are handled:
-
Save reports locally to display in Agent Insights. Enables the agent to save reports locally so they appear in Agent Insights. When this setting is enabled, the following Reports to save options are selected automatically:
-
Reports to save. Specifies the types of reports to save locally:
- Logon analysis: Saves the logon analysis report.
- Profile insights: Saves the profile container insights report.
-
Reports to save. Specifies the types of reports to save locally:
- Set alternative location for locally saved agent reports. Specifies an alternative location for saving the reports.
-
Save reports locally to display in Agent Insights. Enables the agent to save reports locally so they appear in Agent Insights. When this setting is enabled, the following Reports to save options are selected automatically:
-
Optimization and usage insights. Lets you gain insights into application behavior. Use the following option to control whether the agent collects and uploads data for insights.
- Enable data collection and upload for optimization and usage insights
After you enable the option, data updates might take a few hours to complete.
-
Profile insights. Lets you gain insights into profile containers for Profile Management and FSLogix. Use the following option to control whether the agent scans large files on profile containers.
-
Enable large file scanning
If enabled, run a scan of large files on profile containers when container usage exceeds the specified threshold value. Scanning is limited to once every 24 hours. You can specify what files are treated as large files based on their size.
-
-
Profile Management health check. Lets you specify the scope of settings to cover in Profile Management health check reports. Health checks run every 24 hours or on demand. Select the Profile Management settings that you want to cover in the reports.
Note:
- To run health checks on demand, use the Run Profile Management health check option in Monitoring > Administration > Agents.
- Changes you make are reflected only in new reports and do not affect existing reports. Only the latest report is maintained for each agent.
-
Security logs. Lets you collect logs on security rule executions and generates a report. Select the security aspects that you want to include in the report.
- The Privilege elevation security aspect controls log collection for the events, EXE privilege elevation, MSI privilege elevation, and Self-elevation.
- When you select the Process hierarchy control security aspect, Blocked activities option is selected by default, but the Allowed activities option can be edited.
- When you select the Application security log security aspect, Blocked activities option is checked by default, whereas the Audited activities, and Allowed activities option can be edited.
For more details, see Reports.
-
Application delivery results. Lets you collect the results of application delivery and generates a report. If you select the Application delivery task results check box, the agent will collect the report and upload the report to the WEM server. For more details, see Reports.
Note:
- Results are uploaded every 4 hours. To immediately upload results from the agents, use the Retrieve statistics from agent option in Monitoring > Administration > Agents
- VHD management. Collects results and generates reports on operations related to VHD management. If you select VHD disk compaction, the agent collects the related report and uploads it to the WEM service. For more information, see Reports.
File shares
This page lets you add SMB shares to which WEM can connect. You can then configure shares for desired features so that those features can use the shares as needed. Using SMB shares reduces traffic on networks and reduces the time to download files to agent machines.
The following graphic provides an overview of how file shares work.
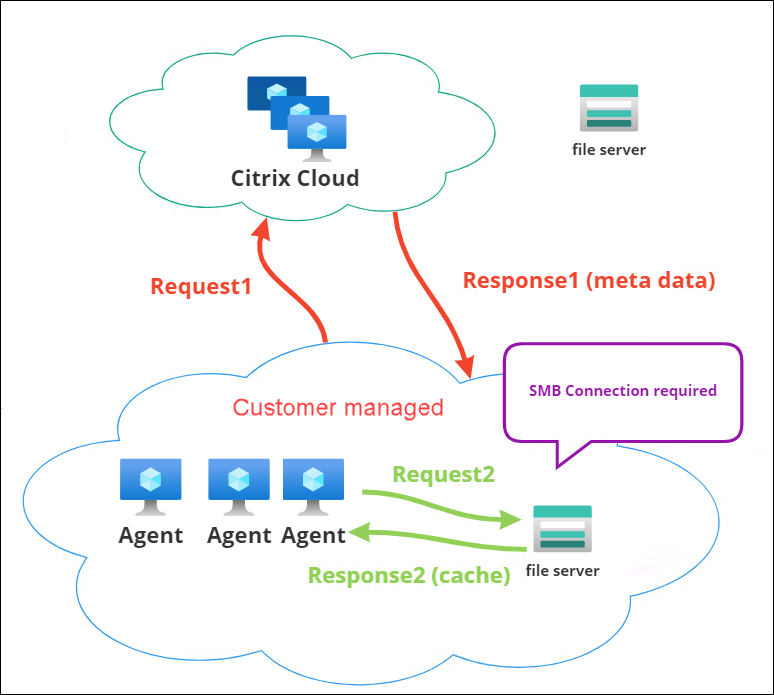
A file download begins with a specific agent machine. This initial download occurs through Citrix Cloud. After the download completes, the agent uploads the file to the file share for other agents to use. So, later downloads occur directly through the file share rather than through Citrix Cloud.
With a file share configured, when a file download is needed, the agent first verifies whether the file is available on the file share. If available, the download occurs through the file share. If unavailable, the agent connects to Citrix Cloud for the initial download and then uploads the downloaded file to the file share.
Add SMB share
Enter an SMB share and credentials of an administrator with permission to access that share. Complete the following steps:
-
On the File shares page, click Add SMB share.
-
In the Add SMB share wizard, fill in the following information:
-
SMB share. Enter the path in the form
\\ServerName\ShareNamewhereServerNameis the FQDN or IP address of the server hosting the SMB share andShareNameis the name of the SMB share. -
User name. Enter the name in the form
domain\username. - Password. Enter the password to be used to access the SMB share.
-
SMB share. Enter the path in the form
-
Click Done to save and exit.
Select SMB shares for features to use
Select an SMB share from the list. The setting defaults to None. When selecting shares for features, consider the following:
- The credentials must have full read/write permission on the shares.
- To connect to the shares, the agent must run under the local system account.
- When configured, the features use the shares as needed — the connections to the shares are non-persistent and established only when necessary.
- If the shares are not accessible, agents fall back to downloading files through Citrix Cloud.
You can also change or remove the SMB shares for the App package delivery feature.
Select SMB shares for relevant services to use
Select one or more SMB shares from the list. When selected, services (for example, Citrix Profile Management service) running under the local system account in your deployment can use the shares as needed — the connections to the shares are persistent. This feature enables those services to access the shares through the connections.
SMB configuration example
For examples of how to configure SMB shares: