iOS
To manage iOS devices in the XenMobile Server, you set up an Apple Push Notification service (APNs) certificate from Apple. For information, see APNs certificates.
Enrollment profiles determine whether iOS devices enroll in MDM+MAM, with the option for users to opt out of MDM. XenMobile Server supports the following authentication types for iOS devices in MDM+MAM. For information, see the articles under Certificates and authentication.
- Domain
- Domain plus security token
- Client certificate
- Client certificate plus domain
Requirements for trusted certificates in iOS 13:
Apple has new requirements for TLS server certificates. Verify that all certificates follow the new Apple requirements. See the Apple publication, https://support.apple.com/en-us/HT210176. For help with managing certificates, see Uploading certificates in XenMobile Server.
For supported operating systems, see Supported device operating systems.
iOS 14 compatibility
XenMobile® Server and Citrix® mobile apps are compatible with iOS 14, but don’t currently support the new iOS 14 features.
For supervised iOS devices, you can delay software upgrades for up to 90 days. In the Restrictions device policy for iOS, use these settings:
- Force delayed software updates
- Enforced software update delay
See iOS settings. Those settings aren’t available for devices in user enrollment mode or unsupervised (full MDM) mode.
Apple host names that must remain open
Some Apple host names must remain open to make sure proper operation of iOS, macOS, and Apple App Store. Blocking those host names can affect the installation, update, and proper operation of the following: iOS, iOS apps, MDM operation, and device and app enrollment. For more information, see https://support.apple.com/en-us/HT201999.
Supported enrollment methods
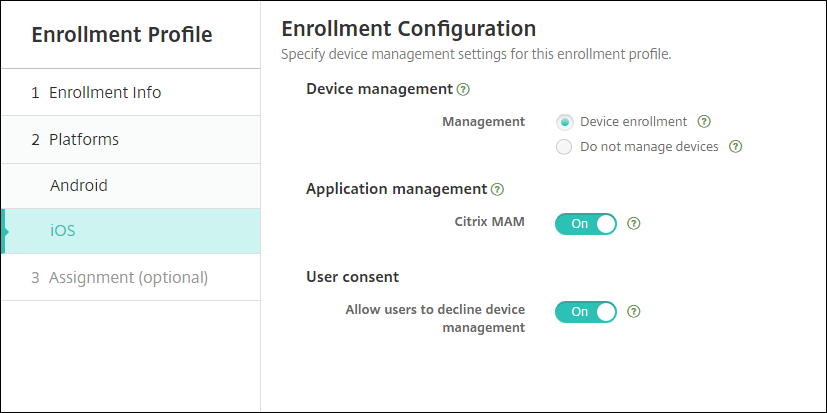
You specify how to manage iOS devices in enrollment profiles. You can choose device enrollment or no MDM enrollment.
To configure enrollment settings for iOS devices, go to Configure > Enrollment Profiles > iOS.
The following table lists which enrollment methods XenMobile Server supports for iOS devices:
| Method | Supported |
|---|---|
| Apple Deployment Program | Yes |
| Apple School Manager | Yes |
| Apple Configurator | Yes |
| Manual enrollment | Yes |
| Enrollment invitations | Yes |
Apple has device enrollment programs for business and education accounts. For business accounts, you enroll in the Apple Deployment Program to use the Apple Deployment Program for device enrollment and management in the XenMobile Server. That program is for iOS and macOS devices. See Deploy devices through Apple Deployment Program.
For education accounts, you create an Apple School Manager account. Apple School Manager unifies the Deployment Program and volume purchase. Apple School Manager is a type of Education Apple Deployment Program. See Integrate with Apple Education features.
You can use the Apple Deployment Program to bulkly enroll iOS and macOS devices. You can purchase those devices directly from Apple, a participating Apple Authorized Reseller, or a carrier. Whether you purchase iOS devices directly from Apple, you can use the Apple Configurator to enroll those devices. See Bulk enrollment of Apple devices.
Add an iOS device manually
If you want to add an iOS device manually, such as for testing purposes, follow these steps.
-
In the XenMobile Server console, click Manage > Devices. The Devices page appears.

-
Click Add. The Add Device page appears.

-
Configure these settings:
- Select platform: Click iOS.
- Serial Number: Type the device serial number.
-
Click Add. The Devices table appears with the device added to the bottom of the list. To view and confirm the device details: Choose the device that you added and then, in the menu that appears, click Edit.
Note:
When you select the checkbox next to a device, the options menu appears above the device list. When you click anywhere else in the list, the options menu appears on the right side of the listing.
-
LDAP configured
-
If using local groups and local users:
-
One or more local groups.
-
Local users assigned to local groups.
-
Delivery groups are associated with local groups.
-
-
If using Active Directory:
- Delivery groups are associated with Active Directory groups.

-
-
The General page lists the device Identifiers, such as the serial number and other information for the platform type. For Device Ownership, select Corporate or BYOD.
The General page also lists device Security properties, such as Strong ID, Lock Device, Activation Lock Bypass, and other information for the platform type. The Full Wipe of Device field includes the user PIN code. The user must enter that code after the device is wiped. If the user forgets the code, you can look it up here.
-
The Properties page lists the device properties that XenMobile Server is to provision. This list shows any device properties included in the provisioning file used to add the device. To add a property, click Add and then select a property from the list. For valid values for each property, see the PDF Device property names and values.
When you add a property, it initially appears under the category where you added it. After you click Next and then return to the Properties page, the property appears in the appropriate list.
To delete a property, hover over the listing and then click the X on the right side. XenMobile Server deletes the item immediately.
-
The remaining Device Details sections have summary information for the device.
- User Properties: Displays RBAC roles, group memberships, volume purchase accounts, and properties for the user. You can retire a volume purchase account from this page.
- Assigned Policies: Displays the number of assigned policies including the number of deployed, pending, and failed policies. Provides the policy name, type and last deployment information for each policy.
- Apps: Displays, for the last inventory, the number of installed, pending, and failed app deployments. Provides the app name, identifier, type, and other information. For a description of iOS and macOS inventory keys, such as HasUpdateAvailable, see Mobile Device Management (MDM) Protocol.
- Media: Displays, for the last inventory, the number of deployed, pending, and failed media deployments.
- Actions: Displays the number of deployed, pending, and failed actions. Provides the action name and time of the last deployment.
- Delivery Groups: Displays the number of successful, pending, and failed delivery groups. For each deployment, provides the delivery group name and deployment time. Select a delivery group to view more detailed information, including status, action, and channel or user.
- iOS Profiles: Displays the last iOS profile inventory, including name, type, organization, and description.
- iOS Provisioning Profiles: Displays enterprise distribution provisioning profile information, such as the UUID, expiration date, and managed status.
- Certificates: Displays, for valid, expired, or revoked certificates, information such as the type, provider, issuer, serial number, and the number of remaining days before expiration.
- Connections: Displays the first connection status and the last connection status. Provides for each connection, the user name, penultimate (next to last) authentication time, and last authentication time.
- MDM Status: Displays information such as the MDM status, last push time, and last device reply time.
Configure iOS device policies
Use these policies to configure how XenMobile Server interacts with devices running iOS. This table lists all device policies available for iOS devices.
Enroll iOS devices
This section shows how users enroll iOS devices (12.2 or later) into the XenMobile Server. For more information about the iOS enrollment, open the following video:
- Go to the Apple store on your iOS device, download the Citrix Secure Hub™ app, and then tap the app.
- When prompted to install the app, tap Next and then tap Install.
- After Secure Hub installs, tap Open.
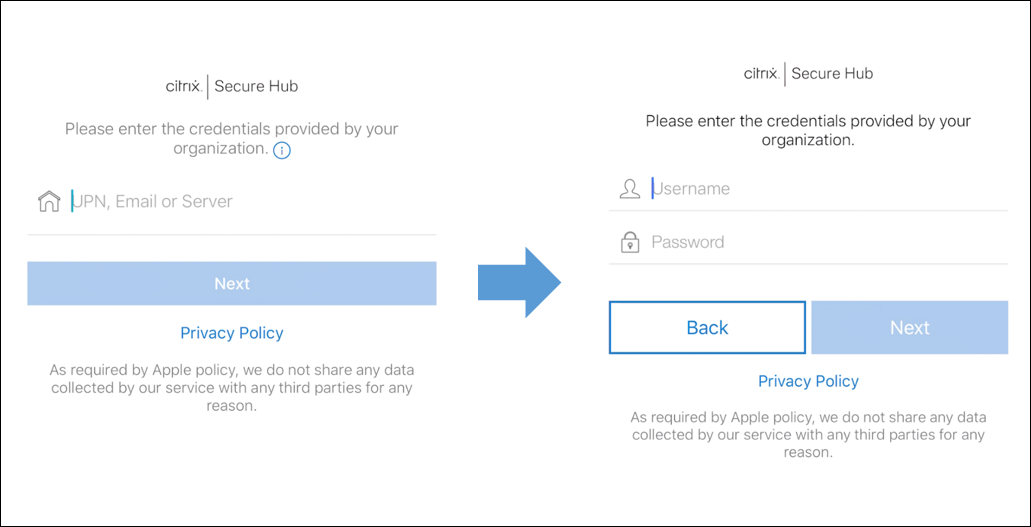
- Enter your corporate credentials, such as your XenMobile Server server name, User Principal Name (UPN), or email address. Then, click Next.
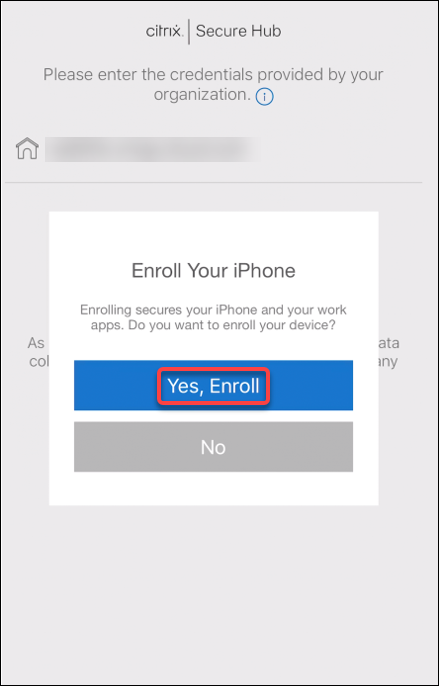
- Tap Yes, Enroll to enroll your iOS device.
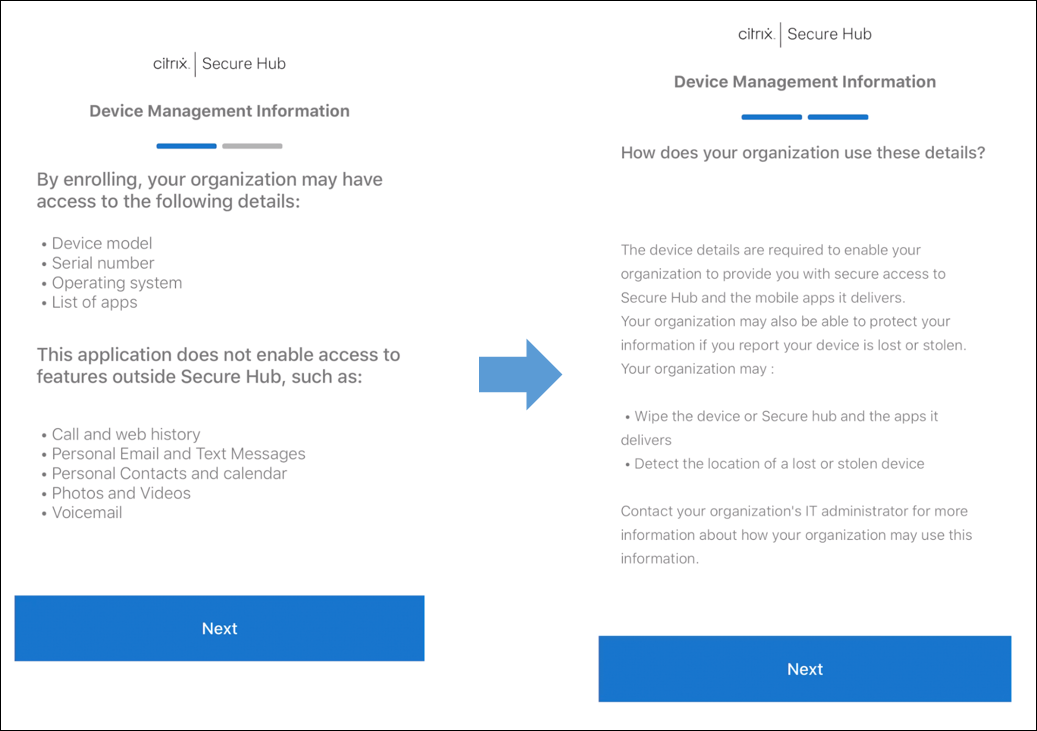
- A list of the data XenMobile Server collects appears. Click Next. An explanation of how an organization uses that data appears. Click Next.
- After you type your credentials, tap Allow when prompted, to download the configuration profile. After you download the configuration profile, tap Close.
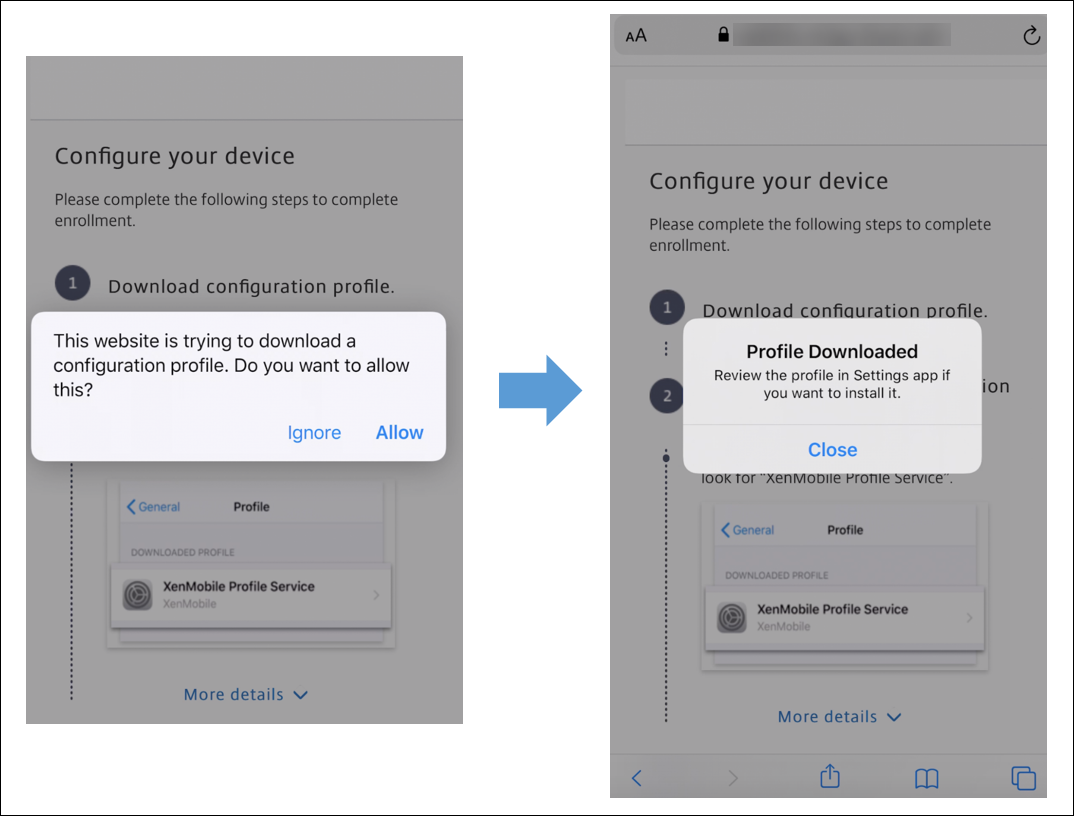
- In your device settings, install the iOS certificate and add the device to the trusted list.
- Go to Settings > General > Profile > XenMobile Profile Service and tap Install to add the profile.
- In the notification window, tap Trust to enroll your device into remote management.
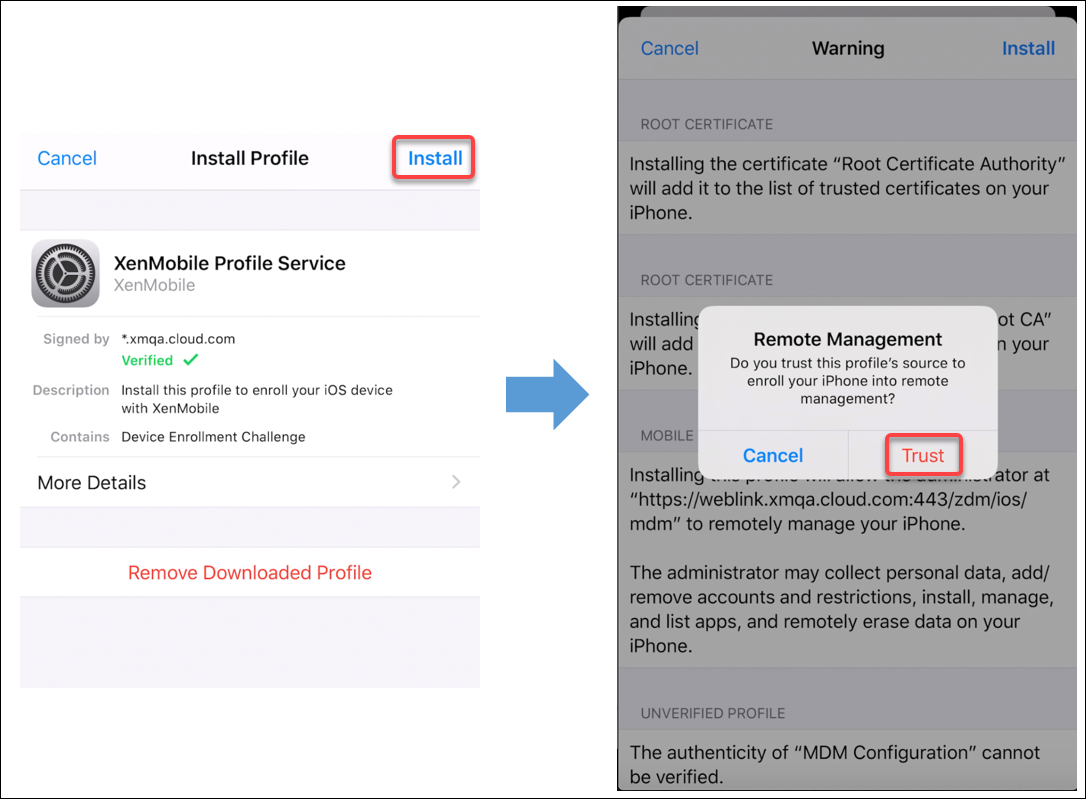
- Once enrollment succeeds, open Secure Hub. If you are enrolling into MDM+MAM: After your credentials validate, create and confirm your Citrix PIN when prompted.
- After the workflow completes, the device is enrolled. You can then access the app store to view the apps you can install on your iOS device.
Security actions
iOS supports the following security actions. For a description of each security action, see Security actions.
| Activation Lock Bypass | App Lock | App Wipe |
| ASM Activation Lock | Certificate Renewal | Clear Restrictions |
| Enable/Disable Lost Mode | Enable/Disable Tracking | Full Wipe |
| Locate | Lock | Ring |
| Request/Stop AirPlay Mirroring | Restart/Shut Down | Revoke/Authorize |
| Selective Wipe | Unlock |
Lock iOS devices
You can lock a lost iOS device with an accompanying display of a message and phone number that displays on the device lock screen.
To display a message and phone number on a locked device, set the Passcode policy to true in the XenMobile Server console. Alternatively, users can enable the passcode on the device manually.
-
Click Manage > Devices. The Devices page appears.

-
Select the iOS device that you want to lock.
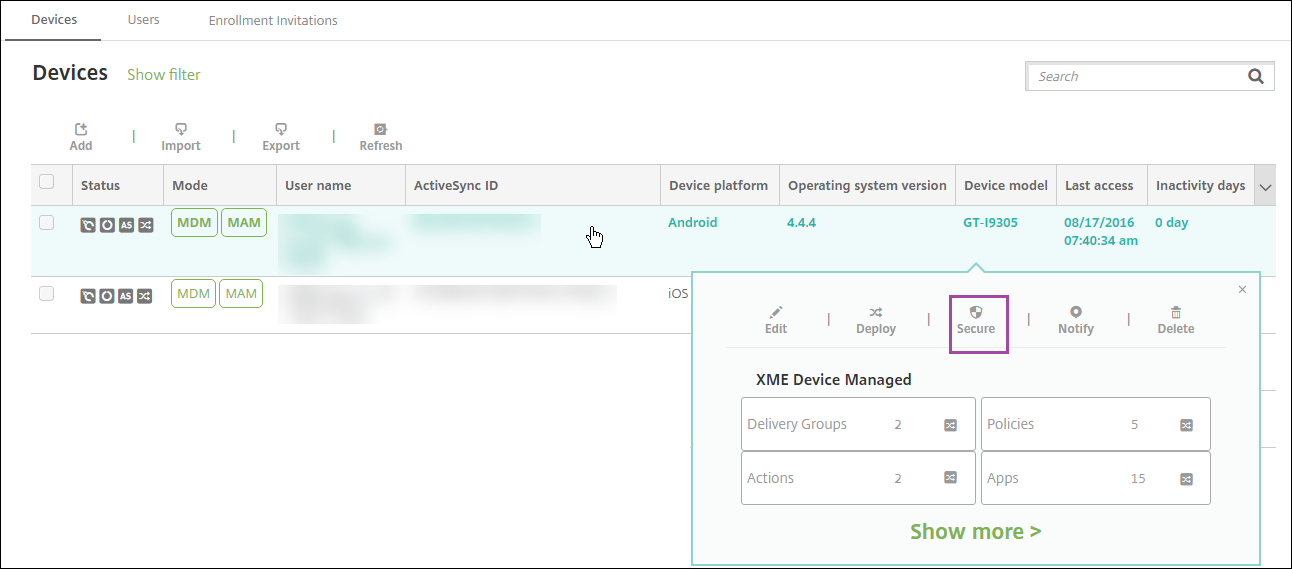
Select the checkbox next to a device to show the options menu above the device list. Click anywhere else in the list to show the options menu on the right side of the listing.

-
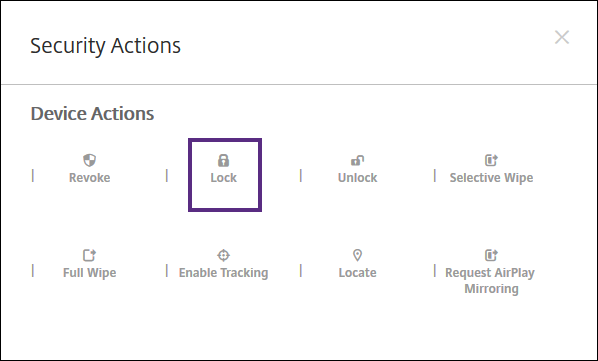
In the options menu, click Secure. The Security Actions dialog box appears.
-
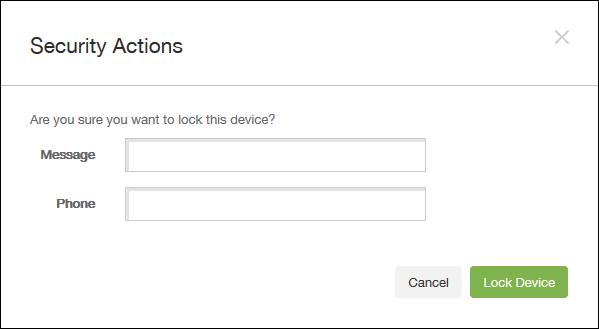
Click Lock. The Security Actions confirmation dialog box displays.
-
Optionally, type a message and phone number that appears on the lock screen of the device.
iOS appends the words “Lost iPad” to what you type in the Message field.
If you leave the Message field empty and provide a phone number, Apple displays the message “Call owner” on the device lock screen.
-
Click Lock Device.
Put iOS devices in Lost Mode
The XenMobile Server Lost Mode device property puts an iOS device in Lost Mode. Unlike Apple Managed Lost Mode, XenMobile Server Lost Mode doesn’t require a user to do either of the following actions to enable locating their device: Configure the Find My iPhone/iPad setting or enable the Location Services for Citrix Secure Hub.
In XenMobile Server Lost Mode, only XenMobile Server can unlock the device. (In contrast, if you use the XenMobile Server device lock feature, users can unlock the device directly by using a PIN code that you provide.
To enable or disable lost mode: Go to Manage > Devices, choose a supervised iOS device, and then click Secure. Then, click Enable Lost Mode or Disable Lost Mode.
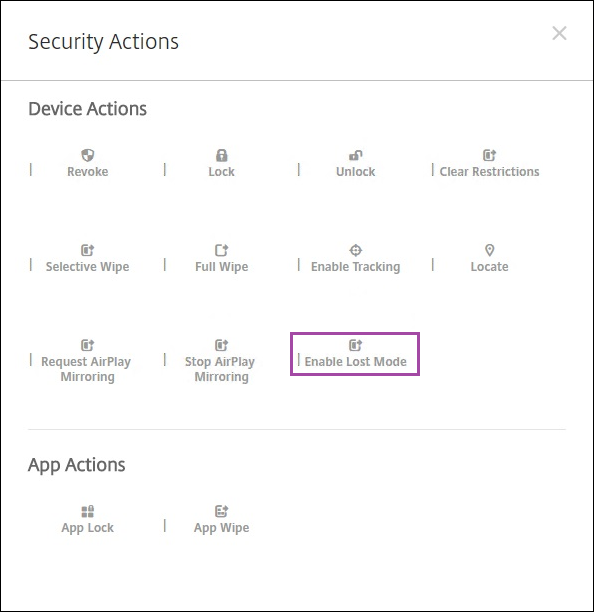
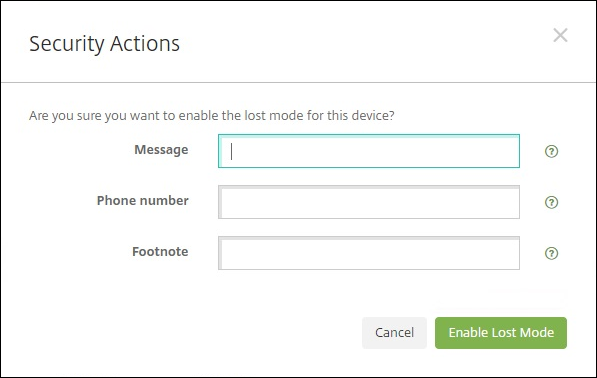
If you click Enable Lost Mode, type information to appear on the device when it’s in lost mode.
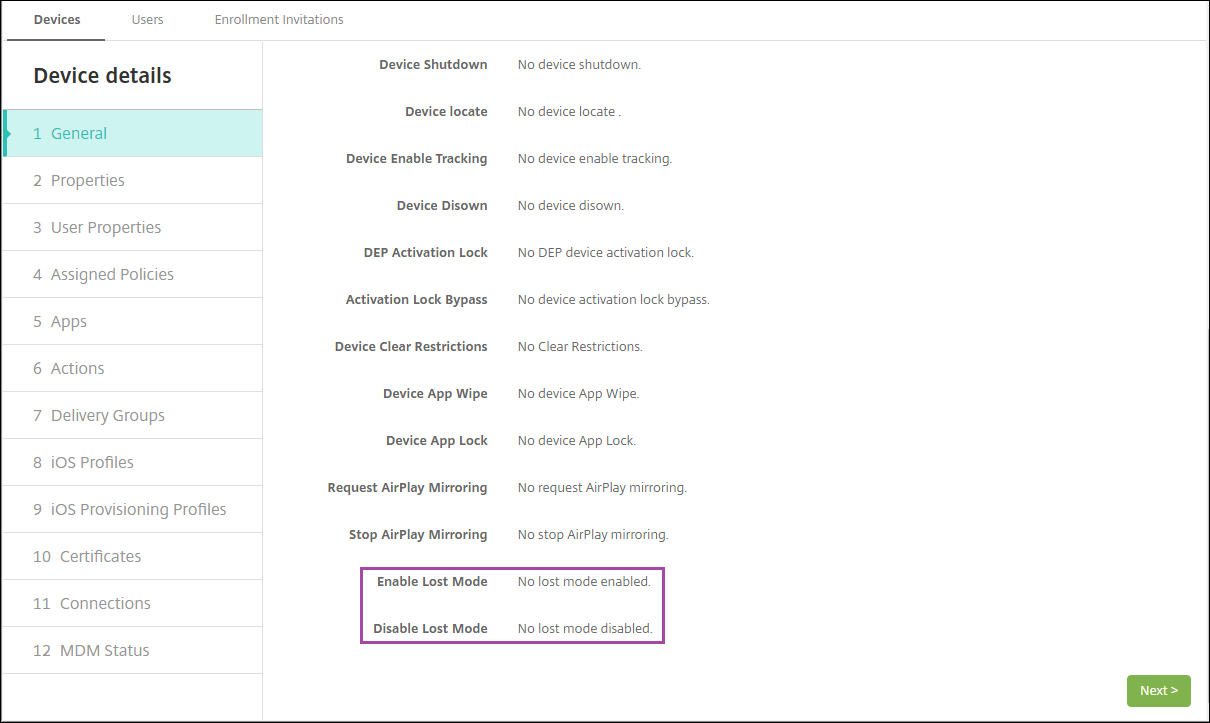
Use any of the following methods to check Lost Mode status:
- In the Security Actions window, verify if the button is set as Disable Lost Mode.
- From Manage > Devices, on the General tab under Security, see the last Enable Lost Mode or Disable Lost Mode action.
- From Manage > Devices, on the Properties tab, verify that the value of the MDM lost mode enabled setting is correct.
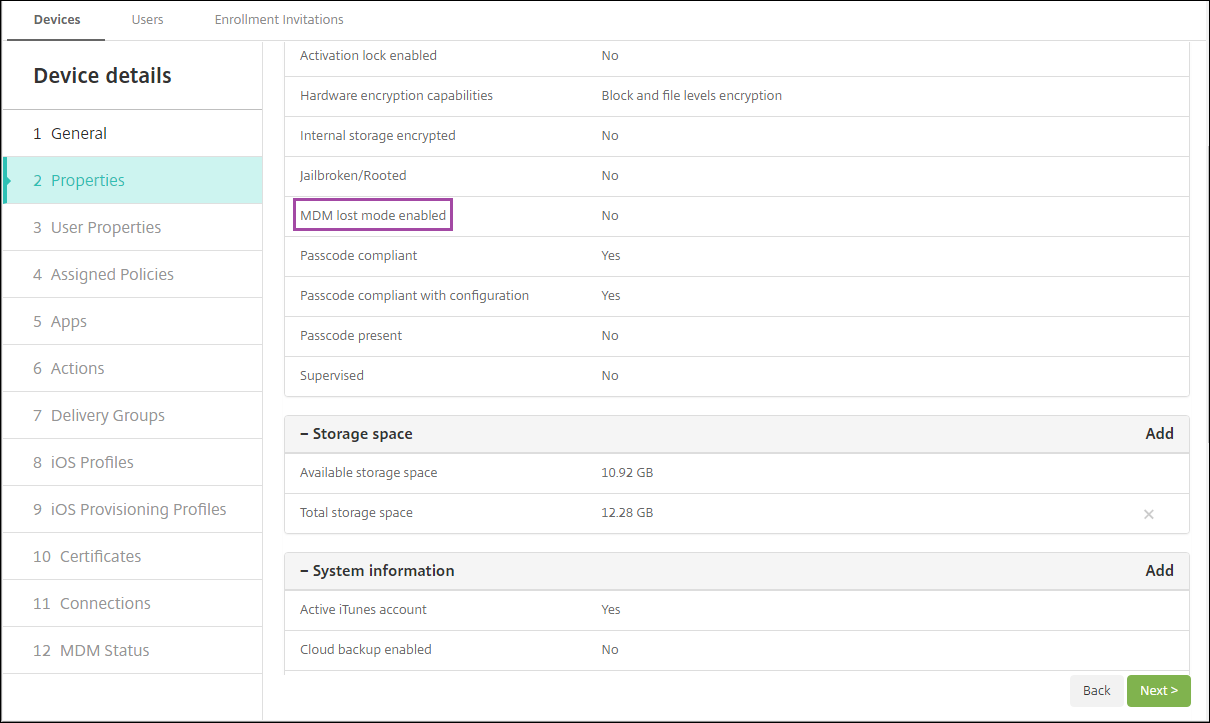
If you enable XenMobile Server Lost Mode on an iOS device, the XenMobile Server console also changes as follows:
- In Configure > Actions, the Actions list doesn’t include these automated actions: Revoke the device, Selectively wipe the device, and Completely wipe the device.
- In Manage > Devices, the Security Actions list no longer includes the Revoke and Selective Wipe device actions. You can still use a security action to do a Full Wipe action, as needed.
iOS appends the words “Lost iPad” to what you type in the Message in the Security Actions screen.
If you leave the Message empty and provide a phone number, Apple shows the message “Call owner” on the device lock screen.
Bypass an iOS activation lock
Activation Lock is a feature of Find My iPhone/iPad that prevents reactivation of a lost or stolen supervised device. Activation Lock requires the user Apple ID and password before anyone can do these actions: Turn off Find My iPhone/iPad, erase the device, or reactivate the device. For the devices that your organization owns, bypassing an Activation Lock is necessary to, for example, reset or reallocate devices.
To enable Activation Lock, you configure and deploy the XenMobile Server MDM Options device policy. You can then manage a device from the XenMobile Server console without the Apple credentials of the user. To bypass the Apple credential requirement of an Activation Lock, issue the Activation Lock Bypass security action from the XenMobile Server console.
For example, if the user returns a lost phone or to set up the device before or after a Full Wipe: When the phone prompts for the Apple App Store account credential, you can bypass that step by issuing the Activation Lock Bypass security action from the XenMobile Server console.
Device requirements for activation lock bypass
- Supervised through Apple Configurator or Apple Deployment Program
- Configured with an iCloud account
- Find My iPhone/iPad enabled
- Enrolled in XenMobile Server
- MDM Options device policy, with activation lock enabled, is deployed to devices
To bypass an activation lock before issuing a Full Wipe of a device:
- Go to Manage > Devices, select the device, click Secure, and then click Activation Lock Bypass.
- Wipe the device. The activation lock screen doesn’t appear during device setup.
To bypass an activation lock after issuing a Full Wipe of a device:
- Reset or wipe the device. The activation lock screen appears during device setup.
- Go to Manage > Devices, select the device, click Secure, and then click Activation Lock Bypass.
- Tap the Back button on the device. The home screen appears.
Keep in mind the following:
- Advise your users not to turn off Find My iPhone/iPad. Don’t do a full wipe from the device. In either of those cases, the user is prompted to enter the iCloud account password. After account validation, the user won’t see an Activate iPhone/iPad screen after erasing all content and settings.
- For a device with a generated Activation lock bypass code and with the Activation lock enabled: If you can’t bypass the Activate iPhone/iPad page after a Full Wipe, there is no need to delete the device from XenMobile Server. Either you or the user can contact Apple support to unblock the device directly.
- During a hardware inventory, XenMobile Server queries a device for an Activation lock bypass code. If a bypass code is available, the device sends it to the XenMobile Server. Then, to remove the bypass code from the device, send the Activation Lock Bypass security action from the XenMobile Server console. At that point, XenMobile Server and Apple have the bypass code required to unblock the device.
- The Activation Lock Bypass security action relies on the availability of an Apple service. If the action doesn’t work, you can unblock a device as follows. On the device, manually enter the credentials of the iCloud account. Or, leave the user name field empty and type the bypass code in the password field. To look up the bypass code, go to Manage > Devices, select the device, click Edit, and click Properties. The Activation lock bypass code is under Security information.
