Network Access Control
You can use the Network Access Control (NAC) solution to extend the XenMobile® device security assessment for Android and Apple devices. The NAC solution uses the XenMobile security assessment to facilitate and handle authentication decisions. After you configure your NAC appliance, the device policies and NAC filters that you configure in XenMobile get enforced.
Using XenMobile with a NAC solution adds QoS and more granular control over devices that are internal to your network. For a summary of the advantages of integrating NAC with XenMobile, see Access control.
Citrix® supports these solutions for integration with XenMobile:
- Citrix Gateway
- Cisco Identity Services Engine (ISE)
- ForeScout
Citrix doesn’t guarantee integration for other NAC solutions.
With a NAC appliance in your network:
-
XenMobile supports NAC as an endpoint security feature for iOS, Android Enterprise, and Android devices.
-
You can enable filters in XenMobile to set devices as compliant or non-compliant for NAC, based on rules or properties. For example:
-
If a managed device in XenMobile doesn’t meet the specified criteria, XenMobile marks the device as non-compliant. A NAC appliance blocks non-compliant devices on your network.
-
If a managed device in XenMobile has non-compliant apps installed, a NAC filter can block the VPN connection. As a result, a non-compliant user device cannot access apps or websites through the VPN.
-
If you use Citrix Gateway for NAC, you can enable split tunneling to prevent the Citrix Gateway plug-in from sending unnecessary network traffic to Citrix Gateway. For more information on split tunneling, see Configuring Split Tunneling.
-
Supported NAC compliance filters
XenMobile Server supports the following NAC compliance filters:
Anonymous Devices: Checks if a device is in anonymous mode. This check is available if XenMobile can’t reauthenticate the user when a device tries to reconnect.
Failed Samsung Knox attestation: Checks if a device failed a query of the Samsung Knox attestation server.
Forbidden Apps: Checks if a device has forbidden apps, as defined in an App Access device policy. For information about that policy, see App access device policies.
Inactive Devices: Checks if a device is inactive as defined by the Device Inactivity Days Threshold setting in Server Properties. For details, see Server properties.
Missing Required Apps: Checks if a device is missing any required apps, as defined in an App Access policy.
Non-suggested Apps: Checks if a device has non-suggested apps, as defined in an App Access policy.
Noncompliant Password: Checks if the user password is compliant. On iOS and Android devices, XenMobile can determine whether the password currently on the device is compliant with the passcode policy sent to the device. For instance, on iOS, the user has 60 minutes to set a password if XenMobile sends a passcode policy to the device. Before the user sets the password, the passcode might be non-compliant.
Out of Compliance Devices: Checks whether a device is out of compliance, based on the Out of Compliance device property. Typically, automated actions or third parties using XenMobile APIs change that device property.
Revoked Status: Checks whether the device certificate is revoked. A revoked device cannot re-enroll until it is authorized again.
Rooted Android and Jailbroken iOS Devices: Checks whether an Android or iOS device is jailbroken.
Unmanaged Devices: Check whether a device is still in a managed state under XenMobile control. For example, a device enrolled in MAM or an unenrolled device is not managed.
Note:
The Implicit Compliant/Not Compliant filter sets the default value only on devices that XenMobile is managing. For example, any devices that have a blocked app installed or are not enrolled, get marked as Not Compliant. The NAC appliance blocks those devices from your network.
Configuration overview
We recommend that you configure the NAC components in the order listed.
-
Configure device policies to support NAC:
For iOS devices: See Configure the VPN device policy to support NAC.
For Android Enterprise devices: See Create an Android Enterprise Managed configuration for Citrix SSO.
For Android devices: See Configure the Citrix SSO protocol for Android.
-
Configure a NAC solution:
-
Citrix Gateway, detailed in Update Citrix Gateway policies to support NAC.
Requires that you install Citrix SSO on devices. See Citrix Gateway Clients.
- Cisco ISE: See the Cisco documentation.
- ForeScout: See the ForeScout documentation.
-
Enable NAC filters in XenMobile
-
In the XenMobile console, go to Settings > Network Access Control.
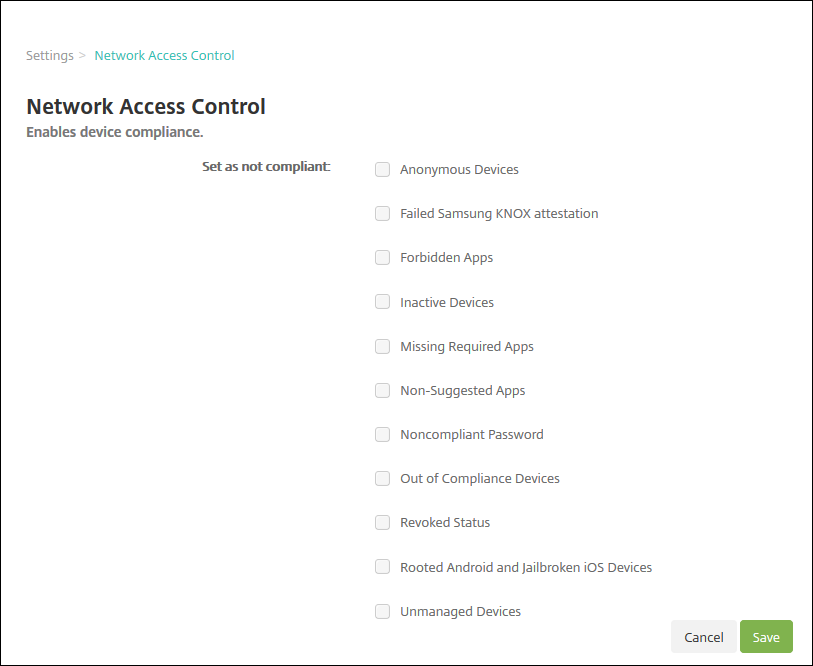
-
Select the checkboxes for the Set as not compliant filters you want to enable.
-
Click Save.
Update Citrix Gateway policies to support NAC
You must configure advanced (not classic) authentication and VPN sessions policies on your VPN virtual server.
These steps update a Citrix Gateway with either of these characteristics:
- Is integrated with a XenMobile Server environment.
- Or, is set up for VPN, not part of the XenMobile Server environment, and can reach XenMobile.
On your virtual VPN server from a console window, do the following. The IP addresses in the commands and examples are fictitious.
-
If you are using classic policies on your VPN virtual server, remove and unbind all classic policies. To check, type:
show vpn vserver <VPN_VServer>Remove any result that has the word Classic. For example:
VPN Session Policy Name: PL_OS_10.10.1.1 Type: Classic Priority: 0To remove the policy, type:
unbind vpn vserver <VPN_VServer> -policy <policy_name> -
Create the corresponding advanced session policy by typing the following.
add vpn sessionPolicy <policy_name> <rule> <session action>For example:
add vpn sessionPolicy vpn_nac true AC_OS_10.10.1.1_A_ -
Bind the policy to your VPN virtual server by typing the following.
bind vpn vserver _XM_XenMobileGateway -policy vpn_nac -priority 100 -
Create an authentication virtual server by typing the following.
add authentication vserver <authentication vserver name> <service type> <ip address>For example:
add authentication vserver authvs SSL 0.0.0.0In the example,0.0.0.0means that the authentication virtual server is not public facing. -
Bind an SSL certificate with the virtual server by typing the following.
bind ssl vserver <authentication vserver name> -certkeyName <Webserver certificate>For example:
bind ssl vserver authvs -certkeyName Star_mpg_citrix.pfx_CERT_KEY -
Associate an authentication profile to the authentication virtual server from the VPN virtual server. First, create the authentication profile by typing the following.
add authentication authnProfile <profile name> -authnVsName <authentication vserver name>For example:
add authentication authnProfile xm_nac_prof -authnVsName authvs -
Associate the authentication profile with the VPN virtual server by typing the following.
set vpn vserver <vpn vserver name> -authnProfile <authn profile name>For example:
set vpn vserver _XM_XenMobileGateway -authnProfile xm_nac_prof -
Check the connection from Citrix Gateway to a device by typing the following.
curl -v -k https://<XenMobile server>:4443/Citrix/Device/v1/Check --header "X-Citrix-VPN-Device-ID: deviceid_<device_id>"For example, this query verifies connectivity by getting the compliance status for the first device (
deviceid_1) enrolled in the environment:curl -v -k https://10.10.1.1:4443/Citrix/Device/v1/Check --header "X-Citrix-VPN-Device-ID: deviceid_1"A successful result is similar to the following example.
HTTP/1.1 200 OK < Server: Apache-Coyote/1.1 < X-Citrix-Device-State: Non Compliant < Set-Cookie: ACNODEID=181311111;Path=/; HttpOnly; Secure <!--NeedCopy--> -
When the preceding step is successful, create the web authentication action to XenMobile. First, create a policy expression to extract the device ID from the iOS VPN plug-in. Type the following.
add policy expression xm_deviceid_expression "HTTP.REQ.BODY(10000).TYPECAST_NVLIST_T(\'=\',\'&\').VALUE(\"deviceidvalue\")" -
Send the request to XenMobile by typing the following. In this example, the XenMobile Server IP is
10.207.87.82and the FQDN isexample.em.server.com:4443.add authentication webAuthAction xm_nac -serverIP 10.207.87.82 -serverPort 4443 -fullReqExpr q{"GET /Citrix/Device/v1/Check HTTP/1.1\r\n" + "Host: example.em.server.com:4443\r\n" + "X-Citrix-VPN-Device-ID: " + xm_deviceid_expression + "\r\n\r\n"} -scheme https -successRule "HTTP.RES.STATUS.EQ(\"200\") &&HTTP.RES.HEADER(\"X-Citrix-Device-State\").EQ(\"Compliant\")"The successful output for the XenMobile NAC is
HTTP status 200 OK. TheX-Citrix-Device-Stateheader must have the value ofCompliant. -
Create an authentication policy with which to associate the action by typing the following.
add authentication Policy <policy name> -rule <rule> -action <web authentication action>For example:
add authentication Policy xm_nac_webauth_pol -rule "HTTP.REQ.HEADER(\"User-Agent\").CONTAINS(\"NAC\")" -action xm_nac -
Convert the existing LDAP policy to an advanced policy by typing the following.
add authentication Policy <policy_name> -rule <rule> -action <LDAP action name>For example:
add authentication Policy ldap_xm_test_pol -rule true -action 10.10.1.1_LDAP -
Add a policy label with which to associate the LDAP policy by typing the following.
add authentication policylabel <policy_label_name>For example:
add authentication policylabel ldap_pol_label -
Associate the LDAP policy to the policy label by typing the following.
bind authentication policylabel ldap_pol_label -policyName ldap_xm_test_pol -priority 100 -gotoPriorityExpression NEXT -
Connect a compliant device to do a NAC test to confirm successful LDAP authentication. Type the following.
bind authentication vserver <authentication vserver> -policy <web authentication policy> -priority 100 -nextFactor <ldap policy label> -gotoPriorityExpression END -
Add the UI to associate with the authentication virtual server. Type the following command to retrieve the device ID.
add authentication loginSchemaPolicy <schema policy>-rule <rule> -action lschema_single_factor_deviceid -
Bind the authentication virtual server by typing the following.
bind authentication vserver authvs -policy lschema_xm_nac_pol -priority 100 -gotoPriorityExpression END -
Create an LDAP advanced authentication policy to enable the Secure Hub connection. Type the following.
add authentication Policy ldap_xm_test_pol -rule "HTTP.REQ.HEADER(\"User-Agent\").CONTAINS(\"NAC\").NOT" -action 10.200.80.60_LDAPbind authentication vserver authvs -policy ldap_xm_test_pol -priority 110 -gotoPriorityExpression NEXT