Configure roles with RBAC
Each predefined role-based access control (RBAC) role has certain associated access and feature permissions. This article describes what each of those permissions does. For a full list of default permissions for each built-in role, download Role-Based Access Control Defaults.
When you apply permissions, you’re defining the user groups the RBAC role has the permission to manage. The default administrator can’t change the applied permission settings. By default, the applied permissions apply to all user groups.
When you make an assignment, you’re assigning the RBAC role to a group, so that the group of users owns the RBAC administrator rights.
Important:
Under the Settings permission, the RBAC permission gives Admin users full access, including the ability to assign their own permissions. Give this access only to users who you intend to give the ability to manipulate everything in the Endpoint Management system.
This article has the following sections:
Admin Role
Users with the predefined Admin role have access or do not have access to the following features in XenMobile. By default, Authorized access (except Self-Help Portal), Console features, and Apply permissions are enabled.
Authorized access
| Admin console access | Administrators have access to all features on the XenMobile console. |
| Self-Help Portal access | Administrators do not have Self-Help Portal access. |
| Shared devices enroller | Administrators do not have Shared devices enroller access. This feature is intended for users who need to enroll shared devices. |
| Remote Support access | Administrators own Remote Support access.* |
| Public API access | Administrators have access to the public API to do actions programmatically that are available on the XenMobile console. The actions include administering certificates, apps, devices, delivery groups, and local users. |
| COSU devices enroller | Provides a way for administrators to enroll dedicated Android Enterprise devices (also known as COSU devices) if this capability isn’t configured using an enrollment profile. |
* Remote support enables your help desk representatives to take remote control of managed Android mobile devices. Screen cast is supported on Samsung Knox devices only. Remote support isn’t available for clustered on-premises XenMobile Server deployments. Remote Support is no longer available for new customers from January 1, 2019. Existing customers can continue to use the product, however Citrix doesn’t provide enhancements or fixes.
Console features
Administrators have unrestricted access to the XenMobile console.
| Dashboard | The Dashboard is the first page that administrators see after logging on to the XenMobile console. The Dashboard shows basic information about notifications and devices. | |
| Reporting | The Analyze > Reporting page provides pre-defined reports that let you analyze your app and device deployments. | |
| Devices | The Manage > Devices page is where you manage user devices. You can add individual devices on the page or import a device provisioning file to add multiple devices at one time. | |
| Local Users and Groups | The Manage > Users page is where you can add, edit, or delete local users and local user groups. | |
| Enrollment | The Manage > Enrollment Invitations page is where you manage how users are invited to enroll their devices in XenMobile. | |
| Policies | The Configure > Device Policies page is where you manage device policies, such as VPN and Wi-Fi. | |
| Apps | The Configure > Apps page is where you manage the various apps that users can install on their devices. | |
| Media | The Configure > Media page is where you manage the various media that users can install on their devices. | |
| Action | The Configure > Actions page is where you manage responses to trigger events. | |
| Enrollment Profiles | The Configure > Enrollment Profiles page is where you configure enrollment profiles (modes) to allow users to enroll their devices. | |
| Delivery Groups | The Configure > Delivery Groups page is where you manage delivery groups and the resources associated with them. | |
| Settings | The Settings page is where you manage system settings, such as client and server properties, certificates, and credential providers. Important: These settings include the RBAC permission. The RBAC permission gives admins full access, including the ability to assign their own permissions. Give this access only to users who you intend to give the ability to manipulate everything in the Endpoint Management system. | |
| Support | The Troubleshooting and Support page is where you do troubleshooting activities such as running diagnostics and generating logs. |
Devices
Administrators access device features throughout the console by setting device restrictions, setting up and sending notifications to devices, administering apps on the devices, and so on.
| Full Wipe device | Erase all data and apps from a device, including memory cards if the device has one. |
| Clear Restriction | Remove one or more device restrictions. |
| Selective Wipe device | Erase all corporate data and apps from a device, leaving personal data and apps in place. |
| View locations | See the location of and set geographic restrictions on a device. Includes: Locate device, See the location of a device, Track device, Track a device’s location over time. |
| Lock device | Remotely lock a device so that users can’t use the device. |
| Unlock device | Remotely unlock a device so that users can use the device. |
| Lock container | Remotely lock the corporate container on a device. |
| Unlock container | Remotely unlock the corporate container on a device. |
| Reset container password | Reset the corporate container password. |
| Enable ASM DEP/Bypass activation lock | Store a bypass code on a supervised iOS device when Activation Lock is enabled. If you need to erase the device, use this code to clear the Activation Lock automatically. |
| Rings the device | Remotely ring a Windows device at full volume for 5 minutes. |
| Reboot the device | Restart Windows devices from the XenMobile console. |
| Deploy to device | Send apps, notifications, restrictions, and so on to a device. |
| Edit device | Change the settings on the device. |
| Notification to device | Send a notification to a device. |
| Add/Delete device | Add or remove devices from XenMobile. |
| Devices import | Import a group of devices from a file into XenMobile. |
| Export device table | Collect device information from the Device page and export it to a .csv file. |
| Revoke device | Prohibit a device from connecting to XenMobile. |
| App lock | Deny access to all apps on a device. On Android, users can’t log into XenMobile. On iOS, users can log in, but they can’t access apps. |
| App wipe | On Android, this action deletes the user’s XenMobile account. On iOS, this action deletes the encryption key users need to access XenMobile features. |
| View software inventory | See what software is installed on a device. |
| Request AirPlay mirroring | Request to start AirPlay streaming. |
| Stop AirPlay mirroring | Stop AirPlay streaming. |
| Enable lost mode | On Manage > Devices, you can put a supervised device in lost mode to block a supervised device on the lock screen. Lost mode also enables you to locate the device when the device is lost or stolen. |
| Disable lost mode | On Manage > Devices, you can disable lost mode for a device that is set to lost mode. |
| OS Update device | You can deploy a Control OS Updates device policy to devices. |
| Shut down device | Shut down iOS devices from the XenMobile console. |
| Restart device | Restart iOS devices from the XenMobile console. |
Local Users and Groups
Administrators manage local users and local user groups on the Manage > Users page in XenMobile.
| Add Local Users |
| Delete Local Users |
| Edit Local Users |
| Import Local Users |
| Export Local Users |
| Local User Groups |
| Get Local User Lock ID |
| Delete Local User Lock |
Enrollment
Administrators can add and delete enrollment invitations, send notifications to users, and export the enrollment table to a .csv file.
| Add/Delete enrollment | Add or remove an enrollment invitation to a user or a group of users. |
| Notify user | Send and enrollment invitation to a user or group of users. |
| Export enrollment invitation table | Collect enrollment information from the Enrollment page and export it to a .csv file. |
Policies
| Add/Delete policy | Add or remove a device or app policy. |
| Edit policy | Change a device or app policy. |
| Upload Policy | Upload a device or app policy. |
| Clone Policy | Copy a device or app policy. |
| Disable Policy | Disable an existing app policy. |
| Export Policy | Collect device policy information from the Device Policies page and export it to a .csv file. |
| Assign Policy | Assign a device policy to one or more delivery groups. |
App
Administrators manage apps on the Configure > Apps page in XenMobile.
| Add/Delete app store or enterprise app | Add or remove a public app store app or an enterprise app (not MDX-enabled). |
| Edit app store or enterprise app | Change a public app store app or an enterprise app (not MDX-enabled). |
| Add/Delete MDX, Web, and SaaS app | Add or remove an MDX-enabled app, an app from your internal network (Web app), or an app from a public network (SaaS) to XenMobile. |
| Edit MDX, Web, and SaaS app | Change an MDX-enabled app, an app from your internal network (Web app), or an app from a public network (SaaS) to XenMobile. |
| Add/Delete category | Add or delete a category in which apps can appear in the XenMobile Store. |
| Assign public/enterprise app to delivery group | Assign a public app store app or an MDX-enabled app to a delivery group for deployment. |
| Assign MDX/WebLink/SaaS app to delivery group | Assign to a delivery group an app that is MDX-enabled, doesn’t require single sign-on (WebLink), or that’s from a public network (SaaS). |
| Export app table | Collect app information from the App page and export it to a .csv file. |
Note:
When you select Console features > App, the API endpoint
GET <https://XMS_IP:4443/controlpoint/rest/ad>returns the LDAP information by design.
Media
Manage media obtained from a public app store or through a Volume Purchase license.
| Add/Delete app store or enterprise books |
| Assign public/enterprise books to delivery group |
| Edit app store or enterprise books |
Action
| Add/delete action | Add or remove an action that is defined by a trigger (event, device or user property, or installed app name) and associated response. |
| Edit action | Change an action that is defined by a trigger (event, device or user property, or installed app name) and associated response. |
| Assign action to delivery group | Assign an action to a delivery group for deployment to user devices. |
| Export action | Collect action information from the Actions page and export it to a .csv file. |
Delivery group
Administrators manage delivery groups from the Configure > Delivery Groups page.
| Add/delete delivery group | Create or remove a delivery group, which adds specified users and optional policies, apps, and actions. |
| Edit delivery group | Change an existing delivery group, which modifies users and optional policies, apps, and actions. |
| Deploy delivery group | Make a delivery group available for use. |
| Export delivery group | Collect delivery group information from the Delivery group page and export it to a .csv file. |
Enrollment profile
Manage enrollment profiles.
| Add/delete enrollment profile |
| Edit enrollment profile |
| Assign enrollment profile to delivery group |
Settings
Administrators configure various settings on the Settings pages.
| RBAC | RBAC Assignment, Assign roles. Important: This permission gives admins full access, including the ability to assign their own permissions. Give this access only to users who you intend to give the ability to manipulate everything in the Endpoint Management system. |
| LDAP | Administer one or more LDAP-compliant directories, such as Active Directory, to import groups, user accounts, and related properties. |
| License | For on-premises XenMobile Server. Administer your Citrix® licenses. |
| Enrollment | Enable enrollment security modes for users and the Self-Help Portal. |
| Release Management | View the current installed release. Includes: Release Management Update |
| Certificates | Edit APNS certificate, Certificates SSL Listener |
| Notification Templates | Create notification templates to use in automated actions, enrollment, and standard notification message delivery to users. |
| Workflows | Manage the creation, approval, and removal of user accounts for use with app configurations. |
| Credential Providers | Add one or more credential providers authorized to issue device certificates. The credential providers control the certificate format and the conditions for renewing or revoking the certificate. |
| PKI Entities | Manage public key infrastructure entities (generic, Microsoft Certificate Services, or discretionary CA). |
| Test PKI Connection | Use the Test Connection button on the Settings > PKI Entities page to make sure that the server is accessible. |
| Client Properties | Manage various properties on user devices, such as passcode type, strength, or expiration. |
| Client Support | Set the ways in which users can contact your support services (email, phone, or support ticket email). |
| Client Branding | Create a custom store name and default store views for the XenMobile Store. Add a custom logo that appears in a XenMobile Store or Secure Hub. |
| Carrier SMS Gateway | Set up carrier SMS gateways to configure notifications that XenMobile sends through carrier SMS gateways. |
| Notification Server | Set up an SMTP gateway server to send an email to users. |
| ActiveSync Gateway | Manage user access to users and devices through rules and properties. |
| Apple Deployment Program | Add an Apple Deployment Program account to XenMobile. |
| Apple Configurator Device Enrollment | Configure Apple Configurator settings in XenMobile. |
| iOS/volume purchase Settings | Add Apple Volume Purchase accounts. |
| Mobile Service Provider | Use the Mobile Service Provider interface to query BlackBerry and other Exchange ActiveSync devices and to issue operations. |
| Citrix Gateway | For on-premises XenMobile Server. Add a Citrix Gateway. Choose whether to enable authentication and whether to push a user certificate for authentication. Choose a credential provider. |
| Network Access Control | Set the conditions that determine a device is non-compliant and therefore denied access to the network. |
| Samsung Knox | Enable or disable XenMobile to query Samsung Knox attestation server REST APIs. |
| Server Properties | Add or modify server properties. Requires restarting XenMobile on all nodes. |
| Syslog | For on-premises XenMobile Server. Send log files to a System Log (syslog) server using the server host name or IP address. |
| XenApp and XenDesktop® | Allow users to add Virtual Apps and Desktops through Secure Hub. |
| Citrix Files | When using XenMobile with Enterprise accounts: Configure settings to connect to the ShareFile account and administrator service account to manage user accounts. Requires existing Citrix Files domain and administrator credentials. When using XenMobile with storage zone connectors: Configure XenMobile to point to network shares and SharePoint locations defined in storage zones connectors. |
| Experience Improvement Program | For on-premises XenMobile Server. Opt into or out of sending anonymous statistics and usage information to Citrix. |
| Microsoft Azure | For on-premises XenMobile Server. Integrate XenMobile with Microsoft Azure. |
| Android Enterprise | Configure Android Enterprise server settings. |
| Identity Provider (IdP) | Configure an identity provider. |
| XenMobile Tools | Access the XenMobile Tools page. |
| SNMP Configuration | Enable SNMP for XenMobile Server nodes. Edit or add monitoring users, set up the SNMP manager where trap notifications appear, and configure trap intervals and thresholds. |
Support
Administrators can do various support tasks.
| Citrix Gateway Connectivity Checks | Do various connectivity checks for Citrix Gateway by IP address. Requires a user name and password. |
| XenMobile Connectivity Checks | Do connectivity checks for selected XenMobile features, such as database, DNS, or Google Plan. |
| Create Support Bundles | For on-premises XenMobile Server. Create a file to send to Citrix Support for troubleshooting. Has system information, logs, database information, core information, trace files, and the latest configuration information for XenMobile or Citrix Gateway. |
| Citrix Product Documentation | Access the public Citrix XenMobile documentation site. |
| Citrix Knowledge Center | Access the Citrix Support site to search for knowledge-base articles. |
| Logs | Access and analyze log file details for debug, admin audit, and user audit. |
| Cluster Information | For on-premises XenMobile Server. Access information about each of the nodes in a clustered environment. |
| Garbage Collection | For on-premises XenMobile Server. Access information about memory objects no longer in use. |
| Java Memory Properties | For on-premises XenMobile Server. Access a snapshot of Java memory usage, memory details, and memory pool details. |
| Macros | Populate user or device property data within the text field of a profile, policy, notification, or enrollment template. Configure a single policy, deploy the policy to a large user base, and have user-specific values appear for each targeted user. |
| PKI Configuration | Import and export PKI configuration information. |
| APNS Signing Utility | Submit a request for Apple Push Network signing (APNs) certificates, or upload a Secure Mail APNs certificate for iOS. |
| Citrix Insight Services | Upload logs to Citrix Insight Services (CIS) for assistance with various issues. |
| Device Citrix Gateway connector™ for Exchange ActiveSync Status | Query XenMobile for the status of a device as sent to the Citrix Gateway connector for Exchange ActiveSync based on the device ActiveSync ID. |
| Anonymization and de-anonymization | For on-premises XenMobile Server. When you create support bundles in XenMobile, sensitive user, server, and network data are made anonymous by default. You can change this behavior in Support > Anonymization and De-anonymization under Advanced. |
| Log Settings | Customize the log level or add a custom logger. |
Restrict Group Access
Admin users can apply permissions to all user groups.
Support Role
Users with the Support role have access to remote support. Their permissions apply to all users by default and they can’t edit this setting.
User Role
Users with the User role have the following limited access to XenMobile.
Authorized access
| Self-Help Portal | Users have access only to the Self-Help Portal in XenMobile. |
Console features
Users have the following restricted access to the XenMobile console.
Devices
| Full Wipe device | Erase all data and apps from a device, including memory cards if the device has one. |
| Selective Wipe device | Erase all corporate data and apps from a device, leaving personal data and apps in place. |
| View locations | See the location of and set geographic restrictions on a device. Included: Locate device, See the location of a device, Track device, Track device location over time |
| Lock device | Remotely lock a device so that it can’t be used. |
| Unlock device | Remotely unlock a device so that It can be used. |
| Lock container | Remotely lock the corporate container on a device. |
| Unlock container | Remotely unlock the corporate container on a device. |
| Reset container password | Reset the corporate container password. |
| Enable ASM DEP/Bypass activation lock | Store a bypass code on a supervised iOS device when Activation Lock is enabled. If you need to erase the device, use this code to clear the Activation Lock automatically. |
| Rings the device | Remotely ring a Windows device at full volume for 5 minutes. |
| Reboot the device | Restart a Windows device. |
| View software inventory | See what software is installed on a device. |
Enrollment
| Add/Delete enrollment | Add or remove an enrollment invitation to a user or a group of users. |
| Notify user | Send and enrollment invitation to a user or group of users. |
Restrict Group Access
For all four default roles, this permission is set by default and can be applied to all user groups. You can’t edit the role.
Configure roles with RBAC
The Role-Based Access Control (RBAC) feature in XenMobile lets you assign predefined roles, or sets of permissions, to users and groups. These permissions control the level of access users have to system functions.
XenMobile implements four default user roles to logically separate access to system functions:
- Administrator: Grants full system access.
- Support: Grants access to remote support.
- User: Used by users who can enroll devices and access the Self-Help Portal.
You can also use the default roles as templates that you customize to create user roles. You can assign the roles permissions to access specific system functions beyond the functions defined by the default roles.
Roles can be assigned to local users (at the user level) or to Active Directory groups (all users in that group have the same permissions). If a user belongs to several Active Directory groups, all the permissions are merged to define the permissions for that user. For example, suppose that ADGroupA users can locate manager devices and ADGroupB users can wipe employee devices. In that case, a user who belongs to both groups can locate and wipe the devices of managers and employees.
Note:
Local users might have only one role assigned to them.
You can use the RBAC feature in XenMobile to do the following:
- Create a role.
- Add groups to a role.
- Associate local users to roles.
-
In the XenMobile console, go to Settings > Role-Based Access Control. The Role-Based Access Control page appears, which displays the four default user roles, plus any roles you have previously added.
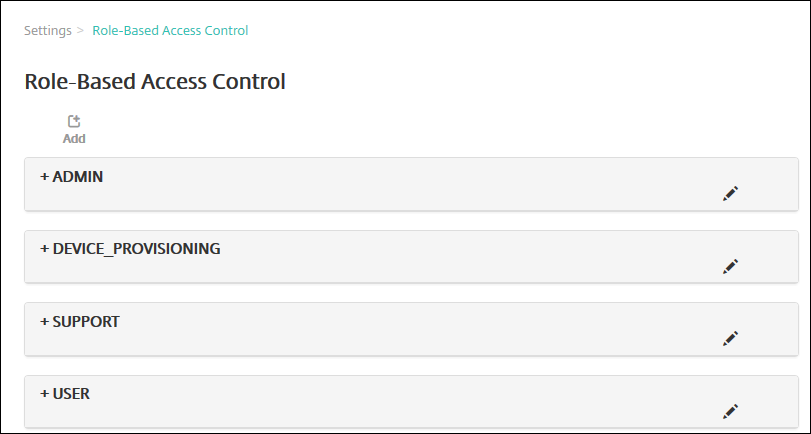
If you click the plus sign (+) next to a role, the role expands to show all the permissions for that role, as shown in the following figure.

-
Click Add to add a new user role. To edit the role, click the pen icon to the right of an existing role. To delete the role, click the trash can icon to the right of a role. You can’t delete the default user roles.
- When you click Add or the pen icon, the Add Role or the Edit Role page appears.
- When you click the trash can icon, a confirmation dialog appears. Click Delete to remove the selected role.
-
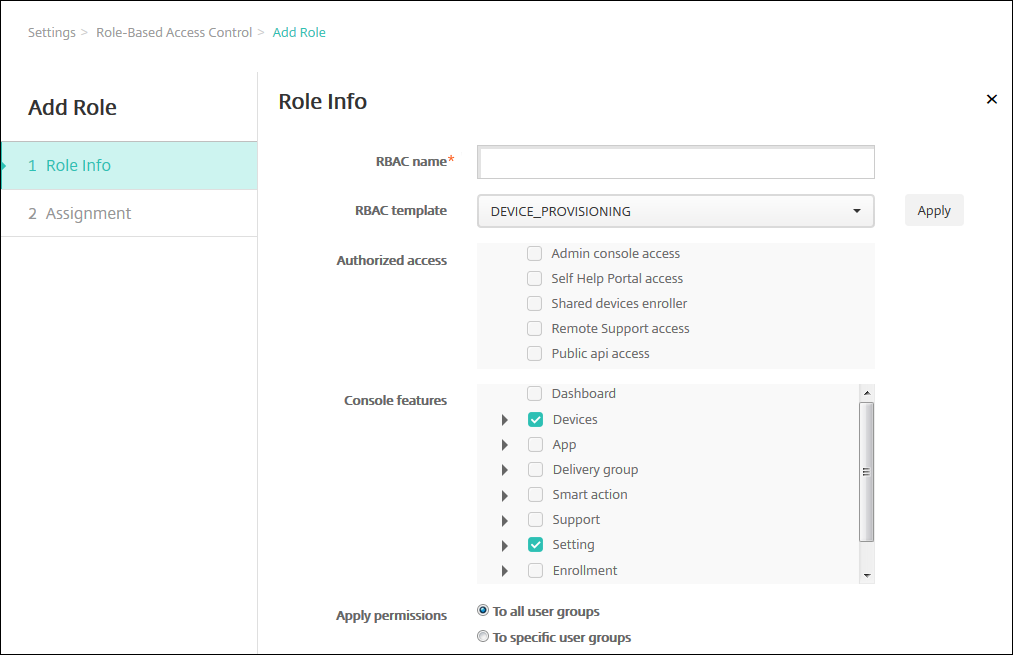
Enter the following information to create or edit a user role:
- RBAC name: Enter a descriptive name for the new user role. You can’t change the name of an existing role.
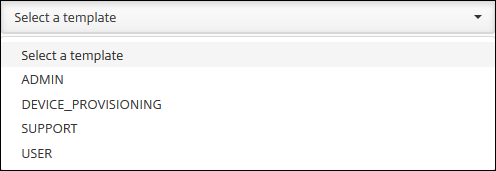
- RBAC template: Optionally, click a template as the starting point for the new role. You can’t select a template if you’re editing an existing role.
RBAC templates are the default user roles. They define the access to system functions that users associated with that role have. After you select an RBAC template, you can see all permissions associated with that role in the Authorized Access and Console Features fields. Using a template is optional. You can directly select the options you want to assign to a role in the Authorized Access and Console Features fields.
-
Click Apply near the selected RBAC template field to populate Authorized access and Console features with the pre-defined access and feature permissions.
-
Select and clear the checkboxes in Authorized access and Console features to customize the role.
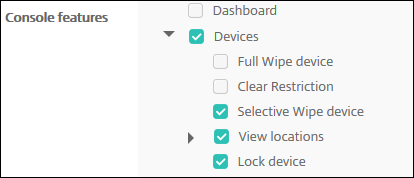
If you click the triangle next to a Console feature, permissions specific to that feature appear that you can select and clear. Clicking the top-level checkbox prohibits access to that console area. Select individual options below the top level to enable those options. For example, in the following figure, the Full Wipe device and Clear Restrictions options don’t appear for users assigned to the role. The checked options do appear.
-
Apply permissions: Select one or more user groups to limit which groups the administrator can manage. If you click To specific user groups, a list of groups appears from which you can select one or more groups.
For example, if an RBAC administrator has permissions to the ActiveDirectory and MSP user groups:
- The administrator can access information only for users who are in the ActiveDirectory group, the MSP group, or both of those groups.
- The administrator can’t view any other local or AD users. The administrator can view users who are members of child groups of either of those groups.
- The administrator can send invitations to:
- the permission groups and their child groups
- the users who are members of permission groups and their child groups

-
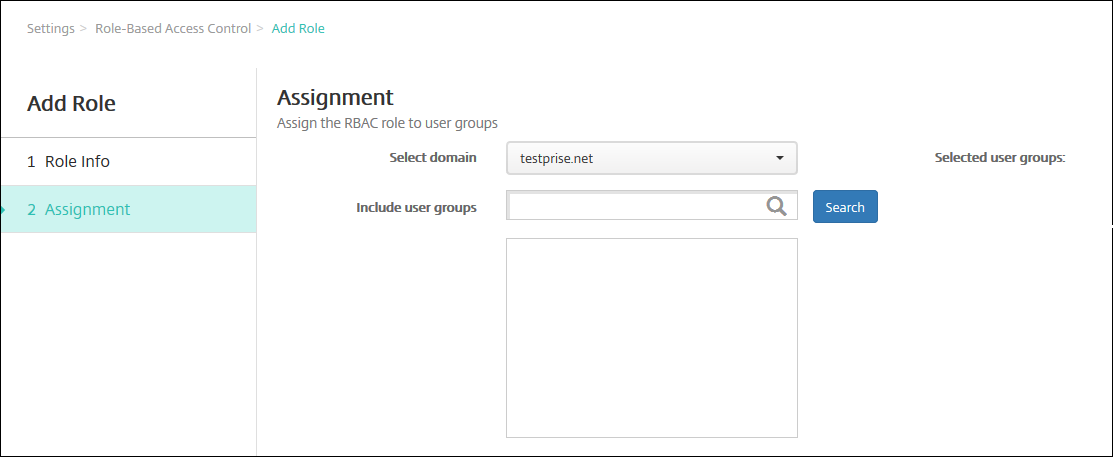
Click Next. The Assignment page appears.
-
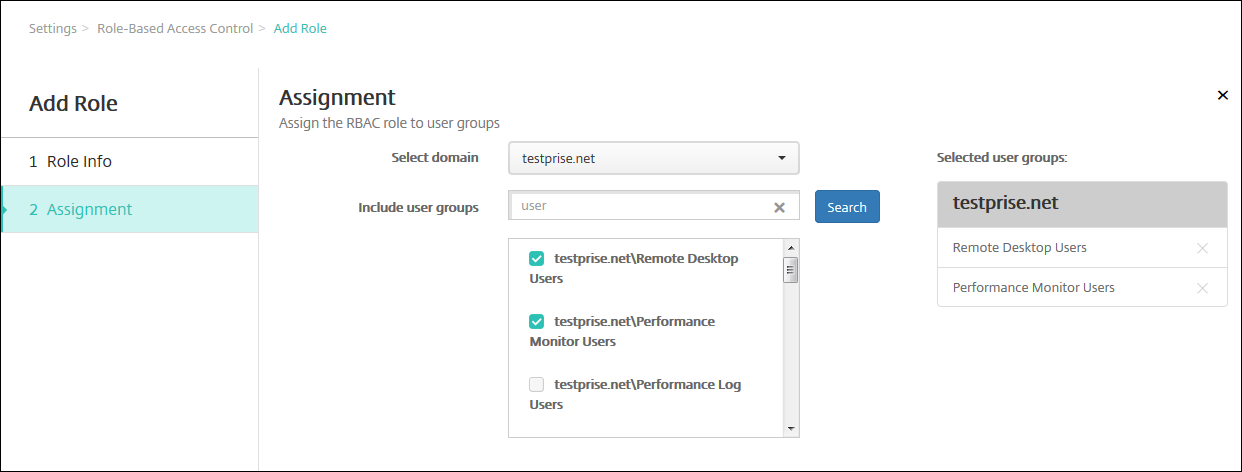
Enter the following information to assign the role to user groups.
- Select domain: Click a domain in the drop-down list.
- Include user groups: Click Search to see a list of all available groups, or type a full or partial group name to limit the list to only groups with that name.
- In the list that appears, select the user groups to which you want to assign the role. When you select a user group, the group appears in the Selected user groups list.
Note:
To remove a user group from the Selected user groups list, click the X next to the user group name.
-
Click Save.