Agentless access to enterprise web apps
Enterprise web applications like SharePoint, JIRA, Confluence, and others hosted by the customer on-premises or on public clouds can now be accessed directly from a client browser. End users no longer need to initiate access to their enterprise web apps from the Citrix Workspace experience. This feature also enables end users to access web apps by clicking links from emails, collaboration tools, or browser bookmarks, providing a true zero-footprint solution to customers.
How it works
-
Add a new DNS record or modify an existing DNS record for the configured enterprise web apps.
-
An IT administrator adds a new public DNS record or modify an existing public DNS record for the configured enterprise web app FQDN to redirect the user to the Citrix Secure Private Access™ service.
-
When the end-user initiates access to the configured enterprise web app, the app traffic is steered to the Citrix Secure Private Access service, which then will proxy the access to the app.
-
Once the request lands on the Citrix Secure Private Access service, it checks for user authentication and application authorization, including contextual access policies checks.
-
Upon successful validation, the Citrix Secure Private Access service communicates with Citrix Cloud Connector™ Appliances, deployed at the customer’s environment (either in on-premises or cloud) to enable access to the configured enterprise web app.
Configure Citrix Secure Private Access for agentless access to enterprise web apps
Prerequisites:
Before you begin, you need the following for the application to be configured.
- Application FQDN
- SSL certificate – Public certificate for the app to be configured
- Resource location – Install Citrix Cloud™ Connector Appliances
- Access to the public DNS record to update it with the canonical name (CNAME) provided by Citrix® during the app configuration.
Configure agentless access to enterprise web apps:
- Log in to Citrix Cloud and select Secure Private Access.
- Click Applications > App Configuration and then click Add an app.
-
In the Choose a template section, click Skip. Templates are available only for SaaS apps.
-
In Where is the application location?, select Inside my corporate network.
-
Select Inside my corporate network for applications hosted within your organization’s private network infrastructure, behind firewalls and accessible only through internal network connection
-
Select Outside my corporate network (Google Connector): For applications hosted outside your organization’s private network infrastructure. Traffic routing occurs directly from users to the external application via the Google Cloud Connector.
-
-
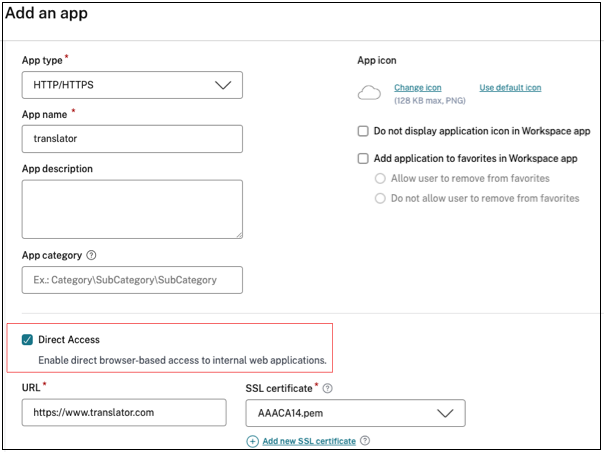
Enter the following details in the App Details section and click Next.

-
App type – Select the app type (HTTP or HTTPS).
Note:
For Chrome Enterprise Premium (CEP), only HTTPS enterprise web and SaaS apps are supported. HTTP enterprise web and SaaS apps are not supported.
-
App name – Name of the application.
-
App description - A brief description of the app. This description is displayed to your users in the workspace.
-
App icon – Click Change icon to change the app icon. The icon file size must be 128x128 pixels. If you do not change the icon, the default icon is displayed.
If you do not want to display the app icon, select Do not display application icon to users.
-
-
Select Agentless Access to enable users access the app directly from a client browser. Enter the following details.
The Agentless Access option is available only for enterprise web apps.
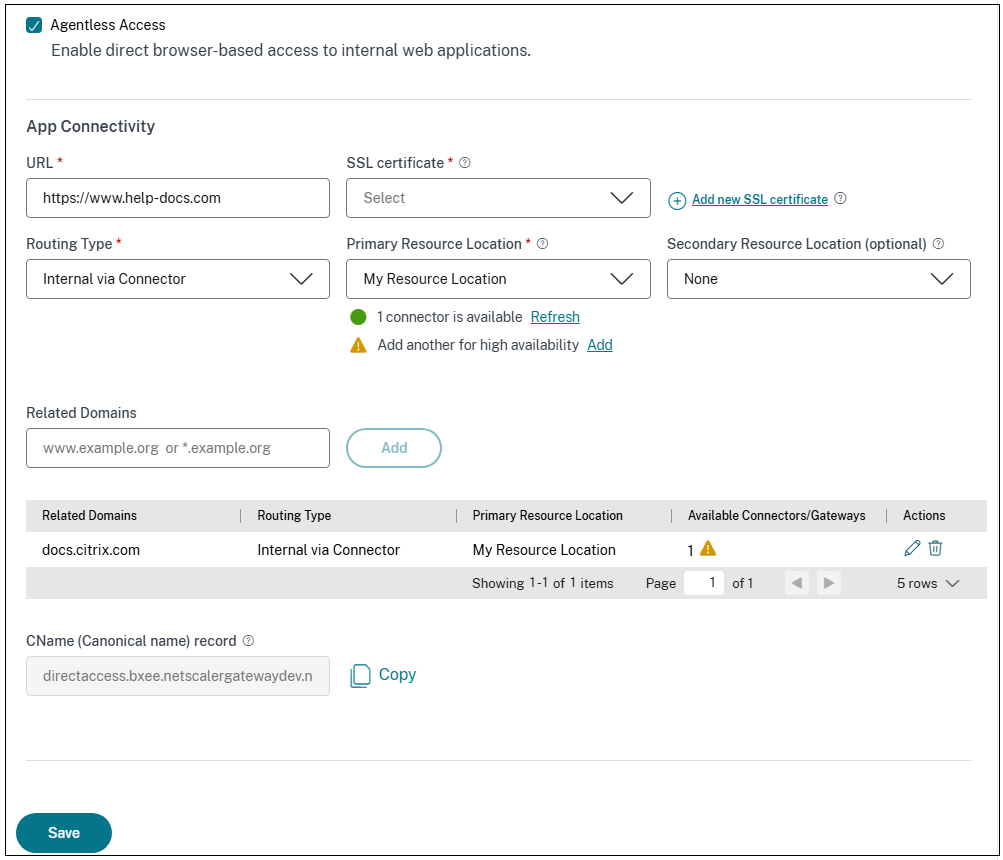
- URL – URL for the back-end application. The URL must be in HTTPS format and a corresponding DNS entry must be added by the admin.
-
SSL certificate – Select an existing SSL certificate from the drop-down menu or add a new SSL certificate by clicking Add New SSL Certificate.
- Only a public or a trusted CA certificate is supported.
- A full chain of certificates must be uploaded.
Important:
- Administrators must upload certificates directly to the Secure Private Access console, as Secure Private Access manages its own certificate store. For details, see Manage certificates in the Secure Private Access console.
- Certificates added to the NetScaler® console can no longer be used in Secure Private Access as the certificates are not synchronized between the two systems.
-
Related Domains – The related domain is auto-populated based on the URL that you’ve provided. Related domain helps the service to identify the URL as part of the app and route traffic accordingly. You can add more than one related domain. You can bind an SSL certificate to each related domain, this is optional.
Note:
A warning message appears if duplicate related domains are added or if a related domain is also added as a URL for a different app. To avoid these issues, see Best Practices for Web and SaaS application configurations.
- CName record – Auto generated by Secure Private Access. This is the value that must be entered in the DNS to enable agentless access to the application.
-
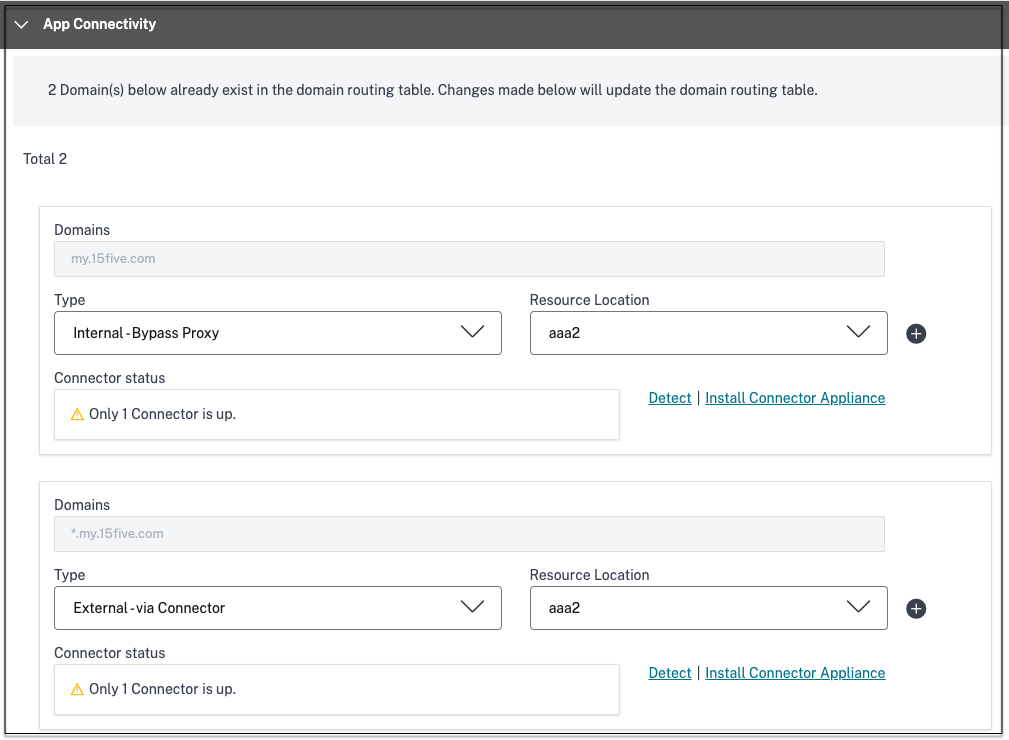
In the App Connectivity section, you define routing for the related domains of applications, if the domains must be routed externally or internally through Citrix Connector™ Appliance.
-
Routing Type - Select one of the following:
-
Internal – bypass proxy - The domain traffic is routed through Connector Appliance™, bypassing the customer’s web proxy configured on the Connector Appliance.
- Internal via Connector - The apps can be external but the traffic must flow through the Connector Appliance to the outside network.
- External – The traffic flows directly to the internet.
-
-
Primary and secondary resource locations - Admins can ensure high availability of applications even during disruptions by configuring a secondary resource location or by using the First Available option.
- Primary Resource Location: Select the primary resource location where the application is hosted. Alternatively, admins can select the option First Available in Primary Resource Location.
- First available: The First Available option ensures that a working resource location is used. When First Available is selected, the system automatically routes traffic to the first available location. This ensures continuous application access without manual intervention. For instance, if ResourceLocation1 is unavailable but ResourceLocation2 is reachable, then ResourceLocation2 is selected by default to front-end the application.
- Secondary Resource Location - The Secondary Resource Location option becomes available only if a primary resource location is explicitly specified. If the primary resource location becomes unavailable, for reasons such as a Connector Appliance or data center failure, the application fails over to the specified secondary resource location. The secondary resource location can also act as a failover even when the application is hosted in another data center.
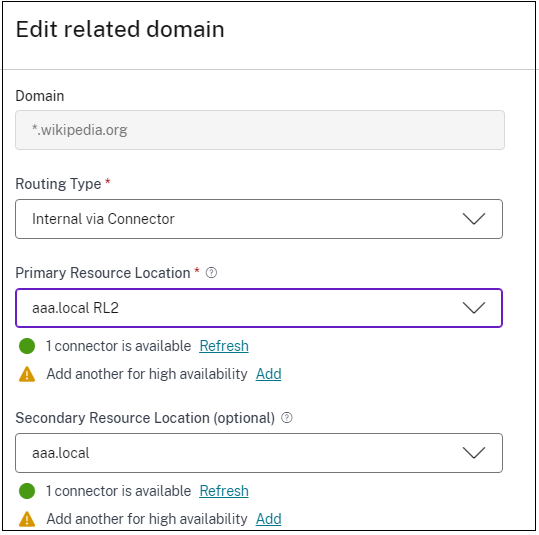
You can also set a primary and secondary resource location or select the First Available option for each of the related domains.
- Click the edit icon in the Actions column of the Related Domains table.
- Set the primary and secondary resource location or choose the First Available option.
Note:
Setting the backup resource location and using the First Available option feature is in Preview.
-
-
In the App Connectivity section, you can either select an existing resource location or create one and deploy a new Connector Appliance. To choose an existing resource location, click one of the resource locations from the list of resource locations, for example My Resource Location, and click Next. For details, see Route tables to resolve conflicts if the related domains in both SaaS and web apps are the same.
-
Maintain consistent connection - Select this checkbox to enable consistent connection to the same Connector Appliance. For details about consistent connections, see Maintain consistent connection.
Note:
When the Maintain consistent connection option is selected, the routing type for the application must be set to Internal via Connector in the App Connectivity section.
-
Set the preferred sign-on method.
Note:
The single sign-on option is not applicable for Citrix Secure Access with Chrome Enterprise (CEP).
-
In the Single Sign On section, select your preferred single sign-on type to be used for your application and click Save. The following single sign-on types are available.
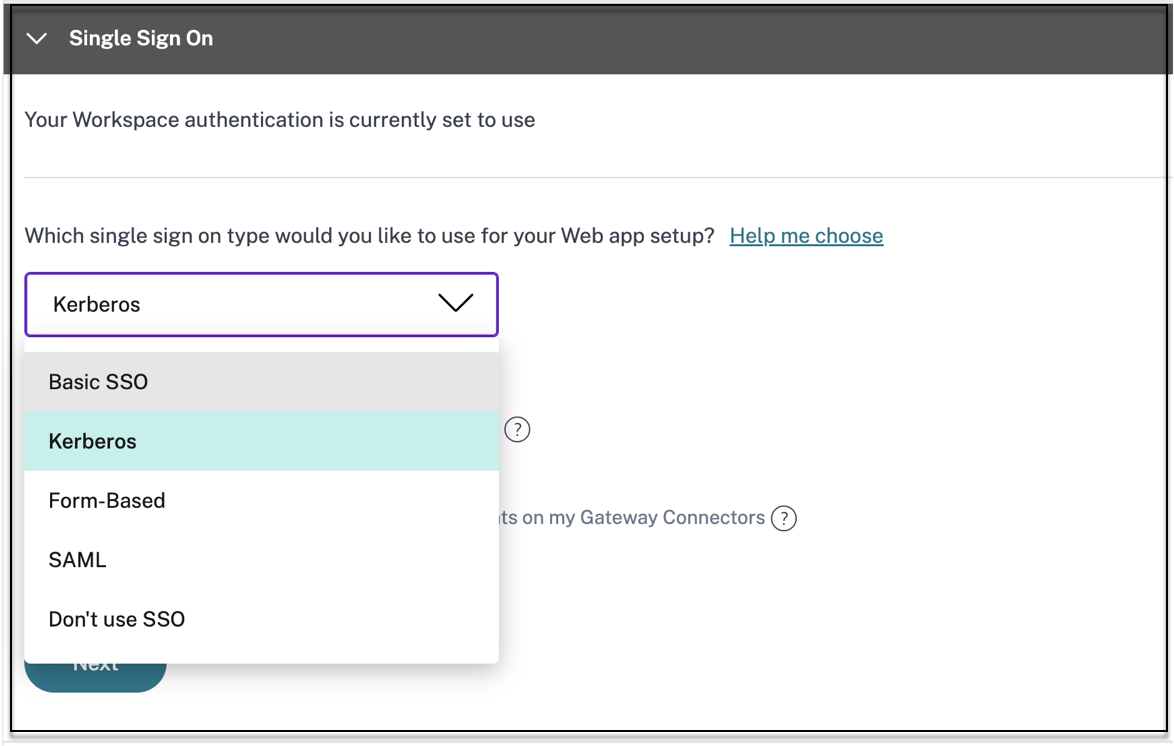
- Basic – If your back-end server presents you with a basic-401 challenge, choose Basic SSO. You do not need to provide any configuration details for the Basic SSO type.
- Kerberos – If your back-end server presents you with the negotiate-401 challenge, choose Kerberos. You do not need to provide any configuration details for the Kerberos SSO type.
- Form-Based – If your back-end server presents you with an HTML form for authentication, choose Form-Based. Enter the configuration details for the Form-Based SSO type.
- SAML - Choose SAML for SAML-based SSO into web applications. Enter the configuration details for SAML SSO type.
- Don’t use SSO – Use the Don’t use SSO option when you do not need to authenticate a user on the back end server. When the Don’t use SSO option is selected, the user is redirected to the URL configured under the App details section.
Form based details:
Enter the following form-based configuration details in the Single Sign On section and click Save.
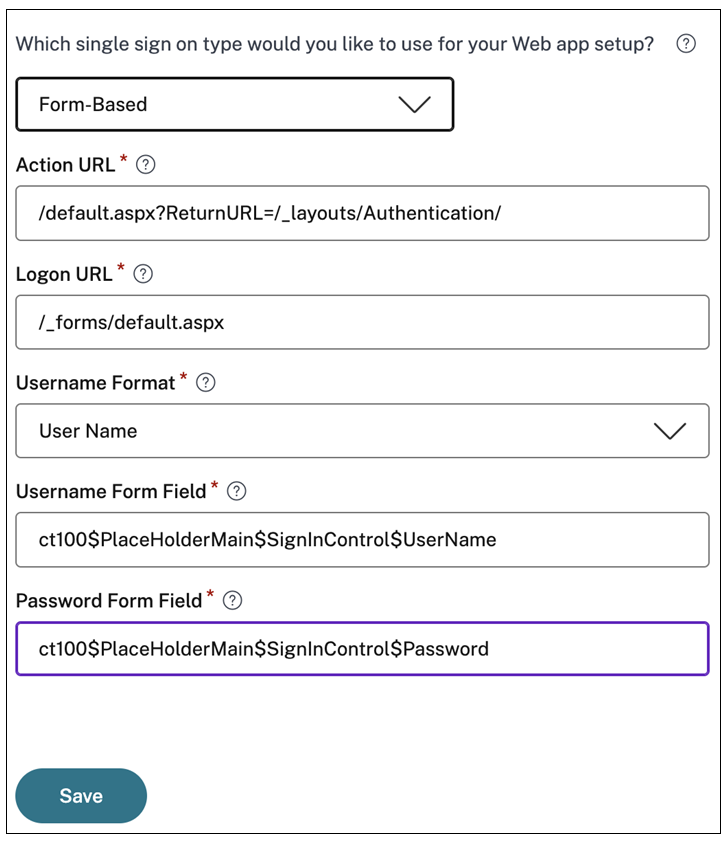
- Action URL - Type the URL to which the completed form is submitted.
- Logon form URL – Type the URL on which the logon form is presented.
- Username Format - Select a format for the user name.
- Username Form Field – Type a user name attribute.
- Password Form Field – Type a password attribute.
SAML:
Enter the following details in the Sign sign on section and click Save.**
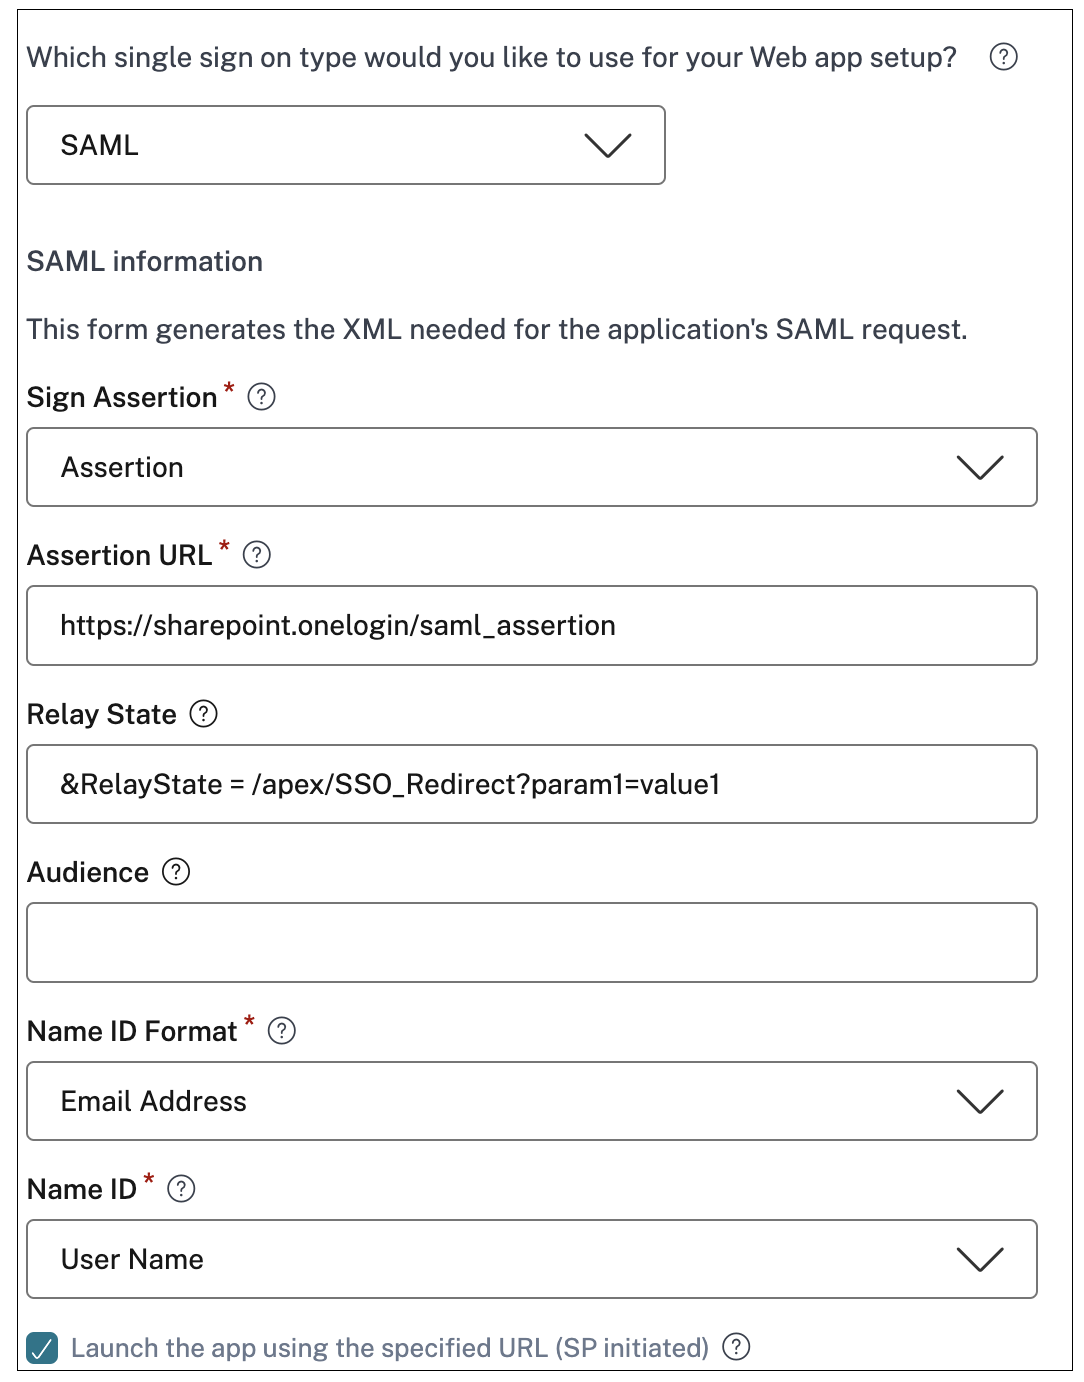
- Sign Assertion - Signing assertion or response ensures message integrity when the response or assertion is delivered to the relying party(SP). You can select Assertion, Response, Both, or None.
- Assertion URL – Assertion URL is provided by the application vendor. The SAML assertion is sent to this URL.
- Relay State – The Relay State parameter is used to identify the specific resource the users access after they’re signed in and directed to the relying party’s federation server. Relay State generates a single URL for the users. Users can click this URL to log on to the target application.
- Audience – Audience is provided by the application vendor. This value confirms that the SAML assertion is generated for the correct application.
-
Name ID Format – Select the supported name identifier format.
- Name ID – Select the supported name ID.
-
In Advanced attributes (optional) add additional information about the user that is sent to the application for access control decisions.
-
Download the metadata file by clicking the link under SAML Metadata. Use the downloaded metadata file to configure SSO on the SaaS apps server.
- You can copy the SSO login URL under Login URL and use this URL when configuring SSO on the SaaS apps server.
- You can also download the certificate from the Certificate list and use the certificate when configuring SSO on the SaaS apps server.
-
-
Click Save and then click Finish. The app is added to the Applications page. You can or edit or delete an app from the Applications page after you’ve configured the application. To do so, click the ellipsis button on an app and select the actions accordingly.
- Edit Application
- Delete
Important:
- To enable zero-trust-based access to the apps, apps are denied access by default. Access to the apps is enabled only if an access policy is associated with the application. For details on creating access policies, see Create access policies.
- If multiple apps are configured with the same FQDN or some variation of the wildcard FQDN, this might result in a conflicting configuration. To prevent conflicting configurations, see Best practices for Web and SaaS application configurations.
Device Posture service with agentless access apps
Citrix Secure Private Access with agentless access apps when combined with the Device Posture service can ensure that only compliant devices access sensitive applications through agentless access. Admins can block access to non-compliant or non-managed devices based on the Device Posture service scan results.
Steps to enable agentless access for compliant devices only
To enable agentless access to only compliant devices, the admin must perform the following steps:
-
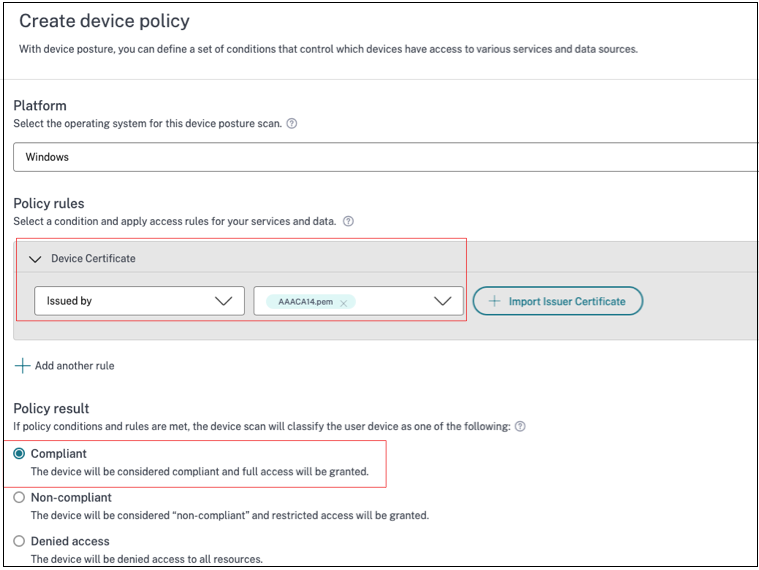
From the Device Posture service admin console, create a device posture policy to check for the device posture scan conditions such as device certificate, antivirus, browser and then select Compliant as the policy result action. For details, see Configure device posture.
-
From the Secure Private Access admin console, perform the following:
- Create an application for which you want to enable agentless access. For details, see Direct access to Enterprise web apps.
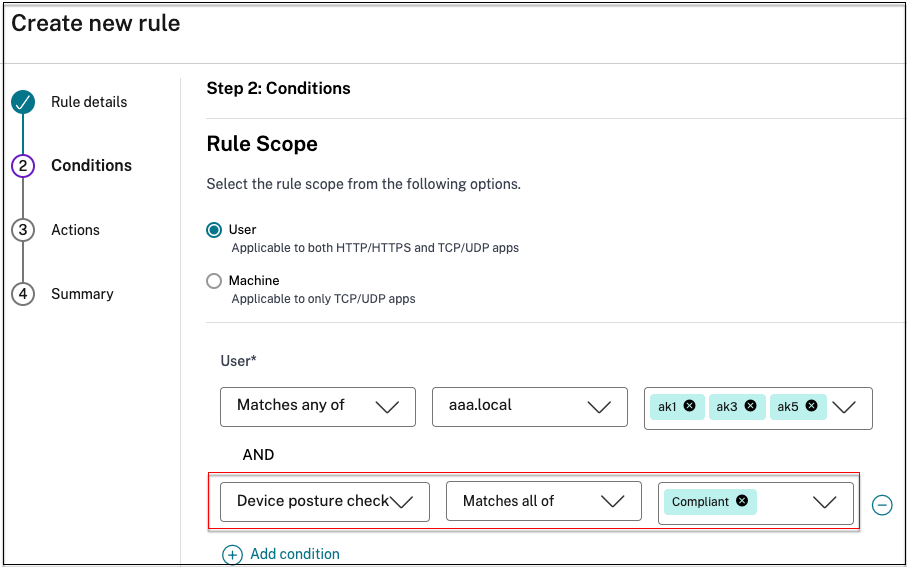
- Configure Secure Private Access with Device Posture. In Rule Scope, select Device posture check > Matches any of and enter the tag Compliant. This tag is sent from the Device Posture service.
Note:
The tag must be entered exactly as captured earlier, using initial caps (Compliant). Otherwise, the device posture policies do not function as intended. For details, see Citrix Secure Private Access configuration with Device Posture.
Once this configuration is performed, based on the device posture scan results, the device is tagged as compliant, non-compliant, or denied login and app access is enabled accordingly.
Example:
Consider that you have created a device posture policy to check for the presence of a device certificate on an endpoint device and determine its login status. Once the device posture policies are set and device posture is enabled, the following actions occur when an end user logs into Citrix Workspace.
-
The device posture scan checks the endpoint device for the presence of a device certificate.
- If the device certificate is present on the device, the device is tagged as compliant.
- If the device certificate is not present on the device, the device is tagged as non-compliant.
- This information is then passed to the Citrix Secure Private Access service as tags.
-
The access policy is evaluated based on the device classification.
- If the device is compliant, agentless access is allowed for the apps.
- If the device is non-compliant, agentless access is disabled for the apps.
End user experience
The end user experience is based on the classification of the device as compliant or non-compliant.
-
Compliant device:
The user can launch the agentless access app from Citrix Workspace or from the browser using the app URL.
-
Non-compliant device:
- The app is not enumerated in Citrix Workspace.
- The user cannot launch the app from the browser using the app URL.
- An access blocked page is displayed to the user.