Configure SaaS apps
Software as a Service (SaaS) is a software distribution model that delivers software remotely as a web-based service. Commonly used SaaS apps include Salesforce, Workday, Concur, GoToMeeting, and so forth.
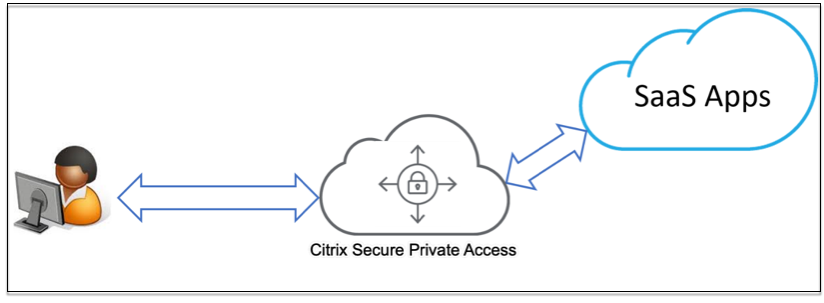
SaaS apps can be accessed using Citrix Workspace™ using the Secure Private Access service. The Secure Private Access service coupled with Citrix Workspace provides a unified user experience for the configured SaaS apps, configured virtual apps, or any other workspace resources. SaaS app delivery using the Secure Private Access service provides you an easy, secure, robust, and scalable solution to manage the apps.
How SaaS apps are supported with the Secure Private Access service
- Customer admin configures SaaS apps using the Secure Private Access service UI.
- Admin provides the service URL to the users to access Citrix Workspace.
- To launch the app, a user clicks the enumerated SaaS app icon.
- SaaS app trusts the SAML assertion provided by the Secure Private Access service and the app is launched.
Note:
- To grant access to the apps for the users, admins are required to create access policies. In access policies, admins add app subscribers and configure security controls. For details, see Create access policies.
- Configured SaaS apps are aggregated along with virtual apps and other resources in Citrix Workspace for a unified user experience.
Configure a SaaS app
- Log in to Citrix Cloud and select Secure Private Access.
-
Click Applications > App Configuration and then click Add an app.
Note:
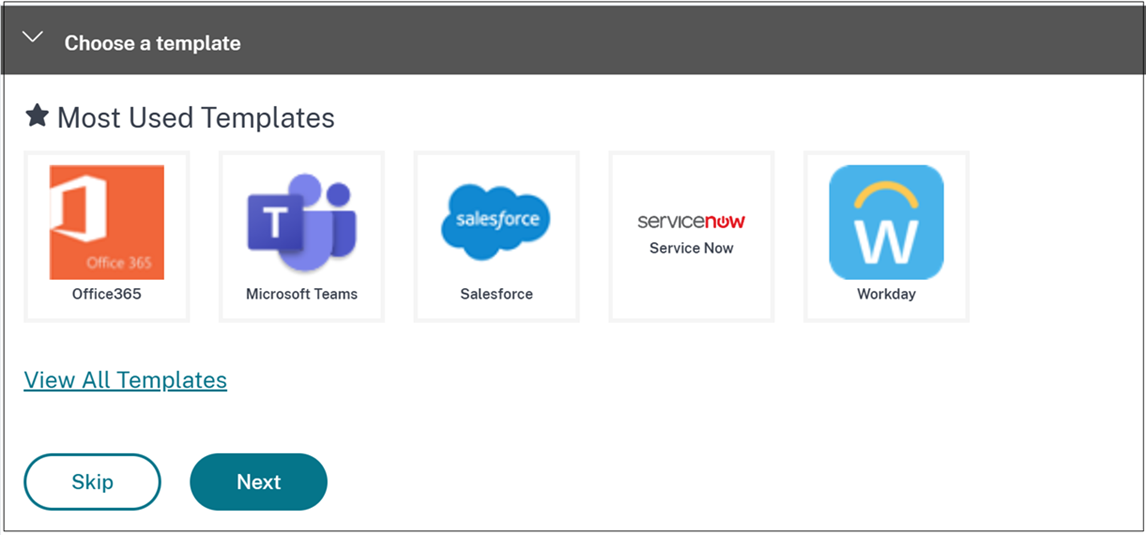
You can configure an app manually or by using a template. Templates prefill most application settings, but you must still provide customer-specific details.
Manual configuration: Click Skip in Choose a template section and then configure the application in the App Details section. Start from step 3.
Template-based configuration: Click Choose a template, select a template, and click Next. Review and update the app details as needed.
- The app configuration page highlights the five most-used templates to simplify and accelerate app onboarding.
- Select View the templates to browse templates for other supported SaaS apps.
-
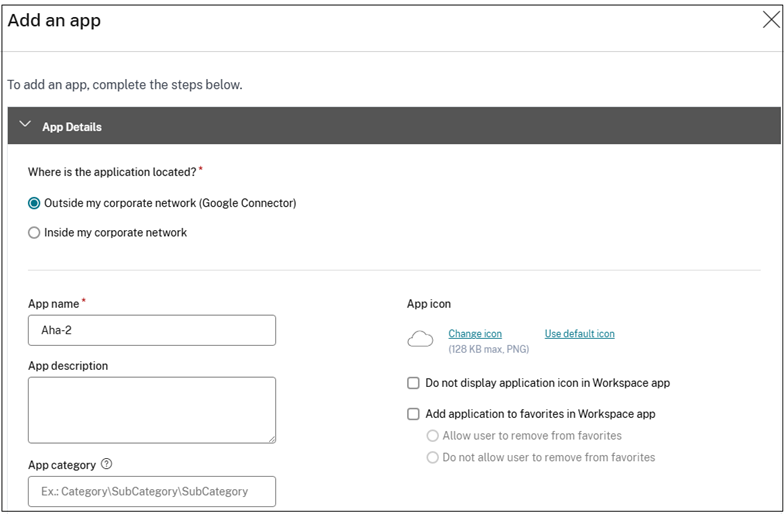
In Where is the application location?, choose the location of the target application to determine the routing path, policies, and access mechanisms that must be applied. For SaaS apps, select Outside my corporate network (Google Connector).
-
Outside my corporate network (Google Connector): For applications hosted outside your organization’s private network infrastructure. Traffic routing occurs directly from users to the external application via Citrix Cloud.
-
Inside my corporate network: For applications hosted within your organization’s private network infrastructure, behind firewalls and accessible only through internal network connections.
-
-
Enter the following details in the App Details section and click Next.
-
App name – Name of the application.
-
App description - A brief description of the app. This description is displayed to your users in the workspace.
-
App category - Add the category and the subcategory name (if applicable) under which the app that you’re publishing must appear in the Citrix Workspace UI. You can add a new category for each app or use existing categories from the Citrix Workspace UI. Once you specify a category for a web or a SaaS app, the app shows up in the Workspace UI under the specific category.
- The category/subcategories are admin configurable and admins can add a new category for every app.
- The App category field is applicable for HTTP/HTTPS apps and is hidden for TCP/UDP apps.
-
The category/subcategories names must be separated by a backslash. For example, Business And Productivity\Engineering. Also, this field is case sensitive. Admins must ensure that they define the correct category. If there’s a mismatch between the name in the Citrix Workspace UI and the category name entered in the App category field, the category gets listed as a new category.
For example, if you enter the Business and Productivity category incorrectly as Business And productivity in the App category field, then a new category named Business and productivity gets listed in the Citrix Workspace UI in addition to the Business And Productivity category.
-
App icon – Click Change icon to change the app icon. The icon file size must be 128x128 pixels. If you do not change the icon, the default icon is displayed.
If you do not want to display the app icon, select Do not display application icon to users.
-
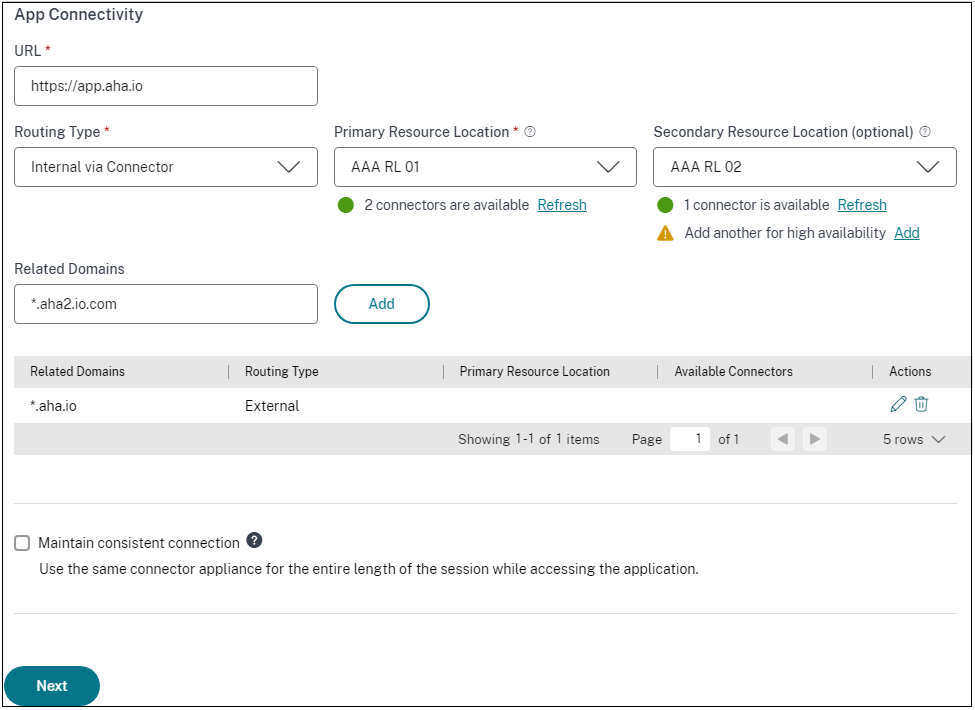
URL – URL with your customer ID. The URL must contain your customer ID (Citrix Cloud™ customer ID). To get your customer ID, see Sign up for Citrix Cloud. In case SSO fails or you do not want to use SSO, the user is redirected to this URL.
-
Customer domain name and Customer domain ID - Customer domain name and ID are used to create the app URL and other subsequent URLs in the SAML SSO page.
For example, if you’re adding a Salesforce app, your domain name is
salesforceformyorgand ID is 123754, then the app URL ishttps://salesforceformyorg.my.salesforce.com/?so=123754.Customer domain name and Customer ID fields are specific to certain apps.
-
Related Domains – The related domain is auto-populated based on the URL that you’ve provided. Related domain helps the service to identify the URL as part of the app and route traffic accordingly. You can add more than one related domain.
Note:
A warning message appears if duplicate related domains are added or if a related domain is also added as a URL for a different app. To avoid these issues, see Best Practices for Web and SaaS application configurations.
-
Maintain consistent connection - Consistent connection to the Connector Appliance is supported for SaaS apps. Select the Maintain consistent connection checkbox and choose Internal via Connector as the connectivity type in the App Connectivity section. For details about consistent connections, see Maintain consistent connection.
-
Click Add application to favorites in Workspace app to add this app as a favorite app in Citrix Workspace app.
- Click Allow user to remove from favorites to allow app subscribers to remove the app from the favorites apps list in Citrix Workspace app. When you select this option, a yellow star icon appears at the top left-hand corner of the app in Citrix Workspace app.
- Click Do not allow user to remove from favorites to prevent subscribers from removing the app from the favorites apps list in Citrix Workspace app. When you select this option, a star icon with a padlock appears at the top left-hand corner of the app in Citrix Workspace app.
If you remove the apps marked as favorites from the Secure Private Access service console, then these apps must be removed manually from the favorites list in Citrix Workspace. The apps aren’t auto deleted from the Workspace app if removed from the Secure Private Access service console.
Important:
- To enable zero-trust-based access to the apps, apps are denied access by default. Access to the apps is enabled only if an access policy is associated with the application.
- If multiple apps are configured with the same FQDN or some variation of the wildcard FQDN, this might result in a conflicting configuration.
- These issues can be resolved by following some of the best practices. For details, see Best practices for Web and SaaS application configurations.
-
-
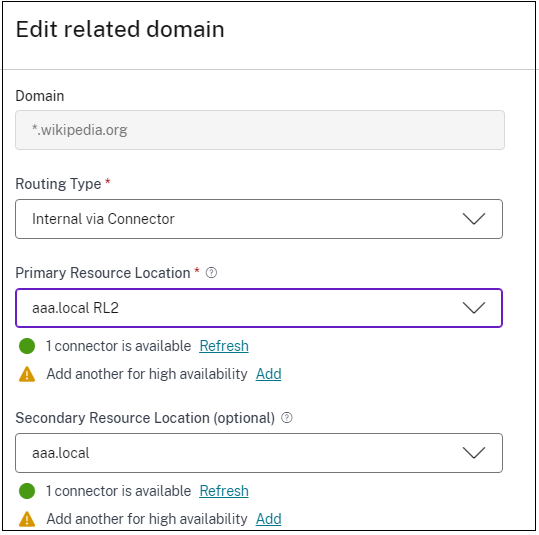
In the App Connectivity section, you define routing for the related domains of applications, if the domains must be routed externally or internally through Citrix Connector™ Appliance.
-
Routing Type - Select one of the following:
- Internal – bypass proxy - The domain traffic is routed through Connector Appliance™, bypassing the customer’s web proxy configured on the Connector Appliance.
- Internal via Connector - The apps can be external but the traffic must flow through the Connector Appliance to the outside network.
- External – The traffic flows directly to the internet.
-
Primary and secondary resource locations - Admins can ensure high availability of applications even during disruptions by configuring a secondary resource location or by using the First Available option.
- Primary Resource Location: Select the primary resource location where the application is hosted. Alternatively, admins can select the option First Available in Primary Resource Location.
- First available: The First Available option ensures that a working resource location is used. When First Available is selected, the system automatically routes traffic to the first available location. This ensures continuous application access without manual intervention. For instance, if ResourceLocation1 is unavailable but ResourceLocation2 is reachable, then ResourceLocation2 is selected by default to front-end the application.
- Secondary Resource Location - The Secondary Resource Location option becomes available only if a primary resource location is explicitly specified. If the primary resource location becomes unavailable, for reasons such as a Connector Appliance or data center failure, the application fails over to the specified secondary resource location. The secondary resource location can also act as a failover even when the application is hosted in another data center.
You can also set a primary and secondary resource location or select the First Available option for each of the related domains.
- Click the edit icon in the Actions column of the Related Domains table.
- Set the primary and secondary resource location or choose the First Available option.
Note:
Setting the backup resource location and using the First Available option feature is currently in Preview.
-
Maintain consistent connection - Select this checkbox to enable consistent connection to the same Connector Appliance. For details about consistent connections, see Maintain consistent connections.
Note:
When the Maintain consistent connection option is selected, the routing type for the application must be set to Internal via Connector in the App Connectivity section.
-
-
Set a preferred sign-on method.
Note:
The single sign-on option is not applicable for Citrix Secure Access with Chrome Enterprise (CEP).
-
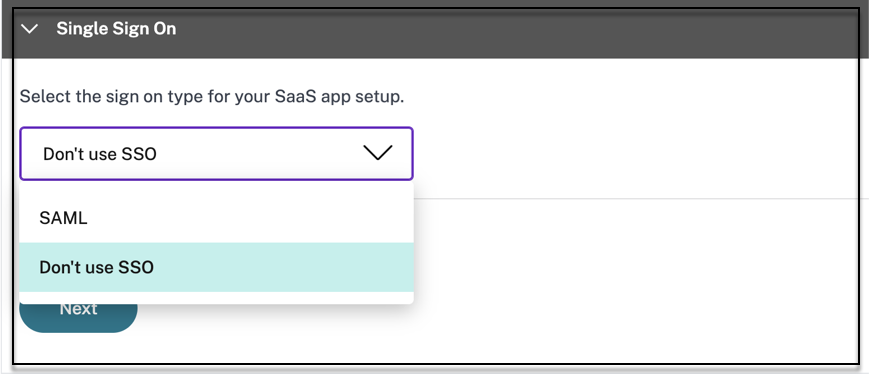
In the Single Sign On section, select your preferred single sign-on type to be used for your application and click Save. The following single sign-on types are available.
-
Don’t use SSO – Use the Don’t use SSO option when you do not need to authenticate a user on the back end server. When the Don’t use SSO option is selected, the user is redirected to the URL configured under the App details section.
-
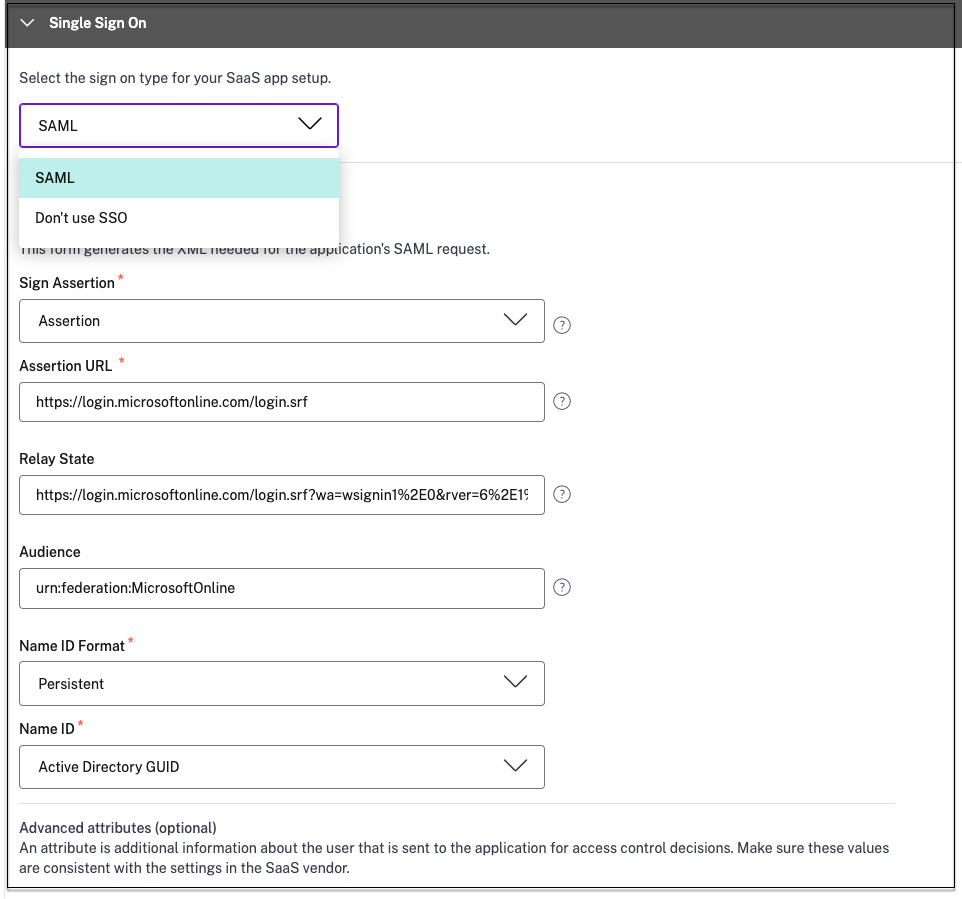
SAML - Choose SAML for SAML-based SSO into web applications. Enter the configuration details for SAML SSO type.
Enter the following details in the Sign sign on section and click Save.
- Sign Assertion - Signing assertion or response ensures message integrity when the response or assertion is delivered to the relying party(SP). You can select Assertion, Response, Both, or None.
- Assertion URL – Assertion URL is provided by the application vendor. The SAML assertion is sent to this URL.
- Relay State – The Relay State parameter is used to identify the specific resource the users access after they’re signed in and directed to the relying party’s federation server. Relay State generates a single URL for the users. Users can click this URL to log on to the target application.
- Audience – Audience is provided by the application vendor. This value confirms that the SAML assertion is generated for the correct application.
- Name ID Format – Select the supported name identifier format.
- Name ID – Select the supported name ID.
- Select Launch the app using the specific URL (SP initiated) to override the identity provider-initiated flow and use only the service provider-initiated flow.
-
-
In Advanced attributes (optional), add additional information about the user that is sent to the application for access control decisions.
-
Download the metadata file by clicking the link under SAML Metadata. Use the downloaded metadata file to configure SSO on the SaaS apps server.
- You can copy the SSO login URL under Login URL and use this URL when configuring SSO on the SaaS apps server.
- You can also download the certificate from the Certificate list and use the certificate when configuring SSO on the SaaS apps server.
-
-
Click Save and then click Finish.
After you click Finish, the app is added to the Applications page. You can edit or delete an app from the Applications page after you’ve configured the application. To do so, click the ellipsis button on an app and select the actions accordingly.
- Edit Application
- Delete
SaaS app server specific configuration
Following are the links to the documents that have guidance on app server specific configuration using a template. Citrix presently supports the following SaaS apps and is continually adding support for more apps.
-
15Five - Continuous performance management tool to coach employees.
-
10000 ft - Project management tool to plan for growth.
-
4me - Service management tool for collaboration between internal, external, and outsourced teams.
-
Abacus - Real-time expense reporting software.
-
Absorb - Learning management tool.
-
Accompa - Requirements management tool to build products.
-
Adobe Captivate Prime - Learning management system to deliver personalized learning experiences across devices.
-
Aha - Product roadmap and marketing planning tool to build products and launch campaigns.
-
AlertOps - Collaboration incidence response tool to manage IT incidents.
-
Allocadia - Marketing performance management tool to manage an organization’s marketing planning process.`
-
Ana plan - Planning tool to help organizations with decision making by connecting data, people, and plans.
-
&frankly - An engagement tool to drive change in the workplace.
-
Anodot - An AI platform that monitors times series data, detects anomalies and forecasts business performance in real time.
-
App Follow - Product management tool for accelerating global app growth and increasing customer loyalty.
-
Assembla - Version control and source code management tool for software development.
-
Automox - Patch management tool to track, control, and manage the patching process.
-
Azendoo - Collaboration tool for teams to converse and collaborate.
-
BambooHR - Human resources management tool to manage employee data.
-
Bananatag - Tool to track and schedule emails, track files and create email templates
-
Base CRM - Sales management tool to manage emails, phone calls, and notes.
-
Beekeeper - Tool to integrate multiple operational systems and communication channels in one Secure Hub that is accessible from desktop and mobile devices.
-
BitaBIZ - Absence and vacation planning and communication tool for leave and absence management.
-
BlazeMeter - Testing suite.
-
Blissbook - Policy management tool to create employee handbooks.
-
BlueJeans - Video conferencing solution.
-
Bold360 - Live chat tool for customer engagement.
-
Bonusly - Employee recognition and reward management tool to recognize team contributions.
-
Box - Content management and file sharing tool to manage, share, and access your content.
-
Branch - A mobile linking platform powering deep links and mobile.
-
Brandfolder - Digital asset management tool to store and share digital assets.
-
Breezy HR - Recruiting software and applicant tracking system.
-
Buddy Punch- Time management tool to monitor employee attendance. -
Bugsnag - Monitoring tool to manage application stability and report errors and diagnostic data.
-
Buildkite - Infrastructure tool for continuous integration software development.
-
Bullseye Locations - Store locator tool to locate a store or dealer on a device.
-
CA Flowdock - Collaboration tool for teams to converse and collaborate.
-
CakeHR - Human resources management tool for attendance and performance management.
-
Cardboard - Collaborative product planning tool to track disorganized information.
-
Citrix Cedexis - Traffic management tool for large websites to leverage multivendor sourcing of data centers, cloud providers, and content delivery networks.
-
CipherCloud - Platform that provides an end-to-end data protection and advanced threat protection, and comprehensive compliance capabilities for an enterprise embracing cloud-based applications.
-
Celoxis - Project management tool to create project plans, automate work, and collaborate.
-
CircleHD - Training, learning, and collaboration tool to share videos and slides within the organization.
-
Circonus - Data analytics and monitoring tool to deliver alerts, graphs, dashboards, and machine-learning intelligence.
-
Cisco Umbrella - Cloud security platform to provide the first line of defense against threats on the internet.
-
ClearSlide - Sales engagement tool to let users share content and sales material for customer interaction.
-
Cloudability - Cloud cost management platform to improve visibility, optimization, governance across cloud environments.
-
CloudAMQP - Message queue tool to pass messages between processes and other systems.
-
CloudCheckr - Cost management, security, reporting, and analytics tool to help users optimize their AWS and Azure deployments.
-
CloudMonix - Tool for cloud and on-premises resources monitoring and automation.
-
CloudPassage - Visibility and continuous monitoring tool to reduce cyber risk and maintain compliance.
-
CloudRanger - Tool to streamline your backups, disaster recovery, and server control for AWS Cloud.
-
Clubhouse - Project management tool for software development.
-
Coggle - Mind mapping web application to create hierarchically structured documents, like a branching tree.
-
Comm100 - Customer service software and communication tool for customer service professionals.
-
Confluence - Content collaboration tool to help teams collaborate and share knowledge.
-
ConceptShare - Proofing tool to deliver content faster, quicker, and cheaper.
-
Concur - Travel and expense management tool to manage expenses on the go.
-
ConnectWise Control - Business management tool to provide remote support and access.
-
Contactzilla - Contact management tool to access up to date contact information.
-
ContractSafe - Contract management tool to track, store, and manage contracts.
-
Contentful - Software for content to create, manage, and distribute content to any platform.
-
Convo - Team communication and collaboration tool for internal conversations.
-
Copper - CRM tool.
-
Cronitor - Monitoring tool for cron jobs.
-
Crowdin - Solution that provides seamless and continuous localization for developers.
-
Dashlane - Password management tool that also manages digital wallets.
-
Declaree - Travel and expense management tool for business travel.
-
Dell Boomi - An integration tool to connect cloud and on-premises applications and data.
-
Deskpro - Help desk tool to facilitate ticket management, customer self-help, and customer feedback.
-
Deputy - Workforce management tool for scheduling and tracking employees’ time, tasks, and communication.
-
DigiCert - Certificate management and troubleshooting tool for SSL certificates for websites.
-
Dmarcian - Email monitoring tool to filter spam, malware, and phishing.
-
DocuSign - An online signature tool for different documents, such as insurance, medical, and real estate.
-
DOME9 ARC - Security and compliance tool to manage public cloud environments.
-
Dropbox - Cloud storage tool for secure file sharing and storage.
-
Duo - Security tool to provide secure access to your applications.
-
Dynatrace - Medical laboratory services.
-
Easy Projects - Project Management tool.
-
EdApp - Learning management tool for workspace learning.
-
EduBrite - Learning management tool to create, deliver, and track training programs.
-
Ekarda - Electronic card designing tool.
-
Envoy - Visitor management tool to manage people and packages.
-
Evernote - Application for note taking, organizing, task lists, and archiving.
-
Expensify - Expense management tool for expense report management, receipt tracking, and business travel.
-
ezeep - Print infrastructure management tool to print from any device, any location to any printer in the Cloud.
-
EZOfficeInventory - Inventory management tool to track all your assets and equipment.
-
EZRentOut - Equipment rental tool to track equipment quality and availability.
-
Fastly - Edge cloud platform to serve and secure applications closer to the users.
-
Favro - Planning and collaboration tool for organizational flow.
-
Federated Directory - Cross-company contact directory tool to search through the corporate address books of different companies.
-
Feedly - News aggregation tool to compile news feeds from different sources.
-
FileCloud - Software solution that provides a robust and secure file hosting and sharing platform for organizations.
-
Fivetran - Tool to help analysts replicate data into a cloud warehouse.
-
Flatter Files - Digital flat file cabinet for drawings and documents to provide a secure and simple way for providing access to content.
-
Float - Resource planning tool for project scheduling and managing the teams’ utilization.
-
Flock - Collaboration tool.
-
Formstack - An online form builder and data collection tool.
-
FOSSA - Automated open source license scanning and vulnerability management tools built natively into CI/CD.
-
Freshdesk - Customer support tool to help support the needs of customers.
-
Freshservice - IT help desk tool to simplify IT operations.
-
FrontApp - Collaboration tool to manage all conversations in one place.
-
Frontify - Platform to facilitate and streamline day-to-day branding, marketing, and development operations.
-
Fulcrum - Mobile data collection platform that allows you to easily build mobile forms and collect data.
-
Fusebill - Billing management and recurring billing software.
-
G-Suite - Set of intelligent apps to connect the people in your company.
-
GetGuru - Knowledge management software.
-
GitBook - Tool to create and maintain your documentation.
-
GitHub - A web-based hosting service for version control using Git for repositories hosted behind a corporate firewall.
-
GitLab - A complete DevOps platform, delivered as a single application.
-
GlassFrog - Software to Holacracy practice.
-
GoodData - An embedded BI and analytics platform that provides fast, reliable, and easy to use analytics
-
GotoMeeting - Online meeting software with HD Video Conferencing capabilities.
-
HackerRank - Provides competitive programming challenges for consumers and businesses.
-
HappyFox - Online help desk software and web based support ticket system.
-
Helpjuice - Knowledge management solution to create and maintain knowledge bases.
-
Help Scout - Customer service software and knowledge base tool for customer service professionals.
-
Hello sign - E-signing interface to enable signing from anywhere, at any time, on any device.
-
HelpDocs - knowledge base software to guide your users when they are stuck.
-
Honeybadger - Application health monitoring tool.
-
Harness - Tool for continuous delivery and integration for Java, .NET apps in AWS, GCP, Azure, and Bare Metal.
-
HelpDocs - Tool to create an authoritative knowledge base to guide your users when they’re stuck.
-
Helpmonks - A collaborative email platform for team collaboration.
-
Hoshinplan - Tool to visualize your strategic plans and track statuses in one canvas.
-
Hosted Graphite - Tool to monitor your website, app, server, and container performance.
-
Humanity - Online employee scheduling software to manage shifts, schedules, payroll, and time clocking.
-
Igloo - Digital workplace and intranet solution provider to solve IT challenges across your organization.
-
iLobby - Cloud-based visitor registration management solution.
-
Illumio - Security system to prevent spread of breaches inside data center and cloud environments.
-
Image Relay - Digital asset management and brand management software to securely organize and share digital files.
-
Informatica - Tool for SaaS apps integration and a platform for developing and deploying custom integration services.
-
Intelligent contract - Contract management software.
-
iMeet Central - Project management software for marketers, creative agencies, and enterprise businesses.
-
InteractGo - Tool to measure real-time and historical data on system performance.
-
iQualify One - Learning and management tool to deliver authentic learning experiences.
-
InsideView - Data and intelligence solutions to solve sales, marketing, and other business challenges.
-
Insightly - A cloud-based customer relationship management (CRM) and project management tools for small and medium size businesses.
- ITGlue - A cloud-based IT documentation platform to help MSPs standardize documentation, create knowledge bases, manage passwords. and track devices.
- Jitbit - Help desk software and ticketing system to manage and track incoming support request emails and their associated tickets.
JupiterOne - Software platform to create and manage your entire security process.
-
Kanbanize - An online portfolio Kanban software for lean management.
-
Klipfolio - An online dashboard platform for building powerful real-time business dashboards for your team or your clients.
-
Jira - Tool to plan, track, and manage your issues and projects.
-
Kanban Tool - Visual management software to improve your team performance and boost productivity.
-
Keeper Security - Password manager and security software to protect your passwords and private information.
-
Kentik - Tool to apply big data for network and performance monitoring, DDoS protection, and real-time ad-hoc network flow analytics.
-
Kissflow - Workflow tool and business process workflow management software to automate your workflow process.
-
KnowBe4 - Tool to provide security awareness training and simulated phishing.
-
KnowledgeOwl - Knowledge base and authoring tool.
-
Kudos - Retail, job, project, and fulfillment process systems.
-
LaunchDarkly - Feature management platform to enable dev and ops teams to control the feature lifecycle.
-
Lifesize - Video conferencing solution.
-
Litmos - Learning management system for employee training, customer training, compliance training, and partner training.
-
LiquidPlanner - Online project management software for your business.
-
LeanKit - Lean-based, enterprise process and work management software to help enterprises visualize work, optimize processes, and deliver faster.
-
LiveChat - Live chat and help desk software for businesses.
-
LogDNA - Tool to collect, monitor, parse, and analyze logs from all sources in one centralized logging tool.
-
Mango - Team collaboration software to consolidate and streamline siloed applications into one single platform.
-
Manuscript - A writing tool to help you plan, edit, and share your work.
-
Marketo - Automation software to help marketing teams master the art and science of digital marketing.
-
Matomo - A Web analytics platform that evaluates the entire user-journey of everyone who visits the website.
-
Meisterplan - Software that helps organizations create project portfolios.
-
Mingle - Am agile project management and collaboration tool to provide a combined workplace for the entire team.
-
MojoHelpdesk - Help desk software and ticketing system.
-
Monday - Team management software to plan, track, and collaborate all your work in one tool.
-
Mixpanel - System to track user interactions with web and mobile.
-
MuleSoft - Integration software to connect SaaS and enterprise applications in the cloud and on-premises.
-
MyWebTimesheets - Online time tracking system to track time spent on various projects/jobs/activities.
-
New Edge - Secure application networking service for Hybrid IT.
-
NextTravel - Corporate travel management software tool.
-
N2F - Expense report management tool to manage your business and travel expenses.
-
New Relic - Digital intelligence platform to measure and monitor the performance of applications and infrastructure.
-
Nmbrs - Cloud HR and payroll software for businesses.
-
Nuclino - Collaboration software to collaborate and share information in real-time.
-
Office365 - Microsoft’s cloud-based subscription service.
-
OfficeSpace - a Cloud-based platform that helps organizations allocate workspace.
-
OneDesk - Project management and help desk software to connect with and support your customers.
-
OpsGenie - An Incident management platform for DevOps and IT Ops teams to streamline alerts and incident resolution processes.
-
Orginio - An online organizational chart creation tool to visualize the organizational structure.
-
Oomnitza - IT Asset Management platform solution to track and manage assets.
-
OpenEye - Mobile app for viewing live and recorded videos on the Apex recorder.
-
Oracle ERP Cloud - Cloud-based software application suite to manage enterprise functions.
-
Pacific Timesheet - Web-based timesheet tool for payroll, project hours, and expenses.
-
PagerDuty - Digital operations management system.
-
PandaDoc - A mobile app for iPhone users access to their documents, analytics, and dashboard directly on their mobile phones.
-
Panopta - Infrastructure monitoring tool.
-
Panorama9 - Cloud-based IT management platform for enterprise network monitoring.
-
Papyrs - Editor to design your own intranet pages.
-
ParkMyCloud - Single-purpose SaaS tool to connect to AWS, Azure Services, or GCP.
-
Peakon - Tool to measure and improve employee engagement.
-
People HR - HR software system for all key HR functions.
-
Pingboard - Tool to build organization charts for organizing teams and workforce planning.
-
Pigeonhole Live - Interactive Q&A platform.
-
Pipedrive - Sales CRM and pipeline management software.
-
PlanMyLeave - Leave management system for managing and tracking employee’s leave of absence.
-
PlayVox - Customer service quality monitoring tool.
-
Podbean - Podcast service provider.
-
Podio - A web-based tool to organize team communication, business processes, data, and content in project management workspaces.
-
POPin - Crowd-solving platform and mobile app that operationalizes team engagement for problem-solving
-
Postman - API development environment.
-
Prescreen - Applicant tracking tool to publish job vacancies online and offline.
-
ProductBoard - Product management tool.
-
ProdPad - Product management software to develop product strategies.
-
Proto.io - Application prototyping platform to create fully interactive, high-fidelity prototypes.
-
Proxyclick - Cloud-based visitor management solution to manage visitors, build their brand image, and ensure the security.
-
Pulumi - Cloud native development platform for containers, serverless, infrastructure, and Kubernetes.
-
PurelyHR - Leave management tool for accessing employee leave data.
-
Promapp - Business process management (BPM) tool.
-
Prescreen - Cloud-based applicant tracking system to publish job vacancies online and offline.
-
QAComplete - Software test management tool.
-
Qualaroo - Feedback tool to gain insights from customers.
-
Quality Built, LLC - Insurance, financial, and construction industry for providing reliable and innovative Third Party Quality Assurance Services.
-
Qubole - Self-service platform for Big Data analytics built on Amazon.
-
Questetra BPM Suite - Web-based business process platform for routine workflows.
-
QuestionPro - Online survey software to create surveys and questionnaires.
-
Quandora - Question and answer based knowledge management solution.
-
Quip - Collaborative productivity software suite for mobile and the Web.
-
Rackspace - Managed cloud computing services.
-
ReadCube - Tool for web, desktop, and mobile reference management.
-
RealtimeBoard - Whiteboard Collaboration tool for organizations to collaborate beyond formats, tools, locations, and time zones.
-
Receptive - Tool to gather feedback from customers, teams, and the market at one place.
-
Remedyforce - IT service management and help desk system.
-
Retrace - An Application performance management tool that provides bug tracking, data aggregation, and automatic alerts.
-
Robin - Workplace experience tools to schedule conference meeting rooms and desk bookings.
-
Rollbar - Real-time error alerting and debugging tools for developers.
-
Really Simple Systems - Cloud-based CRM software for small businesses to manage their sales and marketing.
-
Reamaze - Customer support software to support, engage, and convert customers with chat, social, SMS, FAQ, and email on a single platform.
-
Resource Guru - Resource management software to schedule people, equipment, and other resources.
-
Retrace - Application performance management to integrate code profiling, error tracking, application logs, and metrics.
-
Roadmunk - Product roadmap software and roadmap tool to create product roadmaps.
-
Runscope - Tool to create, manage, and run functional API tests and monitors.
-
Salesforce – CRM tool to manage customer contact information, integrate social media, and facilitate real-time customer collaboration.
-
SalesLoft - Sales engagement platform for efficient and revenue-boosting sales
-
Salsify - Product experience management (PXM) platform.
-
Samanage - Tool for IT service management.
-
Samepage - Collaboration software to manage online projects.
-
Screencast-O-Matic – Tool to screencast and edit video.
-
ScreenSteps –Tools to create visual documents centered on screen captures.
-
SendSafely – Encryption platform for secure exchange of files and emails.
-
Sentry - Open-source error tracking software.
-
ServiceDesk Plus - Tool for IT service desk.
-
ServiceNow - Cloud platform to create digital workflows.
-
SharePoint – Collaborative platform used for document management and storage.
-
Shufflrr - Presentation management tool to create, update, share, and broadcast presentations.
-
Sigma Computing – An Analytics tool to explore, analyze, and visualize data.
-
Signavio – A business process modeling tool.
-
Skeddly - Tool to automate AWS resources.
-
Skills Base - Talent management tool to track and document employee’s performance and skills.
-
Skyprep - Learning management system (LMS) to train customers and employees.
-
Slack - Collaboration tool to communicate and share information.
-
Slemma - Data analysis tool to create data reports from multiple data sets.
-
Sli.do - Interaction tool for meetings, events, and conferences.
-
SmartDraw - Diagram tool used to make flowcharts, organization charts, mind maps, project charts, and other business visuals.
-
SmarterU - Learning management system (LMS) to train customers and employees.
-
Smartsheet - Collaboration tool to assign tasks, track project process, manage calendars, and share documents.
-
SparkPost - Email delivery service.
-
Split - Bill splitting application.
-
Spoke - Service desk tool to file service tickets.
-
Spotinst - A SaaS optimization platform that helps companies purchase and manage cloud infrastructure capacity.
-
SproutVideo - Platform to host business videos.
-
Stackify - Troubleshooting tool that provides support with a suite of tools including Prefix and Retrace.
-
StatusCast - Hosted page to keep your employees and customers aware about downtime and website maintenance.
-
StatusDashboard - Communications platform for hosting status dashboards and broadcasting incident notifications to customers.
-
Status Hero - Tool for tracking status updates and daily goals from your team.
-
StatusHub - Platform to host the service state page.
-
Statuspage - Tool to communicate status and incidents.
-
SugarCRM - CRM tool for Salesforce automation, marketing campaigns, customer support, collaboration, Mobile CRM, Social CRM, and reporting.
-
Sumo Logic - Data analytics software that focuses on security, operations, and BI use cases.
-
Supermood - HR platform to gather employee’s feedback in real-time.
-
Syncplicity - Tool to share and synchronize files.
-
Tableau - Tool to create interactive data visualization.
-
TalentLMS - Learning management system (LMS) to facilitate online seminars, courses, and other training programs.
-
Tallie – Tool to capture and upload receipts, generate expense reports, and customize expense details.
-
Targetprocess - Agile project management software to Scrum, Kanban, SAFe, and so on.
-
Teamphoria - Software to provide real-time employee engagement metrics, employee reviews, and recognition.
-
TeamViewer - Proprietary software application for remote control, desktop sharing, online meetings, web conferencing, and file transfer between computers.
-
Tenable.io - Tool that provides data to identify, investigate, and prioritize the remediation of vulnerabilities and misconfigurations in your IT environment.
-
Testable - Tool to create behavioral experiments and surveys.
-
TestingBot - Tool to provide various browser versions for live and automated testing.
-
TestFairy - Mobile testing platform, to provide companies with video recordings, logs, and crash reports of mobile sessions.
-
TextExpander - Communication tool to insert snippets of text from a repository of emails, and other content, as you type.
-
TextMagic - Messaging service to connect with customers.
-
ThousandEyes - Tool to monitor network infrastructure, troubleshoot application delivery, and map internet performance.
-
Thycotic Secret server - Account management software tool to manage passwords.
-
TimeLive – Tool to provide timesheets and track time.
-
Tinfoil Security - Security solution software to check for vulnerabilities.
-
Trisotech - Tool that allows customers to discover, model, analyze their digital enterprise.
-
Trumba - Tool to publish online, interactive, calendars of events.
-
TwentyThree - Video marketing platform to integrate and add videos to the marketing stack.
-
Twilio - A developer platform for communications.
-
Ubersmith - Business management software for usage-based billing, quoting, order management, infrastructure management, and help desk ticketing solutions.
-
UniFi - Communication and collaboration software with voice, web collaboration, and video conferencing capabilities.
-
UPTRENDS – Website monitoring solution to track website uptime and performance.
-
UserEcho - Community forum tool that helps businesses manage customer feedback.
-
UserVoice - Product feedback management software to enable businesses to make data-driven product decisions.
-
VALIMAIL - Email authentication software to authenticate legitimate emails and block phishing attacks.
-
Veracode - Source code analyzer and code scanner protect enterprises from cyber threats and application backdoors.
-
Velpic - Learning management system (LMS) designed to streamline workplace training.
-
VictorOps - Incident management software to provide DevOps observability, collaboration, and real-time alerting.
-
VIDIZMO - Enterprise live and on-demand video streaming software.
-
Visual Paradigm - Visual modeling and diagramming online platform for team collaboration.
-
Vtiger - CRM tool that enables sales, support, and marketing teams to organize and collaborate.
-
WaveMaker – Software for building and running custom apps.
-
Weekdone - Tool to create managers’ dashboard and team management service for companies.
-
Wepow - Tool to connect recruiters, job candidates, and employers through a mobile and video interviewing solution.
-
When I Work - Tool for employee scheduling and time tracking.
-
WhosOnLocation – Tool to track the flow of people through sites and zones.
-
Workable - Applicant tracking system.
-
Workday - Tool for financial management, human resources, and planning.
-
Workpath - Tool to manage the goals and performance of the organization.
-
Workplace - Collaboration tool by Facebook to help employees communicate through a familiar interface.
-
Workstars - Platform for social and peer employee recognition programs.
-
Workteam - Tool to track employee time and attendance.
-
Wrike - Social project management and collaboration software.
-
XaitPorter - Document co-authoring software for bids and proposals and other business documents.
-
Ximble - Tool for employee scheduling and time tracking.
-
XMatters - Collaboration platform with an alerting software that integrates with other tools creating seamless process and effective communication.
-
Yodeck - Tool to manage screens remotely, through the web or mobile.
-
Zendesk - Software to request for customer service and to log support tickets.
-
Ziflow - Tool for creative production teams.
-
Zillable – Collaboration platform with communication capabilities.
-
Zing tree - A toolkit for creating interactive decision trees and troubleshooters.
-
ZIVVER - Tool that allows secure email and file transfer from your familiar email program.
-
Zoho - Business application suite.
-
Zoom - Communication and collaboration software with voice, web collaboration, and video conferencing capabilities.
-
Zuora - A subscription-based software that enables a company launch, manage, and transform into a subscription business.
End-to-end app configuration
- For a complete end-to-end configuration of an app, see Admin-guided workflow for easy onboarding and set up.
- Access restriction options.