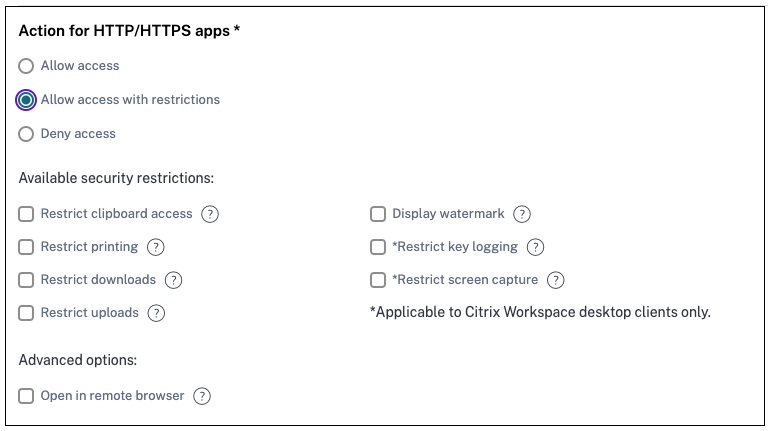
Access restriction options
When you select the action Allow access with restrictions while creating an access policy, you can select the access restrictions. These restrictions are predefined in the system. Admins cannot modify or add other combinations. For details on creating an access policy and enabling access restrictions, see Configure an access policy.
Clipboard
Enable/disable cut/copy/paste operations on a SaaS or internal web app with this access policy when accessed via Citrix Enterprise Browser. Default value: Enabled.
Copy
Enable/disable copying of data from a SaaS or internal web app with this access policy when accessed via Citrix Enterprise Browser. Default value: Enabled.
Note:
- If both Clipboard and Copy restrictions are enabled in a policy, the Clipboard restriction takes precedence over the Copy restriction.
- End users must use Citrix Enterprise Browser™ version 2405 or later for accessing applications for which this restriction is enabled. Else, the application access is restricted.
- For granular control of copy operation within the apps, admins can use the Security groups restriction. For details, see Clipboard restriction for security groups.
Download restriction by file type
Enable/Disable the user’s ability to download specific MIME (file) type from within the SaaS or internal web app with this policy when accessed via Citrix Enterprise Browser.
Note:
- The Download restriction by file type restriction is available in addition to the Download restriction.
- If both Downloads and Download restriction by file type restrictions are enabled in a policy, the Downloads restriction takes precedence over the Download restriction by file type restriction.
- End users must use Citrix Enterprise Browser version 2405 or later for accessing applications for which this restriction is enabled. Else, the application access is restricted.
To enable downloading of MIME types, perform the following steps:
- Create or edit an access policy. For details, see Create access policies.
- In the Step 3: Action page, select Allow with restrictions.
- Click Download restriction by file type and then click Edit.
-
In the Download restriction by file type settings page, select one of the following:
- Allow all downloads with exceptions – Select the types that must be blocked and allow all other types.
- Block all downloads with exceptions – Select only the types that can be uploaded and block all other types.
-
If the file type does not exist in the list, then do the following:
- Click Add custom MIME types.
- In Add MIME types, enter the MIME type in the format
category/subcategory<extension>. For exampleimage/png. - Click Done.
- Click Next and then click Finish.
The MIME type now appears in the list of exceptions.
When an end user tries to download a restricted file type, Citrix Enterprise Browser displays the following message:

Downloads
Enable/disable the user’s ability to download from within the SaaS or internal web app with this policy when accessed via Citrix Enterprise Browser. Default value: Enabled.
Note:
If both Downloads and Download restriction by file type restrictions are enabled in a policy, the Downloads restriction takes precedence over the Download restriction by file type.
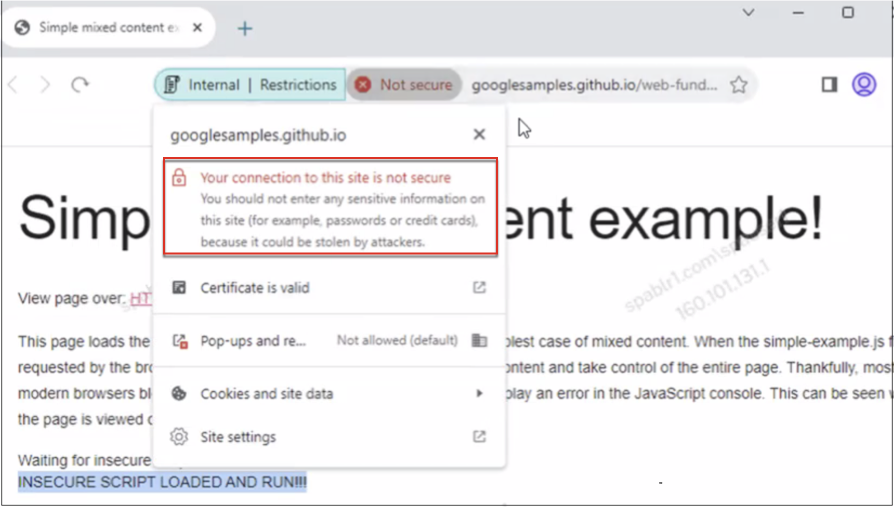
Insecure content
Enable/disable end users from accessing insecure content within the SaaS or internal web app configured with this policy when accessed via Citrix Enterprise Browser. Insecure content is any file linked to from a webpage using an HTTP link rather than an HTTPS link. Default value: Disabled.
End users must use Citrix Enterprise Browser version 126 or later for disabling accessing insecure content.
To enable accessing insecure content, perform the following steps:
- Create or edit an access policy. For details, see Create access policies.
- In the Step 3: Action page, select Allow with restrictions.
- Select Insecure content.
- Click Next and then click Finish.
The following figure displays a sample notification when you access insecure content.
Keylogging protection
Enable/disable keyloggers from capturing keystrokes from the SaaS or internal web app with this access policy when accessed via Citrix Enterprise Browser. Default value: Enabled.
Microphone
Prompt/do not prompt users every time to access the microphone within the SaaS or internal web app configured with this policy when accessed via Citrix Enterprise Browser. Default value: Prompt every time.
End users must use Citrix Enterprise Browser version 126 or later for accessing applications for which the Microphone restriction is enabled.
To allow microphone every time without being prompted, perform the following steps:
- Create or edit an access policy. For details, see Create access policies.
- In the Step 3: Action page, select Allow with restrictions.
- Click Microphone and then click Edit.
- In the Microphone settings page, click Always allow access.
- Click Save.
- Click Next and then click Finish.
Note:
- If the Microphone restriction is enabled in the Secure Private Access policy, then Citrix Enterprise Browser displays the settings Allow.
- If the option Prompt every time in Secure Private Access policy, then the setting applied on Citrix Enterprise Browser varies depending on whether the Global App Configuration service (GACS) is used to manage Citrix Enterprise Browser.
- If GACS is used, then the GACS setting is applied on Citrix Enterprise Browser.
- If GACS is not used, then Citrix Enterprise Browser displays the setting Ask.
For more information on GACS, see Manage Citrix Enterprise Browser through Global App Configuration service.
Notifications
Allow/prompt users every time to view the notifications within the SaaS or internal web app configured with this policy when accessed via Citrix Enterprise Browser. Default value: Prompt every time.
End users must use Citrix Enterprise Browser version 126 or later for accessing applications for which this restriction is enabled.
To block notifications without prompting, perform the following steps.
- Create or edit an access policy. For details, see Create access policies.
- In the Step 3: Action page, select Allow with restrictions.
- Click Notifications and then click Edit.
- In the Notification settings page, click Always block notifications.
- Click Save.
- Click Next and then click Finish.
Paste
Enable/disable pasting of copied data into the SaaS or internal web app with this access policy when accessed via Citrix Enterprise Browser. Default value: Enabled.
Note:
- If both Clipboard and Paste restrictions are enabled in a policy, the Clipboard restriction takes precedence over the Paste restriction.
- End users must use Citrix Enterprise Browser version 126 or later for accessing applications for which this restriction is enabled. Else, the application access is restricted.
- For granular control of paste operation within the apps, admins can use the Security groups restriction. For details, see Clipboard restriction for security groups.
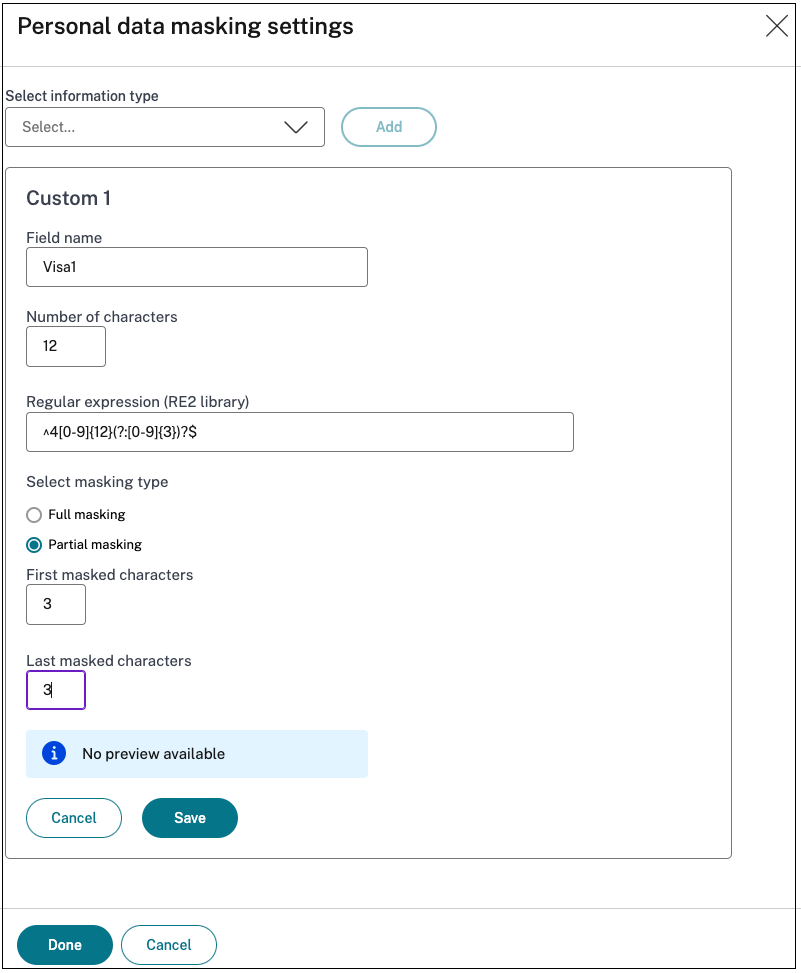
Personal data masking
Enable/disable redacting or masking personally identifiable information (PII) on the SaaS or internal web app with this policy when accessed via Citrix Enterprise Browser. The personal identifiable information can be credit card numbers, social security numbers, dates, and so on. You can also define custom rules for detecting specific types of sensitive information and masking it accordingly. The Personal data masking restrictions also provide an option to fully or partially mask the information.
Note:
End users must use Citrix Enterprise Browser version 2405 or later for accessing applications for which this restriction is enabled. Else, the application access is restricted.
To redact or mask personally identifiable information, perform the following steps:
- Create or edit an access policy. For details, see Create access policies.
- In the Step 3: Action page, select Allow with restrictions.
- Click Personal data masking and then click Edit.
-
Select the information type that you want to obscure or mask and then click Add.
If the information type does not appear in the pre-defined list, then you can add a custom information type. For details, see Add custom information type.
-
Select the masking type.
- Full masking – Completely cover the sensitive information to make it unreadable.
-
Partial masking – Partially cover the sensitive information. Only the relevant sections are covered leaving the rest intact.
When you select Partial marking, you must select characters starting from the beginning or the end of the document. You must enter the numbers in the First masked characters and Last masked characters fields.
The Preview field displays the masking format. This preview is not available for custom policies.
- Click Save and then click Done.
- Click Next and then click Finish.
Add custom information type
You can add a custom information type by adding the information type’s regular expression.
- In Select Information type, select Custom, and then click Add.
- In Field name, enter the name for the information type that you want to mask.
- In Number of characters, enter the number of characters of the information type.
- In Regular Expression (RE2 library), enter the expression for the custom information type. For example,
^4[0-9]{12}(?:[0-9]{3})?$. - Select the masking type, if you want to mask the complete information or the first or last few characters.
- Click Save, and then click Done.
- Click Next and then click Finish.
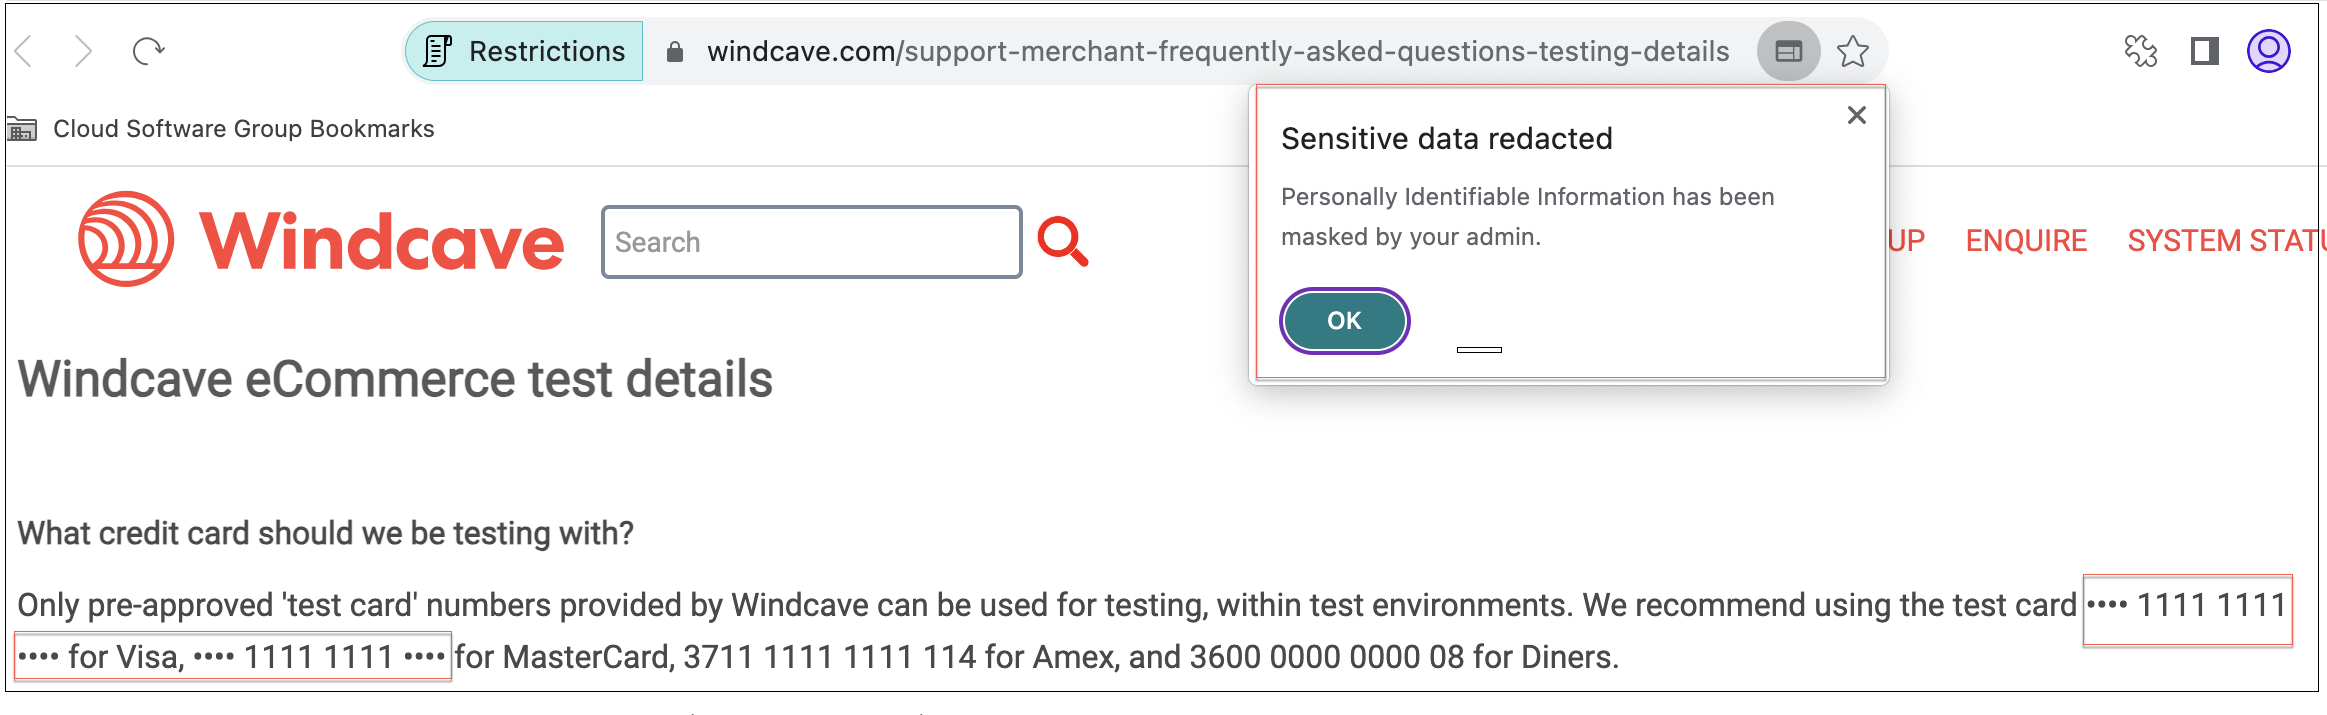
The following figure displays a sample app in which the PII is masked. The figure also displays the notification related to masking of the PII.
Popups
Enable/disable the display of popups within the SaaS or internal web app configured with this policy when accessed via Citrix Enterprise Browser. By default popups are disabled within webpages. Default value: Always block pop-ups.
End users must use Citrix Enterprise Browser version 126 or later for accessing applications for which this restriction is enabled.
To enable display of popups, perform the following steps:
- Create or edit an access policy. For details, see Create access policies.
- In the Step 3: Action page, select Allow with restrictions.
- Click Popups and then click Edit.
- In the Popups settings page, click Always allow pop-ups.
- Click Save.
- Click Next and then click Finish.
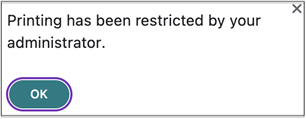
Printing
Enable/disable printing data from the configured SaaS or Internal web apps with this policy when accessed via Citrix Enterprise Browser. Default value: Enabled.
The following message appears when an end user tries to print content from the application for which the printing restriction is enabled.
Note:
If both Printing and Printer management restrictions are enabled in a policy, the Printing restriction takes precedence over the Printer management restriction.
Printer management
Enable/disable printing data by using the admin-configured printers from the configured SaaS or internal web apps with this policy when accessed via Citrix Enterprise Browser.
Note:
- The Printer management restriction is available in addition to the Printing restriction where printing is either enabled or disabled. If both Printing and Printer management restrictions are enabled in an access policy, the Printing restriction takes precedence over the Printer management restriction.
- End users must use Citrix Enterprise Browser version 2405 or later for accessing applications for which this restriction is enabled. Else, the application access is restricted.
To enable/disable printing restrictions, perform the following steps:
- Create or edit an access policy. For details, see Create access policies.
- In the Step 3: Action page, select Allow with restrictions.
- Click Printer management and then click Edit.
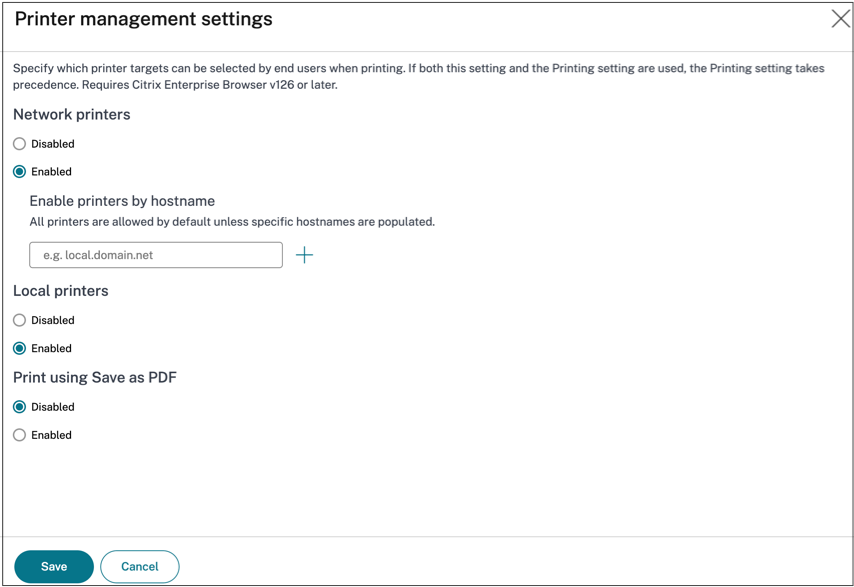
-
Select the exceptions as per your requirement.
-
Network printers - A network printer is a printer that can be connected to a network and used by multiple users.
- Disabled: Printing from any network printers in the network is disabled.
- Enabled: Printing from all network printers is enabled. If printer host names are specified, then all other network printers apart from the ones specified are blocked.
Note: Network printers are identified by their host names.
-
Local printers - A local printer is a device directly connected to an individual computer through a wired connection. This connection is typically facilitated through USB, parallel ports, or other direct interfaces.
- Disabled: Printing from all local printers is disabled.
- Enabled: Printing from all local printers is enabled.
-
Print using Save as PDF
- Disabled: Saving the content from the application in a PDF format is disabled.
- Enabled: Saving the content from the application in a PDF format is enabled.
-
Network printers - A network printer is a printer that can be connected to a network and used by multiple users.
- Click Save.
- Click Next and then click Finish.
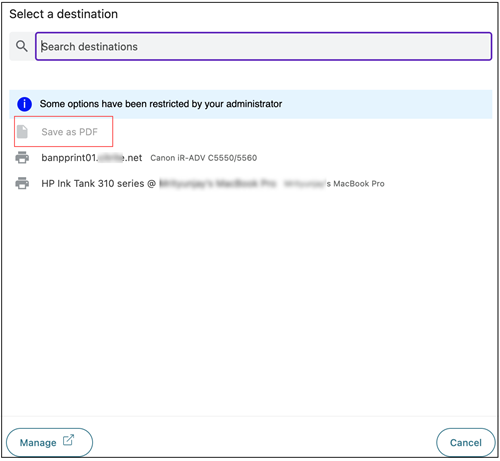
If a network printer is disabled, then the specific printer name appears grayed out when end users try to select the printer in the Destination field.
Also, if Print using save as PDF is disabled, then when you click the See more link in the Destination field, the Save as PDF option appears grayed out.
If the end users rename the network printers, then they cannot use the network printer.
Screen capture
Enable/disable the ability to capture the screens from the SaaS or internal web app with this policy when accessed via Citrix Enterprise Browser using any of the screen capture programs or apps. If a user tries to capture the screen, a blank screen is captured. Default value: Enabled.
Upload restriction by file type
Enable/disable the user’s ability to download specific MIME (file) type from the SaaS or internal web app with this policy when accessed via Citrix Enterprise Browser.
Note:
- The Upload restriction by file type restriction is available in addition to the Upload restriction.
- If both Upload and Upload restriction by file type restrictions are enabled in a policy, the Uploads restriction takes precedence over the Upload restriction by file type restriction.
- End users must use Citrix Enterprise Browser version 2405 or later for accessing applications for which this restriction is enabled. Else, the application access is restricted.
To enable/disable uploading of MIME types, perform the following steps:
- Create or edit an access policy. For details, see Create access policies.
- In the Step 3: Action page, select Allow with restrictions.
- Click Upload restriction by file type and then click Edit.
-
In the Upload restriction by file type settings page, select one of the following:
- Allow all uploads with exceptions – Upload all files except the selected types.
- Block all uploads with exceptions – Blocks all file types from uploading except the selected types.
-
If the file type does not exist in the list, then do the following:
- Click Add custom MIME types.
- In Add MIME types, enter the MIME type in the format
category/subcategory<extension>. For exampleimage/png. - Click Done.
- Click Next and then click Finish.
The MIME type now appears in the list of exceptions.
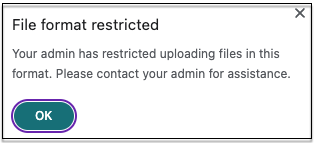
When an end user tries to upload a restricted file type, Citrix Enterprise Browser displays a warning message.
Uploads
Enable/disable the user’s ability to upload within the SaaS or internal web app configured with this policy when accessed via Citrix Enterprise Browser. Default value: Enabled.
Note:
If both Uploads and Upload restriction by file type restrictions are enabled in a policy, the Uploads restriction takes precedence over the Upload restriction by file type.
Watermark
Enable/disable the watermark on the user’s screen displaying the user name and IP address of the user’s machine. Default value: Disabled.
Webcam
Prompt/do not prompt users every time to access the webcam within the SaaS or internal web app configured with this policy when accessed via Citrix Enterprise Browser. Default value: Prompt every time.
End users must use Citrix Enterprise Browser version 126 or later for accessing applications for which the Webcam restriction is enabled.
To allow webcam every time without being prompted, perform the following steps:
- Create or edit an access policy. For details, see Create access policies.
- In the Step 3: Action page, select Allow with restrictions.
- Click Webcam and then click Edit.
- In the Webcam settings page, click Always allow access.
- Click Save.
- Click Next and then click Finish.
Note:
- If the Webcam restriction is enabled in the Secure Private Access policy, then Citrix Enterprise Browser displays the settings Allow.
- If the option Prompt every time is enabled in the Secure Private Access policy, then the setting applied on Citrix Enterprise Browser varies depending on whether the Global App Configuration service (GACS) is used to manage Citrix Enterprise Browser.
- If GACS is used, then the GACS setting is applied on Citrix Enterprise Browser.
- If GACS is not used, then Citrix Enterprise Browser displays the setting Ask.
For more information on GACS, see Manage Citrix Enterprise Browser through Global App Configuration service.
Clipboard restriction for security groups
You can restrict clipboard access to any designated group of apps. These designated groups of apps are created as security groups so that the end users are permitted to copy and paste contents only within that security groups. To enable clipboard access within the apps in a security group, you must just have an access policy configured with the action allow or allow with restrictions without selecting any access setting.
-
When the Security groups restriction is enabled, you cannot copy / paste data between applications in different security groups. For example if the app “ProdDocs” belongs to security group “SG1” and the app “Edocs” belong to security group “SG2”, you cannot copy / paste content from “Edocs” to “ProdDocs” even if Copy / Paste restriction is enabled for both groups.
-
For apps not part of a security group, you can have an access policy created with action allow with restrictions and selecting the restrictions (Copy, Paste, or Clipboard). In this case, the app is not part of a security group and the Copy / Paste restriction can be applied on that app.
Note:
You can also restrict clipboard access for apps accessed via Citrix Enterprise Browser through the Global App Configuration service (GACS). If you are using GACS to manage Citrix Enterprise Browser, then use the Enabled Sandboxed Clipboard option to manage the clipboard access. When you restrict clipboard access through GACS, it applies to all apps accessed via Citrix Enterprise Browser.
To create a security group, perform the following steps:
- In the Secure Private Access console, click Applications and then click Security groups.
- Click Add a new security group.
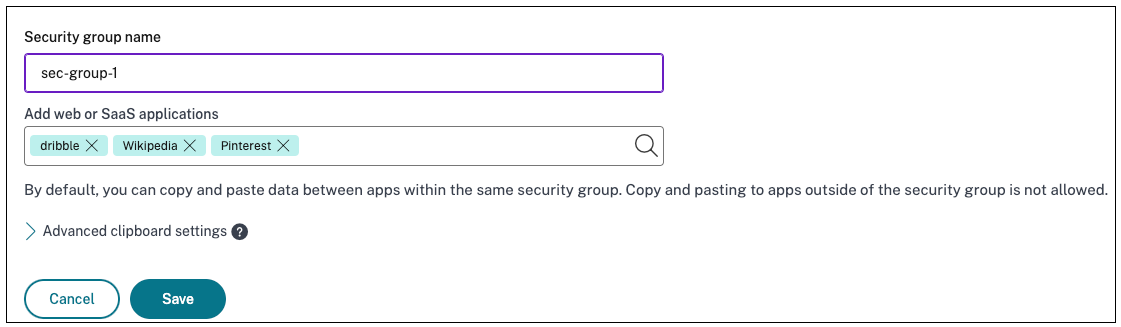
- Enter a name for the security group.
- In Add web or SaaS applications, choose the applications that you want to group to enable the copy and paste control. For example, Wikipedia, Pinterest and Dribble.
- Click Save.
For details on Advanced clipboard settings, see Enable copy / paste controls for native applications and unpublished apps.
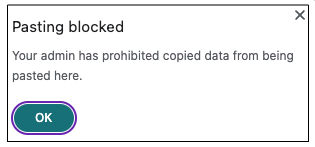
When end users launch these applications (Wikipedia, Pinterest and Dribble) from Citrix Workspace, they must be able to share data (copy / paste) from one application to the other applications within the security group. The copy / paste occurs irrespective of other security restrictions that are already enabled for the applications.
However, end users cannot copy and paste content from their local applications on their machines or unpublished applications to these designated applications and conversely. The following notification appears when the content is copied from the designated application into another application:
Note:
You can copy and paste the contents between the apps in a security group and other local apps on the machines or unpublished web apps by using the options in Advanced clipboard settings. For details, see Enable copy / paste controls for native applications and unpublished apps.
Enable granular level clipboard access
You can enable granular level clipboard access within the applications in a designated group. You can do so by creating access policies for the applications and enabling the Copy / Paste restriction as per your requirement.
Note:
Ensure that the specific access policy that you have created for granular level clipboard access has a higher priority than the policy that you have created for the security groups.
Example:
Consider that you have created a security group with three applications namely, Wikipedia, Pinterest, and Dribble.
Now, you want to restrict the pasting of content from Wikipedia or Dribble into Pinterest. To do so, perform the following steps:
- Create or edit an access policy assigned for the application
Pinterest. For details on creating an access policy, see Create access policies. - In the Step 3: Action page, select Allow with restrictions.
- Select Paste.
Although Pinterest is part of a security group which also contains Wikipedia and Dribble, users cannot copy content from Wikipedia or Dribble to Pinterest because of the access policy associated with Pinterest in which the Paste restriction is disabled.

Enable copy / paste controls for native applications and unpublished apps
You can copy and paste the contents between the apps in a security group and other local apps on the machines or unpublished web apps by using the options in Advanced clipboard settings
- Create a security group. For details, see Clipboard restriction for security groups.
-
Expand Advanced clipboard settings.
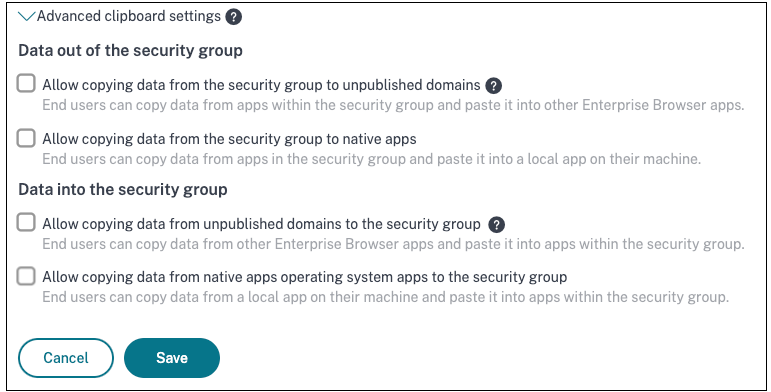
-
Select any of the following options as per your requirement:
- Allow copying of data from the security group to unpublished domains – Enable copying of data from applications in the security groups to the apps that are not published in Secure Private Access.
- Allow copying of data from the security group to native apps - Enable copying of data from the applications in the security groups to the local applications on your machines.
- Allow copying of data from the unpublished domains to the security group – Enable copying of data from the apps not published through Secure Private Access to the applications in the security groups.
- Allow copying of data from native apps operating system the security group - Enable copying of data from local applications on the machines to the applications.
Known issues
-
The routing table in (Settings > Application Domain) retains the domains of a deleted application. Hence, these applications are also considered as published applications in Secure Private Access. If these domains are accessed directly from Citrix Enterprise Browser, copy / paste is disabled from these applications irrespective of the options that you have selected in Advanced clipboard settings.
For example, assume the following scenario:
- You have deleted an application named Jira2 (
https://test.citrite.net) that was part of a security group. - You have enabled the option Allow copying of data from the security group to unpublished domains.
In this scenario, if the user tries to copy data from this application into another application in the same security group, the pasting control is disabled. A notification regarding the same is displayed to the user.
- You have deleted an application named Jira2 (
-
For a SaaS app, the app access can be denied if the application is configured with an access policy with action Deny access. The end users can still access the app because the app traffic is not tunneled through Secure Private Access. Also, if the application is part of the security group, the security group settings are not honored and hence you cannot copy /paste content from the application.