ADFS integration with Secure Private Access
Claim rules are necessary to control the flow of claims through the claims pipeline. Claim rules can also be used to customize the claims flow during the claim rule execution process. For more information about claims, see Microsoft documentation.
To set up ADFS to accept claims from Citrix Secure Private Access™, you must perform the following steps:
- Add claim provider trust in ADFS.
- Complete the app configuration on Citrix Secure Private Access.
Add claim provider trust in ADFS
- Open ADFS management console. Go to ADFS > Trust relationship > Claim provider Trust.
-
Right-click and select Add Claim Provider Trust.

-
Add an app in Secure Private Access that is used to federate to ADFS. For details see, App configuration on Citrix Secure Private Access.
Note:
First add the app and from the app’s SSO configuration section, you can download the SAML metadata file, and then import the metadata file into ADFS.
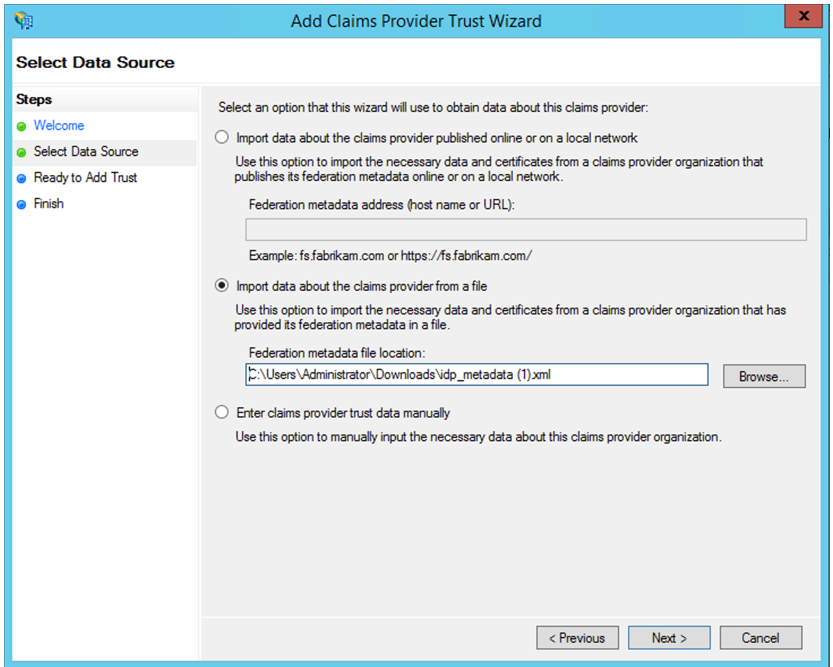
- Complete the steps to finish adding claim provider trust. After you complete adding the claim provider trust, a window to edit the claim rule appears.
- Add a claim rule with Transform An Incoming Claim.
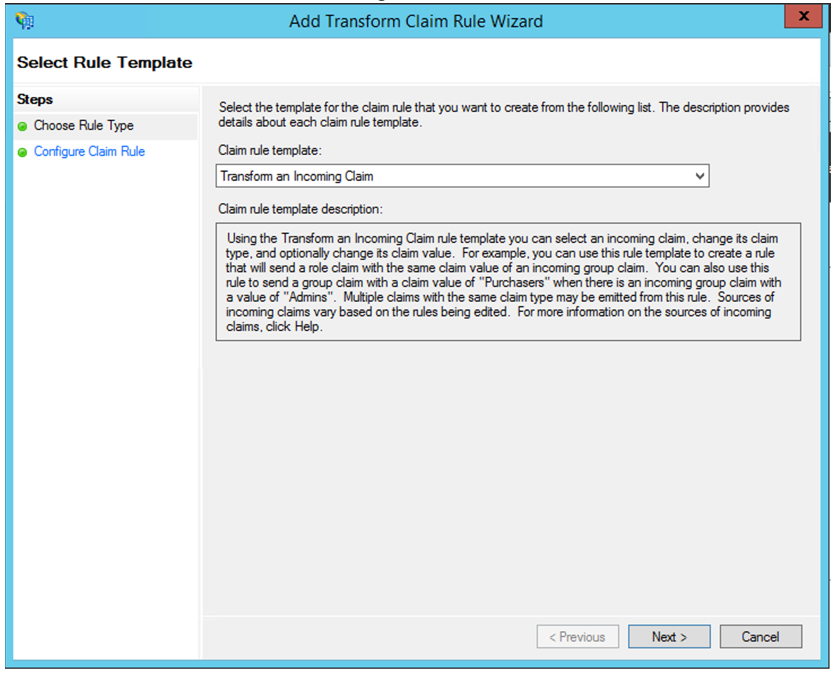
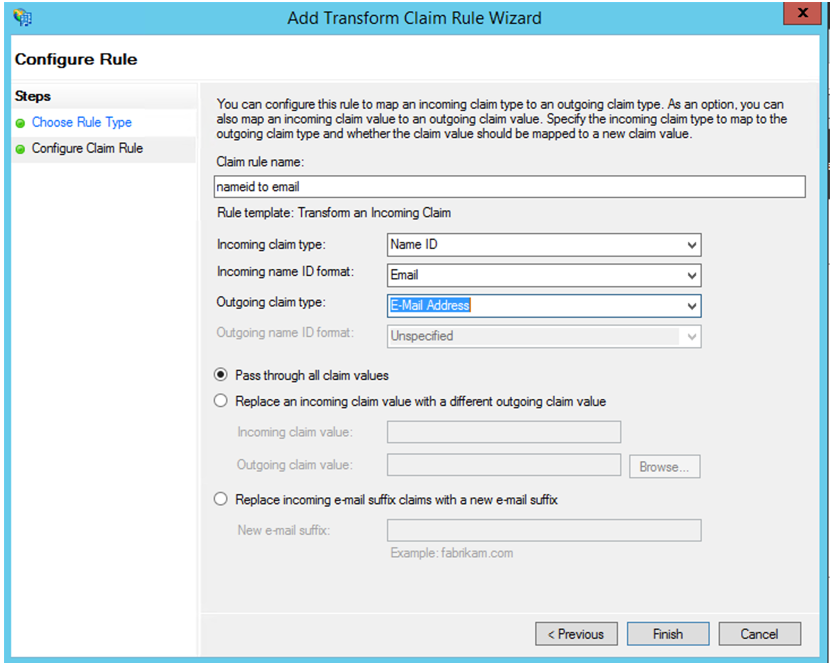
- Complete the settings as shown in the following figure. If your ADFS accepts other claims, then use those claims and configure SSO in Secure Private Access also accordingly.
-
You have now configured the claim provider trust that confirms ADFS now trusts Citrix Secure Private Access for SAML.
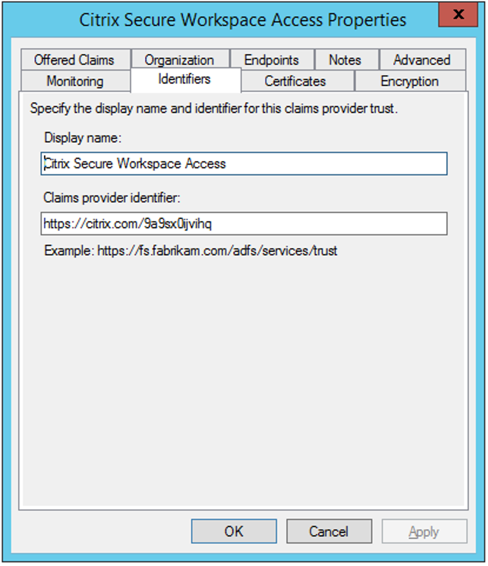
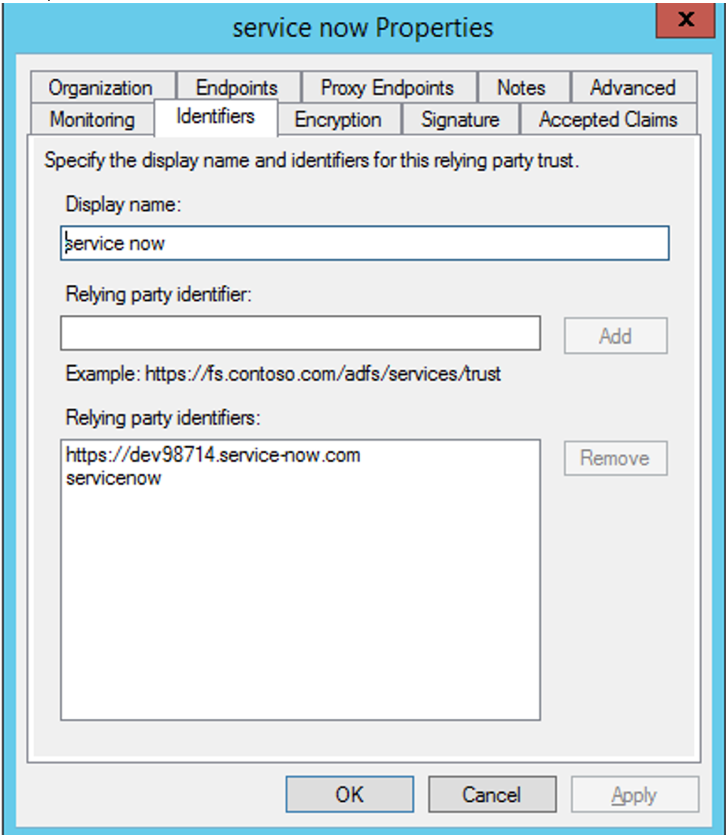
Claim Provider trust ID
Make a note of the claim provider trust id that you added. You need this ID while configuring the app in Citrix Secure Private Access.
Relaying Party Identifier
If your SaaS app is already authenticated using ADFS, then you must already have the Relaying party trust added for that app. You need this ID while configuring the app in Citrix Secure Private Access.
Enable relay state in IdP initiated flow
RelayState is a parameter of the SAML protocol that is used to identify the specific resource the users access after they are signed in and directed to the relying party’s federation server. If RelayState is not enabled in ADFS, users see an error after they authenticate to the resource providers that requires it.
For ADFS 2.0, you must install update KB2681584 (Update Rollup 2) or KB2790338 (Update Rollup 3) to provide RelayState support. ADFS 3.0 has RelayState support built in. In both cases RelayState still needs to be enabled.
To enable the RelayState parameter on your ADFS servers
- Open the file.
- For ADFS 2.0, enter the following file in Notepad: %systemroot%\inetpub\adfs\ls\web.config
- For ADFS 3.0, enter the following file in Notepad: %systemroot%\ADFS\Microsoft.IdentityServer.Servicehost.exe.config
- In the microsoft.identityServer.web section, add a line for useRelyStateForIdpInitiatedSignOn as follows, and save the change:
<microsoft.identityServer.web> ... <useRelayStateForIdpInitiatedSignOn enabled="true" /> ...</microsoft.identityServer.web>- For ADFS 2.0, run
IISResetto restart IIS.
- For ADFS 2.0, run
- For both platforms, restart the Active Directory Federation Services
(adfssrv) service.Note: If you have windows 2016 or Windows 10 then use the following PowerShell command to enable it.Set-AdfsProperties -EnableRelayStateForIdpInitiatedSignOn $true
Link to commands - https://docs.microsoft.com/en-us/powershell/module/adfs/set-adfsproperties?view=win10-ps
App configuration on Citrix Secure Private Access
You can either configure the IdP initiated flow or the SP initiated flow. The steps to configure IdP or SP initiated flow in Citrix Secure Private Access are the same except that for SP initiated flow, you must select the Launch the app using the specified URL (SP initiated) check box in the UI.
IdP initiated flow
- While setting up the IdP initiated flow, configure the following.
-
App URL – Use the following format for the app URL.
https://<adfs fqdn>/adfs/ls/idpinitiatedsignon.aspx?LoginToRP=<rp id>&RedirectToIdentityProvider=<idp id> - ADFS FQDN – FQDN of your ADFS setup.
- RP ID – RP ID is the ID that you can get from your relaying party trust. It is the same as the Relaying Party Identifier. If it is a URL, then URL encoding happens.
-
IDP ID – IdP ID is the same as the claim provider trust ID. If it is a URL, then URL encoding happens.
-
App URL – Use the following format for the app URL.
-
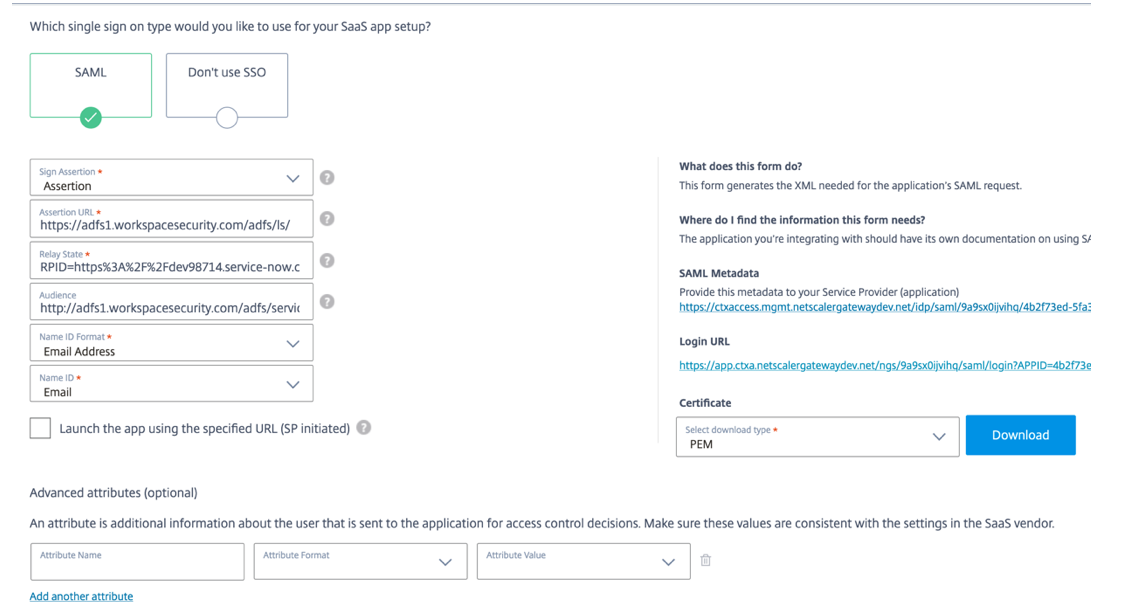
SAML SSO configuration.
The following are the default values of the ADFS server. If any of the values are changed, get the correct values from the metadata of the ADFS server. Federation metadata of the ADFS server can be downloaded from its federation metadata endpoint, whose endpoint can be known from ADFS > Service > Endpoints.
-
Assertion URL –
https://<adfs fqdn>/adfs/ls/ -
Relay State – Relay state is important for the IdP initiated flow. Follow this link to construct it properly -
https://docs.microsoft.com/en-us/previous-versions/windows/it-pro/windows-server-2008-R2-and-2008/jj127245(v=ws.10)Example: RPID=https%3A%2F%2Fdev98714.service-now.com&RelayState=https%3A%2F%2Fdev98714.service-now.com%2F
-
Audience –
http://<adfsfqdn>/adfs/services/trust - For the other SAML SSO configuration settings, see to the following image. For more details, see Support for SaaS apps.
-
Assertion URL –
- Save and subscribe the app to the user.
SP initiated flow
For SP initiated flow, configure the settings as captured in the IDP initiated flow section. In addition, enable the Launch the app using the specified URL (SP initiated) check box.