Install
StoreFront
Enable Citrix Workspace app for HTML5 on the Citrix Receiver for Web site. The StoreFront store provides the desktops and applications for Citrix Workspace app for HTML5 users.
Important:
In multiple-server StoreFront deployments, use only one server at a time to change the configuration of the server group. Verify the Citrix StoreFront management console isn’t running on any of the other servers in the deployment. Once complete, propagate your configuration changes to the server group so you update the other servers in the deployment.
-
Deploy StoreFront and create a store aggregating the desktops and applications you want to make available to Citrix Workspace app for HTML5 users.
A Citrix Receiver for Web site is created automatically for new stores. For more information about creating StoreFront stores, see Create or remove a store.
-
In the Citrix StoreFront management console, do the following steps:
- On the Windows Start screen or Apps screen, locate and click the Citrix StoreFront tile.
- In the left pane, select Stores and in the Action pane, select Manage Receiver for Web Sites, and click Configure.
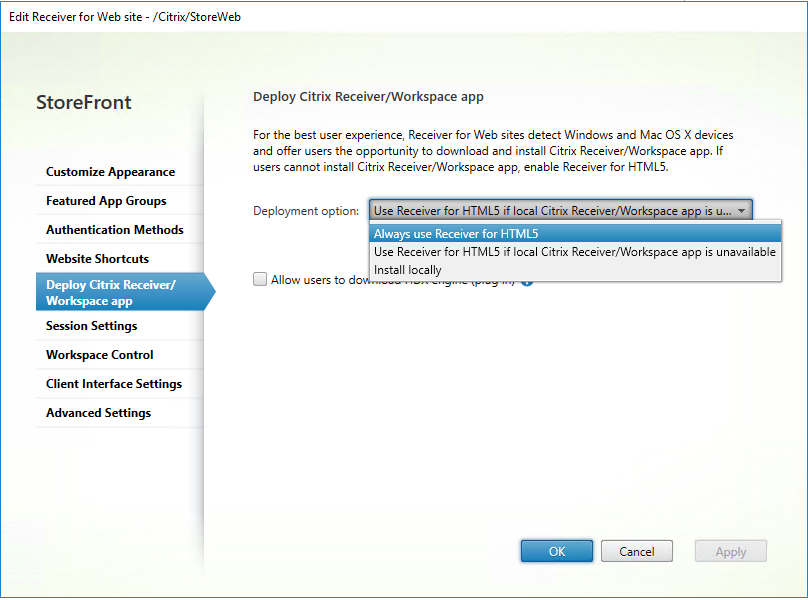
- Select Deploy Citrix Receiver/Citrix Workspace app.
-
Enable Citrix Workspace app for HTML5 by selecting one of the options.
-
Select Use Receiver for HTML5 if local Citrix Receiver/Citrix Workspace app is unavailable option, if you want to access desktops and applications from the site using the locally installed Citrix Workspace app, example, Citrix Workspace app for Windows.
If you haven’t installed any Citrix Workspace app, you can access desktops and applications from the site using Citrix Workspace app for HTML5.
Windows and macOS users without Citrix Workspace app for HTML5 are prompted to install it every time they sign in to the site. They can use Citrix Workspace app for HTML5 if they’re unable to install Citrix Workspace app.
When you select Use Receiver for HTML5 if local Citrix Receiver/Citrix Workspace app is unavailable, the Change Citrix Receiver option appears. This option allows you to switch to the light version or the local Citrix Workspace app dynamically based on the application or the desktop that you want to launch. Also, you can view the Change Citrix Receiver option under the Profile option.
-
If you want to use Citrix Workspace app for HTML5 to access applications or desktops from Citrix Virtual Apps and Desktops, select Always use Receiver for HTML5.
-
WebSocket
-
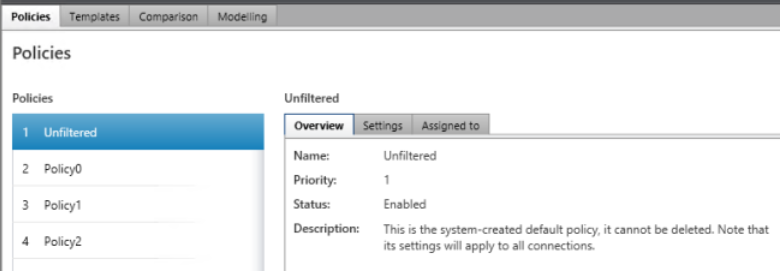
Go to the Group Policy Management Console or Citrix Studio and select Policy to configure the policies.
-
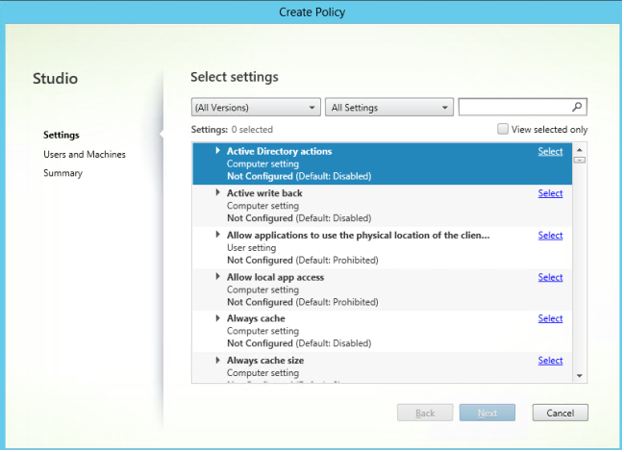
In the middle pane, under Policies, either modify an existing policy or create a policy.
-
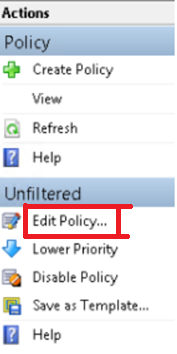
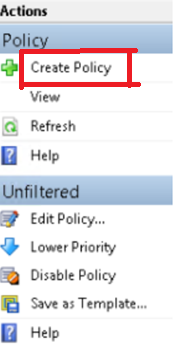
To edit an existing policy, in the right pane, under Actions, select Edit Policy….
-
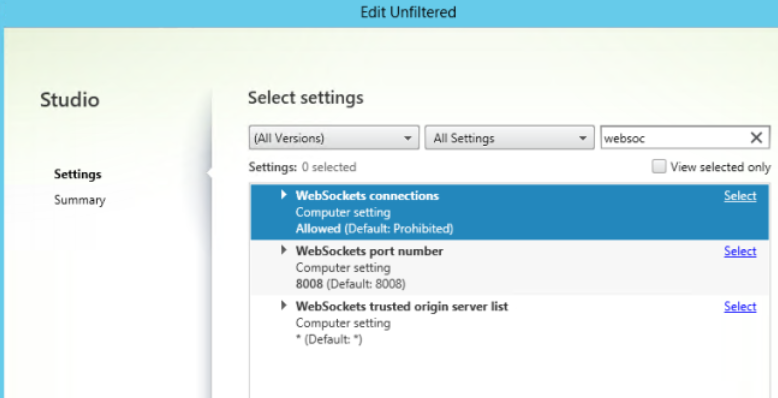
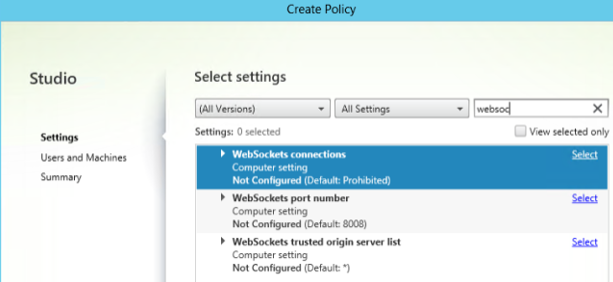
The Edit Unfiltered window appears. Type websoc and select Enter. The three WebSockets related policy settings are filtered.
-
Click Select for each policy, select Allowed, and then click OK.
-
Leave the default value, select OK, and then click Next.
-
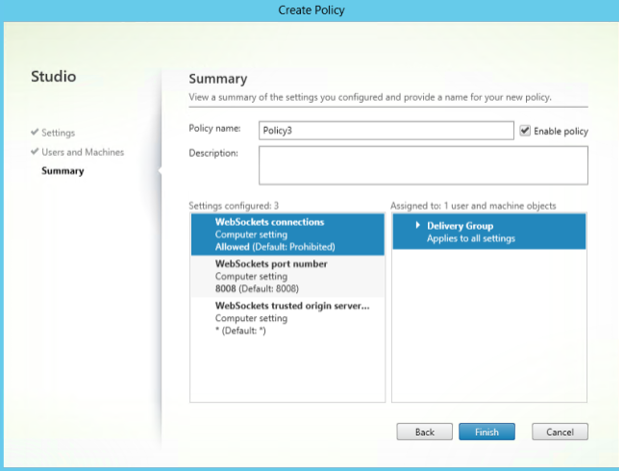
Enter a policy name or leave the default value. Verify that you select Enable policy and then click Finish.
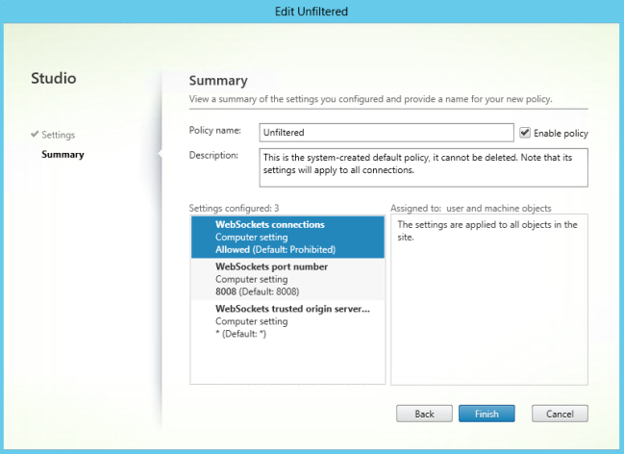
Note:
If you modify an existing default (unfiltered) policy, the option Assign policy to user and machine objects isn’t available. So, we recommend you either modify an existing (not default) policy or create a policy.
-
To create a policy in Citrix Studio, under Actions, select Policy and then click Create Policy. The Create Policy window opens.
-
In the search field, type websoc and select Enter. The search filters all three WebSockets related policy settings.
-
Click Select for each policy, and then select Next.
-
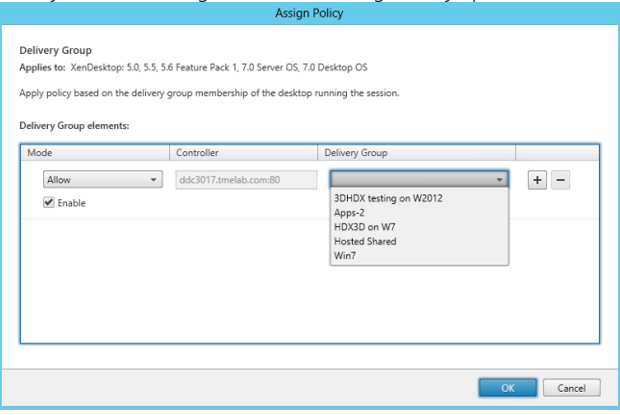
Assign the permission based on the Delivery Group. Select Delivery Group and click Assign.
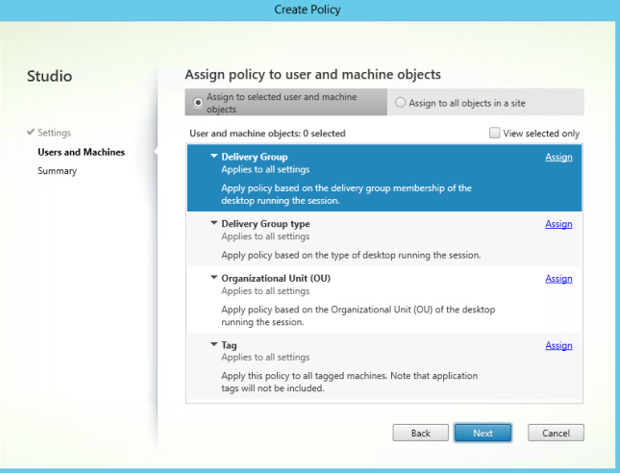
-
The Assign Policy window appears. Select the appropriate Delivery Group from the list and click OK.
-
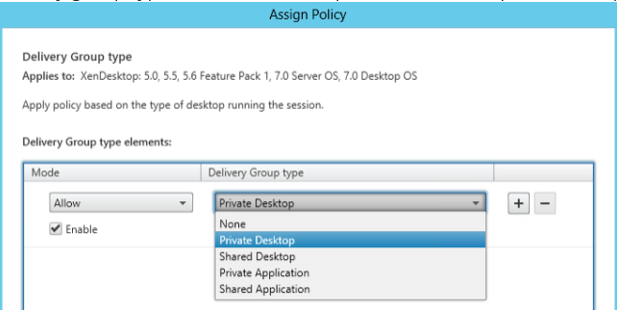
Select the Delivery Group type and click Assign. You can select the Delivery Group from the list.
-
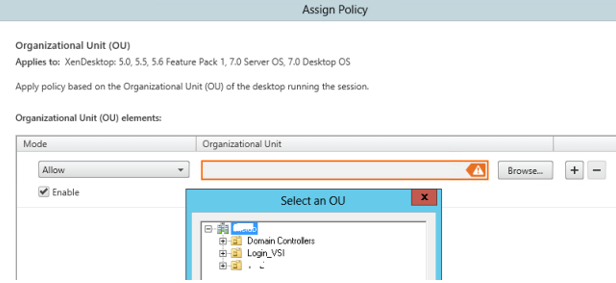
If you select Organizational Unit (OU), you can select a specific OU from your Active Directory environment.
-
On the Summary window, review your policy settings, and click Finish.
-
If you changed the port used when you allowed WebSocket connections on Citrix Virtual Apps or Citrix Virtual Apps and Desktops, complete the following steps.
To change the WebSocket port for the Citrix Workspace app for a Web site:
-
Use a text editor to open the web.config file for the Citrix Receiver for Web site. It is in the C:\inetpub\wwwroot\Citrix\storenameWeb directory. The storename is the name specified for the store when it was created.
-
Locate the following elements in the file.
<html5 ... preferences="" ... /> -
Set the value of the preferences attribute to wsPort:portnumber;, where portnumber is the port that you configured in the policy.
-
To verify HTML5 by accessing the desktop and applications using a web browser
-
Log on to the StoreFront using the URL,
http://<XDControllerIPaddressorFQDN>/Citrix/StoreWebusing domain credentials based on the permission (users/groups) in the Delivery Group. When you select Use Receiver for HTML5 if local CItrix Receiver/Citrix Workspace app is unavailable, a page appears. Use the light version to access HTML5.You have the following two options:
- Citrix Receiver™ Plug-in
- Receiver for HTML5
-
Click Log On.
-
Enter the correct User name and Password.
-
The page displays all the apps and desktops that you have access to. You can launch desktops and applications using an HTML5 browser. The desktops and applications are launched in a new tab.
To view Citrix Receiver for HTML5 logs by navigating to the log page
-
Log on to the Citrix Receiver for Web site.
-
For Citrix Workspace app 1908 for HTML5 and later, open a new tab and navigate to siteurl/Clients/HTML5Client/src/SessionWindow.html#engineType=log, where siteurl is the URL of the Citrix Receiver for Web site (
http://server.domain/Citrix/StoreWeb). -
For Citrix Workspace app 1907 and earlier, open a new tab and navigate to siteurl/Clients/HTML5Client/src/ViewLog.html, where siteurl is the URL of the Citrix Receiver for Web site (
http://server.domain/Citrix/StoreWeb).
-
Direct connections to Citrix Virtual Apps and Desktops and Citrix DaaS
Citrix Workspace app for HTML5 uses the WebSocket protocol to access virtual desktops and hosted applications. By default, WebSocket connections are prohibited on Citrix Virtual Apps and Desktops and Citrix DaaS (formerly the Citrix Virtual Apps and Desktops service).
If you enable users to access resources from the local network without connecting through Citrix Gateway, allow WebSocket connections on Citrix Virtual Apps and Desktops and Citrix DaaS.
For more information about creating HTTP profiles, see HTTP Configurations.
Warning:
Editing the registry incorrectly can cause serious problems that might require you to reinstall your operating system. Citrix can’t guarantee that problems resulting from the incorrect use of the Registry Editor can be solved. Use Registry Editor at your own risk. Be sure to back up the registry before you edit it.
Note:
If you’re using SecureICA to encrypt communications between users’ devices and your Citrix Virtual Apps and Desktops and Citrix DaaS or Citrix Virtual Apps servers, Citrix Workspace app for HTML5 supports Basic encryption only. If you use other encryption levels, sessions don’t start.
Citrix Provisioning™ Services
To deploy provisioned (non-persistent) machines using Citrix Provisioning Services, create the machine catalog and delivery group on which you want to enable Citrix Workspace app for HTML5 connections. Verify that the configured WebSocket policies apply to your machine catalog.
Restart the machine to apply the WebSocket policies. For Citrix Provisioning Services-based machines that are configured to use persistent write cache files and machines deployed using MCS (that have separate identity disks), the policies are persisted when the machines restart. However, for Citrix Provisioning Services-based machine catalogs that use temporary write cache files, these policies must be applied to the vDisk. Otherwise, the policies aren’t implemented successfully on target devices.
Complete the following steps to ensure that the policies are correctly applied to the vDisk.
-
Using the Citrix Provisioning Console, shut down a target device that is part of the machine catalog and delivery group. Change the access type of the target device from Production to Maintenance.
For details, see Target Devices. You must use a target device that is a part of the machine catalog and delivery group. Otherwise, the policies aren’t applied.
-
Create a version of your vDisk and set the Access to Maintenance. For details, see Manually updating a vDisk image.
- Start the maintenance target device, selecting the maintenance vDisk version from the boot menu. Verify that the following keys are added to the registry.
- HKEY_LOCAL_MACHINE\SOFTWARE\Policies\Citrix\ICAPolicies\AcceptWebSocketsConnections
- HKEY_LOCAL_MACHINE\SOFTWARE\Policies\Citrix\WebSocketsPort
- HKEY_LOCAL_MACHINE\SOFTWARE\Policies\Citrix\WSTrustedOriginServerList
- Shut down the target device, change the target device access type back to Production, and promote the new vDisk version to production. Then, start the target device and restart any other target devices currently running from the existing vDisk.
If you don’t use vDisk versioning, you can apply the policies to your base vDisk image. You can apply the policy by shutting down all the target devices that use the vDisk. Place the vDisk in Private Image mode, and then start the target device to update the image.
To Upgrade Citrix Workspace app for HTML5 on StoreFront
To upgrade to the new Citrix Workspace app, do the following steps on each StoreFront server:
-
Verify the current version of Citrix Workspace app for HTML5.
-
Download CitrixHTML5Client-x64.exe.
-
Copy CitrixHTML5Client-x64.exe to the StoreFront machine.
-
Install CitrixHTML5Client-x64.exe as an administrator to update Citrix Workspace app for HTML5.
-
Refresh the StoreFront console.
In this article
- StoreFront
- WebSocket
- To verify HTML5 by accessing the desktop and applications using a web browser
- To view Citrix Receiver for HTML5 logs by navigating to the log page
- Direct connections to Citrix Virtual Apps and Desktops and Citrix DaaS
- Citrix Provisioning™ Services
- To Upgrade Citrix Workspace app for HTML5 on StoreFront