Graphics and display
Pinning multi-monitor screen layout
Starting with Version 2103, you can save the selection for multi-monitor screen layout. The layout is how a desktop session is displayed. Pinning helps to relaunch a session with the selected layout, resulting in an optimized user experience.
As a prerequisite, you must enable this feature in the AuthManConfig.xml file. Navigate to $ICAROOT/config/AuthManConfig.xml and add the following entries:
     <key>ScreenPinEnabled</key>
     <value>true</value>
<!--NeedCopy-->
Only after adding the preceding key, you can see the Screen Layout option in the App indicator icon. For more information about the app indicator icon, see App indicator icon.
To select the screen layout, click the app indicator icon in the taskbar, and select Screen Layout. The Screen Layout dialog appears.
Alternately, you can launch the Screen Layout dialog by pressing Ctrl+m keys when on the self-service window.
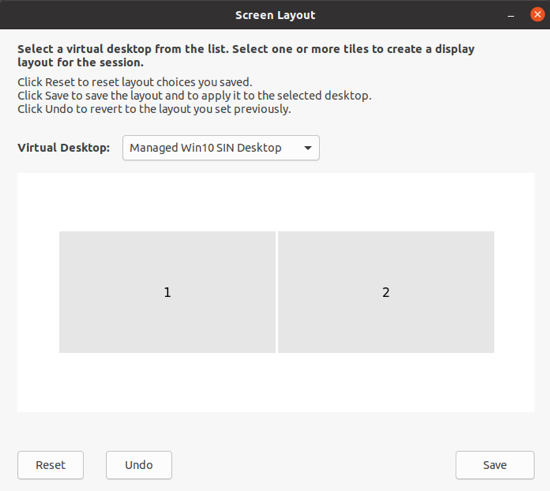
Select a virtual desktop from the drop-down menu. The layout selection is applied only to the desktop that you select.
Select one or more tiles to form a rectangular selection for the layout. The session then appears as per the layout selection.
Limitations:
- Enabling screen pinning disables the save layout feature in a session.
- This feature is applicable only on desktops that are marked as favorite.
Screen pinning in custom web stores
Starting with Citrix Workspace app version 2309, the screen pinning in custom web stores allows you to save the selection for multi-monitor screen layout in custom web stores.
As a prerequisite, you must enable this feature in the AuthManConfig.xml file. Navigate to $ICAROOT/config/AuthManConfig.xml and add the following entries:
<key>ScreenPinEnabled</key>
<value>true</value>
<!--NeedCopy-->
Only after adding the preceding key, you can see the Screen Layout option in the Citrix Workspace app menu.
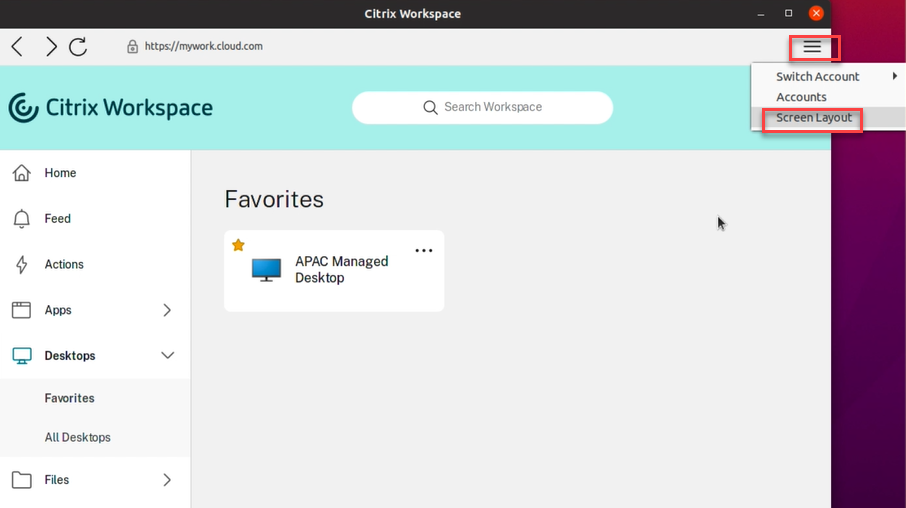
To select the screen layout, select Screen Layout in the Citrix Workspace app menu. The Screen Layout dialog box appears.
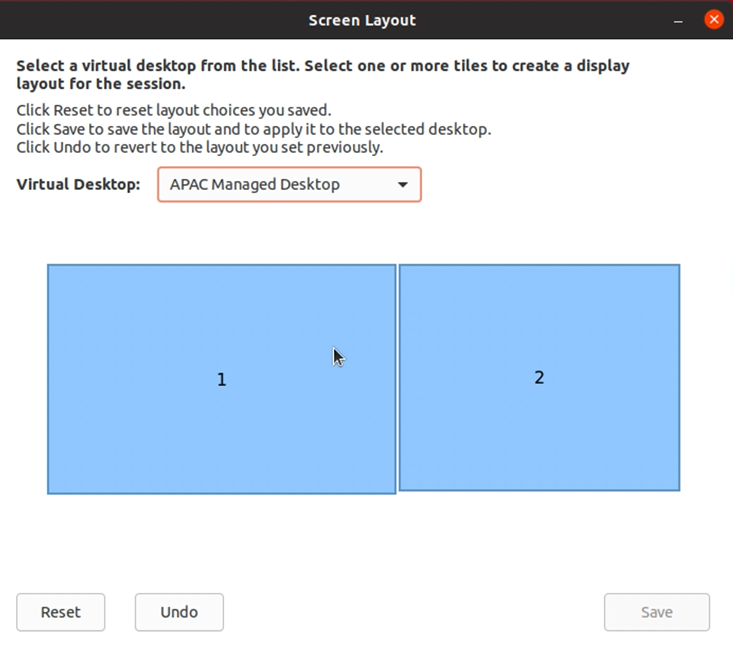
Select a virtual desktop from the drop-down menu. The layout selection is applied only to the desktop that you select.
Select one or more tiles to form a rectangular selection for the layout. The session then appears as per the layout selection.
Limitations:
- Enabling screen pinning disables the save layout feature in a session.
- This feature is applicable only on desktops that are marked as favorite.
Support for DPI matching
The display resolution and DPI scale values set in the Citrix Workspace app match to the corresponding values in the virtual apps and desktops session. You can set the required scale value in the Linux client, and the scaling of the VDA session is updated automatically.
DPI scaling is mostly used with large-size and high-resolution monitors. This feature helps to display the following in a size that can be viewed comfortably:
- Applications
- Text
- Images
- Other graphical elements
Note:
The DPI matching feature supports only
GNOME,KDE, andXfcedesktop environments.
This feature is disabled by default. You can enable this feature using the command-line interface or GUI.
Command-line interface
- Navigate to the
$HOME/.ICAClient/wfclient.iniconfiguration file. -
Go to the [WFClient] section and set the following entry:
DPIMatchingEnabled=TRUE
<!--NeedCopy-->
GUI
-
Go to Menu > Preferences. The Citrix Workspace‑Preferences dialog appears.
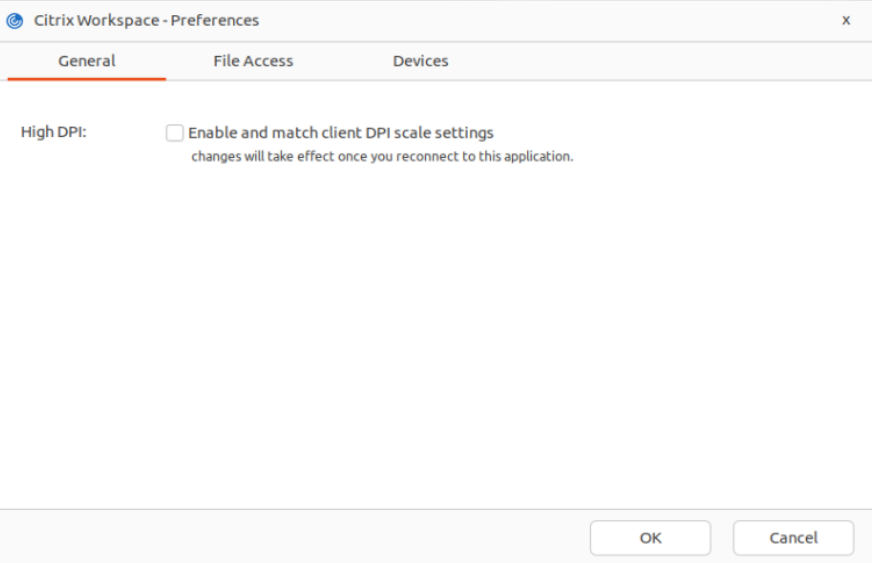
- Navigate to General tab.
- Select the Enable and match client DPI scale settings checkbox.
- Click OK.
Note:
The updated DPI scale settings take effect after you reconnect to Citrix Workspace app.
Limitation:
The DPI matching feature doesn’t support the following:
- Fractional scaling on the client side.
- Desktop session that is extended to more than one monitor and when those monitors have different DPIs configured.
Multi-monitor layout persistence
This feature retains the session monitor layout information across endpoints. The sessions appear on the same monitor as configured.
Prerequisite:
This feature requires the following:
- StoreFront v3.15 or later.
-
If
.ICAClientis already present in the home folder of the current user:Delete the All_Regions.ini file
or
To retain the
All_Regions.inifile, add the following lines at the end of the [Client Engine\Application Launching] section:SubscriptionUrl=
PreferredWindowsBounds=
PreferredMonitors=
PreferredWindowState=
SaveMultiMonitorPref=
If the .ICAClient folder is not present then it indicates a fresh install of the Citrix Workspace app. In that case, the default setting for the feature is retained.
Use cases
- Launch a session on any monitor in windowed mode and save the setting. When you relaunch the session, it appears in the same mode, on the same monitor, and in the same position.
- Launch a session on any monitor in full-screen mode and save the setting. When you relaunch the session, it appears in full-screen mode on the same monitor.
- Stretch and span a session in windowed mode across multiple monitors and then switch to full-screen mode. The session continues in full-screen across all monitors. When you relaunch the session, it appears in full-screen mode, spanning across all monitors.
Notes:
- The layout is overwritten with every save, and the layout is saved only on the active StoreFront.
- f you launch extra desktop sessions from the same StoreFront on different monitors, saving the layout in one session saves the layout information of all the sessions.
Using Citrix Virtual Desktops™ on dual monitor
- Select the Desktop Viewer and click the down arrow.
- Select Window.
- Drag the Citrix Virtual Desktops screen between the two monitors. Verify that about half the screen is present in each monitor.
-
From the Citrix Virtual Desktop toolbar, select Full-screen.
The screen extends to both the monitors.
Enhancement to multiple monitors
When using multiple monitors, if you dock or undock your primary endpoint machine from a docking station, the session extends to the monitors automatically with the updated layout. Also, when you start a session with multiple monitors, the session is extended to those monitors. If you add or remove monitors, the session is adapted to the newly available screens.
Note:
This feature supports a primary monitor and one secondary monitor only.
By default, this feature is disabled.
Perform the following to enable this feature:
- Navigate to the
$HOME/.ICAClient/wfclient.inifolder. - Go to the
[WFClient]section. -
Add the following entry:
MultiMonitorPnPEnabled=True
<!--NeedCopy-->
Note:
If you are using the 4K resolution monitor, during the multi-monitor plug and play, set
MonitorLayoutEventTimeout=4on the$HOME/.ICAClient/wfclient.inifile in the[WFClient]section.
Limitation:
- When you change the monitor layout on your local machine after a session is started, the monitor layout inside the session might not change accordingly. [HDX-58023]
Fixed issue:
- When you manually switch the session from Window mode to Full-screen mode and then connect a second monitor, the session might fail to display correctly on the second monitor. [HDX-55370]
ICA-to-X proxy
You can use a workstation running Citrix Workspace app as a server and redirect the output to another X11-capable device. You might want to do this task to deliver Microsoft Windows applications to X terminals or to UNIX workstations for which Citrix Workspace app isn’t available.
Note:
Citrix Workspace app software is available for many X devices, and installing the software on these devices is the preferred solution in these cases. Running Citrix Workspace app in this way, as an ICA-to-X proxy, is also referred to as server-side ICA.
When you run Citrix Workspace app, you can think of it as an ICA-to-X11 converter that directs the X11 output to your local Linux desktop. However, you can redirect the output to another X11 display. You can run extra copies of Citrix Workspace app simultaneously on one system. In this case, each Citrix Workspace app sends its output to a different device.
This graphic shows a system with Citrix Workspace app for Linux set up as an ICA-to-X proxy:
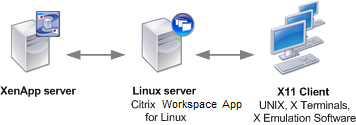
To set up this type of system, you need a Linux server to act as the ICA-to-X11 proxy:
- If you have X terminals already, you can run Citrix Workspace app on the Linux server that usually supplies the X applications to the X terminals.
- If you want to deploy UNIX workstations for which Citrix Workspace app isn’t available, you need an extra server to act as the proxy. This server can be a PC running Linux.
Applications are supplied to the final device using X11, using the capabilities of the ICA protocol. By default, you can use drive mapping only to access the drives on the proxy. This setting isn’t a problem if you’re using X terminals (which usually do not have local drives). If you’re delivering applications to other UNIX workstations, you can either:
- NFS mounts the local UNIX workstation on the workstation acting as the proxy, then point a client drive map at the NFS mount point on the proxy.
- Use an NFS-to-SMB proxy such as SAMBA, or an NFS client on the server such as Microsoft Services for UNIX.
Some features aren’t passed to the final device:
- USB redirection
- Smart card redirection
- COM port redirection
- Audio isn’t delivered to the X11 device, even if the server acting as a proxy supports audio.
- Client printers aren’t passed through to the X11 device. You access the UNIX printer from the server manually using LPD printing, or use a network printer.
- Redirection of multimedia input isn’t supported. Because it requires a webcam on the machine that runs Citrix Workspace app, where the server acts as a proxy. However, redirection of multimedia output supports when
GStreamerinstalled on the server acting as a proxy (untested).
To start Citrix Workspace app with server-side ICA from an X terminal or a UNIX workstation:
-
Use ssh or telnet to connect to the device acting as the proxy.
-
In a shell on the proxy device, set the DISPLAY environment variable to the local device. For example, in a C shell, type:
setenv DISPLAY <local:0>Note:
If you use the command
ssh -Xto connect to the device acting as the proxy, you do not need to set the DISPLAY environment variable. -
At a command prompt on the local device, type xhost <proxy server name>
-
Verify whether Citrix Workspace app is installed in the default installation directory. If not installed, verify that the environment variable ICAROOT is set to point to the actual installation directory.
-
Locate the directory where Citrix Workspace app is installed. At a command prompt, type
selfservice &.
Font
ClearType font smoothing
ClearType font smoothing improves the quality of displayed fonts beyond the available quality through:
- traditional font smoothing or,
- anti-aliasing.
ClearType font smoothing is also known as subpixel font rendering. You can turn this feature on or off.
You can also specify the type of smoothing by doing the following:
- Navigate to the [WFClient] section of the appropriate configuration file.
-
Edit the following setting:
FontSmoothingType=number
Where the number can take one of the following values:
Value Behavior 0 The local preference on the device is used. The FontSmoothingTypePref setting defines this value. 1 No smoothing 2 Standard smoothing 3 ClearType (horizontal subpixel) smoothing
Both standard smoothing and ClearType smoothing can increase Citrix Workspace app’s bandwidth requirements.
Important:
The server can configure
FontSmoothingTypethrough theICAfile. This value takes precedence over the value set in [WFClient].
If the server sets the value to 0, the following setting in the [WFClient] determines the local preference: FontSmoothingTypePref=number
Where a number can take one of the following values:
| Value | Behavior |
|---|---|
| 0 | No smoothing |
| 1 | No smoothing |
| 2 | Standard smoothing |
| 3 | ClearType (horizontal subpixel) smoothing (default) |
Xcapture
The Citrix Workspace app package includes a helper application, Xcapture. This application assists the exchange of graphical data between the server clipboard and non-ICCCM-compliant X Window applications on the X desktop. Users can use Xcapture to:
- Capture dialog boxes or screen areas and copy them between the user device desktop (including non-ICCCM-compliant applications) and an application running in a connection window
- Copy graphics between a connection window and X graphics manipulation utilities
xmagorxv
To start Xcapture from the command-line:
At the command prompt, type /opt/Citrix/ICAClient/util/xcapture and press ENTER (where /opt/Citrix/ICAClient is the directory in which you installed Citrix Workspace app).
To copy from the user device desktop:
- From the
Xcapturedialog box, click From Screen. The cursor changes to a crosshair. - Choose from the following tasks:
- Select a window. Move the cursor over the window that you want to copy and click the middle mouse button.
- Select a region. Hold down the left mouse button and drag the cursor to select the area you want to copy.
- Cancel the selection. Click the right mouse button. While dragging, you can cancel the selection by clicking the right button before releasing the middle or left mouse button.
- From the
Xcapturedialog box, click To ICA. TheXcapturebutton changes color to show that it is processing the information. - When the transfer is complete, use the appropriate paste command in an application launched from the connection window.
To copy from xv to an application in a connection window:
- From xv, copy the information.
- From the
Xcapturedialog box, click From XV and then click To ICA. TheXcapturebutton changes color to show that it is processing the information. - When the transfer is complete, use the appropriate paste command in an application launched from the connection window.
To copy from an application in the connection window to xv:
- From the application in a connection window, copy the information.
- From the
Xcapturedialog box, click From ICA and then click To XV. TheXcapturebutton changes color to show that it is processing the information. - When the transfer is complete, paste the information into xv.
UI option to manage monitor plug and play feature
Previously, you had to enter MultiMonitorPnPEnabled=True in the [WFClient] section of the $HOME/.ICAClient/wfclient.ini file to enable the monitor plug and play feature.
Starting with the 2405 version, a new UI option, the Automatically extend desktop session to external monitors checkbox is available to enable or disable the monitor plug and play feature.
By default, the Automatically extend desktop session to external monitors checkbox is not selected. To select this option, do the following:
- Click Desktop viewer > Preferences > General.
-
Select the Automatically extend desktop session to external monitors checkbox.
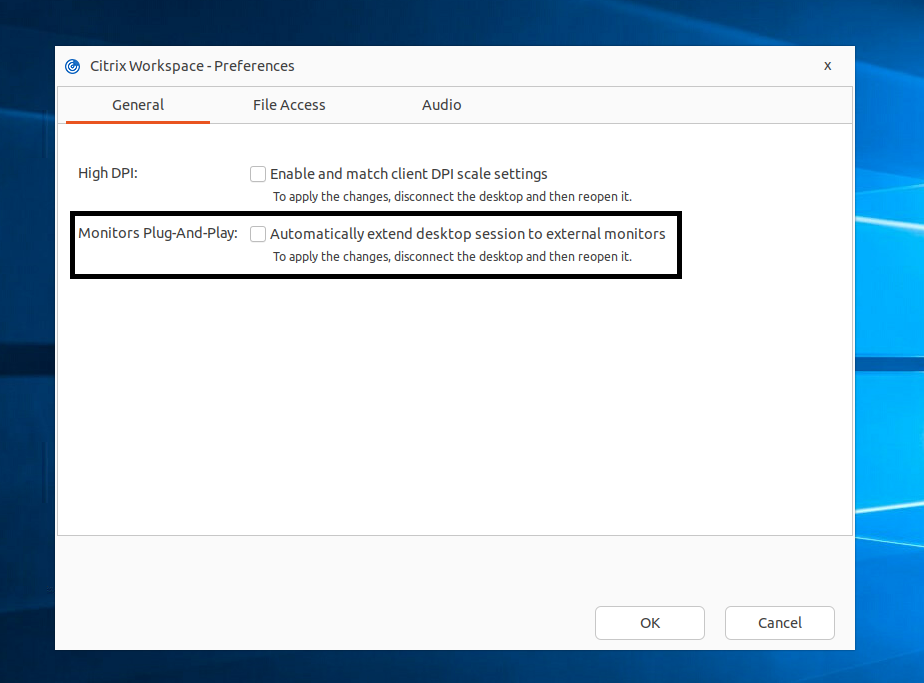
- Click OK. The change will take effect from the next-time you open the desktop session.
Note:
If you have disabled the feature through
All_Regions.iniper machine, the Automatically extend desktop session to external monitors checkbox isn’t visible.
Performance optimization for graphics
Citrix Workspace™ app 2408 version supports OpenGL library that improves the performance of graphics usage within an HDX session.
This feature is enabled by default starting with release 2503. To disable this feature, do the following:
- Navigate to the $HOME/.ICAClient/wfclient.ini file.
- Go to the [Thinwire3.0] section and add the following entry:
  OpenGLEnabled=False
<!--NeedCopy-->
Note
- To enable this feature, the operating system must support OpenGL 4.6.
- This feature is not supported on Linux based on Arm64 architectures.
- This feature is applicable only for the virtual desktop session.
- NVIDIA GPUs are not supported in this configuration.
Support for H.264 hardware decoding for seamless apps
Starting with the 2508 version, Citrix Workspace app for Linux supports H.264 hardware decoding for seamless apps, utilizing the GPU on the client device. This feature is enabled by default. To disable this feature, do the following:
- Navigate to the $HOME/.ICAClient/wfclient.ini folder.
- Go to the [Thinwire3.0] section.
- Add the following entry:
OpenGLEnabled=False
<!--NeedCopy-->
Support for H.264 hardware decoding
Starting with the 2408 version, Citrix Workspace app for Linux supports the GPU that can be used for H.264 decoding wherever it’s available at the client. H.264 video codec must be supported and enabled on both the VDA and Citrix Workspace app.
Prerequisites for H.264
- VDA 7.16 or later
- Use any of the following GPUs in VDA:
- NVIDIA Maxwell generation GPU or later
- Intel 6th generation GPU or later
- AMD Raven generation GPU or later
- Enable the Optimize for 3D graphics workload policy on the VDA.
- Enable the Use hardware encoding for video codec policy on the VDA.
This feature is set to be enabled by default starting with release 2503.
To disable this feature, complete the following steps:
- Navigate to the
$HOME/.ICAClient/wfclient.inifolder. - Go to the [Thinwire3.0] section.
- Add the following entry:
For H.264 hardware decoding:
OpenGLEnabled=False
Note
If hardware decoding acceleration is enabled, then:
- In the window mode, the maximum window size supported by the client is 4096x4096 (approximately 4K).
- For some Red Hat operating systems with Intel graphics, you might notice that “Initialized h264 software decoding successfully” printed in
ICAClient.logafter launching a session. In such cases, you need to verify whether the intel-media-driver is installed.
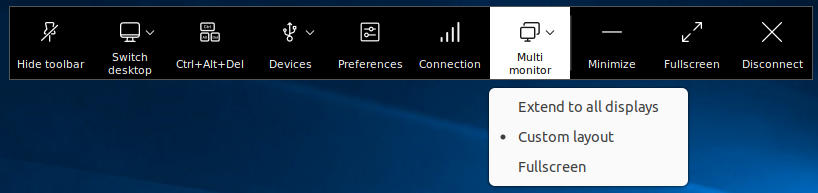
Multi-monitor custom layout
Starting with version 2411, the Multi-Monitor Selector (MMS) allows users to choose which displays to use in full-screen mode for desktop sessions only, not for seamless sessions. A new Multi-Monitor button has been added to the toolbar, which appears only when more than one screen is connected. This feature enhances the flexibility and usability of multi-monitor setups in desktop sessions, providing a more tailored and efficient user experience.
Starting with version 2503, we provide an enhanced multi-monitor experience when using a full-screen session through the Custom Layout feature. Additionally, you can save a monitor layout as per your preference and start a session with the saved layout.
This enhancement ensures a stable Citrix session experience in the following situations:
Unplugging or plugging in monitors:
Unplugging or plugging monitors into the system doesn’t affect the stability of your full-screen Citrix session.
When you unplug a monitor that isn’t used by a full-screen Citrix session: If you unplug an external monitor that isn’t being used by a full-screen session, the session remains normal and available. The same applies when you plug the monitor back in.
When you unplug a monitor that is used by a full-screen Citrix session: When you unplug a monitor that is being used by a full-screen session, the session transfers to the next available monitor without interrupting the session progress. Once you plug the monitor back in, the session automatically restores to its previous state.
When you unplug a monitor when a full-screen Citrix session spans across more than one monitor: If your full-screen session spans across multiple monitors, unplugging a monitor causes the session to adjust to the remaining monitor(s), adapting their layout. When you plug the monitor back in, the session automatically restores back to its previous state.
Disconnecting and reconnecting monitors:
When your session monitor is disconnected due to network issues or other reasons, the full-screen session transfers to the next available monitor without affecting your work. Once the monitor is reconnected, the session automatically restores back to its previous state.
Prerequisites
The multi-monitor layout selection feature is enabled by default starting with Citrix Workspace app for Linux version 2505. To disable the multi-monitor layout selection feature:
- Open the
$HOME/.ICAClient/wfclient.inifile. - Navigate to the
[WFClient]section. - Add the following entry:
MultiMonitorSelectionEnabled=False
<!--NeedCopy-->
Multi-monitor menu options
The toolbar button includes three dropdown menu options for desktop sessions in full-screen mode:
- Extend to All Displays: The session switches to full-screen mode on all connected screens.
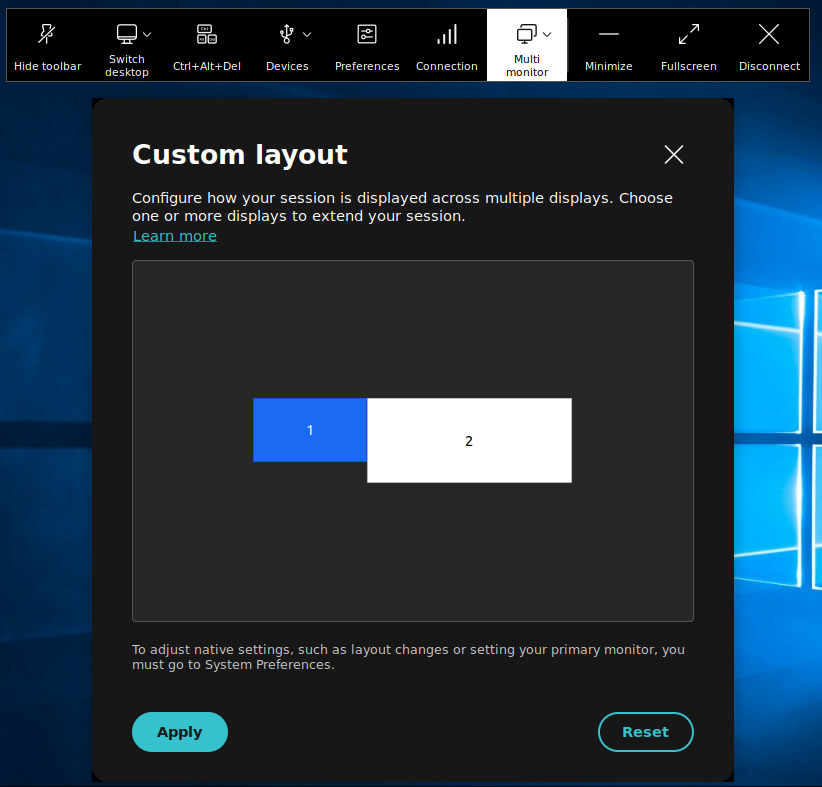
-
Custom Layout: This option opens a custom monitor selector displaying the layout of the Linux system. Users can click on the rectangles in the selector to choose which screens to use and then click Apply. The session then uses the selected screens in full-screen mode.
-
Fullscreen: The session switches to full-screen mode on the current single display where the toolbar is located or where the button is clicked.
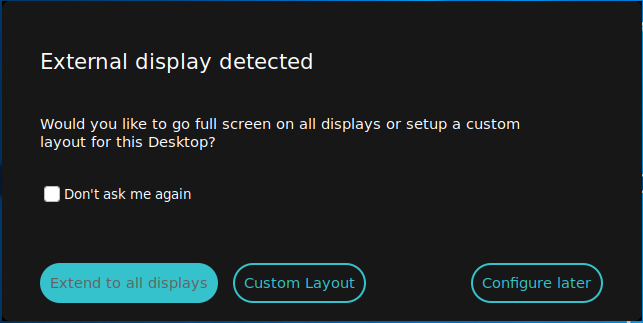
When a new monitor is plugged in, a notification appears for the user to make a selection. Users can select the Don’t ask me again checkbox to mute this notification.
Starting with 2503 release, to save a monitor layout, do the following:
- Click the Multi-monitor option from the toolbar. For more information, see Multi-monitor menu options.
- Select the Don’t ask me again checkbox and then click Extend to all displays or Custom Layout.
The monitor layout is saved.
The user-customized layout is used first when the session is restarted or the monitor layout is changed.
- If you select Extend to all displays, the session always extends to all monitors in Fullscreen mode.
- If you select Custom Layout, the session extends to the selected monitors.