Storebrowse
Storebrowse is a lightweight command-line utility that interacts between the client and the server. Using the storebrowse utility, administrators can automate the following day-to-day operations:
- Add a store.
- List the published apps and desktops from a configured store.
- Subscribe and unsubscribe apps and desktops from a configured store.
- Enable and disable shortcuts for published apps and desktops.
- Launch published applications.
- Reconnect to disconnected sessions.
Generally, the storebrowse utility is available in the /util folder. You can find it under the installation location. For example, /opt/Citrix/ICAClient/util.
Prerequisites
The storebrowse utility requires the libxml2 library package.
Launch published desktops and applications
There are two ways to launch a resource:
- You can use the command line and
storebrowsecommands - You can use the UI to launch a resource.
This article discusses storebrowse commands.
Storebrowse enhancement for service continuity
Previously, the Workspace connection lease files were synced with files available on the remote server only if you connected using the Self-Service plug-in. As a result, the service continuity feature wasn’t supported when you launched apps or desktop session using storebrowse. Most third-party thin-client vendors use storebrowse to connect to the Workspace platform and the service continuity feature wasn’t enabled for them.
Starting with version 2109 for Citrix Workspace app, the Workspace connection lease files sync with files available on the remote server when you connect using storebrowse as well. This feature helps the third-party thin-client vendors to access Workspace even when offline.
Note:
- This enhancement is available only when service continuity is enabled in cloud deployments. For more information, see the Configure Service Continuity section in the Citrix Workspace documentation.
Command usage
The following section details the storebrowse commands that you can use from the storebrowse utility.
Add a store
-a, --addstore, -as
Description:
Adds a store with gateway and beacon details along with the ServiceRecord daemon process. This command returns the full URL of the store. An error appears if adding a store fails.
Previously, -a command added a store and all linked accounts for the given URL. Starting with the 2408 version, it adds a store for a given URL.
Starting with the 2408 version, the -as command adds a store and all linked accounts for the given URL.
Command example of StoreFront:
Command:
./storebrowse -a *URL of StoreFront or a PNAStore*
Example:
./storebrowse -a https://my.firstexamplestore.net
Note:
You can add several stores using the
storebrowseutility.Previously, this command adds a single store and returns the URL of the store. Starting with the 2311 release, along with the existing functionality, this command adds all URLs when multiple accounts are available.
Help
-?, -h, --help
Description:
Provides details on the storebrowse utility usage.
List store
-l --liststore
Description:
Lists the stores that you’ve added.
Command Example on StoreFront:
./storebrowse -l
Note:
Previously, this command was listing only single stores added to an account. Starting with the 2311 release, this command lists multi-stores as well.
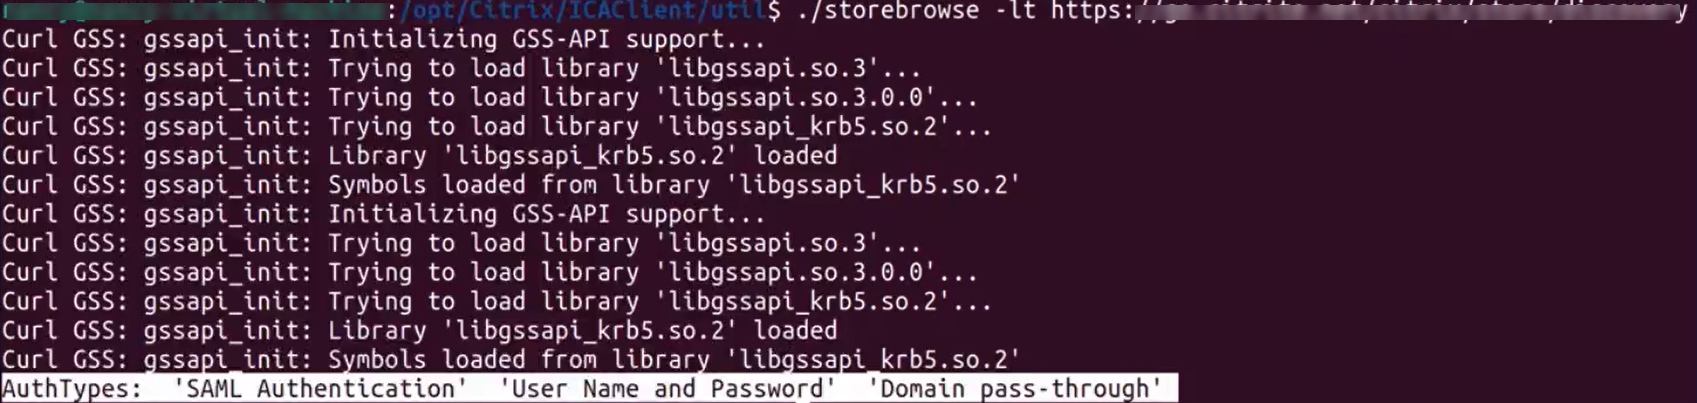
List authentication methods
-lt
Description: Starting with Citrix Workspace app for Linux version 2402, a new command -lt is introduced to list out all types of enabled authentication methods for StoreFront. This command supports using the credential insertion SDK.
Enter the storebrowse command as follows:
./storebrowse -lt <full URL>`
<!--NeedCopy-->
The output is as follows:
Enumerate
-E --enumerate
Description:
Lists the available resources. By default, the following values appear:
- Resource name
- Display name
- Resource folder
To view more information, append the -M --details command to the -E command.
Note:
When you run the -E command, an authentication window appears if you have not provided your credentials earlier.
Enter the entire store URL as reported by -liststore.
Command example of StoreFront:
-
./storebrowse.exe -E https://my.firstexamplestore.net/Citrix/Store/discovery -
./storebrowse.exe -E -M https://my.firstexamplestore.net/Citrix/Store/discovery
Subscribed
-S --subscribed
Description:
Lists the subscribed resources. By default, the following values appear:
- Resource name
- Display name
- Resource folder
To view more information, append the -M --details command to the -E command.
Command example of StoreFront:
-
./storebrowse.exe -S https://my.firstexamplestore.net/Citrix/Store/discovery -
./storebrowse.exe -S -M https://my.firstexamplestore.net/Citrix/Store/discovery
Details
-M --details
Description:
This command returns several attributes of the published applications. Generally, this command is used with -E and -S commands. This command takes an argument that is the sum of the numbers corresponding to the required details:
- Publisher(0x1)
- VideoType(0x2)
- SoundType(0x4)
- AppInStartMenu(0x8)
- AppOnDesktop(0x10)
- AppIsDesktop(0x20)
- AppIsDisabled(0x40)
- WindowType(0x80)
- WindowScale(0x100)
- DisplayName(0x200)
- AppIsMandatory(0x10000)
- CreateShortcuts(0x100000)
- RemoveShortcuts(0x200000)
Notes:
To create menu entries for subscribed applications, use the CreateShortcuts(0x100000) argument with the -S, -s, and -u commands.
To delete all menu entries, use RemoveShortcuts(0x200000) with the -S command.
Command example of StoreFront:
./storebrowse.exe -S -M 0x264 https://my.firstexamplestore.net/Citrix/Store/discovery
In the preceding command example, 0x264 is the combination of DisplayName(0x200), AppIsDisabled(0x40), AppIsDesktop(0x20), and SoundType(0x4). The output lists the subscribed resources along with the details.
You can use the -M command for listing the resources with the required details:
./storebrowse.exe -E -M 0x264 https://my.firstexamplestore.net/Citrix/Store/discovery
Notes:
- You can express the values in either decimal or in hexadecimal format. For example, 512 for 0x200.
- When some of the details aren’t available through storebrowse, the output value is zero.
Subscribe
-s --subscribe
Description:
Subscribes the specified resource from a given store.
Command example of StoreFront:
./storebrowse -s <Resource_Name> https://my.firstexamplestore.net/Citrix/Store/discovery
Unsubscribe
-u --unsubscribe
Description:
Unsubscribes the specified resource from a given store.
Command example of StoreFront:
./storebrowse -u <Resource_Name> https://my.firstexamplestore.net/Citrix/Store/discovery
Launch
-L --launch
Description:
Launches a connection to a published resource. The utility then closes automatically, leaving a successfully connected session.
Command example of StoreFront:
./storebrowse -L <Resource_Name> https://my.firstexamplestore.net/Citrix/Store/discovery
Icons
-i --icons
Description:
This command fetches desktop and application icons in PNG format. This command is used with the -E or the -S command.
To fetch icons of required sizes and depths, use the best argument or the size argument method.
Best argument
Using the best argument method, you can fetch the best-sized icons available on the server. You can later convert the icons to the required sizes. The best argument method is the most efficient way to store, apply bandwidth, and simplify scripting. The files are saved in the <resource name>.png format.
Size argument
To fetch icons of specified sizes and depths, use the size argument method. An error appears if the server is unable to fetch icons of a given size or depth.
The size argument is of the WxB form, where:
- W is the width of icons. All icons are square, so only one value is required to specify the size.
- B is the color depth. That is, the number of bits per pixel.
Note:
The value W is mandatory. The value B is optional.
If you leave the values unspecified, icons of all available image depths appear. The files are saved in the <resource name>_WxWxB.png format.
Both the methods save icons in the .png format for each resource that the -E or the -S command returns.
Icons are stored in the .ICAClient/cache/icons folder.
Command example of StoreFront:
-
./storebrowse -E -i best https://my.firstexamplestore.net/Citrix/Store/discovery -
./storebrowse -S -i 16x16 https://my.firstexamplestore.net/Citrix/Store/discovery
Reconnect session
-W [r|R] --reconnect [r|R]
Description:
Reconnects the disconnected yet active sessions of the specified store. The [r] option reconnects all the disconnected sessions. The [R] option reconnects all the active and disconnected sessions.
Command example of StoreFront:
-
./storebrowse -Wr https://my.firstexamplestore.net/Citrix/Store/discovery -
./storebrowse -WR https://my.firstexamplestore.net/Citrix/Store/discovery
Disconnect session
-WD --disconnect
Description:
Disconnects all sessions of the specified store.
Command example of StoreFront:
./storebrowse -WD https://my.firstexamplestore.net/Citrix/Store/discovery
Terminate session
-WT --terminate
Description:
Terminates all sessions of the specified store.
Command example of StoreFront:
./storebrowse -WT https://my.firstexamplestore.net/Citrix/Store/discovery
Version
-v --version
Description:
Displays the version of the storebrowse utility.
Command example of StoreFront:
./storebrowse -v
Root directory
-r --icaroot
Description:
Specifies the root directory where Citrix Workspace app for Linux is installed. If not specified, the root directory is determined at run time.
Command example of StoreFront:
./storebrowse -r /opt/Citrix/ICAClient
Username, Password, Domain
-U --username, -P --password, -D --domain
Description:
Passes the user name, password, and the domain details to the server. This method works only with a PNA store. StoreFront stores ignore this command. The details aren’t cached. Enter the details with every command.
Command example of StoreFront:
./storebrowse -E https://my.firstexamplestore.net/Citrix/Store/discovery -U user1 -P password -D domain-name
Delete store
-d --deletestore
Description:
Deregisters a store with the ServiceRecord daemon.
Command example of StoreFront:
./storebrowse -d https://my.firstexamplestore.net/Citrix/Store/discovery
Configure self-service
-c --configselfservice
Description:
Gets and configures the self-service UI settings that are stored in StoreCache.ctx. Takes an argument of the <entry[=value]> form. If only an entry is present, the setting’s current value is printed. However, if a value is present, the value is used to configure the setting.
Command example of StoreFront:
./storebrowse -c SharedUserMode=True
Add CR file
-C --addcr
Description:
Reads the provided Citrix Receiver™ (CR) file, and prompts you to add each store. The output is the same as the -a command, but has more than one store, separated by new lines.
Command example of StoreFront:
./storebrowse -C <path to CR file>
Sync connection lease files
-o --synclease
Description:
Starts to sync Workspace connection lease files with the files available on the remote server for the specified store. This command helps to update the default store and triggers the lease file sync. An error appears if service continuity is disabled.
Command:
./storebrowse -o *URL of Store *
Command example of StoreFront:
./storebrowse –o https://my.firstexamplestore.net
Close storebrowse daemon
-K --killdaemon
Description:
Terminates the storebrowse daemon. As a result, all credentials and tokens are purged.
Starting with the 2311 release, the -K command also helps to sign out from the StoreFront™, cloud stores, or NetScaler Gateway.
Command example of StoreFront:
./storebrowse -K
List error codes
-e --listerrorcodes
Description:
Lists the error codes that are registered.
Command example of StoreFront:
./storebrowse -e
Store gateway
-g --storegateway
Description:
Sets the default gateway for a store that is already registered with the ServiceRecord daemon.
Command example of StoreFront:
./storebrowse -g “<unique gateway name>” https://my.firstexamplestore.net/Citrix/Store/discovery
Note:
The unique gateway name must be in the list of gateways for the specified store.
Quick launch
-q, --quicklaunch
Description:
Launches an application using the direct URL. This command works only for StoreFront stores.
Command example of StoreFront:
.\storebrowse.exe -q <https://my.firstexamplestore.net/Citrix/Store/resources/v2/Q2hJkOlmNoPQrSTV9y/launch/ica> <https://my.firstexamplestore.net/Citrix/Store/discovery>
Daemonize
-n --nosingleshot
Description:
Always daemonizes the storebrowse process.
Command example of StoreFront:
./storebrowse -n
File parameters
-F --fileparam
Description:
Launches a file with the file path and the resource specified.
Command example of StoreFront:
./storebrowse -F “<path to file>” -L <Resource Name> <https://my.firstexamplestore.net/Citrix/Store/discovery>
Accept End-User License Agreement (EULA)
-eu --accept-eula
Description: This command applies to version 2503 and later. Use this command to accept EULA from the users. This command eliminates the GUI and silently accepts the EULA.
Enter the storebrowse command as follows:
./storebrowse -eu
The output is as follows:

Workflow
This article demonstrates a simple workflow on how to launch an app using the storebrowse commands:
-
./storebrowse -a https://my.firstexamplestore.netAdds a store and provides the full URL of the store. Make a note of the full URL because it’s used in the later commands.
-
./storebrowse.exe -E https://my.firstexamplestore.net/Citrix/Store/discoveryLists all the published apps and desktops. Enter your credentials using the popup that appears for the registered store.
-
./storebrowse -L <Resource_Name> https://my.firstexamplestore.net/Citrix/Store/discoveryLaunches the resource. Take the Resource_Name from the output of the previous command.
-
./storebrowse -KThis command purges the credentials entered earlier and closes the
storebrowsedaemon. If you do not mention this command explicitly, thestorebrowseprocess exits after an hour.