Update
Support for auto-update scheduling
Starting with version 2411, admins can schedule auto-updates for the Citrix Workspace™ app during convenient hours. This capability allows them to determine the rollout period, minimizing disruption to end-users and improving adoption of the auto-update service, which was previously controlled by Citrix.
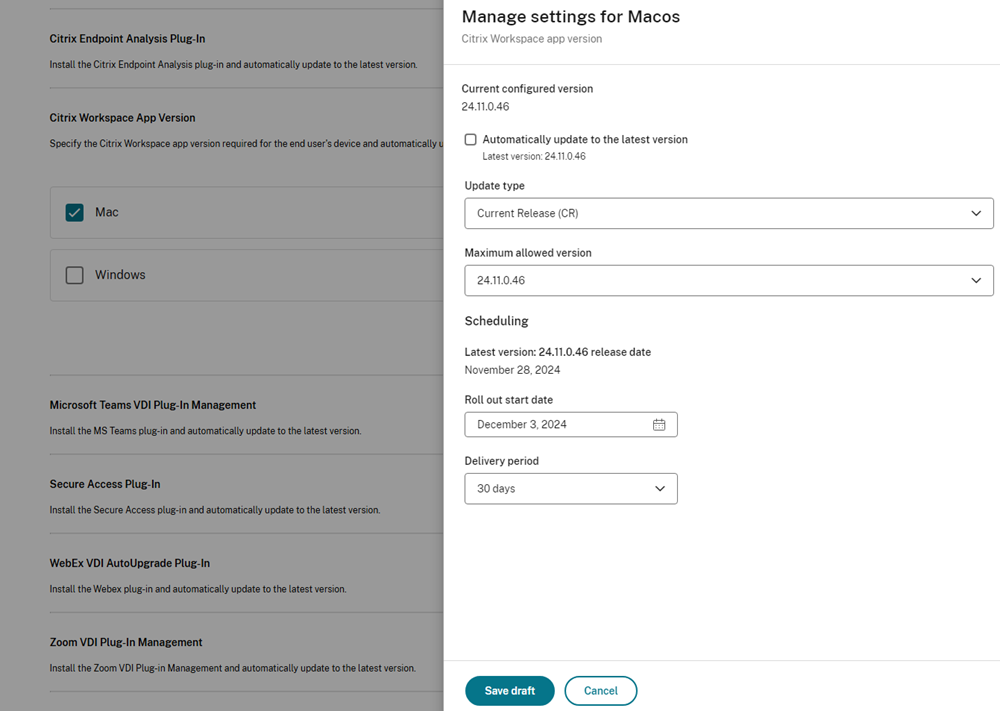
End-users receive auto-updates for the Citrix Workspace app at a time scheduled by their admins, ensuring updates happen in a planned manner. Admins can control updates on macOS in the following ways:
- Admins can set the dates and time range for updates of the Citrix Workspace app for macOS.
- Scheduled updates set by customer admins take precedence over any rollout periods defined in the Citrix Catalog.
You can configure this feature using Mobile Device Management (MDM) and Global App Configuration service (GACS).
Using MDM:
 <array>
  <dict>
   <key>AutoUpdateSchedulerSettings</key>
    <string>
    {
                    "startTime":"20:30",
                    "endTime":"23:30",
                    "deferCount":"4"
    }
    </string>
   <key>PayloadDisplayName</key>
    <string>Citrix Workspace #1</string>
   <key>PayloadIdentifier</key>
    <string>com.citrix.receiver.nomas</string>
   <key>PayloadType</key>
    <string>com.citrix.receiver.nomas</string>
   <key>PayloadUUID</key>
    <string>3BE38AD3-7D95-423F-BD7B-8A4D1F5208EF</string>
   <key>PayloadVersion</key>
   <integer>1</integer>
  </dict>
 </array>

<!--NeedCopy-->
Using GACS:
- Navigate to Workspace Configuration > App Configuration > URL Configuration.
- Click Citrix Workspace app version and configure the desired settings.
- Next, click Automatic Update Timeframe > Edit to define the time window within which auto-update trigger occurs.
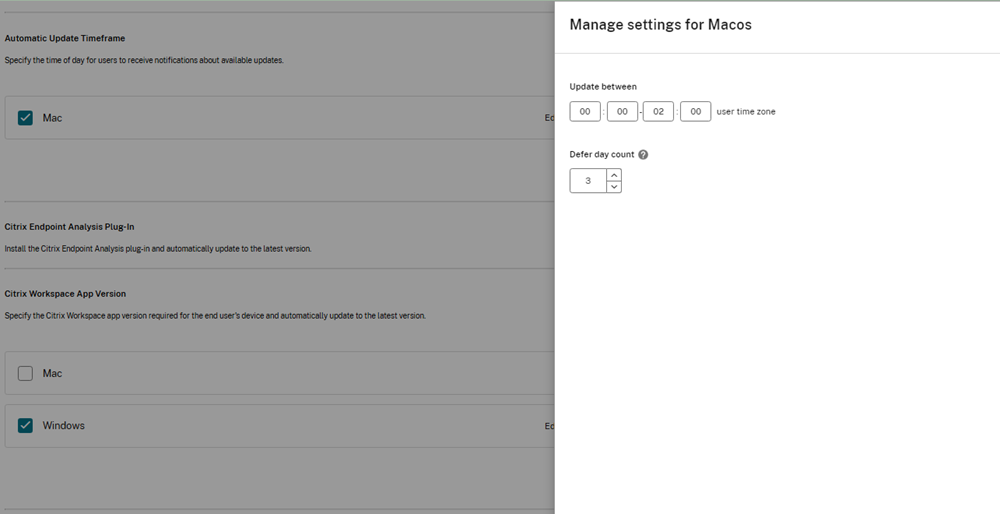
- Enter the required values. Defer day count specifies the number of times the end user can defer the auto-update.
For more information, see Automatic update timeframe.
Auto-update enhancement for active users
Starting with version 2411 of Citrix Workspace app for Mac, the auto-update feature was enhanced to trigger only for active users, ensuring that updates are available only for users with Global App Configuration service (GACS) or Mobile Device Management (MDM) policies, or those actively using the app. Building on this, version 2505 further refines the auto-update feature by introducing additional conditions for defining an active user. This enhancement provides more precise and controlled updates by applying the auto-update feature only to users who meet the updated activity criteria, offering greater flexibility and control over the update process.
A user is considered active if any of the following criteria is met:
- The user has launched at least one session (Desktop, Citrix Virtual app, or SaaS app).
- User is logged into the native Citrix Workspace application, allowing updates to be targeted to those actively engaging with the app.
- A Mobile Device Management (MDM) policy is configured for Auto-update Version Control, ensuring that devices in managed environments with specific update policies receive timely updates.
- The user is a managed user, with their system and profile controlled and maintained by an IT administrator, and has added a store with Global Application Configuration service (GACS) settings.
If none of these conditions are met, the user is considered inactive, and the auto-update feature is not available. When a user transitions from inactive to active status, the application triggers the auto-update feature, if applicable, ensuring the application is up-to-date.
Auto-update support for user groups
Starting with version 2411, customers can configure different app versions for different user groups through Configuration Profile in Global App Configuration Service (GACS). For more information, see Automatic update management settings supports configuration profiles.
Manual update
To manually update the Citrix Workspace app for Mac, download and install the latest version of the app from the Citrix Downloads page.
Automatic update
When a new version of the Citrix Workspace app releases, Citrix pushes the update on the system that has the Citrix Workspace app installed. You’re notified of the available update.
Note:
- If you’ve configured an SSL intercepting outbound proxy, add an exception to the Workspace auto-update server
https://downloadplugins.citrix.com/to receive updates from Citrix.- Auto-update isn’t available for Citrix Workspace app versions earlier than 2301.1. For more information, see Knowledge Center article CTX491310.
- Your system must have an internet connection to receive updates.
- Workspace for web users can’t download the StoreFront policy automatically.
- Citrix HDX RTME for macOS is included in Citrix Workspace Updates. You’re notified of the available HDX RTME update on the Citrix Workspace app.
- Starting with Version 2111, Citrix Workspace updates log paths are modified. The Workspace updates logs are present at
/Library/Logs/Citrix Workspace Updater. For information about collecting logs, see the Log collection section.
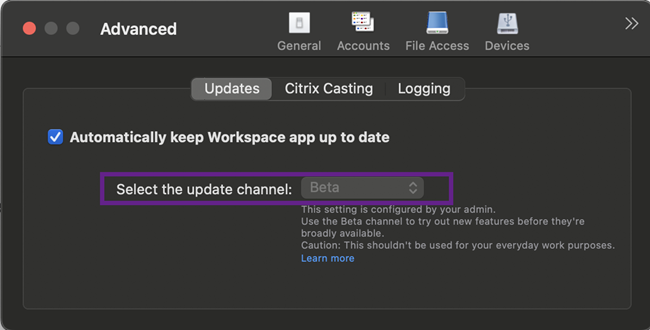
Support for restricting users to modify the update channel
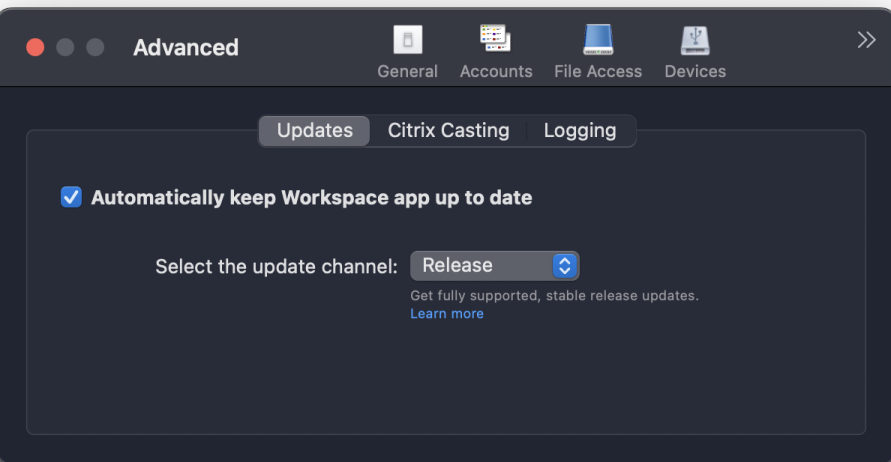
Previously, users can modify the update channel to release or beta using the Select the update channel option available on the Advanced setting.
Starting with the 2409 version, the Citrix workspace app for Mac allows the admin to manage the Select the update channel option. With this feature, you have control over the update channel preference, ensuring that end users cannot modify it. This ensures that the update channel remains consistent and secure, as per your administrative settings.
You can configure this feature through the Global App Configuration service (GACS), Mobile Device Management (MDM), and the web.config file.
Using MDM
To push the auto-update for release or beta channels, administrators must use the following settings:
<key>AutoUpdateChannel</key><string>release</string>
0r
<key>AutoUpdateChannel</key><string>beta</string>
Using the web.config file
To push the auto-update for release or beta channels, do the following steps:
- Use a text editor to open the web.config file, which is typically in the
C:\inetpub\ wwwroot\Citrix\Roamingdirectory. -
Locate the user account element in the file (Store is the account name of your deployment). For example:
<account id=... name="Store"> -
Navigate to the properties of that user account and add the following properties before the </account> tag,:
<property name=“autoUpdateChannel” value=“release” /><property name=“autoUpdateChannel” value=“beta” />
Installing Citrix Workspace app Beta program
You receive an update notification when the Citrix Workspace app is configured for automatic updates. To install the Beta build on your system, perform the following steps:
- Open Citrix Workspace app.
- Right-click on Citrix Workspace in the toolbar and click Preferences > Advanced.
-
Select Beta from the drop-down list, when the Beta build is available.
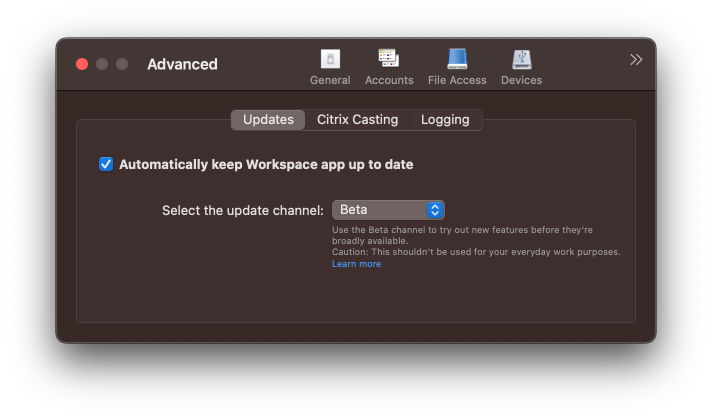
To switch from a Beta build to a Release build, perform the following steps:
- Open Citrix Workspace app.
- Right-click on Citrix Workspace in the toolbar and click Preferences > Advanced.
-
Select Release from the Select the update channel drop-down list.
Note:
Beta builds are available for customers to test in their non-production or limited production environments, and to share feedback. Citrix does not accept support cases for beta builds but welcomes feedback for improving them. Citrix might or might not act on feedback based on its severity, criticality, and importance. It’s advised that you do not deploy Beta builds in production environments.
Auto-update version control
Administrators can now manage the auto-updated version of Citrix Workspace app for the devices in the organization. Administrators can control the version by setting the range for maximumAllowedVersion and minimumAllowedVersion properties in the Global App Configuration service.
Example JSON file in Global App Configuration service:
{
  "serviceURL": {
    "url": "https://serviceURL:443"
  },
  "settings": {
    "name": "Version Control for Citrix Workspace",
    "description": "Provides admin ability to Version Control for Citrix Workspace",
    "useForAppConfig": true,
    "appSettings": {
      "macos": [
        {
          "category": "AutoUpdate",
          "userOverride": false,
          "assignedTo": [
            "AllUsersNoAuthentication"
          ],
          "settings": [
            {
              "name": "Auto update plugins settings",
              "value": [
                {
                  "pluginName": "Citrix Workspace",
                  "pluginId": "D99C3E77-FBF5-4B97-8EDA-4E381A1E0826",
                  "pluginSettings": {
                    "deploymentMode": "Update",
                    "upgradeToLatest": false,
                    "minimumAllowedVersion": "23.07.0.63",
                    "maximumAllowedVersion": "23.07.0.63",
                    "delayGroup": "Medium",
                    "detectRule": ""
                  }
                }
              ]
            }
          ]
        }
      ]
    }
  }
}

<!--NeedCopy-->
When the range is set, Citrix Workspace app on the user’s device is automatically updated to the highest available version that falls between the mentioned range.
If you want to auto-update Citrix Workspace app to a specific version, enter the same version in the maximumAllowedVersion and minimumAllowedVersion properties in the Global App Configuration service.
Note:
- To enable auto-update version control, set the upgradeToLatest setting to false in the Global App Configuration service. If the upgradeToLatest setting is true, maximumAllowedVersion and minimumAllowedVersion is ignored.
- Do not modify the pluginId. The pluginID is mapped to Citrix Workspace app.
- If the administrator hasn’t configured the version in the Global App Configuration service, Citrix Workspace app is updated to the latest available version by default.
- You can only use the version ranges that are set to update Citrix Workspace app. However, a downgrade isn’t supported.
- This feature is supported from release 2307 onwards.
Improved auto-update experience
The auto-update feature automatically updates the Citrix Workspace app to the latest version without the need for any user intervention.
Citrix Workspace app periodically checks and downloads the latest available version of the app. Citrix Workspace app determines the best time to install based on user activity not to cause any disruptions.
Advanced configuration for automatic updates (Citrix Workspace Updates)
You can configure Citrix Workspace updates using the following methods:
- Graphical user interface (GUI)
- Global App Configuration service (GACS)
- Mobile Device Management (MDM)
- StoreFront
Configure Citrix Workspace automatic updates using the graphical user interface
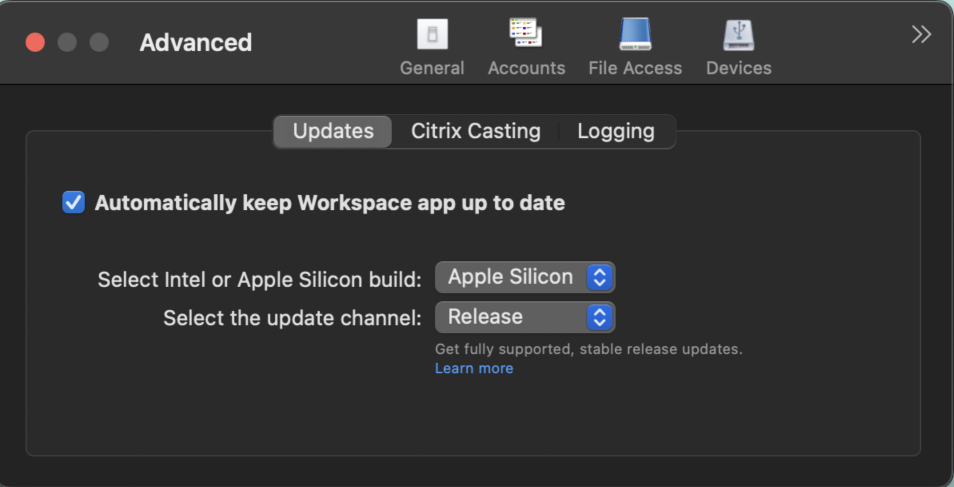
Individual users can override the Citrix Workspace updates setting using the Advanced preferences dialog box, which is a per-user configuration and the settings apply only to the current user. To configure the update using the GUI, perform the following steps:
- Select the Citrix Workspace app helper icon on your Mac.
- From the drop-down list, select Preferences > Advanced > Updates.
- Select the build for which you want to install the automatic updates. It can be either the Apple Silicon or Intel build (only applicable for users on Mac with Apple silicon (M1 Series).
Configure Citrix Workspace automatic updates using StoreFront
-
Use a text editor to open the
web.configfile, which is typically in theC:\inetpub\wwwroot\Citrix\Roaming directory. -
Locate the user account element in the file (Store is the account name of your deployment).
For example:
<account id=... name="Store">Before the
</account>tag, navigate to the properties of that user account:<properties> <clear/> </properties> <!--NeedCopy--> -
Add the auto-update tag after the <clear /> tag.
<account>

    <clear />

    <account id="d1197d2c-ac82-4f13-9346-2ee14d4b0202" name="F84Store"

      description="" published="true" updaterType="Citrix" remoteAccessType="None">

      <annotatedServices>

        <clear />

        <annotatedServiceRecord serviceRef="1__Citrix_F84Store">

          <metadata>

            <plugins>

              <clear />

            </plugins>

            <trustSettings>

              <clear />

            </trustSettings>

            <properties>

              <property name="Auto-Update-Check" value="Disabled" />

              <property name="Auto-Update-DeferUpdate-Count" value="1" />

              <property name="Auto-Update-Rollout-Priority" value="fast" />

              <property name="Auto-Update-Architecture" value="Universal" or "Intel" />

                    </properties>

          </metadata>

        </annotatedServiceRecord>

      </annotatedServices>

      <metadata>

        <plugins>

          <clear />

        </plugins>

        <trustSettings>

          <clear />

        </trustSettings>

        <properties>

          <clear />

        </properties>

      </metadata>

    </account>

<!--NeedCopy-->
The meaning of the properties and their possible values are detailed as follows:
-
Auto-Update-Check: Indicates that Citrix Workspace app detects an update automatically when available.
- Auto (default) – Checks and performs updates automatically
- Manual – updates are only fetched when the user makes a check request from the Citrix Workspace app system tray menu,
- Disabled – Updates checks aren’t performed.
-
Auto-Update-Rollout-Priority: Indicates the delivery period in which you can receive the update.
- Fast – updates are rolled-out to the users towards the beginning of the delivery period.
- Medium – updates are rolled-out towards the middle of the delivery period.
- Slow– updates are rolled-out towards the end of the delivery period.
-
Auto-Update-DeferUpdate-Count: Indicates the number of counts that you can defer the notifications for the updates.
Note:
This configuration is applicable only for interactive updates and not when the silent auto-update feature is enabled, as the user doesn’t get any option to defer the updates.
- -1: The user can defer the auto-update any number of times.
- 0: The user can’t view the remind me later option.
- number: The user can view remind later options with the given count.
Configure Citrix Workspace automatic updates using the GACS
Administrators can use GACS to configure the automatic updates to either Apple Silicon or Intel builds by using the following settings:
“name”:“autoUpdateArchitecture”
“value”:“Universal” or “Intel”
Configure Citrix Workspace automatic updates using the MDM
Administrators can use MDM to configure the automatic updates to either Apple Silicon or Intel builds by using the following settings:
<key>AutoUpdateArchitecture</key>
<string>Universal</string> or <string>Intel</string>
<key>AutoUpdateState</key>
<string>Auto</string> or <string>Manual</string> or <string>Disabled</string>
For more information on how to use MDM, see Mobile Device Management.
Log collection
Log collection simplifies the process of collecting logs for Citrix Workspace app. The logs help Citrix to troubleshoot, and, in cases of complicated issues, provide support.
You can collect logs using the GUI.
Collecting logs:
- Open Citrix Workspace app.
- Right-click on Citrix Workspace in the toolbar and click Preferences > Advanced.
-
Select Logging.
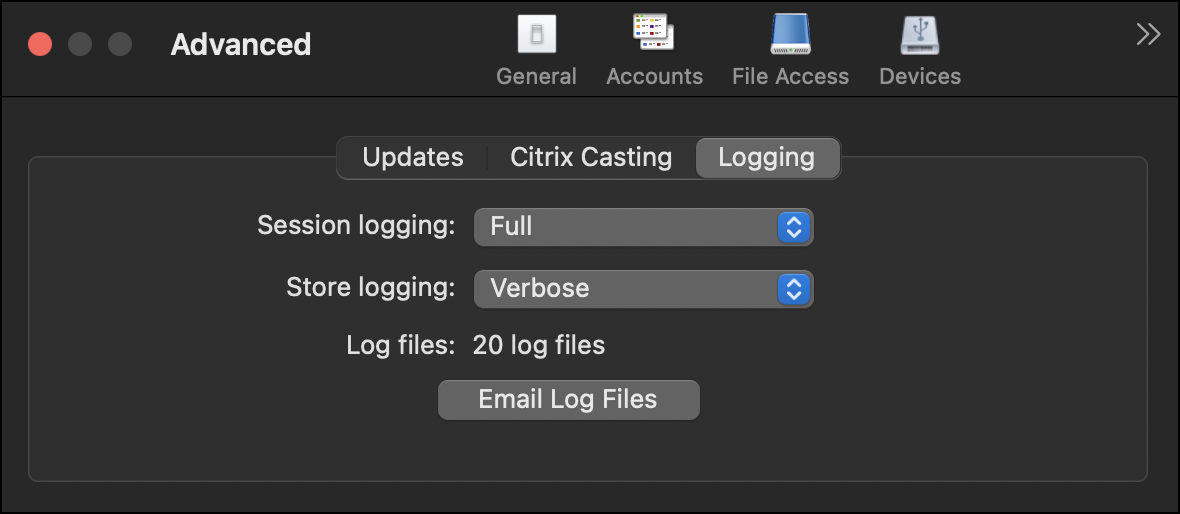
- Select one of the following session log levels:
- Disabled (Default): Minimum logs are collected for basic troubleshooting.
- Connection Diagnostics: Identifies errors while connecting. All logging is enabled up until the point when the session is deemed successful.
- Full: Captures everything including the connection diagnostics. Once enabled, the Citrix Workspace app will store up to 10 session logs after which they’re deleted starting with the oldest to maintain 10 logs.
Note:
Selecting the Full logging option can impact performance and must be used only while troubleshooting an issue because of the amount of data. Do not enable full logging during normal use. Enabling this level of logging triggers a warning dialog that must be acknowledged for you to continue.
- Select one of the following store log levels:
- Disabled (Default): Minimum logs are collected for basic troubleshooting.
- Normal: Only store communication logs are collected.
- Verbose: Detailed authentication and store communication logs are collected.
- Click Email Log Files to collect and share logs as a .zip file.
Enhanced Universal Architecture builds for virtual apps and desktops session
From the 2311 version, the Universal Architecture build can now automatically choose to run the virtual sessions in the native Apple Silicon mode or Intel mode. It uses the Rosetta emulation to launch the virtual session in Intel mode. The virtual session launches in the native Apple Silicon mode, if the virtual channel SDK is built based on the native Apple Silicon architecture or there’s no virtual channel SDK. However, the virtual session launches in the Intel mode using the Rosetta emulation, if the virtual channel SDK is built based on the x86_64 Intel-based architecture.
This enhancement to the Universal Architecture build improves the launch experience on Macs with the Apple Silicon chipset. For users on Macs with the Intel-based chipset, there is no change, and the Universal Architecture build continues to run the virtual sessions natively.
In this article
- Support for auto-update scheduling
- Auto-update enhancement for active users
- Auto-update support for user groups
- Manual update
- Automatic update
- Support for restricting users to modify the update channel
- Advanced configuration for automatic updates (Citrix Workspace Updates)
- Log collection
- Enhanced Universal Architecture builds for virtual apps and desktops session