Secure communications
To secure the communication between Citrix Virtual Apps and Desktops server and Citrix Workspace app, you can integrate your Citrix Workspace app connections using a range of secure technologies such as the following:
- Citrix Gateway: For information, see the topics in this section and the Citrix Gateway, and StoreFront documentation.
- A firewall: Network firewalls can allow or block packets based on the destination address and port.
- Transport Layer Security (TLS) versions 1.2 and 1.3 are supported.
- Trusted server to establish trust relations in Citrix Workspace app connections.
- ICA® file signing
- Local Security Authority (LSA) protection
- Proxy server for Citrix Virtual Apps deployments only: A SOCKS proxy server or secure proxy server. Proxy servers help to limit access to and from the network. They also handle the connections between Citrix Workspace app and the server. Citrix Workspace app supports SOCKS and secure proxy protocols.
- Outbound proxy
Citrix Gateway
Citrix Gateway (formerly Access Gateway) secures connections to StoreFront stores. Also, lets administrators control user access to desktops and applications in a detailed way.
To connect to desktops and applications through Citrix Gateway:
-
Specify the Citrix Gateway URL that your administrator provides using one of the following ways:
- The first time you use the self-service user interface, you are prompted to enter the URL in the Add Account dialog box.
- When you later use the self-service user interface, enter the URL by clicking Preferences > Accounts > Add.
- If you’re establishing a connection with the storebrowse command, enter the URL at the command line
The URL specifies the gateway and, optionally, a specific store:
-
To connect to the first store that Citrix Workspace app finds, use a URL in the following format:
-
To connect to a specific store, use a URL of the form, for example: https://gateway.company.com?<storename>. This dynamic URL is in a non-standard form; do not include “=” (the “equals” sign character) in the URL. If you’re establishing a connection to a specific store with storebrowse, you might need quotation marks around the URL in the storebrowse command.
- When prompted, connect to the store (through the gateway) using your user name, password, and security token. For more information about this step, see the Citrix Gateway documentation.
When authentication is complete, your desktops and applications are displayed.
Connecting through firewall
Network firewalls can allow or block packets based on the destination address and port. If you’re using a firewall, Citrix Workspace app for Windows can communicate through the firewall with both the Web server and the Citrix server.
Common Citrix Communication Ports
| Source | Type | Port | Details |
|---|---|---|---|
| Citrix Workspace app | TCP | 80/443 | Communication with StoreFront |
| ICA or HDX | TCP/UDP | 1494 | Access to applications and virtual desktops |
| ICA or HDX with Session Reliability | TCP/UDP | 2598 | Access to applications and virtual desktops |
| ICA or HDX over TLS | TCP/UDP | 443 | Access to applications and virtual desktops |
For more information about the ports, see the Knowledge Center article CTX101810.
Transport Layer Security
Transport Layer Security (TLS) is the replacement for the SSL (Secure Sockets Layer) protocol. The Internet Engineering Taskforce (IETF) renamed it TLS when it took over responsibility for the development of TLS as an open standard.
TLS secures data communications by providing server authentication, encryption of the data stream, and message integrity checks. Some organizations, including U.S. government organizations, require the use of TLS to secure data communications. These organizations might also require the use of validated cryptography, such as Federal Information Processing Standard (FIPS) 140. FIPS 140 is a standard for cryptography.
To use TLS encryption as the communication medium, you must configure the user device and the Citrix Workspace app. For information about securing StoreFront communications, see the Secure section in the StoreFront documentation. For information about securing VDA, see Transport Layer Security (TLS) in the Citrix Virtual Apps and Desktops documentation.
You can use the following policies to:
- Enforce the use of TLS: We recommend that you use TLS for connections using untrusted networks, including the Internet.
- Enforce the use of FIPS (Federal Information Processing Standards): Approved cryptography and follow the recommendations in NIST SP 800-52. These options are disabled by default.
- Enforce the use of a specific version of TLS and specific TLS cipher suites: Citrix supports the TLS 1.2 and 1.3 protocol.
- Connect only to specific servers.
- Check for revocation of the server certificate.
- Check for a specific server-certificate issuance policy.
- Select a particular client certificate, if the server is configured to request one.
Citrix Workspace app for Windows supports the following cipher suites for TLS 1.2 and 1.3 protocol:
- TLS_AES_256_GCM_SHA384
- TLS_AES_128_GCM_SHA256
- TLS_ECDHE_RSA_WITH_AES_256_GCM_SHA384
- TLS_ECDHE_RSA_WITH_AES_256_CBC_SHA384
- TLS_ECDHE_RSA_WITH_AES_128_CBC_SHA
Important:
The following cipher suites are deprecated for enhanced security:
- Cipher suites RC4 and 3DES
- Cipher suites with prefix “TLS_RSA_*”
- TLS_RSA_WITH_AES_256_GCM_SHA384 (0x009d)
- TLS_RSA_WITH_AES_128_GCM_SHA256 (0x009c)
- TLS_RSA_WITH_AES_256_CBC_SHA256 (0x003d)
- TLS_RSA_WITH_AES_256_CBC_SHA (0x0035)
- TLS_RSA_WITH_AES_128_CBC_SHA (0x002f)
- TLS_RSA_WITH_RC4_128_SHA (0x0005)
- TLS_RSA_WITH_3DES_EDE_CBC_SHA (0x000a)
TLS support
- Open the Citrix Workspace app GPO administrative template by running gpedit.msc.
-
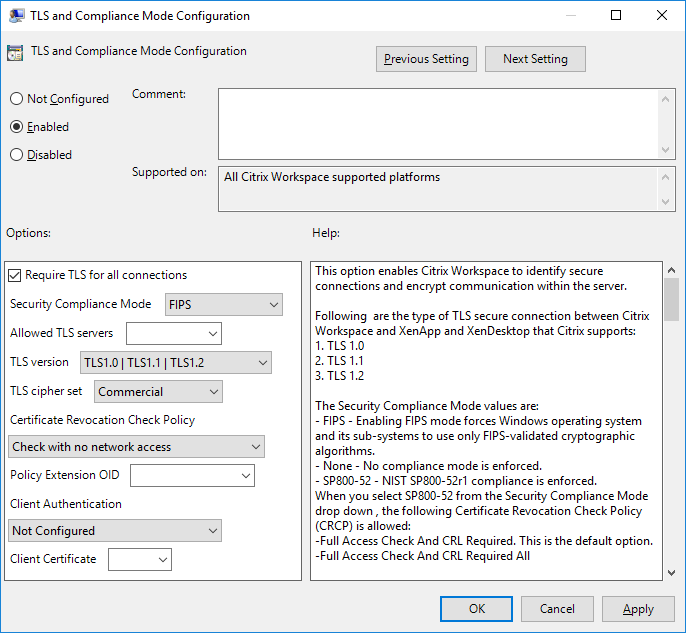
Under the Computer Configuration node, go to Administrative Templates > Citrix Workspace > Network routing, and select the TLS and Compliance Mode Configuration policy.
-
Select Enabled to enable secure connections and to encrypt communication on the server. Set the following options:
Note:
Citrix recommends TLS for secure connections.
-
Select Require TLS for all connections to force Citrix Workspace app to use TLS for connections to published applications and desktops.
-
From the Security Compliance Mode menu, select the appropriate option:
- None - No compliance mode is enforced.
- SP800-52 - Select SP800-52 for compliance with NIST SP 800-52. Select this option only if the servers or gateway follow NIST SP 800-52 recommendations.
Note:
If you select SP800-52, FIPS Approved cryptography is automatically used, even if Enable FIPS isn’t selected. Also, enable the Windows security option, System Cryptography: Use FIPS-compliant algorithms for encryption, hashing, and signing. Otherwise, Citrix Workspace app might fail to connect to the published applications and desktops.
If you select SP800-52, set the Certificate Revocation Check Policy setting to Full access check and CRL required.
When you select SP800-52, Citrix Workspace app verifies that the server certificate follows the recommendations in NIST SP 800-52. If the server certificate does not comply, Citrix Workspace app might fail to connect.
- Enable FIPS - Select this option to enforce the use of FIPS approved cryptography. Also, enable the Windows security option from the operating system group policy, System Cryptography: Use FIPS-compliant algorithms for encryption, hashing, and signing. Otherwise, Citrix Workspace app might fail to connect to published applications and desktops.
-
From the Allowed TLS servers drop-down menu, select the port number. Use a comma-separated list to ensure that the Citrix Workspace app connects only to a specified server. You can specify wildcards and port numbers. For example, *.citrix.com: 4433 allows connections to any server whose common name ends with .citrix.com on port 4433. The issuer of the certificate asserts the accuracy of the information in a security certificate. If Citrix Workspace does not recognize or trust the issuer, the connection is rejected.
-
From the TLS version menu, select one of the following options:
-
TLS 1.0, TLS 1.1, or TLS 1.2 - This is the default setting, which is recommended only if there is a business requirement for TLS 1.0 for compatibility.
-
TLS 1.1 or TLS 1.2 - Use this option to ensure that the connections use either TLS 1.1 or TLS 1.2.
-
TLS 1.2 - This option is recommended if TLS 1.2 is a business requirement.
-
TLS cipher set - To enforce use of a specific TLS cipher set, select Government (GOV), Commercial (COM), or All (ALL).
-
From the Certificate Revocation Check Policy menu, select any of the following:
-
Check with No Network Access - Certificate Revocation list check is done. Only local certificate revocation list stores are used. All distribution points are ignored. A Certificate Revocation List check that verifies the server certificate available from the target SSL Relay/Citrix Secure Web Gateway server isn’t mandatory.
-
Full Access Check - Certificate Revocation List check is done. Local Certificate Revocation List stores and all distribution points are used. If revocation information for a certificate is found, the connection is rejected. Certificate Revocation List check for verifying the server certificate available from the target server isn’t critical.
-
Full Access Check and CRL Required - Certificate Revocation List check is done, except for the root Certificate Authority. Local Certificate Revocation List stores and all distribution points are used. If revocation information for a certificate is found, the connection is rejected. Finding all required Certificate Revocation Lists is critical for verification.
-
Full Access Check and CRL Required All - Certificate Revocation List check is done, including the root CA. Local Certificate Revocation List stores and all distribution points are used. If revocation information for a certificate is found, the connection is rejected. Finding all required Certificate Revocation Lists is critical for verification.
-
No Check - No Certificate Revocation List check is done.
-
Using the Policy Extension OID, you can limit Citrix Workspace app to connect only to servers with a specific certificate issuance policy. When you select Policy Extension OID, Citrix Workspace app accepts only server certificates that contain the Policy Extension OID.
-
From the Client Authentication menu, select any of the following:
-
Disabled - Client Authentication is disabled.
-
Display certificate selector - Always prompt the user to select a certificate.
-
Select automatically if possible - Prompt the user only if there a choice of the certificate to identify.
-
Not configured - Indicates that client authentication isn’t configured.
-
Use specified certificate - Use the client certificate as set in the Client Certificate option.
-
Use the Client Certificate setting to specify the identifying certificate’s thumbprint to avoid prompting the user unnecessarily.
-
Click Apply and OK to save the policy.
-
Support for TLS protocol version 1.3
Starting with 2409 version, Citrix Workspace app supports Transport Layer Security protocol (TLS) version 1.3.
Note:
This enhancement requires VDA version 2303 or later.
This feature is enabled by default. To disable it, do the following:
- Open the Registry Editor using
regediton the Run command. - Navigate to
HKEY_LOCAL_MACHINE\SOFTWARE\WOW6432Node\Citrix\ICA Client\TLS1.3. - Create a DWORD key by the name
EnableTLS1.3and set the value of the key to0.
Limitations:
- Connections using Access Gateway or NetScaler Gateway Service attempts to use TLS 1.3. However, these connections fallback to TLS 1.2 because Access Gateway and NetScaler Gateway Service doesn’t support TLS 1.3 yet.
- Direct connection to a VDA version that doesn’t support TLS 1.3 fallback to TLS 1.2.
Trusted server
Enforce trusted server connections
Trusted server configuration policy identifies and enforces trust relations in Citrix Workspace app connections.
Using this policy, administrators can control how the client identifies the published application or desktop it is connecting to. The client determines a trust level, called a trust region with a connection. The trust region then determines how the client is configured for the connection.
Enabling this policy prevents connections to the servers that are not in the trusted regions.
By default, region identification is based on the address of the server the client is connecting to. To be a member of the trusted region, the server must be a member of the Windows Trusted Sites zone. You can configure this using the Windows Internet zone setting.
Alternatively, for compatibility with non-Windows clients, the server address can be specifically trusted using the Address setting in the group policy. The server address must be comma-separated list of servers supporting the use of wildcards, for example, cps*.citrix.com.
Prerequisite:
- Enusre that you have installed Citrix Workspace app for Windows version 2409 or later.
-
Set the DNS resolution to True on DDC when using internal storefront and host FQDN in the Windows Internet options. For more information, see the Knowledge Center article CTX135250.
Note:
No changes on DDC are required if the IP address is used in the Windows Internet security zone options.
- Copy and paste the latest ICA client policies template as per the following table:
| File type | Copy from | Copy to |
|---|---|---|
| receiver.admx | Installation Directory\ICA Client\Configuration\receiver.admx | %systemroot%\policyDefinitions |
| CitrixBase.admx | Installation Directory\ICA Client\Configuration\CitrixBase.admx | %systemroot%\policyDefinitions |
| receiver.adml | Installation Directory\ICA Client\Configuration[MUIculture]receiver.adml | %systemroot%\policyDefinitions[MUIculture] |
| CitrixBase.adml | Installation Directory\ICA Client\Configuration[MUIculture]\CitrixBase.adml | %systemroot%\policyDefinitions[MUIculture] |
Note:
- Ensure that you are using the latest .admx and .adml files included with Citrix Workspace app for Windows version 2409 or later. For more configuration details, see Group policy documentation.
-
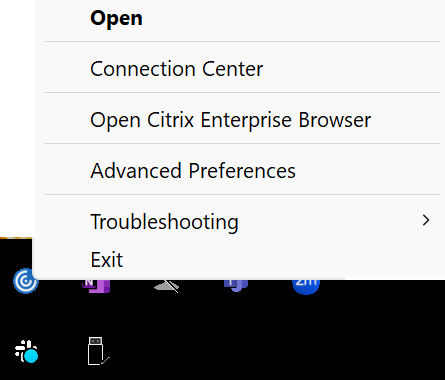
Close any running Citrix Workspace app instance and exit the same from system tray.
Perform the following steps to enable trusted server configuration using the Group Policy Object administrative template:
- Open the Citrix Workspace app Group Policy Objective Administrative template by running
gpedit.msc. -
Under the Computer Configuration node, go to Administrative Templates > Citrix Components > Citrix Workspace > Network Routing :
- For x64 deployments, select Configure trusted server configuration in x64 machines.
- For x86 deployments, select Configure trusted server configuration in x86 machines.
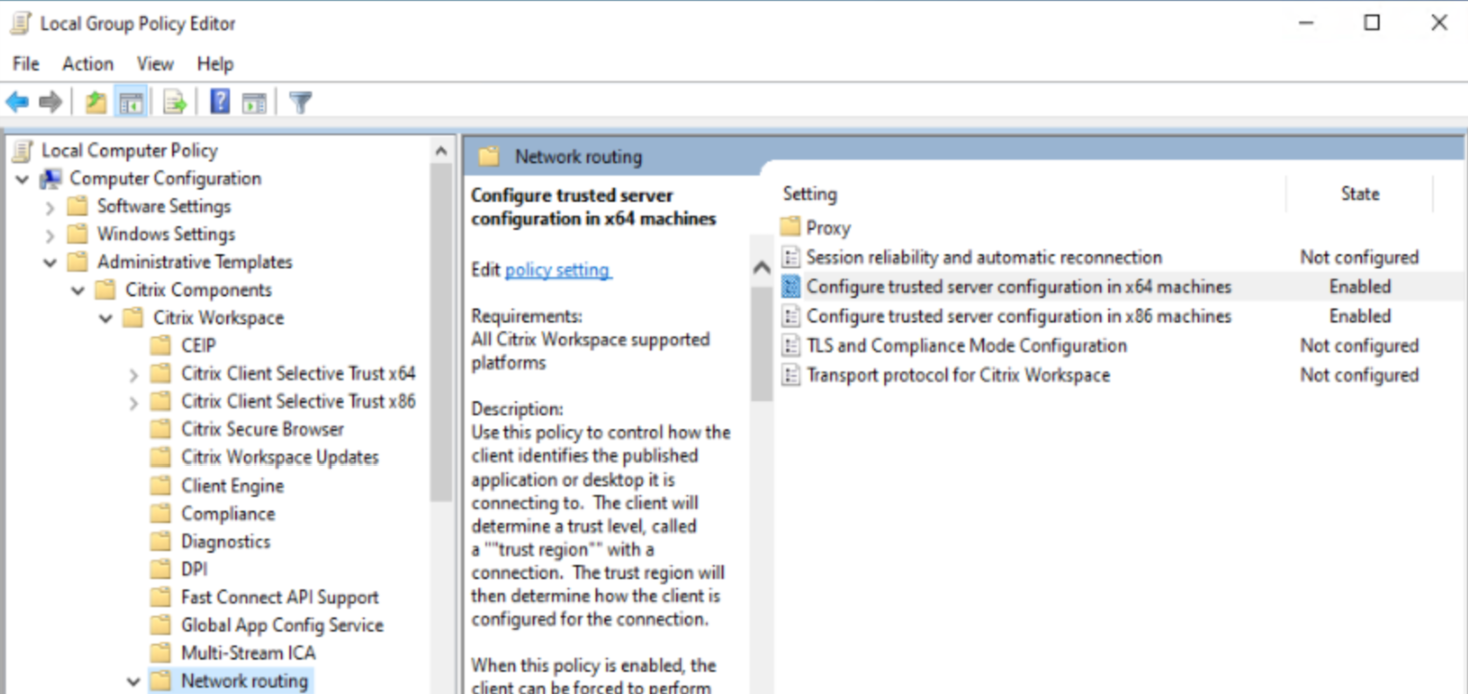
- Enable the selected policy and select the Enforce Trusted server configuration checkbox.
-
From the Windows internet zone drop-down menu, select Trusted.
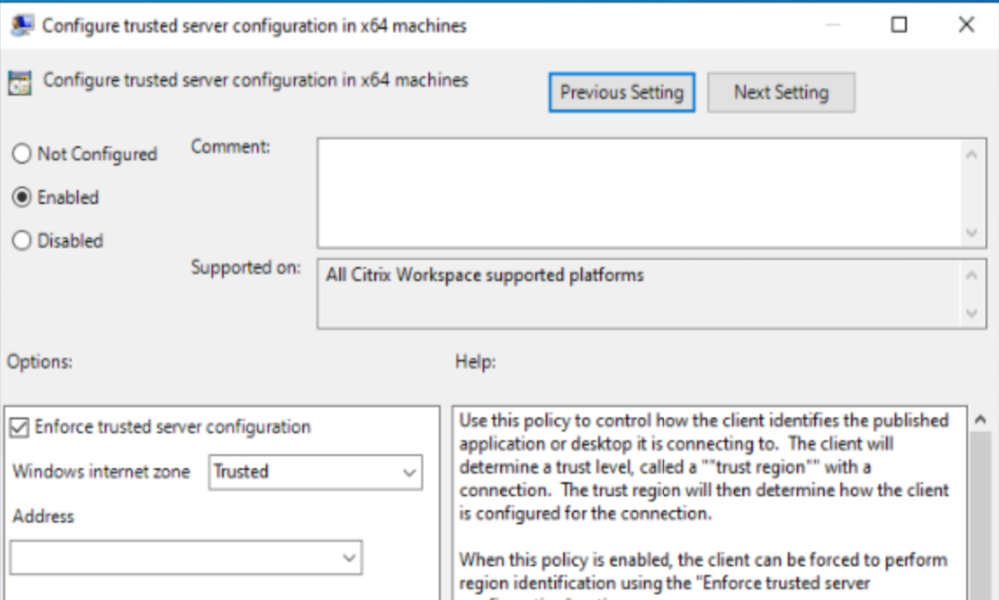
Note:
You can skip selecting options from the Address drop-down list.
- Click OK and Apply.
-
If the same logged-on user has published Citrix resources, you can proceed with the following or login with a different user.
-
Open Windows Internet options and navigate to Trusted sites > Sites to add a domain address or VDA FQDN into the same.
Note:
You can add an invalid domain
*.test.comor specific invalid or valid VDA FQDN to test the feature.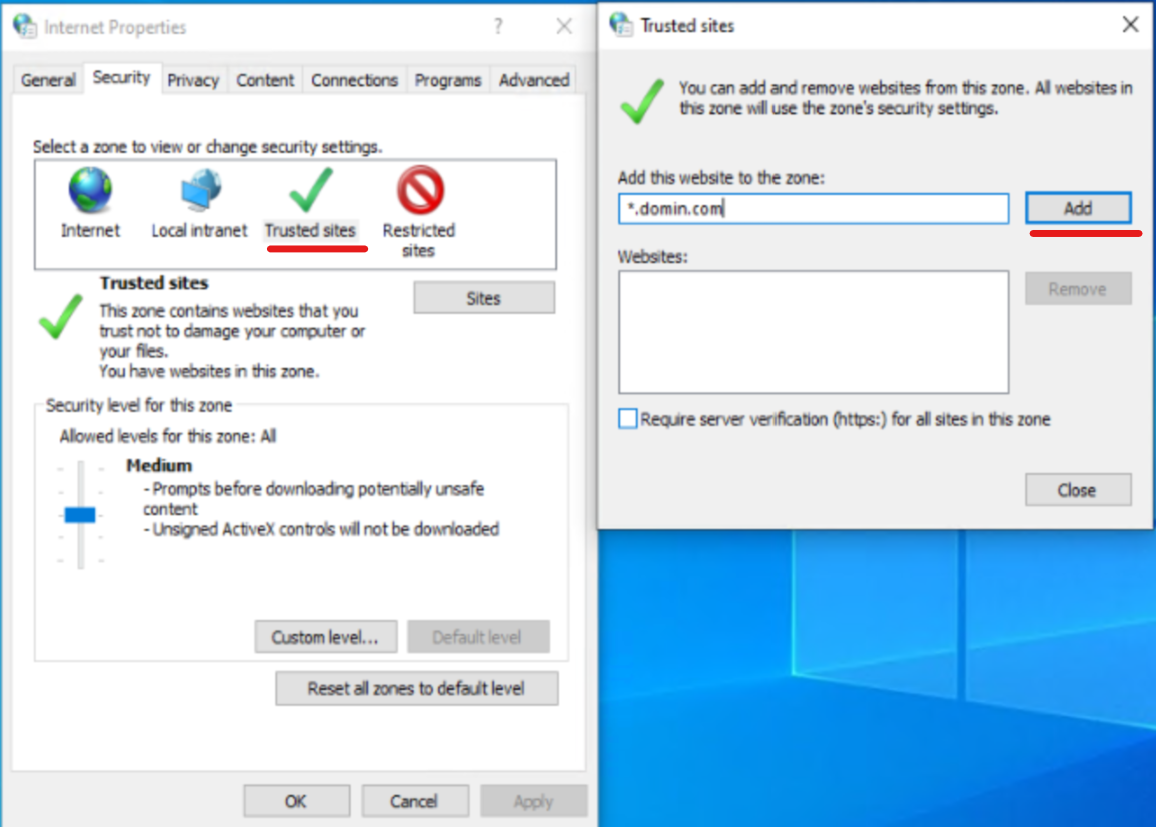
-
Based on preference, change to Trusted or Local Intranet Sites based on zone selection in Windows Internet Zone within Configure trusted server configuration policy.
For more information, see Modify the Internet Explorer settings in Authenticate section.
- Update the Group Policy on the target device where Citrix Workspace app is installed using an admin command prompt or reboot the system.
- Ensure that the internal StoreFront FQDN is added to the Local Intranet zone or Trusted sites zones based on zone selection in Windows Internet Zone within Configure trusted server configuration policy. For information, see Modify the Internet Explorer settings in Authenticate section. Also, ensure that in the case of Gateway stores, the Gateway URL must be added to the Trusted sites.
- Open Citrix Workspace app or published resources and validate the feature.
Note:
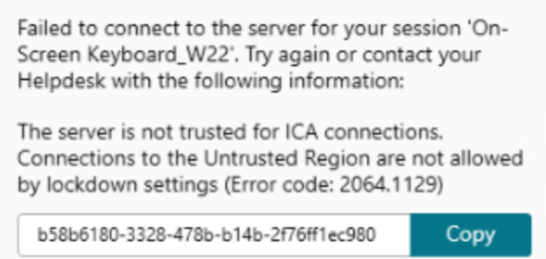
If you have not configured the preceding steps, the session launch might fail and you might get the following error message:
As a workaround, you can disable the Configure trusted server configuration policy in the GPO.
Client selective trust
In addition to allowing or preventing connections to the servers, the client also uses the regions to identify file, microphone, or webcam, SSO access.
| Regions | Resources | Access level |
|---|---|---|
| Internet | File, Microphone, Web | Prompt user for access, SSO is not allowed |
| Intranet | Microphone, Web | Prompt user for access, SSO is allowed |
| Restricted Sites | All | No access and connection might be prevented |
| Trusted | Microphone, Web | Read or write, SSO is allowed |
When the user has selected the default value for a region then the following dialog box might appear:
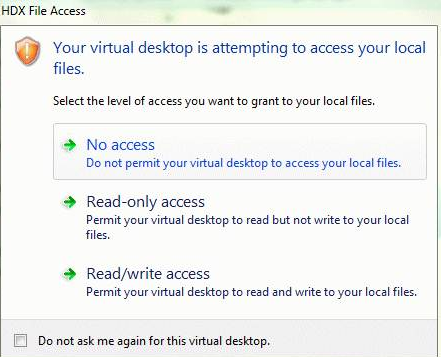
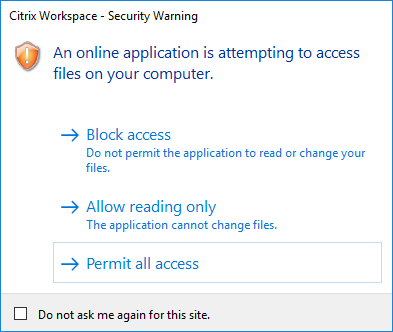
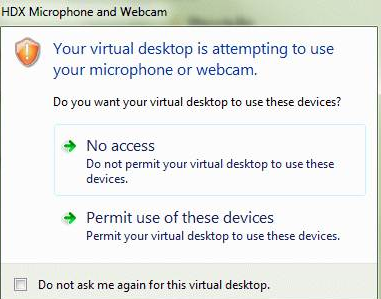
Administrators can modify this default behavior by creating and configuring the Client Selective Trust registry keys either using the Group Policy or in the registry. For more information on how to configure Client Selective Trust registry keys, see Knowledge Center article CTX133565.
Local Security Authority (LSA) protection
Citrix Workspace app supports Windows Local Security Authority (LSA) protection, which maintains information about all aspects of local security on a system. This support provides the LSA level of system protection to hosted desktops.
Connecting through proxy server
Proxy servers are used to limit access to and from your network, and to handle connections between Citrix Workspace app for Windows and servers. Citrix Workspace app supports SOCKS and secure proxy protocols.
When communicating with the server, Citrix Workspace app uses proxy server settings that are configured remotely on the server running workspace for web.
When communicating with the web server, Citrix Workspace app uses the proxy server settings configured through the Internet settings of the default web browser on the user device. Configure the Internet settings of the default web browser on the user device accordingly.
To enforce proxy settings through the ICA file on StoreFront, see Knowledge Center article CTX136516.
SOCKS5 Proxy Support for EDT
Previously, Citrix Workspace app only supported HTTP proxies operating on TCP. However, SOCKS5 proxy functionality was already fully supported within the Virtual Delivery Agent (VDA). For more information on VDA support, see the Rendezvous V2 documentation.
Starting with 2409 version, Citrix Workspace app now supports SOCKS5 proxies for Enlightened Data Transport (EDT), enhancing compatibility with modern enterprise network configurations.
Key benefits:
- Expanded proxy compatibility: Connect seamlessly through SOCKS5 proxies, widely used by enterprise networking teams for their support of both TCP and UDP traffic.
- Improved EDT performance: Use the full benefits of EDT (UDP-based) for optimized data transfer within Citrix Workspace app sessions.
This feature is disabled by default. To enable this feature, do the following:**
-
Open the Citrix Workspace app GPO administrative template by running
gpedit.msc. -
Under the Computer Configuration node, go to Administrative Templates > Citrix Workspace > Network routing > Proxy > Configure client proxy settings and select the Proxy types.
-
Set the following parameters:
- ProxyType: SocksV5
- ProxyHost: Specify the address of the proxy server.
For more information, see ICA Settings Reference and the Knowledge Center article CTX136516.
Outbound proxy support
SmartControl allows administrators to configure and enforce policies that affect the environment. For instance, you might want to prohibit users from mapping drives to their remote desktops. You can achieve the granularity using the SmartControl feature on the Citrix Gateway.
The scenario changes when the Citrix Workspace app and the Citrix Gateway belong to separate enterprise accounts. In such cases, the client domain can’t apply the SmartControl feature because the gateway doesn’t exist on the domain. You can then use the Outbound ICA Proxy. The Outbound ICA Proxy feature lets you use the SmartControl feature even when Citrix Workspace app and Citrix Gateway are deployed in different organizations.
Citrix Workspace app supports session launches using the NetScaler LAN proxy. Use the outbound proxy plug-in to configure a single static proxy or select a proxy server at runtime.
You can configure outbound proxies using the following methods:
- Static proxy: Proxy server is configured by giving a proxy host name and port number.
- Dynamic proxy: A single proxy server can be selected among one or more proxy servers using the proxy plug-in DLL.
You can configure the outbound proxy using the Group Policy Object administrative template or the Registry editor.
For more information about outbound proxy, see Outbound ICA Proxy support in the Citrix Gateway documentation.
Outbound proxy support - Configuration
Note:
If both static proxy and dynamic proxies are configured, the dynamic proxy configuration takes precedence.
Configuring the outbound proxy using the GPO administrative template:
- Open the Citrix Workspace app Group Policy Object administrative template by running gpedit.msc.
- Under the Computer Configuration node, go to Administrative Templates > Citrix Workspace > Network routing.
- Select one of the following options:
- For static proxy: Select the Configure NetScaler® LAN proxy manually policy. Select Enabled and then provide the host name and port number.
- For dynamic proxy: Select the Configure NetScaler LAN proxy using DLL policy. Select Enabled and then provide the full path to the DLL file. For example,
C:\Workspace\Proxy\ProxyChooser.dll.
- Click Apply and OK.
Configuring the outbound proxy using the Registry editor:
-
For static proxy:
- Launch the Registry editor and navigate to
HKEY_LOCAL_MACHINE\SOFTWARE\Policies\Citrix\ICA Client\Engine\Network Routing\Proxy\NetScaler. -
Create DWORD value keys as follows:
"StaticProxyEnabled"=dword:00000001"ProxyHost"="testproxy1.testdomain.com"ProxyPort"=dword:000001bb
- Launch the Registry editor and navigate to
-
For dynamic proxy:
- Launch the Registry editor and navigate to
HKEY_LOCAL_MACHINE\SOFTWARE\Policies\Citrix\ICA Client\Engine\Network Routing\Proxy\NetScaler LAN Proxy. - Create DWORD value keys as follows:
"DynamicProxyEnabled"=dword:00000001"ProxyChooserDLL"="c:\\Workspace\\Proxy\\ProxyChooser.dll"
- Launch the Registry editor and navigate to
Connections and certificates
Connections
- HTTP store
- HTTPS store
- Citrix Gateway 10.5 and later
Certificates
Note:
Citrix Workspace app for Windows is digitally signed. The digital signature is time-stamped. So, the certificate is valid even after the certificate is expired.
- Private (self-signed)
- Root
- Wildcard
- Intermediate
Private (self-signed) certificates
If a private certificate exists on the remote gateway, install the root certificate of the organization’s certificate authority on the user device that’s accessing the Citrix resources.
Note:
If the remote gateway’s certificate cannot be verified upon connection, an untrusted certificate warning appears. This warning appears when the root certificate is missing in the local Keystore. When a user chooses to continue through the warning, the apps are displayed but cannot be launched.
Root certificates
For domain-joined computers, you can use a Group Policy Object administrative template to distribute and trust CA certificates.
For non-domain joined computers, the organization can create a custom install package to distribute and install the CA certificate. Contact your system administrator for assistance.
Wildcard certificates
Wildcard certificates are used on a server within the same domain.
Citrix Workspace app supports wildcard certificates. Use wildcard certificates by following your organization’s security policy. An alternative to wildcard certificates is a certificate with the list of server names and the Subject Alternative Name (SAN) extension. Private and public certificate authorities issue these certificates.
Intermediate certificates
If your certificate chain includes an intermediate certificate, the intermediate certificate must be appended to the Citrix Gateway server certificate. For information, see Configuring Intermediate Certificates.
Certificate revocation list
Certificate revocation list (CRL) allows Citrix Workspace app to check if the server’s certificate is revoked. The certificate check improves the server’s cryptographic authentication and the overall security of the TLS connection between the user device and a server.
You can enable CRL checking at several levels. For example, it’s possible to configure Citrix Workspace app to check only its local certificate list or to check the local and network certificate lists. You can also configure certificate checking to allow users to log on only if all the CRLs are verified.
If you’re configuring certificate checking on your local computer, exit Citrix Workspace app. Check if all the Citrix Workspace components, including the Connection Center, are closed.
For more information, see the Transport Layer Security section.
Support to mitigate man-in-the-middle attacks
Citrix Workspace app for Windows helps you to reduce the risk of a man-in-the-middle attack using the Enterprise Certificate Pinning feature of Microsoft Windows. A man-in-the-middle attack is a type of cyber-attack where the attacker secretly intercepts and relays messages between two parties who believe they are communicating directly with each other.
Previously, when you contact the store server, there was no way to verify whether the response received is from the server you intended to contact or not. Using the Enterprise Certificate Pinning feature of Microsoft Windows, you can verify the validity and integrity of the server by pinning its certificate.
Citrix Workspace app for Windows is pre-configured to know what server certificate it must expect for a particular domain or site using the Certificate pinning rules. If the server certificate does not match the pre-configured server certificate, the Citrix Workspace app for Windows prevents the session from taking place.
For information on how to deploy the Enterprise Certificate Pinning feature, see the Microsoft documentation.
Note:
You must be aware of the expiry of the certificate and update the group policies and certificate trust lists correctly. Otherwise, you might fail to start the session, even if there is no attack.
