Update
Manual update
If you have already installed Citrix Workspace app for Windows, download and install the latest version of the app from the Citrix Downloads page. For information on the installation, see Install and Uninstall.
Automatic update
When a new version of the Citrix Workspace app is available, Citrix pushes the update on the system that has the Citrix Workspace app installed.
Note:
- If you’ve configured an SSL intercepting outbound proxy, add an exception to the Workspace auto-update server
https://downloadplugins.citrix.com/to receive updates from Citrix.- Auto-update is not available for verisons prior to Citrix Workspace app 2104 and Citrix Workspace app 1912 LTSR CU4.
- Your system must have an internet connection to receive updates.
- By default, Citrix Workspace updates are disabled on the VDA. This includes RDS multi-user server machines, VDI, and Remote PC Access machines.
- Citrix Workspace updates are disabled on machines where Desktop Lock is installed.
- Workspace for web users can’t download the StoreFront policy automatically.
- Citrix Workspace updates can be limited to LTSR updates only.
- Citrix HDX RTME for Windows is included in Citrix Workspace Updates. A notification appears when updates to the HDX RTME on both LTSR and current release of the Citrix Workspace app are available.
- Starting with Version 2105, Citrix Workspace Updates log paths are modified. The Workspace Updates logs are present at C:\Program Files (x86)\Citrix\Logs. For information on logging, see Log collection section.
- A non-administrator can update Citrix Workspace app on an admin-installed instance. You can do that by right-clicking the Citrix Workspace app icon in the notification area and selecting Check for Updates. The Check for Updates option is available on both the user-installed and the admin-installed instances of Citrix Workspace app.
- You can also perform auto-update when Proxy auto-configuration (PAC) and Web Proxy Auto-Discovery Protocol (WPAD) detection is enabled. This is not supported when proxy require credentials for authentication.
If Non-EDCHE cipher suite is added, Citrix Workspace can’t reach Citrix auto-update server and the following error appears during the auto-update:
Unable to connect to server
Restart the Citrix Workspace app for Windows after a manual or automatic update.
You can check the current version of Citrix Workspace app installed on your device either through Advanced Preferences or query the DisplayVersion registry from the HKEY_LOCAL_MACHINE\SOFTWARE\WOW6432Node\Microsoft\Windows\CurrentVersion\Uninstall\CitrixOnlinePluginPackWeb location.
To view the version in the Advanced Preferences:
- Right-click Citrix Workspace app icon from the notification area.
-
Select Advanced Preferences.
Citrix Workspace app version is displayed in the About section.
Installing Citrix Workspace app Beta program
You receive an update notification when the Citrix Workspace app is configured for automatic updates. To install the Beta build on your system, do the following steps:
- Open Citrix Workspace app from the system tray.
- Navigate to Advanced Preferences > Citrix Workspace updates.
-
Select Beta from the drop-down list, when the Beta build is available, and click Save. A notification window appears.
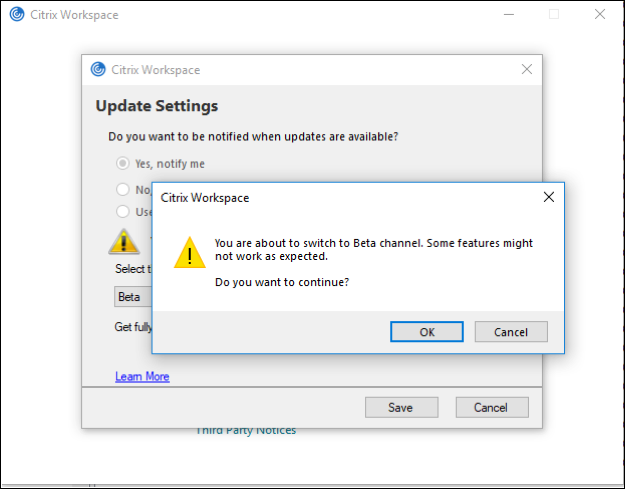
- Click OK to update to Beta build.
To switch from a Beta build to a Release build, do the following steps:
- Open Citrix Workspace app from the system tray.
- Navigate to Advanced Preferences > Citrix Workspace updates.
- In the Update Settings screen, select Release from the Update channel drop-down list and click Save.
Note:
- If any new updates are available, an auto-update notification appears.
- Beta builds are available for customers to test in their non-production or limited production environments, and to share feedback. Citrix does not accept support cases for beta builds but welcomes feedback for improving them. Citrix might or might not act on feedback based on its severity, criticality, and importance. It’s advised that Beta builds aren’t deployed in the production environments.
Supporting auto-update of Citrix Workspace app on VDA
Starting with Citrix Workspace app for Windows version 2209, you can enable auto-update feature on VDA. To enable this feature, you must create the following registry value:
On 32-bit machine:
- Registry Key: HKEY_LOCAL_MACHINE\SOFTWARE\Citrix\ICA Client\AutoUpdate
- Registry Value: AllowAutoUpdateOnVDA
- Registry Type: REG_SZ
- Registry Data: True
On 64-bit machine:
- Registry Key: HKEY_LOCAL_MACHINE\SOFTWARE\WOW6432Node\Citrix\ICA Client\AutoUpdate
- Registry Value: AllowAutoUpdateOnVDA
- Registry Type: REG_SZ
- Registry Data: True
Auto-update version control
Administrators can now manage the auto-update version for the devices in the organization.
Administrators can control the version by setting the version in the Maximum allowed version property in the Global App Config Service.
For more information, see Manage version settings.
Note:
If the administrator hasn’t configured the version in the Global App Config Service, Citrix Workspace app is updated to the latest available version by default.
Advanced configuration for automatic updates (Citrix Workspace Updates)
You can configure Citrix Workspace Updates using the following methods:
- Group Policy Object (GPO) administrative template
- Command-line interface
- GUI
- StoreFront
Configure Citrix Workspace Updates using the Group Policy Object administrative template
- Open the Citrix Workspace app Group Policy Object administrative template by running gpedit.msc and navigate to the Computer Configuration node.
-
Go to Administrative Templates > Citrix Components > Citrix Workspace > Workspace Updates.

-
Enable or disable updates – Select Enabled or Disabled to enable or disable Workspace Updates.
Note:
When you select Disabled, you aren’t notified of new updates. Disabled option also hides the Workspace Updates option from the Advanced Preferences sheet.
-
Update notification – When an update is available, you can choose to be automatically notified or check for them manually. After you have enabled Workspace updates, select one of the following options from the Enable Citrix Workspace Update Policy drop-down list:
- Auto - You’re notified when an update is available (default). This is applicable only for versions prior to Citrix Workspace app 2207. In 2207 or later versions, Citrix Workspace app update is automatic and you aren’t notified when an update is available.
- Manual - You aren’t notified when an update is available. Check for updates manually.
- Select LTSR ONLY to get updates for LTSR only.
-
From the Citrix-Workspace-Update-DeferUpdate-Count drop-down list, select a value between -1 and 30:
- If the value is 0, the Remind Me Later option doesn’t appear. Update available prompt is shown on every periodic automatic check for update.
- If the value is -1, the Remind Me Later option appears with the Update available prompt. You can defer the update notification any number of times.
- A value between 1-30 defines the number of times the Remind Me Later option with the Update available prompt must appear. You can defer the update notification based on the value defined in this field. However, the Update available prompt continues to appear but without the Remind Me Later option.
Note:
Starting with Citrix Workspace app for Windows version 2207, the auto-update feature is improved and the Citrix-Workspace-Update-DeferUpdate-Count field is not required.
Configure the delay in checking for updates
When a new version of the Citrix Workspace app is available, Citrix rolls out the update during a specific delivery period. With this property, you can control at what stage during the delivery period you can receive the update.
To configure the delivery period, run gpedit.msc to launch the Group Policy Object administrative template. Under Computer Configuration node, go to Administrative Templates > Citrix Components > Citrix Workspace > Set the Delay in Checking for Update.
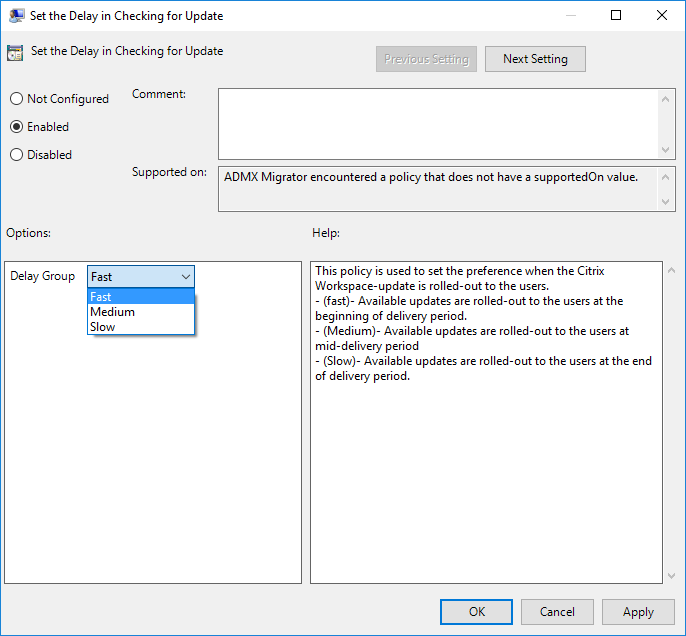
Select Enabled, and from the Delay Group drop-down list, select one of the following:
- Fast – Update rollout happens at the beginning of the delivery period.
- Medium – Update rollout happens at the mid-delivery period.
- Slow – Update rollout happens at the end of the delivery period.
Note:
When you select Disabled, you aren’t notified of available updates. Disabled also hides the Workspace Updates option from the Advanced Preferences sheet.
Configure Citrix Workspace Updates using the command-line interface
By specifying command-line parameters while installing Citrix Workspace app:
You can configure Workspace updates by specifying command-line parameters during the Citrix Workspace app installation. See Install parameters for more information.
By using command-line parameters after Citrix Workspace app has been installed:
Citrix Workspace Updates can also be configured after installing the Citrix Workspace app for Windows. Navigate to the location of CitrixReceiverUpdater.exe using the Windows command line.
Typically, CitrixReceiverUpdater.exe is at CitrixWorkspaceInstallLocation\Citrix\Ica Client\Receiver. You might run the CitrixReceiverUpdater.exe binary along with the command-line parameters listed in the Install parameters section.
For example,
CitrixReceiverUpdater.exe /AutoUpdateCheck=auto /AutoUpdateStream=Current /DeferUpdateCount=-1 /AURolloutPriority=fast
Note:
The
/AutoUpdateCheckis a mandatory parameter that you must set to configure other parameters like /AutoUpdateStream,/DeferUpdateCount,/AURolloutPriority.
Configure Citrix Workspace Updates using the graphical user interface
Individual user can override the Citrix Workspace Updates setting using the Advanced Preferences dialog. This is a per-user configuration and the settings apply only to the current user.
- Right-click Citrix Workspace app icon from the notification area.
- Select Advanced Preferences > Citrix Workspace Updates.
-
Select one of the following notification preference options:
- Yes, notify me - You’re notified when an update is available for Citrix Workspace app.
- No, don’t notify me - You aren’t notified when an update is available for Citrix Workspace app. Check for updates manually.
-
Use administrator specified settings - Uses the settings configured on StoreFront server.
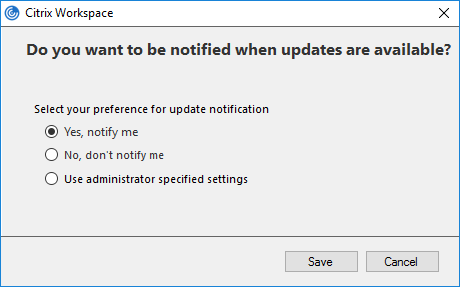
- Click Save.
Note:
- The Yes, notify me and the No, don’t notify me options are applicable only for versions prior to Citrix Workspace app 2207. In 2207 or later versions, the Citrix Workspace app update is automatic and you aren’t notified when an update is available. If you select the No, don’t notify me option, check for updates manually.
- You can hide all or part of the Advanced Preferences sheet available from the Citrix Workspace app icon. For more information, see the Advanced Preferences sheet section.
Configure Citrix Workspace Updates using StoreFront
-
Use a text editor to open the
web.configfile, which is typically atC:\inetpub\wwwroot\Citrix\Roaming directory. -
Locate the user account element in the file (Store is the account name of your deployment)
For example:
<account id=... name="Store">Before the
</account>tag, navigate to the properties of that user account:<properties> <clear/> </properties> <!--NeedCopy--> -
Add the auto-update tag after the <clear /> tag.
<account>

    <clear />

    <account id="d1197d2c-ac82-4f13-9346-2ee14d4b0202" name="F84Store"

      description="" published="true" updaterType="Citrix" remoteAccessType="None">

      <annotatedServices>

        <clear />

        <annotatedServiceRecord serviceRef="1__Citrix_F84Store">

          <metadata>

            <plugins>

              <clear />

            </plugins>

            <trustSettings>

              <clear />

            </trustSettings>

            <properties>

              <property name="Auto-Update-Check" value="auto" />

              <property name="Auto-Update-DeferUpdate-Count" value="1" />

                      <property name="Auto-Update-LTSR-Only" value="FALSE" />

              <property name="Auto-Update-Rollout-Priority" value="fast" />

                    </properties>

          </metadata>

        </annotatedServiceRecord>

      </annotatedServices>

      <metadata>

        <plugins>

          <clear />

        </plugins>

        <trustSettings>

          <clear />

        </trustSettings>

        <properties>

          <clear />

        </properties>

      </metadata>

    </account>

<!--NeedCopy-->
The meaning of the properties and their possible values are detailed as follows:
-
Auto-update-Check: Indicates that Citrix Workspace app detects an update automatically when available.
- Auto (default) – Checks and performs updates automatically
- Manual – updates are only fetched when the user makes a check request from the Citrix Workspace app system tray menu,
- Disabled – Updates checks are not performed.
-
Auto-update-LTSR-Only: Indicates that the update is for LTSR only.
- True – the updater ignores any updates that are not marked as LTSR valid. Only LTSR updates are considered.
- False (default) - Updater considers only current stream updates.
-
Auto-update-Rollout-Priority: Indicates the delivery period in which you can receive the update.
- Fast – updates are rolled-out to the users towards the beginning of the delivery period.
- Medium – updates are rolled-out towards the middle of the delivery period.
- Slow– updates are rolled-out towards the end of the delivery period.
-
Auto-update-DeferUpdate-Count: Indicates the number of counts that you can defer the notifications for the updates.
Note:
This configuration is applicable only for interactive updates and not when the silent auto-update feature is enabled, as the user doesn’t get any option to defer the updates.
- -1: User can defer the auto-update any number of times.
- 0: User cannot view remind me later option.
- number: User can view remind later options with the given count.
Define timeframe for automatic update and manage automatic update version and rollout period for Citrix Workspace™ app
The auto-update of Citrix Workspace app is now enhanced with the following features:
- Define timeframe for automatic update: Administrators can now schedule automatic updates for Citrix products at any preferred time on their Windows devices. During this specified time, software updates automatically or users receive notifications on available updates.
- Manage automatic update version and rollout period for Citrix Workspace app: Administrators can schedule a convenient start date and rollout period for a specific version of Citrix Workspace app during which an automatic update is set to roll out to their end users. This capability allows them to determine the rollout dates, minimizing disruption to end users, and improving the user experience.
Note:
Starting with the Citrix Workspace app for Windows version 2503, you can enable these features using Group Policy Object (GPO).
Starting with the Citrix Workspace app for Windows version 2503.10, you can enable these features using Global App Configuration Service (GACS).
Benefits:
- Custom rollout period: Admins can determine the rollout period for their organization, overriding the default period set by Citrix.
- Scheduled updates: Admins can specify the hours or time frame during the day to check for and update Citrix Workspace app.
- Flexible update days: Admins can choose a specific start date to specify when to download and begin installation updates.
Define timeframe for automatic update
You can define a timeframe for automatic update using Group Policy Object (GPO) and Global App Configuration Service (GACS).
Using GPO:
You can define a timeframe for automatic update using Group Policy Object (GPO). For this, first copy the ADMX and ADML files. For more information, see Group Policy.
Perform the following steps to enable the feature using GPO:
- Open the Citrix Workspace app Group Policy Object administrative template by running gpedit.msc and navigate to the Computer Configuration node.
- Go to Administrative Templates > Citrix Components > Citrix Workspace > Citrix Workspace Updates.
-
Select the Automatic update timeframe policy.
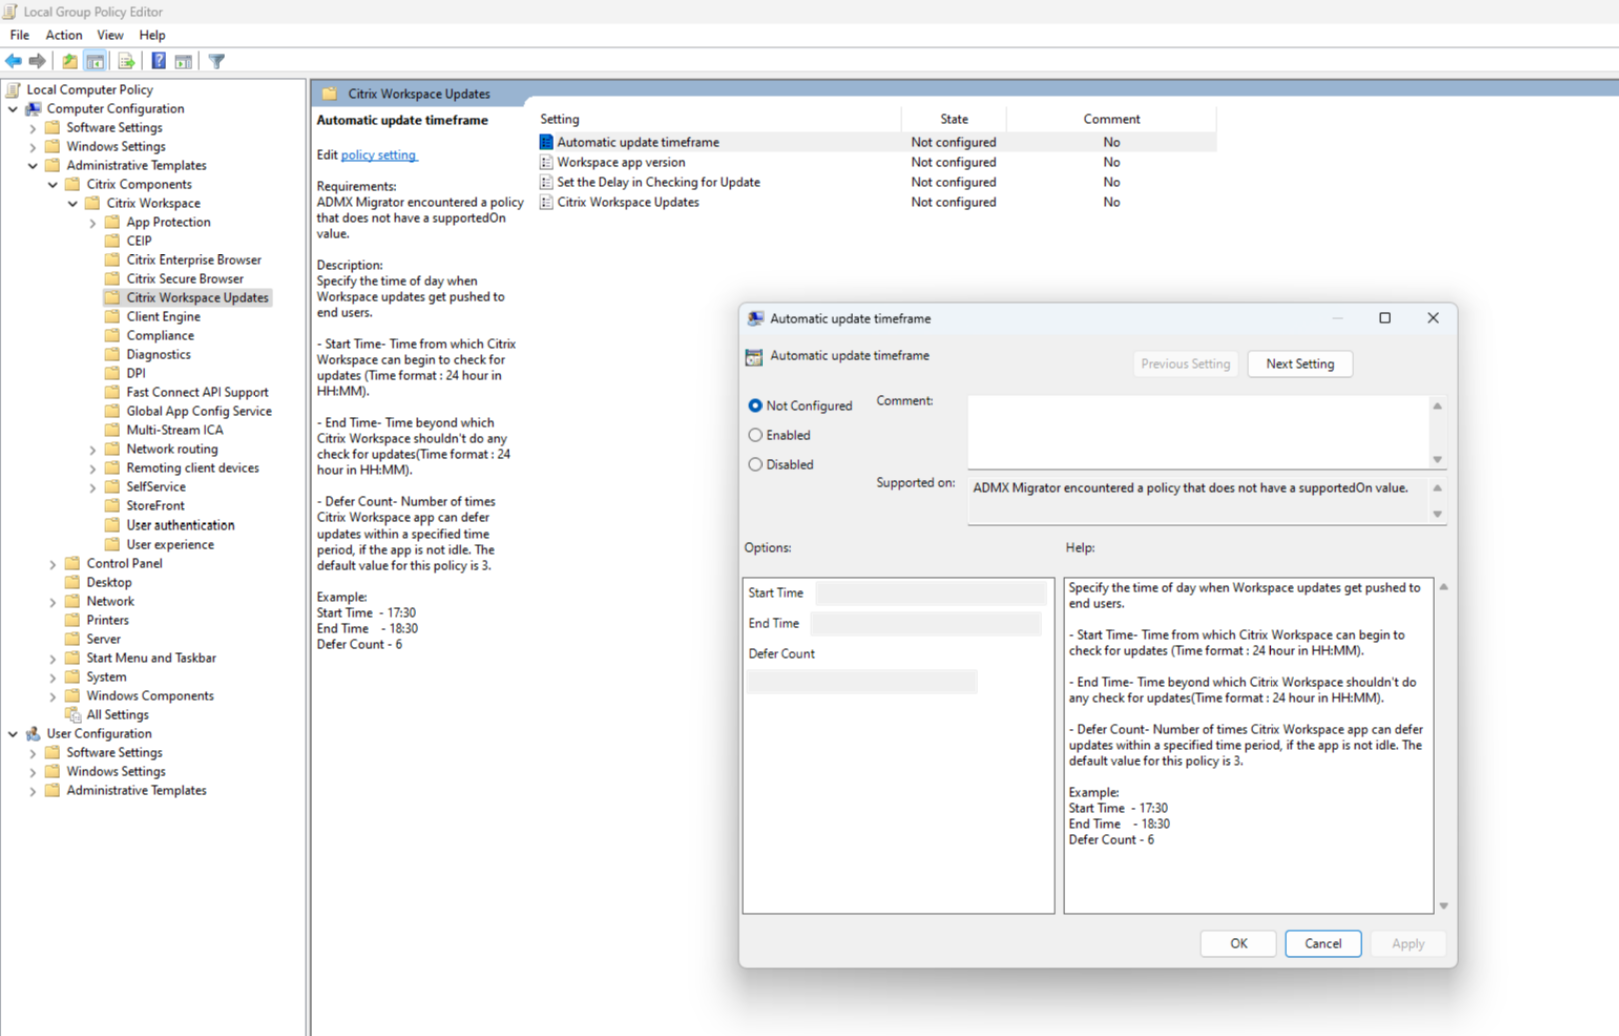
- Enter the Start time from which Citrix Workspace app can begin to check for updates. The time format is 24 hours in HH:MM format. For example: 17:30.
- Enter the End time after which Citrix Workspace app must not do any check for updates. The time format is 24 hours in HH:MM format. For example: 18:30.
- Enter the Defer count: The number of times Citrix Workspace app can defer updates within a specified time. When a user runs out of the allocated defer count, the automatic update occurs at any available time.
- Select the Enabled checkbox.
- Click OK and then click Apply.
Using GACS:
To enable this feature, do the following:
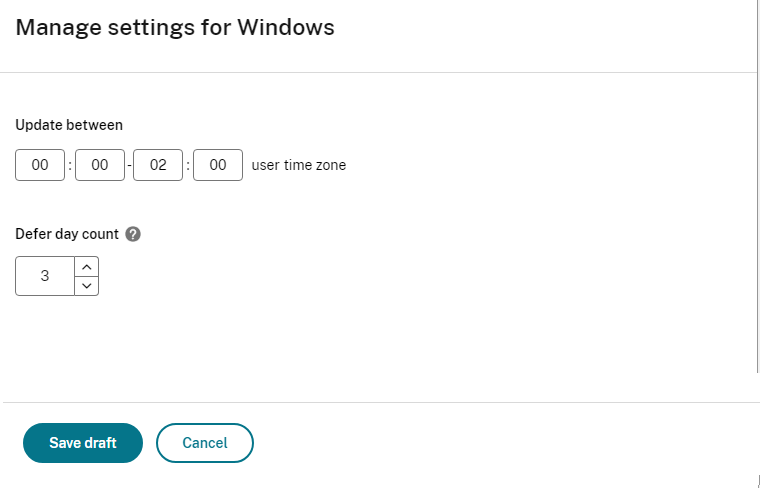
- Navigate to Workspace Configuration > App Configuration in Citrix Cloud.
- Select the required store URL from the list.
- Navigate to Configure > Updates and Plug-ins, and click the Automatic update timeframe setting.
-
Select Windows operating system, and click Edit to define the time window within which an automatic update occurs.
-
In the Update between field, add the start time and end time between which you prefer to run the automatic update.
Note:
The difference between start and end time must be at least 1 hour and must be on the same day.
- In the Defer day count field, mention the number of times users can postpone the automatic update. When a user runs out of the allocated defer count, the automatic update occurs during any available time.
For more information, see the Automatic update timeframe in the GACS documentation.
Manage automatic update version and rollout period for Citrix Workspace app
You can manage automatic update version and rollout period for Citrix Workspace app using Group Policy Object (GPO) and Global App Configuration Service (GACS).
Using GPO:
You can manage automatic update version and rollout period for Citrix Workspace app using Group Policy Object (GPO). For this first copy the ADMX and ADML files. For more information, see Group Policy.
Perform the following steps to enable the feature using GPO:
- Open the Citrix Workspace app Group Policy Object administrative template by running gpedit.msc and navigate to the Computer Configuration node.
- Go to Administrative Templates > Citrix Components > Citrix Workspace > Citrix Workspace Updates.
-
Select the Workspace app version policy.
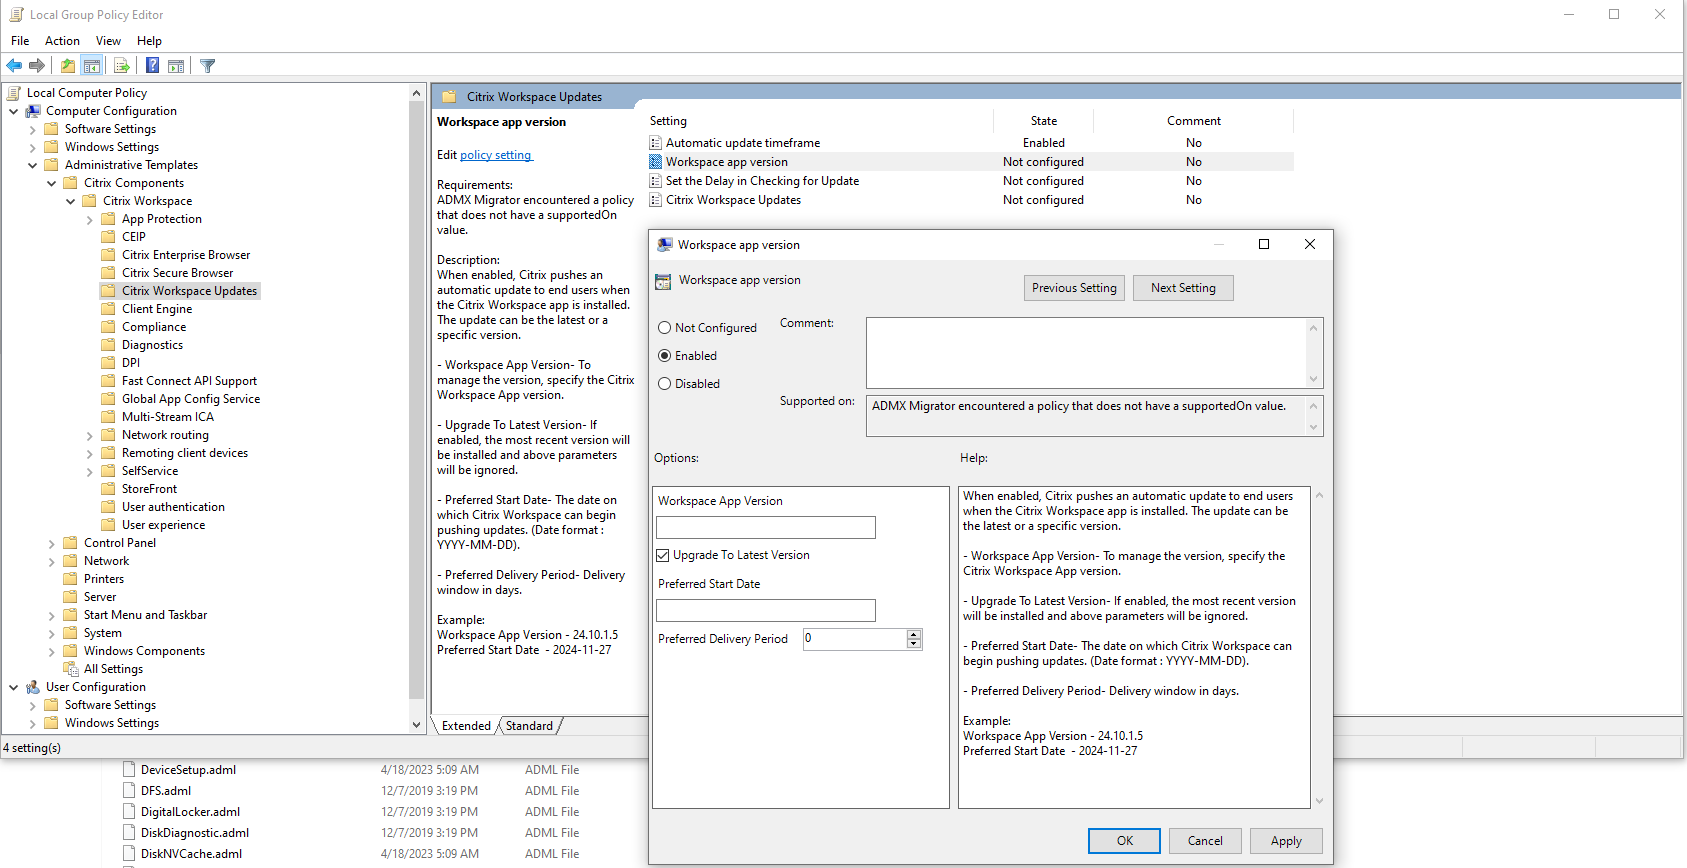
- Enter the required version in the Workspace App Version text field. The example format is 24.10.1.5.
Or,
Select the Upgrade To Latest Version checkbox. If you select this checkbox, the most recent version of Citrix Workspace app is installed, and the version added in the Workspace App Version text field is ignored. - Define the start date on which Citrix Workspace app can begin pushing the updates in the Preferred Start Date field. The format is YYYY-MM-DD. For example: 2024-11-27.
- Enter the number of days up to which the automatic update rolls out in the Preferred Delivery Period field. The automatic update process completes within the specified delivery period.
- Select the Enabled checkbox.
- Click OK and then click Apply.
Using GACS:
- Navigate to Workspace Configuration > App Configuration in Citrix Cloud.
- Select the required store URL from the list.
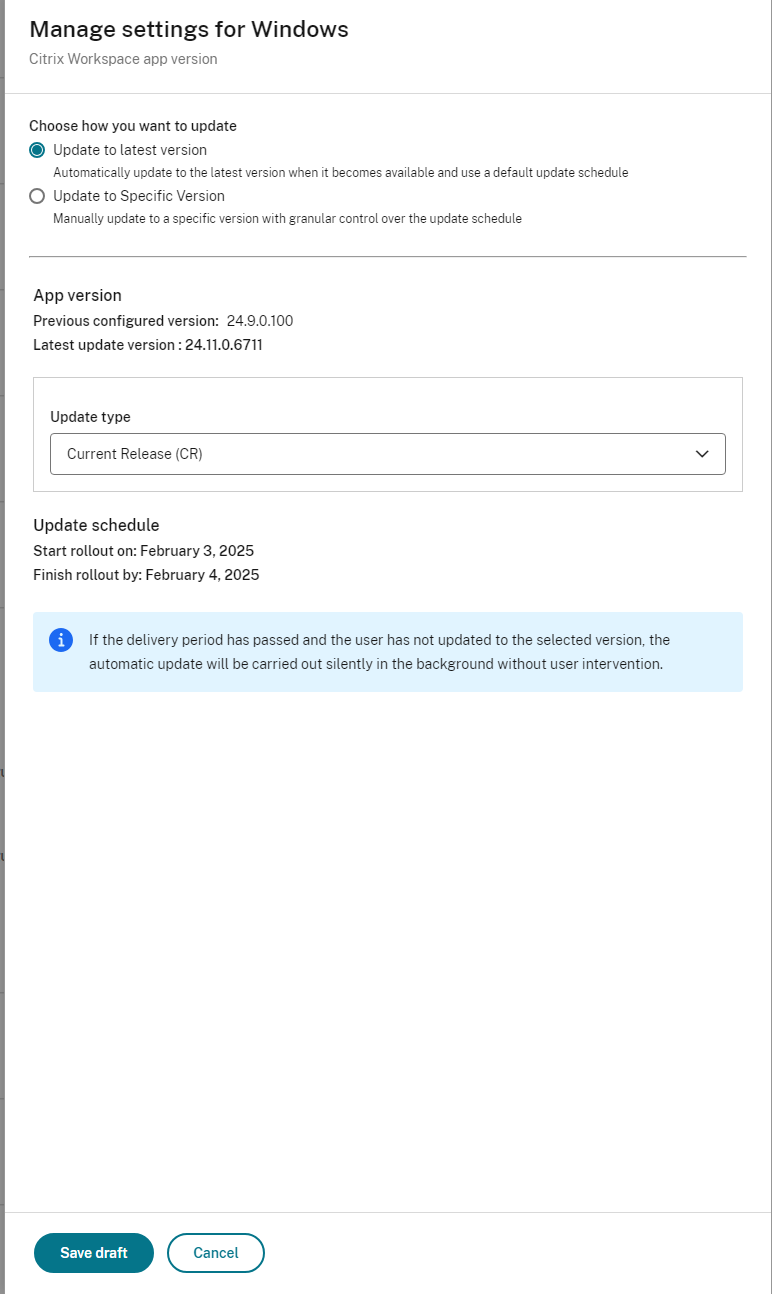
- Navigate to Configure > Updates and Plug-ins, and click the Citrix Workspace app version setting.
-
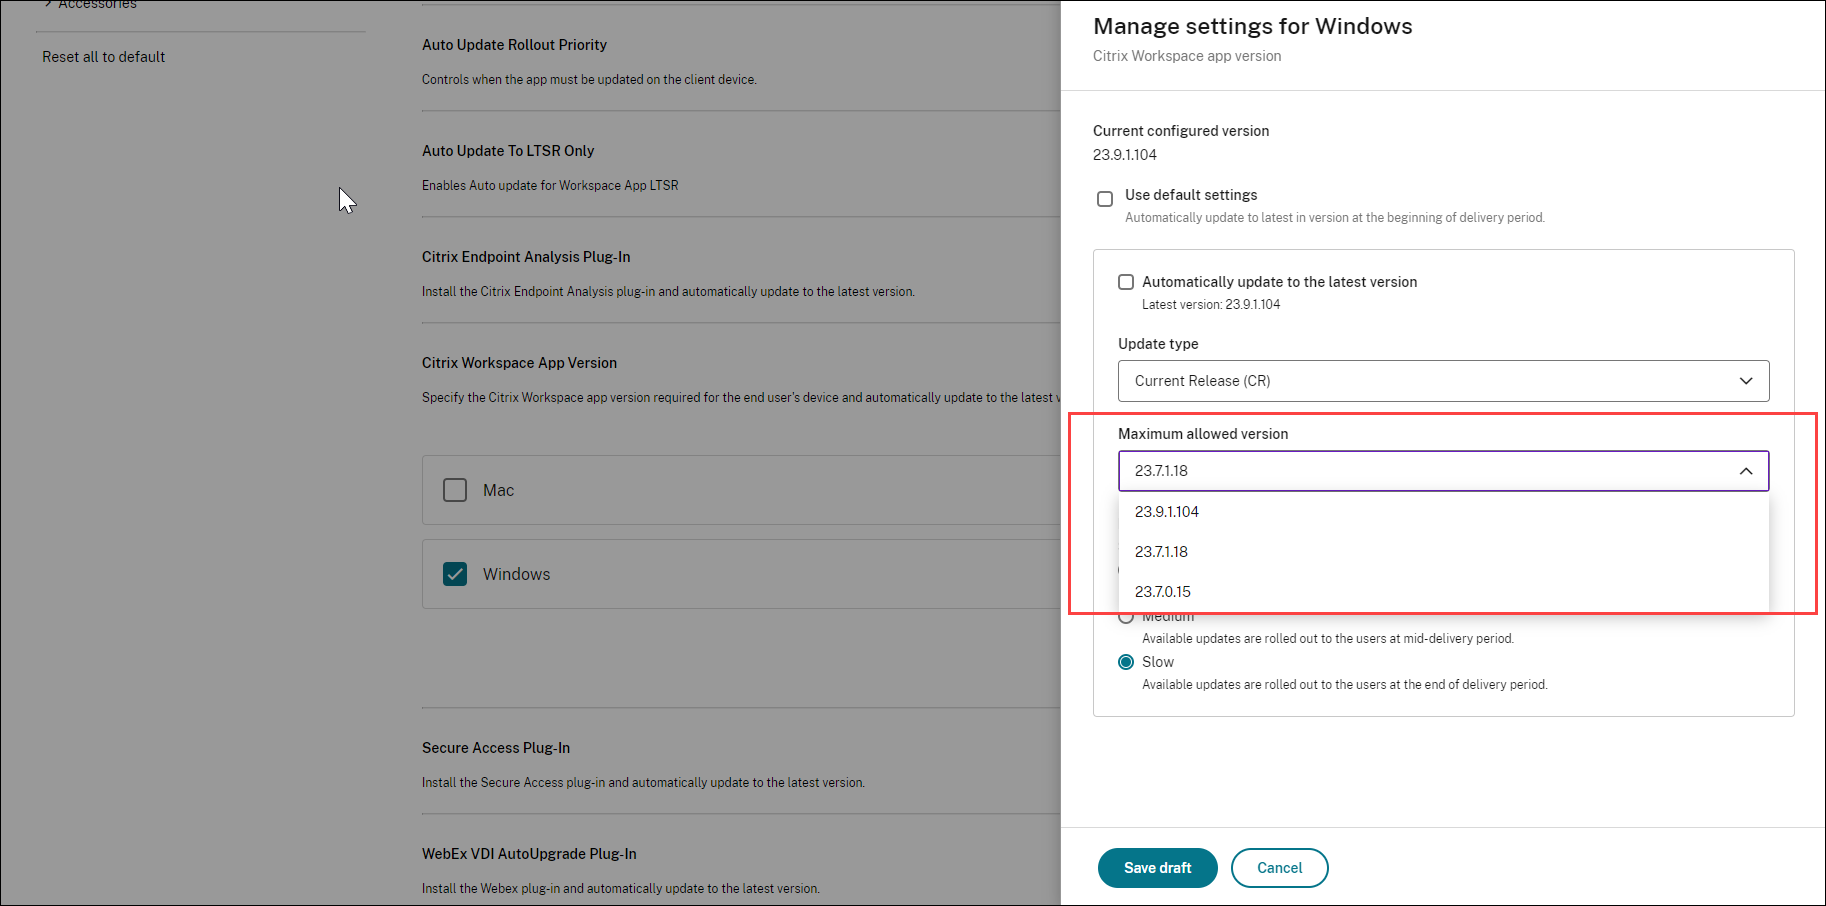
Select the operating system, and click Edit to configure the setting. The Manage Setting for Windows screen appears.
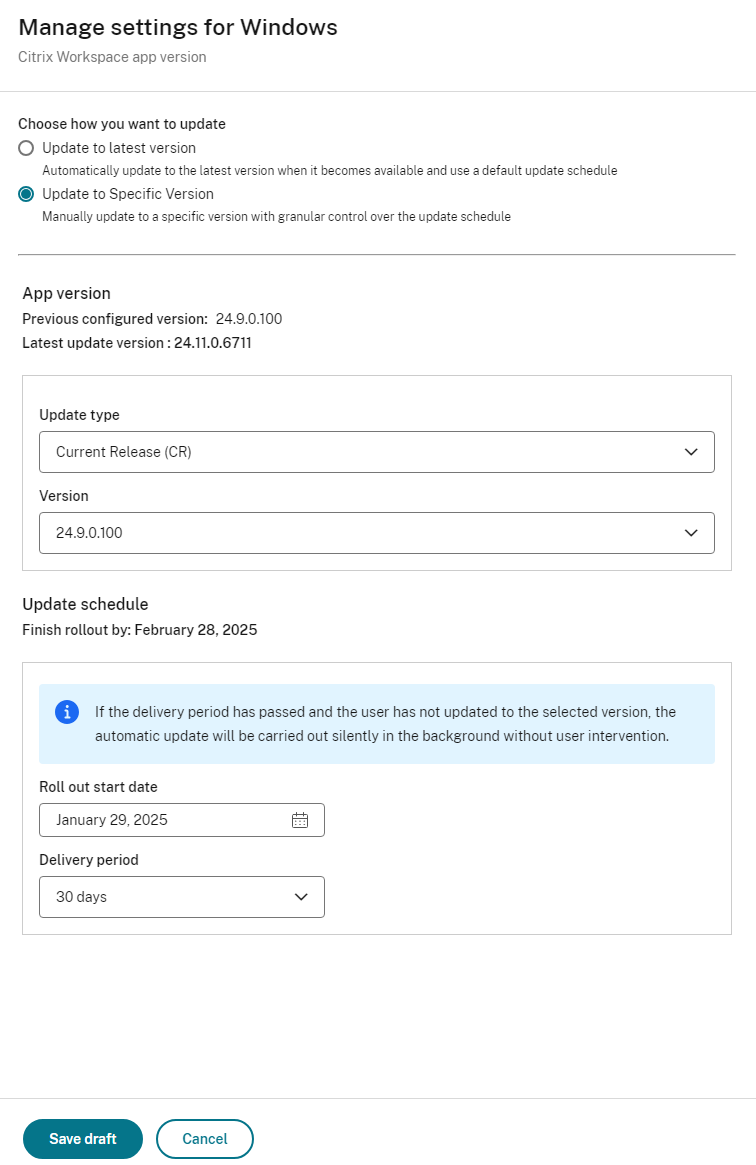
-
Select one of the following from the Choose how you want to update section:
- Update to latest version: Select this option to automatically update to the latest version when it becomes available and use a default update schedule.
- Update to specific version: Select this option to manually update to a specific version with granular control over the update schedule.
-
If you have selected Update to latest version, do the following:
- Select the Update type from the drop-down list.
- Verify the App version and update schedules.
Or,
If you have selected Update to specific version, do the following:
- Select the Update type from the drop-down list.
- Select the Version from the drop-down list.
- In the Roll out start date field, define the start date at which you prefer to start the automatic update of your Citrix Workspace app. Once you set a date, the app doesn’t get updated even if a newer version of the app is available.
- In the Delivery period field, enter the number of days up to which the automatic update rolls out. The automatic update process completes within the specified delivery period.
The Update Schedule displays the rollout finish date based on the date given in the Roll out start date field and Delivery period field.
-
Click Save draft.
Note:
Automatic updates occur only after the user signs in to Citrix Workspace app.
For more information, see Citrix Workspace app version in the GACS documentation.
Enable auto-update for active users only
Starting with version 2503, the auto-update feature has been enhanced to trigger only for active users.
A user is considered active if any of the following criteria is met:
- Managed users using Group Policy Object (GPO) template with Citrix Workspace app version control setting enabled.
- GACS users with Citrix Workspace app version control setting enabled.
- The user has signed in to the current version of Citrix Workspace app.
- The user has opened at least a single Citrix Workspace app session for the current version of Citrix Workspace app. This is applicable in the case of accessing Citrix Workspace app using a browser.
If none of these conditions are met, the user is considered inactive, and the auto-update feature is not available.
When a user transitions from inactive to active status, the auto-update resumes.