Citrix Workspace app Desktop Lock
Overview
The Citrix Workspace app Desktop Lock, also known as direct boot to VDI, simplifies access to virtual desktops. This feature allows admins to configure local desktops so that users can directly access their virtual desktops without access to local resources or applications on the endpoint device.
Direct boot to VDI or Desktop Lock is ideal where data protection, compliance, and simplicity are top priorities for organizations. This solution locks users out of the endpoint operating system, keeping your data secure and reducing risk. It is ideal for the kiosk mode and frontline use cases.
Starting from Citrix Workspace app for Windows version 2503, the Citrix Workspace app Desktop Lock, includes the following enhancements:
-
Integrated installer: Desktop Lock is now part of the main Citrix Workspace™ app installer, simplifying deployment and distribution for admins. When you install Citrix Workspace app using:
- Command line installation: You can enable Desktop Lock using command-line parameters during the installation.
- UI: You can enable Desktop Lock using the Group Policy Object (GPO) policy after the installation.
You need to reboot the machine after enabling the Desktop Lock feature.
-
De-coupled from SSON: Previously, you had to install the Citrix Workspace app for Windows with the
/includeSSONflag to enable the Desktop Lock feature. Desktop Lock is now available without single sign-on (SSON). However, it is recommended to use it with SSON enabled for a seamless experience. -
Enable feature through policy or command line: You can manage the feature enablement through GPOs or command line. This enhancement provides granular controls to enable the feature at any point in time. The following policies can be managed in the Group Policy Editor:
- AllowDesktopLockOnMachine: This policy is a machine-level policy that allows the ability to switch to Desktop Lock for any user on the machine. This policy requires a reboot of the machine.
- EnableDesktopLockforAllStandardUsers: This policy is a machine-level policy that enables Desktop Lock for all standard users on the machine. Along with this policy, you need to enable the AllowDesktopLockOnMachine policy.
- EnableDesktopLockforUser: This policy is a user group policy to enable or disable Desktop Lock for a specific user. Along with this policy, you need to enable the AllowDesktopLockOnMachine policy.
-
Post-installation configuration: Stores can be configured post-installation, extending Desktop Lock to existing stores configured through GPO.
-
Support for Any Identity Provider (IDP): Desktop Lock now supports booting into VDI with any IdP that supports Citrix Workspace app.
Key features
- Direct Virtual Desktop access: Users land directly in their virtual desktop after logging into the local desktop.
- Single sign-on (SSO) integration: When single sign-on is enabled, users experience a seamless login process without needing to enter credentials multiple times. This integration is supported only with domain-joined endpoints.
- Non-domain-joined machine support: While primarily intended for domain-joined environments, Desktop Lock also supports user authentication on non-domain-joined machines. However, manual authentication is required in this scenario.
- Flexibility: Desktop Lock supports both shared and dedicated local desktops, catering to various use cases like kiosks and frontline users.
Benefits
- Easier installation and configuration: Simplifies the deployment process for admins.
- Reduced login times: Provides a faster login experience for users.
- Seamless boot into VDI: Enhances the overall user experience with a smooth transition into the VDI environment.
- Flexible management: Allows admins to manage and configure Desktop Lock at any point in time through policies.
These enhancements make the Desktop Lock feature more flexible and easier to manage, providing a better experience for both admins and users.
Note:
You must reboot the machine after upgrading Citrix Workspace app for Windows with the Desktop Lock feature for the changes to take effect.
For optimal functionality, domain-joined endpoints are recommended.
Configuring Desktop Lock
You can manage the Desktop Lock feature enablement through Group Policy Object (GPO)s or command line.
Enable Desktop Lock feature using GPO
You can enable or disable the Desktop Lock feature using Group Policy Object (GPO) for all standard users and specific sets of users. These specific sets of users might include admins as well.
Configuring Desktop Lock for all standard users
Perform the following steps to enable the feature using GPO:
- Open the Citrix Workspace app Group Policy Object administrative template by running gpedit.msc and navigate to the Computer Configuration (local machine) node.
-
Go to Administrative Templates > Citrix Components > Citrix Workspace > User Experience.
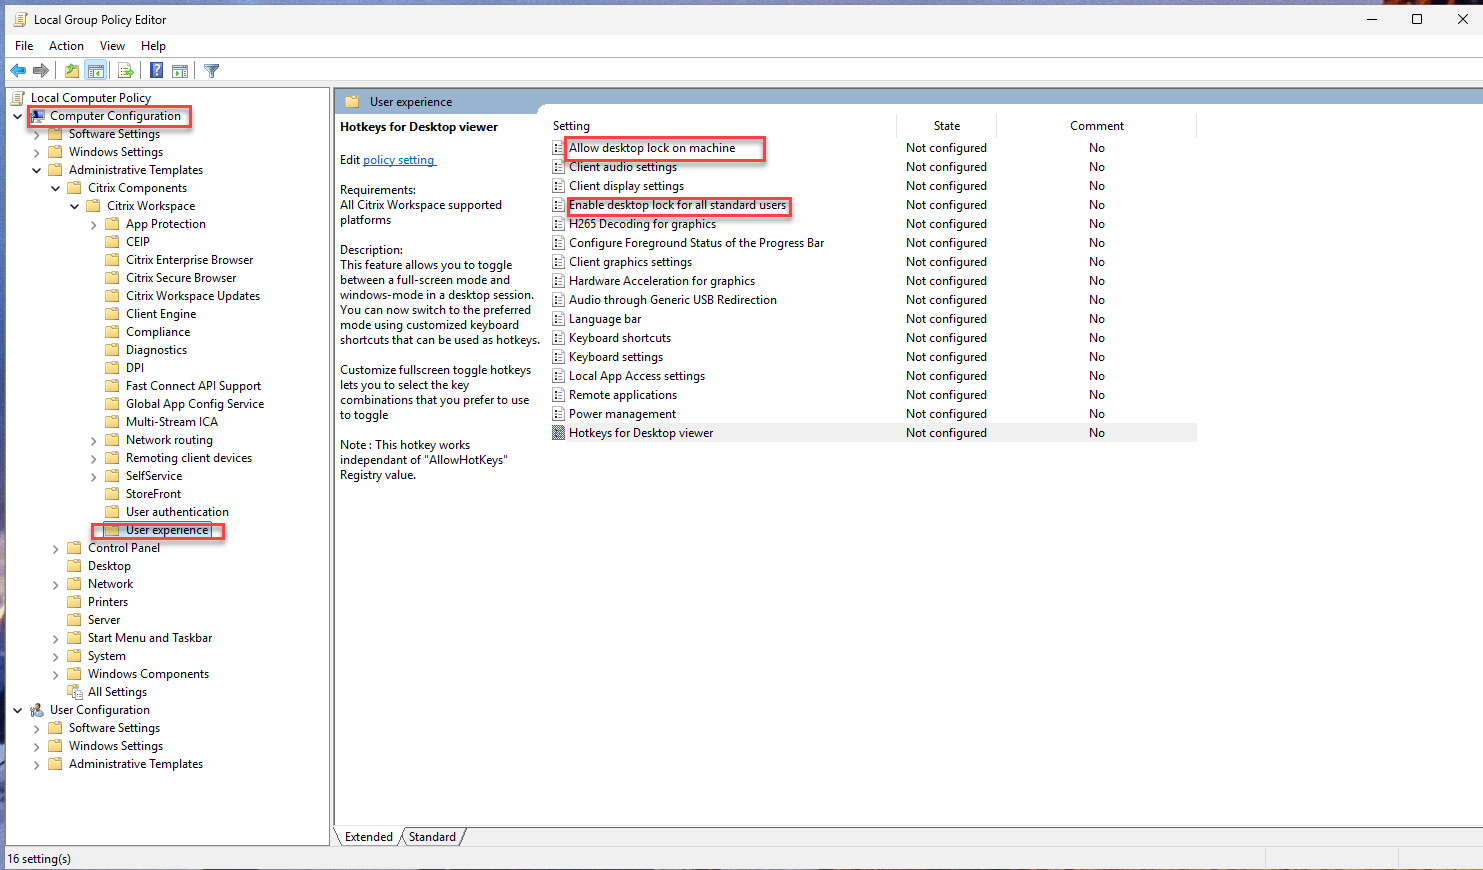
- Select the Allow desktop lock on machine policy.
- Select the Enabled checkbox.
- Select the Enable desktop lock for all standard users policy.
- Select the Enabled checkbox.
- Click OK and then click Apply.
- Reboot the machine.
Configuring Desktop Lock for specific users
Perform the following steps to enable the feature using GPO:
- Open the Citrix Workspace app Group Policy Object administrative template by running gpedit.msc and navigate to the Computer Configuration (local machine) node.
- Go to Administrative Templates > Citrix Components > Citrix Workspace > User Experience.
- Select the Allow desktop lock on machine policy.
- Select the Enabled checkbox.
- Open the Citrix Workspace app Group Policy Object administrative template by running gpedit.msc and navigate to the User Configuration node.
- Go to Administrative Templates > Citrix Components > Citrix Workspace > User Experience.
-
Select the Enable desktop lock policy.
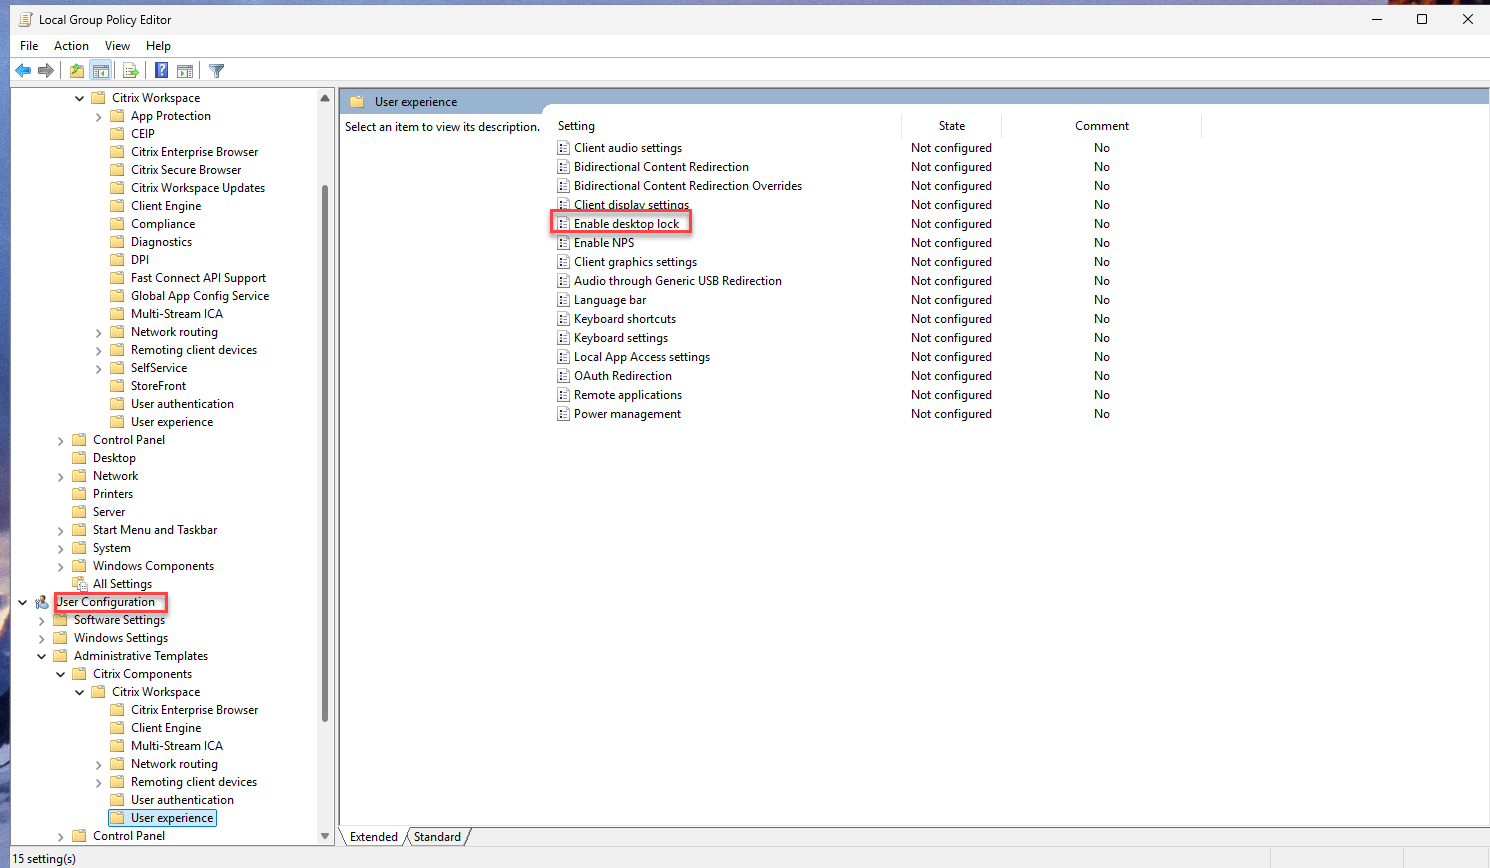
- Select the Enabled checkbox.
- Click OK and then click Apply.
- Reboot the machine.
Note:
The User Configuration > Enable desktop lock policy takes precedence over the Computer Configuration> Enable desktop lock for all standard users policy in case of the Desktop Lock feature.
Enable Desktop Lock feature using command line parameters
You can enable the Desktop Lock feature for all standard users on the machine using the following command line parameter:
CitrixWorkspaceApp.exe AllowDesktopLockOnMachine EnableDesktopLockForAllStandardUsers
<!--NeedCopy-->
Note:
By default the Desktop Lock feature is disabled. On enabling, if you want to disable the Desktop Lock feature, you can use the Allow desktop lock on machine GPO policy.
It is not possible to enable the desktop lock feature for a specific user using the command line.
After the Desktop Lock feature configuration, you can configure the store. Use the ADM/ADMX file or command‑line options to configure the store. For more information on installation using Group policy, see the Group Policy documentation.
Command line installation example:
CitrixWorkspaceApp.exe STORE0="DesktopStore;https:// my.storefront.server/Citrix/MyStore/discovery;on;Desktop Store "
Important considerations
- Automatic desktop selection: When using Citrix Workspace app for Windows with Desktop Lock, a user is signed in to the first available desktop. Currently, there is no option to selectively choose which desktop the user must sign in.
- Desktop-only support: This feature currently supports only desktops, not applications.
- User profiles: A local user profile is created on the device upon login. Profile retention depends on your Profile Management settings.
- Session disconnection: Disconnecting the Desktop Lock session logs the user out of the device.
- Local device Task Manager: Access to the local device’s Task Manager is restricted.
- Streamlined Desktop Viewer: The Desktop Viewer is optimized for Desktop Lock. It does not include Home, Restore, Maximize, and Display properties.
Authentication
Citrix Workspace app Desktop Lock supports all the authentication methods available in Citrix Workspace app. For more information, see Authentication.
Shared devices
In a shared device scenario, multiple users can use the same local machine. Upon logging in with their designated authentication method to the local machine, users directly access the virtual desktop. Once signed out of the virtual desktop, the local device is immediately available for the next user. This setup is beneficial for organizations with shift workers or shared desktop environments.
Dedicated devices
In a dedicated device setup, a single user is assigned to the local machine. The virtual desktop opens directly upon login to the local machine using the assigned authentication credentials.
Additional supported features
- HDX and Multimedia: All HDX and multimedia features are supported. For more information, see HDX and multimedia.
- Local App Access: Local App Access is supported but requires careful configuration to prevent unauthorized access to the local desktop. For more information, see the Configure Local App Access and URL redirection section in the Citrix Virtual Apps and Desktops documentation.
Passing Windows shortcut keys to the remote session
Most Windows shortcut keys function within the remote session, except for Windows+L. Frequently used examples include:
- Win+D: Minimize all open windows.
- Alt+Tab: Switch between active windows.
- Ctrl+Alt+Delete: Accessible via Ctrl+F1 or the Desktop Viewer toolbar.
- Alt+Shift+Tab: Navigate backward through active windows.
- Windows+Tab: Open the Task view.
- Windows+Shift+Tab: Navigate backward through the Task view.
- Windows+All Character Keys: Various shortcuts based on the specific character key.
Uninstalling Desktop Lock
The Desktop Lock feature is installed as part of the Citrix Workspace app. Therefore, uninstalling the Citrix Workspace app also removes the Desktop Lock feature. For more information, see Uninstall Citrix Workspace app