Create a non-domain-joined Linux VDA using easy install
This article walks you through using the easy install method to create and enroll a non-domain-joined Linux VDA with a machine catalog in Citrix DaaS or Citrix Virtual Apps and Desktops™ 2407 and later.
Important:
- For Citrix DaaS™ customers:
- You can deploy non-domain-joined VDAs in a public cloud or in the on-premises data center. Non-domain-joined VDAs are managed by the control plane in Citrix DaaS.
- To create non-domain-joined VDAs, customers using the Citrix Gateway service must ensure that Rendezvous V2 is enabled. Cloud Connectors are required only if you plan to provision machines on on-premises hypervisors or if you want to use Active Directory as the identity provider in Workspace.
- To create non-domain joined VDAs, you can also use MCS. For more information, see Create non-domain-joined Linux VDAs using MCS.
- MCS doesn’t support bare metal servers.
- The following features are available for non-domain-joined Linux VDAs:
Step 1: Create an empty machine catalog
Sign in to the Citrix Web Studio™ and create an empty machine catalog without machines in it. The Linux VDA doesn’t support the use of a token file for enrolling with a power-managed machine catalog.
The process for creating machine catalogs and adding Linux VDA machines is similar to the traditional Windows VDA approach. For a more detailed description of how to complete these tasks, see Create machine catalogs and Manage machine catalogs.
For creating machine catalogs that contain Linux VDA machines, there are a few restrictions that differentiate the process from creating machine catalogs for Windows VDA machines:
-
For the operating system, select:
- The Multi-session OS option for a hosted shared desktop delivery model.
- The Single-session OS option for a VDI dedicated desktop delivery model.
- Do not mix Linux and Windows VDA machines in the same machine catalog.
- Do not mix domain-joined and non-domain-joined machines in the same machine catalog.
- For creating token enrollment machine catalog, Choose Single-session OS or Multi-session OS on Machine Type page, choose “Machines that are not power managed (for example, physical machines)” on the Machine Management page.
Note:
Early versions of Citrix Studio don’t support the notion of a “Linux OS.” However, selecting the Windows Server OS or Server OS option implies an equivalent hosted shared desktops delivery model. Selecting the Windows Desktop OS or Desktop OS option implies a single user per machine delivery model.
Step 2: Create an enrollment token
To create a non-domain-joined VDA using easy install, you need a token file to enroll the VDA with a machine catalog and authenticate the VDA to the cloud or on-premises delivery controller. The Linux VDA does not support the use of a token file for enrolling with a power-managed machine catalog.
To create an enrollment token, complete the following steps in Citrix Web Studio:
Tip:
In Citrix DaaS, Web Studio is known as Full Configuration.
-
Select the empty machine catalog that you created earlier and then select Manage Enrollment Tokens in the action bar.
-
On the Manage Enrollment Tokens page, click Generate to create an enrollment token. Alternatively, you can choose an existing token that is in a valid status.
-
Follow the wizard to complete the settings.
-
Download the successfully created token and save it with least privilege in a secure location. Later when you run the easy install script, the CTX_XDL_NDJ_ENROLLMENT_TOKEN_FILE variable allows you to specify the path to the token file for enrolling the VDA.
Step 3: Install .NET
Before installing the Linux VDA package, install .NET per the system requirement.
After installing .NET, run the which dotnet command to find your runtime path.
Based on the command output, set the .NET runtime binary path. For example, if the command output is /aa/bb/dotnet, use /aa/bb as the .NET binary path.
Step 4: Add self-signed CA certificates
For details on configuring self-signed CA certificates, see Configure self-signed certificates for WebSocket. This section entails placing and updating CA certificates on the Linux VDA.
-
For RHEL and Rocky Linux:
Save your self-signed CA certificates to the /etc/pki/ca-trust/source/anchors directory on the Linux VDA, and then run the following command to update the certificates:
sudo update-ca-trust <!--NeedCopy--> -
For SUSE, Ubuntu, and Debian:
Place the root CA certificate in the /usr/local/share/ca-certificates directory. Then, run the update-ca-certificate command.
 sudo update-ca-certificates
 <!--NeedCopy-->
Step 5: Download the Linux VDA package
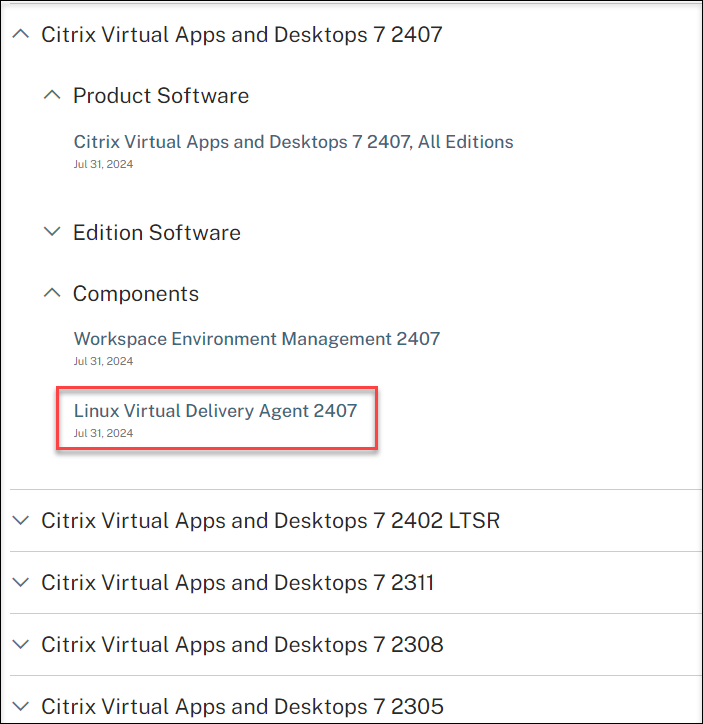
- Go to the Citrix Virtual Apps and Desktops download page.
- Expand the appropriate version of Citrix Virtual Apps™ and Desktops.
-
Expand Components to find the Linux VDA. For example:
-
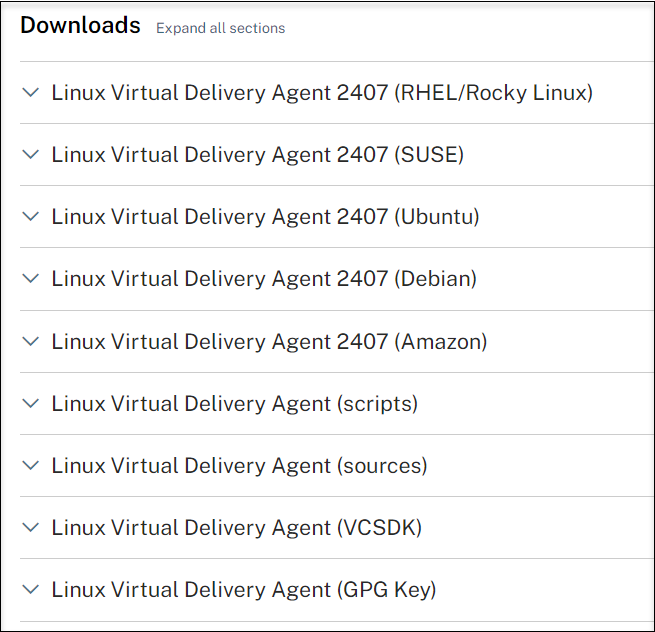
Click the Linux VDA link to access the Linux VDA downloads.
-
Download the Linux VDA package that matches your Linux distribution.
-
Download the GPG public key that you can use to verify the integrity of the Linux VDA package. For example:
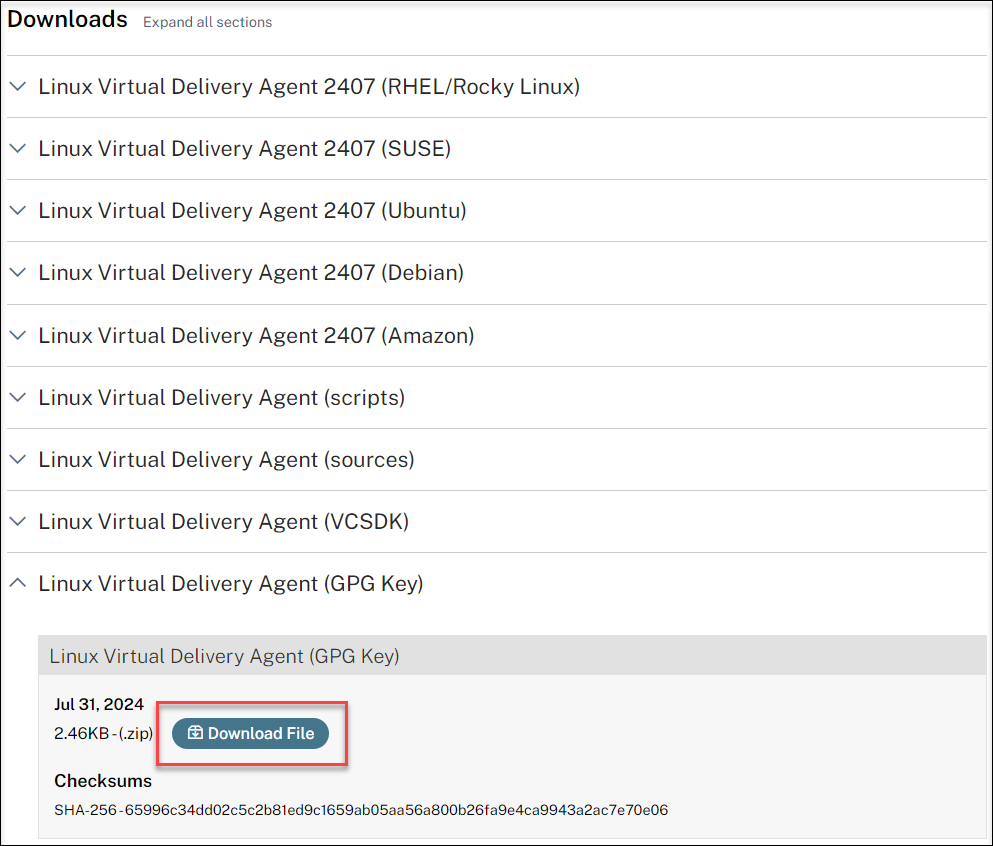
To verify the integrity of the Linux VDA package by using the public key:
-
For an RPM package, run the following commands to import the public key into the RPM database and to check the package integrity:
rpmkeys --import <path to the public key> rpm --checksig --verbose <path to the Linux VDA package> <!--NeedCopy--> -
For a DEB package, run the following commands to import the public key into the DEB database and to check the package integrity:
 sudo apt-get install dpkg-sig
 gpg --import <path to the public key>
 dpkg-sig --verify <path to the Linux VDA package>
 <!--NeedCopy-->
-
Step 6: Install the Linux VDA package
To set up the environment for the Linux VDA, run the following commands.
For RHEL and Rocky Linux distributions:
Note:
For RHEL and CentOS, install the EPEL repository before you can install the Linux VDA successfully. For information on how to install EPEL, see the instructions at https://docs.fedoraproject.org/en-US/epel/.
Before installing the Linux VDA on RHEL 9.x and Rocky Linux 9.x, update the libsepol package to version 3.4 or later.
sudo yum  -y localinstall   <PATH>/<Linux VDA RPM>
<!--NeedCopy-->
Note:
After you install the Linux VDA on RHEL 8.x/9.x and Rocky Linux 8.x/9.x hosted on GCP, the Ethernet connection might be lost and the Linux VDA might be unreachable after a VM restart. To work around the issue, set a root password when logging on to the VM for the first time and make sure that you can log on to the VM as root. Then, run the following commands in the console after restarting the VM:
nmcli dev connect eth0
systemctl restart NetworkManager
<!--NeedCopy-->
For Ubuntu/Debian distributions:
sudo dpkg -i <PATH>/<Linux VDA deb>
sudo apt-get install -f
<!--NeedCopy-->
Note:
To install the necessary dependencies for a Debian 11 distribution, add the
deb http://deb.debian.org/debian/ bullseye mainline to the /etc/apt/sources.list file.For Ubuntu 24.04/22.04 on GCP, disable RDNS. To do so, add the rdns = false line under [libdefaults] in /etc/krb5.conf.
For SUSE distributions:
-
For SUSE 15.6 on AWS, Azure, and GCP, ensure that:
- You are using libstdc++6 version 12 or later.
- The Default_WM parameter in /etc/sysconfig/windowmanager is set to “gnome”.
-
Run the following command to install the Linux VDA:
zypper -i install <PATH>/<Linux VDA RPM>
<!--NeedCopy-->
Step 7: Install NVIDIA GRID drivers
Enabling HDX™ 3D Pro requires you to install the NVIDIA GRID drivers on your hypervisor and on the VDA machine.
To install and configure the NVIDIA GRID Virtual GPU Manager (the host driver) on the specific hypervisors, see the following guides:
To install and configure the NVIDIA GRID guest VM drivers, perform the following general steps:
- Ensure that the guest VM is shut down.
- In the hypervisor control panel, allocate a GPU to the VM.
- Start the VM.
- Install the guest VM driver (from your cloud vendor or NVIDIA) on the VM.
Step 8: Specify a database to use
You can switch between SQLite, PostgreSQL and built-in registry service after installing the Linux VDA package.
-
To do so, complete the following steps:
-
We recommend you use SQLite for VDI mode only and use PostgreSQL or built-in registry service for a hosted shared desktops delivery model.
-
For easy install and MCS, you can specify SQLite, PostgreSQL or built-in registry service to use without having to install them manually. Unless otherwise specified through /etc/xdl/db.conf, the Linux VDA uses built-in registry service by default. If you require a custom version of PostgreSQL instead of the version provided by your Linux distribution, you must install the specified version manually, edit
/etc/xdl/db.confto reflect the new version, and start the PostgreSQL service before running the easy install script (ctxinstall.sh) or the MCS script (deploymcs.sh). -
You can also use /etc/xdl/db.conf to configure the port number for PostgreSQL.
-
To use build-in registry service on RHEL9, RHEL10 and Rocky9, the CodeReady Builder repository is required to enable:
RHEL9: subscription-manager repos –enable codeready-builder-for-rhel-9-$(arch)-rpms RHEL10: subscription-manager repos –enable codeready-builder-for-rhel-10-$(arch)-rpms Rocky9: dnf config-manager –enable crb
-
-
Run
/opt/Citrix/VDA/sbin/ctxcleanup.sh. Omit this step if it is a fresh installation. -
Edit
/etc/xdl/db.confbefore runningdeploymcs.sh. The following is an example db.conf file:
# database configuration file for Linux VDA


## database choice

# possible choices are:

#     SQLite

#     PostgreSQL

#     ctxregd - use the built-in registry service # default choice is ctxregd

DbType="ctxregd"


## database port

# specify database port for the database.

# if not specified, default port will be used:

# SQLite: N/A

# PostgreSQL: 5432

DbPort=5432


## PostgreSQL customized

# only the following value means true, otherwise false:

#     true

#     yes

#     y

#     YES

#     Y

# default is false

DbCustomizePostgreSQL=false


## PostgreSQL service name

# specify the service name of PostgreSQL for Linux VDA

# default is "postgresql"

DbPostgreSQLServiceName="postgresql"

<!--NeedCopy-->
You can specify SQLite, PostgreSQL or built-in registry service to use by editing /etc/xdl/db.conf after installing the Linux VDA package.
To do so, edit /etc/xdl/db.conf before running sudo /opt/Citrix/VDA/sbin/ctxinstall.sh or /opt/Citrix/VDA/bin/easyinstall.
Note:
We recommend you use SQLite for VDI mode only.
For easy install and MCS, you can specify SQLite, PostgreSQL or built-in registry service to use without having to install them manually. Unless otherwise specified through /etc/xdl/db.conf, the Linux VDA uses built-in registry service by default.
You can also use /etc/xdl/db.conf to configure the port number for PostgreSQL.
To use build-in registry service on RHEL9, RHEL10 and Rocky9, the CodeReady Builder repository is required to enable: RHEL9: subscription-manager repos –enable codeready-builder-for-rhel-9-$(arch)-rpms RHEL10: subscription-manager repos –enable codeready-builder-for-rhel-10-$(arch)-rpms Rocky9: dnf config-manager –enable crb
Step 9: Run the easy install to configure the environment and VDA to complete the installation
After installing the Linux VDA package, configure the running environment by using the ctxinstall.sh script or GUI.
When running the sudo command, type the -E option to pass the existing environment variables to the new shell it creates. We recommend that you create a shell script file from the preceding commands with #!/bin/bash as the first line.
Alternatively, you can specify all variables by using a single command.
To set up the VDA running environment variables (those variables beginning with ‘CTX_XDL_’), you can run ctxinstall.sh -s (note that the letter s here is in lowercase).
Note:
Before setting up the runtime environment, ensure that the en_US.UTF-8 locale is installed in your OS. If the locale is not available in your OS, run the sudo locale-gen en_US.UTF-8 command. For Debian, edit the /etc/locale.gen file by uncommenting the # en_US.UTF-8 UTF-8 line and then run the sudo locale-gen command.
GUI
You can use easy install through a GUI. Run the /opt/Citrix/VDA/sbin/linux-vda-installer command in the desktop environment of your VDA and then follow the instructions on the easy install GUI.
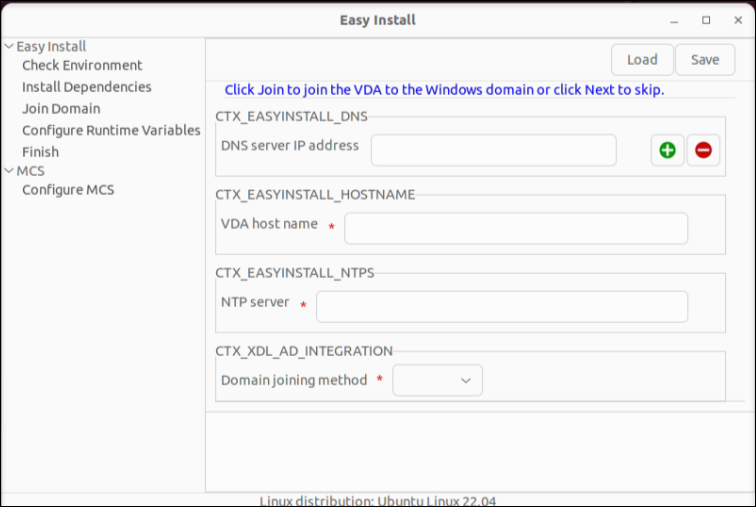
The easy install GUI guides you through the following operations:
- Check the system environment
- Configure database
- Install dependencies
- Configure the runtime environment
Note:
The user also can click the “Advanced Configuration (optional)” button to expand the detailed configuration options
ctxinstall.sh
ctxinstall.sh is the easy install script for doing some pre-configuration and setting up the VDA running environment variables.
-
Only root can run this script.
- Easy install uses /opt/Citrix/VDA/sbin/ctxinstall.conf as its configuration file to set, save, and synchronize the values of all environment variables used. We recommend you read the template (ctxinstall.conf.tmpl) carefully and then customize your own ctxinstall.conf. When you first create the configuration file, use either of the following ways:
- By copying the /opt/Citrix/VDA/sbin/ctxinstall.conf.tmpl template file and saving it as /opt/Citrix/VDA/sbin/ctxinstall.conf.
- By running ctxinstall.sh. Each time you run ctxinstall.sh, your input is saved in /opt/Citrix/VDA/sbin/ctxinstall.conf.
-
Easy install supports modular running. Modules include pre-check, installation, domain-configuration, setup, and verification.
- Debugging details for this script can be found in /var/log/xdl/ctxinstall.log.
For more information, use the help command ctxinstall.sh -h.
Note:
- Following the principle of least privilege, ensure that only the root user can read /opt/Citrix/VDA/sbin/ctxinstall.conf because the domain joining password might be set in the file.
- Uninstalling the Linux VDA removes files under /opt/Citrix/VDA. We recommend you back up /opt/Citrix/VDA/sbin/ctxinstall.conf before uninstalling the VDA.
You can run ctxinstall.sh in interactive mode or silent mode. Before you run the script, set the following environment variables:
-
CTX_XDL_NON_DOMAIN_JOINED=’y|n’ – Whether to join the machine to a domain. The default value is ‘n’. For non-domain-joined scenarios, set it to ‘y’.
-
CTX_XDL_NDJ_ENROLLMENT_TOKEN_FILE=’<path-to-token-file-on-vda-machine>‘ – To create a non-domain-joined VDA using easy install, you need a token file to enroll the VDA in a machine catalog of the Delivery Controller. Save the token with least privilege in a secure location.
- CTX_XDL_VDI_MODE=’y|n’ – Whether to configure the machine as a dedicated desktop delivery model (VDI) or hosted shared desktop delivery model. For HDX 3D Pro environments, set the value to ‘y’.
-
CTX_XDL_HDX_3D_PRO=’y|n’ – The Linux VDA supports HDX 3D Pro, a set of GPU acceleration technologies designed to optimize the virtualization of rich graphics applications. If HDX 3D Pro is selected, the VDA is configured for VDI desktops (single-session) mode - (that is, CTX_XDL_VDI_MODE=’y’).
-
CTX_XDL_START_SERVICE=’y|n’ – Determines whether the Linux VDA services are started when the configuration is complete.
-
CTX_XDL_REGISTER_SERVICE=’y|n’ – The Linux Virtual Desktop services are started after machine startup.
-
CTX_XDL_ADD_FIREWALL_RULES=’y|n’ – The Linux VDA services require incoming network connections to be allowed through the system firewall. You can open the required ports (by default ports 80 and 1494) automatically in the system firewall for the Linux Virtual Desktop.
-
CTX_XDL_DESKTOP_ENVIRONMENT=gnome/gnome-classic/mate – Specifies the GNOME, GNOME Classic, or MATE desktop environment to use in sessions. If you leave the variable unspecified, the default desktop configured on the VDA is used.
-
CTX_XDL_DESKTOP_ENVIRONMENT=gnome/gnome-classic/kde/mate/xfce/’<none>‘ – Specifies the GNOME, GNOME Classic, KDE, MATE, or Xfce desktop environment to use in sessions. If you set it to ‘<none>’, the default desktop configured on the VDA is used. You can specify a desktop environment to use in sessions by using the CTX_XDL_DESKTOP_ENVIRONMENT variable. You can also switch between desktop environments by running commands or using the system tray. For more information, see Desktop switching commands and System tray.
-
CTX_XDL_DOTNET_RUNTIME_PATH=’<path-to-install-dotnet-runtime>‘ – The path to install .NET for supporting the new broker agent service (ctxvda). The default path is ‘/usr/bin’.
- CTX_XDL_VDA_PORT=’<port-number>‘ – The Linux VDA communicates with Delivery Controllers through a TCP/IP port.
Interactive mode
To run the ctxinstall.sh script in interactive mode, use the sudo /opt/Citrix/VDA/sbin/ctxinstall.sh command without the -S option. Type the relevant variable value at each prompt in the command-line interface. If a variable is already set, ctxinstall.sh asks for confirmation in case you want to change it.
Silent mode
In silent mode, you must set the preceding variables by using /opt/Citrix/VDA/sbin/ctxinstall.conf or the export command. After that, run ctxinstall.sh -S (note that the letter S here is in uppercase). If not all required variables are set or some value is invalid, ctxinstall.sh aborts execution, unless there are default values.
If you set it, the exported value for each variable overwrites the value in /Citrix/VDA/sbin/ctxinstall.conf. All updated values are saved in /Citrix/VDA/sbin/ctxinstall.conf.
export CTX_XDL_NON_DOMAIN_JOINED='y'
export CTX_XDL_NDJ_ENROLLMENT_TOKEN_FILE='<token-file-path>'
export CTX_XDL_VDI_MODE='y|n'
export CTX_XDL_START_SERVICE='y|n'
export CTX_XDL_REGISTER_SERVICE='y|n'
export CTX_XDL_ADD_FIREWALL_RULES='y|n'
export CTX_XDL_HDX_3D_PRO='y|n'
export CTX_XDL_DESKTOP_ENVIRONMENT=gnome|gnome-classic|kde|mate|xfce|'<none>'
export CTX_XDL_DOTNET_RUNTIME_PATH='<path-to-install-dotnet-runtime>'
export CTX_XDL_VDA_PORT='<port-number>'
sudo -E /opt/Citrix/VDA/sbin/ctxinstall.sh -S
<!--NeedCopy-->
When running the sudo command, type the -E option to pass the existing environment variables to the new shell it creates. We recommend that you create a shell script file from the preceding commands with #!/bin/bash as the first line.
Alternatively, you can specify all variables by using a single command.
To set up the VDA running environment variables (those variables beginning with ‘CTX_XDL_’), you can run ctxinstall.sh -s (note that the letter s here is in lowercase).
Step 10: Run XDPing
Run sudo /opt/Citrix/VDA/bin/xdping to check for common configuration issues with a Linux VDA environment. For more information, see XDPing.
Step 11: Run the Linux VDA
Start the Linux VDA:
To start the Linux VDA services:
sudo systemctl start ctxhdx.service

sudo systemctl start ctxvda.service
<!--NeedCopy-->
Stop the Linux VDA:
To stop the Linux VDA services:
sudo systemctl stop ctxvda.service

sudo systemctl stop ctxhdx.service
<!--NeedCopy-->
Note:
Before you stop the ctxvda and ctxhdx services, run the systemctl stop ctxmonitord command to stop the monitor service daemon. Otherwise, the monitor service daemon restarts the services you stopped.
Restart the Linux VDA:
To restart the Linux VDA services:
sudo systemctl stop ctxvda.service

sudo systemctl restart ctxhdx.service

sudo systemctl start ctxvda.service
<!--NeedCopy-->
Check the status of the Linux VDA:
To check the running status of the Linux VDA services:
sudo systemctl status ctxvda.service

sudo systemctl status ctxhdx.service
<!--NeedCopy-->
Step 12: Create delivery groups
The process for creating a delivery group and adding machine catalogs containing Linux VDA machines is almost identical to Windows VDA machines. For a more detailed description of how to complete these tasks, see Create delivery groups.
For creating delivery groups that contain Linux VDA machine catalogs, the following restrictions apply:
- Ensure that the AD users and groups that you select have been properly configured to log on to the Linux VDA machines.
- Do not allow logon of unauthenticated (anonymous) users.
- Do not mix the delivery group with machine catalogs that contain Windows machines.
Important:
Publishing applications is supported with Linux VDA Version 1.4 and later. However, the Linux VDA does not support the delivery of desktops and apps to the same machine.
For information about how to create machine catalogs and delivery groups, see Citrix Virtual Apps and Desktops 7 2503.
Step 13: Enable local account mapping
What if local account mapping is not enabled
Sessions hosted on non-domain-joined VDAs fail at logon, displaying a password prompt but not accepting the correct password. Errors similar to the following can be found in the hdx.log:
2024-09-25 06:40:30.767979 [LOGIN_BOX:ERROR] <P124211:T58675:S4> citrix-ctxlogin: PamAuthenticate: pam authentication: Authentication failure. Can retry for user 'user3'
2024-09-25 06:40:30.768431 [LOGIN:ERROR] <P124211:T58675:S4> citrix-ctxlogin: LoginBoxValidate: Failed to validate user 'user3'. Due to INVALID_PASSWORD
2024-09-25 06:40:30.768947 [LOGIN_AUTH:INFO] <P124218:T58682:S4> citrix-ctxloginui: CalLabelFormat: Update username label on LoginUI from 'user3' to 'user3' (18)
2024-09-25 06:41:18.766196 [GFX_SLIDER:ERROR] <P124161:T58699:S4> citrix-ctxgfx: GfxCreateSliderListener: Failed to get user home dir.
<!--NeedCopy-->
Enable local account mapping
To ensure that users can log on to a non-domain-joined Linux VDA, enable local account mapping using the following command:
Set-BrokerDesktopGroup -Name "<your delivery group name>" -MachineLogOnType LocalMappedAccount
<!--NeedCopy-->
For an on-premises deployment, run the command on the Delivery Controller directly. For a Citrix DaaS deployment, run the command through the Citrix Virtual Apps and Desktops Remote PowerShell SDK.
In this article
- Step 1: Create an empty machine catalog
- Step 2: Create an enrollment token
- Step 3: Install .NET
- Step 4: Add self-signed CA certificates
- Step 5: Download the Linux VDA package
- Step 6: Install the Linux VDA package
- Step 7: Install NVIDIA GRID drivers
- Step 8: Specify a database to use
- Step 9: Run the easy install to configure the environment and VDA to complete the installation
- Step 10: Run XDPing
- Step 11: Run the Linux VDA
- Step 12: Create delivery groups
- Step 13: Enable local account mapping