-
-
Enable support for Azure AD joined and non-domain-joined VDA machines
-
Enable credential-based access to user stores
-
Configure the Customer Experience Improvement Program (CEIP)
-
Enable asynchronous processing for user Group Policy on logon
This content has been machine translated dynamically.
Dieser Inhalt ist eine maschinelle Übersetzung, die dynamisch erstellt wurde. (Haftungsausschluss)
Cet article a été traduit automatiquement de manière dynamique. (Clause de non responsabilité)
Este artículo lo ha traducido una máquina de forma dinámica. (Aviso legal)
此内容已经过机器动态翻译。 放弃
このコンテンツは動的に機械翻訳されています。免責事項
이 콘텐츠는 동적으로 기계 번역되었습니다. 책임 부인
Este texto foi traduzido automaticamente. (Aviso legal)
Questo contenuto è stato tradotto dinamicamente con traduzione automatica.(Esclusione di responsabilità))
This article has been machine translated.
Dieser Artikel wurde maschinell übersetzt. (Haftungsausschluss)
Ce article a été traduit automatiquement. (Clause de non responsabilité)
Este artículo ha sido traducido automáticamente. (Aviso legal)
この記事は機械翻訳されています.免責事項
이 기사는 기계 번역되었습니다.책임 부인
Este artigo foi traduzido automaticamente.(Aviso legal)
这篇文章已经过机器翻译.放弃
Questo articolo è stato tradotto automaticamente.(Esclusione di responsabilità))
Translation failed!
Enable credential-based access to user stores
By default, Citrix Profile Management impersonates the current user to access the user store. This behavior requires the current user to have permission to directly access the user store. By contrast, the Enable credential-based access to user stores policy lets Profile Management access the user store using the store’s own credentials.
This policy gives you more flexibility in deploying and accessing the user store. For example, this policy lets you deploy the user store on a file share that the current user doesn’t have permission to access, such as Azure Files. Or, you can enable this policy if you don’t want Profile Management to impersonate the current user when accessing user stores.
Note:
Profile Management provides two types of profile solutions, and the user store can serve as the storage location for both of them:
- File-based solution. User profiles are fetched from the remote user store to the local computer on logon and written back on logoff.
- Container-based solution. User profiles are stored in VHDX files (known as profile containers). Those VHDX files are attached on logon and detached on logoff.
This policy is available both for the file-based and container-based solutions. For Profile Management versions earlier than 2212, this policy is available only for the container-based solution.
For more information about creating secure user stores, see Create a file share for roaming user profiles on the Microsoft TechNet website.
To let Profile Management access the user store by using the store’s own credentials, you must perform both of the following actions:
- Enable the Enable credential-based access to user stores policy on each machine where Profile Management runs.
- Add the store’s credentials to those machines.
You can use one of the following ways to achieve that goal: Workspace Environment Management™ (WEM) service and GPOs.
Note:
With the container-based solution enabled, NTFS permissions are retained for the user store.
Enable credential-based access using the WEM service
Using WEM eliminates the need to enter the same credentials for each machine where Profile Management runs. You enable the policy and enter the credentials for the user store only once in the WEM service console. The WEM service then applies these settings to each machine.
Detailed steps are as follows:
-
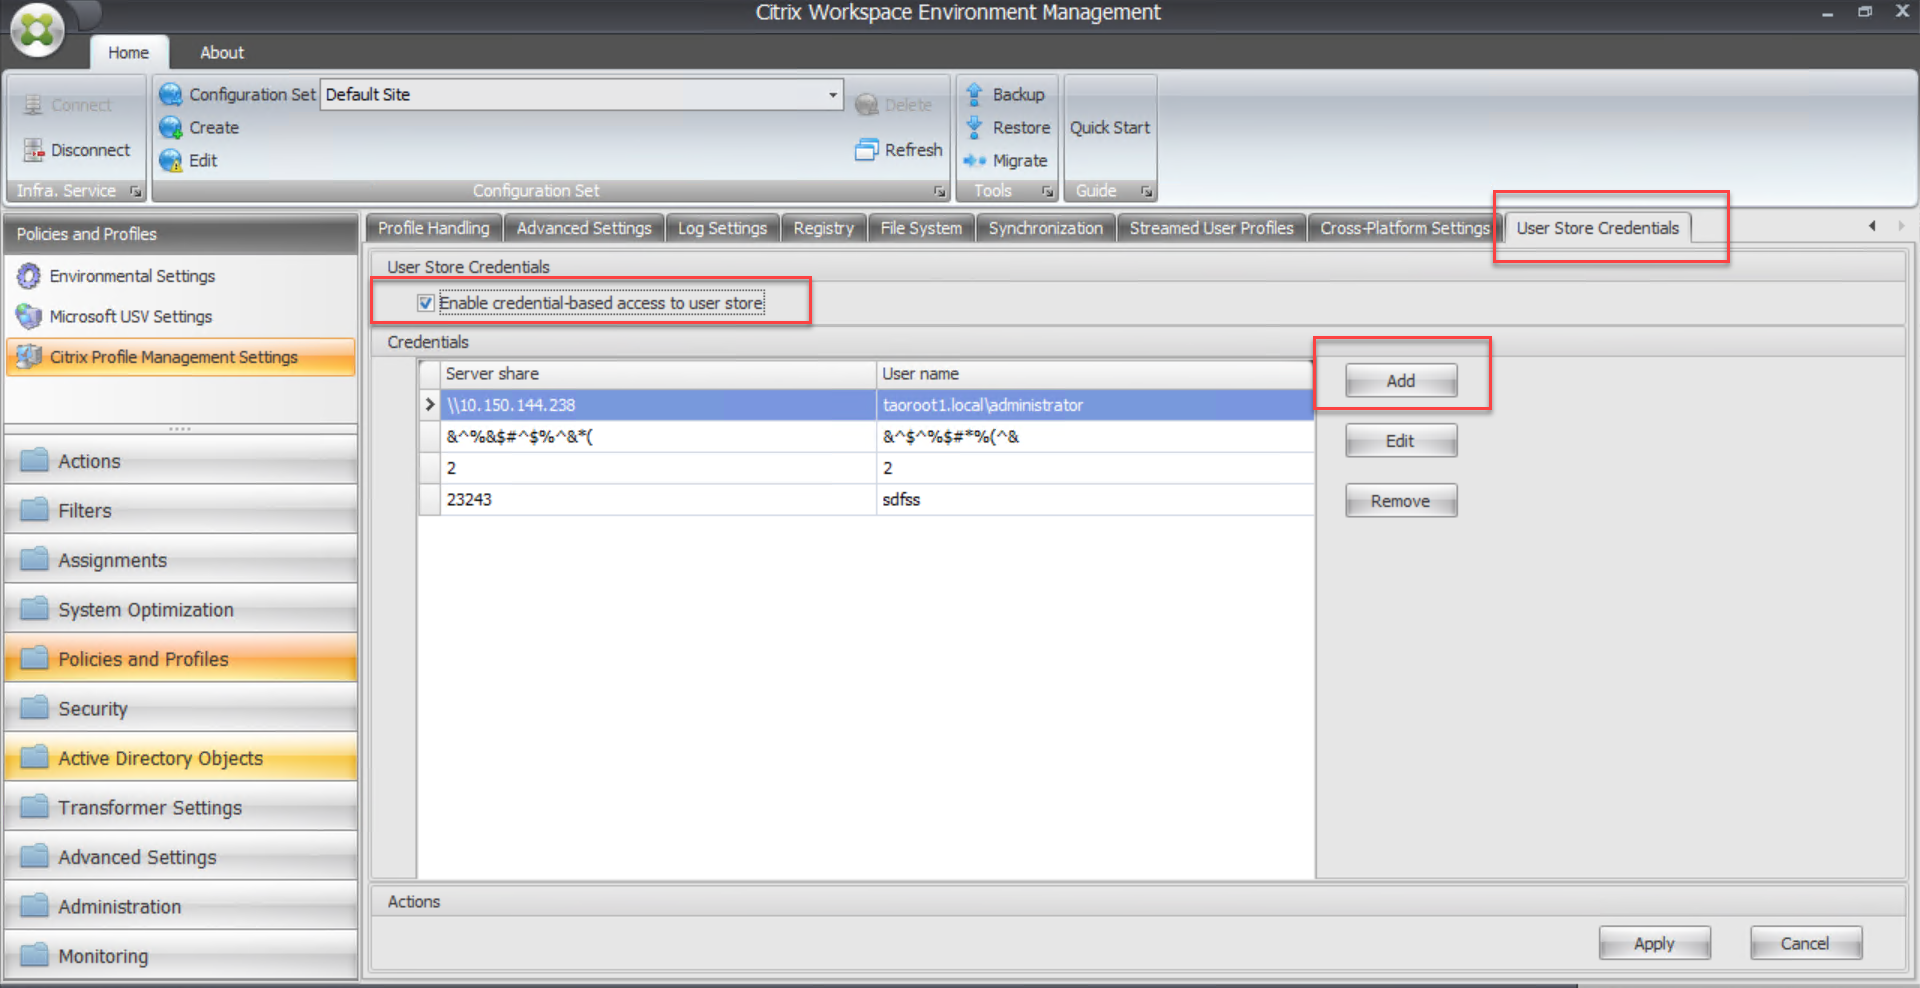
In the administration console, go to Policies and Profiles > Citrix Profile Management Settings > User Store Credentials.
-
On the User Store Credentials tab, select the Enable credential-based access to user store check box.

-
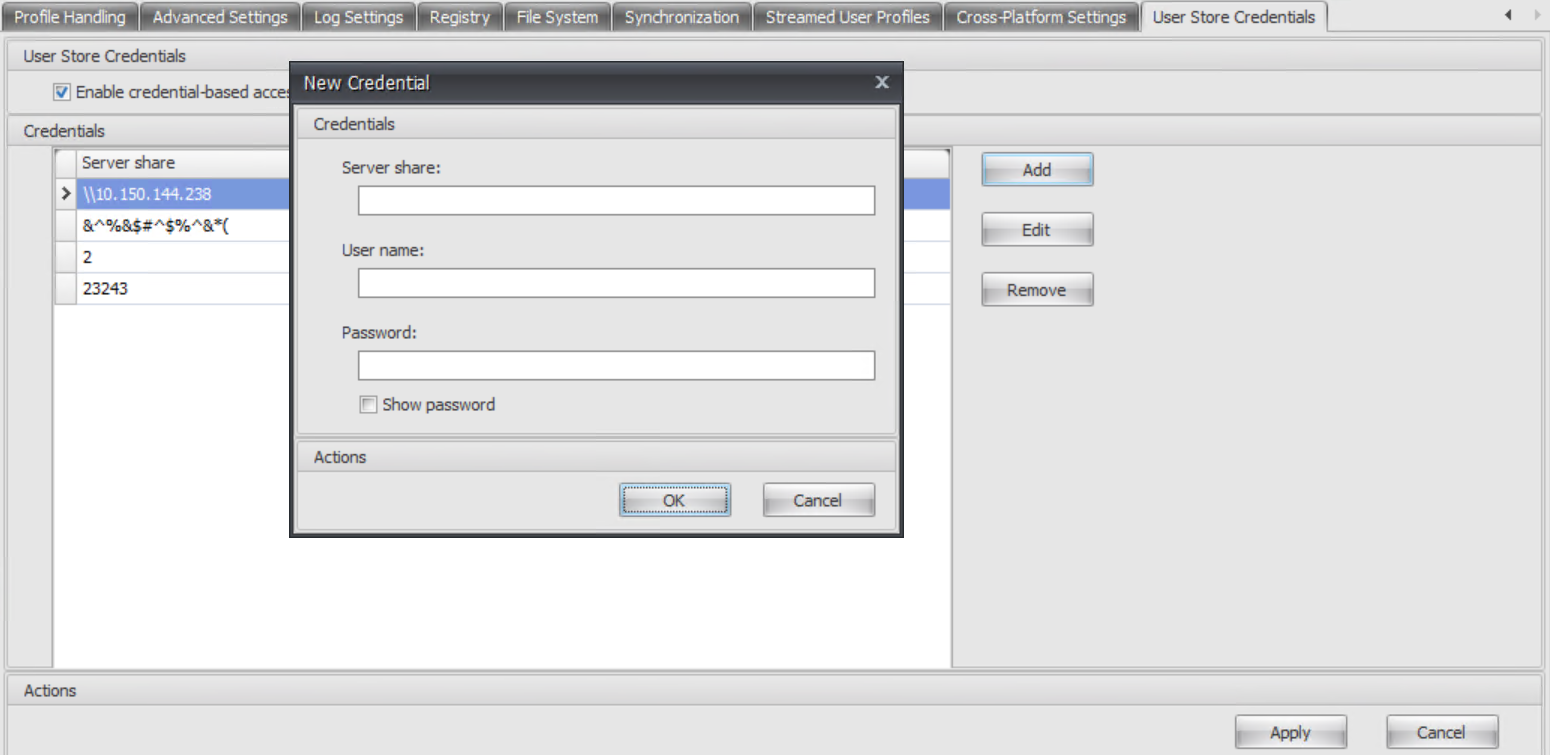
Click Add. The New Credential dialog box appears.

-
Type the FQDN or IP address of your profile storage server and its credentials.
-
Click OK.
Enable credential-based access using GPOs
When you choose to enable the policy using GPOs, you must manually add the credentials on each machine where Profile Management runs.
Enable the policy
Detailed steps are as follows:
- Open the Group Policy Management Editor.
- Access Policies > Administrative Templates: Policy definitions (ADMX files) > Citrix Components > Profile Management > Advanced settings, and then double-click Enable credential-based access to user stores.
- Select Enabled.
- Click OK.
Add the credentials to Windows Credential Manager
Profile Management uses the credentials saved on the machine to access the user store. Add the credentials for the user store to Windows Credential Manager on each machine where Profile Management runs. Detailed steps are as follows:
-
Download PsExec from the Sysinternals website and unzip files to
C:\PSTools. -
From the Start menu, right-click Command Prompt and select Run as administrator. A command shell starts.
-
Run the
C:\PSTools\PsExec -s -i cmdcommand. Another command shell starts.Note:
The
-sparameter indicates you’re running the tool using the Local System account. As a result, the credentials can be securely saved. -
In the new command shell, run the
rundll32.exe keymgr.dll, KRShowKeyMgrcommand. The Stored User Names and Passwords dialog box appears. -
In the Stored User Names and Passwords dialog box, click Add.
-
Type the FQDN or IP address of your profile storage server and its credentials, leave the default credential type as is, and then click OK.
Share
Share
This Preview product documentation is Citrix Confidential.
You agree to hold this documentation confidential pursuant to the terms of your Citrix Beta/Tech Preview Agreement.
The development, release and timing of any features or functionality described in the Preview documentation remains at our sole discretion and are subject to change without notice or consultation.
The documentation is for informational purposes only and is not a commitment, promise or legal obligation to deliver any material, code or functionality and should not be relied upon in making Citrix product purchase decisions.
If you do not agree, select I DO NOT AGREE to exit.