Import a Citrix Gateway
Remote access settings configured within the Citrix Gateway administration console have to be identical to those configured in StoreFront. This article shows you how to import details of a Citrix Gateway virtual server so that Citrix Gateway and StoreFront are configured correctly to work together.
Requirements
- NetScaler 11.1.51.21 or later is required to export multiple gateway vServers to a ZIP file.
Note:
Citrix Gateways can only export gateway vServers created using the Citrix Virtual Apps and Desktops™ wizard.
- It must be possible for DNS to resolve, and for StoreFront to contact, all STA (Secure Ticket Authority) server URLs in the GatewayConfig.json file within the ZIP file generated by the Citrix Gateway.
- The GatewayConfig.json file within the ZIP file generated by the Citrix Gateway must contain the URL of an existing Citrix Receiver for Web site on the StoreFront server. Citrix Gateway 11.1 and later takes care of this by contacting the StoreFront server and enumerating all existing stores and websites before generating the ZIP file for export.
-
StoreFront must be able to resolve the callback URL in DNS to the gateway VPN vServer IP address for authentication using the imported gateway to succeed.
The callback URL and port combination you use is usually the same as the gateway URL and port combination, as long as StoreFront can resolve this URL.
or
The callback URL and port combination may be different from the gateway URL and port combination if you use different external and internal DNS namespaces in your environment. If your gateway is located in a DMZ and uses an
<example.com>URL and StoreFront is on your private corporate network and uses an<example.local>URL you may use an<example.local>callback URL to point back to the gateway vServer in the DMZ.
Export configuration from Citrix Gateway
-
Log onto the Citrix Gateway.
-
Go to the Configuration tab
-
Under “Integrate with Citrix Products”, click XenApp and XenDesktop®
-
On the top right click “Download file”.
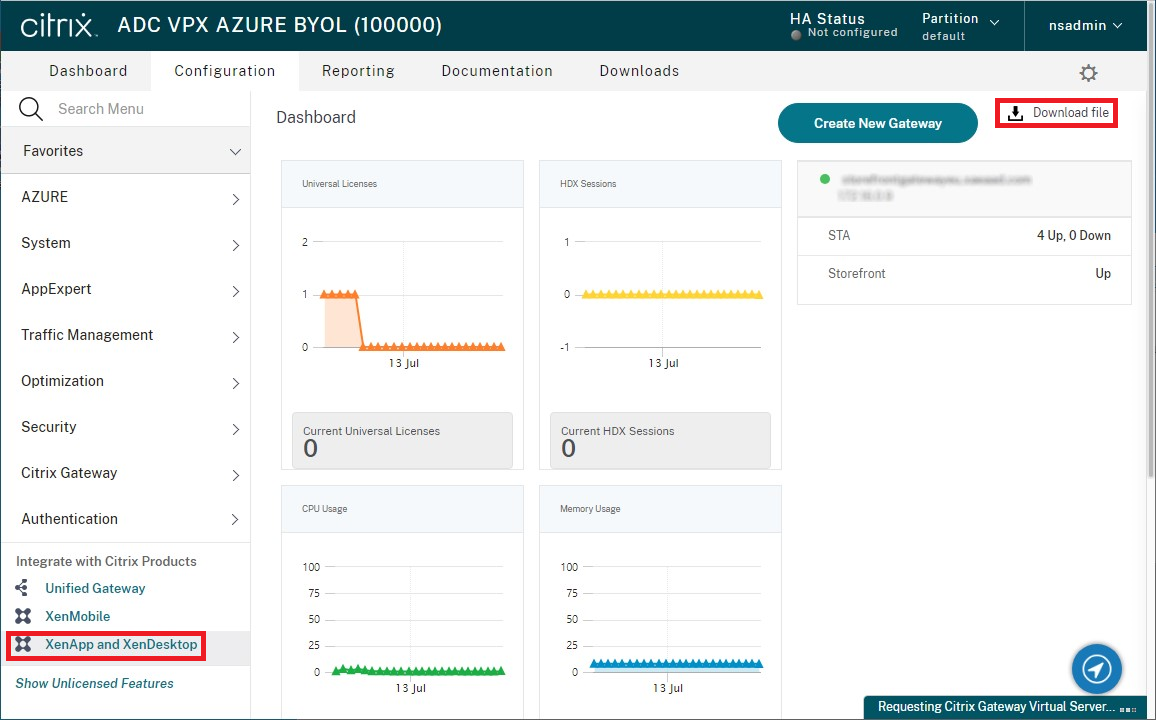
- Choose whether you wish to download the configuration for all gateways or a specific gateway.
Import a Citrix Gateway using the console
You can import one or more Citrix Gateway virtual server configurations using the same import file. If you have multiple gateway virtual servers from different Citrix Gateway, you must use multiple import files.
Important:
Citrix does not support manual editing of the configuration file exported from Citrix Gateway.
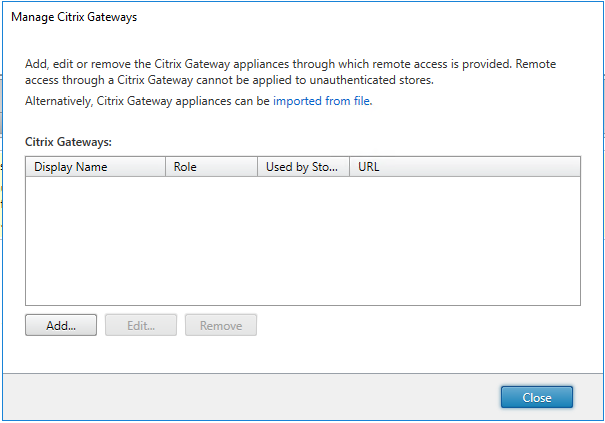
- Select Stores in the left pane of the Citrix StoreFront management console, and in the Actions pane, click Manage Citrix Gateways.
-
On the Manage Citrix Gateways screen, click the imported from file link.
-
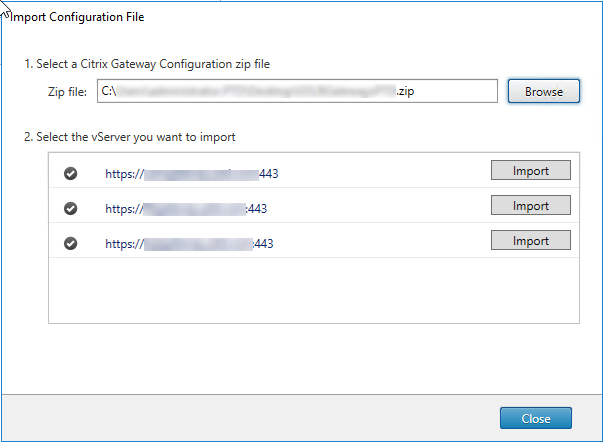
Browse to the Citrix Gateway virtual server configuration file.
-
A list of gateway vServers from the selected ZIP file is displayed. Select the gateway vServer you want to import and click Import. If you are repeating an import of a vServer, the Import button displays as Update. If you choose Update, you have the option later to overwrite or create a new gateway.
-
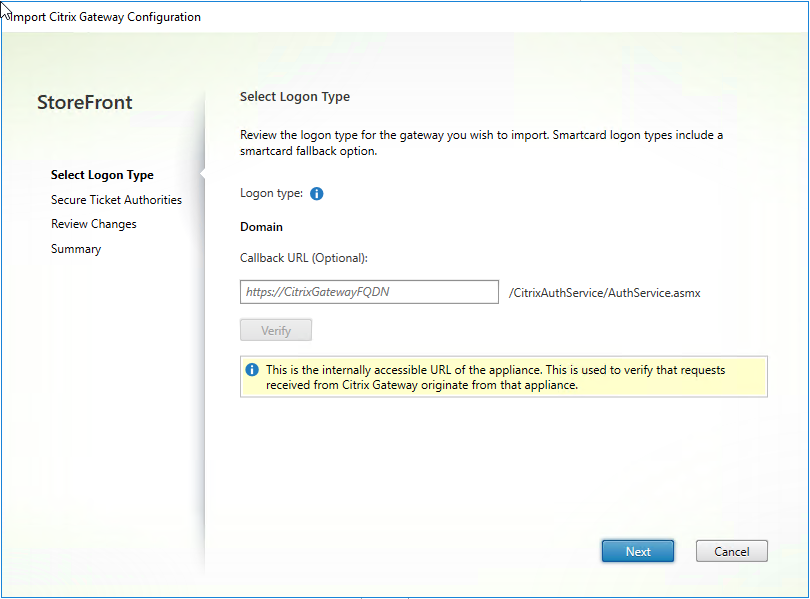
Review the Logon type for the selected gateway and specify a Callback URL if required. The logon type is the authentication method that you configured on the Citrix Gateway for Citrix Workspace app users. Some logon types require callback URLs (see table).
- Click Verify to check that the Callback URL is valid and reachable from the StoreFront server.
Logon type in console LogonType in JSON file Callback URL required Domain Domain No Domain and security token DomainAndRSA No Security token RSA Yes Smart card - no fallback SmartCard Yes Smart card - domain SmartCardDomain Yes Smart card - domain and security token SmartCardDomainAndRSA Yes Smart card - security token SmartCardRSA Yes Smart card - SMS authentication SmartCardSMS Yes SMS authentication SMS Yes If a callback URL is required, StoreFront will autofill Callback URL based on the gateway URL found in the ZIP file. You can change this to any valid URL that points back to the correct Citrix Gateway VIP. For GSLB gateways, unique callback URLs are required for each of the gateways you import.
To use Smart Access or password-less authentication, a Callback URL is required.
-
Click Next.
-
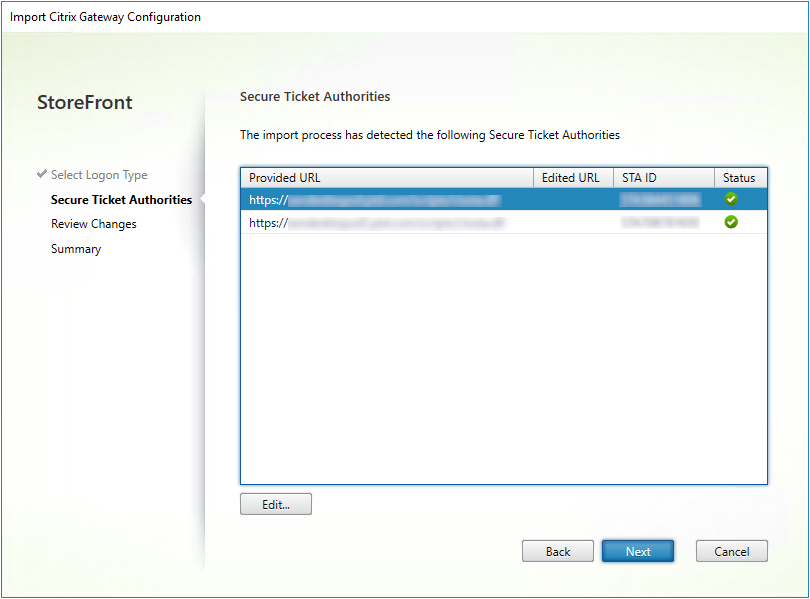
StoreFront contacts all the STA (Secure Ticket Authorities) server URLs listed in the ZIP file using DNS, and validates that they are functional STA ticketing servers. The import will not continue if one or more of the STA URLs is invalid.
-
Click Next.
-
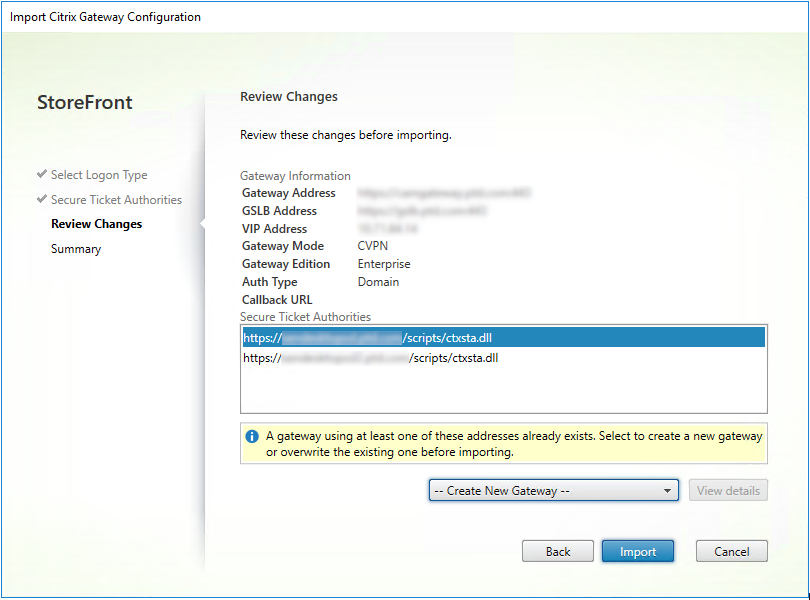
Review the details of the import. If a gateway with the same gateway URL and port combination (GatewayURL:port) already exists, use the drop-down to select a gateway to overwrite it, or create a new gateway.
StoreFront uses the GatewayURL:port combination to determine whether a gateway you are trying to import matches an existing gateway that you may wish to update. If a gateway has a different GatewayURL:port combination then StoreFront treats it as a new gateway. This table of gateway settings shows which settings you can update.
Gateway Setting Can be updated Gateway URL:Port Combination No GSLB URL Yes Netscaler® Trust Certificate & Thumbprint Yes Callback URL Yes Receiver for Web Site URL Yes Gateway Address/VIP Yes STA URL and STA ID Yes All Logon Types Yes -
Click Import. If the StoreFront server is part of a server group, a message is displayed reminding you to propagate the imported gateway settings to the other servers in the group.
- Click Finish.
To import another vServer configuration, repeat the steps above.
Note:
The default gateway for a store is the gateway that Citrix Workspace™ apps try to connect through unless they are configured to use a different gateway. If no gateways are configured for the store, the first gateway imported from the ZIP file will become the default gateway used by Citrix Workspace apps. Importing subsequent gateways does not change the default gateway already set for the store.
Import multiple Citrix Gateways using PowerShell
Read-STFNetScalerConfiguration
- Copy the ZIP file to the desktop of the currently logged on StoreFront administrator.
- Read the contents of the Citrix Gateway virtual server configuration file ZIP file into memory and look at the three gateways it contains using their index values.
$ImportedGateways = Read-STFNetScalerConfiguration -path "$env:USERPROFILE\desktop\GatewayConfig.zip"
<!--NeedCopy-->
View the three gateway objects in memory which were read in from the Netscaler ZIP import package using the Read-STFNetScalerConfiguration cmdlet.
$ImportedGateways.Document.Gateways[0]
$ImportedGateways.Document.Gateways[1]
$ImportedGateways.Document.Gateways[2]

GatewayMode            : CVPN
CallbackUrl            :
GslbAddressUri         : https://gslb.example.com/
AddressUri             : https://emeagateway.example.com/
Address                : https://emeagateway.example.com:443
GslbAddress            : https://gslb.example.com:443
VipAddress             : 10.0.0.1
Stas                   : {STA298854503, STA909374257}
StaLoadBalance         : True
CertificateThumbprints : {F549AFAA29EBF61E8709F2316B3981AD503AF387}
GatewayAuthType        : Domain
GatewayEdition         : Enterprise
ReceiverForWebSites    : {Citrix.StoreFront.Model.Roaming.NetScalerConfiguration.ReceiverForWebSite}

GatewayMode            : CVPN
CallbackUrl            :
GslbAddressUri         : https://gslb.example.com/
AddressUri             : https://emeagateway.example.com/
Address                : https://emeagateway.example.com:444
GslbAddress            : https://gslb.example.com:443
VipAddress             : 10.0.0.2
Stas                   : {STA298854503, STA909374257}
StaLoadBalance         : True
CertificateThumbprints : {F549AFAA29EBF61E8709F2316B3981AD503AF387}
GatewayAuthType        : DomainAndRSA
GatewayEdition         : Enterprise
ReceiverForWebSites    : {Citrix.StoreFront.Model.Roaming.NetScalerConfiguration.ReceiverForWebSite}

GatewayMode            : CVPN
CallbackUrl            : https://emeagateway.example.com:445
GslbAddressUri         : https://gslb.example.com/
AddressUri             : https://emeagateway.example.com/
Address                : https://emeagateway.example.com:445
GslbAddress            : https://gslb.example.com:443
VipAddress             : 10.0.0.2
Stas                   : {STA298854503, STA909374257}
StaLoadBalance         : True
CertificateThumbprints : {F549AFAA29EBF61E8709F2316B3981AD503AF387}
GatewayAuthType        :SmartCard
GatewayEdition         : Enterprise
ReceiverForWebSites    : {Citrix.StoreFront.Model.Roaming.NetScalerConfiguration.ReceiverForWebSite}
<!--NeedCopy-->
Import-STFNetScalerConfiguration without specifying a CallbackURL
Copy the ZIP file to the desktop of the currently logged in StoreFront administrator. Read in the Citrix Gateway configuration ZIP import package into memory and look at the three gateways it contains using their index values.
$ImportedGateways = Read-STFNetScalerConfiguration -path "$env:USERPROFILE\desktop\GatewayConfig.zip"
<!--NeedCopy-->
Import three new gateways into StoreFront using the Import-STFNetScalerConfiguration cmdlet and specifying the gateway indexes you require. Using the -Confirm:$False parameter prevents the PowerShell GUI from prompting you to allow every gateway to be imported. Remove this if you wish to carefully import one gateway at a time.
Import-STFNetScalerConfiguration -Configuration $ImportedGateways -GatewayIndex 0 -Confirm:$False
Import-STFNetScalerConfiguration -Configuration $ImportedGateways -GatewayIndex 1 -Confirm:$False
Import-STFNetScalerConfiguration -Configuration $ImportedGateways -GatewayIndex 2 -Confirm:$False
<!--NeedCopy-->
Import-STFNetScalerConfiguration specifying your own CallbackURL
Import three new gateways into StoreFront using the Import-STFNetScalerConfiguration cmdlet and specify a callback URL of your choice using the -callbackURL parameter.
$ImportedGateways = Read-STFNetScalerConfiguration -path "$env:USERPROFILE\desktop\GatewayConfig.zip"

Import-STFNetScalerConfiguration -Configuration $ImportedGateways -GatewayIndex 0 -CallbackUrl "https://emeagatewaycb.example.com:443 -Confirm:$False

Import-STFNetScalerConfiguration -Configuration $ImportedGateways -GatewayIndex 1 -CallbackUrl "https://emeagatewaycb.example.com:444 -Confirm:$False

Import-STFNetScalerConfiguration -Configuration $ImportedGateways -GatewayIndex 2 -CallbackUrl "https://emeagatewaycb.example.com:445 -Confirm:$False
<!--NeedCopy-->
Import-STFNetScalerConfiguration override the authentication method stored in the import file and specify your own CallbackURL
Import three new gateways into StoreFront using the Import-STFNetScalerConfiguration cmdlet and specify a callback URL of your choice using the -callbackURL parameter.
$ImportedGateways = Read-STFNetScalerConfiguration -path "$env:USERPROFILE\desktop\GatewayConfig.zip"

Import-STFNetScalerConfiguration -Configuration $ImportedGateways -GatewayIndex 0 -LogonType "SmartCard" -CallbackUrl "https://emeagatewaycb.example.com:443" -Confirm:$False

Import-STFNetScalerConfiguration -Configuration $ImportedGateways -GatewayIndex 1 -LogonType "SmartCard" -CallbackUrl "https://emeagatewaycb.example.com:444" -Confirm:$False

Import-STFNetScalerConfiguration -Configuration $ImportedGateways -GatewayIndex 2 -LogonType "SmartCard" -CallbackUrl "https://emeagatewaycb.example.com:445" -Confirm:$False
<!--NeedCopy-->