Actions
In Workspace Environment Management™ (WEM), actions are crucial for customizing user environments. They define the configurations and resources applied to users or machines. Using actions can improve logon performance and simplify environment management.
You apply actions to users or machines through assignments and refine them with filters to target specific scenarios. Actions are organized into configuration sets—logical containers that group related settings based on your use cases.
Group Policy settings
Group Policy provides centralized management of user and computer settings on Windows. WEM extends this capability by supporting a wide range of policy configurations and allowing you to migrate existing Group Policy settings from Microsoft Active Directory. Processing Group Policy through WEM can help reduce logon times in Citrix® environments.
You can process Group Policy settings in two ways:
-
Registry-based settings processing
You can configure settings directly by specifying their registry locations. This method is fast and flexible.
-
Template-based settings processing
You can configure settings using Administrative Templates (ADM or ADMX files). This method provides structured configuration management.
Important:
WEM currently supports managing Group Policy settings associated with the
HKEY_LOCAL_MACHINEand theHKEY_CURRENT_USERregistry hives. To configure Group Policy preferences such as environment variables, go to the corresponding objects in the Actions section.
Before you begin
To enable Group Policy settings processing for a configuration set, go to Actions > Group Policy settings and turn on Process GPOs.
-
When the Process GPOs is enabled, the WEM agent can process Group Policy settings.
-
When the Process GPOs is disabled, the WEM agent does not process Group Policy settings even if they are already assigned to users or user groups.
Manage registry-based settings
Use the Registry-based tab to configure settings for Windows by configuring registry operations.
In Actions > Group Policy settings > Registry-based under a configuration set, you can perform the following operations:
-
Create GPO: Create a registry-based Group Policy object (GPO).
- Import: Import registry-based Group Policy settings into WEM.
- Refresh: Update the GPO list.
- View: Display the details of a GPO.
- Edit: Modify a selected GPO.
- Manage assignments: Manage assignments for a GPO.
- Clone: Clone a GPO.
- Delete: Delect a GPO.
Warning:
Editing, adding, and deleting registry-based settings incorrectly can prevent the settings from taking effect in the user environment.
Import Group Policy settings
You can use the Import function to migrate configurations from your existing Group Policy infrastructure. You can import settings from a GPO backup or directly from exported registry files.
Before importing settings from registry files, be aware of the following:
-
When importing settings, you can upload only .zip files into the WEM console. The .zip file can contain one or more registry files.
-
Each .reg file will be converted into a GPO. You can treat each converted GPO as a set of registry settings.
-
The name of each converted GPO is generated based on the name of the corresponding .reg file. Example: If the name of the .reg file is
test1.reg, the name of the converted GPO istest1. -
The feature supports converting delete operations associated with registry keys and values that you define in .reg files. For information about deleting registry keys and values by using a .reg file, see https://support.microsoft.com/en-us/topic/how-to-add-modify-or-delete-registry-subkeys-and-values-by-using-a-reg-file-9c7f37cf-a5e9-e1cd-c4fa-2a26218a1a23.
-
Descriptions of converted GPOs are empty by default.
To import your Group Policy settings, complete the following steps:
-
In the action bar, click Import.
-
Select the file type.
-
GPO backup file. Select this option if you want to import settings from GPO backup files. For information on how to back up Group Policy settings, see Back up Group Policy settings.
-
Exported registry file. Select this option if you want to import settings from registry files you export using the Windows Registry Editor.
-
-
Click Browse to navigate to your zip file.
Note:
You can upload only files whose size doesn’t exceed 20 MB.
-
Choose whether to overwrite existing GPOs with the same name.
-
Click Import to start the import process.
After the import completes successfully, imported GPOs appear on the Registry-based tab.
Create a GPO
To create a GPO, complete the following steps:
-
In the action bar, click Create GPO.
-
Specify a name for the GPO.
-
Optionally, specify additional information to help you identify the GPO.
-
Click Add to add registry operations. The following settings become available:
-
Action. Lets you specify the type of action for the registry key.
- Set value. Lets you set a value for the registry key.
- Delete value. Lets you delete a value for the registry key.
- Create key. Lets you create the key as specified by the combination of the root key and the subpath.
- Delete key. Lets you delete a key under the registry key.
- Delete all values. Lets you delete all values under the registry key.
-
Root Key. Supported values:
HKEY_LOCAL_MACHINEandHKEY_CURRENT_USER. -
Subpath. The full path of the registry key without the root key. For example, if
HKEY_LOCAL_MACHINE\Software\Microsoft\Windowsis the full path of the registry key,Software\Microsoft\Windowsis the subpath. -
Name. Lets you specify a name for the registry value. The highlighted item in the following diagram as a whole is a registry value. Leaving the Name field blank sets it as the default value for that key.

-
Type. Lets you specify the data type for the value.
- REG_SZ. This type is a standard string used to represent human readable text values.
- REG_EXPAND_SZ. This type is an expandable data string that contains a variable to be replaced when called by an application. For example, for the following value, the string “%SystemRoot%” will be replaced by the actual location of the folder in an operating system.
- REG_BINARY. Binary data in any form.’’
- REG_DWORD. A 32-bit number. This type is commonly used for Boolean values. For example, “0” means disabled and “1” means enabled.
- REG_DWORD_LITTLE_ENDIAN. A 32-bit number in little-endian format.
- REG_QWORD. A 64-bit number.
- REG_QWORD_LITTLE_ENDIAN. A 64-bit number in little-endian format.
- REG_MULTI_SZ. This type is a multistring used to represent values that contain lists or multiple values. Each entry is separated by a null character.
- REG_NONE. Lets you configure registry values that do not fit into predefined data type categories.
-
Data. Lets you type data corresponding to the registry value. For different data types, you might need to type different data in different formats.
-
-
After you finish, click:
- Done. This action completes the GPO creation.
- Save and Assign. This action completes the GPO creation and opens the Assignment page, where you can continue to assign the created GPO.
View a GPO
You can view the WEM Group Policy settings and GPO summaries in read-only mode without editing the GPO. This implementation eliminates the risk of misconfiguration while reviewing the existing settings
To view a GPO, complete the following steps:
-
Select the GPO and then click View in the action bar.
-
View the name, description, registry operations.
-
After you finish, click Close.
Edit a GPO
To edit a GPO, complete the following steps:
-
Select the GPO and then click Edit in the action bar.
-
Edit the name and description. When you create or update a registry key value, leaving the Name field blank sets it as the default value for that key.
-
Do the following as needed:
-
Click Add to add a registry operation.
-
Select a registry operation and then edit it.
-
Delete a registry operation and then delete it.
-
Move a registry operation down or up. Alternatively, select a registry operation, click the six-dot icon, and then drag it to the desired position.
-
-
After you finish, click Done.
Note:
If a GPO is already assigned to users, editing it will impact those users.
Manage assignments for a GPO
You can assign a GPO to users, Active Directory (AD) groups, or organizational units (OUs). An AD group or OU can contain both users and machines.
-
Machine-level settings apply when the computer belongs to the assigned group or OU.
-
User-level settings apply when the signed-in user belongs to the assigned group or OU.
Tip:
For machine-level settings to take effect immediately, restart the Citrix WEM Agent Host Service. For user-level settings to take effect immediately, users must log off and log back on.
To manage assignment for a GPO, complete the following steps:
-
After creating a GPO, click the Save and Assign button to complete the creation and continue with the following steps.
-
Select the GPO and then click Manage assignments in the action bar.
-
Select assignment targets (users, groups, and OUs) to assign the GPO to.
Note:
When assigning GPOs to machines, make sure that the machines reside either in OUs or in relevant security groups.
- To add a new target, click Add new target. For more information, see Add an assignment target.
-
Use filters to contextualize the assignment and then set the priority of the GPO for each target.
Tip:
For information about adding filters, see Filters. Group Policy settings comprise user and machine settings. Some filter conditions apply only to user settings. If you apply those conditions to machine settings, the WEM agent skips them when evaluating the filter before assigning the settings. For a complete list of conditions that do not apply to machine settings, see Conditions not applicable to machine settings.
-
Click the ellipsis icon on each tile and do the following as needed:
-
Copy configuration. Lets you copy the configuration of the assignment.
-
Paste configuration. Lets you paste the configuration you copied from other configuration.
-
Apply this configuration to all targets. Lets you apply the configuration of the assignment to all targets.
-
-
After you finish, click Save.
Clone a GPO
To clone a GPO, complete the following steps:
-
Select the GPO and then click Clone in the action bar.
-
Edit the name and description.
-
Select the configuration set you want to clone the GPO to.
-
Click Clone to start the clone process.
Delete a GPO
To delete a GPO, select it and then click Delete in the action bar.
Note:
If a GPO is already assigned to users, deleting it will impact those users.
Manage template-based settings
Use the Template-based tab to configure settings for Windows by using Group Policy Administrative Templates. You can configure GPOs at a machine and user level.
In Actions > Group Policy Settings > Template-based under a configuration set, you can perform the following operations:
- Create a GPO with a template: Create a template-based Group Policy object (GPO).
- Manage templates: Manage Administrative Templates.
- Import templates: Import custom Administrative Templates into WEM.
- Refresh: Update the GPO list.
- Edit: Update a GPO.
- View: Update a GPO.
- Clone: Clone a GPO.
- Delete: Delete a GPO.
Create a GPO with a template
To create a GPO with a template, complete the following steps:
-
In the action bar, click Create GPO.
-
In Basic information:
- Specify a name for the GPO.
- Optionally, specify additional information to help you identify the GPO.
-
In Computer configuration, configure policies that you want to apply to machines (regardless of who logs on to them).
-
In User configuration, configure policies that you want to apply to users (regardless of which machine they log on to).
-
In Summary, review the changes you made.
-
After you finish, click Done.
In Computer configuration and User configuration, select a setting to configure it. You can show policies in tree view and list view. In the list view, policies are sorted alphabetically, and you can search for desired policies.
To configure a setting, you first enable it. A setting might have multiple items that can be configured. Depending on the type of input needed, the setting can be a checkbox, input box (text or number as input), selection, list, or a combination.
For information about the settings, download a GPO reference sheet from Microsoft.
Manage templates
To manage templates, complete the following steps:
-
In the action bar, click Manage template.
-
In the Manage template wizard:
- Select Computer configuration to configure policies that you want to apply to machines (regardless of who logs on to them).
- Select User configuration to configure policies that you want to apply to users (regardless of which machine they log on to).
- After you finish, click Done.
In Computer configuration and User configuration, select a setting to configure it. You can show policies in tree view and list view. In the list view, policies are sorted alphabetically, and you can search for desired policies.
To configure a setting, you first enable it. A setting might have multiple items that can be configured. Depending on the type of input needed, the setting can be a checkbox, input box (text or number as input), selection, list, or a combination.
For information about the settings, download a GPO reference sheet from Microsoft.
Import templates
Important:
When importing ADMX files to WEM for use as templates, ensure that all .adml files in the zip file are of the same language.
You can import ADMX files to WEM for use as templates. You then create GPOs with those templates. To import templates, complete the following steps:
-
In the action bar, click Manage template.
-
In the Manage template wizard, click Import.
-
Browse to the zip file that contains your ADMX files and decide what to do if the file contains a template with the same name as an existing template:
- Do not import. Cancels the import.
- Skip the template and import the rest.
- Overwrite the existing template. Overwriting might change associated settings originating from existing templates. Existing GPOs created with the templates are not affected. However, when you edit those GPOs, associated settings are lost.
-
Click Start import to start the import process.
-
After you finish, click Done to return to the Manage template wizard.
-
Manage templates there or click Done to exit.
For information on how to manage your imported template files, see Files. When managing them there, consider the following:
- Deleting GPO administrative template files will remove the associated settings from your current template. Existing GPOs created with the templates are not affected. However, when you edit those GPOs, associated settings are lost.
View a GPO
You can view the WEM Group Policy settings and GPO summaries in read-only mode without editing the GPO. This implementation eliminates the risk of misconfiguration while reviewing the existing settings
To view a GPO, complete the following steps:
-
Select the GPO and then click View in the action bar.
-
View the name, description, and configurations.
-
After you finish, click Close.
Edit a GPO
To edit a GPO, complete the following steps:
-
Select the GPO and then click Edit in the action bar.
-
In Basic information, edit the name and description.
-
In Computer configuration, edit machine policies.
-
In User configuration, edit user policies.
-
In Summary, review the changes you made.
-
After you finish, click Save.
Note:
If a GPO is already assigned to users, editing it will impact those users.
Manage assignments for a GPO
You can manage assignments for GPOs created using templates, just like you do for registry-based GPOs. For more information, see Manage assignments for a GPO.
Clone a GPO
To clone a GPO, complete the following steps:
-
Select the GPO and then click Clone in the action bar.
-
Decide whether to clone the GPO as a registry-based GPO or a template-based GPO.
Note:
When cloned as registry-based, the GPO is converted to registry values and appears on the Registry-based tab. You can treat each converted GPO as a set of registry settings.
-
Edit the name and description.
-
Select the configuration set you want to clone the GPO to.
-
Click Clone to start the clone process.
Delete a GPO
To delete a GPO, select it and then click Delete in the action bar.
Note:
If a GPO is already assigned to users, deleting it will impact those users.
Applications
This feature lets you add applications to assign to your users. When assigned, those applications have their shortcuts created on the desktop, Start menu, or taskbar, depending on your configuration.
Tip:
You can use the Full Configuration management console of Citrix DaaS to edit the application settings and then add an executable file path that points to VUEMAppCmd.exe. VUEMAppCmd.exe ensures that the Workspace Environment Management agent finishes processing an environment before Citrix DaaS and Citrix Virtual Apps and Desktops published applications are started. For more information, see Editing application settings using the Full Configuration management interface.
You can perform the following operations:
- Add an application.
- Refresh the application list.
- Edit an application to manage its properties.
- View an application
- Manage assignments for an application.
- Clone an application.
- Delete an application.
- Switch to the Start menu view.
- Specify how the agent processes applications.
A general workflow to add and assign an application is as follows:
-
In the web console, go to the relevant configuration set, navigate to Actions > Applications, and click Add application. See Add an application.
-
Select the application you added and click Manage assignments in the action bar. See Manage assignments for an application.
The assignment takes some time to take effect, depending on the value you specified for SQL Settings Refresh Delay in Advanced Settings. For the assignment to take effect immediately, complete the following steps:
-
Go to Web Console > Monitoring > Administration > Agents > Statistics and select the agent.
-
Click More in the action bar and select Agent > Refresh agent host settings.
Important:
- For the agent to process actions, verify that the following settings are enabled:
- Launch agent on logon (for processing actions on logon)
- Launch agent on reconnection (for processing actions on reconnection)
- Enable desktop compatibility mode
- You can find these settings in Legacy Console > Advanced Settings > Configuration > Main Configuration > Agent Service Actions.
Add an application
To add an application, complete the following steps:
-
In Applications, click Add application.
-
On the Basic information page, configure the following settings:
- Name. Specify a name to help you identify the application.
- Description. Specify additional information about the application.
- State. Enable or disable the application or put it into maintenance mode. When in maintenance mode, the application is unavailable for use. Its shortcut icon contains a warning sign, indicating that it is unavailable.
-
Application type. Specify the type of application the shortcut opens. The user interface differs depending on your selection.
-
Installed application. Create a shortcut that opens an application installed on the user’s machine. If selected, prompts you to complete the following:
- Application path. Type the full path of the application that resides on the user’s machine.
- Working folder. Type the full path to a folder on the user’s machine as a working folder for the application. This field populates automatically after you type the full path in the Application path field.
- Parameters. Type launch parameters for the application if needed.
-
Installed application. Create a shortcut that opens an application installed on the user’s machine. If selected, prompts you to complete the following:
-
File or folder. Lets you create a shortcut that opens the target file or folder on the user’s machine when a user clicks the shortcut icon. If selected, prompts you to complete the following:
- Path. Type the full path to the target file or folder.
-
URL. Lets you add the URL of an application. If selected, prompts you to complete the following:
- Application URL. Type the URL of an application.
-
Citrix Workspace™ resource. Lets you add an application from Citrix Workspace. If selected, prompts you to complete the following:
- Store URL. Type the URL of a StoreFront™ or Workspace store that contains the resource you want to start from the application shortcut.
Note:
You can’t open SaaS apps or certain applications of the Citrix Workspace (Storefront) resource type on the agent machine.
- Resource. Use Citrix Environment Tool Hub > Application Assistant to browse to the target Workspace resource. Copy the resource information and paste it here by clicking Paste resource info. Click Open Application Assistant to open Citrix Environment Tool Hub (if installed). To download Citrix Environment Tool Hub, go to Citrix Cloud > WEM service > Utilities. For more information, see Citrix Environment Tool Hub.
-
On the Options page, configure the following settings:
-
Application icon. Click Change to select a different icon or add a new icon.
- To add a new icon, browse to an .ico file or paste the icon data copied from Citrix Environment Tool Hub > Application Assistant. WEM supports saving up to 100 icons. For more information, see Citrix Environment Tool Hub.
- Set icon location on user’s desktop. Specify the target location of the application shortcut on the user’s desktop. Values are in pixels. If moved, the shortcut reverts to the specified location on next logon.
- Display name. Specify the name of the shortcut. The name appears in the user environment.
-
Start menu integration. Click Change to specify where to create the application shortcut on the left side of the Start menu. By default, a new shortcut is created in Programs. In the Start menu integration window, you can do the following:
- Create a custom folder for the shortcut.
- Specify where the application shortcut resides in the Start menu folder.
- Rename a custom folder.
Note:
To delete custom folders, go to Start menu view in Applications. See Switch to the Start menu view.
- Window style. Specify whether the application opens in a minimized (minimized to taskbar), normal (normal screen view), or maximized (full-screen view) window on the user’s machine.
- Hotkey. To set a hotkey, click the input field and press the key combination. Or enter the combination in the following format (for example): Ctrl + Alt + S
- Enable automatic restore. If enabled, the agent automatically recreates the shortcut (if moved or deleted) on refresh.
- Hide application from agent menu. Specify whether to show or hide the application in the agent menu accessible from the user’s machine.
- Create shortcut in user’s Favorites folder. Specify whether to create an application shortcut in the user’s Favorites folder.
-
Application icon. Click Change to select a different icon or add a new icon.
-
When you finish, click Done to save and exit.
Edit an application
To edit an application, complete the following steps:
-
In Applications, select the application. If needed, use the search box to quickly find the application.
-
Click Edit in the action bar.
-
On the Basic information and Options pages, make changes as needed.
-
After you finish, click Save.
View an application
You can view the WEM applications in read-only mode. This implementation eliminates the risk of misconfiguration when reviewing the existing settings
To view a application, complete the following steps:
- Select the application and then click View in the action bar.
- You can view the name, description, and configurations.
- After you finish, click Close.
Manage assignments for an application
To manage assignments for an application, complete the following steps:
-
Select the application and then select Manage assignments in the action bar.
-
Select assignment targets (users and groups) to assign the application to.
-
To add a new target, click Add new target. For more information, see Add an assignment target.
-
Configure a target to specify which filter to use and where to create the application shortcut:
- Create a desktop shortcut
- Add to Start menu
- Pin to Start menu
- Add to Quick Launch
- Add to Windows startup
- Pin to taskbar
-
Use filters to contextualize the assignment.
- For information about adding filters, see Filters.
-
After you finish, click Done.
Clone an application
Note:
Assignments are not cloned.
To clone an application, complete the following steps:
-
Select the application and then select Clone in the action bar.
-
Edit the name and description.
-
Select the configuration set you want to clone the application to.
-
Click Clone to start the clone process.
Delete an application
To delete an application, select it and then select Delete in the action bar.
Note:
If an application is already assigned to users, deleting it will impact those users.
Switch to the Start menu view
To switch to the Start menu view, click Start menu view. The view shows where each application resides in the Start menu folder. You can do the following:
- Create a custom folder.
- Move an application to a desired folder.
- Rename a custom folder.
- Delete a custom folder. When you delete a custom folder, the applications in the folder will also be deleted.
Specify how the agent processes applications
Processing:
- Process applications on logon and refresh
- Process applications on reconnection
- Delete applications from desktops when unassigned
- Enforce processing of applications
- Enforce processing of filters for applications
StoreFront:
- Add a StoreFront URL and enter a description for it if needed. You need the URL when adding an application of type “Citrix Workspace resource.” See Add an application.
External tasks
Tip:
External tasks work at a user session level. To run tasks at a machine level, use Scripted Tasks instead.
This feature lets you create external tasks to assign to your users. External tasks work at a user session level and can be scripts or applications. Make sure that the target agent machines have the necessary programs to run them. Commonly used scripts include: .vbs and .cmd scripts.
You can specify when to run an external task so that you can manage your user environments precisely and effectively.
You can perform the following operations:
- Create an external task
- Edit, view, clone, and delete an external task
- Manage assignments for an external task
- Refresh the external task list
- Enable and view reports for script-based external tasks
Tip:
You can quickly enable or disable an external task by using the toggle in the State column. To enable a task, configure at least 1 trigger for it.
Create an external task
To create a task, complete the following steps:
-
In External Tasks, click Create external task.
-
On the Task tab, configure the following settings.
-
Name. Specify a name to help you identify the task.
-
Description. Specify additional information about the task.
-
Enable this task. Controls whether the task is enabled or disabled. When disabled, the agent does not process the task even if the task is assigned to users.
-
Task details
-
Run script. Supported script types (file types) are .ps1, .vbs, .cmd, .bat, .py. You can view the script by selecting View content or even replace the script by clicking Replace. However, an error is thrown if the script is larger than 1 MB and if you select an invalid or unsupported file/script format.
- Program to run script with. Enter the path to the program to run the script with. This field appears only when the uploaded script is a python script with the .py. file extension.
- Arguments. Enter arguments. This entry is optional.
- Working folder. Enter the working folder. This entry is also optional.
-
Run command.
-
Path. Enter the path to the task or browse to the task. The path resolves in the user environment. Make sure that:
- The path you specified here is consistent with the target agent machine.
- The target agent machine has the corresponding program to run the task.
- Arguments. Specify launch parameters or arguments. You can type a string. The string contains arguments to pass to the target script or application. For examples about using the Path and Arguments fields, see External task examples. This entry is optional.
- Working folder. Enter the working folder. This entry is also optional.
-
-
-
Task settings
- Run hidden. If selected, the task runs in the background and is not visible to users.
- Run once. If selected, WEM runs the task only once regardless of which options you select in Triggers and regardless of whether agents restart.
- Execution order. Use this option when you have multiple tasks assigned to users and some tasks rely on others to run successfully. Tasks with an execution order value of 0 (zero) run first, then those with a value of 1, then those with a value of 2, and so on.
- Wait for task to complete. Specify how long the agent waits for the task to complete. By default, the Wait timeout value is 30 seconds. If the task is script-based, you can select Collect task output report to collect output data from the task.
-
-
On the Triggers tab, select triggers that you want to associate with the task.
Note:
Not all triggers can be associated with external tasks. See Considerations.
-
Create new trigger. See Create a trigger.
-
Show only triggers that apply to this task. Filter out triggers that do not apply to the task.
-
-
When you finish, click Done to save and exit.
Considerations
External tasks work at a session level. You can associate only the following triggers with external tasks. For more information, see Supportability matrix for triggers.
-
Built-in triggers:
- Agent refresh
- Reconnect
- Logon
- Logoff
- Disconnect
- Lock
- Unlock
- Machine startup
- Machine shutdown
-
Windows triggers:
- event
-
Scheduled triggers
-
User process triggers:
- Process started
- Process ended
When using the Reconnect built-in trigger, consider the following:
- If the WEM agent is installed on a physical Windows device, this option is not applicable.
When using the Disconnect, Lock, and Unlock triggers, consider the following:
-
The implementation of disconnect, lock, and unlock is based on Windows events. In some environments, these options might not work as expected. For example, in desktops running on Windows 10 or Windows 11 single-session VDAs, the disconnect option does not work. Instead, use the lock option. (In this scenario, the action we receive is “lock.”)
-
We recommend that you use these triggers with the UI agent. Two reasons:
- When you use them with the CMD agent, the agent starts in the user environment each time the corresponding event occurs, to check whether the external task runs.
- The CMD agent might not work optimally in concurrent task scenarios.
With user process triggers, you can define external tasks to supply resources only when certain processes are running and to revoke those resources when the processes end. Using processes as triggers for external tasks lets you manage your user environments more precisely compared with processing external tasks on logon or logoff. Before using user process triggers, verify that the following prerequisites are met:
- The WEM agent launches and runs in UI mode.
- The specified processes run in the same user session as the logged-on user.
- To keep the configured external tasks up to date, be sure to select Enable Automatic Refresh on the Advanced Settings > Configuration > Advanced Options tab.
When using the Windows event trigger, consider the following:
- Only the Windows event, with the user name recorded, can be used to trigger an external task.
- The WEM agent opens and runs in UI mode.
Edit an external task
To edit a task, perform the following steps:
-
In External Tasks, select the task. If needed, use the search box to quickly find the task.
-
Click Edit in the action bar.
-
On the Task and Triggers tabs, make changes as needed.
-
After you finish, click Done.
View an external task
You can view the WEM external tasks in read-only mode. This implementation eliminates the risk of misconfiguration when reviewing the existing settings
To view a external task, complete the following steps:
- Select the external task and then click View in the action bar.
- View the name, description, and configurations.
- After you finish, click Close.
Manage assignments for an external task
To manage assignments for an external task, complete the following steps:
-
Select the task and then select Manage assignments in the action bar.
-
Select assignment targets (users and groups) to assign the task to.
- To add a new target, click Add new target. For more information, see Add an assignment target.
-
Use filters to contextualize the assignment.
- For information about adding filters, see Filters.
-
After you finish, click Done.
Clone an external task
Note:
Trigger associations and assignments are not cloned.
To clone a task, complete the following steps:
-
Select the task and then select Clone in the action bar.
-
Edit the name and description.
-
Select the configuration set you want to clone the task to.
-
Click Clone to start the clone process.
Delete an external task
To delete a task, select it and then select Delete in the action bar.
Note:
If an external task is already assigned to users, deleting it will impact those users.
Enable and view reports for script-based external tasks
Note:
For external tasks, reporting is available only for script-based tasks.
You can configure Workspace Environment Management to generate and display reports for a script-based external task. Two types of reports are available: Action Processing Results and Action Processing Events.
Enable external task reporting
To enable reporting for a script-based external task, complete the following setup:
- Go to Advanced Settings > Monitoring Preferences > Action Processing Results, and select External Tasks.
- When creating this external task, enable both Wait for Task to Complete and Collect task output report.
View processing results of external tasks
The Action processing results report shows the final status of each script-based external task with reporting enabled, indicating whether it completed successfully or encountered an error.
To view the report:
- Go to Monitoring > Reports.
- Apply the Event type Is Action processing results filter.
- On the Action Processing Results page that appears, select the External Tasks tab.
View event details of external tasks
The Action processing events report provides detailed information for each script-based external task with reporting enabled. Details include:
- Task result
- Agent that ran the task
- User who triggered the task
- Configuration set name
- Captured console output
To view the report:
- Go to Monitoring > Reports.
- Apply the Event type Is Action processing events filter.
Printers
This feature lets you add printers as assignable actions. When assigned, those printers are available for use within the user’s desktop.
You can perform the following operations:
- Add a printer.
- Add printers from a print server.
- Refresh the printer list.
- Edit a printer.
- View a printer.
- Manage assignments for a printer.
- Clone a printer.
- Delete a printer.
- Specify how the agent processes printers.
A general workflow to add and assign a printer is as follows:
-
In the web console, go to the relevant configuration set, navigate to Actions > Printers, and click Add printer. See Add a printer.
-
Select the printer you added and click Manage assignments in the action bar. See Manage assignments for a printer.
The assignment takes some time to take effect. For immediate effect, see Make assignments take effect immediately.
Add a printer
To add a printer, complete the following steps:
- In Printers, click Add printer.
-
Specify the action type. The interface differs based on the selected action type.
-
Map network printer.
- Name. Specify a name to help you identify the printer.
- Description (optional). Specify additional information about the printer.
- Enable this printer. Enable or disable the printer. When disabled, it is not processed by the agent even if assigned to a user.
- Printer path. Specify the path to the printer as it resolves in the user environment.
- Connect using specific credentials. By default, the agent uses the Windows account under which it runs to connect to the printer. Select this option if users must specify different credentials for the connection.
- Display name. Specify the name of the printer. The name appears in the user environment.
- Enable automatic restore. If enabled, the agent automatically recreates the printer (if removed) on refresh.
-
Use printer mapping file.
- Name. Specify a name to help you identify the printer.
- Description (optional). Specify additional information about the printer.
- Enable this printer. Enable or disable the printer. When disabled, it is not processed by the agent even if assigned to a user.
- File path. You can configure printers for your users using an XML printer list file. Place the file on the agent machine that you use as an image. When the agent refreshes, it parses the XML file for printers to add to the action queue. See XML printer list configuration.
-
Map network printer.
- When you finish, click Done to save and exit.
Add printers from a print server
To add printers from a network print server, look for desired printers in Citrix Environment Tool Hub > Printer Assistant, copy their information, and then paste it. See Citrix Environment Tool Hub.
Edit a printer
To edit a printer, complete the following steps:
- In Printers, select the printer. If needed, use the search box to quickly find the printer.
- Click Edit in the action bar.
- Make changes as needed.
- After you finish, click Save.
View a printer
You can view the WEM printers in read-only mode. This implementation eliminates the risk of misconfiguration when reviewing the existing settings
To view a printer, complete the following steps:
- Select the printer and then click View in the action bar.
- View the name, description, and configurations.
- After you finish, click Close.
Manage assignments for a printer
To manage assignments for a printer, complete the following steps:
- Select the printer and then select Manage assignments in the action bar.
-
Select assignment targets (users and groups) to assign the printer to.
- To add a new target, click Add new target. For more information, see Add an assignment target.
- Configure a target to specify which filter to use and whether to set it as the default printer. For information about adding filters, see Filters.
- After you finish, click Done.
Clone a printer
Note:
Assignments are not cloned.
To clone a printer, complete the following steps:
- Select the printer and then select Clone in the action bar.
- Edit the name and description.
- Select the configuration set you want to clone the printer to.
- Click Clone to start the clone process.
Delete a printer
To delete a printer, select it and then select Delete in the action bar.
Note:
If a printer is already assigned to users, deleting it will impact those users.
Specify how the agent processes printers
Processing options:
- Process printers on logon and refresh
- Process printers on reconnection
- Delete printers from desktops when unassigned
- Enforce processing of printers
- Enforce processing of filters for printers
- Process printers asynchronously (if enabled, the agent processes printers asynchronously, without awaiting the completion of the processing of other actions)
Network drives
This feature lets you add network drives as assignable actions. When assigned, those network drives are available for use within the user’s desktop.
You can perform the following operations:
- Add a network drive.
- Refresh the network drive list.
- Edit a network drive.
- View a network drive.
- Manage assignments for a network drive.
- Clone a network drive.
- Delete a network drive.
- Specify how the agent processes network drives.
A general workflow to add and assign a network drive is as follows:
-
In the web console, go to the relevant configuration set, navigate to Actions > Network Drive, and click Add network drive. See Add a network drive.
-
Select the network drive you added and click Manage assignments in the action bar. See Manage assignments for a network drive.
The assignment takes some time to take effect. For immediate effect, see Make assignments take effect immediately.
Add a network drive
To add a network drive, complete the following steps:
-
In Network Drives, click Add network drive.
-
Configure the following settings:
- Name. Specify a name to help you identify the network drive.
- Description (optional). Specify additional information about the network drive.
- Enable this network drive. Enable or disable the network drive. When disabled, it is not processed by the agent even if assigned to a user.
- Target path. Specify the path to the network drive as it resolves in the user environment.
- Connect using specific credentials. By default, the agent uses the Windows account under which it runs to connect to the network drive. Select this option if users must specify different credentials for the connection.
- Display name. Specify the name of the network drive. The name appears in the user environment.
- Enable automatic restore. If enabled, the agent automatically recreates the network drive (if removed) on refresh.
- Set as home drive. If enabled, the network drive is set as the home drive.
-
When you finish, click Done to save and exit.
Edit a network drive
To edit a network drive, complete the following steps:
-
In Network Drives, select the network drive. If needed, use the search box to quickly find the network drive.
-
Click Edit in the action bar.
-
Make changes as needed.
-
After you finish, click Save.
View a network drive
You can view the WEM network drives in read-only mode. This implementation eliminates the risk of misconfiguration when reviewing the existing settings
To view a network drive, complete the following steps:
- Select the network drive and then click View in the action bar.
- View the name, description, and configurations.
- After you finish, click Close.
Manage assignments for a network drive
To manage assignments for a network drive, complete the following steps:
-
Select the network drive and then select Manage assignments in the action bar.
-
Select assignment targets (users and groups) to assign the network drive to.
- To add a new target, click Add new target. For more information, see Add an assignment target.
- Configure a target to specify which filter and drive letter to use. For information about adding filters, see Filters.
-
After you finish, click Done.
Clone a network drive
Note:
Assignments are not cloned.
To clone a network drive, complete the following steps:
-
Select the network drive and then select Clone in the action bar.
-
Edit the name and description.
-
Select the configuration set you want to clone the network drive to.
-
Click Clone to start the clone process.
Delete a network drive
To delete a network drive, select it and then select Delete in the action bar.
Note:
If a network drive is already assigned to users, deleting it will impact those users.
Specify how the agent processes network drives
Processing options:
- Process network drives on logon and refresh
- Process network drives on reconnection
- Delete network drives from desktops when unassigned
- Enforce processing of network drives
- Enforce processing of filters for network drives
- Process network drives asynchronously. If enabled, the agent processes network drives asynchronously, without awaiting the completion of the processing of other actions.
Drive letter:
- Drive letters not to be used for assignment. Any selected drive letter is excluded from the drive letter selection when assigning a drive resource.
- Allow drive letter reuse in assignment. If enabled, a drive letter used in an assignment is still available for use by other drives assigned to the same target.
Virtual drives
This feature lets you add virtual drives as assignable actions. When assigned, those virtual drives are available for use within the user’s desktop.
You can perform the following operations:
- Add a virtual drive.
- Refresh the virtual drive list.
- Edit a virtual drive.
- View a virtual drive.
- Manage assignments for a virtual drive.
- Clone a virtual drive.
- Delete a virtual drive.
- Specify how the agent processes virtual drives.
A general workflow to add and assign a virtual drive is as follows:
-
In the web console, go to the relevant configuration set, navigate to Actions > Virtual Drive, and click Add virtual drive. See Add a virtual drive.
-
Select the virtual drive you added and click Manage assignments in the action bar. See Manage assignments for a virtual drive.
The assignment takes some time to take effect. For immediate effect, see Make assignments take effect immediately.
Add a virtual drive
To add a virtual drive, complete the following steps:
-
In Virtual Drives, click Add virtual drive.
-
Configure the following settings:
- Name. Specify a name to help you identify the virtual drive.
- Description (optional). Specify additional information about the virtual drive.
- Enable this virtual drive. Enable or disable the virtual drive. When disabled, it is not processed by the agent even if assigned to a user.
- Target path. Specify the path to the virtual drive as it resolves in the user environment.
- Set as home drive. If enabled, the network drive is set as the home drive.
-
When you finish, click Done to save and exit.
Edit a virtual drive
To edit a virtual drive, complete the following steps:
-
In Virtual Drives, select the virtual drive. If needed, use the search box to quickly find the virtual drive.
-
Click Edit in the action bar.
-
Make changes as needed.
-
After you finish, click Save.
View a virtual drive
You can view the WEM virtual drives in read-only mode. This implementation eliminates the risk of misconfiguration when reviewing the existing settings
To view a virtual drive, complete the following steps:
- Select the virtual drive and then click View in the action bar.
- View the name, description, and configurations.
- After you finish, click Close.
Manage assignments for a virtual drive
To manage assignments for a virtual drive, complete the following steps:
-
Select the virtual drive and then select Manage assignments in the action bar.
-
Select assignment targets (users and groups) to assign the virtual drive to.
- To add a new target, click Add new target. For more information, see Add an assignment target.
-
Configure a target to specify which filter and drive letter to use. For information about adding filters, see Filters.
Important:
The Next available and No letter assigned options apply only to network drives.
-
After you finish, click Done.
Clone a virtual drive
Note:
Assignments are not cloned.
To clone a virtual drive, complete the following steps:
-
Select the virtual drive and then select Clone in the action bar.
-
Edit the name and description.
-
Select the configuration set you want to clone the virtual drive to.
-
Click Clone to start the clone process.
Delete a virtual drive
To delete a virtual drive, select it and then select Delete in the action bar.
Note:
If a virtual drive is already assigned to users, deleting it will impact those users.
Specify how the agent processes virtual drives
Processing options:
- Process virtual drives on logon and refresh
- Process virtual drives on reconnection
- Delete virtual drives from desktops when unassigned
- Enforce processing of filters for virtual drives
- Enforce processing of filters for virtual drives
Drive letter:
- Drive letters not to be used for assignment. Any selected drive letter is excluded from the drive letter selection when assigning a drive resource.
- Allow drive letter reuse in assignment. If enabled, a drive letter used in an assignment is still available for use by other drives assigned to the same target.
Registry entries
This feature lets you create, set, delete registry values, and assign them to create or modify registries. You can add tags to registry entries and assign multiple registry entries at the same time.
You can perform the following operations:
- Add a registry entry
- Refresh the registry entry list
- Edit a registry entry or entries
- Manage assignments for a registry entry or entries
- Clone a registry entry
- Import registry entries by reg file
- Delete a registry entry
- Remove tags
A general workflow to add and assign a registry entry is as follows:
-
In the web console, go to the relevant configuration set. Navigate to Actions > Registry entries, and click Add registry entry. For more details, see Add a registry entry.
-
Select the registry entry that you added and click Manage assignments in the action bar. For more details, see Manage assignments for a registry entry or multiple registry entries.
The assignment takes some time to take effect. For immediate effect, see Make assignments take effect immediately.
Add a registry entry
To add a registry entry, complete the following steps:
-
In registry entries, click Add registry entry.
-
Configure the following settings:
- Action type. Describes the type of action of the resource.
- Name. Specify a name to help you identify the registry entry. When you create a registry key value, leaving the Name field blank sets it as the default value for that key.
- Description (optional). Specify additional information about the registry entry.
- Tags. You can create new tags or select existing tags for the registry entry and then you can batch and manage registry entries with the tags.
- Enable this action. Enable or disable the registry entry. When disabled, it is not processed by the agent even if assigned to a user or machine.
- Registry path. Specify a registry path for the registry entry.
- Value name. The name of your registry value as it appears in the registry (for example, NoNtSecurity).
- Type. The type of registry entry that might be created.
-
Data. The value of the registry entry once created (for example,
0orC:\Program Files) - Run once. If selected, WEM runs the action only once.
-
When you finish, click Done to save and exit.
Edit a registry entry or registry entries
To edit a registry entry or registry entries, complete the following steps:
-
In registry entries, select the registry entry or entries. If needed, use the search box or tag the list to quickly find the registry entry.
-
Click Edit in the action bar.
-
Make changes as needed.
-
After you finish, click Save.
Manage assignments for a registry entry or multiple registry entries
To manage assignments for a registry entry or multiple registry entries, complete the following steps:
- Select the registry entry or registry entries and then select Manage assignments in the action bar. If needed, use the search box or tag list to quickly find the registry entry or registry entries.
Note:
To manage assignments for multiple registry entries, review the registry entries list and then click Next.
-
Select assignment targets (users and groups) to assign the registry entry.
- To add a new target, click Add new target. For more information, see Add an assignment target.
- Configure a target to specify which filter to use. For information about adding filters, see Filters.
-
After you finish, click Done.
Clone a registry entry
Note:
Assignments are not cloned.
To clone a registry entry, complete the following steps:
-
Select the registry entry and then select Clone in the action bar.
-
Edit the name and description.
-
Select the configuration set where you want to clone the registry entry.
-
Click Clone to start the clone process.
Import registry entries by reg file
You can convert your registry file into registry entries for an assignment. This feature has the following limitations:
-
It supports only registry values under
HKEY_CURRENT_USER. With the registry entries feature, you can assign only registry settings underHKEY_CURRENT_USER. -
It does not support registry values of the
REG_BINARYandREG_MULTI_SZ types.
To avoid the limitations, we recommend that you import your registry files to WEM by using the Import Group Policy settings in Group Policy Settings. For more information, see, Import Group Policy settings.
To import registry entries, complete the following steps:
-
Select Import in the action bar.
-
Browse local
regfile. -
Click Import to load registry entries to the page.
-
Select the Options for the loaded registry entries.
-
Select overwrite rule for the loaded registry entries.
-
Click Import to start the import process.
Delete a registry entry
To delete a registry entry, select the registry entry and then select Delete in the action bar.
Remove tags
To remove tags for registry entries, complete the following steps:
-
Select the registry entries and then select Remove tags in the action bar.
-
Click Remove to begin the removal process.
Environment variables
This feature lets you add environment variables as assignable actions. When assigned, those environment variables are created or set in the user environment.
You can perform the following operations:
- Add an environment variable.
- Refresh the environment variable list.
- Edit an environment variable.
- View an environment variable.
- Manage assignments for an environment variable.
- Clone an environment variable.
- Delete an environment variable.
- Specify how the agent processes environment variables.
A general workflow to add and assign an environment variable is as follows:
- In the web console, go to the relevant configuration set, navigate to Actions > Environment Variable, and click Add environment variable. See Add an environment variable.
- Select the environment variable that you added and click Manage assignments in the action bar. See Manage assignments for an environment variable.
The assignment takes some time to take effect. For immediate effect, see Make assignments take effect immediately.
Add an environment variable
To add an environment variable, complete the following steps:
- In Environment Variables, click Add environment variable.
-
Configure the following settings:
- Name. Specify a name to help you identify the environment variable.
- Description (optional). Specify additional information about the environment variable.
- Enable this environment variable. Enable or disable the environment variable. When disabled, it is not processed by the agent even if assigned to a user.
- Variable name. The functional name of the environment variable.
- Variable value. The environment variable value.
- Execution order. Use this option to determine the order in which the agent processes the variables. The agent first processes variables with an execution order value of 0 (zero), then those with a value of 1, then those with a value of 2, and so on. When conflicts occur, variables processed last overwrite those processed earlier.
- When you finish, click Done to save and exit.
Edit an environment variable
To edit an environment variable, complete the following steps:
- In Environment Variables, select the environment variable. If needed, use the search box to quickly find the environment variable.
- Click Edit in the action bar.
- Make changes as needed.
- After you finish, click Save.
View an environment variable
You can view the WEM environment variables in read-only mode. This implementation eliminates the risk of misconfiguration when reviewing the existing settings
To view an environment variable, complete the following steps:
- Select the environment variable and then click View in the action bar.
- View the name, description, and configurations.
- After you finish, click Close.
Manage assignments for an environment variable
To manage assignments for an environment variable, complete the following steps:
- Select the environment variable and then select Manage assignments in the action bar.
- Select assignment targets (users and groups) to assign the environment variable to.
- To add a new target, click Add new target. For more information, see Add an assignment target.
- Configure a target to specify which filter to use. For information about adding filters, see Filters.
- After you finish, click Done.
Clone an environment variable
Note:
- Assignments are not cloned.
To clone an environment variable, complete the following steps:
- Select the environment variable and then select Clone in the action bar.
- Edit the name and description.
- Select the configuration set you want to clone the environment variable to.
- Click Clone to start the clone process.
Delete an environment variable
To delete an environment variable, select it and then select Delete in the action bar.
Note:
- If an environment variable is already assigned to users, deleting it will impact those users.
Specify how the agent processes environment variables
Processing options:
- Process environment variables on logon and refresh
- Process environment variables on reconnection
- Delete environment variables from desktops when unassigned
- Enforce processing of filters for environment variables
- Enforce processing of filters for environment variables
More information
Make assignments take effect immediately
Typically, an assignment takes effect after the period of time that you specified for SQL Settings Refresh Delay in Advanced Settings. For the assignment to take effect immediately, complete the following steps:
- Go to Web Console > Monitoring > Administration > Agents > Statistics and select the agent.
- Click More in the action bar and select Agent > Refresh agent host settings.
Important:
- For the agent to process actions, verify that the following settings are enabled:
- Launch agent on logon (for processing actions on logon)
- Launch agent on reconnection (for processing actions on reconnection)
- Enable desktop compatibility mode
- You can find these settings in Legacy Console > Advanced Settings > Configuration > Main Configuration > Agent Service Actions.
Back up Group Policy settings
To back up your Group Policy settings, complete the following steps on your domain controller:
- Open the Group Policy Management Console.
- In the Group Policy Management window, right-click the GPO you want to back up and then select Back Up.
- In the Back Up Group Policy Object window, specify the location where you want to save the backup. Optionally, you can give the backup a description.
- Click Back Up to start the backup and then click OK.
- Navigate to the backup folder and then compress it into a zip file.
Note:
WEM supports importing zip files that contain multiple GPO backup folders.
Configure FSLogix Profile Container using WEM GPO
For an example of how to configure settings for Windows by using Group Policy Administrative Templates, see Configure FSLogix Profile Container using WEM GPO.
Application launcher
Application launcher aggregates all applications you assigned to your users through the administration console. Using the tool, users can launch all assigned applications in one place.
Tip:
We recommend that you publish this tool as a Citrix virtual app.
This feature provides the following benefits:
- Assigned applications can be launched faster.
- Users can launch all applications assigned to them in one place.
- Users can quickly access their bookmarked websites. With Profile Management, browser bookmarks can be roamed.
Your users can directly open the application launcher tool (AppLauncherUtil.exe) in their environment. The tool is available in the agent installation folder: %ProgramFiles%\Citrix\Workspace Environment Management Agent\ AppLauncherUtil.exe. After opening the tool, users see the following, reflecting the applications assigned to them:
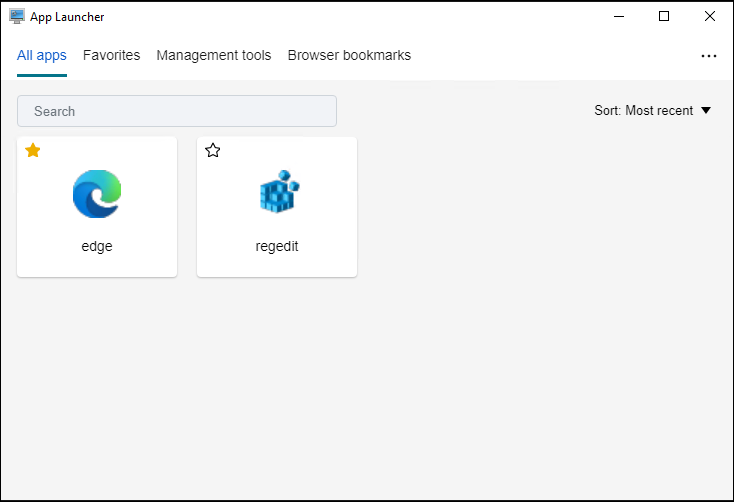
-
All apps. Shows all assigned applications. Available sorting options: Most recent, A-Z, and Z-A.
-
Favorites. Shows applications marked as favorites.
-
Management tools. Shows the following two tools:
- Taskmgr. Opens Task Manager.
- VUEMUIAgent. Launches the WEM UI agent.
-
Browser bookmarks. Shows websites saved in browser bookmarks. By clicking a bookmark, users can quickly open the browser and get to the target website. Bookmarks can be grouped by browser. This feature supports only Google Chrome and Microsoft Edge. Available sorting options: Most recent, A-Z, and Z-A.
-
Ellipsis icon. There is a Sign out option that lets users sign out of their sessions.
Make sure that the assigned applications are present on the agent machine. If an assigned application is not installed on the agent machine, the application is shown but unavailable for launch.

For an example of how to use this feature, see Aggregate assigned applications in one place.
External task examples
For a script (for example, PowerShell script):
- If neither the folder path nor the script name contains blank spaces:
- In the Path field, type the following:
C:\Windows\System32\WindowsPowerShell\v1.0\powershell.exe. - In the Arguments field, type the following:
C:\<folder path>\<script name>.ps1.
Alternatively, you can type the path to the script file directly in the Path field. For example:
C:\<folder path>\<script name>.ps1. In the Arguments field, specify arguments if needed. However, whether the script file runs or opens with a different program depends on file type associations configured in the user environment. For information about file type associations, see File Associations. - In the Path field, type the following:
- If the folder path or the script name contains blank spaces:
- In the Path field, type the following:
C:\Windows\System32\WindowsPowerShell\v1.0\powershell.exe. - In the Arguments field, type the following:
-file C:\<folder path>\<script name>.ps1.
- In the Path field, type the following:
For an application (for example, iexplore.exe):
- In the Path field, type the following:
C:\Program Files\"Internet Explorer"\iexplore.exe. - In the Arguments field, type the URL of the website to open:
https://docs.citrix.com/.
File system operations
Controls the copying of folders and files into the user’s environment.
Tip:
You can use dynamic tokens to extend Workspace Environment Management actions to make them more powerful.
File system operations list
A list of your existing file and folder operations. You can use Find to filter the list by name or ID against a text string.
To add a file system operation
- Use the context menu Add command.
- Enter details in the New File System Operation dialog tabs, then click OK.
Fields and controls
Name. The display name of the file or folder operation, as it appears in the list.
Description. Lets you specify additional information about the resource. This field appears only in the edition or creation wizard.
Filesystem Operation State. Controls whether the file system operation is enabled or disabled. When disabled, it is not processed by the agent even if assigned to a user.
Source Path. The path to the source file or folder that is copied.
Target Path. The destination path for the source file or folder that is copied.
Overwrite Target if Existing. Controls whether the file or folder operation overwrites existing files or folders with the same names in the target location. If cleared, and a file or folder with the same name already exists at the target location, the affected files are not copied.
Run Once. By default, Workspace Environment Management runs a file system operation every time the agent refreshes. Select this option to let Workspace Environment Management run the operation only once, rather than on every refresh. This speeds up the agent refresh process, especially if you have many file system operations assigned to your users.
Action Type. Describes what type of action this file or folder action is: Copy, Delete, Move, Rename or Symbolic Link operation. For symbolic link creation, you need to give users the SeCreateSymbolicLinkPrivilege privilege for Windows to allow symbolic link creation.
Execution order. Determines the running order of operations, letting certain operations run before others. Operations with an execution order value of 0 (zero) run first, then those with a value of 1, then those with a value of 2, and so on.
File type associations
Important:
File type associations (FTAs) that you configure become default associations automatically. However, when you open an applicable file, the “How do you want to open this file?” window might still appear, prompting you to select an application to open the file. Click OK to dismiss the window. If you do not want to see a similar window again, do the following: Open the Group Policy Editor and enable the Do not show the ‘new application installed’ notification policy (Computer Configuration > Administrative Templates > Windows Components > File Explorer).
Controls the creation of FTAs in the user environment.
Tip:
You can use dynamic tokens to extend Workspace Environment Management actions to make them more powerful.
This feature lets you add FTAs as assignable actions.
You can perform the following operations:
- Add FTAs
- Refresh FTAs
- Edit FTAs
- View FTAs
- Manage assignments
- Clone FTAs
- Delete FTAs
Add FTAs
- Use the context menu Add association command.
- Enter details in the Add file type association dialog box.
Action Type. Describes what type of action this resource is.
Name. The display name of the file association, as it appears in the file association list.
Description. This field is only shown in the edition/creation wizard and allows you to specify additional information about the resource.
File Association State. Toggles whether the file association is Enabled or Disabled. When disabled, it is not processed by the agent even if assigned to a user.
File Extension. The extension used for this file type association. If you select a file name extension from the list, the ProgID field automatically populates (if the file type is present on the machine where the administration console is running). You can also type the extension directly. However, for browser associations, you must type the extension directly. For more information, see Browser association.
ProgID. The programmatic identifier associated with an application (COM). This value automatically populates when you select a file extension from the list. You can also type the ProgID directly. To discover the ProgID of an installed application, you can use the OLE/COM Object Viewer (oleview.exe), and look in Object Classes/Ole 1.0 Objects. For more information about ProgID, see Programmatic identifier (ProgID).
Action. Lets you select the action type: open, edit, or print.
Target application. Lets you specify the executable used with this file name extension. Type the full path of the executable. For example, for UltraEdit Text Editor: C:\Program Files\IDM Computer Solutions\UltraEdit\uedit64.exe
Command. Lets you specify action types that you want to associate with the executable. For example:
- For an open action, type
“%1”. - For a print action, type
/p"%1".
Set as Default Action. Toggles whether the association is set as a default for that file name extension.
Overwrite. Toggles whether this file association overwrites any existing associations for the specified extension.
Run Once. By default, Workspace Environment Management (WEM) creates a file association every time the agent refreshes. Select this option to create the file association once, rather than on every refresh. This speeds up the agent refresh process, especially if you have many file associations assigned to your users.
Tip:
You can use File Type Association Assistant data to add them as assignable actions in the management console.
For more information, see Good to know.
Edit a file type association
To edit a file type association, complete the following steps:
-
In File Type Associations, select the required association. If needed, use the search box to quickly find the required file type association.
-
Click Edit in the action bar.
-
Make changes as needed.
-
After you finish, click Save.
View a file type associations
You can view the WEM file type associations in read-only mode. This implementation eliminates the risk of misconfiguration when reviewing the existing settings.
To view a file type association, complete the following steps:
- Select the file type association and then click View in the action bar.
- View the name, description, and configurations.
- After you finish, click Close.
Manage assignments
To manage assignments for a file type association, complete the following steps:
-
Select the file type association and then select Manage assignments in the action bar.
-
Select assignment targets (users and groups) to assign the association to.
-
To add a new target, click Add new target. For more information, see Add an assignment target.
-
Use filters to contextualize the assignment. If necessary, set the priority of the required association for each target.
-
Click the three ellipses associated with the assignment to copy the configuration.
-
You can also apply the copied configuration to all the targets by choosing the respective option associated with the assignment.
Clone file-type association
To clone a file-type association, complete the following steps:
-
Select the file type association and then select Clone in the action bar.
-
Edit the name and description.
-
Select the configuration set you want to clone the file type association to.
-
Click Clone to start the clone process.
Delete a file type association
To delete a file type association, select it and then select Delete in the action bar.
Specify how the agent processes file type associations
Processing options:
- Process file type associations on logon and refresh
- Process FTAs on reconnection
- Enforce processing of filters for FTAs
- Delete FTAs from desktops when unassigned
JSON files
This feature lets you add JSON objects and assign them to create or modify JSON files. Using this feature, you can apply personalized settings to applications with a JSON configuration file (for example, Microsoft Teams).
You can perform the following operations:
- Add a JSON object.
- Refresh the JSON object list.
- Edit a JSON object.
- View a JSON object.
- Manage assignments for a JSON object.
- Clone a JSON object.
- Delete a JSON object.
- Control whether to process JSON objects.
A general workflow to add and assign a JSON object is as follows:
- In the web console, go to the relevant configuration set, navigate to Actions > JSON object, and click Add JSON object. See Add a JSON object.
- Select the JSON object that you added and click Manage assignments in the action bar. See Manage assignments for a JSON object.
The assignment takes some time to take effect. For immediate effect, see Make assignments take effect immediately.
Add a JSON object
To add a JSON object, complete the following steps:
- In JSON objects, click Add JSON object and select Standard.
- Configure the following settings:
- Name. Specify a name to help you identify the JSON object.
- Description (optional). Specify additional information about the JSON object.
- Enable this action. Enable or disable the JSON object. When disabled, it is not processed by the agent even if assigned to a user or machine.
- File path and content. Specify the path to the JSON file that you want the object to modify. The specified content is merged with the existing content in the target file. To understand how content is merged, see JSON content merge example.
If you don’t want to enter the path and content manually, click Generate with template. The Generate with template feature lets you generate JSON content with templates for configuring specific applications. Currently, the feature applies only to Microsoft Teams.
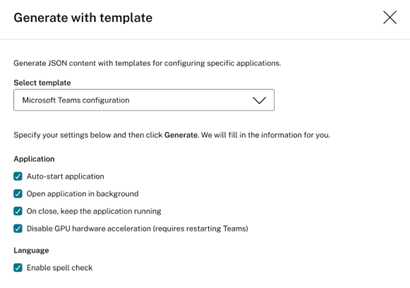
- Create file if it does not exist. This is a failsafe option ensuring that the object works as expected. For example, in the case of Microsoft Teams, the “desktop-config.json” file does not exist until Microsoft Teams is launched for the first time.
- Back up the original file. When selected, the agent automatically saves a backup of the target file in the same location. The backup inherits the name of the original and has a suffix “-WEMCopy.”
-
Processing mode
- User-level processing. Process the action when the user logs on or when the agent refreshes.
- Machine-level processing. Process the action when the machine starts or when the agent refreshes its SQL connection settings.
- Run once. If selected, WEM runs the action only once.
- When you finish, click Done to save and exit.
JSON content merge example
The following example illustrates how the specified content is merged with the existing content in the target JSON file.
Example of content in the target file:
{
    "value": "value1",
    "array": ["test1", "test2"],
    "object": {"key1": "value1", "key2":  "value2"}
}
<!--NeedCopy-->
Example of specified content:
{
    "value": "value2",
    "array": ["test2", "test3"],
    "object": { "key1": "changed", "key3": "value3", "key4": "value4" },
    "new": 1
}
<!--NeedCopy-->
Example of merged result:
{
    "value": "value2",
    "array": ["test1", "test2", "test3"],
    "object": {"key1": "changed", "key2": "value2", "key3": "value3", "key4": "value4" },
     "new": 1
}
<!--NeedCopy-->
Add a JSON object to the Windows 11 Start menu layout
To add a JSON object to the Windows 11 Start menu layout, complete the following steps.
-
Click Add a new JSON object.
-
Select Start menu configuration for Windows 11.
-
Paste the configuration in the Add JSON object page.
-
Click Done.
For more information, see Customize the Start menu layout for Windows 11.
Edit a JSON object
To edit a JSON object, complete the following steps:
- In JSON objects, select the JSON object. If needed, use the search box to quickly find the JSON object.
- Click Edit in the action bar.
- Make changes as needed.
- After you finish, click Save.
View a JSON object
You can view the WEM JSON objects in read-only mode. This implementation eliminates the risk of misconfiguration when reviewing the existing settings
To view a JSON object, complete the following steps:
- Select the JSON object and then click View in the action bar.
- View the name, description, and configurations.
- After you finish, click Close.
Manage assignments for a JSON object
To manage assignments for a JSON object, complete the following steps:
- Select the JSON object and then select Manage assignments in the action bar.
- Select assignment targets (users and groups) to assign the JSON object to.
- To add a new target, click Add new target. For more information, see Add an assignment target.
- Configure a target to specify which filter to use. For information about adding filters, see Filters.
- After you finish, click Done.
Clone a JSON object
Note:
- Assignments are not cloned.
To clone a JSON object, complete the following steps:
- Select the JSON object and then select Clone in the action bar.
- Edit the name and description.
- Select the configuration set you want to clone the JSON object to.
- Click Clone to start the clone process.
Delete a JSON object
To delete a JSON object, select it and then select Delete in the action bar.
Note:
- If a JSON object is already assigned to users, deleting it will impact those users.
INI files
Controls the creation of .ini file operations, allowing you to modify .ini files.
Ini files operation list
A list of your existing .ini file operations. You can use Find to filter the list by name or ID against a text string.
Add INI file operation
- Use the context menu Add command.
- Enter details in the Add INI File Operation page and click OK.
Fields and controls
Name. The display name of the .ini file operation, as it appears in the Ini File Operations list.
Description. This field is only shown in the edition/creation wizard and allows you to specify additional information about the resource.
.ini File Operation State. Toggles whether the .ini file operation is enabled or disabled. When disabled, it is not processed by the agent even if assigned to a user.
Target Path. Specifies the location of the .ini file that will be modified as it resolves in the user’s environment.
Note:
While using a non-domain-joined agent, WEM might not work if the Target Path is a network share.
Target Section. Specifies which section of the .ini file this operation targets. If you specify a non-existent section, then it will be created.
Target Value Name. Specifies the name of the value that will be added.
Target Value. Specifies the value itself.
Run Once. By default, Workspace Environment Management performs an .ini file operation every time the agent refreshes. Select this checkbox to make the Workspace Environment Management perform the operation only once, rather than at every refresh. This operation speeds up the agent refresh process, especially if you have many .ini file operations assigned to your users.
Action Type. Describes what type of action this resource is.
Edit an INI file operation
To edit, complete the following steps:
- Click Edit in the action bar.
- Make changes as needed.
- After you finish, click Save.
View an INI file
You can view the WEM INI files in read-only mode. This implementation eliminates the risk of misconfiguration when reviewing the existing settings
To view an INI file, complete the following steps:
- Select the INI file and then click View in the action bar.
- You can view the name, description, and configurations.
- After you finish, click Close.
Manage assignments
To manage assignments, complete the following steps:
- Select the INI file and then select Manage assignments in the action bar.
- Select assignment targets (users and groups) to assign this INI file to.
- Use filters to contextualize the assignment.
- Set the priority of the selected INI file for each target.
- After you finish, click Save.
Clone INI file operation
To clone, complete the following steps:
- Select the INI file and then select Clone in the action bar.
- Edit the name and description.
- Select the configuration set you need to clone.
- Click Clone to start the clone process.
Delete INI file
To delete an INI file, select it and then select Delete in the action bar.
Ports
Lets you add port mappings as assignable actions. The Ports feature allows client COM port mapping. You can also use Citrix Studio policies to enable automatic connection of COM ports. If you use the Ports feature to manually control the mapping of each port, remember to enable the Client COM port redirection policies in Citrix Studio. By default, COM port redirection is prohibited.
Ports list
A list of your existing ports. You can use Find to filter the list by name or ID.
Add a port
- Select Add port mapping from the context menu.
- Enter details on the Add port mapping dialog tab, then click OK.
Fields and controls
Name. The display name of the port, as it appears in the port list.
Description. Appears only in the edition/creation wizard and allows you to specify additional information about the resource.
Port State. Toggles whether the port is enabled or disabled. When disabled, it is not processed by the agent even if assigned to a user.
Port Name. The functional name of the port.
Port Target. The target port.
Options tab
Action Type. Describes what type of action this resource performs.
For example, you can configure the port settings as follows:
- Port name: Select “COM3:”
-
Port target: Enter
\\Client\COM3:
View a port
You can view the WEM ports in read-only mode. This implementation eliminates the risk of misconfiguration when reviewing the existing settings.
To view a port, complete the following steps:
- Select the port and then click View in the action bar.
- View the name, description, and configurations.
- After you finish, click Close.
Edit port mapping
To edit port mapping, complete the following steps:
- Click Edit in the action bar.
- Make changes as needed.
- After you finish, click Save.
Manage assignments
To manage assignments, complete the following steps:
- Select a port mapping and then select Manage assignments in the action bar.
- Select assignment targets (users and groups) to assign this port to.
- Use filters to contextualize the assignment.
- Set the priority of the selected port mappings for each target.
- After you finish, click Save.
Clone port mapping
To clone, complete the following steps:
- Select the port and then select Clone in the action bar.
- Edit the name and description.
- Select the configuration set you need to clone.
- Click Clone to start the clone process.
Delete port mapping
To delete port mapping, select it and then select Delete in the action bar.
User DSNs
Controls the creation of user DSNs.
User DSN list
A list of your existing user DSNs. You can use Find to filter the list by name or ID against a text string.
Add a user DSN
- Use the context menu Add command.
- Enter details in the Add User DSN dialog tabs, then click OK.
Fields and controls
Name. The display name of the user DSN, as it appears in the user DSN list.
Description. This field is only shown in the edition/creation wizard and allows you to specify additional information about the resource.
User DSN State. Toggles whether the user DSN is enabled or disabled. When disabled, it will not be processed by the agent even if assigned to a user.
Data source name. The functional name of the user DSN.
Driver. The DSN driver. Now, only SQL server DSNs are supported.
Server Name. The name of the SQL server to which the user DSN is connecting.
Database Name. The name of the SQL database to which the user DSN is connecting.
Run Once. By default, Workspace Environment Management will create a user DSN every time the agent refreshes. Tick this box to make Workspace Environment Management only create the user DSN once, rather than at every refresh. This speeds up the agent refresh process, especially if you have many DSNs assigned to your users.
Action Type. Describes what type of action this resource is.
View a user DSN
You can view the WEM user DSNs in read-only mode. This implementation eliminates the risk of misconfiguration when reviewing the existing settings.
To view a user DSN, complete the following steps:
- Select the user DSN and then click View in the action bar.
- You can view the name, description, and configurations.
- After you finish, click Close.
Edit a user DSN
To edit a user DSN, complete the following steps:
- Click Edit in the action bar.
- Make changes as needed.
- After you finish, click Save.
Manage assignments for a user DSN
To manage assignments for a user DSN, complete the following steps:
- Select a user DSN and then select Manage assignments in the action bar.
- Select assignment targets (users, groups, and OUs) to assign the user DSN to.
- Use filters to contextualize the assignment.
- Set the priority of the selected user DSN for each target.
- After you finish, click Save.
Clone a user DSN
To clone a user DSN, complete the following steps:
- Select the user DSN and then select Clone in the action bar.
- Edit the name and description.
- Select the configuration set you need to clone.
- Click Clone to start the clone process.
Delete a user DSN
To delete a user DSN, select it and then select Delete in the action bar.