Install and configure
Before you start
You can use the following preinstallation checklist to note the prerequisites and settings for installing XenMobile® on-premises. Each task or note includes a column indicating the component or function for which the requirement applies.
Planning a XenMobile deployment involves many considerations. For recommendations, common questions, and use cases for your complete XenMobile environment, see the XenMobile Deployment Handbook.
For installation steps, see the Install XenMobile section later in this article.
Preinstallation checklist
Basic Network Connectivity
The following are the network settings that you need for the XenMobile solution.
| Prerequisite or setting | Component or function | Note the setting | ||
|---|---|---|---|---|
| Note the fully qualified domain name (FQDN) to which remote users connect. | XenMobile and Citrix Gateway | |||
| Note the public and local IP address. | ||||
| You need these IP addresses to configure the firewall to set up network address translation (NAT). | XenMobile and Citrix Gateway | |||
| Note the subnet mask. | XenMobile and Citrix Gateway | |||
| Note the DNS IP addresses. | XenMobile and Citrix Gateway | |||
| Write down the WINS server IP addresses (if applicable). | Citrix Gateway | |||
| Identify and write down the Citrix Gateway host name. | Citrix Gateway | This item is not the FQDN. The FQDN is contained in the signed server certificate that is bound to the virtual server and to which users connect. You can configure the host name by using the Setup Wizard in Citrix Gateway. | Citrix Gateway | |
| Note the IP address of XenMobile. Reserve one IP address if you install one instance of XenMobile. If you configure a cluster, note all IP addresses that you need. | XenMobile | |||
| One public IP address configured on Citrix Gateway | Citrix Gateway | |||
| One external DNS entry for Citrix Gateway | Citrix Gateway | |||
| Note the web proxy server IP address, port, proxy host list, and the administrator user name and password. These settings are optional if you deploy a proxy server in your network (if applicable). | Citrix Gateway | You can use either the sAMAccountName or the User Principal Name (UPN) when configuring the user name for the web proxy. | XenMobile and Citrix Gateway | |
| Note the default gateway IP address. | XenMobile and Citrix Gateway | |||
| Note the system IP (NSIP) address and subnet mask. | Citrix Gateway | |||
| Note the subnet IP (SNIP) address and subnet mask. | Citrix Gateway | |||
| Note the Citrix Gateway virtual server IP address and FQDN from the certificate. To configure multiple virtual servers, note all virtual IP addresses and FQDNs from the certificates. | Citrix Gateway | |||
| Note the internal networks that users can access through Citrix Gateway. Example: 10.10.0.0/24. Enter all internal networks and network segments that users need access to in these cases: When users connect with Secure Hub or the Citrix Gateway Plug-in when split tunneling is set to On. | Citrix Gateway | |||
| Ensure that the network connectivity between the XenMobile Server, the Citrix Gateway, the external Microsoft SQL Server, and the DNS server are reachable. | XenMobile and Citrix Gateway |
Licensing
XenMobile requires you to purchase licensing options for Citrix Gateway and XenMobile. For more information about Citrix Licensing, see The Citrix Licensing System.
| Prerequisite | Component | Note the location |
|---|---|---|
| Obtain Universal licenses from the Citrix website. For details, see Licensing in the Citrix Gateway documentation. | Citrix Gateway, XenMobile, and Citrix License Server |
Certificates
XenMobile and Citrix Gateway require certificates to enable connections with other Citrix products and apps and from user devices. For details, see the Certificates and Authentication section in the XenMobile documentation.
| Prerequisite | Component | Notes |
|---|---|---|
| Obtain and install the required certificates. | XenMobile and Citrix Gateway |
Ports
Open ports to allow communication with the XenMobile components.
| Prerequisite | Component | Notes |
|---|---|---|
| Open ports for XenMobile | XenMobile and Citrix Gateway |
Database
XenMobile requires database connection configuration. The XenMobile repository requires a Microsoft SQL Server database running on one of the supported versions noted in System requirements and compatibility. Citrix recommends using Microsoft SQL remotely. PostgreSQL is included with XenMobile. Use PostgreSQL locally or remotely only in test environments.
By default, XenMobile uses the jTDS database driver. To use the Microsoft JDBC driver for on-premises installations of XenMobile Server, see SQL Server drivers.
| Prerequisite | Component | Notes |
|---|---|---|
| Microsoft SQL Server IP address and port. Make sure that the service account of the SQL Server to be used on XenMobile has the DBcreator role permission. | XenMobile |
Active Directory Settings
| Prerequisite | Component | Notes |
|---|---|---|
| Note the Active Directory IP address and ports for the primary and secondary servers. If you use port 636, install a root certificate from a CA on XenMobile, and change the Use secure connections option to Yes. | XenMobile and Citrix Gateway | |
| Note the Active Directory domain name. | XenMobile and Citrix Gateway | |
| Note the Active Directory service account, which requires a user ID, password, and domain alias. | ||
| The Active Directory service account is the account that XenMobile uses to query the Active Directory. | XenMobile and Citrix Gateway | |
Note the User Base DN, which is the directory level under which users are located. For example: cn=users,dc=ace,dc=com. Citrix Gateway and XenMobile use the User Base DN to query the Active Directory. |
XenMobile and Citrix Gateway | |
| Note the Group Base DN, which is the directory level under which groups are located. Citrix Gateway and XenMobile use this DN to query Active Directory. | XenMobile and Citrix Gateway |
Connections between XenMobile and Citrix Gateway
| Prerequisite | Component | Note the setting |
|---|---|---|
| Note the XenMobile host name. | XenMobile | |
| Note the FQDN or IP address of XenMobile. | XenMobile | |
| Identify the apps users can access. | Citrix Gateway | |
| Note the Callback URL. | XenMobile |
User Connections: Access to Citrix Virtual Apps and Desktops™ and Citrix Secure Hub
Citrix recommends that you use the Quick Configuration wizard in Citrix ADC to configure connection settings between XenMobile and Citrix Gateway and between XenMobile and Secure Hub. You create a second virtual server to enable user connections from Citrix Receiver™ and web browsers. Those connections are to Windows-based applications and virtual desktops in Virtual Apps and Desktops. Citrix recommends that you also use the Quick Configuration wizard in Citrix ADC to configure these settings.
| Prerequisite | Component | Note the setting |
|---|---|---|
| Note the Citrix Gateway host name and external URL. The external URL is the web address with which users connect. | XenMobile | |
| Note the Citrix Gateway callback URL. | XenMobile | |
| Note the IP addresses and subnets masks for the virtual server. | Citrix Gateway | |
| Note the path for Program Neighborhood Agent or a Virtual Apps and Desktops Site. | Citrix Gateway and XenMobile | |
| Note the FQDN or IP address of the Citrix Virtual Apps™ and Desktops server running the Secure Ticket Authority (STA) (for ICA connections only). | Citrix Gateway | |
| Note the public FQDN for XenMobile. | Citrix Gateway | |
| Note the public FQDN for Secure Hub. | Citrix Gateway |
Flowchart for XenMobile deployment
You can use this flowchart to guide you through the main steps for deploying XenMobile. Links to topics on each step follow the figure.
1: System requirements and compatibility
3 and 4: Preinstallation checklist (this article)
5: Configure XenMobile in the Command Prompt Window (this article)
6: Configure XenMobile in a web browser (this article)
7: Configuring Settings for Your XenMobile Environment
Install XenMobile
The XenMobile virtual machine (VM) runs on Citrix XenServer, VMware ESXi, or Microsoft Hyper-V. You can use XenCenter® or vSphere management consoles to install XenMobile.
Note:
Make sure that the hypervisor is configured with the correct time – either using an NTP server or a manual configuration - because XenMobile uses that time. If you have time zone issues when syncing XenMobile time with a hypervisor, you can avoid the issues by pointing XenMobile to an NTP server. To do that, use the XenMobile CLI, as described in Command-line interface options.
XenServer or VMware ESXi prerequisites. Before installing XenMobile on XenServer or VMware ESXi, you must do the following. For details, see your XenServer or VMware documentation.
- Install XenServer® or VMware ESXi on a computer with adequate hardware resources.
- Install XenCenter or vSphere on a separate computer. The computer that hosts XenCenter or vSphere connects to the XenServer or VMware ESXi host through the network.
Hyper-V prerequisites. Before installing XenMobile on Hyper-V, you must do the following. For details, see your Hyper-V documentation.
- Install Windows Server 2016 or Windows Server 2019 with Hyper-V enabled, role enabled, on a computer with adequate system resources. While installing the Hyper-V role, be sure to specify the NICs on the server that Hyper-V uses to create the virtual networks. You can reserve some NICs for the host.
- Delete the file Virtual Machines/<build-specific UUID>.xml
- Move the file Legacy/<build-specific UUID>.exp into Virtual Machines
FIPS 140-2 mode. To install XenMobile Server in FIPS mode, complete a prerequisite group, as discussed in Configure FIPS with XenMobile.
Download XenMobile product software
You can download product software from the Citrix website. Log on to the site and then use the Downloads link to navigate to the page containing the software you want to download.
To download the software for XenMobile
-
Go to the Citrix website.
-
Next to the Search box, click Log On and log on to your account.
-
Click the Downloads tab.
-
On the Downloads page, from the select a product list, click Citrix Endpoint Management™ (and Citrix XenMobile Server). The Citrix Endpoint Management (and Citrix XenMobile Server) page automatically appears.
-
Expand XenMobile Server (on-premises).
-
Expand Product Software.
-
Click XenMobile Server 10.
-
Click the Jump to Download menu and choose the appropriate virtual image to use to install XenMobile. Alternatively, scroll down the page to locate the Download File button for the image you want to install.
-
Follow the instructions on your screen to download the software.
To download the software for Citrix Gateway
You can use this procedure to download the Citrix Gateway virtual appliance or software upgrades to your existing Citrix Gateway appliance.
- Go to the Citrix website.
- If you are not already logged on to the Citrix website, next to the Search box, click Log On and log on to your account.
- Click the Downloads tab.
- On the Downloads page, from the select product list, click Citrix Gateway.
- Click Go. The Citrix Gateway page appears.
- On the Citrix Gateway page, expand the version of Citrix Gateway you are running.
-
Under Firmware, click the appliance software version you want to download.
Note:
You can also click Virtual Appliances to download Citrix ADC VPX. When you select this option, you receive a list of software for the virtual machine for each hypervisor.
- Click the appliance software version that you want to download.
- On the appliance software page for the version you want to download, click Download for the appropriate virtual appliance.
- Follow the instructions on your screen to download the software.
Configure XenMobile for First-Time Use
-
To configure the IP address and subnet mask, default gateway, DNS servers, and other settings for XenMobile: Use the XenCenter or vSphere command-line console.
Note:
When you use a vSphere web client: We recommend that you don’t configure networking properties during the time you deploy the OVF template on the Customize template page. By doing so in a high availability configuration: You avoid an issue with the IP address that occurs when you clone and then restart the second XenMobile virtual machine.
-
Access the XenMobile management console only through the XenMobile Server fully qualified domain name or the IP addresses of the node.
-
Log on and then follow the steps in the initial logon screen.
Configure XenMobile in the Command Prompt Window
- Import the XenMobile virtual machine into Citrix XenServer, Microsoft Hyper-V, or VMware ESXi. For details, see XenServer, Hyper-V, or VMware documentation.
- In your hypervisor, select the imported XenMobile virtual machine and start the command prompt view. For details, see the documentation for your hypervisor.
-
From the hypervisor console page, create an administrator account for XenMobile in the command prompt window by typing the administrator user name and password.
When you create or change passwords for the command prompt administrator account, Public Key Infrastructure (PKI) server certificates, and FIPS: XenMobile enforces the following rules for all users except Active Directory users whose passwords are managed outside of XenMobile.
- The password must be at least eight characters long.
- The password must meet at least three of the following complexity criteria:
- Uppercase letters (A through Z)
- Lowercase letters (a through z)
- Numerals (0 through 9)
- Special characters (such as
! # $ %)
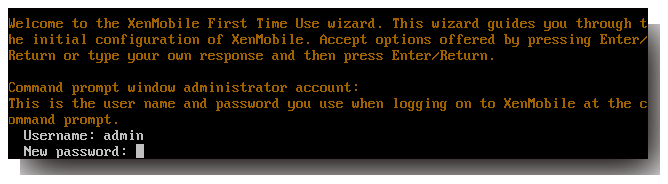
No characters, such as asterisks, appear when you type the new password.
- Provide the following network information and then type y to commit the settings:
- IP address of the XenMobile Server
- Netmask
- Default gateway, which is the IP address of the default gateway in the DMZ
- Primary DNS server, which is the IP address of the DNS server
-
Secondary DNS server (optional)
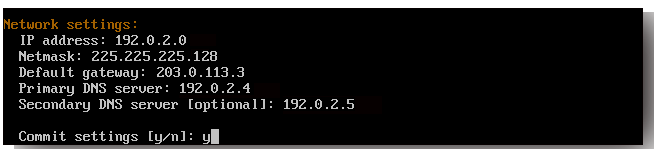
Note:
The addresses shown in this and the following images are non-working and are provided as examples only.
-
Type y to increase security by generating a random encryption passphrase or n to provide your own passphrase. Citrix recommends typing y to generate a random passphrase.
The passphrase is used as part of the protection of the encryption keys used to secure your sensitive data. A hash of the passphrase, stored in the server file system, is used to retrieve the keys during the encryption and decryption of data. The passphrase cannot be viewed.
Note:
If you intend to extend your environment and configure more servers, provide your own passphrase. If you select a random passphrase, you can’t view it.

-
Optionally, enable the Federal Information Processing Standard (FIPS). For details about FIPS, see FIPS. Also, be sure to complete a prerequisite group, as discussed in Configure FIPS with XenMobile.

-
Provide the following information to configure the database connection.
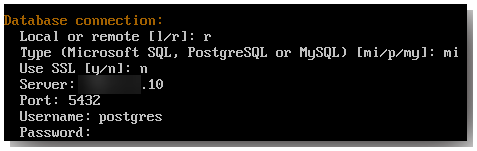
- Your database can be local or remote. Type l for local or r for remote.
-
Select the database type. Type mi for Microsoft SQL or type p for PostgreSQL.
Important:
- Citrix recommends using Microsoft SQL remotely. PostgreSQL is included with XenMobile. Use PostgreSQL locally or remotely only in test environments.
- Database migration is not supported. Databases created in a test environment cannot be moved to a production environment.
- Optionally, type y to use SSL authentication for your database.
- Provide the fully qualified domain name (FQDN) for the server hosting XenMobile. This one-host server provides both device management and app management services.
- Type your database port number if it is different from the default port number. The default port for Microsoft SQL is 1433 and the default port for PostgreSQL is 5432.
- Type your database administrator user name.
- Type your database administrator password.
- Type the database name.
- Press Enter to commit the database settings.
-
Optionally, type y to enable clustering XenMobile nodes, or instances.
Important:
If you enable a XenMobile cluster, after system configuration completes, open port 80 to enable real-time communication between cluster members. Complete that setup on all cluster nodes.
-
Type the XenMobile Server fully qualified domain name (FQDN).

- Press Enter to commit the settings.
- Identify the communication ports. For details on ports and their uses, see Port Requirements.
Note:
Accept the default ports by pressing Enter (Return on a Mac).

- Skip the next question about upgrading from a previous XenMobile release because you are installing XenMobile for the first time.
-
Type y if you want to use the same password for each Public Key Infrastructure (PKI) certificate. For details on the XenMobile PKI feature, see Uploading Certificates.
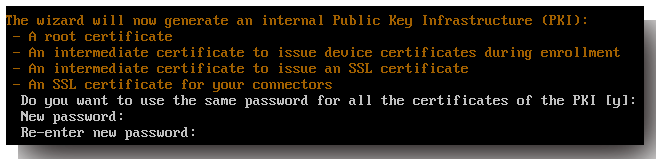
Important:
If you intend to cluster nodes, or instances, of XenMobile together, provide identical passwords for subsequent nodes.
-
Type the new password and then enter the new password again to confirm it.
No characters, such as asterisks, appear when you type the new password.
- Press Enter to commit the settings.
-
Create an administrator account for logging on to the XenMobile console with a web browser. Be sure to record these credentials for later use.

Note:
No characters, such as asterisks, appear when you type the new password.
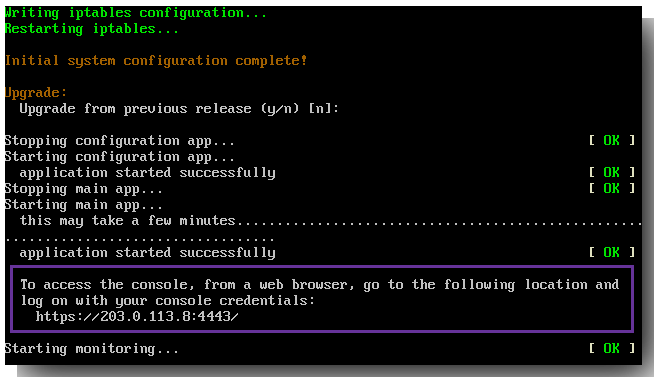
- Press Enter to commit the settings. The initial system configuration is saved.
- When asked if you’re upgrading, type n because it is a new installation.
-
Copy the complete URL that appears on the screen and continue this initial XenMobile configuration in your web browser.
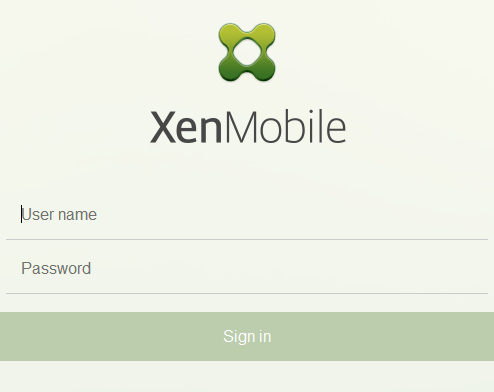
Configure XenMobile in a web browser
After completing the initial portion of the XenMobile configuration in your hypervisor command prompt window, complete the process in your web browser.
-
In your web browser, navigate to the location provided at the conclusion of the command prompt window configuration.
-
Type the XenMobile console administrator account user name and password that you created in the command prompt window.
-
On the Get Started page, click Start. The Licensing page appears.
-
Configure the license. If you don’t upload a license, you use an evaluation license valid for 30 days. For details on adding and configuring licenses and configuring expiration notifications, see Licensing.
Important:
If you intend to use XenMobile clustering by adding cluster nodes, or instances, of XenMobile, you must use the Citrix Licensing on a remote server.
-
On the Certificates page, click Import. The Import dialog box appears.
-
Import your APNs and SSL Listener certificate. iOS device management requires an APNs certificate. For details on working with certificates, see Certificates.
Note:
This step requires restarting the server.
-
If appropriate to the environment, configure Citrix Gateway. For details on configuring Citrix Gateway, see Citrix Gateway and XenMobile and Configuring Settings for Your XenMobile Environment.
Note:
- You can deploy Citrix Gateway at the perimeter of your internal network (or intranet). That deployment provides a secure single point of access to the servers, apps, and other network resources that reside in the internal network. In this deployment, all remote users must connect to Citrix Gateway before they can access any resources in the internal network.
- Although Citrix Gateway is an optional setting: After you enter data on the page, you must clear or complete the required fields before you can leave the page.
-
Complete the LDAP configuration to access users and groups from the Active Directory. For details on configuring the LDAP connection, see LDAP Configuration.
-
Configure the notification server to be able to send messages to users. For details on notification server configuration, see Notifications.
Post-requisite. Restart the XenMobile Server to activate your certificates.