-
-
Samsung Knox bulk enrollment
-
This content has been machine translated dynamically.
Dieser Inhalt ist eine maschinelle Übersetzung, die dynamisch erstellt wurde. (Haftungsausschluss)
Cet article a été traduit automatiquement de manière dynamique. (Clause de non responsabilité)
Este artículo lo ha traducido una máquina de forma dinámica. (Aviso legal)
此内容已经过机器动态翻译。 放弃
このコンテンツは動的に機械翻訳されています。免責事項
이 콘텐츠는 동적으로 기계 번역되었습니다. 책임 부인
Este texto foi traduzido automaticamente. (Aviso legal)
Questo contenuto è stato tradotto dinamicamente con traduzione automatica.(Esclusione di responsabilità))
This article has been machine translated.
Dieser Artikel wurde maschinell übersetzt. (Haftungsausschluss)
Ce article a été traduit automatiquement. (Clause de non responsabilité)
Este artículo ha sido traducido automáticamente. (Aviso legal)
この記事は機械翻訳されています.免責事項
이 기사는 기계 번역되었습니다.책임 부인
Este artigo foi traduzido automaticamente.(Aviso legal)
这篇文章已经过机器翻译.放弃
Questo articolo è stato tradotto automaticamente.(Esclusione di responsabilità))
Translation failed!
Samsung Knox bulk enrollment
To enroll multiple Samsung Knox devices into XenMobile® (or any mobile device manager) without manually configuring each device, use Knox Mobile Enrollment. The enrollment occurs upon first-time use or after a factory reset. Admins can also pass user names and passwords directly to the device, so users don’t need to enter any information upon enrollment.
Note:
The setup for Knox Mobile Enrollment is not related to the XenMobile Knox container. For more information on Knox Mobile Enrollment, see the Knox Mobile Enrollment Admin Guide.
Prerequisites for Knox Mobile Enrollment
- XenMobile must be configured (including licenses and certificates) and running.
- Secure Hub APK file. You upload the file when setting up Knox Mobile Enrollment.
- For a list of KME requirements, see the Knox Mobile Enrollment Introduction.
- Samsung Knox Platform for Enterprise (PKE) license that is required to apply device policies. Provide the license key in the XenMobile device policy, Knox Platform for Enterprise.
To download the Secure Hub APK file
Go to the Google Play store to download the Citrix Secure Hub™ for Android file.
Configure firewall exceptions
To access Knox Mobile Enrollment, configure the following firewall exceptions. Some of these firewall exceptions are required for all devices and some are specific the device’s geographical region.
| Device Region | URL | Port | Destination |
|---|---|---|---|
| All | https://gslb.secb2b.com |
443 | Global load balancer for Knox Mobile Enrollment initiation |
| All | https://gslb.secb2b.com |
80 | Global load balancer for Knox Mobile Enrollment initiation on some limited legacy devices |
| All | umc-cdn.secb2b.com |
443 | Samsung agent update servers |
| All | bulkenrollment.s3.amazonaws.com |
80 | Knox Mobile Enrollment customer EULAs |
| All | eula.secb2b.com |
443 | Knox Mobile Enrollment customer EULAs |
| All | us-be-api-mssl.samsungknox.com |
443 | Samsung servers for IMEI verification |
| United States | https://us-segd-api.secb2b.com |
443 | Samsung Enterprise Gateway for US region |
| Europe | https://eu-segd-api.secb2b.com |
443 | Samsung Enterprise Gateway for European region |
| China | https://china-segd-api.secb2b.com |
443 | Samsung Enterprise Gateway for China region |
Note:
You can find a full list of firewall exceptions in the Knox Mobile Enrollment Admin Guide.
Getting access to Knox Mobile Enrollment
Follow Samsung documentation to get access to Knox Mobile Enrollment at Get started with KME.
Setting up Knox Mobile Enrollment
After you get access to Knox Mobile Enrollment, log in to the Knox portal.
The enrollment process follows these general steps.
-
Create an MDM profile with your MDM console information and settings.
The MDM profile indicates to your devices how to connect to your MDM.
-
Add the devices to your MDM profile.
You can either upload a CSV file with device information or install and use the Knox deployment app from Google Play.
-
Samsung alerts you when device ownership is verified.
-
Provide users with MDM credentials. Instruct them to connect to the Internet using Wi-Fi and to accept the prompt to enroll their device.
To create an MDM profile
Follow the steps outlined in the Samsung documentation on Profile Configuration.
When you come across the following fields or steps, configure them as described:
- Pick your MDM: Select Citrix® from the menu. Only for device owner profiles.
-
MDM Agent APK: Only for device owner profiles. Type the Secure Hub APK download URL:
https://play.google.com/managed/downloadManagingApp?identifier=xenmobile.The APK file can stay on any server that the device can access during enrollment. During enrollment, a device:
- Downloads Secure Hub from APK download URL
- Installs Secure Hub
- Then opens Secure Hub with the custom JSON data described next.
The capitalization of the .apk file name must match the URL you enter. For example, if the file name is all lowercase, it must also be all lowercase in the URL.
- MDM Server URI: Do not specify an MDM server URI. XenMobile does not use the Samsung MDM protocol.
-
Custom JSON Data: Secure Hub needs the XenMobile Server address plus the user name and password for enrollment. You can provide that data in JSON so that Secure Hub doesn’t prompt users for it. Secure Hub prompts users for server address, user name, or password only if the field is left out from the JSON.
The format for custom JSON data is:
{"serverURL": "URL", "xm_username":"Username", "xm_password":"Password"}In this example, typical for bulk enrollment, Secure Hub doesn’t prompt users for the server address or their credentials during enrollment:
{"serverURL":"https://example.com/zdm", "xm_username":"userN", "xm_password":"password1234"}{"serverURL":"https://pmdm.mycorp-inc.net/zdm", "xm_username":"userN2", "xm_password":"password7890"}In this example, typical for kiosk-based devices, Secure Hub prompts users for their credentials:
{"serverURL":"https://example.com/zdm"}You can also enter the custom JSON for zero-touch enrollment for Android Enterprise.
     {
         "android.app.extra.PROVISIONING_ADMIN_EXTRAS_BUNDLE":
         {
             "serverURL":"URL","xm_username":"username","xm_password":"password"
         }
     }
 <!--NeedCopy-->
When a device starts enrollment, the device downloads Secure Hub from the given URL, installs Secure Hub, and opens Secure Hub.
Further configuration
See the following Samsung documentation pages for more information on configuration:
- Device configuration: Add devices in bulk.
- Samsung Knox Deployment App: Enroll devices through bluetooth, NFC, or Wi-Fi Direct enrollment.
- Knox Mobile Enrollment: Explore the Samsung documentation for more information on Samsung Knox.
To enroll devices running a Knox API earlier than version 2.4
On devices that have the Knox API earlier than the version 2.4, bulk enrollment doesn’t start during the initial device setup. Instead, users must start enrollment. To do that, users go to a Samsung site to download the new Mobile Enrollment client and start the enrollment.
The downloaded enrollment client uses the same MDM profile and APKs configured in the Knox Bulk enrollment portal for the Knox 2.4/2.4.1 devices.
Users typically follow these steps:
-
Turn on the device and connect to Wi-Fi. If the Mobile Enrollment doesn’t start or Wi-Fi is not available, do the following:
-
Tap the Next button to enroll devices with mobile data.
-
When the prompt Enroll with Knox appears, tap Continue.
-
Read the EULAs (if available). Tap Next.
-
If prompted, enter the User ID and Password provided by the IT administrator.
At this point, the user credentials are validated and their device is enrolled in your organization’s enterprise IT environment.
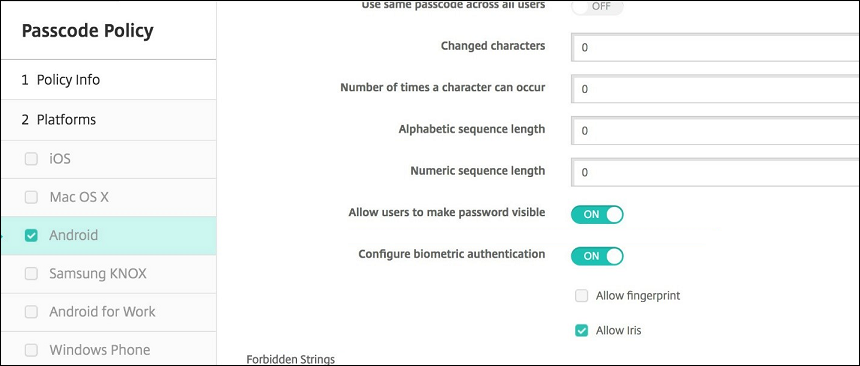
Enable and disable biometric authentication for Samsung devices
XenMobile supports fingerprint and iris scan authentication, also known as biometric authentication. You can enable and disable biometric authentication for Samsung devices without requiring any action from users. If you disable biometric authentication in XenMobile, users and third-party apps cannot enable the feature.
-
In the XenMobile console, click Configure > Device Policies. The Device Policies page appears.
-
Click Add. The Add New Policy page appears.
-
Click Passcode. The Passcode Policy information page appears.
-
In the Policy Information pane, enter the following information:
- Policy Name: Type a descriptive name for the policy.
- Description: Optionally, type a description of the policy.
-
Click Next. The Platforms page appears.
-
Under Platforms, select Android or Samsung Knox.
-
Set Configure biometric authentication to ON.
-
If you selected Android, under Samsung SAFE, select Allow fingerprint, Allow Iris, or both.
Share
Share
This Preview product documentation is Citrix Confidential.
You agree to hold this documentation confidential pursuant to the terms of your Citrix Beta/Tech Preview Agreement.
The development, release and timing of any features or functionality described in the Preview documentation remains at our sole discretion and are subject to change without notice or consultation.
The documentation is for informational purposes only and is not a commitment, promise or legal obligation to deliver any material, code or functionality and should not be relied upon in making Citrix product purchase decisions.
If you do not agree, select I DO NOT AGREE to exit.