Configure O365
Prerequisites
To configure O365 apps in the Citrix Workspace app, make sure to complete the following:
-
If you have a primary domain available in Microsoft Entra ID that is not federated with other services, you can use that domain to federate to Citrix Secure Private Access. Ensure that this domain, either the parent or the child domain of it is not already federated and the parent domain of it is not already added in the Microsoft Entra ID.
For example, if your user login using
user1@demo.citrix.com, then demo.citrix.com is primary domain, citrix.com is parent domain, and us.demo.citrix.com is child domain. -
If you cannot federate the primary domain, add a new domain to Microsoft Entra ID and federate it to Citrix Secure Private Access. Create the domain and complete the verification. For details, see https://docs.microsoft.com/en-us/azure/active-directory/fundamentals/add-custom-domain.
OR
You can add a subdomain to Microsoft Entra ID that can be leveraged to federate to Citrix Secure Private Access for SSO. For that, you must add and promote the subdomain to a root domain. For details, see https://docs.microsoft.com/en-us/azure/active-directory/enterprise-users/domains-verify-custom-subdomain.
Note: You might need to use Microsoft Entra ID Graph Explorer instead of Microsoft Graph Explorer for the POST request to change a subdomain to a root domain.
For details on why you need a federated domain, see How domain federation works.
-
Confirm that the new domain or the subdomain that you have added is in the “Verified” state in the Microsoft Entra ID.
-
Set up a trust between your SAML identity provider and Microsoft Entra ID. To set up a trust, you must have a domain that is verified in Microsoft Entra ID. When a federation is configured in Microsoft Entra ID using a domain, Microsoft Entra ID trusts the SAML provider for user authentication to Microsoft Entra ID, even if the user is from a different domain than the federated domain. In the SP initiated flow when Microsoft Entra ID must identify which IdP to use for authentication(accelerate user to federated IdP) it is identified using the
whr query paramordomain_hintpassed to the URL https://docs.microsoft.com/en-us/azure/active-directory/manage-apps/configure-authentication-for-federated-users-portal.Adding a federation for a new domain does not impact an existing federation that you have in your setup. If you have ADFS already federated to a domain, it is not impacted as you are federating on a different domain that is neither sub domain or parent domain of an already federated domain.
SSO can have the following two flows:
IDP initiated flow: Typically used when you want to log in to the Microsoft Entra ID portal. The Citrix Secure Private Access service posts the SAML assertion to Microsoft Entra ID. Microsoft Entra ID validates it based on the federation setting that we did earlier. If the validation passes, it extracts the
nameidattribute of SAML. Thenameidattribute must matchimmutableIdof the user which is present in the Microsoft Entra ID.SP initiated flow: Typically used when you want to land to the app directly instead of the Microsoft Entra ID portal. In this flow, the Citrix Secure Private Access service loads the URL that is configured in the app settings. The URL goes to Microsoft Entra ID and because the URL has some indication of the federated domain, the user is redirected to the Citrix Secure Private Access service with a SAML request and a relay state. The Citrix Secure Private Access service posts the SAML assertion to Microsoft Entra ID with the same relay state that came in the request. Once SAML is validated, Microsoft Entra ID redirects a user to the context in the relay state and hence the user lands on the app directly.
-
Configure the O365 app in the Citrix Secure Private Access service. For details see Support for Software as a Service apps.
How domain federation works
The following figure illustrates a typical flow involved after a domain federation is complete.
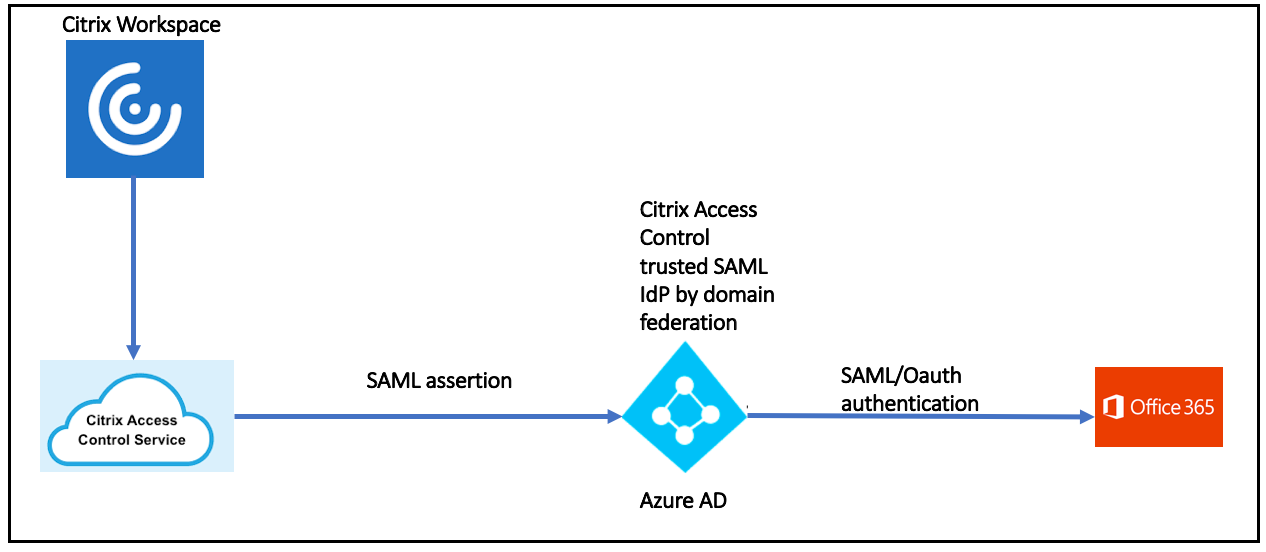
Consider that you want to add the Office 365 app into the Citrix Workspace and enable watermarking and restrict downloads. The typical flow is as follows:
- You launch the Office 365 app in the Citrix Workspace.
- The request goes to the Citrix Secure Private Access service.
- Citrix Secure Private Access service creates the SAML assertion and forwards it to Microsoft Entra ID.
-
As the request is coming from a trusted SAML IdP, Microsoft Entra ID identifies it through the domain federation that is created and passes the SAML assertion to the Office 365 app.
The Office 365 app is launched.
Authentication methods supported for the Office 365 app
By default, Citrix Cloud uses the Citrix identity provider to manage the identity information for all users in your Citrix Cloud account.
Citrix Workspace supports the following authentication methods for Office 365. Okta and Google IdP are not currently supported.
- On-premises Active Directory
- Active Directory plus Token
-
Microsoft Entra ID
Note: If Microsoft Entra ID is used to authenticate to the workspace, then you cannot federate the primary domain (user’s login domain) because this creates a loop. In such cases, you must federate a new domain
- Citrix Secure Private Access
- Active Directory plus RADIUS
For more details, see Identity and access management.
Configure the O365 app in the Secure Private Access service
The following are the high-level steps to configure the O365 app in the Secure Private Access service. For more details, see Support for Software as a Service app.
- Go to the Secure Private Access service in Citrix Cloud.
-
Search for Office 365 and choose the Office365 template. For details on configuring an app using the template, see Support for Software as a Service apps.
Note:
Once you select the Office365 template, the following related domains are autopopulated in the App Details section.
- *.office.com
- *.office365.com
- *.sharepoint.com
- *.live.com
- *.onenote.com
- *.microsoft.com
- *.powerbi.com
- *.dynamics.com
- *.microsoftstream.com
- *.powerapps.com
- *.yammer.com
- *.windowsazure.com
- *.msauth.net
- *.msauthimages.net
- *.msocdn.com
- *.microsoftonline.com
- *.windows.net
- *.microsoftonline-p.com
- *.akamaihd.net
- *.sharepointonline.com
- *.officescriptsservice.com
- *.live.net
- *.office.net
- *.msftauth.net
- Enable enhanced security controls, if needed.
-
Configure SSO.
Note: The only change you must do is to make sure “Name ID” is the Active Directory GUID.
- Ensure that advanced attributes also send
IDPEmail.- Attribute Name:
IDPEmail - Attribute Format: Unspecified
- Attribute Value: Email
- Attribute Name:
- Click SAML metadata to open in a new tab.
- Copy “entityID”
- Copy “Login URL”
- Download the Certificate in CRT format
Configure domain federation from Microsoft Entra ID to Citrix Workspace
Prerequisites:
- Enable PowerShell in Microsoft Entra ID
- Install Microsoft MSOnline module
The following are the PowerShell commands to install the required modules.
`PS> Install-Module AzureAD -Force`

`PS> Import-Module AzureAD -Force`

`PS> Install-Module MSOnline -Force`

`PS> Import-module MSOnline -Force`
<!--NeedCopy-->
If the modules are already installed, then run the following command.
PS> connect-msolservice
<!--NeedCopy-->
Note: A Microsoft cloud account is required to connect to msolservice. For example, admin.user@onmicrosoft.com.
Steps to configure domain federation from Microsoft Entra ID to Citrix Workspace
-
Run the following commands in the PowerShell to configure the federation:
PS> $dom = "ad-domain.com"
Note: ad-domain.com is the new domain added to Microsoft Entra ID
PS> $IssuerUri = "https://citrix.com/[customerID]"
Note: The customerID can be found from the following locations:
- Citrix Cloud > Identity and Access Management > API Access
-
Citrix Cloud > Citrix Secure Private Access. the customer ID can be found in the app configuration details (Single sign > SAML Metadata file > entityID).
PS> $fedBrandName = “CitrixWorkspace”PS> $logoffuri = "https://app.netscalergateway.net/cgi/logout"PS> $uri = "https://app.netscalergateway.net/ngs/[customerID]/saml/login?APPID=[AppID]”
Note: $uri can be copied from Citrix Secure Private Access Service > Add a Web/SaaSApp > Single sign on > Login URL or from SAML Metadata > Location.
-
PS> $cert = New-Object System.Security.Cryptography.X509Certificates.X509Certificate2(“<location of certificate downloaded from Citrix Secure Private Access service/filename.crt>”)For example:
PS> $cert = New-Object System.Security.Cryptography.X509Certificates.X509Certificate2("c:\cert\saml_idp.crt")
PS> $certData = [system.convert]::tobase64string($cert.rawdata) -
Run the PS string to complete the Federation to Citrix Secure Private Access:
PS> Set-MsolDomainAuthentication -DomainName $dom –federationBrandName $fedBrandName -Authentication Federated -PassiveLogOnUri $uri -LogOffUri $logoffuri -SigningCertificate $certData -IssuerUri $IssuerUri -PreferredAuthenticationProtocol SAMLP -
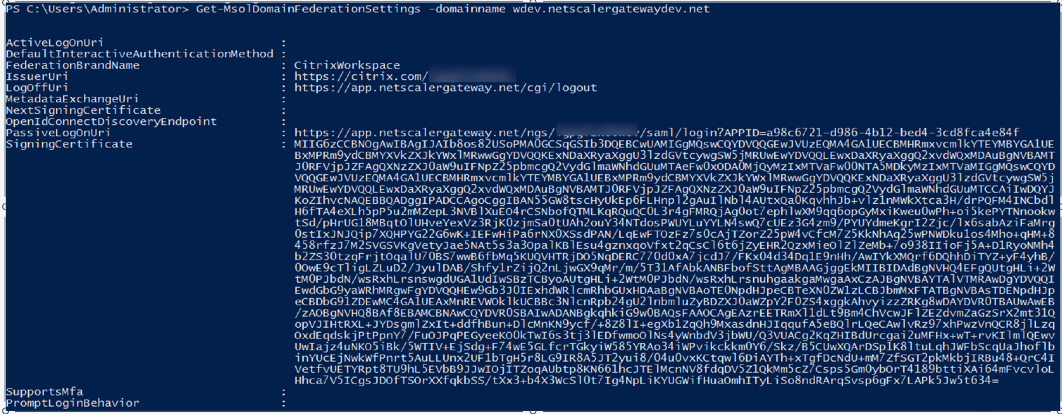
Verify domain federation settings by running the following command:
Get-MsolDomainFederationSettings -DomainName <domain name>
Automated domain federation from Microsoft Entra ID to Citrix Workspace
In the manual domain federation from Microsoft Entra ID to Citrix Workspace, users have to switch between cloud portal and PowerShell to copy data and run the scripts. For example;
- Copy data, such as customer ID and app ID from the cloud portal.
- Download the certificate from the cloud portal.
- Run the PowerShell scripts.
This manual copy-paste action might introduce errors because of which the federation might not be successful.
The steps to federate a domain are now integrated within the Citrix Secure Private service user interface making the federation process automated. The PowerShell scripts are run in the back end when users click the appropriate links in the interface. Users do not have to switch between cloud portal and PowerShell.
Steps to federate a domain automatically
- Configure the O365 app. For details, see Configure the O365 app in the Secure Private Access service.
-
In Single sign on, select SAML.
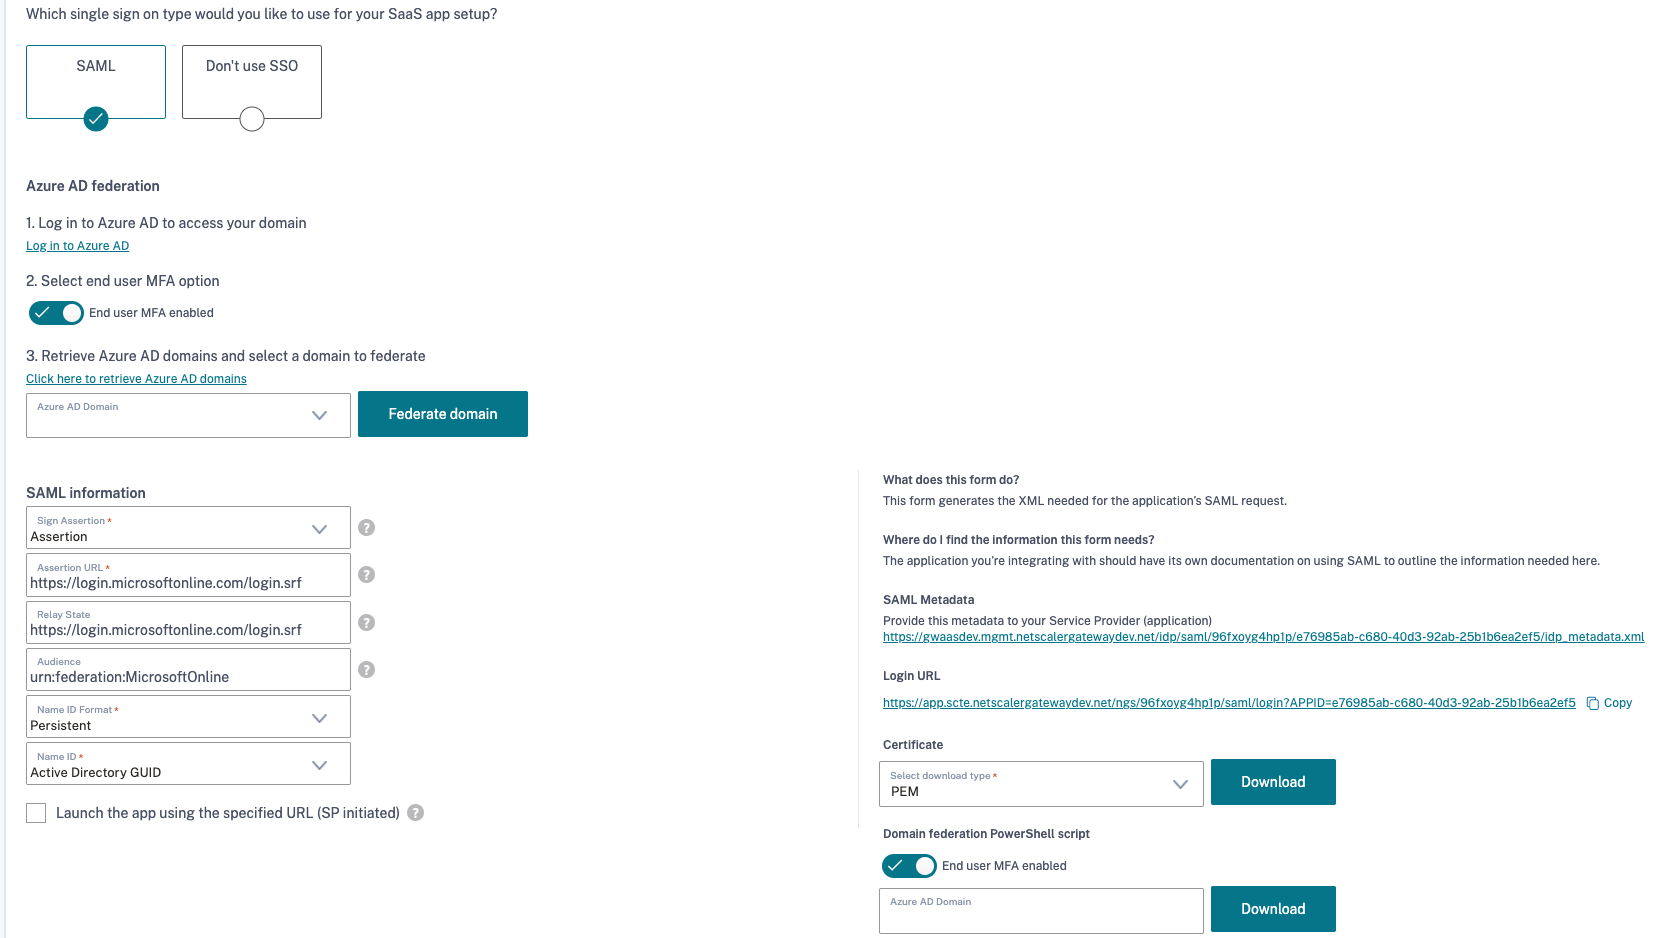
- Log on to Microsoft Entra ID using your credentials.
When you click Log in to Entra ID, you are directed to the Microsoft Entra ID logon portal for authentication.
- OAuth protocol is used for authentication. After the authentication is successful, you must provide consent for federating the domain.
- Select end user MFA option is enabled, by default.
- Click Click here to retrieve Entra ID Domains to view the list of all domains.
- Select the domain that you want to federate and click Federate domain.
Note:
- When you click Federate domain, the PowerShell scripts are run in the back end and the domain is federated.
- You can also download the PowerShell scripts, if necessary, from the interface. In Domain federation PowerShell script, click Download.
Suppress multifactor authentication (MFA)
An option is added to the advanced attributes of O365 apps that suppresses MFA when the user has already entered the MFA during user authentication to Citrix Workspace.
-
Attribute Name: “
http://schemas.microsoft.com/ws/2008/06/identity/claims/authenticationmethod”, -
Attribute Value: “
http://schemas.microsoft.com/claims/multipleauthn”
For the Microsoft Entra ID to accept this claim, federate using the following PowerShell command:
Set-MsolDomainAuthentication -DomainName $dom –federationBrandName $fedBrandName -Authentication Federated -PassiveLogOnUri $uri -LogOffUri $logoffuri -SigningCertificate $certData -IssuerUri $IssuerUri -PreferredAuthenticationProtocol SAMLP -SupportsMfa $true
Note:
IdP initiated flow does not honor relay state. Use SP initiated flow to land on the app directly.
Configuring individual Office suite applications in Citrix Workspace
Perform the following to configure individual office suite applications:
- Complete the domain federation as detailed in previous sections.
- Choose the O365 template.
- Change the name of the app to, for example, MS Word.
- Change the app URL to accordingly.
Word: https://login.microsoftonline.com/login.srf?wa=wsignin1%2E0&rver=6%2E1%2E6206%2E0&wreply=https%3A%2F%2Fwww.office.com%2Flaunch%2FWord%3Fauth%3D2&whr=<federated domain>
Powerpoint: <https://login.microsoftonline.com/login.srf?wa=wsignin1%2E0&rver=6%2E1%2E6206%2E0&wreply=https%3A%2F%2Fwww.office.com%2Flaunch%2Fpowerpoint%3Fauth%3D2&whr=<federated domain>
Excel: https://login.microsoftonline.com/login.srf?wa=wsignin1%2E0&rver=6%2E1%2E6206%2E0&wreply=https%3A%2F%2Fwww.office.com%2Flaunch%2FExcel%3Fauth%3D2&whr=<federated domain>
CRM/Dynamics Online: https://<tenant>.crm.dynamics.com/?whr=<federated domain>
OneDrive for Business: https://login.microsoftonline.com/login.srf?wa=wsignin1%2E0&rver=6%2E1%2E6206%2E0&wreply=https%3A%2F%2F<tenant>-my.sharepoint.com%2F&whr=<federated domain>
Outlook Calendar: https://outlook.office.com/owa/?realm=<federated domain>&path=/calendar/view/Month
Outlook Web Access to Exchange Online: https://outlook.com/owa/<federated domain>
SharePoint Online: https://login.microsoftonline.com/login.srf?wa=wsignin1%2E0&rver=6%2E1%2E6206%2E0&wreply=https%3A%2F%2F<tenant>.sharepoint.com%2F&whr=<federated domain>
Teams: https://login.microsoftonline.com/common/oauth2/authorize?client_id=cc15fd57-2c6c-4117-a88c-83b1d56b4bbe&response_mode=form_post&response_type=code+id_token&scope=openid+profile&redirect_uri=https%3a%2f%2fteams.microsoft.com%2f&domain_hint=<federated domain>
Third party apps integrated into Microsoft Entra ID
If you have integrated third party applications like Box, Salesforce, ServiceNow, Workday, you can obtain the Smart Links for these apps from the Microsoft Entra ID.
Perform the following steps.
-
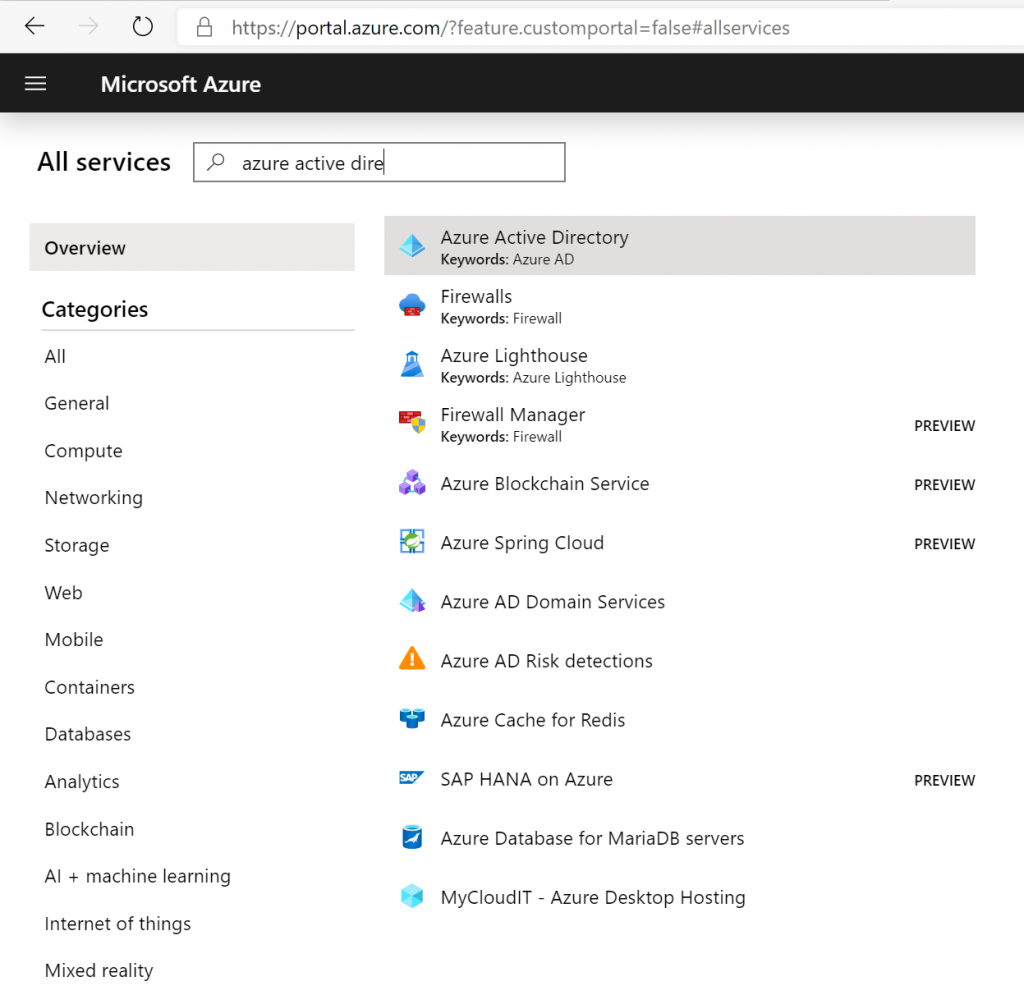
Log in to your Microsoft Entra ID Portal https://portal.azure.com.
-
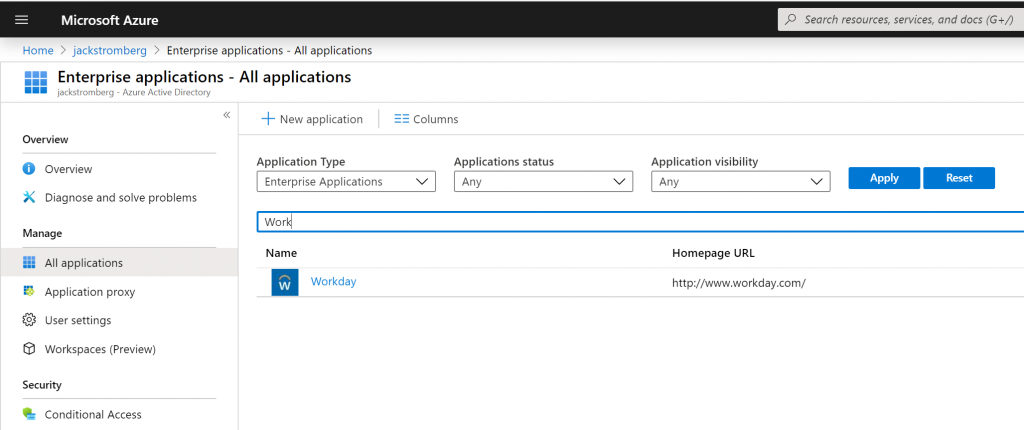
Select All Services > Azure Active Directory, and select your directory.
-
Select Enterprise Applications and then choose the application you want to generate a Smart Link to.
-
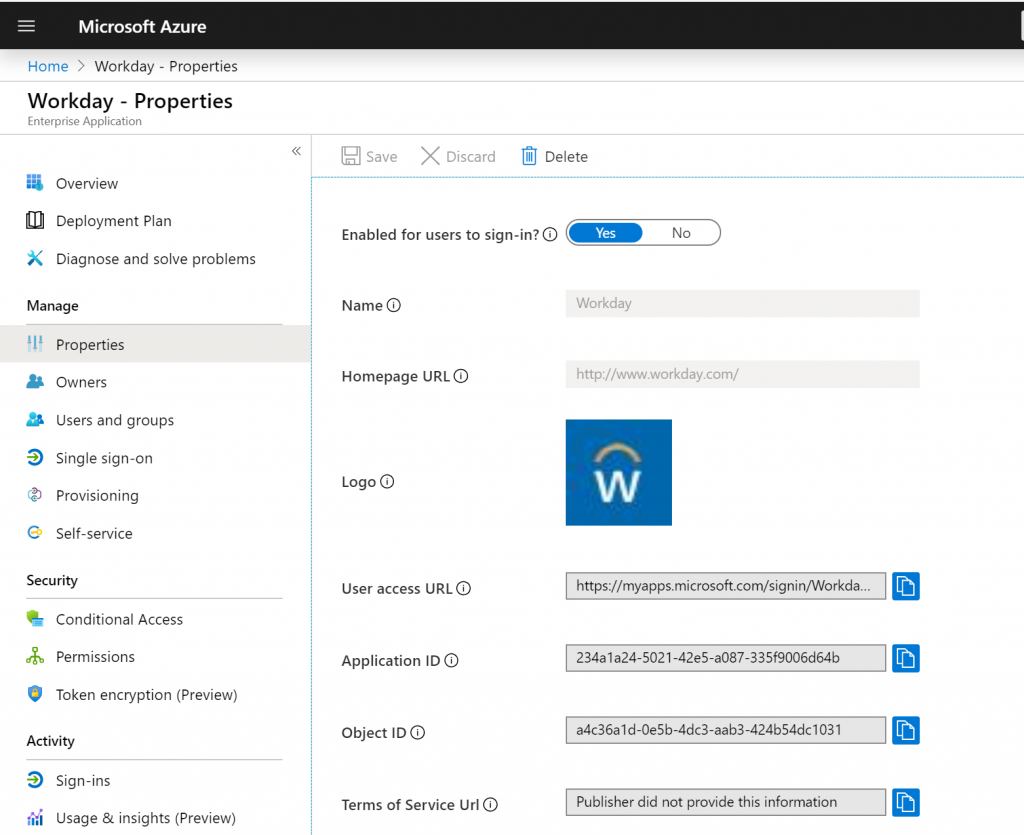
Select Properties and copy the User access URL.
-
After you append
whrto the URL, thewhrparameters appear as shown in the example URL.Example URL: https://myapps.microsoft.com/signin/Workday/1234567891234567891234567896d64b&whr=ctxnsqa.net
Note: Append
whrto the URL so that Microsoft Entra ID knows which IdP to use to authenticate a user based on federation setting and auto redirect to that IdP. - Set enhanced security controls.
- Configure SSO.
- Name ID = AD GUID
- Enable SP-initiated checkbox
-
Assertion URL = Login URL
When you perform an IdP initiated flow, users are redirected to the Microsoft Entra ID portal page. If you want to land directly on the app page, then SP initiated flow is needed as it sends the correct relay state in the SAML assertion.
Note:
- When federation of the primary domain is enabled, all Microsoft Entra ID users are redirected to Citrix Workspace when authenticating to any Office 365 applications. This might cause an outage/incident for customers if done without understanding the impact.
If users log on to Citrix Workspace using Microsoft Entra ID, then the primary domain of the users that is used to log in must not be federated to the Citrix Gateway service. This results in a loop. In such cases, use another domain different from the domains of users login to Microsoft Entra ID to federate to the Citrix Secure Private Access service.
- If the primary domain is federated to the Citrix Secure Private Access service, then all user logins on that domain in Microsoft Entra ID are redirected to the Citrix Secure Private Access service. For POC, if needed, you can federate a test domain before federating the primary domain.
- If Microsoft Entra ID has the location policy turned on, users must be from the list of allowed IP addresses of a corporate network only. In such cases, you can publish the O365 app as a Web app and route its traffic via the Connector Appliance.
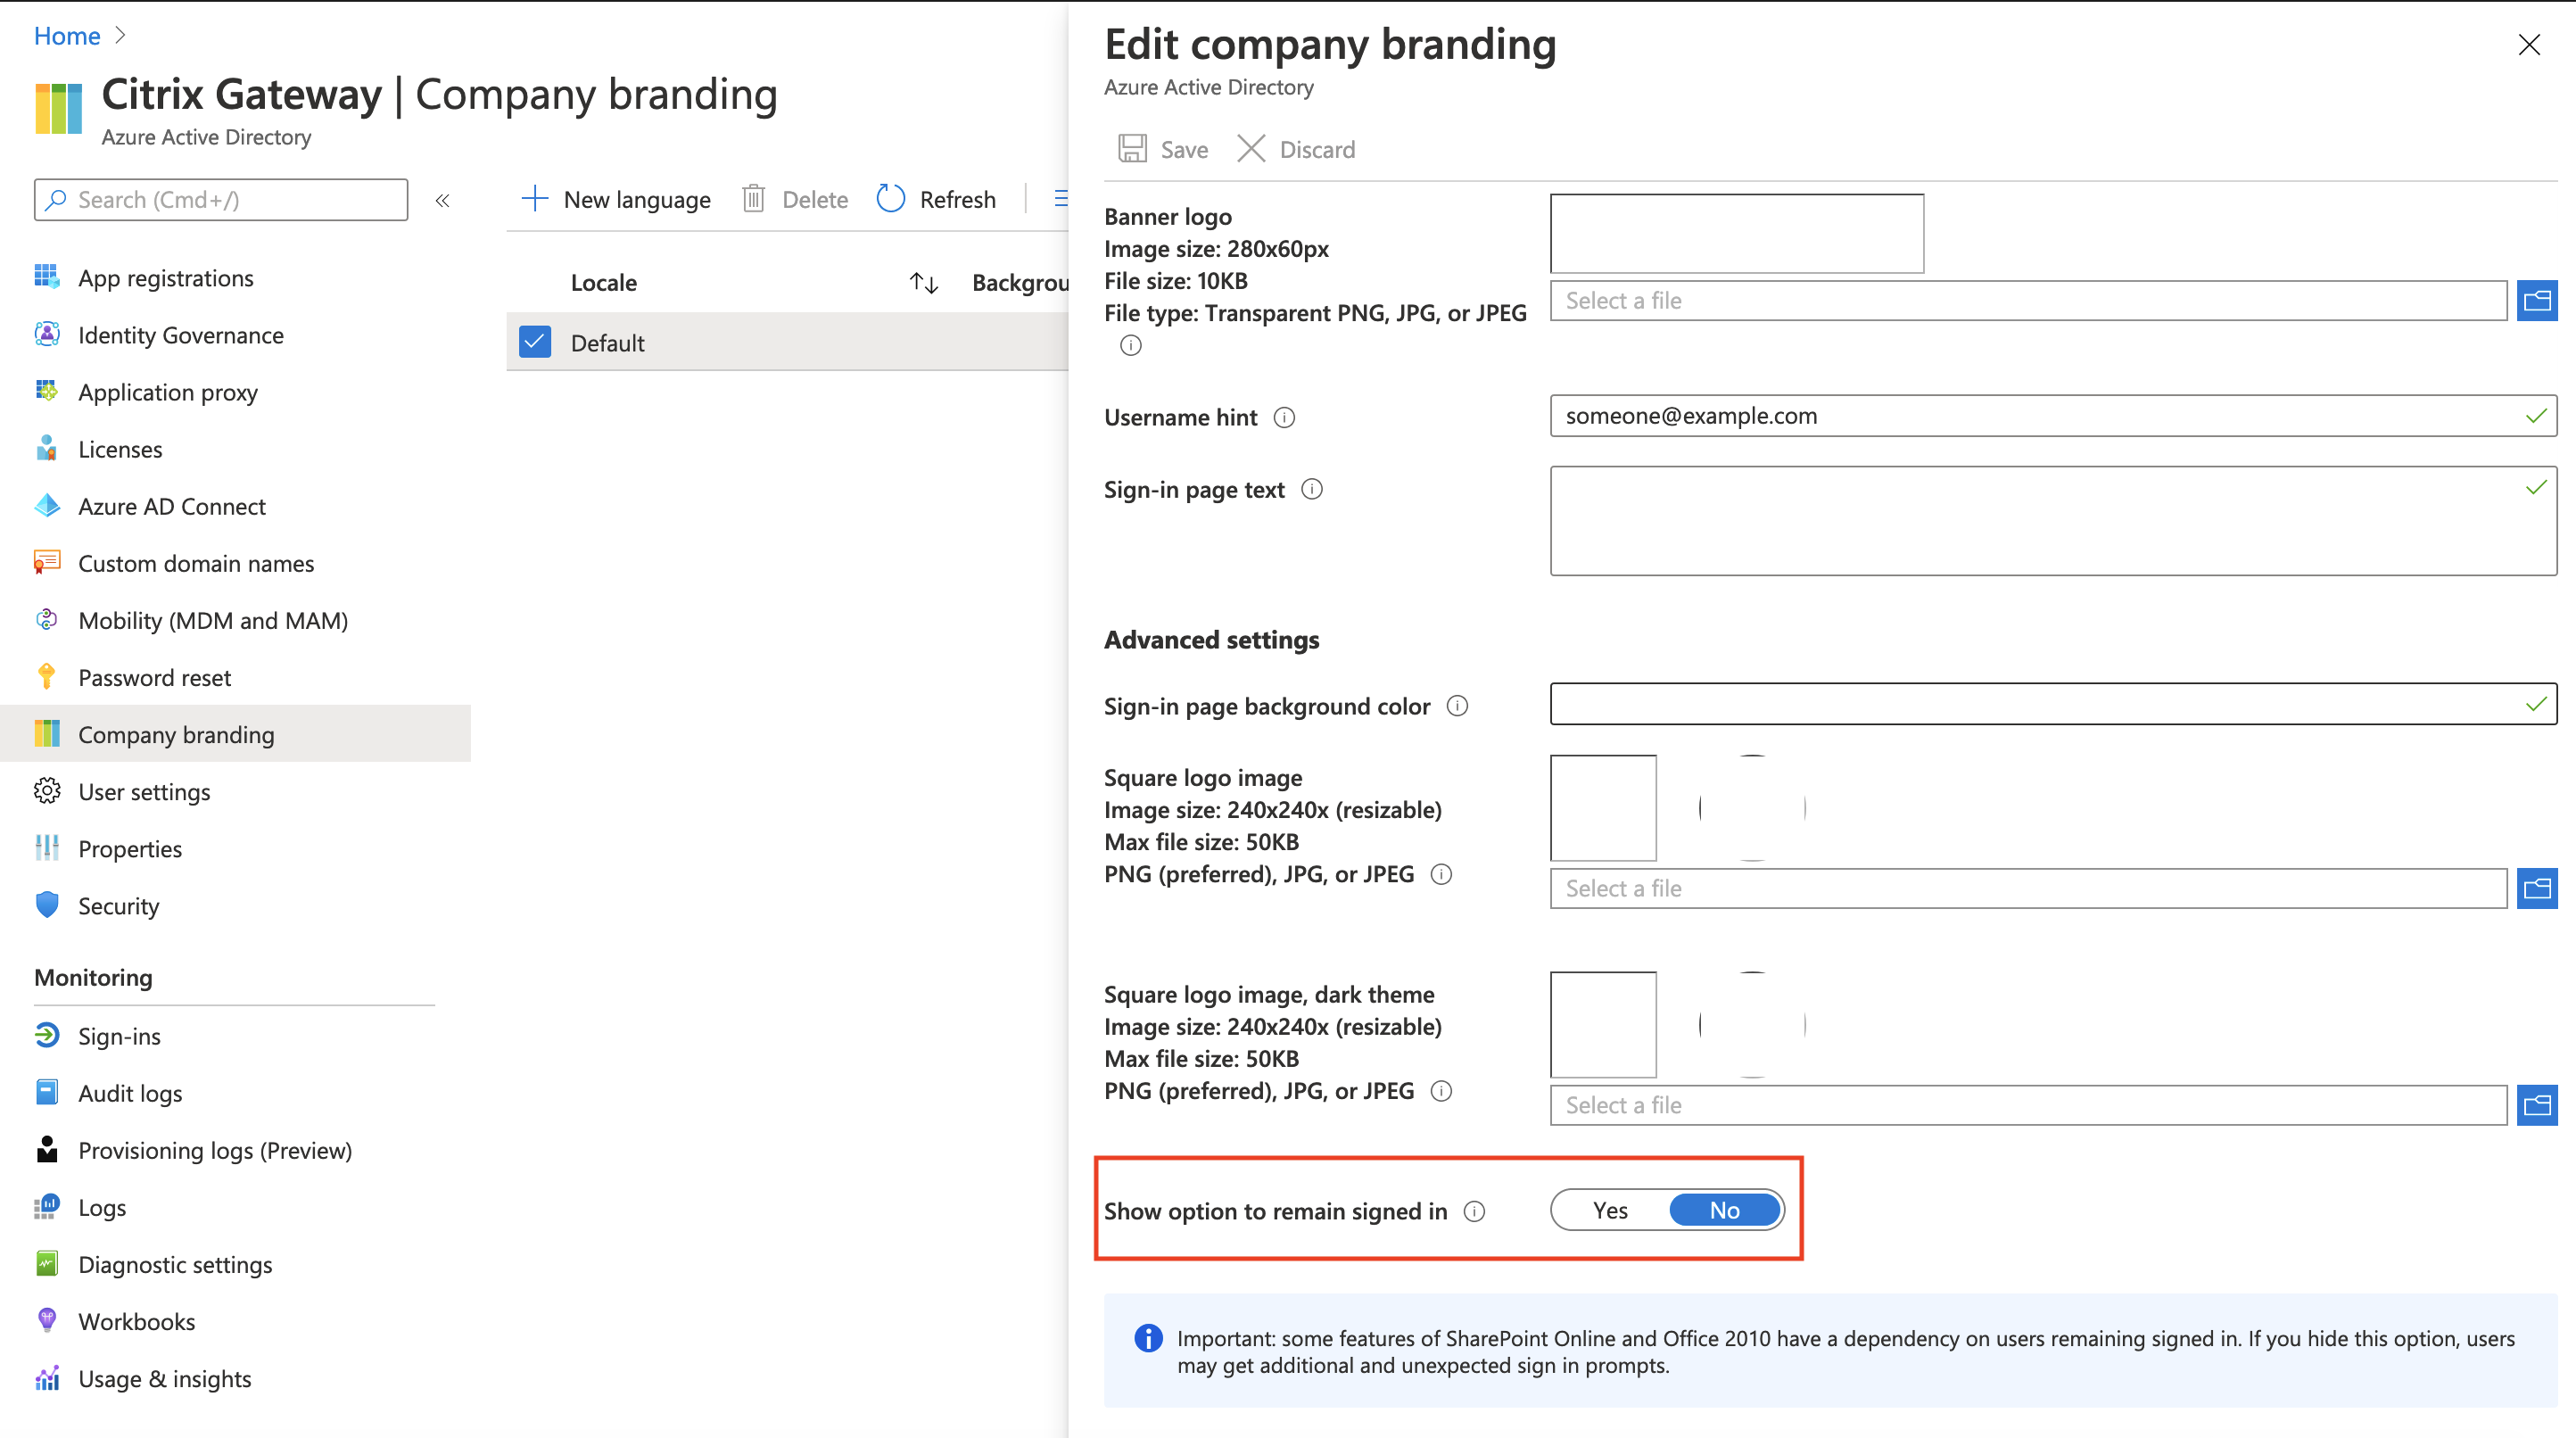
- When logging on to the Microsoft Entra ID, if you want to avoid the Stay signed in? prompt, you can change this setting by using the Microsoft Entra ID. Note the important message that appears when you change the setting and revert if necessary.

Reference Links
Azure PowerShell Module Reference
Azure PowerShell Command Reference
Deploy Office 365 Directory Synchronization in Microsoft Azure
In this article
- Prerequisites
- How domain federation works
- Authentication methods supported for the Office 365 app
- Configure the O365 app in the Secure Private Access service
- Configure domain federation from Microsoft Entra ID to Citrix Workspace
- Automated domain federation from Microsoft Entra ID to Citrix Workspace
- Suppress multifactor authentication (MFA)
- Configuring individual Office suite applications in Citrix Workspace
- Third party apps integrated into Microsoft Entra ID