Troubleshooting
This article provides information to help administrators troubleshoot issues with Citrix Workspace app.
Connection
You might come across the following connection issues.
Published resource or desktop session
When establishing a connection to a Windows server, if a dialog box appears with the message “Connecting to server…” but no connection window appears later, you might need to configure the server with a Client Access License (CAL). For more information about licensing, see Licensing.
Session reconnection
The connection might fail when reconnecting to a session with a higher color depth than that the Citrix Workspace app requires. This failure occurs when running out of available memory on the server.
If the reconnection fails, Citrix Workspace app tries to use the original color depth. Otherwise, the server tries to start a new session with the requested color depth, leaving the original session in a disconnected state. The second connection might also fail if there’s still a lack of available memory on the server.
Full Internet name
Citrix® recommends that you configure DNS (Domain Name Server) on your network. This configuration enables you to resolve the names of servers to which you want to connect. If you do not have DNS configured, it might not be possible to resolve the server name to an IP address. Instead, you can specify the server by its IP address, rather than by its name. TLS connections require a fully qualified domain name, not an IP address.
Slow sessions
If a session does not start until you move the mouse, there might be a problem with random number generation in the Linux kernel. As a workaround, run an entropy-generating daemon such as rngd (which is hardware-based) or haveged (from Magic Software).
Send feedback on Citrix Workspace app
The Send Feedback option allows you to inform Cloud Software Group about any issues that you might run into while using Citrix Workspace app. You can also send suggestions to help us improve your Citrix Workspace app experience.
This new feature enhances the feedback experience, ensuring a more efficient and informative communication channel between users and support teams.
The Send Feedback option includes an integrated log manager, empowering users to capture and include relevant logs for a comprehensive feedback report.
Also, the Send Feedback provides seamless communication by enabling users to send feedback emails directly using the default mail client installed on their system.
The supported email clients are the following:
- Thunderbird
- Evolution
- Mutt
- Alpine
To configure email address for send feedback, do the following:
Add the following key in the Authmanconfig.xml file:
<!-- Configure email address for sendfeedback - - >

<FeedbackEmailAddress>cwa-linux-feedback@cloud.com</FeedbackEmailAddress>

<key>SendFeedbackEnabled</key>

<value>true</value>
<!--NeedCopy-->
Note:
By sending your feedback to Cloud Software Group, you agree your participation is in accordance with and subject to the Cloud software Group End User Agreement.
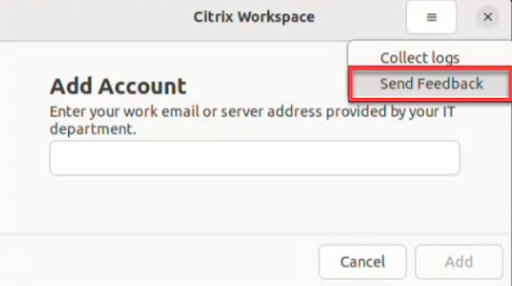
You can send feedback using any one of the following methods:
- Navigate to the Add Account screen.
- Click the hamburger menu.
-
Click Send Feedback.
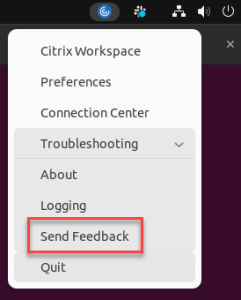
Or,
-
Click Send Feedback in the App indicator icon.
Or,
- At the command-line, navigate to the
/opt/Citrix/ICAClient/utilpath. -
Run the following command:
./sendfeedback <!--NeedCopy--> -
The Send Feedback screen appears.
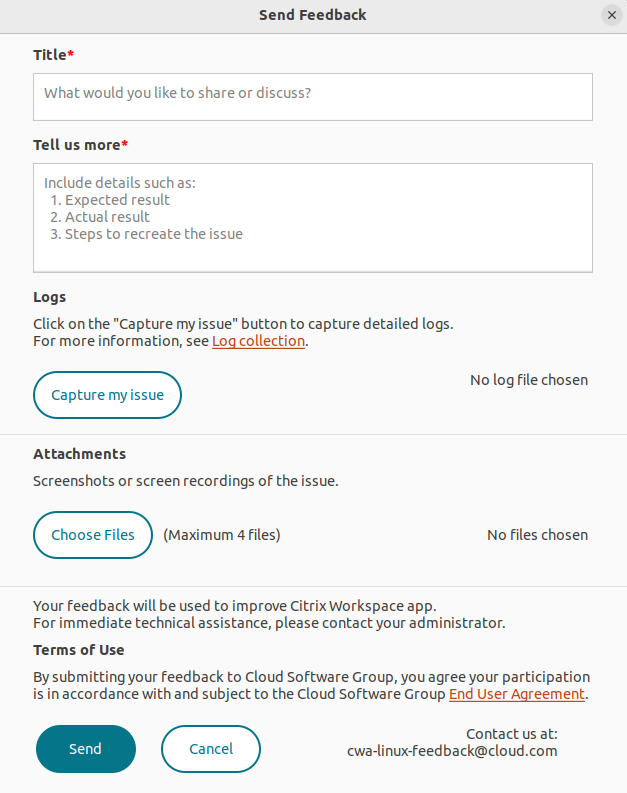
- Provide the issue Title.
- Add issue details in the Tell us more field.
-
Click Capture my issue. The Citrix Log Collection Utility screen appears.
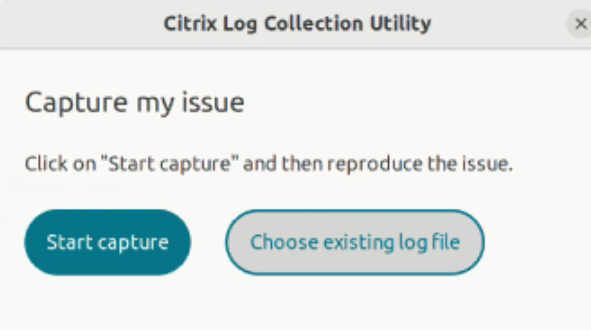
Click Start capture and then reproduce the issue to collect the latest logs.
Or,
Click Choose existing logs if you are not able to reproduce the issue.
Note:
For more information on the Citrix Log Collection Utility, see Log Collection.
- Ensure that the log files are displayed next to Capture my issue.
-
Click Choose Files and then add attachments that describe your issues such as screenshots or screen recordings.
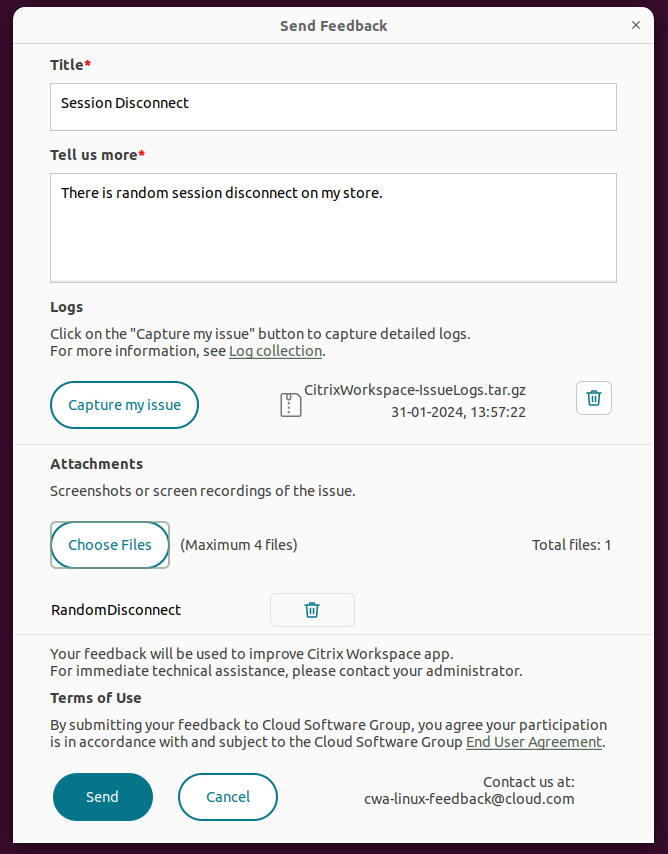
-
Click Send. The Feedback report screen appears.
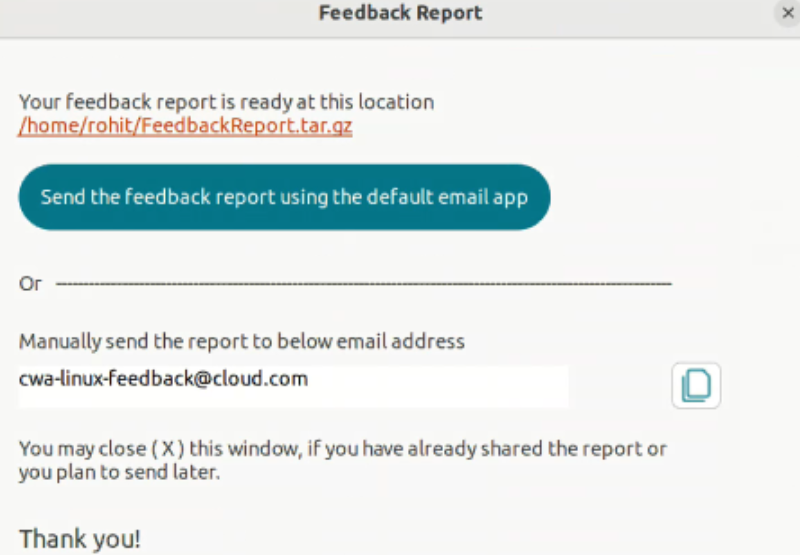
The .tar.gz file contains the log files, the issue description as test files, and the attachments.
-
You can send the feedback report to Citrix using the following options:
Click Send the feedback report using the default email app to use the default mail app in your system.
Or,
Send the report manually to the provided email ID.
Note:
Ensure that the .zip file is attached in the email.
Cipher suites
If your connection fails with the new cryptographic support:
- You can use various tools to check the cipher suites that your server support, including:
-
Ssllabs.com(requires the server to have Internet access) -
sslyze(https://github.com/nabla-c0d3/sslyze)
-
- In Linux Client WireShark, find the packet (Client Hello, Server Hello) with the filter (ip.addr ==
VDAIPAddress) to find the SSL section. The result has the cipher suites sent by the client and accepted by the server.
Incorrect Citrix Optimization SDK
The Citrix Optimization SDK package includes an incorrect version of the UIDialogLibWebKit.so. As a workaround, do the following:
-
Download Citrix Optimization SDK package version 18.10 from the Downloads page.
-
Go to the path
CitrixPluginSDK/UIDialogLib/GTK:cd CitrixPluginSDK/UIDialogLib/GTK -
Delete all the object files:
rm -rf *.o -
Go to the WebKit folder:
cd ../WebKit -
Remove the existing
UIDialogLibWebKit.so:rm -rf UIDialogLibWebKit.so -
Use the following command in the WebKit directory:
make allThe new
UIDialogLibWebKit.sois generated. -
Copy the new library into the $ICAROOT/lib directory.
-
Weak cipher suites for SSL connections
When making a TLS connection, the Citrix Workspace app offers an advanced and restricted set of cipher suites by default.
If you’re connecting to a server that requires an older cipher suite, set the configuration option SSLCiphers=ALL in the [WFClient] section of a configuration file.
The following advanced cipher suites are supported:
- TLS_ECDHE_RSA_WITH_AES_256_GCM_SHA384 (0xc030), ALL, GOV
- TLS_ECDHE_RSA_WITH_AES_256_CBC_SHA384 (0xc028), ALL, GOV
- TLS_ECDHE_RSA_WITH_AES_128_CBC_SHA (0xc013), ALL, COM
Loss of connection
When using the EDT protocol, you might see the error message: Connection to “…” has been lost. This issue might occur when the connection goes through a router with a Maximum Transmission Unit for EDT that is smaller than the default of 1,500 bytes. Do the following:
- Set
edtMSS=1000in a configuration file.
Connection errors
Connection errors might produce various different error dialogs. Examples are:
- Error in connection: A protocol error occurred while communicating with the Authentication Service.
- The Authentication Service can’t be contacted.
- Your account can’t be added using this server address.
Some problems might cause such errors, including:
- An error might occur when the local computer and the remote computer can’t negotiate a common TLS protocol. For more information, see TLS.
- An error might occur when the remote computer requires an older cipher suite for a TLS connection. In this case, you can set the configuration option
SSLCiphers=ALLin the\[WFClient\]section of a configuration file and runkillall AuthManagerDaemon ServiceRecord selfservice storebrowsebefore restarting the connection. - An error might occur when the remote computer requests a client certificate inappropriately. IIS must only accept or require certificates for Citrix, Authentication, and Certificate.
- Other problems.
Low-bandwidth connections
Citrix recommends you use the latest version of Citrix Virtual Apps and Desktops or Citrix DaaS (formerly Citrix Virtual Apps and Desktops service) on the server. Also, the use the latest Citrix Workspace app on the user device.
If you’re using a low-bandwidth connection, you can change your Citrix Workspace app configuration and the way you use Citrix Workspace app to improve performance.
- Configure your Citrix Workspace app connection - Configuring your Citrix Workspace app connections can reduce the bandwidth that ICA requires and improves performance
- Change how Citrix Workspace app is used - Changing the way Citrix Workspace app is used can also reduce the bandwidth required for a high-performance connection
- Enable UDP audio - This feature can maintain consistent latency on congested networks in Voice-over-IP (VoIP) connections
- Use the latest versions of Citrix Workspace app for Linux and Citrix Virtual Apps and Desktops or Citrix DaaS - Citrix continually enhances and improves performance with each release, and many performance features require the latest Citrix Workspace app and server software
Display
Screen tearing
Screen tearing occurs when parts of two (or more) different frames appear on the screen at the same time, in horizontal blocks. This issue is most visible with large areas of fast changing content on screen.
Tearing is avoided when data is captured at the VDA. Tearing isn’t introduced when data is passed to the client. However, X11 (the Linux/Unix graphics subsystem) does not provide a consistent way to draw to the screen in a way that prevents tearing.
To prevent screen tearing, Citrix recommends the standard approach which synchronizes application drawing with the drawing of the screen. That is, wait for vsvnc, to start the drawing of the next frame. Depending on the graphics hardware on the client and the window manager you’re using, the following two groups of solutions are available to prevent screen tearing:
- X11 GPU settings
- Use a Composition Manager
X11 GPU Configuration
For Intel HD graphics, create a file in the xorg.conf.d called 20-intel.conf with the following contents:
Section "Device"

 Identifier    "Intel Graphics"
 Driver        "intel"
 Option        "AccelMethod" "sna"
 Option        "TearFree" "true"

 EndSection
For NVIDIA graphics, locate the file in the xorg.conf.d folder that includes the “MetaModes” Option for your configuration. For each comma-separated MetaMode used add the following:
{ForceFullCompositionPipeline = On}
For example:
Option “MetaModes” “DFP-0: 1920x1200 +0+0 {ForceFullCompositionPipeline = On}”
Note:
Different Linux distributions use different paths to xorg.conf.d, for example, /etc/X11/xorg.conf.d, or, /user/share/X11/xorg.conf.d.
Composition managers
Use the following:
-
Compiz (built into Ubuntu Unity). Install the “CompizConfig Settings Manager.”
Run “CompizConfig Settings Manager”.
Under General > Composition clear Undirect Fullscreen Windows.
Note:
Use “CompizConfig Settings Manager” with caution because incorrectly changing values can prevent the system from launching.
-
Compton (an add-on utility). Refer to the main page/documentation for Compton for full details. For example, run the following command:
compton --vsync opengl --vsync -aggressive
Incorrect keystrokes
If you’re using a non-English language keyboard, the screen display might not match the keyboard input. In this case, you must specify the keyboard type and layout that you’re using. For more information about specifying keyboards, see Control keyboard behavior.
Excessive redrawing
Some window managers continuously report the new window position when moving seamless windows, which can result in excessive redrawing. To fix this problem, switch the window manager to a mode that draws only window outlines when moving a window.
Icon compatibility
The Citrix Workspace app creates window icons that are compatible with most window managers. However, these icons aren’t fully compatible with the X Inter-Client Communication Convention.
Full icon compatibility
To provide full icon compatibility:
- Open the wfclient.ini configuration file.
- Edit the following line in the [WFClient] section: UseIconWindow=True
- Save and close the file.
Cursor color
The cursor can be difficult to see if it’s the same or similar in color to the background. You can fix this issue by forcing areas of the cursor to be black or white.
To change the color of the cursor
-
Open the wfclient.ini configuration file.
-
Add one of the following lines to the [WFClient] section:
CursorStipple=ffff,ffff (to make the cursor black)
CursorStipple=0,0 (to make the cursor white)
-
Save and close the file.
Color flash
When you move the mouse into or out of a connection window, the colors in the non-focused window start to flash. This issue is a known limitation when using the X Windows System with PseudoColor displays. If possible, use a higher color depth for the affected connection.
Color changes with TrueColor display
You have the option of using 256 colors when connecting to a server. This option assumes that the video hardware has palette support to enable applications to change the palate colors to produce animated displays.
TrueColor displays have no facility to emulate the ability to produce animations by rapidly changing the palette. Software emulation of this facility is expensive for time and network traffic. To reduce this cost, Citrix Workspace app buffers rapid palette changes, and updates the real palette only every few seconds.
Incorrect display
Citrix Workspace app uses EUC-JP or UTF-8 character encoding for Japanese characters, while the server uses SJIS character encoding. Citrix Workspace app does not translate between these character sets. This issue can cause problems displaying:
- files that are saved on the server and viewed locally
- files that are saved locally and viewed on the server
This issue also affects Japanese characters in parameters used in extended parameter passing.
Session span
Full-screen sessions span all monitors by default, but a command-line multi-monitor display control option, -span, is also available. It allows full-screen sessions to span extra monitors.
Desktop Viewer toolbar functionality allows you to switch a session between windowed and full-screen session window, including multi-monitor support for the intersected monitors.
Important:
Span has no effect on Seamless or normal windowed sessions (including those sessions in maximized windows).
The - span option has the following format: -span [h][o][a|mon1[,mon2[,mon3, mon4]]]
If h is specified, a list of monitors is printed on stdout. If h is the whole option value, wfica exits.
If o is specified, the session window has the override-redirect attribute.
Caution:
- The use of this option isn’t recommended. It’s intended as a last option to use with uncooperative window managers.
- The session window isn’t visible to the window manager, does not have an icon, and can’t be restacked.
- It can be removed only by ending the session.
If a is specified, Citrix Workspace app tries to create a session that covers all monitors.
Citrix Workspace app assumes that the rest of the -span option value is a list of monitor numbers:
- A single value selects a specific monitor.
- Two values select monitors at the top-left and bottom-right corners of the required area.
- Four values specify monitors at the top, bottom, left, and right edges of the area.
Assuming o wasn’t specified, wfica uses the _NET_WM_FULLSCREEN_MONITORS message to request an appropriate window layout from the window manager, if it’s supported. Otherwise, it uses size and position hints to request the desired layout.
The following command can be used to test for window manager support:
xprop -root | grep \_NET\_WM\_FULLSCREEN\_MONITORS
If there’s no output, there’s no support. If there’s no support, you might need an override-redirect window. You can set up an override-redirect window using -span o.
To make a session that spans extra monitors from the command line:
-
At a command prompt, type:
/opt/Citrix/ICAClient/wfica -span hA list of the numbers of the monitors currently connected to the user device is printed to
stdoutandwficaexits. -
Make a note of these monitor numbers.
-
At a command prompt, type:
/opt/Citrix/ICAClient/wfica -span \[w\[,x\[,y,z\]\]\]The w, x, y, and z values are monitor numbers from step 1 of the preceding steps. The single value w, specifies a specific monitor. Two values w and x specify monitors at the top-left and bottom-right corners of the required area.Four values w, x, y, and z specify monitors at the top, bottom, left, and right edges of the area.
> **Important:**
>
> -  Define the WFICA\_OPTS variable before starting self-service through a browser. To defin this variable, edit your profile file, normally found at $HOME/.bash\_profile or $HOME/.profile, adding a line to define the WFICA\_OPTS variable. For example: `export WFICA_OPTS="-span a"`
> -  This change affects both virtual apps and desktops sessions.
> -  If you have started self-service or `storebrowse`, remove processes that are started for the new environment variable to take effect. Remove them with: `killall AuthManagerDaemon ServiceRecord storebrowse`
Local applications
You might not escape from a full-screen session to use local applications or another session. This issue occurs because the client-side system UI is hidden and the Keyboard Transparency feature disables the usual keyboard command, for example Alt+Tab, sending the command to the server instead.
As a workaround, use CTRL+F2 to clear the Keyboard Transparency feature temporarily until the focus next returns to the session window. An alternative workaround is to set TransparentKeyPassthrough to No in $ICAROOT/config/module.ini. This workaround disables the Keyboard Transparency feature. However, you might have to override the ICA file by adding this setting in the All_regions.ini file.
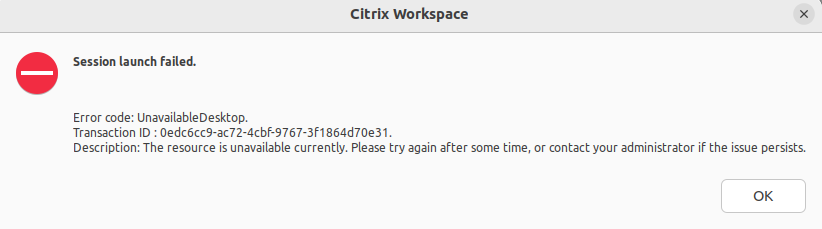
Improved error messages
Previously all error messages were having a default error code and a description that isn’t specific to the error. Starting with Citrix Workspace app version 2309, the error messages are improved to include the Error code, Transaction ID, and Description fields specific to the error. These error messages appear when a session starts using ICA launch or when a session starts with the Service Continuity feature enabled.
For example, if there’s a session launch failure, the following error message is displayed:
Webcam
Updating the default webcam
Currently, webcam redirection in Citrix Workspace app for Linux supports only one webcam at a time. The default webcam selected is mapped to the device path /dev/video0 which is, generally, the built-in webcam in laptops.
To list all devices with video capabilities in the system, you must install v4l tools using the following command:
sudo apt-get install v4l-utils
<!--NeedCopy-->
List the video devices using the following command:
v4l2-ctl --list-devices
<!--NeedCopy-->
You might receive an output as follows:
user@user-pc:~ $ v4l2-ctl --list-devices
UVC Camera (046d:09a6) (usb-0000:00:14.0-1):
    /dev/video2
    /dev/video3
    /dev/media1
Integrated Camera: Integrated C (usb-0000:00:14.0-8):
    /dev/video0
    /dev/video1
    /dev/media0
<!--NeedCopy-->
As per the preceding example, there are two webcams. You can use any of them. Citrix recommends using the first index. There’s a known issue with Ubuntu, so that you might see multiple indexes for one webcam. In this example, you can use /dev/video0 and /dev/video2.
To set another capture video as default, do the following:
- Navigate to the
~/.ICAClient/wfclient.iniconfiguration file and edit it. -
In the [WFClient] section, add the following setting.
HDXWebCamDevice=<device path>
For example, add HDXWebCamDevice=/dev/video2 to set the webcam mapped to /dev/video2 in a system.
Testing capabilities
On the client, the webcam redirection module can be used in different modes to test isolated components under customer environment conditions.
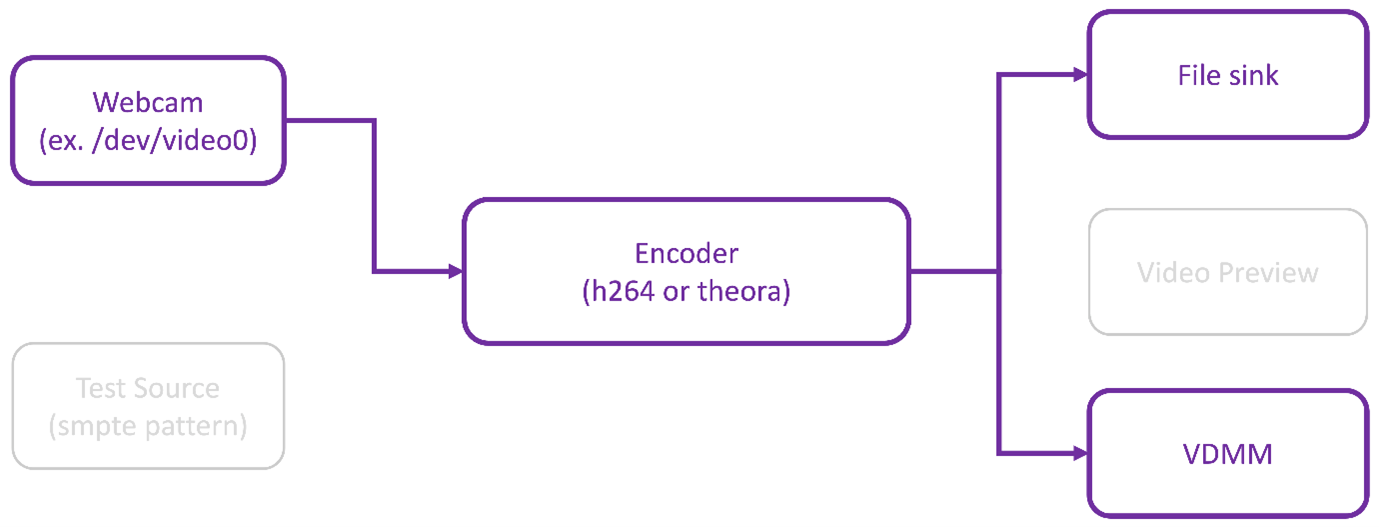
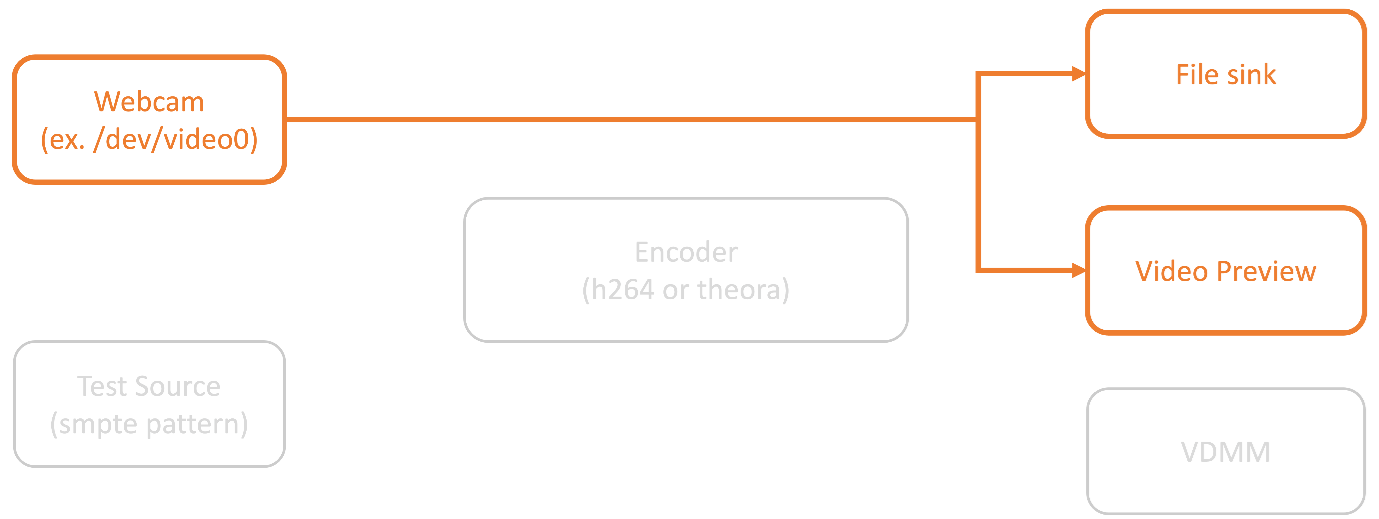
Production and debug mode
This mode compares the video displaying on the VDA side and the actual buffers that the encoder produces on the client side. It allows to test the entire pipeline.
To enable this mode:
- Navigate to the
~/.ICAClient/wfclient.iniconfiguration file and edit it. -
Set the
HDXWebcamDebugvalue to True.HDXWebcamDebug=True
After this mode is enabled, the encoder generates the following files with the buffers, depending on the encoder used:
- For H264 encoder: /tmp/file_mode_buffers.h264
- For Theora encoder: /tmp/file_mode_buffers.theora
The following diagram describes the production and debug modes:
Webcam tester mode
This mode allows you to test the webcam isolated from the rest of the pipeline elements.
./gst_read --buffers | -b BUFFERS_AMOUNT  [ --input_device | -i WEBCAM_DEVICE; default=/dev/video0]
<!--NeedCopy-->
To enable to webcam tester mode, run the following commands from the command lines:
   cd /opt/Citrix/ICAClient/util
   <!--NeedCopy-->
   `$./gst_read -b 100 /dev/video0
   <!--NeedCopy-->
After this mode is enabled, a video preview appears and creates the following file with the raw buffers from the webcam:
/tmp/wewbcam_buffers.buff
The only switch required for webcam tester mode is the --buffers (-b) options. You can also specify the webcam device to test. For example, see the following:
- ./gst_read -buffers 150
- ./gst_read –buffers 100 –input_device /dev/video2
The following diagram describes the webcam tester mode:
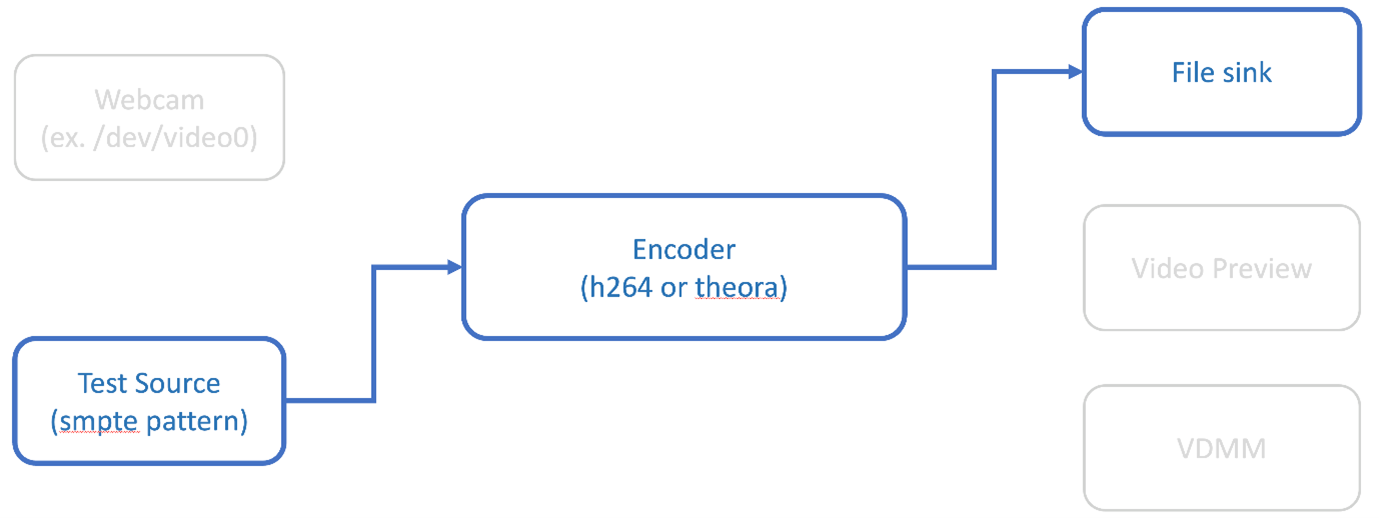
Encoder tester mode
This mode allows you to test the encoder isolated from the pipeline.
./gst_read --output_file | -o FILE_NAME [ --buffers | -b BUFFER_AMOUNT; default=10 0 ]  [ --enableH264  | -e ]
<!--NeedCopy-->
To enable the encoder tester mode, run the following commands from the command lines:
cd /opt/Citrix/ICAClient/util
<!--NeedCopy-->
./gst_read -o ~/file_buffers.h264 -e
 <!--NeedCopy-->
The only switch required for this mode is the --output_file (-o) options. You can also test Theora or H264 encoders and the amount of buffer to generate. For example, see the following:
- For H264: ./gst_read –output_file ~/file_buffers.h264 –buffers 200 –enableH264
- For Theora: ./gst_read -o ~/file_buffers.theora -b 100
The following diagram describes the encoder tester mode:
H264 software encoder
If the software-based H264 encoder does not work correctly, you must verify its dependencies using the following steps:
-
Verify if the x264
GStreamerplug-in is in the system as part ofgstreamer-plugins-ugly. If it’s available in thelibgstx264.solibrary, run the following command to verify it:gst-inspect-1.0 x264 <!--NeedCopy-->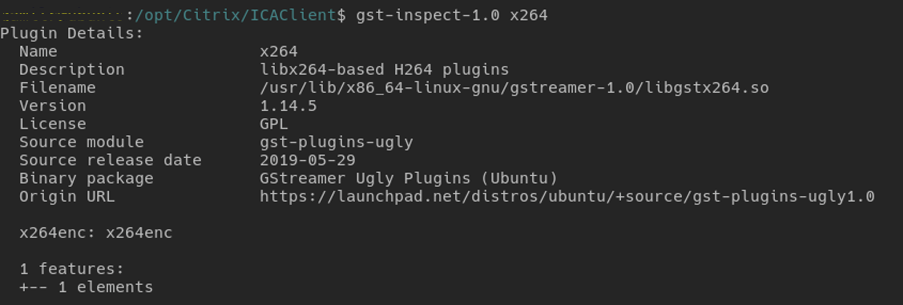
-
Run the following command to verify the dependencies of the
libgstx264.solibrary:ldd /usr/lib/x86_64-linux-gnu/gstreamer-1.0/libgstx264.so <!--NeedCopy-->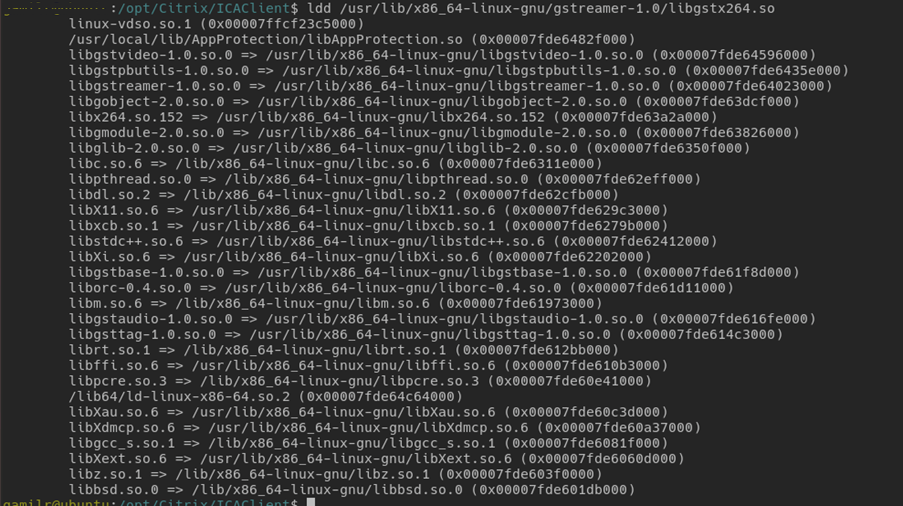
If the libgstx264.so file isn’t present, you must install GStreamer plugins ugly using the following command:
sudo apt-get install gstreamer1
0-plugins-ugly
<!--NeedCopy-->
H264 hardware encoder
-
Verify
vaapi GStreamerplug-in is in the system as part ofgstreamer1.0-vaapi. If it’s available in thelibgstvaapi.solibrary, run the following command to verify it:gst-inspect-1.0 vaapi <!--NeedCopy-->
-
Run the following command to verify the dependencies of the libgstvaapi.so library:
    ldd /usr/lib/x86_64-linux-gnu/gstreamer-1.0/libgstvaapi.so
<!--NeedCopy-->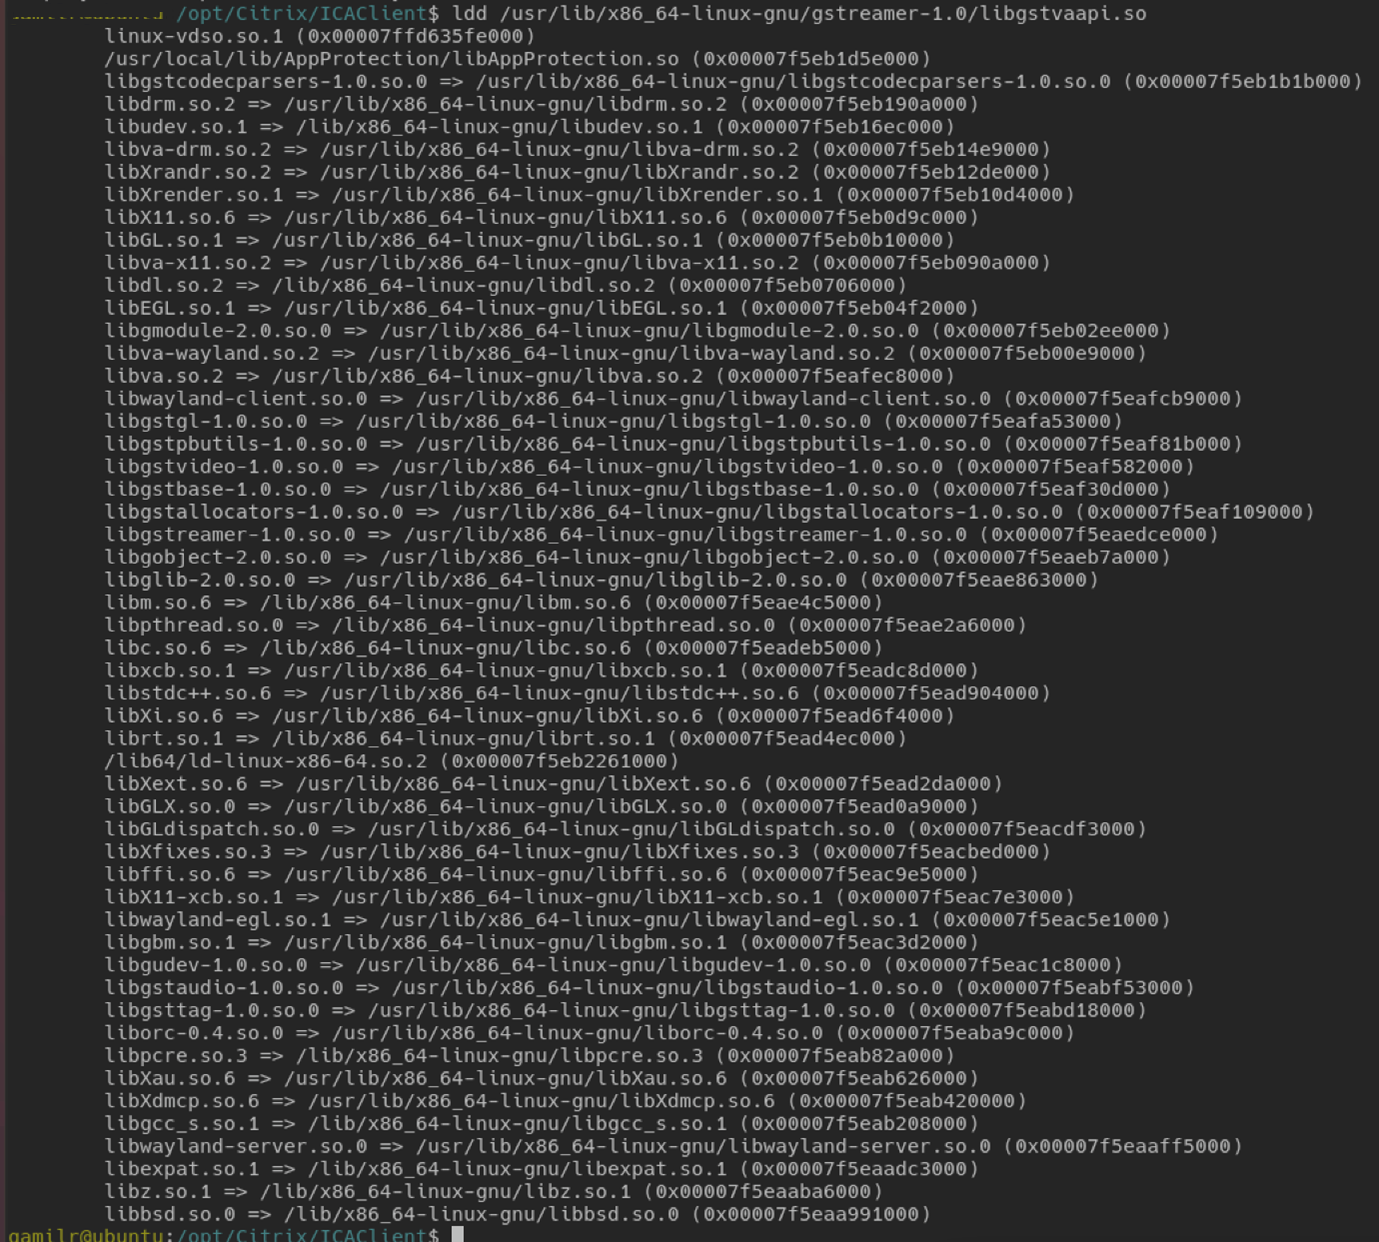
-
Resolve any missing dependencies.
To install and configure vaapi, follow the GStreamer vappi installation guide.
Collect internal GStreamer frameworks and gst_read logs
Alternative to regular ICAClient logs, you must collect the logs from the gst_read module.
Do the following to collect the logs:
-
Open a terminal and run the following commands:
export GST_DEBUG=2,gst_read_debug:6
<!--NeedCopy-->
export GST_DEBUG_FILE=~/gst_read.log <!--NeedCopy-->Note:
This variable sets the level of log collection and the file to store them. In this case, we’re setting level 2 for the
GStreamerframework and level 7 for thegst_readmodule. For more information, see the document. It’s recommended only to set error and warning levels for the internalGStreamerframework and log level forgst_read. - Download an ICA® file of a valid VDA.
-
On the same terminal, run the following command to start a VDA session:
cd /opt/Citrix/ICAClient
<!--NeedCopy-->
./wfica <ICA file path>/vda.ica <!--NeedCopy-->
The gst_read.log file is generated with the internal GStreamer framework and the gst_read logs.
GStreamer pipeline inspections
To see the actual pipelines that the GStreamer framework is creating, do the following:
- Create a folder to store the dot files, for example:
gstIntPipes. - Open a terminal and export
GST_DEBUG_DUMP_DOT_DIR=<Absolute path>/gstIntPipes. This variable indicates to theGStreamerwhere to store the dot files. - Download an ICA file of a valid VDA.
-
On the same terminal, run the following commands to start a VDA session:
cd /opt/Citrix/ICAClient/
<!--NeedCopy-->
./wfica <ICA file path>/vda.ica <!--NeedCopy--> -
The directory
gstIntPipesincludes the dot files.GStreamergenerates a dot file for every state change in the pipeline. As a result, you can inspect all the processes of the pipeline creation. The following is an example of the set of dot files: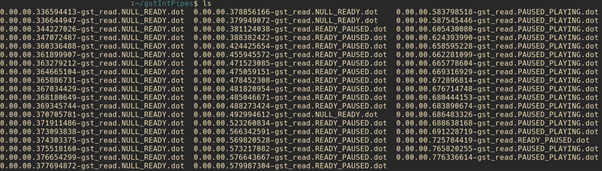
- Install a dot file utility to see a visual representation of the pipelines. For example, Graphviz. The following images are examples of good and bad creation of the pipeline:
Pipeline successfully created:

Pipeline unable to link:

Note:
To enlarge the preceding images or any other images, right-click the image, select Open image in new tab, and zoom the browser as required.
As shown in the preceding image, the second pipeline is unable to link the GstCapsFilter element and the GstVaapiEncodeH264 element. The capabilities are never fully negotiated. For more information, see the document.
System diagnostic script for RAVE
We provide a script, rave_troubleshooting.sh to verify whether the system configuration and dependencies are suitable to support Remote Audio Video Extensions (RAVE).
Note:
RAVE is an HDX™ feature to support optimized webcam redirection and Windows Media Player redirection for Citrix VDAs.
Do the following to run the script:
- Click rave_troubleshooting.sh to download the script.
- Open the terminal in your Linux machine.
- Type
rave_troubleshooting.sh --helporrave_troubleshooting.sh -hto see the supporting command line arguments. -
Type one of the following:
-
rave_troubleshooting.sh -worrave_troubleshooting.sh --webcam- Use this command to run checks for webcam redirection. This command is the default command. -
rave_troubleshooting.sh -rorrave_troubleshooting.sh --rave- Use this command to run checks for RAVE. A pop-up window playing a h264 test video is displayed.
The system configuration and dependencies are displayed.
-
Generic USB redirection
How to redirect Android phones as generic USB
You can redirect Android phones as generic USB as follows:
- Connect your Android phone to the system where Citrix Workspace app for Linux is installed using a USB cable.
- Select USB connection mode (MTP or PTP) on your phone. For most Android phones, the supported mode is PTP.
-
Type the following in the terminal to get your Android phone’s vendor ID from the device descriptor (VID) and product ID from the device descriptor (PID):
lsusb <!--NeedCopy--> - Take a note of the VID and PID your Android phone.
- Navigate to
usb.conffile. -
Add the
CONNECT vid=<vid of your phone> pid=<pid of your phone> split=01 intf=00line at the end of theusb.conffile. For example, add it as follows:CONNECT vid=18d1 pid=4ee2 split=01 intf=00 <!--NeedCopy--> - Navigate to the Device menu in the Desktop Viewer toolbar.
- Select the Android phone that you want to redirect.
Browser
Local browser
When you click a link in a Windows session, the content appears in a local browser. Server-client content redirection is enabled in wfclient.ini. This redirection causes a local application to run. To disable server-client content redirection, see server-client content redirection.
Access published resources
When you access published resources, your browser prompts to save a file. Browsers other than Firefox and Chrome might require configuration before you can connect to a published resource. However, when trying to access a resource by clicking an icon on the page, your browser prompts you to save the ICA file.
Specific browser
If you have problems using a specific web browser, set the environment variable BROWSER to specify the local path and name of the required browser before running setupwfc.
Firefox browser
When you launch desktops or applications in Firefox, if a page is unresponsive, try enabling the ICA plug-in.
ICA plug-in in Firefox
When the ICA plug-in is enabled in Firefox, desktop and application sessions might not start. In this case, try disabling the ICA plug-in.
Configuration errors
These errors might occur if you configured a connection entry incorrectly.
E_MISSING_INI_SECTION - Verify the configuration file: “…”. The section “…” is missing in the configuration file.
The configuration file was incorrectly edited or is corrupt.
E_MISSING_INI_ENTRY - Verify the configuration file: “…”. The section “…” must contain an entry “…”.
The configuration file was incorrectly edited or is corrupt.
E_INI_VENDOR_RANGE - Verify the configuration file: “…”. The X server vendor range “…” in the configuration file is invalid.
The X Server vendor information in the configuration file is corrupt. Contact Citrix.
wfclient.ini configuration errors
These errors might occur if you edited wfclient.ini incorrectly.
E\_CANNOT\_WRITE\_FILE - Cannot write file: "..."
There was a problem saving the connection database; for example, no disk space.
E\_CANNOT\_CREATE\_FILE - Cannot create file: "..."
There was a problem creating a connection database.
E_PNAGENT_FILE_UNREADABLE - Cannot read Citrix Virtual Apps file “…”: No such file or directory.
— Or —
Cannot read Citrix Virtual Apps™ file “…”: Permission denied.
You’re trying to access a resource through a desktop item or menu, but the Citrix Virtual Apps and Desktops™ or Citrix DaaS file for the resource isn’t available. Refresh the list of published resources by selecting Application Refresh on the View menu, and try to access the resource again. If the error persists:
- Check the properties of the desktop icon or menu item
- Check the Citrix Virtual Apps and Desktops or Citrix DaaS™ file to which the icon or item refers.
Browser Content Redirection
For information on how to troubleshoot Browser Content Redirection, see the Knowledge Center article CTX230052.
How to import self-signed certificate into nssdb
Run the following command in the terminal to import the self-signed certificate into nssdb:
certutil -A -n "badssl.cer" -t "C,," -d ~/.pki/nssdb -i ~/Downloads/badssl.cer
<!--NeedCopy-->
The arguments in the commands are:
-
-A- To add a certificate to the database. -
-n- The name of the certificate. This argument is optional and can be used to add the nick name. -
"badssl.cer"- The name of the certificate that is exported from the badssl.com site. -
-t "C,,"--tis for TRUSTARGS and C is for CA certificate. For more information, see the Google documentation. -
-d ~/.pki/nssdb- The location of the database. -
-i- Denotes the input file. This argument is to add the location and name of the certificate file.
For information about BCR, see the Browser content redirection page in the Citrix Virtual Apps and Desktops documentation.
Others
Connection issues
You might also find the following issues.
Close a session
To know whether the server has instructed Citrix Workspace app to close a session, use the wfica program. This program logs when it has received a command to terminate the session from the server.
To record this information through the syslog system, add SyslogThreshold with the value 6 to the [WFClient] section of the configuration file. This setting enables the logging of messages that have a priority of LOG_INFO or higher. The default value for SyslogThreshold is 4 (=LOG_WARNING).
Similarly, to have wfica, send the information to standard error and add PrintLogThreshold with the value 6 to the [WFClient] section. The default value for PrintLogThreshold is 0 (=LOG_EMERG).
For more information on log collection, see Log collection and for more information on syslog configuration, see syslog configuration.
Configuration file settings
For each entry in wfclient.ini, there must be a corresponding entry in All_Regions.ini for the setting to take effect. Also, for each entry in the [Thinwire3.0], [ClientDrive], and [TCP/IP] sections of wfclient.ini, there must be a corresponding entry in canonicalization.ini for the setting to take effect. See the All_Regions.ini and canonicalization.ini files in the $ICAROOT/config directory for more information.
Published applications
If you have issues running published applications that access a serial port, the application might fail (with or without an error message, depending on the application itself) if the port has been locked by another application. In such circumstances, check that there are no applications that have either temporarily locked the serial port or have locked the serial port and exited without releasing it.
To overcome this problem, stop the application that is blocking the serial port. Regarding UUCP-style locks, there might be a lock file left behind after the application exits. The location of these lock files depends on the operating system used.
Starting Citrix Workspace app
If Citrix Workspace app does not start, the error message “Application default file could not be found or is out of date” appears. The reason might be that the environment variable ICAROOT isn’t defined correctly. This variable is a requirement if you installed Citrix Workspace app to a non-default location. To overcome this problem, Citrix recommends that you do one of the following:
-
Define ICAROOT as the installation directory.
To check that the ICAROOT environment variable is defined correctly, try starting Citrix Workspace app from a terminal session. If the error message still appears, it’s likely that the ICAROOT environment variable isn’t correctly defined.
-
Reinstall Citrix Workspace app to the default location. For more information about installing Citrix Workspace app, see Install and set up.
If Citrix Workspace app was previously installed in the default location, remove the
/opt/Citrix/ICAClientor$HOME/ICAClient/platformdirectory before reinstalling.
Citrix CryptoKit (formerly SSLSDK)
To find the Citrix CryptoKit (formerly SSLSDK) or OpenSSL version number that you’re running, you can use the following command:
strings libctxssl.so | grep "Citrix SSLSDK"
You can also run this command on AuthManagerDaemon or PrimaryAuthManager
Keyboard shortcuts
If your window manager uses the same key combinations to provide native functionality, your key combinations might not function correctly. For example, the KDE window manager uses the combinations from CTRL+SHIFT+F1 to CTRL+SHIFT+F4 to switch between desktops 13 to 16. If you experience this problem, try the following solutions:
- Translated mode on the keyboard maps a set of local key combinations to server-side key combinations. For example, by default in Translated mode, CTRL+SHIFT+F1 maps to the server-side key combination ALT+F1. To reconfigure this mapping to an alternative local key combination, update the following entry in the [WFClient] section of $HOME/.ICAClient/wfclient.ini. This setting maps the local key combination Alt+Ctrl+F1 to Alt+F1:
- Change Hotkey1Shift=Ctrl+Shift to Hotkey1Shift=Alt+Ctrl.
- Direct mode on the keyboard sends all key combinations directly to the server. They aren’t processed locally. To configure Direct mode, in the [WFClient] section of $HOME/.ICAClient/wfclient.ini, set TransparentKeyPassthrough to Remote.
- Reconfigure the window manager so that it suppresses default keyboard combinations.
Remote Croatian keyboard
This procedure ensures that ASCII characters are correctly sent to remote virtual desktops with Croatian keyboard layouts.
- In the WFClient section of the appropriate configuration file, set UseEUKSforASCII to True.
- Set UseEUKS to 2.
Japanese keyboard
To configure the use of a Japanese keyboard, update the following entry in the wfclient.ini configuration file:
KeyboardLayout=Japanese (JIS)
ABNT2 keyboard
To configure the use of an ABNT2 keyboard, update the following entry in the wfclient.ini configuration file:
KeyboardLayout=Brazilian (ABNT2)
Local keyboard
If some keys on the local keyboard do not behave as expected, choose the best-matching server layout from the list in $ICAROOT/config/module.ini.
Windows Media Player
Citrix Workspace app might not have GStreamer plugins to handle a requested format. This issue normally causes the server to request a different format. Sometimes the initial check for a suitable plug-in incorrectly indicates that one is present. This issue is normally detected and causes an error dialog to appear on the server that indicates the Windows Media Player found a problem while playing the file. Retrying the file within the session typically works because Citrix Workspace app rejects the format. And as a result, the server either requests another format or provides the media itself.
In a few situations, there’s no suitable plug-in is detected and the file isn’t played correctly, despite the progress indicator moving as expected in the Windows Media Player.
To avoid this error dialog or failure to play in future sessions:
-
Temporarily add the configuration option “SpeedScreenMMAVerbose=On” to the [WFClient] section of $Home/.ICAClient/wfclient.ini, for example.
-
Restart
wficafrom a self-service that has been started from a terminal. -
Play a video that generates this error.
-
Note (in the tracing output) the mime type associated with the missing plug-in trace, or the mime type that must be supported but does not play (for example, “video/x-h264..”).
-
Edit $ICAROOT/config/MediaStreamingConfig.tbl. On the line with the noted mime type, insert a ‘?’ between the ‘:’ and the mime type. This setting disables the format.
-
Repeat steps 2–5 (preceding) for other media formats that produce this error condition.
-
Distribute this modified MediaStreamingConfig.tbl to other machines with the same set of
GStreamerplugins.
Note:
Alternately, after identifying the mime type it might be possible to install a
GStreamerplugin to decode it.
Script to verify system requirements for Windows Media Player redirection
With the 2307 release, a new bash script is introduced to verify the configuration required for the Windows Media Player redirection feature in the Citrix Workspace app for Linux. This feature helps to reduce troubleshooting time for the Windows Media Player redirection feature. To verify the configuration, you can use the same rave_troubleshooting.sh available at System diagnostic script for RAVE.
Serial port setting
To configure a single serial port, add the following entries in the $ICAROOT/config/module.ini configuration file:
LastComPortNum=1
ComPort1=device
To configure two or more serial ports, add the following entries in the $ICAROOT/config/module.ini configuration file:
LastComPortNum=2
ComPort1=device1
ComPort2=device2
Errors
This topic includes a list of other common error messages that you might see when using Citrix Workspace app.
An error occurred. The error code is 11 (E_MISSING_INI_SECTION). Please refer to the documentation. Exiting.
When running Citrix Workspace app from the command line, this error usually means the description given on the command line wasn’t found in the appsrv.ini file.
E_BAD_OPTION - The option “…” is invalid.
Missing argument for option “…”.
E_BAD_ARG - The option “…” has an invalid argument: “…”.
Invalid argument specified for option “…”.
E_INI_KEY_SYNTAX - The key “…” in the configuration file “…” is invalid.
The X Server vendor information in the configuration file is corrupt. Create a configuration file.
E_INI_VALUE_SYNTAX - The value “…” in the configuration file “…” is invalid.
The X Server vendor information in the configuration file is corrupt. Create a configuration file.
E_SERVER_NAMELOOKUP_FAILURE - Cannot connect to server “…”.
The server name can’t be resolved.
Cannot write to one or more files: “…”. Correct any disk full issues or permissions problems and try again.
Check for disk-full issues, or permissions problems. If a problem is found and corrected, retry the operation that prompted the error message.
Server connection lost. Reconnect and try again. These files might be missing data: “…”.
Reconnect and retry the operation that prompted the error.
Diagnostic information
If you are experiencing problems using Citrix Workspace app, you might be asked to provide Technical Support with diagnostic information. This information assists this team in trying to diagnose the problem and offer assistance to rectify it.
To obtain diagnostic information about Citrix Workspace app:
-
In the installation directory, type util/lurdump. It’s recommended that you do this modification while a session is open and if possible, while the issue is occurring.
A file is generated that provides detailed diagnostic information, which includes version details, the contents of Citrix Workspace app’s configuration files, and the values of various system variables.
-
Check the file for confidential information before sending it to Technical Support.
Troubleshoot connections to resources
Users can manage their active connections using the Connection Center. This feature is a useful productivity tool that enables users and administrators to troubleshoot slow or problematic connections. With Connection Center, users can manage connections by:
- Closing an application.
- Logging off a session. This step ends the session and closes any open applications.
- Disconnecting from a session. This step cuts the selected connection to the server without closing any open applications (unless the server is configured to close applications on disconnection).
- Viewing connection transport statistics.
Log collection
In earlier versions, the debug.ini and module.ini files were used to configure logging.
As of version 2009, you can configure the log collection using one of the following methods:
- Command-line interface
- GUI
Also as of Version 2009, the debug.ini configuration file is removed from the Citrix Workspace app installer package.
Logs capture the Citrix Workspace app deployment details, configuration changes, and administrative activities to a log collection database. A third-party developer can apply this log collection mechanism by using the log collection SDK, which is bundled as part of the Citrix Workspace app Platform Optimization SDK.
You can use the log information to:
- Diagnose and troubleshoot issues that occur after any changes. The log provides a breadcrumb trail.
- Assist change management and track configurations.
- Report administration activities.
If Citrix Workspace app is installed with root user privileges, the logs are stored in the /var/log/citrix/ICAClient.log. Otherwise, the logs are stored in ${HOME}/.ICAClient/logs/ICAClient.log.
When Citrix Workspace app is installed, a user called citrixlog is created to handle the logging functionality.
Command-line interface
- At the command prompt, navigate to the
/opt/Citrix/ICAClient/utilpath. -
Run the following command to set the log preferences.
./setlog help
All the available commands are displayed.
The following table lists various modules and their corresponding trace class values. Use the following table for a specific command-line log value set:
| Module | Log class |
|---|---|
| Assertions | LOG_ASSERT |
| Audio Monitor | TC_CM |
| BCR with CEF | TC_CEFBCR |
| Client Audio Mapping | TC_CAM |
| Connection Center | TC_CONNCENTER |
| Client Communication Port | TC_CCM |
| Client Drive Mapping | TC_CDM |
| Clip | TC_CLIP |
| Client Printer Mapping | TC_CPM |
| Client Printer Mapping | TC_CPM |
| Font | TC_FONT |
| Frame | TC_FRAME |
| Graphics Abstraction | TC_GA |
| Input Method Editor | TC_IME |
| IPC | TC_IPC |
| Keyboard Mapping | TC_KEY |
| Licensing Driver | TC_VDLIC |
| Multimedia | TC_MMVD` |
| Mouse Mapping | TC_MOU |
| MS Teams | TC_MTOP |
| Other Libraries | TC_LIB |
| Protocol Driver | TC_PD |
| PNA Store | TC_PN |
| Standard Event Logs | LOG_CLASS |
| SRCC | TC_SRCC |
| SSPI Login | TC_CSM |
| Smart Card | TC_SCARDVD |
| Selfservice | TC_SS |
| Selfservice Extension | TC_SSEXT |
| StorefrontLib | TC_STF |
| Transport Driver | TC_TD |
| Thinwire | TC_TW |
| Transparent Window Interface | TC_TUI |
| Virtual Channel | TC_VD |
| PAL | TC_VP |
| UI | TC_UI |
UIDialogLibWebKit3 |
TC_UIDW3 |
| `UIDialogLibWebKit3_ext | TC_UIDW3E |
| USB Daemon | TC_CTXUSB |
| Video Frame Driver | TC_VFM |
| Web kit | TC_WEBKIT |
| WinStation Driver | TC_WD |
Wfica |
TC_NCS |
Wfica Engine |
TC_WENG |
Wfica Shell |
TC_WFSHELL |
| Web helper | TC_WH |
| Zero Latency | TC_ZLC |
GUI
Go to Menu > Preferences. The Citrix Workspace-Preferences dialog appears.
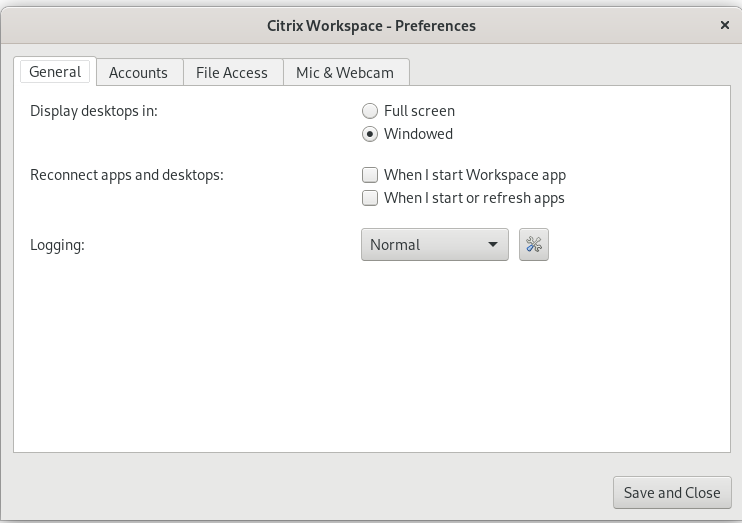
At increasing levels of tracing detail, the following values are available:
- Disabled
- Only Error
- Normal
- Verbose
By default, the Logging option is set to Only Error.
Due to the large amount of data that can be generated, tracing might significantly impact the performance of Citrix Workspace app. The Verbose level is recommended only if necessary for troubleshooting.
Click Save and Close after you select the desired log collection level. The changes are applied in the session dynamically.
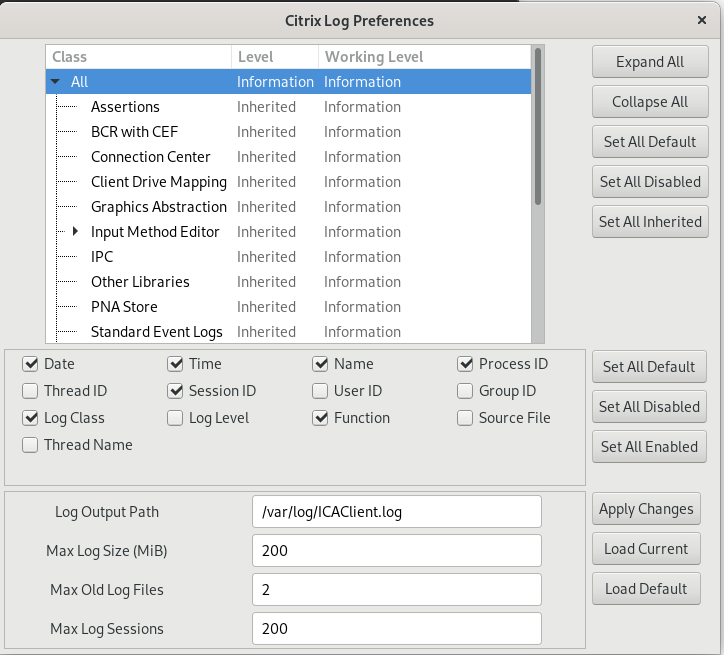
Click the settings icon next to the Logging option drop-down menu. The Citrix Log Preferences dialog appears.
Note:
If you delete the
ICAClient.logfile, you must restart the log collection servicectxcwalogd.For example, if you are on a
systemd-capablesetup, run the following command:
systemctl restart ctxcwalogd.
Enabling log collection on Version 2006 and earlier:
If you are on Version 2006 and earlier, enable log collection using the following procedure:
- Download and install Citrix Workspace app on your Linux machine.
-
Set the
ICAROOTenvironment variable to the installation location.For example,
/opt/Citrix/ICAClient.By default, the
TC_ALLtrace class is enabled to provide all the traces. -
To collect logs for a particular module, open the
debug.inifile at$ICAROOTand add the required trace parameters to the[wfica]section.Add the trace classes with a “+” symbol. For example,
+TC_LIB.You can add different classes separated by the pipe symbol. For example,
+TC_LIB|+TC_MMVD.
The following table lists the wfica modules and their corresponding trace class values:
| Module | TraceClasses value |
|---|---|
| Graphics | TC_TW |
| EUEM | TC_EUEM |
WFICA (Session Launch) |
TC_NCS |
| Printing | TC_CPM |
| Connection Sequence - WD | TC_WD |
| Connection Sequence - PD | TC_PD |
| Connection Sequence - TD | TC_TD |
| Proxy related files | TC_PROXY |
| Multimedia Virtual Driver / Webcam | TC_MMVD |
| Virtual Drivers | TC_VD |
| Client Drive Mapping | TC_CDM |
| Audio | TC_CAM |
| COM (Communication Port) | TC_CCM |
| Seamless | TC_TWI |
| Smart Card | TC_SCARDVD |
The following table lists the connection center module and their corresponding trace class value:
| Module | TraceClasses value |
|---|---|
| Connection center | TC_CSM |
The following table lists the trace class value for setWebHelper:
| TraceClasses value |
|---|
| Set logSwitch to 1 (to enable) or 0 (to disable) |
| Example: logSwitch = 1 |
Troubleshooting:
If ctxcwalogd turns unresponsive, the logs are traced in the syslog.
For information about getting new and refreshed logs in subsequent launches, see Syslog configuration.
Syslog configuration
By default, all syslog logs are saved at /var/log/syslog. To configure the path and the name of the log file, edit the following line under the [RULES] section in the /etc/rsyslog.conf file. For example,
user.* -/var/log/logfile_name.log
Save your changes and then restart the syslog service using the command:
sudo service rsyslog restart
Points to remember:
-
To verify that a new syslog is available, delete the syslog and run the command:
sudo service rsyslog restart. -
To avoid duplicate messages, add $RepeatedMsgReduction on at the beginning of the
rsyslog.conffile. -
To receive logs, ensure that the $ModLoad imuxsock.so line is uncommented at the beginning of the
rsyslog.conffile.
Remote log collection
To enable remote log collection on:
-
Server-side configuration: uncomment the following lines in the
rsyslog.conffile of the syslog server:$ModLoad imtcp$InputTCPServerRun 10514 -
Client-side configuration: add the following line in the
rsyslog.conffile by replacing the localhost with the IP address of the remote server:*.* @@localhost:10514
Collecting log files
Previously, there was no tool available to collect the log files in Citrix Workspace app. Log files were present in different folders. You had to manually collect log files from different folders.
Starting with the 2109 version, Citrix Workspace app introduces a collectlog.py tool to collect log files from different folders. You can run the tool using the command-line. The log files are generated as a compressed log file. You can download it from the local server.
Prerequisites
- Python 3
- Requires extra space to save the logs
Starting with Version 2109, two new files are added to collect log files using the collectlog.py tool:
-
logcollector.inifile – Saves the name and path of the log file. -
collectlog.pyfile – Collects the log files and saves them ascwalog_{timestamp}.tar.gzcompressed file.
By default, the [hdxteams] component is added in the logcollector.ini file to collect log files for Microsoft Teams. However, you can add other components also in the logcollector.ini file using the following procedure:
- Navigate to the
${HOME}/.ICAClient/logs/ICAClient.log/logcollector.inifile. - Add the component that you require to collect log files as per the following example:
[component_name]
log_name1 = “log_path1”
log_name2 = “log_path2”
If you are on Version 2109, collect log files using the following procedure:
- Download and install Citrix Workspace app on your Linux machine.
- At the command-line, navigate to the
/opt/Citrix/ICAClient/utilpath. -
Run the following command:
./collctlog.py -hThe following command usage information appears:
usage: collect_log [-h] [-c CONFIG] [-a ARCHIVE]optional arguments: -h, --help show this help message and exit -c CONFIG, --config CONFIG The logcollector.ini path & file -a ARCHIVE, --archive ARCHIVE The archive path & file -
Run the following commands as required:
-
./collectlog.py– Collects log files using the configuration file from the default path and saves them as a compressed log files at the default path. -
./collectlog.py -c /user_specified_path/logcollector.ini– Collects log files using the configuration file from a user-specified path and saves them as a compressed log files at the default path. -
./collectlog.py -c /user_specified_path/logcollector.ini -a/another_user_specified_path/– Collects log files using the configuration file from a user-specified path and saves them as a compressed log files at the user-defined path.
Note:
The default path of the
logcollector.iniconfiguration file is/opt/Citrix/ICAClient/config/logcollector.ini. The default path of the compressed log file is/tmp. -
- Navigate to the
/tmpfolder and collect thecwalog_{timestamp }.tar.gzcompressed file.
Note:
The log files are saved in the
/tmpfolder with the file namecwalog_{timestamp}.tar.gz.
Enhancement to log collection
Starting with Citrix Workspace app version 2309, the following enhancements are available:
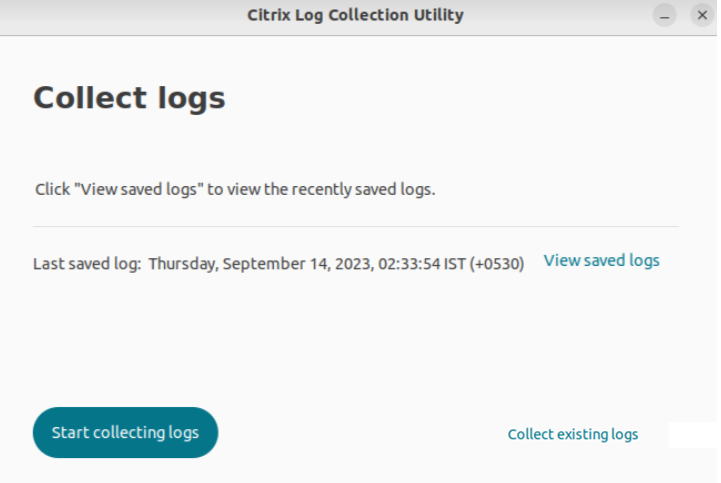
Citrix Log Collection Utility
The Citrix Log Collection Utility helps you collect both new and existing logs. This utility specifically collects verbose logs and saves all logs in a tar.gz file.
You can open the Citrix Log Collection Utility by using any one of the following methods:
- Navigate to the Add Account screen.
- Click the hamburger menu.
-
Select Collect logs
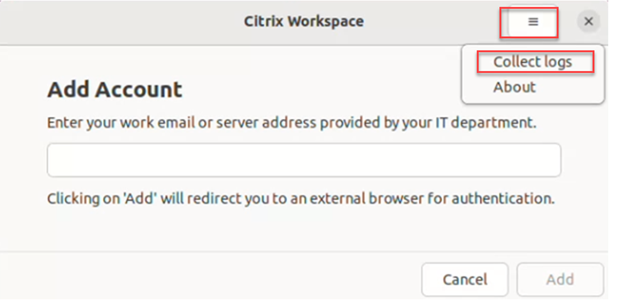
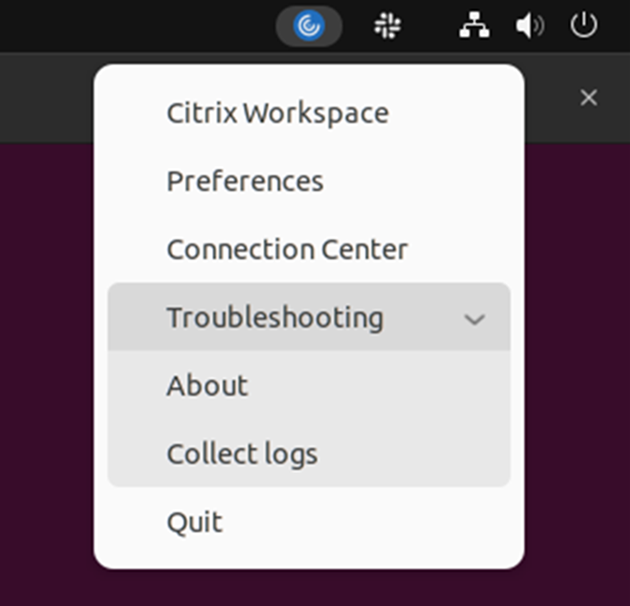
Or,
Click Troubleshooting > Collect logs in the App indicator icon.
Or,
- At the command-line, navigate to the
/opt/Citrix/ICAClient/utilpath. - Run the following command: ./logmgr
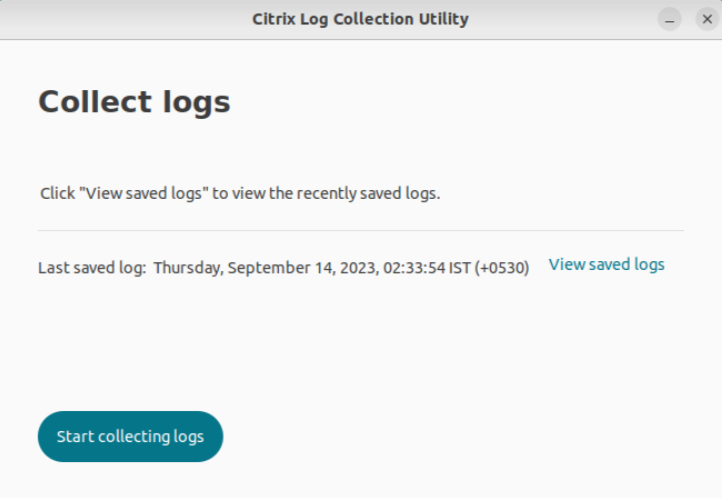
The Citrix Log Collection utility screen appears.
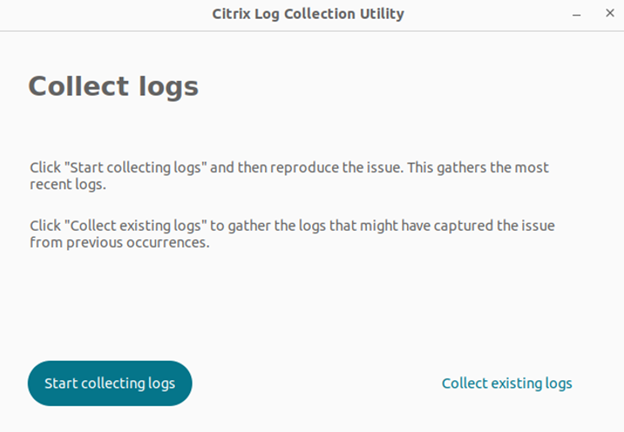
Collect fresh logs
-
Navigate to Citrix Log Collection Utility and click Start collecting logs. The following screen appears:

- Reproduce the issue scenario.
-
Click Stop collecting logs after the issue is reproduced. The following screen appears:
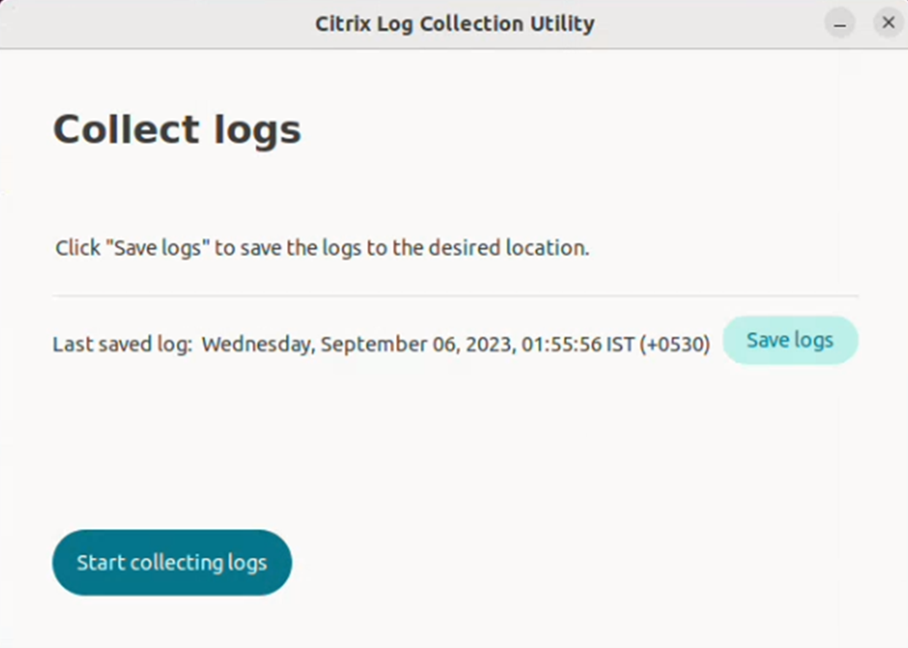
-
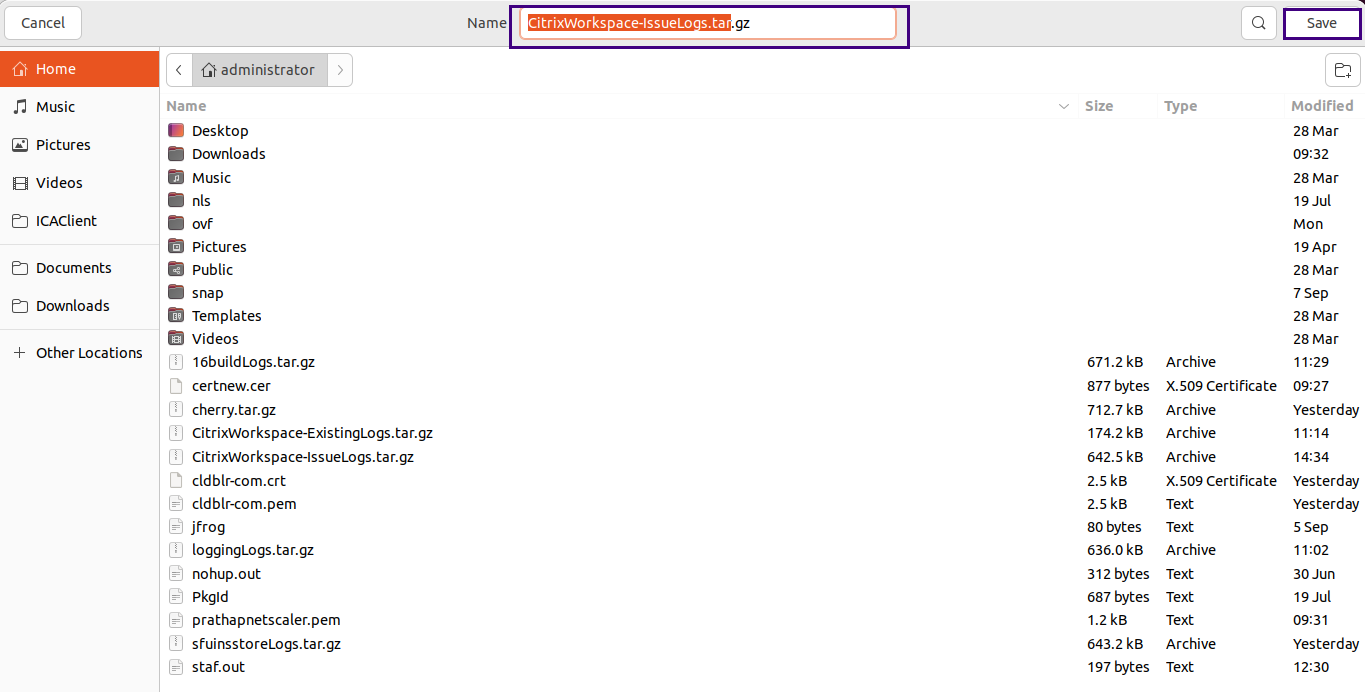
Click Save logs to save the logs. The file explorer window to save logs is opened.
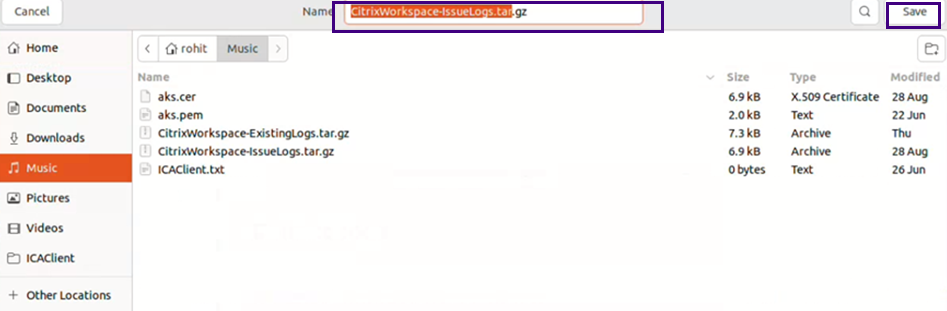
-
Click Save. The log file is saved. The following screen appears:
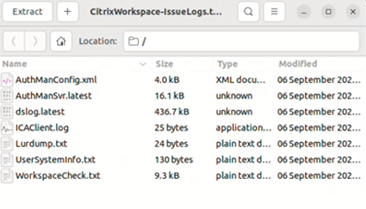
-
Click View Saved logs to view the saved logs. The saved log files are displayed in the following screen:
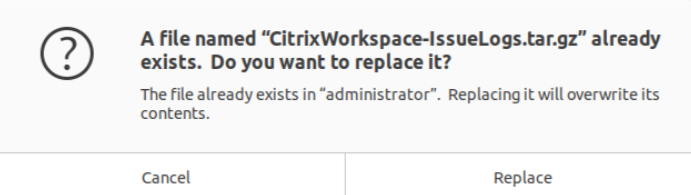
Note:
If you click Start collecting logs for the second time, you get a warning message to overwrite the existing logs:
Collect existing logs
- Open the Citrix Log Collection Utility.
-
Click Collect existing logs to collect the logs that might have captured the issue from previous occurrences. The file explorer window is opened to save the existing logs.
-
Click Save to save the existing logs to a different folder, from where you can access the log files later. The following screen appears:
-
Click View saved logs to view the logs.
Collecting user activity logs
Starting with the 2311 version, you can collect the user activity logs. Activities related to most of the Storebrowse commands are saved in the log file. You can find the log files within the following location:
${HOME}/.ICAClient/logs/userActivitylog/
By default, the user activity logs are enabled. To disable it, add the following key in the Authmanconfig.xml file:
<key>UserActivityLogsDisabled</key>
<value>true</value>
<!--NeedCopy-->
Disable collecting DS logs
DS logs collects all logs. If you don’t require the dslogs, you can disable it by adding the following key in the Authmanconfig.xml file:
<key>DsLogsDisabled</key>
<value>true</value>
<!--NeedCopy-->
Enhanced system logs for browser content redirection
Starting with the 2405 version, browser content redirection now allows admins to monitor the feature status as part of the enhancements to the system logs. For more information, see Browser content redirection.
Extended logging support
Starting with version 2601, Citrix Workspace app for Linux adds a configuration option to enable extended logging for easier diagnostics.
To enable extended logging:
- Edit the
AuthManConfig.xmlfile at/opt/Citrix/ICAClient/config/AuthManConfig.xml. - Set
ExtendedLoggingEnabledtotrue.
Example:
<!-- ExtendedLoggingEnabled - true, false (Collects verbose, service record, and dslogs) -->
<key>ExtendedLoggingEnabled</key>
<value>false</value>

<!-- To enable extended logging -->
<key>ExtendedLoggingEnabled</key>
<value>true</value>
<!--NeedCopy-->
When enabled, extended logs are collected for ServiceRecord and dslogs in Citrix Workspace app for Linux.