Application delivery
Configuring available apps in Studio
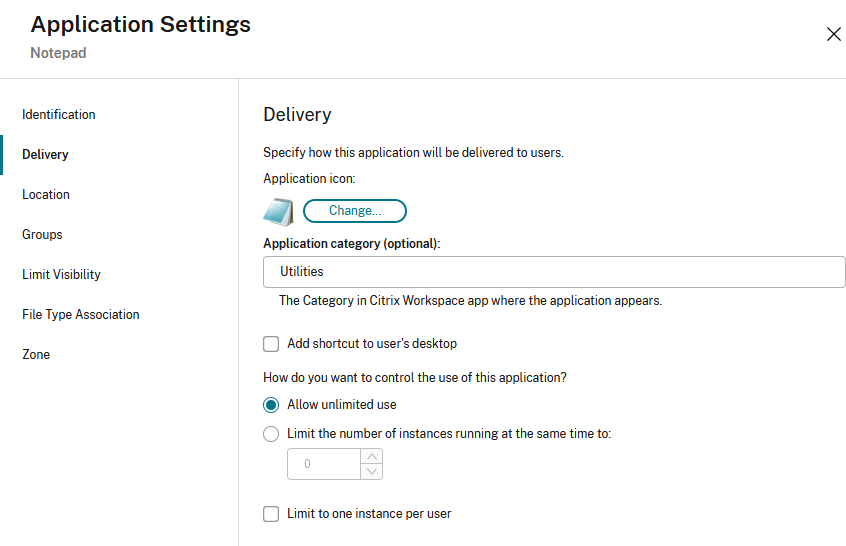
To configure in Studio which apps are available to a user, see Applications. In the Application Settings screen you can configure the following:
- Select the appropriate icon for the application.
- Optionally specify the category in Citrix Workspace app where the application appears. For example, if you are adding shortcuts to Microsoft Office applications, enter Microsoft Office.
- Choose whether to add a shortcut to the user’s desktop.
- To make an individual app mandatory, so that it cannot be removed from the Citrix Workspace app Home tab, append the string KEYWORDS: Mandatory to the application description.
- To automatically make an application a favorite for all users, append the string KEYWORDS: Auto to the description. When users log on to the store, the application is set as a favorite and added to the Home tab. Users can remove the favorite.
Shortcut only mode
By default when a user installs Citrix Workspace app for Windows, they can open the user interface to view all of their apps and desktops for that store. In addition, apps are added to the Start menu depending on configuration. This is known as the “Self-service” mode.
Alternatively, you can disable user interface. This is known as shortcuts-only mode. Apps and desktops can only be opened from the Start menu shortcuts.
By default in shortcuts-only mode, users can configure only one store. The Account and Preferences options are not available to prevent the user from configuring more stores. The administrator can give a user special privileges to add more than one account using the Group Policy Object template. Administrators can also provide special privileges by manually adding a registry key (HideEditStoresDialog) on the client machine. When the administrator gives a user this privilege, the user has a Preferences option in the notification area, where they can add and remove accounts.
There are various ways to configure Citrix Workspace app to use shortcuts-only mode:
Global App Config Service
Yon can disable self-service mode using Global App Configuration service.
During installation
You can disable the self-service user interface during installation, see Install.
Group Policy
You can use Group Policy to configure shortcuts-only mode.
- Open the Citrix Workspace app Group Policy Object administrative template by running gpedit.msc.
- Under the Computer Configuration node, go to Administrative Templates > Citrix Components > Citrix Workspace > Self Service.
- Select Manage SelfServiceMode policy.
- Select Enabled to enable the user interface. This is the default if the policy is not configured.
- Select Disabled to hides user interface and use shortcuts-only mode.
Application shortcuts for favorite and mandatory apps
When favorites are enabled for a store, by default all favorite and mandatory apps are added to the user’s Start menu. As users add and remove favorites they are added and removed from the Start menu. When favorites are disabled for a store, all apps are added to the user’s Start menu and the user does not have an option to remove them. If a user removes a shortcut icon from the desktop, the icon comes back next time Citrix Workspace app starts or when the user selects Refresh from the icon in the notification area. You can configure the following:
- Disable creation of Start menu shortcuts for mandatory and favorite apps. You can continue to configure applications within Studio to create desktop shortcuts.
- Choose the name of the Start menu folder.
- For applications that have categories, you can choose whether applications are grouped into sub-folders matching their category name.
- Create shortcuts on the desktop. You can configure the name of a folder to put the shortcuts into and whether applications are grouped into sub-folders matching their category.
- By default shortcuts remain after you log out of your store or exit Citrix Workspace app. You can choose to remove shortcuts when the user logs off the store exits Citrix Workspace app exits. This is useful when the device is shared by multiple people.
- Choose whether modified apps are automatically reinstalled. When enabled, any changes to the published apps and desktops attributes on the server appear on the client machine. When disabled, apps and desktop attributes aren’t updated. Also, shortcuts aren’t restored on refresh if they are deleted on the client. By default, this is enabled.
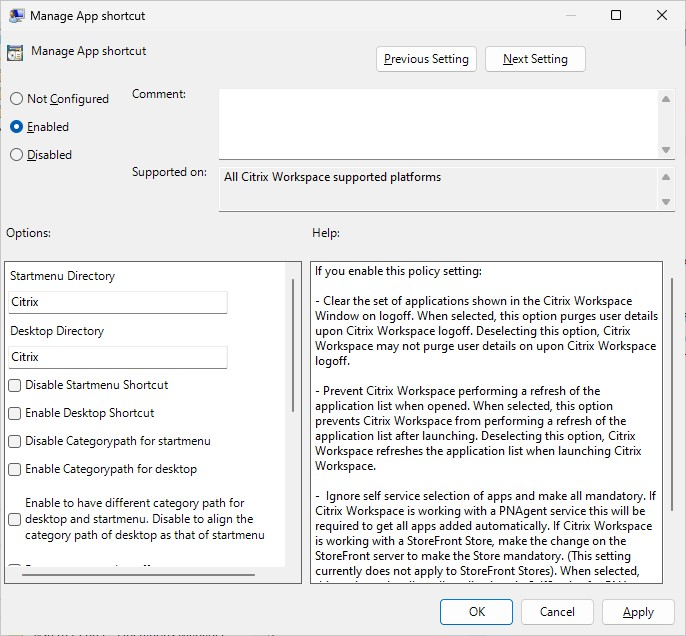
You can configure these shortcuts using the following mechanisms:
Global App Config Service
In the Global App Configuration service, update the settings under App Experience > Desktop Shortcuts.
Group Policy
You can use Group Policy to configure shortcuts.
- Open the Citrix Workspace app Group Policy Object administrative template by running gpedit.msc.
- Under the Computer Configuration node, go to Administrative Templates > Citrix Components > Citrix Workspace > Self Service.
- Select Manage App Shortcut policy.
- Select the options as required
- Click Apply and OK.
- Restart Citrix Workspace app for the changes to take effect.
StoreFront account settings
You can use StoreFront account settings. You can set the following properties:
| Property name | Description | Value | Default |
|---|---|---|---|
PutShortcutsOnDesktop |
Put shortcuts on the desktops. |
true or false
|
false |
PutShortcutsInStartMenu |
Put shortcuts in the Start menu. |
true or false
|
true |
UseCategoryAsStartMenuPath |
Use the category path in the Start menu. |
true or false
|
true |
StartMenuDir |
Sets a single directory for all shortcuts in the Start menu | String value, being the name of the folder into which shortcuts are written. | |
AutoReinstallModifiedApps |
Reinstall modified apps. |
true or false
|
true |
DesktopDir |
Show a single directory for all shortcuts on the desktop. | String value, being the name of the folder into which shortcuts are written | |
DontCreateAddRemoveEntry |
Do not create an entry on the clients ‘add/remove programs’. |
true or false
|
false |
SilentlyUninstallRemovedResources |
Remove shortcuts for an application that was previously available from the Store but now is not available. |
true or false
|
false |
Windows Registry
You can use the Windows registry to configure shortcuts. Add values of type String, with the same value names as used for StoreFront account settings, to the following paths based on the Citrix Workspace App Installer Type (win32 OR x64 & ARM64):
- For 32-bit (x86) CWA:
HKLM\Software\Wow6432Node\Citrix\Dazzle - For x64 and ARM64 CWA:
HKLM\Software\Citrix\Dazzle
During installation
You can configure the directory for the Start menu and desktop shortcuts during installation. For more information, see Install.
Support for 32-bit color icons
Citrix Workspace app supports 32-bit high color icons. To provide for seamless applications, it automatically selects the color depth for:
- applications visible in the Connection Center dialog,
- the Start menu, and
- task bar
Caution
Editing the registry incorrectly can cause serious problems that might require you to reinstall your operating system. Citrix® can’t guarantee that problems resulting from the incorrect use of the Registry Editor can be solved. Use the Registry Editor at your own risk. Be sure to back up the registry before you edit it.
To set a preferred depth, you can add a string registry key named TWIDesiredIconColor to HKEY\LOCAL\MACHINE\SOFTWARE\Wow6432Node\Citrix\ICA Client\Engine\Lockdown Profiles\All Regions\Preferences and set it to the required value. The possible color depths for icons are 4, 8, 16, 24, and 32 bits-per-pixel. The user can select a lower color depth for icons if the network connection is slow.
Reducing enumeration delays or digitally signing application stubs
Citrix Workspace app provides functionality to copy the .EXE stubs from a network share, if:
- there is a delay in app enumeration at each sign-in, or
- there is a need to sign application stubs digitally.
This functionality involves several steps:
- Create the application stubs on the client machine.
- Copy the application stubs to a common location accessible from a network share.
- If necessary, prepare an allow list, or sign the stubs with an Enterprise certificate.
- Add a registry key to enable Workspace for Windows to create the stubs by copying them from the network share.
If RemoveappsOnLogoff and RemoveAppsonExit are enabled, and users are experiencing delays in app enumeration at every logon, use the following workaround to reduce the delays:
- Run
reg add HKEY_CURRENT_MACHINE\Software\Citrix\Dazzle /v ReuseStubs /t REG_SZ /d "true"or
Alternatively add to HKEY_CURRENT_USER. HKEY_CURRENT_USER has preference over HKEY_LOCAL_MACHINE.
Caution
Editing the registry incorrectly can cause serious problems that might require you to reinstall your operating system. Citrix cannot guarantee that problems resulting from the incorrect use of the Registry Editor can be solved. Use the Registry Editor at your own risk. Be sure to back up the registry before you edit it.
Enable a machine to use pre-created stub executables that are stored on a network share:
- On a client machine, create stub executables for all apps. To accomplish create stub executables, add all the applications to the machine using Citrix Workspace app. Citrix Workspace app generates the executables.
- Harvest the stub executables from
%APPDATA%\Citrix\SelfService. You only need the .exe files. - Copy the executables to a network share.
- For each client machine that is locked down, set the following registry keys:
Reg add HKEY_LOCAL_MACHINE\Software\Citrix\Dazzle /v CommonStubDirectory /t REG_SZ /d "\\ShareOne\WorkspaceStubs"-
Reg add HKEY_LOCAL_MACHINE\Software\Citrix\Dazzle /v CopyStubsFromCommonStubDirectory /t REG_SZ /d "true". It’s also possible to configure these settings on HKEY_CURRENT_USER if you prefer. HKEY_CURRENT_USER has preference over HKEY_LOCAL_MACHINE. - Exit and restart Citrix Workspace app for the changes to take effect.
Launching local applications
In a double-hop scenario (where Citrix Workspace app is running on the VDA that hosts your session), you can control whether Citrix Workspace app launches:
- the local instance of an application installed on the VDA (if available as a local app) or
- a hosted instance of the application.
There are two mechanisms for achieving this. It is recommended that you use vPrefer. Alternatively you can use the Prefer keyword.
vPrefer
vPrefer was introduced with Citrix Workspace app for Windows 4.11 and requires StoreFront Version 3.14 and Citrix Virtual Desktops 7.17 and later.
When you launch the application, Citrix Workspace app reads the resource data present on the StoreFront server and applies the settings based on the vprefer flag at the time of enumeration. Citrix Workspace app searches for the application’s installation path in the Windows registry of the VDA. If present, launches the local instance of the application. Otherwise, a hosted instance of the application is launched. If you launch an application that is not on the VDA, Citrix Workspace app launches the hosted application. For more information on how StoreFront handled the local launch, see Control of local application launch on published desktops in the Citrix Virtual Apps and Desktops documentation.
If you do not want the local instance of the application to be launched on the VDA, set the LocalLaunchDisabled to True using the PowerShell on the Delivery Controller. For more information, see the Citrix Virtual Apps and Desktops documentation.
This feature helps to launch applications faster, thereby providing a better user experience. You can configure it by using Group Policy. By default, vPrefer is enabled only in a double-hop scenario.
Note:
When you upgrade or install Citrix Workspace app for the first time, add the latest template files to the local GPO. For more information on adding template files to the local GPO, see Group Policy. For an upgrade, the existing settings are retained while importing the latest files.
- Open the Citrix Workspace app GPO administrative template by running gpedit.msc.
- Under the Computer Configuration node, go to Administrative Template > Citrix Component > Citrix Workspace > SelfService.
- Select the vPrefer policy.
- Select Enabled.
- From the Allow apps drop-down list, select one of the following options:
- Allow all apps: This option launches the local instance of all apps on the VDA. Citrix Workspace app searches for the installed application, including the native Windows apps such as Notepad, Calculator, WordPad, Command prompt. It then launches the application on the VDA instead of the hosted app.
- Allow installed apps: This option launches the local instance of the installed app on the VDA. If the app is not installed on the VDA, it launches the hosted app. By default, Allow installed apps is selected when the vPrefer policy is set to Enabled. This option excludes the native Windows operating system applications like Notepad, Calculator, and so on.
- Allow network apps: This option launches the instance of an app that is published on a shared network.
- Click Apply and OK.
- Restart the session for the changes to take effect.
Limitation:
This is not supported when using hybrid launches.
Prefer keyword
You can specify that the instance of an app installed on the VDA (referred to as local instance in this document) must be launched in preference to the published application by setting the KEYWORDS:prefer=”application” attribute to the application description in Citrix Studio.
Before Citrix Workspace app adds Start menu shortcuts, it searches for the specified patterns to determine if the application is already installed locally. If it is, Citrix Workspace app does not create a shortcut. When the user starts the application from the Citrix Workspace app window, Citrix Workspace app starts the locally installed (preferred) application.
Note:
The keyword prefer is applied when the store is added or the user adds a favorite application. Adding the keyword to an app the user has already added to their favorites has no effect.
You can specify the prefer keyword multiple times for an application. Only one match is needed to apply the keyword to an application.
The following patterns can be used in any combination:
-
prefer=”ApplicationName”
The application name pattern matches any application with the specified application name in the shortcut file name. The application name can be a word or a phrase. Quotation marks are required for phrases. Matching is not allowed on partial words or file paths and is case-insensitive. The application name matching pattern is useful for overrides performed manually by an administrator.
| KEYWORDS:prefer= | Shortcut under Programs | Matches? |
|---|---|---|
| Word | \Microsoft Office\Microsoft Word 2010 | Yes |
| Microsoft Word | \Microsoft Office\Microsoft Word 2010 | Yes |
| Console | McAfee\VirusScan Console | Yes |
| Virus | McAfee\VirusScan Console | No |
| Console | McAfee\VirusScan Console | Yes |
-
prefer=”\\Folder1\Folder2\…\ApplicationName”
The absolute path pattern matches the entire shortcut file path plus the entire application name under the Start menu. The Programs folder is a sub folder of the Start menu directory, so you must include it in the absolute path to target an application in that folder. Quotation marks are required if the path contains spaces. The matching is case-sensitive. The absolute path matching pattern is useful for overrides implemented programmatically in Citrix Virtual Apps and Desktops™ and Citrix DaaS.
| KEYWORDS:prefer= | Shortcut under Programs | Matches? |
|---|---|---|
| \Programs\Microsoft Office\Microsoft Word 2010 | \Programs\Microsoft Office\Microsoft Word 2010 | Yes |
| \Microsoft Office | \Programs\Microsoft Office\Microsoft Word 2010 | No |
| \Microsoft Word 2010 | \Programs\Microsoft Office\Microsoft Word 2010 | No |
| \Programs\Microsoft Word 2010 | \Programs\Microsoft Word 2010 | Yes |
-
prefer=”\Folder1\Folder2\…\ApplicationName”
The relative path pattern matches the relative shortcut file path under the Start menu. The relative path provided must contain the application name and can optionally include the folders where the shortcut resides. Matching is successful if the shortcut file path ends with the relative path provided. Quotation marks are required if the path contains spaces. The matching is case-sensitive. The relative path matching pattern is useful for overrides implemented programmatically.
| KEYWORDS:prefer= | Shortcut under Programs | Matches? |
|---|---|---|
| \Microsoft Office\Microsoft Word 2010 | \Microsoft Office\Microsoft Word 2010 | Yes |
| \Microsoft Office | \Microsoft Office\Microsoft Word 2010 | No |
| \Microsoft Word 2010 | \Microsoft Office\Microsoft Word 2010 | Yes |
| \Microsoft Word | \Microsoft Word 2010 | No |