Domain pass-through to Citrix Workspace using on-premises Citrix Gateway as the identity provider
Important:
This article helps in configuring domain pass-through authentication. If you have already setup on-premises Gateway as IdP, skip to Configure domain pass-through as the authentication method in the Citrix Gateway section.
Citrix Cloud™ supports using an on-premises Citrix Gateway as an identity provider to authenticate subscribers signing into their workspaces.
By using Citrix Gateway authentication, you can:
- Continue authenticating users through your existing Citrix Gateway so they can access the resources in your on-premises Virtual Apps and Desktops deployment through Citrix Workspace.
- Use the Citrix Gateway authentication, authorization, and auditing functions with Citrix Workspace.
- Provide your users access to the resources that they need through Citrix Workspace using features such as pass-through authentication, smart cards, secure tokens, conditional access policies, federation.
Citrix Gateway authentication is supported for use with the following product versions:
- Citrix Gateway 13.1.4.43 Advanced edition or later
Prerequisites:
- Cloud Connectors - You need at least two servers on which to install the Citrix Cloud Connector™ software.
- An Active Directory and make sure that the domain is registered.
- Citrix Gateway requirements
- Use advanced policies on the on-premises gateway because of the deprecation of classic policies.
- When configuring the Gateway for authenticating subscribers to Citrix Workspace, the gateway acts as an OpenID Connect provider. Messages between Citrix Cloud and Gateway conform to the OIDC protocol, which involves digitally signing tokens. Therefore, you must configure a certificate for signing these tokens.
- Clock synchronization – Citrix Gateway must be synchronized to NTP time.
For details, see Prerequisites in the Citrix Cloud documentation.
Before creating the OAuth IdP policy, you need to first set up Citrix Workspace or Cloud to use Gateway as the authentication option in the IdP. For details on how to set up, see Connect an on-premises Citrix Gateway to Citrix Cloud. When you complete the setup, the Client ID, Secret, and Redirect URL required for creating the OAuth IdP policy are generated.
Domain pass-through for Workspace for web is enabled if you are using Internet Explorer, Microsoft Edge, Mozilla Firefox, and Google Chrome. Domain pass-through is enabled only when the client is detected successfully.
Note:
If HTML5 client is preferred by a user or is enforced by the administrator, domain pass-through authentication method is not enabled.
When launching StoreFront URL in a browser, the Detect Receiver prompt is shown.
If the devices are managed, configure the group policy to disable this prompt instead of disabling client detection. For more information, see:
- URLAllowlist in the Microsoft documentation.
- URLAllowlist in the Google Chrome documentation.
Note:
Protocol handler used by Citrix Workspace app is receiver:. Configure this as one of the URLs allowed.
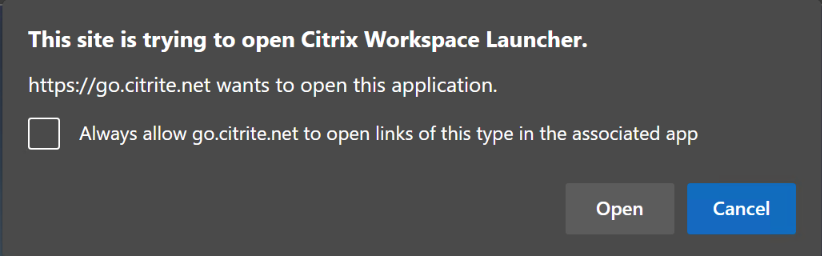
Users can also select the check box as shown in the following example prompt for a StoreFront URL in the client detection prompt. Selecting this check box also avoids the prompt for subsequent launches.
The following steps explain how Citrix Gateway can be set up as IdP.
Create an OAuth IdP policy on the on-premises Citrix Gateway
Creating an OAuth IdP authentication policy involves the following tasks:
- Create an OAuth IdP profile.
- Add an OAuth IdP policy.
- Bind the OAuth IdP policy to a virtual server.
- Bind the certificate globally.
Create an OAuth IdP profile
-
To create an OAuth IdP profile by using the CLI, type the following in the command prompt:
add authentication OAuthIdPProfile <name> [-clientID <string>][-clientSecret ][-redirectURL <URL>][-issuer <string>][-audience <string>][-skewTime <mins>] [-defaultAuthenticationGroup <string>] add authentication OAuthIdPPolicy <name> -rule <expression> [-action <string> [-undefAction <string>] [-comment <string>][-logAction <string>] add authentication ldapAction <name> -serverIP <IP> -ldapBase "dc=aaa,dc=local" ldapBindDn <administrator@aaa.local> -ldapBindDnPassword <password> -ldapLoginName sAMAccountName add authentication policy <name> -rule <expression> -action <string> bind authentication vserver auth_vs -policy <ldap_policy_name> -priority <integer> -gotoPriorityExpression NEXT bind authentication vserver auth_vs -policy <OAuthIdPPolicyName> -priority <integer> -gotoPriorityExpression END bind vpn global –certkey <> <!--NeedCopy--> -
To create an OAuth IdP profile by using the GUI:
-
Log into your on-premises Citrix Gateway management portal and navigate to Security > AAA – Application Traffic > Policies > Authentication > Advanced Policies > OAuth IDP.
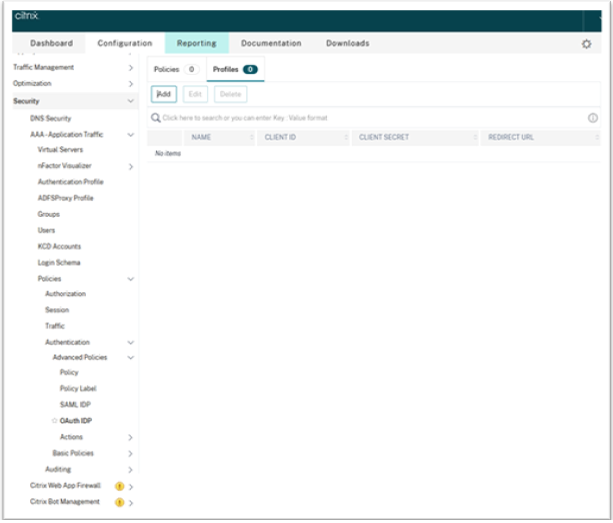
- In the OAuth IdP page, click the Profiles tab and click Add.
-
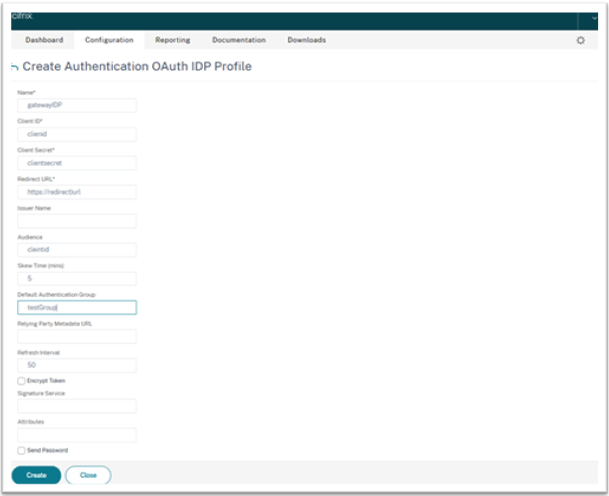
Configure the OAuth IdP profile.
Note:
- Copy and paste the Client ID, Secret, and Redirect URL values from the Citrix Cloud > Identity and Access Management > Authentication tab to establish the connection to Citrix Cloud.
- Enter the Gateway URL correctly in the Issuer Name field. For example,
https://GatewayFQDN.com. - Also copy and paste the client ID in the Audience field.
- Send Password: Enable this option for single sign-on support. This option is disabled by default.
-
On the Create Authentication OAuth IdP Profile screen, set values for the following parameters and click Create.
- Name – Name of the authentication profile. Must begin with a letter, number, or the underscore character (_). Name must have only letters, numbers, and the hyphen (-), period (.) pound (#), space ( ), at (@), equals (=), colon (:), and underscore characters. You cannot change the name after the profile is created.
- Client ID – Unique string that identifies SP. Authorization server infers client configuration using this ID. Maximum Length: 127.
- Client Secret – Secret string established by user and authorization server. Maximum Length: 239.
- Redirect URL – Endpoint on SP to which code/token must be posted.
-
Issuer Name – Identity of the server whose tokens are to be accepted. Maximum Length: 127. Example:
https://GatewayFQDN.com. - Audience – Target recipient for the token sent by IdP. The recipient verifies this token.
- Skew Time – This option specifies the allowed clock skew (in minutes) that Citrix ADC allows on an incoming token. For example, if skewTime is 10 then the token is valid from (current time - 10) mins to (current time + 10) mins, that is 20 mins in all. Default value: 5.
- Default Authentication Group – A group added to the session internal group list when this profile is chosen by IdP which can be used in the nFactor flow. It can be used in the expression (AAA.USER.IS_MEMBER_OF(“xxx”)) for authentication policies to identify relying party related nFactor flow. Maximum Length: 63
A group is added to the session for this profile to simplify policy evaluation and help in customizing policies. This group is the default group that is chosen when the authentication succeeds in addition to the extracted groups. Maximum Length: 63.
-
Add an OAuth IdP policy
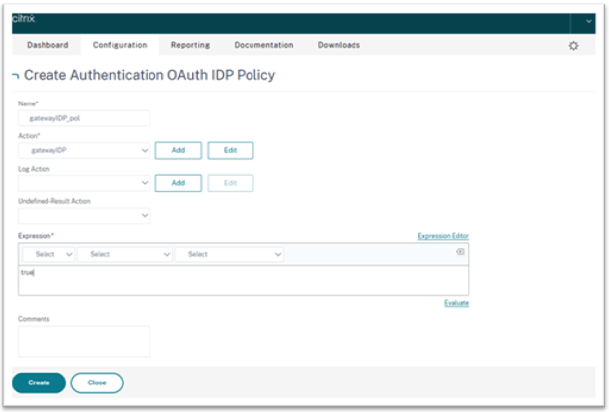
- In the OAuth IdP page, click Policies and click Add.
-
On the Create Authentication OAuth IdP Policy screen, set values for the following parameters and click Create.
- Name – The name of the authentication policy.
- Action – Name of profile created earlier.
- Log Action – Name of the message log action to use when a request matches this policy. Not a mandatory filed.
- Undefined-Result Action – Action to perform if the result of policy evaluation is undefined (UNDEF). Not a mandatory field.
- Expression – Default syntax expression that the policy uses to respond to specific request. For example, true.
- Comments – Any comments about the policy.
Note:
When sendPassword is set to ON (OFF by default), user credentials are encrypted and passed through a secure channel to Citrix Cloud. Passing user credentials through a secure channel allows you to enable SSO to Citrix Virtual Apps and Desktops™ upon launch.
Bind the OAuthIDP policy and LDAP policy to the virtual authentication server
Now you need to bind the OAuth IdP Policy to the virtual authentication server on the on-premises Citrix Gateway.
- Log into your on-premises Citrix Gateway management portal and navigate to Configuration > Security > AAA-Application Traffic > Policies > Authentication > Advanced Policies > Actions > LDAP.
- On the LDAP Actions screen, click Add.
-
On the Create Authentication LDAP Server screen, set the values for the following parameters, and click Create.
- Name – The name of the LDAP action.
- ServerName/ServerIP – Provide FQDN or IP of the LDAP server.
- Choose appropriate values for Security Type, Port, Server Type, Time-Out.
- Make sure that Authentication is checked.
-
Base DN – Base from which to start LDAP search. For example,
dc=aaa,dc=local. -
Administrator Bind DN: User name of the bind to LDAP server. For example,
admin@aaa.local. - Administrator Password/Confirm Password: Password to bind LDAP.
- Click Test Connection to test your settings.
- Server Logon Name Attribute: Choose “sAMAccountName”.
- Other fields are not mandatory and hence can be configured as required.
- Navigate to Configuration > Security > AAA-Application Traffic > Policies > Authentication > Advanced Policies > Policy.
- On the Authentication Policies screen, click Add.
-
On the Create Authentication Policy page, set the values for the following parameters, and click Create.
- Name – Name of the LDAP Authentication Policy.
- Action Type – Choose LDAP.
- Action – Choose the LDAP action.
- Expression – Default syntax expression that the policy uses to respond to specific request. For example, true**.
Bind the certificate globally to the VPN
Binding the certificate globally to the VPN requires CLI access to the on-premises Citrix Gateway. Using Putty (or similar) login to the on-premises Citrix Gateway using SSH.
- Launch a command-line utility, such as, Putty.
- Sign in to the on-premises Citrix Gateway using SSH.
-
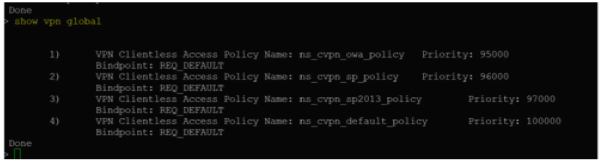
Type the following command:
show vpn globalNote:
No certificate must be bound.
- To list the certificates on the on-premises Citrix Gateway, type the following command:
show ssl certkey -
Select the appropriate certificate and type the following command to bind the certificate globally to VPN:
bind vpn global -certkey cert_key_namewhere cert_key_name is the name of the certificate.
-
Type the following command to check if the certificate is bound globally to the VPN:
show vpn global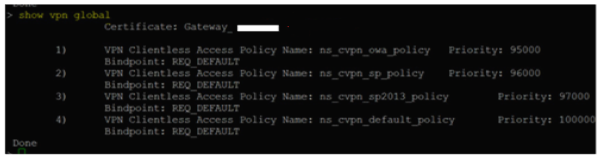
Configure domain pass-through as the authentication method in the Citrix Gateway
When you complete setting up the Citrix Gateway as IdP, perform the following steps to configure the domain pass-through as the authentication method in the Citrix Gateway.
When the domain pass-through is set as the authentication method, the client uses Kerberos tickets to authenticate instead of credentials. Citrix Gateway supports both Impersonation and Kerberos Constrained Delegation (KCD). However, this article describes KCD authentication. For more information, see Knowledge Center article CTX236593.
Configuring the domain pass-through includes the following steps:
- Kerberos Constrained Delegation configuration
- Client configuration
Kerberos Constrained Delegation configuration
-
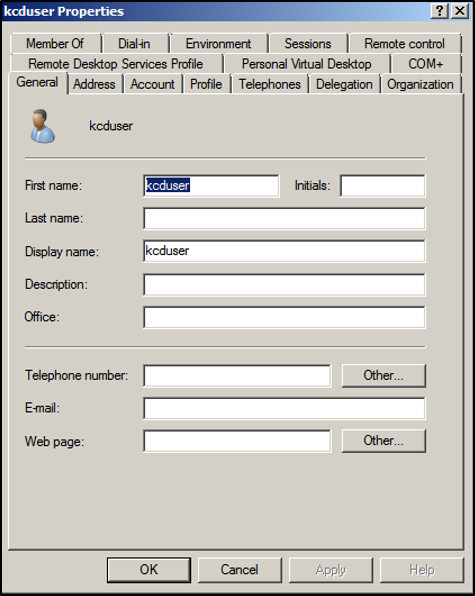
Create a KCD user in the Active Directory
Kerberos works on a ticket granting system to authenticate users to resources, and involves a client, server, and Key Distribution Center (KDC).
For Kerberos to work, the client needs to request a ticket from the KDC. The client must first authenticate to the KDC using their user name, password, and domain before requesting a ticket, called as AS request.
-
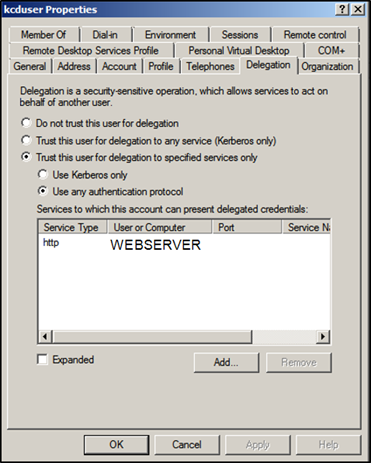
Associate the new user with the Service Principal Name (SPN).
SPN of Gateway is used by the client to authenticate.
- Service Principal Name (SPN): A Service Principal Name (SPN) is a unique identifier of a service instance. Kerberos authentication uses SPN to associate a service instance with a service sign-in account. This function allows a client application to request for the service authentication of an account even if the client doesn’t have the account name.
SetSPN is the application for managing SPNs on a Windows device. With SetSPN, you can view, edit, and delete SPN registrations.
- In the Active Directory server, open a command prompt.
-
In the command prompt, enter the following command:
setspn –A http/<LB fqdn> <domain\Kerberos user> -
To confirm the SPNs for the Kerberos user, run the following command:
setspn –l <Kerberos user>The Delegation tab appears after running the
setspncommand. -
Select Trust this user for delegation to specified services only option and Use any authentication protocol option. Add the web server and select the HTTP service.
-
Create a DNS record for the client to find the Gateway’s SPN:
Add a TXT DNS record in the Active Directory.
Note:
Name must start with _Kerberos, Data must be the domain name. The FQDN must show Kerberos.
. 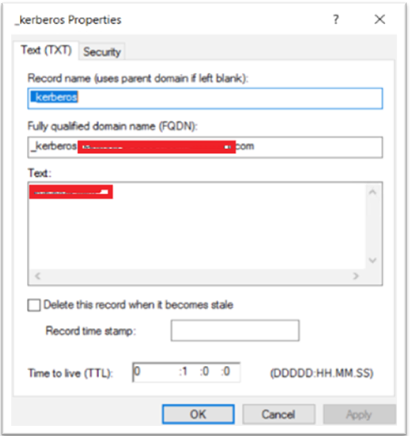
A window’s domain joined client uses _kerberos.fqdn to request tickets. For example, if the client is joined to citrite.net, the operating system can get tickets for any websites with *.citrite.net. However, if the Gateway domain is external like gateway.citrix.com, then the client operating system can’t get the Kerberos ticket.
Hence, you must create a DNS TXT record that helps the client to look up for the _kerberos.gateway.citrix.com and get the Kerberos ticket for authentication.
-
Configure Kerberos as the authentication factor.
-
Create a KCD Account for the NetScaler® user. Here we opted to do this manually, but you can create a keytab file.
Note:
If you are using alternate domains (Internal domain and external domain) then you must set the Service SPN to
HTTP/PublicFQDN.com@InternalDomain.ext.- Realm - Kerberos Realm. Usually your Internal Domain suffix.
- User Realm - This is your user’s Internal Domain suffix.
- Enterprise Realm - This needs to be given only in certain KDC deployments where KDC expects Enterprise user name instead of Principal Name.
- Delegated User - This is the NetScaler user account for KCD that you created in AD in the prior steps. Make sure that the password is correct.

-
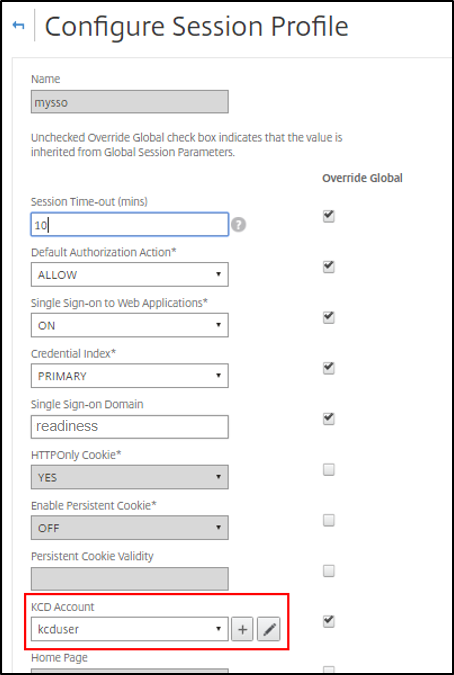
Ensure that the Session Profile is using the right KCD account. Bind the session policy to the authentication, authorization, and auditing virtual server.
-
Bind the Authentication policy to the authentication, authorization, and auditing virtual server. These policies use authentication, authorization, and auditing methods that do not obtain a password from the client, hence the need to use KCD. However, they must still obtain the user name and domain information, in UPN format.
Note:
You can use IP address or EPA scan to differentiate domain joined and non-domain joined devices and use Kerberos or regular LDAP as a factor for authentication.
-
Configure the client
To allow successful single sign-on to VDA, perform the following.
Prerequisites:
- Domain joined machine
- Citrix Workspace 2112.1or later with SSO setting enabled
- Trust necessary URLs that checks if the connections are secured
- Validate Kerberos from Client and AD. Client OS must have connectivity to AD to get Kerberos tickets.
Following are some of the URLs to be trusted in the browser:
- Gateway URL or FQDN
- AD FQDN
- Workspace URL for SSO from browser-based launches.
-
If you are using Internet Explorer, Microsoft Edge, or Google Chrome, do the following:
- Launch the browser.
- Open the Local Group Policy Editor on the Client.
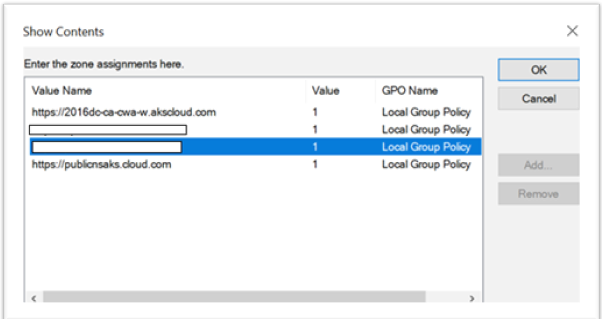
- Go to Computer Configuration > Windows Component > Internet Explorer > Internet Control Panel > Security page.
- Open Site to zone Assignment list and add all the listed URLs with the Value one (1).
- (Optional) Run
Gpupdateto apply policies.
-
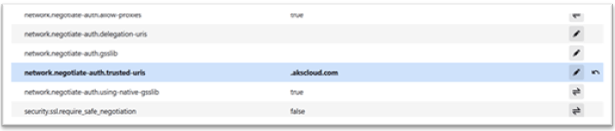
If you are using Mozilla Firefox browser, do the following:
- Open the browser.
- Type
about:configin the search bar. - Accept the risk and continue.
- In the search field, type negotiate.
-
From the list of populated data, verify if the network.negotiate-auth.trusted-uris is set to the domain value.
This completes the configuration on the client-side.
-
Login using Citrix Workspace app or browser to Workspace.
This must not prompt for user name or password on a domain joined device.
Troubleshooting Kerberos
Note:
You must be domain admin to run this verification step.
In the command prompt or Windows PowerShell, run the following command to verify Kerberos ticket validation for the SPN user:
KLIST get host/FQDN of AD