Create Linux VDAs using Machine Creation Services™ (MCS)
You can create domain-joined and non-domain-joined VDAs using MCS. If you want to create non-domain-joined Linux VDAs in Citrix DaaS, you can also refer to the dedicated article Create non-domain-joined Linux VDAs using MCS.
Important:
The following are important changes starting with the 2212 release:
- This AD_INTEGRATION variable in the /etc/xdl/mcs/mcs.conf file or on the easy install GUI does not have a default value any longer. You must set a value as needed. For more information, see the Step 3i: Configure MCS variables section in this article.
- The valid value of the UPDATE_MACHINE_PW entry in /etc/xdl/mcs/mcs.conf is no longer enabled or disabled, but Y or N. For more information, see the Automate machine account password updates section in this article.
Supported distributions
| Winbind | SSSD | Centrify | PBIS | |
|---|---|---|---|---|
| Debian 12.12 | Yes | Yes | No | Yes |
| Debian 13 | Yes | Yes | No | Yes |
| RHEL 10/9.7/9.6/9.4 | Yes | Yes | Yes | No |
| RHEL 8.10 | Yes | Yes | Yes | Yes |
| Rocky Linux 10/9.7/9.6/9.4 | Yes | Yes | Yes | No |
| Rocky Linux 8.10 | Yes | Yes | Yes | No |
| SUSE 15.7 | Yes | Yes | No | Yes |
| Ubuntu 24.04 | Yes | Yes | No | Yes |
| Ubuntu 22.04 | Yes | Yes | No | Yes |
To use a currently running RHEL 8.x/9.x/10 or Rocky Linux 8.x/9.x/10 VDA that is connected to the domain using SSSD as the template VM for MCS, ensure that:
The VDA is installed manually and not by using easy install. Easy install uses Adcli for RHEL 8.x/9.x/10 and Rocky Linux 8.x/9.x/10 and MCS does not support the combination of SSSD and Adcli.
-
Citrix® uses the following Centrify versions for initial feature validation on the relevant Linux distributions:
Linux distribution Centrify version RHEL 7/8 5.8.0 SUSE 5.7.1 Debian, Ubuntu 5.6.1 Using other versions of Centrify might cause errors. Do not use Centrify to join a template machine to a domain.
-
If you are using PBIS or Centrify for joining MCS-created machines to Windows domains, complete the following tasks:
-
On the template machine, configure the PBIS or Centrify package download path in the
/etc/xdl/mcs/mcs.conffile or install the PBIS or Centrify package directly. -
Before you run
/opt/Citrix/VDA/sbin/deploymcs.sh, create an Organizational Unit (OU) that has write and password reset permissions to all its subordinate, MCS-created machines. -
Before you restart MCS-created machines after
/opt/Citrix/VDA/sbin/deploymcs.shfinishes running, runklist -li 0x3e4 purgeon your Delivery Controller or on your Citrix Cloud Connector based on your deployment.
-
-
To use a currently running RHEL 8.x/9.x or Rocky Linux 8.x/9.x VDA that is connected to the domain using SSSD as the template VM for MCS, ensure that:
- The VDA is installed manually and not by using easy install. Easy install uses Adcli for RHEL 8.x/9.x and Rocky Linux 8.x/9.x and MCS does not support the combination of SSSD and Adcli.
- A Samba server is configured to use SSSD for AD authentication. For more information, see the Red Hat article at https://access.redhat.com/solutions/3802321.
Supported hypervisors
- AWS
- XenServer (formerly Citrix Hypervisor™)
- GCP
- Microsoft Azure
- Nutanix AHV
- VMware vSphere
Unexpected results can occur if you try to prepare a master image on hypervisors other than the supported ones.
Use MCS to create Linux VMs
Considerations
-
Starting with the 2203 release, you can host the Linux VDA on Microsoft Azure, AWS, and GCP for Citrix Virtual Apps and Desktops™ as well as Citrix DaaS (formerly Citrix Virtual Apps and Desktops service). To add these public cloud host connections to your Citrix Virtual Apps and Desktops deployment, you need the Citrix Universal Hybrid Multi-Cloud (HMC) license.
-
Bare metal servers are not supported for use with MCS to create virtual machines.
(For Nutanix only) Step 1: Install and register the Nutanix AHV plug-in
Obtain the Nutanix AHV plug-in package from Nutanix. Install and register the plug-in in your Citrix Virtual Apps and Desktops environment. For more information, see the Nutanix Acropolis MCS plug-in installation guide, available at the Nutanix Support Portal.
Step 1a: Install and register the Nutanix AHV plug-in for on-premises Delivery Controllers
After you install Citrix Virtual Apps™ and Desktops, select and install the XD MCS AHV Plugin on your Delivery Controllers.
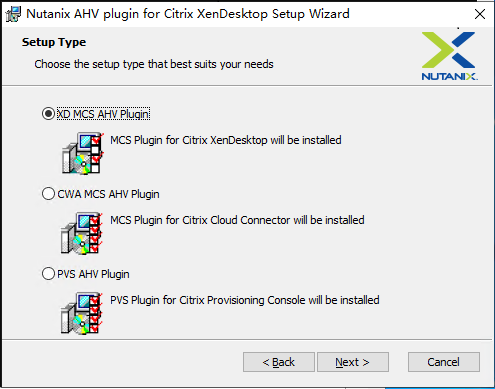
Step 1b: Install and register the Nutanix AHV plug-in for cloud Delivery Controllers
Select and install the CWA MCS AHV Plugin for Citrix Cloud™ Connectors. Install the plug-in on all Citrix Cloud Connectors that are registered with the Citrix Cloud tenant. You must register Citrix Cloud Connectors even when they serve a resource location without the AHV.
Step 1c: Complete the following steps after installing the plug-in
- Verify that a Nutanix Acropolis folder has been created in
C:\Program Files\Common Files\Citrix\HCLPlugins\CitrixMachineCreation\v1.0.0.0. - Run the
"C:\Program Files\Common Files\Citrix\HCLPlugins\RegisterPlugins.exe" -PluginsRoot "C:\Program Files\Common Files\Citrix\HCLPlugins\CitrixMachineCreation\v1.0.0.0"command. -
Restart the Citrix Host, Citrix Broker, and Citrix Machine Creation Services on your on-premises Delivery Controllers or restart the Citrix RemoteHCLServer Service on Citrix Cloud Connectors.
Tip:
We recommend that you stop and then restart the Citrix Host, Citrix Broker, and Machine Creation Services when you install or update the Nutanix AHV plug-in.
Step 2: Create a host connection
This section gives examples on how to create a host connection to Azure, AWS, XenServer® (formerly Citrix Hypervisor), GCP, Nutanix AHV, and VMware vSphere.
Note:
For on-premises Delivery Controllers, choose Configuration > Hosting > Add Connection and Resources in the on-premises Citrix Studio to create a host connection. For cloud Delivery Controllers, choose Manage > Hosting > Add Connection and Resources in the web-based Studio console on Citrix Cloud to create a host connection.
For more information, see Create and manage connections and resources in the Citrix Virtual Apps and Desktops documentation and Create and manage connections in the Citrix DaaS documentation.
Create a host connection to Azure in Citrix Studio
-
For on-premises Delivery Controllers, choose Configuration > Hosting > Add Connection and Resources in the on-premises Citrix Studio to create a host connection. For cloud Delivery Controllers, choose Manage > Hosting > Add Connection and Resources in the web-based Studio console on Citrix Cloud to create a host connection.
-
In the Add Connection and Resources wizard, select Microsoft Azure as the connection type.
-
Select Microsoft Azure as the connection type.
-
The wizard guides you through the pages. Specific page content depends on the selected connection type. After completing each page, select Next until you reach the Summary page. For more information, see Step 2: Create a host connection in the Create non-domain-joined Linux VDAs using MCS article.
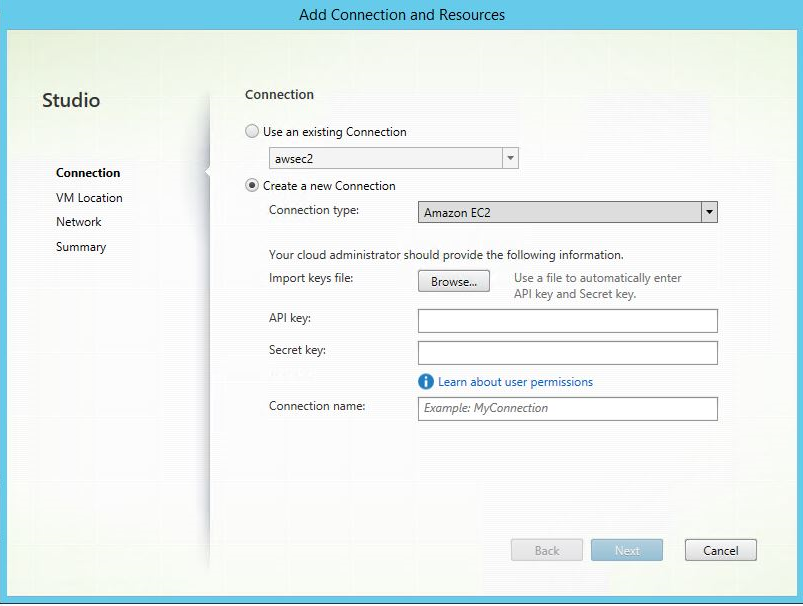
Create a host connection to AWS in Citrix Studio
-
For on-premises Delivery Controllers, choose Configuration > Hosting > Add Connection and Resources in the on-premises Citrix Studio to create a host connection. For cloud Delivery Controllers, choose Manage > Hosting > Add Connection and Resources in the web-based Studio console on Citrix Cloud to create a host connection.
-
In the Add Connection and Resources wizard, select Amazon EC2 as the connection type. To create a connection to Amazon WorkSpaces Core Managed Instances, see Connection to Amazon WorkSpaces Core Managed Instances
Here takes Amazon EC2 connection as an example, in the on-premises Citrix Studio:

-
Type the API key and secret key of your AWS account and type your connection name.
The API key is your access key ID and the Secret key is your secret access key. They are considered as an access key pair. If you lose your secret access key, you can delete the access key and create another one. To create an access key, do the following:
- Sign in to the AWS services.
- Navigate to the Identity and Access Management (IAM) console. 1 On the left navigation pane, choose Users.
- Select the target user and scroll down to select the Security credentials tab.
- Scroll down and click Create access key. A new window appears.
- Click Download .csv file and save the access key to a secure location.
-
The wizard guides you through the pages. Specific page content depends on the selected connection type. After completing each page, select Next until you reach the Summary page.
Create a host connection to XenServer in Citrix Studio
-
For on-premises Delivery Controllers, choose Configuration > Hosting > Add Connection and Resources in the on-premises Citrix Studio to create a host connection. For cloud Delivery Controllers, choose Manage > Hosting > Add Connection and Resources in the web-based Studio console on Citrix Cloud to create a host connection.
-
In the Add Connection and Resources wizard, select XenServer (formerly Citrix Hypervisor) in the Connection type field.
-
Type the connection address (the XenServer URL) and credentials.
-
Enter a connection name.
Create a host connection to GCP in Citrix Studio
Set up your GCP environment according to Google Cloud Platform virtualization environments and then complete the following steps to create a host connection to GCP.
-
For on-premises Delivery Controllers, choose Configuration > Hosting > Add Connection and Resources in the on-premises Citrix Studio to create a host connection. For cloud Delivery Controllers, choose Manage > Hosting > Add Connection and Resources in the web-based Studio console on Citrix Cloud to create a host connection.
-
In the Add Connection and Resources wizard, select Google Cloud Platform as the connection type.
For example, in the web-based Studio console on Citrix Cloud:
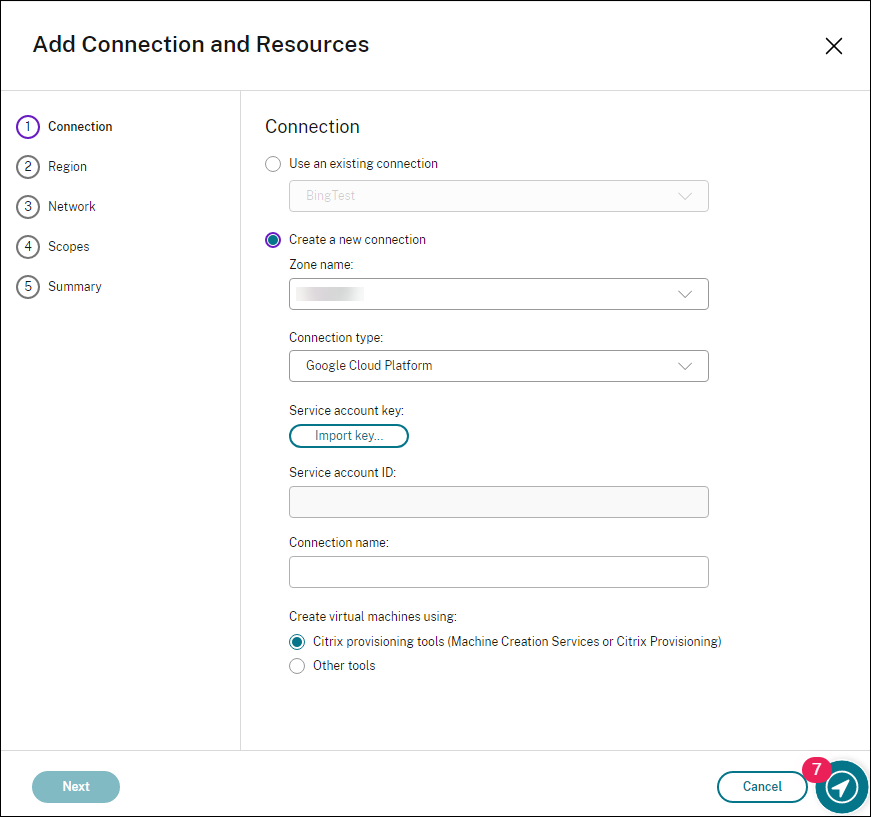
-
Import the service account key of your GCP account and type your connection name.
-
The wizard guides you through the pages. Specific page content depends on the selected connection type. After completing each page, select Next until you reach the Summary page. For more information, see Step 2: Create a host connection in the Create non-domain-joined Linux VDAs using MCS article.
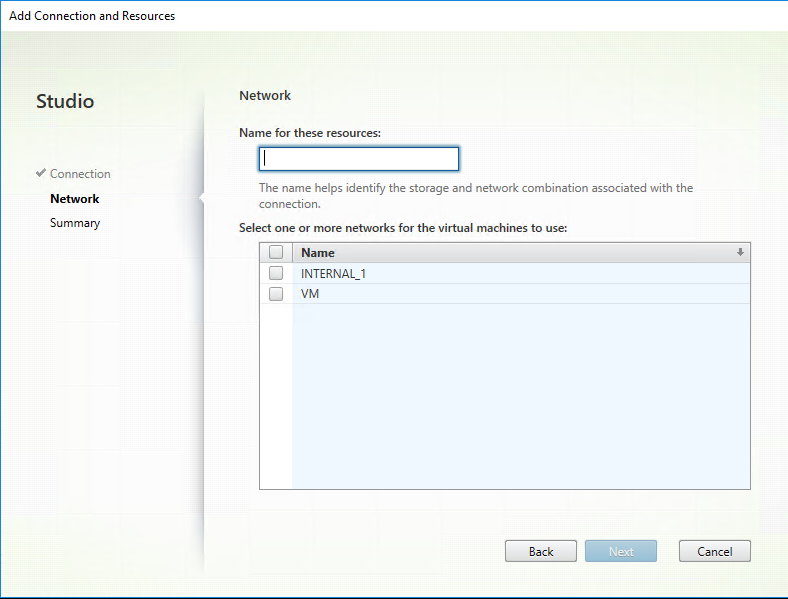
Create a host connection to Nutanix in Citrix Studio
-
For on-premises Delivery Controllers, choose Configuration > Hosting > Add Connection and Resources in the on-premises Citrix Studio to create a host connection. For cloud Delivery Controllers, choose Manage > Hosting > Add Connection and Resources in the web-based Studio console on Citrix Cloud to create a host connection.
-
In the Add Connection and Resources wizard, select Nutanix AHV as the connection type on the Connection page, and then specify the hypervisor address, credentials, and your connection name. On the Network page, select a network for the unit.
For example, in the on-premises Citrix Studio:
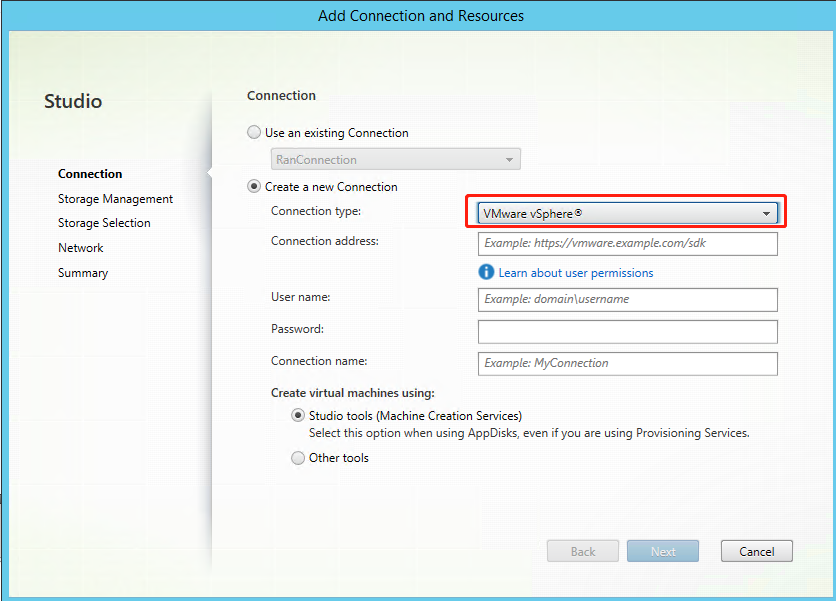
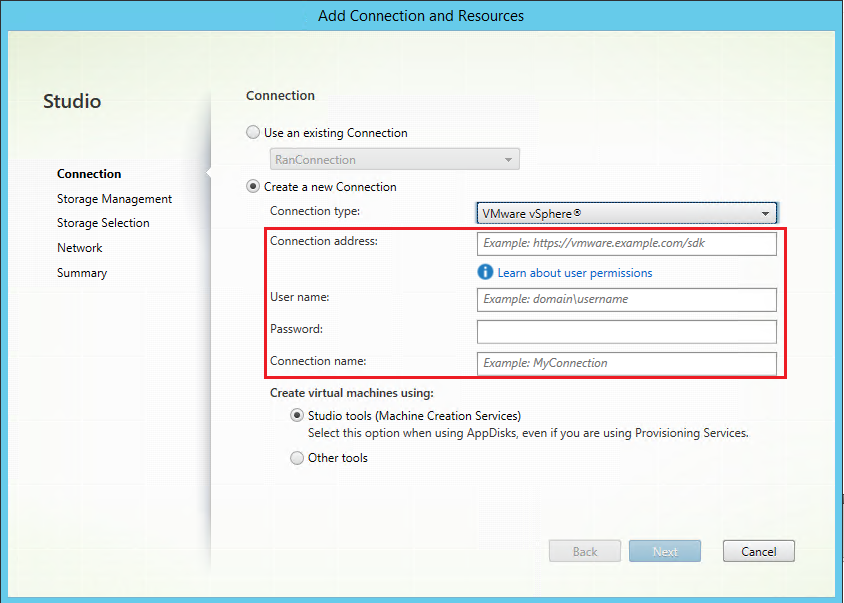
Create a host connection to VMware in Citrix Studio
-
Install vCenter Server in the vSphere environment. For more information, see VMware vSphere.
-
For on-premises Delivery Controllers, choose Configuration > Hosting > Add Connection and Resources in the on-premises Citrix Studio to create a host connection. For cloud Delivery Controllers, choose Manage > Hosting > Add Connection and Resources in the web-based Studio console on Citrix Cloud to create a host connection.
-
Choose VMware vSphere as the connection type.
For example, in the on-premises Citrix Studio:
-
Type the connection address (the vCenter Server URL) of your VMware account, your credentials, and your connection name.
Step 3: Prepare a master image
(For XenServer only) Step 3a: Install XenServer VM Tools
Install XenServer VM Tools on the template VM for each VM to use the xe CLI or XenCenter. VM performance can be slow unless you install the tools. Without the tools, you can’t do any of the following:
- Cleanly shut down, restart, or suspend a VM.
- View the VM performance data in XenCenter.
- Migrate a running VM (through
XenMotion). - Create snapshots or snapshots with memory (checkpoints), and revert to snapshots.
- Adjust the number of vCPUs on a running Linux VM.
-
Download the XenServer VM Tools for Linux file from the XenServer Downloads page or the Citrix Hypervisor Downloads page based on the hypervisor version in use.
-
Copy the
LinuxGuestTools-xxx.tar.gzfile to your Linux VM or to a shared drive that the Linux VM can access. -
Extract the contents of the tar file:
tar -xzf LinuxGuestTools-xxx.tar.gz -
Run the following command to install the
xe-guest-utilitiespackage based on your Linux distribution.For RHEL/CentOS/Rocky Linux/SUSE:
sudo rpm -i <extract-directory>/xe-guest-utilities_{package-version}_x86.64.rpm
<!--NeedCopy-->
For Ubuntu/Debian:
sudo dpkg -i <extract-directory>/xe-guest-utilities_{package-version}_amd64.deb <!--NeedCopy--> -
Check the virtualization state of the template VM on the General tab in XenCenter. If XenServer VM Tools are installed correctly, the virtualization state shows Optimized.
Step 3b: Verify configurations for SUSE 15.6 on AWS, Azure, and GCP
For SUSE 15.6 on AWS, Azure, and GCP, ensure that:
- You are using libstdc++6 version 12 or later.
- The Default_WM parameter in /etc/sysconfig/windowmanager is set to “gnome”.
Step 3c: Disable RDNS for Ubuntu 20.04 on GCP
On the template VM, add the rdns = false line under [libdefaults] in /etc/krb5.conf.
Step 3d: Install .NET on the template VM
To use a currently running VDA as the template VM, skip this step. To use a currently running RHEL 8.x/9.x/10 or Rocky Linux 8.x/9.x/10 VDA that is connected to the domain using SSSD as the template VM, ensure that:
-
The VDA is installed manually and not by using easy install. Easy install uses Adcli for RHEL 8.x/9.x/10 and Rocky Linux 8.x/9.x/10 and the combination of SSSD and Adcli is not supported by MCS.
-
A Samba server is configured to use SSSD for AD authentication. For more information, see the Red Hat article at How to configure a Samba server with SSSD in RHEL with Winbind .
Note:
To use a currently running VDA as the template VM, skip this step. To use a currently running RHEL 8.x/9.x or Rocky Linux 8.x/9.x VDA that is connected to the domain using SSSD as the template VM, ensure that:
The VDA is installed manually and not by using easy install. Easy install uses Adcli for RHEL 8.x/9.x and Rocky Linux 8.x/9.x and the combination of SSSD and Adcli is not supported by MCS.
A Samba server is configured to use SSSD for AD authentication. For more information, see the Red Hat article at https://access.redhat.com/solutions/3802321.
Before installing the Linux VDA package, install .NET on the template VM and notice the following:
-
In addition to the .NET Runtime, you must install .ASP.NET Core Runtime on all supported Linux distributions before you install or upgrade the Linux VDA. Version 6 is required for Amazon Linux 2. Version 8 is required for other distributions.
-
If your Linux distribution contains the .NET version that you require, install it from the built-in feed. Otherwise, install .NET from the Microsoft package feed. For more information, see https://docs.microsoft.com/en-us/dotnet/core/install/linux-package-managers.
Step 3e: Install the Linux VDA package on the template VM
After installing .NET, run the following commands based on your Linux distribution to install the Linux VDA:
For RHEL/CentOS/Rocky Linux:
Note:
Before installing the Linux VDA on RHEL 9.x and Rocky Linux 9.x, update the libsepol package to version 3.4 or later.
sudo yum –y localinstall <PATH>/<Linux VDA RPM>
<!--NeedCopy-->
For Ubuntu/Debian:
sudo dpkg –i  <PATH>/<Linux VDA DEB>

apt-get install -f
<!--NeedCopy-->
For SUSE:
sudo zypper –i install <PATH>/<Linux VDA RPM>
<!--NeedCopy-->
Step 3f: (For RHEL only) Install the EPEL repository that can offer ntfs-3g
Install the EPEL repository on RHEL 8. For information on how to install EPEL, see the instructions at https://docs.fedoraproject.org/en-US/epel/.
Step 3g: (For SUSE only) Manually install ntfs-3g
On the SUSE platform, no repository provides ntfs-3g. Download the source code, compile, and install ntfs-3g manually:
-
Install the GNU Compiler Collection (GCC) compiler system and the make package:
sudo zypper install gcc sudo zypper install make <!--NeedCopy--> -
Download the ntfs-3g package.
-
Decompress the ntfs-3g package:
sudo tar -xvzf ntfs-3g_ntfsprogs-<package version>.tgz <!--NeedCopy--> -
Enter the path to the ntfs-3g package:
sudo cd ntfs-3g_ntfsprogs-<package version> <!--NeedCopy--> -
Install ntfs-3g:
./configure
make
make install
<!--NeedCopy-->
Step 3h: Specify a database to use
You can switch between SQLite, PostgreSQL and built-in registry service after installing the Linux VDA package. To do so, complete the following steps:
Note:
- We recommend you use SQLite for VDI mode only and use PostgreSQL for a hosted shared desktops delivery model.
- For easy install and MCS, you can specify SQLite or PostgreSQL to use without having to install them manually. Unless otherwise specified through /etc/xdl/db.conf, the Linux VDA uses PostgreSQL by default. If you require a custom version of PostgreSQL instead of the version provided by your Linux distribution, you must install the specified version manually, edit
/etc/xdl/db.confto reflect the new version, and start the PostgreSQL service before running the easy install script (ctxinstall.sh) or the MCS script (deploymcs.sh).- You can also use /etc/xdl/db.conf to configure the port number for PostgreSQL.
-
Run
/opt/Citrix/VDA/sbin/ctxcleanup.sh. Omit this step if it is a fresh installation. -
Edit
/etc/xdl/db.confbefore runningdeploymcs.sh. The following is an example db.conf file:# database configuration file for Linux VDA ## database choice # possible choices are: # SQLite # PostgreSQL # default choice is PostgreSQL DbType="PostgreSQL" ## database port # specify database port for the database. # if not specified, default port will be used: # SQLite: N/A # PostgreSQL: 5432 DbPort=5432 ## PostgreSQL customized # only the following value means true, otherwise false: # true # yes # y # YES # Y # default is false DbCustomizePostgreSQL=false ## PostgreSQL service name # specify the service name of PostgreSQL for Linux VDA # default is "postgresql" DbPostgreSQLServiceName="postgresql" <!--NeedCopy-->To use a custom version of PostgreSQL, set DbCustomizePostgreSQL to true.
Step 3i: Configure MCS variables
There are two ways to configure MCS variables:
- Edit the
/etc/xdl/mcs/mcs.conffile. -
Use the easy install GUI. To open the easy install GUI, run the /opt/Citrix/VDA/sbin/linux-vda-installer command in the desktop environment of your Linux VDA.
Note:
The user also can click the “Advanced Configuration (optional)” button to expand the detailed configuration options
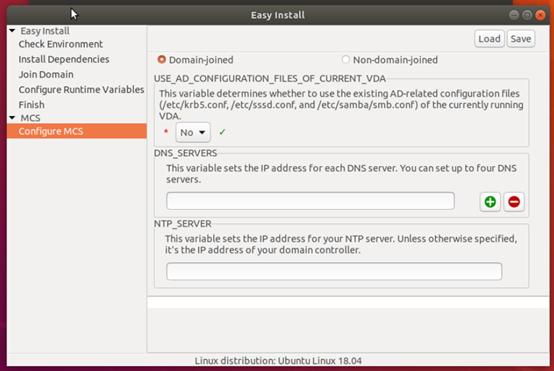
Tip:
Click Save to save variable settings to a local file under the path you specify. Click Load to load variable settings from a file that you specify.
The following are MCS variables that you can configure for non-domain-joined and domain-joined scenarios:
-
For non-domain-joined scenarios
You can use the default variable values or customize the variables as required (optional):
DOTNET_RUNTIME_PATH=path-to-install-dotnet-runtime
DESKTOP_ENVIRONMENT=gnome | mate
REGISTER_SERVICE=Y | N
ADD_FIREWALL_RULES=Y | N
VDI_MODE=Y | N
START_SERVICE=Y | N -
For domain-joined scenarios
-
Use_AD_Configuration_Files_Of_Current_VDA: Determines whether to use the existing AD-related configuration files (/etc/krb5.conf, /etc/sssd.conf, and /etc/samba/smb.conf) of the currently running VDA. If set to Y, the configuration files on MCS-created machines are the same as the equivalents on the currently running VDA. However, you still must configure thednsandAD_INTEGRATIONvariables. The default value is N, which means the configuration templates on the master image determine the configuration files on MCS-created machines. To use a currently running VDA as the template VM, set the value to Y. Otherwise, set it to N. -
dns: Sets the IP address for each DNS server. You can set up to four DNS servers. -
NTP_SERVER: Sets the IP address for your NTP server. Unless otherwise specified, it’s the IP address of your domain controller. -
WORKGROUP: Sets the workgroup name to the NetBIOS name (case-sensitive) that you configured in AD. Otherwise, MCS uses the part of the domain name that immediately follows the machine hostname as the workgroup name. For example, if the machine account is user1.lvda.citrix.com, MCS uses lvda as the workgroup name while citrix is the correct choice. Ensure that you set the workgroup name correctly. -
AD_INTEGRATION: Sets SSSD, Winbind, PBIS, or Centrify. For a matrix of the Linux distributions and domain joining methods that MSC supports, see Supported distributions in this article. -
TRUSTED_DOMAINS: For multi-domain environments, specify a space-separated list of trusted domains (e.g., “mycompany1.com mycompany2.com”). This updates the trusted domains in /etc/krb5.conf and enables auto-discovery of LDAP servers in those domains if LDAP_LIST is not specified. This variable is optional.
Note
SSSD only supports trusted domains in a single Active Directory forest.
-
CENTRIFY_DOWNLOAD_PATH: Sets the path for downloading the Server Suite Free (formerly Centrify Express) package. The value takes effect only when you set theAD_INTEGRATIONvariable to Centrify. -
CENTRIFY_SAMBA_DOWNLOAD_PATH: Sets the path for downloading the Centrify Samba package. The value takes effect only when you set theAD_INTEGRATIONvariable to Centrify. -
PBIS_DOWNLOAD_PATH: Sets the path for downloading the PBIS package. The value takes effect only when you set theAD_INTEGRATIONvariable to PBIS. -
UPDATE_MACHINE_PW: Enables or disables automating machine account password updates. For more information, see Automate machine account password updates. -
Linux VDA configuration variables:
DOTNET_RUNTIME_PATH=path-to-install-dotnet-runtime
DESKTOP_ENVIRONMENT=gnome | mate
SUPPORT_DDC_AS_CNAME=Y | N
VDA_PORT=port-number
REGISTER_SERVICE=Y | N
ADD_FIREWALL_RULES=Y | N
HDX_3D_PRO=Y | N
VDI_MODE=Y | N
SITE_NAME=dns-site-name | ‘<none>’
LDAP_LIST=’list-ldap-servers’ | ‘<none>’
SEARCH_BASE=search-base-set | ‘<none>’
FAS_LIST=’list-fas-servers’ | ‘<none>’
START_SERVICE=Y | N
TELEMETRY_SOCKET_PORT=port-number
TELEMETRY_PORT=port-number
-
(Optional) Step 3j: Write or update registry values for MCS
On the template machine, add command lines to the /etc/xdl/mcs/mcs_local_setting.reg file for writing or updating registry values as required. This action prevents the loss of data and settings every time an MCS-provisioned machine restarts.
Each line in the /etc/xdl/mcs/mcs_local_setting.reg file is a command for setting or updating a registry value.
For example, you can add the following command lines to the /etc/xdl/mcs/mcs_local_setting.reg file to write or update a registry value respectively:
create -k "HKLM\System\CurrentControlSet\Control\Citrix\VirtualChannels\Clipboard\ClipboardSelection" -t "REG_DWORD" -v "Flags" -d "0x00000003" --force
<!--NeedCopy-->
update -k "HKLM\System\CurrentControlSet\Control\Citrix\VirtualChannels\Clipboard\ClipboardSelection" -v "Flags" -d "0x00000003"
<!--NeedCopy-->
Note
To modify settings for MCS, you are allowed to edit files under /etc/xdl/ad_join and /etc/xdl/mcs/, but editing any files under /var/xdl/mcs is prohibited.
Step 3k: Create a master image
- (For SSSD + RHEL 8.x/9.x/10 or Rocky Linux 8.x/9.x/10 only) Run the
update-crypto-policies --set DEFAULT:AD-SUPPORTcommand and then restart the template VM. -
If you configure MCS variables by editing
/etc/xdl/mcs/mcs.conf, run/opt/Citrix/VDA/sbin/deploymcs.sh. If you configure MCS variables by using the GUI, click Deploy. After you click Deploy on the GUI, the variables you set on the GUI override the variables you set in the/etc/xdl/mcs/mcs.conffile. -
(If you are using a currently running VDA as the template VM or if it is a non-domain-joined scenario, skip this step.) On the template VM, update the configuration templates to customize the relevant
/etc/krb5.conf,/etc/samba/smb.conf, and/etc/sssd/sssd.conffiles on all created VMs.For Winbind users, update the
/etc/xdl/ad_join/winbind_krb5.conf.tmpland/etc/xdl/ad_join/winbind_smb.conf.tmpltemplates.For SSSD users, update the
/etc/xdl/ad_join/sssd.conf.tmpl,/etc/xdl/ad_join/sssd_krb5.conf.tmpl, and/etc/xdl/ad_join/sssd_smb.conf.tmpltemplates.For Centrify users, update the
/etc/xdl/ad_join/centrify_krb5.conf.tmpland/etc/xdl/ad_join/centrify_smb.conf.tmpltemplates.Note:
Keep the existing format used in the template files and use variables such as $WORKGROUP, $REALM, $realm, ${new_hostname}, and $AD_FQDN.
-
Create and name a snapshot of your master image based on the public cloud you use.
-
(For XenServer, GCP, and VMware vSphere) Install applications on the template VM and shut down the template VM. Create and name a snapshot of your master image.
-
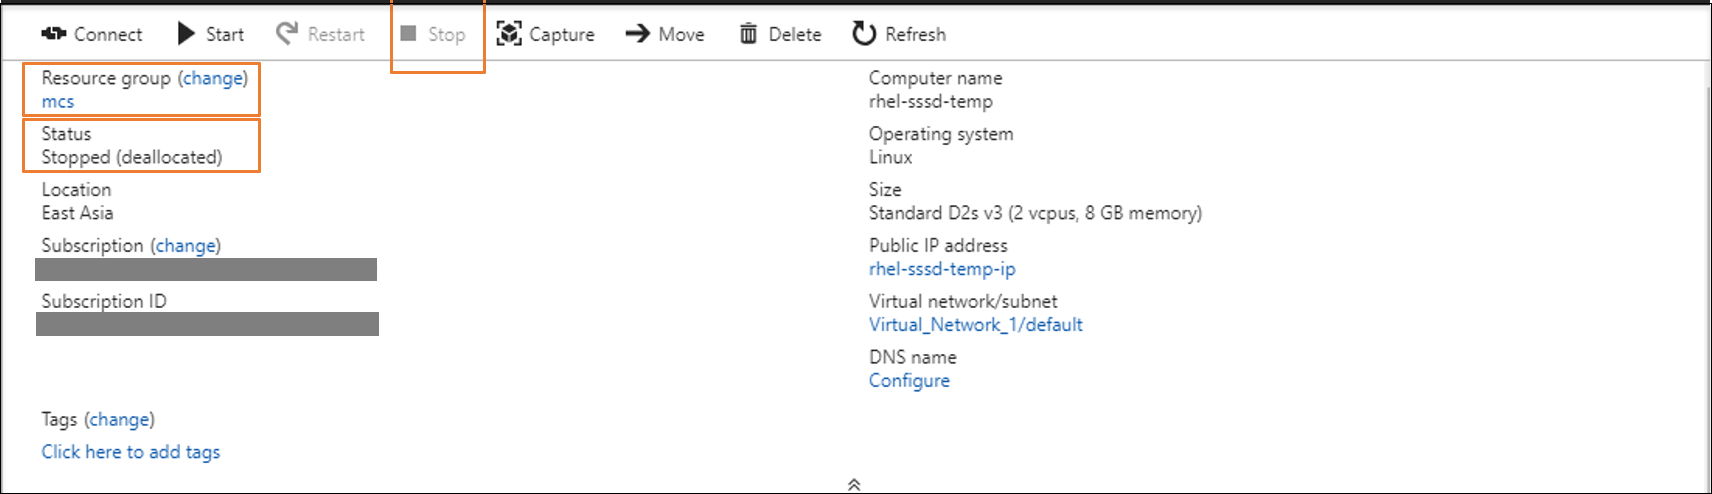
(For Azure) Install applications on the template VM and shut down the template VM from the Azure portal. Ensure that the power status of the template VM is Stopped (deallocated). Remember the name of the resource group here. You need the name to locate your master image on Azure.
-
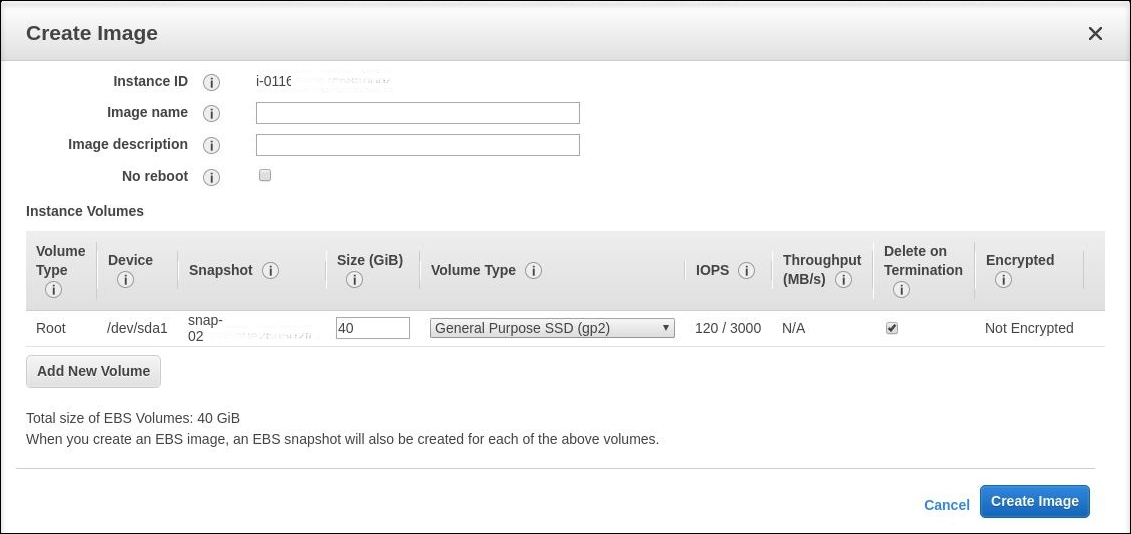
(For AWS) Install applications on the template VM and shut down the template VM from the AWS EC2 portal. Ensure that the instance state of the template VM is Stopped. Right-click the template VM and select Image > Create Image. Type information and make settings as needed. Click Create Image.
-
(For Nutanix) On Nutanix AHV, shut down the template VM. Create and name a snapshot of your master image.
Note:
You must prefix Acropolis snapshot names with
XD_for use in Citrix Virtual Apps and Desktops. Use the Acropolis console to rename your snapshots when needed. After you rename a snapshot, restart the Create Catalog wizard to obtain a refreshed list.
-
(For GCP) Step 3l: Configure Ethernet connection on RHEL 8.x/9.x and Rocky Linux 8.x/9.x/10
After you install the Linux VDA on RHEL 8.x/9.x/10 and Rocky Linux 8.x/9.x/10 hosted on GCP, the Ethernet connection might be lost and the Linux VDA might be unreachable after a VM restart. To work around the issue, set a root password when logging on to the VM for the first time and make sure that you can log on to the VM as root. Then, run the following commands in the console after restarting the VM:
nmcli dev connect eth0
systemctl restart NetworkManager
<!--NeedCopy-->
Step 4: Create prepared image machine catalogs
In Citrix Studio or Web Studio, create prepared images and use the prepared images to create an MCS machine catalog using:
- Web Studio
- PowerShell commands
Currently, you can create prepared image machine catalogs in Azure and VMware virtualization environments.
For more information, refer to Create prepared image machine catalogs
Here takes web studio as an example, to create an image definition and the initial image version, do the following:
-
From Studio, go to the Images node, and click Create Image Definition. Click Next on the Introduction page.
-
On the Image Definition page, specify the OS type and Session type for the image definition.
-
On the Image page, select Resources (only the resources applicable for the set connection are listed) and a master image to use as a template for creating the image version. You can select the Use a machine profile checkbox and select a machine profile.
Note:
Before selecting an image, verify that the master image has VDA 2311 or later installed and the MCSIO driver is installed on the VDA.
-
On the Machine Specification page, select a machine size. If you select a machine profile, then you can see the Virtual CPU count derived from the machine profile and it is unchangeable. If you do not select a machine profile, then you can see only the memory size that is derived from the master image.
-
On the NICs page, select or add NICs for the preparation image. For each NIC, select an associated virtual network. If you do not select a machine profile, then the NIC associated with the master image is selected by default. If you select a machine profile, then the NICs are derived from the machine profile and the count is unchangeable.
-
On the Version Description page, enter a description for the initial image version created.
-
On the Summary page, check the details of the image definition and the initial image version created. Enter a name and description for the image definition. Click Finish.
Create image versions
Image versions allow for the management of different iterations or updates to a particular image. This functionality enables you to maintain multiple versions of an image for different purposes.
To create image versions from the initial image version, do the following:
-
Go to the Images node, select an image version or an image definition, and click Create Image Version.
-
On the Image page, you can change the hosting unit within the same hosting connection, and reselect the master image and machine profile for that image version.
-
If you want the configuration of the image version to be different from the initial configured image version, then configure the settings on the Machine Specification and NICs pages of the Create Image Version dialog.
-
Add a description for the image version. Click Finish.
Step 5: Create a machine catalog
In Citrix Studio or Web Studio, create a machine catalog and specify the number of VMs to create in the catalog. When creating the machine catalog, choose your prepared image in step 4(More recommended)/master image and consider the following:
-
On the Container page that is unique to Nutanix, select the container that you specified for the template VM earlier.
-
When you create a catalog containing single-session OS machines, the Desktop Experience page appears and it lets you determine what occurs each time a user logs on.
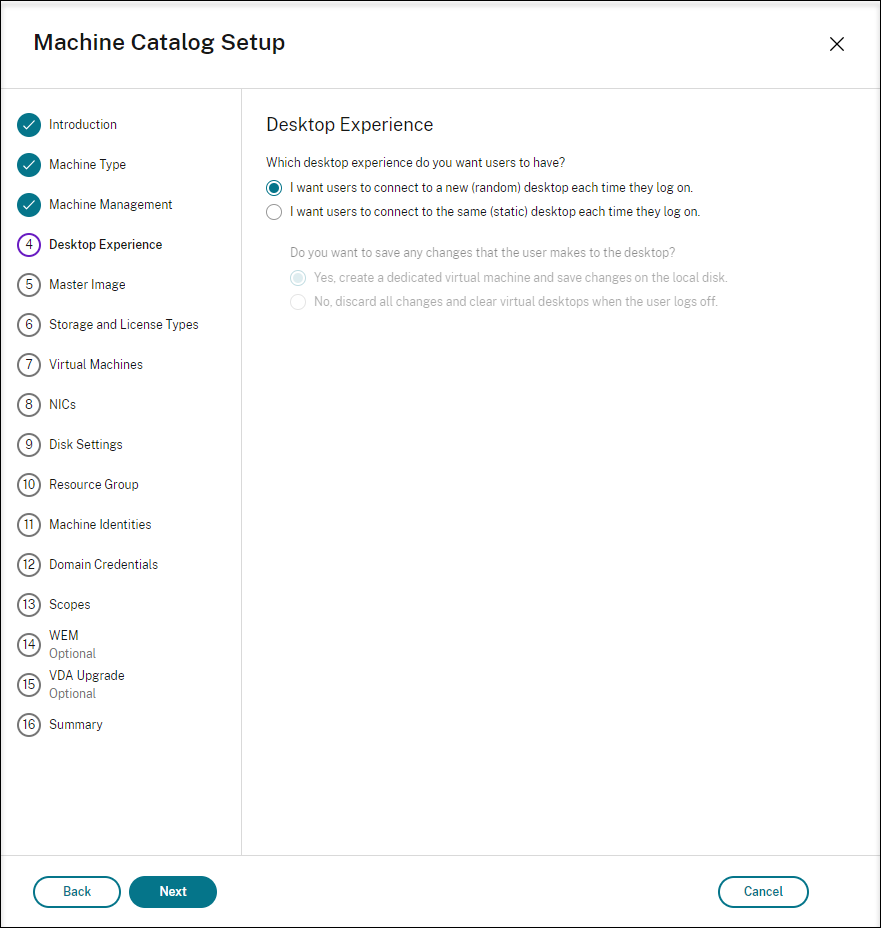
On the Desktop Experience page, select one of:
- Users connect to a new (random) desktop each time they log on.
- Users connect to the same (static) desktop each time they log on.
If you choose the first option, the changes that users make to the desktop will be discarded (non-persistent).
If you choose the second option and are using MCS to provision the machines, you can configure how user changes to the desktop are handled:
- Save user changes to the desktop on the local disk (persistent).
- Discard user changes and clear the virtual desktop when the user logs off (non-persistent). Select this option if you are using the user personalization layer.
-
When updating the master image for an MCS catalog containing persistent machines, any new machines added to the catalog use the updated image. Pre-existing machines continue to use the original master image.
For more information, see machine catalog creation in the Citrix Virtual Apps and Desktops documentation and the Citrix DaaS documentation.
Note:
For Nutanix environments, if your machine catalog creation process on the Delivery Controller™ takes a significant amount of time, go to Nutanix Prism and power on the machine prefixed with Preparation manually. This approach helps to continue the creation process.
Step 6: Create a delivery group
A delivery group is a collection of machines selected from one or more machine catalogs. It specifies which users can use those machines, and the applications and desktops available to those users.
For more information, see delivery group creation in the Citrix Virtual Apps and Desktops documentation and the Citrix DaaS documentation.
Note:
The VMs you create using MCS might not be able to register with Citrix Cloud Connectors and show as Unregistered. The issue occurs when you host the VMs on Azure and join in the AD domain with Samba Winbind. To work around the issue, complete the following steps:
- Go to the ADSI Edit console, select an unregistered VM, and edit the msDS-SupportedEncryptionTypes attribute of its machine account.
- Restart the ctxjproxy and ctxvda services on the VM. If the VM’s status changes to Registered, continue with steps 3 through 5.
- Open the /var/xdl/mcs/ad_join.sh file on the template VM.
Add a line of net ads enctypes set $NEW_HOSTNAME$ <Decimal value of encryption type attribute, for example, 28> -U $NEW_HOSTNAME$ -P password after the following lines inside the /var/xdl/mcs/ad_join.sh file:
if [ "$AD_INTEGRATION" == "winbind" ]; then join_domain_samba restart_service winbind /usr/bin/systemctl <!--NeedCopy-->- Take a new snapshot and create VMs using the new template.
Use MCS to upgrade your Linux VDA
To use MCS to upgrade your Linux VDA, do the following:
-
Ensure that you installed .NET before you upgrade your Linux VDA to the current release.
- Install .NET Runtime 8.0 on all supported Linux distributions except Amazon Linux 2.
- For Amazon Linux 2, continue to install .NET Runtime 6.0.
If your Linux distribution contains the .NET version that you require, install it from the built-in feed. Otherwise, install .NET from the Microsoft package feed. For more information, see https://docs.microsoft.com/en-us/dotnet/core/install/linux-package-managers.
-
Upgrade your Linux VDA on the template machine:
Note:
-
You can also use the Linux VDA self-update through Azure feature to schedule automatic software updates. To achieve this goal, add command lines to the etc/xdl/mcs/mcs_local_setting.reg file on the template machine. For example, you can add the following command lines:
create -k "HKLM\System\CurrentControlSet\Control\Citrix\SelfUpdate" -t "REG_DWORD" -v "fEnabled" -d "0x00000001" --force create -k "HKLM\System\CurrentControlSet\Control\Citrix\SelfUpdate" -t "REG_SZ" -v "ScheduledTime" -d "Immediately" --force create -k "HKLM\System\CurrentControlSet\Control\Citrix\SelfUpdate" -t "REG_SZ" -v "Url" -d "<Your-Azure-Container-Url>" –force create -k "HKLM\System\CurrentControlSet\Control\Citrix\SelfUpdate" -t "REG_SZ" -v "CaCertificate" -d "<Local-Certificate-Path-of-PortalAzureCom>" --force <!--NeedCopy--> -
Starting with the 2407 release, the Linux VDA delegates package managers rpm or dpkg to handle configuration files during upgrades. The following describes how rpm and dpkg interact with changes to configuration files:
-
rpm: by default keeps the local version and saves the new version from the package with a .rpmnew extension.
-
dpkg: interactively prompts you with a choice on how to proceed. To silently upgrade the Linux VDA while retaining your local configuration file and saving the new package version as .dpkg-new or .dpkg-dist, use the following command:
 dpkg --force-confold -i package.deb  # Always keep your version, then save new package's version as *.dpkg-new or *.dpkg-dist
 <!--NeedCopy-->
-
For RHEL and Rocky Linux distributions:
sudo yum -y localinstall <PATH>/<Linux VDA RPM>
<!--NeedCopy-->
Note:
Before upgrading the Linux VDA on RHEL 9.x and Rocky Linux 9.x, update the libsepol package to version 3.4 or later.
For SUSE distributions:
sudo zypper -i install <PATH>/<Linux VDA RPM>
<!--NeedCopy-->
For Ubuntu/Debian distributions:
sudo dpkg -i <PATH>/<Linux VDA deb> sudo apt-get install -f <!--NeedCopy--> -
-
Edit
/etc/xdl/mcs/mcs.confand/etc/xdl/mcs/mcs_local_setting.reg. -
Take a new snapshot.
-
In Citrix Studio, select the new snapshot to update your machine catalog. Wait before each machine restarts. Do not restart a machine manually.
Automate machine account password updates
Machine account passwords, by default, expire 30 days after the machine catalog is created. To prevent password expiration and to automate machine account password updates, do the following:
-
Add the following entry to /etc/xdl/mcs/mcs.conf before running /opt/Citrix/VDA/sbin/deploymcs.sh.
UPDATE_MACHINE_PW="Y" -
After running /opt/Citrix/VDA/sbin/deploymcs.sh, open /etc/cron.d/mcs_update_password_cronjob to set the update time and frequency. The default setting updates machine account passwords weekly at 2:30AM, Sunday.
After each machine account password update, the ticket cache on the Delivery Controller becomes invalid and the following error might appear in /var/log/xdl/jproxy.log:
[ERROR] - AgentKerberosServiceAction.Run: GSSException occurred. Error: Failure unspecified at GSS-API level (Mechanism level: Checksum failed)
To eliminate the error, clear the ticket cache regularly. You can schedule a cache cleanup task on all Delivery Controllers or on the domain controller.