This content has been machine translated dynamically.
Dieser Inhalt ist eine maschinelle Übersetzung, die dynamisch erstellt wurde. (Haftungsausschluss)
Cet article a été traduit automatiquement de manière dynamique. (Clause de non responsabilité)
Este artículo lo ha traducido una máquina de forma dinámica. (Aviso legal)
此内容已经过机器动态翻译。 放弃
このコンテンツは動的に機械翻訳されています。免責事項
이 콘텐츠는 동적으로 기계 번역되었습니다. 책임 부인
Este texto foi traduzido automaticamente. (Aviso legal)
Questo contenuto è stato tradotto dinamicamente con traduzione automatica.(Esclusione di responsabilità))
This article has been machine translated.
Dieser Artikel wurde maschinell übersetzt. (Haftungsausschluss)
Ce article a été traduit automatiquement. (Clause de non responsabilité)
Este artículo ha sido traducido automáticamente. (Aviso legal)
この記事は機械翻訳されています.免責事項
이 기사는 기계 번역되었습니다.책임 부인
Este artigo foi traduzido automaticamente.(Aviso legal)
这篇文章已经过机器翻译.放弃
Questo articolo è stato tradotto automaticamente.(Esclusione di responsabilità))
Translation failed!
Validate the deployment
This page checks that a new Citrix SecurSpaces™ evaluation environment works, for cloud and local deployments.
Sign in
- In a browser, go to
https://<name>.try.sds.citrix.com. Use the hostname, not the IP address. - Enter the administrator email, select Proceed, and enter the administrator password from the installer.
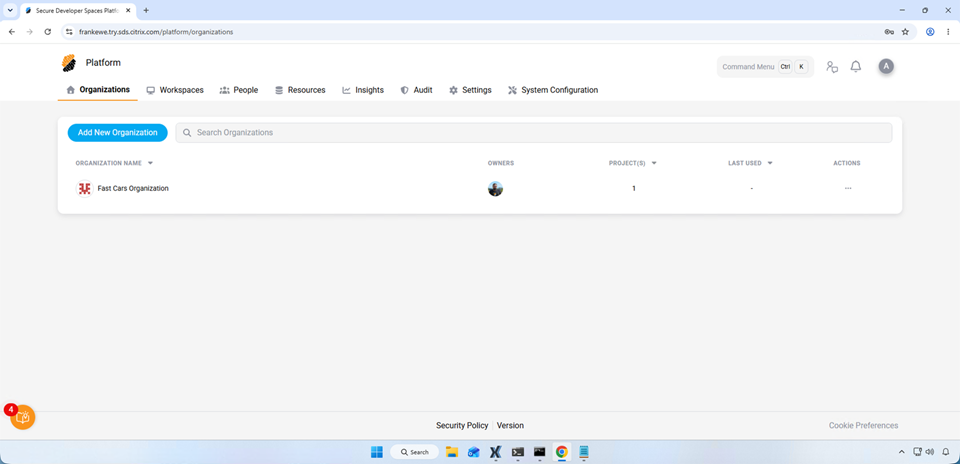
If sign-in fails with “invalid username or password”, wait 5 minutes and try again.
Complete the setup wizard
- On Register Sign-In Domain, select Skip. To use your identity provider instead, see Identity providers.
- On Code Repository Applications, select Skip. To connect a provider later, see Code repositories.
- On Organization, enter an organization name and a project name, for example
Test LabandHello SecurSpaces, and select Finish.
Check the license
Go to Platform > System Configuration > License, and check the license type, limits and expiry date. The evaluation license is valid for 6 months, and the TLS certificate for 90 days. See Licensing.
Create a workspace
- In your project, select Create your first Workspace.
- Select Create Custom Workspace.
-
On Basic Info, enter:
Setting Value Name hello-securspacesOwner Your user Workspace image Default Generic Image Region Default Region Resources Minimal - Select Review and Launch, and then Launch.
- Wait for the status to change to Running.
Run code
- In the Access column, select the VS Code icon. If the browser blocks the window, allow pop-ups for the console URL.
- If the IDE asks whether to trust
/home/developer, select Manage > Trust. -
Open a terminal, and run:
mkdir -p ~/hello-securspaces cd ~/hello-securspaces printf 'print("Hello from Citrix SecurSpaces!")\n' > hello.py python3 hello.py sha256sum hello.py <!--NeedCopy--> - Check that the output is
Hello from Citrix SecurSpaces!, and note the checksum.
Check that files persist
- On the Workspaces page, open the workspace’s action menu, select Pause, and wait for Paused.
- Select Run, and wait for Running.
-
Reopen the IDE, and run:
python3 ~/hello-securspaces/hello.py sha256sum ~/hello-securspaces/hello.py <!--NeedCopy--> - Check that the output and the checksum are the same as before.
The deployment works.
Next step
Continue with Manage the evaluation environment.
To learn SecurSpaces as a developer, follow Your first workspace.
Share
Share
This Preview product documentation is Citrix Confidential.
You agree to hold this documentation confidential pursuant to the terms of your Citrix Beta/Tech Preview Agreement.
The development, release and timing of any features or functionality described in the Preview documentation remains at our sole discretion and are subject to change without notice or consultation.
The documentation is for informational purposes only and is not a commitment, promise or legal obligation to deliver any material, code or functionality and should not be relied upon in making Citrix product purchase decisions.
If you do not agree, select I DO NOT AGREE to exit.