Endpoint Management connector for Exchange ActiveSync
XenMobile Mail Manager is now an Endpoint Management connector for Exchange ActiveSync. For more details about the Citrix unified portfolio, see the Citrix product guide.
The connector extends the capabilities of XenMobile® in the following ways:
- Dynamic Access Control for Exchange Active Sync (EAS) devices. EAS devices can be automatically allowed or blocked access to Exchange services.
- The ability for XenMobile to access EAS device partnership information provided by Exchange.
- The ability for XenMobile to wipe a mobile device based on EAS status.
- The ability for XenMobile to access information about Blackberry devices, and to perform control operations such as Wipe and ResetPassword.
To wipe a device based on EAS status, configure an automated action with an ActiveSync trigger. See Automated Actions.
To download the Endpoint Management connector for Exchange ActiveSync:
- Go to https://www.citrix.com/downloads.
- Navigate to Citrix Endpoint Management™ (and Citrix XenMobile Server) > XenMobile Server (on-premises) > Product Software > XenMobile Server 10 > Server Components.
- On the Citrix Endpoint Management connector for Exchange ActiveSync tile, click Download File.
Important:
Starting in October 2022, the Endpoint Management and Citrix Gateway connectors for Exchange ActiveSync will no longer support Exchange Online given the authentication changes announced by Microsoft here. The Endpoint Management connector for Exchange continues to work with Microsoft Exchange Server (on-premises).
What’s new
The following sections list what’s new in the Endpoint Management connector for Exchange ActiveSync, formerly XenMobile Mail Manager.
What’s new in version 10.1.10
The following issues are fixed in version 10.1.10:
- Customers who experience frequent network issues might not be able to complete a Snapshot within the previously provided three attempts. With this release, an admin can configure the maximum number of attempts (1-10). This fix allows for a snapshot to incur multiple breaks in communication without abandoning the snapshot process completely. [CXM-70837]
- In previous versions, the Snapshot type did not appear in the list of Exchange Configurations. Now, the snapshot type appears. [CXM-70846]
- The PSRemotingTransport exception reported by PowerShell indicates that the session to Exchange is no longer viable. The status is added to the Critical Errors list in the configuration file by default. By doing so, when the PSRemotingTransportException is detected, the connection is marked as in Error for disposal later. The next communication uses a valid connection or creates a connection. [XMHELP-2184, CXM-70836]
- When a configuration change is saved, it is possible that not all previously configured internal components were disposed of properly before loading the new configuration. This issue might lead to unpredictable behavior. The behavior depends on the specific change and if the change conflicted with the previous configuration. In this release all internal components are disposed of before loading the new configuration. [XMHELP-2259, CXM-71388]
What’s new in earlier versions
The following section lists the features and fixed issues in earlier versions of the Endpoint Management connector for Exchange ActiveSync.
What’s new in version 10.1.9
The following issues are fixed in version 10.1.9:
- Configuration changes are now handled in a more consistent manner. When the service detects a change in configuration, each internal subsystem is stopped, which means that any active or scheduled processing is interrupted. Next, the new configuration is loaded and the subsystems are started again, which means that all schedules and other internal infrastructure are reestablished with new settings. This issue corrects a known issue in version 10.1.8. [CXM-47709, CXM-61330]
- During an upgrade, the existing database configuration was not merged into the new configuration file. The database configuration is now merged into the upgraded configuration file. [CXM-49326]
- In the snapshot-related diagnostics files, the column headers were missing. The headers are restored. [CXM-62680]
- When upgrading from a previous version, the defaults section of the configuration file was being overwritten by the analogous section of the configuration file in use. This issue prevented additions or improvements to the defaults section from being loaded by the service after the upgrade. As of this version, the defaults section always reflects the latest configuration. [CXM-62681]
-
Admins can no longer access certain options by pressing Shift when running the application. These options were previously available with Citrix permission. Some options are now fully available, such as Allow Redirection, and others, such as Hang Detection and Count Correction, are deprecated. [CXM-62767]

What’s new in version 10.1.8
The following issues are fixed in version 10.1.8:
- It is possible that Exchange throttles back the Citrix Endpoint Management connector for the Exchange ActiveSync service from issuing commands too frequently. This is common in connections to Office 365. The effect of throttling requires that the service pause for a specified period before sending the next command. The Configure console now shows the amount of time remaining in the pause. [CXM-48044]
- When modifications are made to the “Watchdog” or “SpecialistsDefaults” sections of the configuration file (config.xml), the changes are not reflected in the configuration file after an upgrade. With this release, the modifications are merged correctly into the new configuration file. [CXM-52523]
- More detail has been added to the analytics sent to Google Analytics, especially concerning snapshots. [CXM-56691]
- The Exchange test connectivity feature would attempt to initialize the connection only once. Because Office 365 connections can be throttled, it was possible that a test connectivity would appear to fail when throttled. Citrix Endpoint Management connector for Exchange ActiveSync now attempts to initiate a connection up to three times. [CXM-58180]
- To effect policies on Exchange, the Citrix Endpoint Management connector for Exchange ActiveSync must compile a Set-CASMailbox command that includes all pertinent devices for each mailbox, in two lists: allow and block. If a device is not included in either list, Exchange falls back to its default access state. If that default access state is different than the desired state for a device, that device becomes out of compliance. Consequently, a user might lose access to their email if the Exchange default access state is blocked and it should be allowed. Or, a user whose access to email should be blocked might be granted access. Citrix Endpoint Management connector for Exchange ActiveSync now ensures that all devices with a valid desired state are included in each Set-CasMailbox command. [CXM-61251]
The following issue is known in version 10.1.8:
If an admin makes a change in the Configure application that modifies configuration data, while the service is performing long-duration operations, such as a snapshot or policy evaluation, the service might enter an indeterminate state. A possible symptom might be that policy changes are not processed, or snapshots are not initiated. To return the service to a working state, the service must be restarted. You might need to use the Windows Services manager to terminate the service process before starting the service. [CXM-61330]
What’s new in version 10.1.7
- XenMobile Mail Manager is now an Endpoint Management connector for Exchange ActiveSync.
- We have deprecated the Disable Pipelining option in the Exchange configuration dialog box. You can achieve the same functionality by configuring multiple steps for each command in the config.xml file. [CXM-54593]
The following issues are fixed in version 10.1.7:
- In the Snapshot History window, error messages might be shown with little context. Now, error messages are prefixed with the context of where they occurred. [CXM-49157]
- The XmmGoogleAnalytics .dll did not have the corresponding file version for the release. [CXM-52518]
- To improve diagnostics, we recently changed the string format for a list of device IDs used to set a mailbox Allowed/Blocked state. A specification of too many devices, however, exceeded the maximum string size. Now, we use an internal array data structure. This structure does not have a size limit and also formats the data appropriately for diagnostic purposes. [CXM-52610]
- When device policies that are not in sync with Exchange are detected, their commands might include devices that do not belong to the relevant mailbox. The Endpoint Management connector for Exchange ActiveSync now ensures that commands to Exchange represent only devices that belong to their respective mailboxes. [CXM-54842]
- In some environments, a Microsoft assembly is not available. The required assembly is now explicitly installed with the application. [CXM-55439]
- If Distinguished Names for devices or mailboxes have spaces between the attribute name and the equals, and/or spaces after the equals and before the value, Endpoint Management connector for Exchange ActiveSync might not properly match a device with its mailbox and the opposite way. The result might be that some devices and/or mailboxes are rejected during the snapshot reconciliation. [CXM-56088]
Note:
The following sections refer to the Endpoint Management connector for Exchange ActiveSync by its former name of XenMobile Mail Manager. The name changed as of version 10.1.7.
Update in version 10.1.6.20
An update to 10.1.6 contains the following fix in version 10.1.6.20:
- When device policies that are not in sync with Exchange are detected, their commands might include devices that do not belong to the relevant mailbox. XenMobile Mail Manager now insures that commands to Exchange represent only devices that belong to their respective mailboxes. [CXM-54842]
What’s new in version 10.1.6
XenMobile Mail Manager version 10.1.6 contains the following fixed issues and enhancements:
- The snapshot history window, at times, enters a state where the window is no longer updating. The windows refresh mechanism is improved to update more reliably. [CXM-47983]
- Two separate modes and code paths were used for partitioned and non-partitioned snapshots. Because non-partitioned snapshots are equivalent to partitioned snapshots with a configuration using a single “*” partition, the non-partitioned snapshot mode is eliminated. The default snapshot mode is now partitioned snapshots with 36 partitions (0–9, A–Z). [CXM-49093]
- In the Snapshot History window, error messages are overwritten by status messages. Now, XenMobile Mail Manager provides two separate fields so that users can view status and errors simultaneously. [CXM-51942]
- When connecting to Exchange Online (Office 365), snapshot-related queries might result in a truncated dataset. This issue might occur when XenMobile Mail Manager runs a multi-command pipelined script. The upstream command cannot pass the data quickly enough to the downstream command, which then completes the work prematurely. Incomplete data occurs as a result. XenMobile Mail Manager can now mimic the pipeline itself and wait until the upstream command is done before invoking the downstream command. This change should result in all data being processed and captured. [CXM-52280]
- If a non-resolvable error occurs in a policy update command to Exchange, the same command is returned to the work queue repeatedly for a long period. This situation resulted in the command being sent to Exchange many times. In this version of XenMobile Mail Manager, a command that results in an error is only returned to the work queue a discrete number of times. [CXM-52633]
- If a policy update for a specific mailbox involved the allowing or blocking of all devices: The issued Set-CASMailbox command would fail because of the empty list being converted to an empty string instead of a NULL. The proper data is now sent. [CXM-53759]
- When processing a new device, Exchange can return the state as “DeviceDiscovery” for a while (usually 15 minutes). XenMobile Mail Manager was not specifically handling this state. XenMobile Mail Manager now handles the state. In the Monitor tab of the UI, users can filter for devices in this state. [CXM-53840]
- XenMobile Mail Manager did not check for the ability to write to the XenMobile Mail Manager database. Consequently, if permissions were restricted, the behavior cannot be predicted. XenMobile Mail Manager now captures and validates required permissions from the database. XenMobile Mail Manager indicates reduced permissions when either testing the connection (message shown) or in the Database indicator (hover for message) at the bottom of the main Configure window. [CXM-54219]
- Depending on the current workload, when directed to, the XenMobile Mail Manager service might not stop promptly. Therefore, the service appears to be in an unresponsive state. Improvements allow ongoing tasks to be interrupted, resulting in a more graceful shutdown. [CXM-54282]
What’s new in version 10.1.5
XenMobile Mail Manager version 10.1.5 contains the following fixed issues:
- When Exchange is applying throttling to XenMobile Mail Manager activity, there is no indication (outside of the logs) that the throttling is occurring. With this release, a user can hover over the active snapshot and a “throttling” state appears. Also, while XenMobile Mail Manager is being throttled, the start of a major snapshot is prohibited until Exchange lifts the throttling embargo. [CXM-49617]
- If XenMobile Mail Manager is being throttled by Exchange during a major snapshot: It is possible that an insufficient amount of time is allowed to elapse before running the next attempt of a snapshot. This issue results in further throttling and a failed snapshot. XenMobile Mail Manager now waits a minimum of the time that Exchange specifies to wait between snapshot attempts. [CXM-49618]
- When diagnostics is enabled, the commands file shows Set-CasMailbox commands that have missing hyphens before each property name. This issue only occurs in the formatting of the diagnostics file and not the actual command to Exchange. The missing hyphen prevents a user from cutting the command and directly pasting it to a PowerShell prompt for testing or validation. The hyphens have been added. [CXM-52520]
- If a mailbox identity is of the form “lastname, firstname”, Exchange adds a backslash before the comma when returning data from a query. This backslash must be stripped when XenMobile Mail Manager uses the identity to query for more data. [CXM-52635]
Known limitations
Note:
The following limitation is resolved in version 10.1.6.
XenMobile Mail Manager has a known limitation that can cause commands to Exchange to fail. To apply policy changes to Exchange, a Set_CASMailbox command is issued by XenMobile Mail Manager. This command can take two lists of devices: one to Allow and one to Block. The command is applied to the devices partnered with a mailbox.
These lists are limited to 256 characters each by the Microsoft API. If one of those lists exceeds the limitation, the command fails in its entirety, preventing all of the policies for those devices of the mailbox to be set. The error reported, which will appear in the XenMobile Mail Manager logs, would look like the following. The example is for the blocked list.
“Message:’Cannot bind parameter ‘ActiveSyncBlockedDeviceIDs’ to the target. Exception setting “ActiveSyncBlockedDeviceIDs”: “The length of the property is too long. The maximum length is 256 and the length of the value provided is …”
Device ID lengths can vary, but a good guideline is that about 10 devices or more simultaneously Allowed or Blocked might exceed the limit. Although having that many devices associated with a specific mailbox is rare, it is a possibility. Until XenMobile Mail Manager is improved to handle such a scenario, we recommend that you limit the number of devices associated with a user and mailbox to 10 or fewer. [CXM-52633]
What’s new in version 10.1.4
XenMobile Mail Manager version 10.1.4 contains the following fixed issues:
- Due to its weakening security, TLS 1.0 is being deprecated by the PCI Council. Support for TLS 1.1 and 1.2 is added to XenMobile Mail Manager. [CXM-38573, CXM-32560]
- XenMobile Mail Manager includes a new diagnostic file. When Enable Diagnostics is selected in the Exchange specification, a new Snapshot History file is generated. With every snapshot attempt, a line is added to the file with the results of the snapshot. [CXM-49631]
- In the Commands diagnostic file, the list of devices allowed or blocked did not appear for the Set-CASMailbox command. Instead the internal class name was shown in the file for the related arguments. XenMobile Mail Manager now shows the list of deviceIDs as a comma-delimited list. [CXM-50693]
- When an attempt to acquire a connection to Exchange fails due to a bad specification: The error message is overridden by an incorrect message: “All connections in use”. More descriptive messages now appear, such as “All connections are inoperable”, “Connection pool is empty”, “All connections are throttled”, and “No available connections”. [CXM-50783]
- Sometimes, Allow/Block/Wipe commands are queued up in the XenMobile Mail Manager internal cache multiple times. This issue causes a delay in the command being sent to Exchange. XenMobile Mail Manager now only queues up one instance of each command. [CXM-51524]
What’s new in version 10.1.3
- Google Analytics support: We want to know how you use XenMobile Mail Manager so we can focus on where we can make the product better.
- Setting for enabling diagnostics: An Enable Diagnostic checkbox appears in the Configure console on the Configuration dialog box.
Fixed issues in version 10.1.3
- In the Snapshot History window, tooltips that show the current state of the snapshot do not reflect the actual state. [CXM-5570] Occasionally, XenMobile Mail Manager cannot write to the Commands diagnostics file. When this occurs, the command history is not logged in its entirety. [CXM-49217]
- When an error occurs with a connection, the connection might not be marked as “errored”. As a result, a subsequent command might attempt to use the connection and cause another error. [CXM-49495]
- When throttling from the Exchange Server occurs, an exception might be thrown in the Check Health routine. As a result, connections that have experienced an error or have expired might not be purged. Also, XenMobile Mail Manager might not create connections until the throttling time expires. [CXM-49794]
- When the max session count for Exchange is exceeded, XenMobile Mail Manager reports the error “Device Capture Failed,” which is not an accurate message. Instead, the message should indicate that the two sessions that XenMobile Mail Manager normally uses for Exchange communication are in use. [CXM-49994]
What’s new in version 10.1.2
- Improved connection to Exchange: XenMobile Mail Manager uses PowerShell sessions to communicate with Exchange. A PowerShell session, especially when dealing with Office 365, can become unstable after a while, blocking subsequent commands from succeeding. XenMobile Mail Manager can now set an expiration period for connections. When the connection reaches its expiration time, XenMobile Mail Manager gracefully shuts down the PowerShell session and creates a session. By doing so, the PowerShell session is less likely to become unstable, significantly reducing the chance of a snapshot failure.
- Improved snapshot workflow: Major snapshots are a time-consuming and process-intensive operation. If an error occurs during a snapshot, XenMobile Mail Manager now attempts multiple times (up to three) to complete a snapshot. Subsequent attempts do not start from the beginning. XenMobile Mail Manager continues from where it left off. This enhancement improves the success rate of snapshots in general by allowing transient errors to pass while a snapshot is still in progress.
- Improved diagnostics: Troubleshooting snapshot operations are now easier with three new diagnostics files optionally generated during a snapshot. These files help identify PowerShell command issues, mailboxes with missing information, and devices that cannot be related to a mailbox. An admin can use these files to identify data that might not be correct in Exchange.
- Improved memory usage: XenMobile Mail Manager is now more efficient in its use of memory. Admins can schedule XenMobile Mail Manager to restart automatically to provide a clean slate to the system.
- Microsoft .NET Framework 4.6 prerequisite: The prerequisite for Microsoft .NET Framework is now version 4.6.
Fixed issues
- Prompt for credentials error: Office 365 session instability often caused this error. The Improved Connection to Exchange enhancement addresses the problem. (XMHELP-293, XMHELP-311, XMHELP-801)
- Mailbox and device count inaccuracies: XenMobile Mail Manager has an improved Mailbox-to-Device association algorithm. The Improved Diagnostics feature helps in the identification of mailboxes and devices that XenMobile Mail Manager deems are not within its realm of responsibility. (XMHELP-623)
- Allow/Block/Wipe commands not being recognized: A bug was fixed where sometimes, XenMobile Mail Manager allow/block/wipe commands are not recognized. (XMHELP-489)
- Memory management: Better memory management and mitigation. (XMHELP-419)
Architecture
The following figure shows the main components of the Endpoint Management connector for Exchange ActiveSync. For a detailed reference architecture diagram, see Architecture.
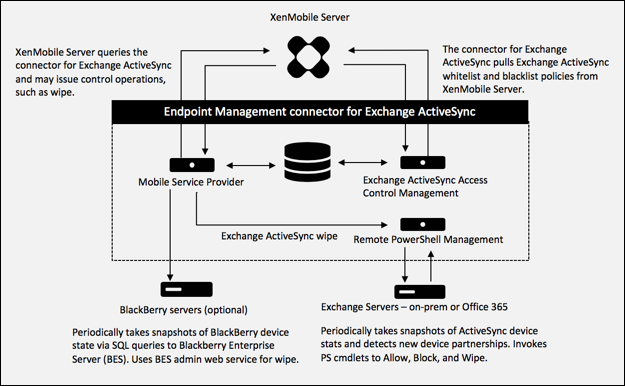
The three main components are:
- Exchange ActiveSync Access Control Management: Communicates with XenMobile to retrieve an Exchange ActiveSync policy from XenMobile, and merges this policy with any locally defined policy to determine the Exchange ActiveSync devices that should be allowed or denied access to Exchange. Local policy allows extending the policy rules to allow access control by Active Directory Group, User, Device Type, or Device User Agent (generally the mobile platform version).
- Remote PowerShell Management: Responsible for scheduling and invoking remote PowerShell commands to enact the policy compiled by Exchange ActiveSync Access Control Management. Periodically takes a snapshot of the Exchange ActiveSync database to detect new or changed Exchange ActiveSync devices.
- Mobile Service Provider: Provides a web service interface so that XenMobile can query Exchange ActiveSync, query Blackberry devices, and issue control operations such as Wipe against ActiveSync and Blackberry devices.
System requirements and prerequisites
The following minimum system requirements are required to use Endpoint Management connector for Exchange ActiveSync:
- Windows Server 2016, Windows Server 2012 R2, or Windows Server 2008 R2 Service Pack 1. Must be an English-based server. Support for Windows Server 2008 R2 Service Pack 1 ends on January 14, 2020 and support for Windows Server 2012 R2 ends on October 10, 2023.
- Microsoft SQL Server 2016 Service Pack 2 or SQL Server 2014 Service Pack 3.
- Microsoft .NET Framework 4.6.
- Blackberry Enterprise Service, version 5 (optional).
Minimum supported versions of Microsoft Exchange Server:
- Microsoft Office 365
- Exchange Server 2016
- Exchange Server 2013 (support ends April 11, 2023)
- Exchange Server 2010 Service Pack 3 (support ends January 14, 2020)
Prerequisites
- Windows Management Framework must be installed.
- PowerShell V5, V4, and V3
- The PowerShell execution policy must be set to RemoteSigned via Set-ExecutionPolicy RemoteSigned.
-
TCP port 80 must be open between the computer running the Endpoint Management connector for Exchange ActiveSync and the remote Exchange Server.
-
Device email clients: Not all email clients consistently return the same ActiveSync ID for a device. Because the Endpoint Management connector for Exchange ActiveSync expects a unique ActiveSync ID for each device, only email clients that consistently generate the same unique ActiveSync IDs for each device are supported. These email clients have been tested by Citrix and done without errors:
- Samsung native email client
- iOS native email client
-
Exchange: The requirements for on-premises computer running Exchange are as follows:
The credentials specified in the Exchange Configuration UI must be able to connect to the Exchange Server and be given full access to run the following Exchange-specific PowerShell cmdlets.
-
For Exchange Server 2010 SP2:
- Get-CASMailbox
- Set-CASMailbox
- Get-Mailbox
- Get-ActiveSyncDevice
- Get-ActiveSyncDeviceStatistics
- Clear-ActiveSyncDevice
- Get-ExchangeServer
- Get-ManagementRole
- Get-ManagementRoleAssignment
-
For Exchange Server 2013 and Exchange Server 2016:
- Get-CASMailbox
- Set-CASMailbox
- Get-Mailbox
- Get-MobileDevice
- Get-MobileDeviceStatistics
- Clear-MobileDevice
- Get-ExchangeServer
- Get-ManagementRole
- Get-ManagementRoleAssignment
- If the Endpoint Management connector for Exchange ActiveSync is configured to view the entire forest, permission must have been granted to run: Set-AdServerSettings -ViewEntireForest $true
- The supplied credentials must have been granted the right to connect to the Exchange Server via the remote Shell. By default, the user who installed Exchange has this right.
- To establish a remote connection and run remote commands, the credentials must correspond to a user who is an administrator on the remote machine. You can use Set-PSSessionConfiguration to eliminate the administrative requirement, but discussion of that command is beyond the scope of this document. For more information, see the Microsoft article About Session Configurations.
- The Exchange Server must be configured to support remote PowerShell requests via HTTP. Typically, an administrator running the following PowerShell command on the Exchange Server is all that is required: WinRM QuickConfig.
- Exchange has many throttling policies. One of the policies controls how many concurrent PowerShell connections are allowed per user. The default number of simultaneous connections allowed for a user is 18 on Exchange 2010. When the connection limit is reached, the Endpoint Management connector for Exchange ActiveSync is not able to connect to Exchange Server. There are ways to change the maximum allowed simultaneous connections via PowerShell that are beyond the scope of this documentation. If interested, investigate Exchange throttling policies as related to remote management with PowerShell.
-
For Exchange Server 2010 SP2:
Requirements for Office 365 Exchange
-
Permissions: The credentials specified in the Exchange Configuration UI must be able to connect to Office 365 and be given full access to run the following Exchange-specific PowerShell cmdlets:
- Get-CASMailbox
- Set-CASMailbox
- Get-Mailbox
- Get-MobileDevice
- Get-MobileDeviceStatistics
- Clear-MobileDevice
- Get-ExchangeServer
- Get-ManagementRole
- Get-ManagementRoleAssignment
- Privileges: The supplied credentials must have been granted the right to connect to the Office 365 server via the remote Shell. By default, the Office 365 online administrator has the requisite privileges.
- Throttling policies: Exchange has many throttling policies. One of the policies controls how many concurrent PowerShell connections are allowed per user. The default number of simultaneous connections allowed for a user is three on Office 365. When the connection limit is reached, the Endpoint Management connector for Exchange ActiveSync is not able to connect to Exchange Server. There are ways to change the maximum allowed simultaneous connections via PowerShell that are beyond the scope of this documentation. If interested, investigate Exchange throttling policies as related to remote management with PowerShell.
Install and configure
-
Click the XmmSetup.msi file and then follow the prompts in the installer to install Endpoint Management connector for Exchange ActiveSync.
-
Leave Launch the Configure utility selected in the last screen of the setup wizard. Or, from the Start menu, open the Endpoint Management connector for Exchange ActiveSync.
-
Configure the following database properties:
- Select the Configure > Database tab.
- Enter the name of the SQL Server (defaults to localhost).
- Keep the database as the default CitrixXmm.
-
Select one of the following authentication modes used for SQL:
- SQL: Enter the user name and password of a valid SQL user.
- Windows Integrated: If you select this option, the logon credentials of the Endpoint Management connector for Exchange ActiveSync Service must be changed to a Windows account that has permissions to access the SQL Server. To do this, open Control Panel > Administrative Tools > Services, right-click the Endpoint Management connector for Exchange ActiveSync Service entry and then click the Log On tab.
If Windows Integrated is also chosen for the BlackBerry database connection, the Windows account specified here must also be given access to the BlackBerry database.
-
Click Test Connectivity to check that a connection can be made to the SQL Server and then click Save.
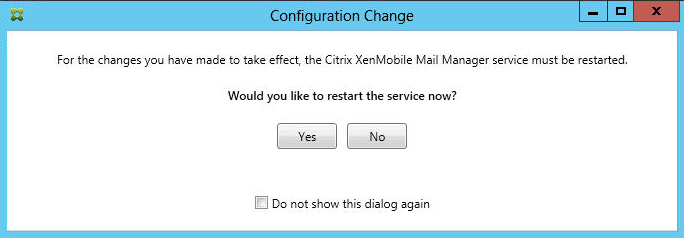
-
A message prompts you to restart the service. Click Yes.
-
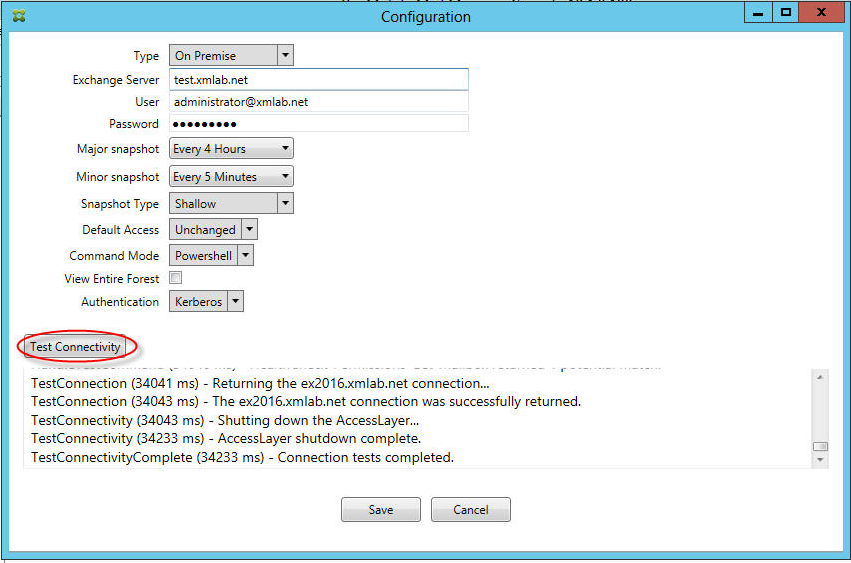
Configure one or more Exchange Servers:
- If managing a single Exchange environment, specify a single server only. If managing multiple Exchange environments, specify a single Exchange Server for each Exchange environment.
- Click the Configure > Exchange tab and then click Add.

-
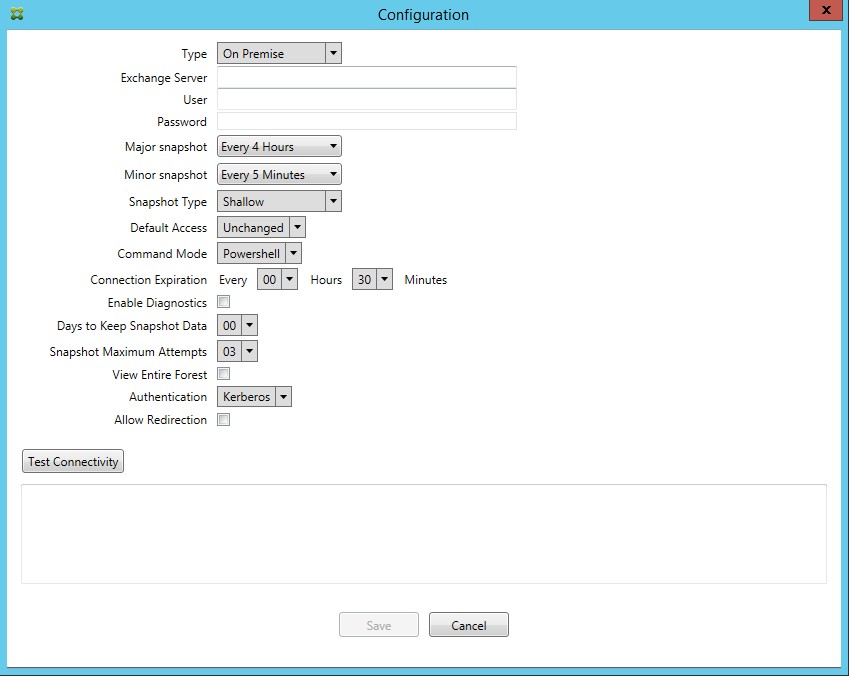
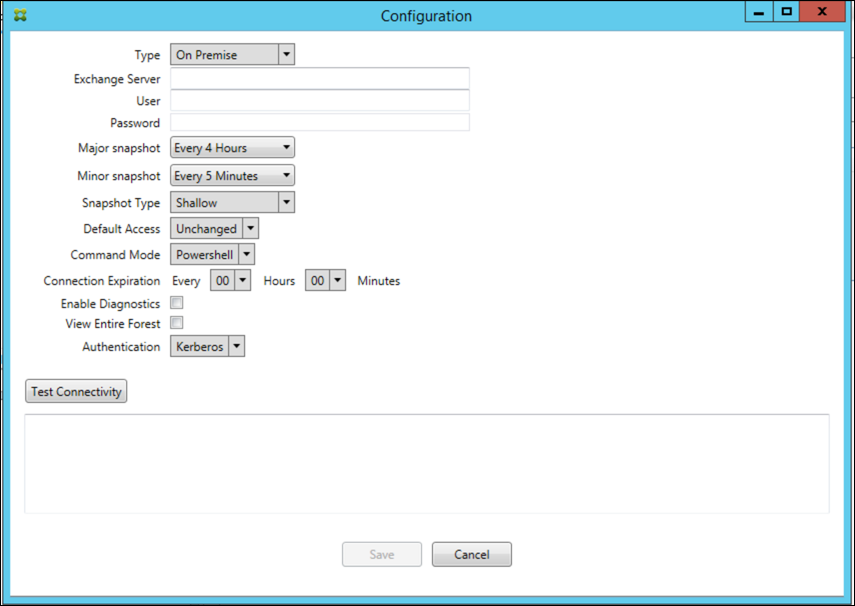
Select the type of Exchange Server environment: On Premise or Office 365.
- If you select On Premise, enter the name of the Exchange Server to use for Remote PowerShell commands.
- Enter the user name of a Windows identity that has appropriate rights on the Exchange Server as specified within the Requirements section and then enter the Password for the user.
- Select the schedule for running Major snapshots. A major snapshot detects every Exchange ActiveSync partnership.
- Select the schedule for running Minor snapshots. A minor snapshot detects newly created Exchange ActiveSync partnerships.
- Select the Snapshot Type: Deep or Shallow. Shallow snapshots are typically much faster and are sufficient to perform all the Exchange ActiveSync Access Control functions of the Endpoint Management connector for Exchange ActiveSync. Deep snapshots might take longer and are only needed if the Mobile Service Provider is enabled for ActiveSync. This option allows XenMobile to query for unmanaged devices.
- Select the Default Access: Allow, Block, or Unchanged. This setting controls how all devices other than those devices identified by explicit XenMobile or Local rules are treated. If you select Allow, ActiveSync access to all such devices is allowed. If you select Block, access is denied. If you select Unchanged, no change is made.
- Select the ActiveSync Command Mode: PowerShell or Simulation.
- In PowerShell mode, the Endpoint Management connector for Exchange ActiveSync issues PowerShell commands to enact the desired access control. In Simulation mode, the Endpoint Management connector for Exchange ActiveSync does not issue PowerShell commands, but logs the intended command and intended outcomes to the database. In Simulation mode, the user can then use the Monitor tab to see what would have happened if PowerShell mode was enabled.
- In Connection Expiration, set the hours and minutes for the life of a connection. When a connection reaches the age specified, the connection is marked as expired, so that the connection is never used again. When the expired connection is no longer used, the Endpoint Management connector for Exchange ActiveSync gracefully shuts down the connection. When a connection is needed again, a new connection is initialized if none is available. If none is specified, the default of 30 minutes is used.
- Select View Entire Forest to configure Endpoint Management connector for Exchange ActiveSync to view the entire Active Directory forest in the Exchange environment.
- Select the authentication protocol: Kerberos or Basic. Endpoint Management connector for Exchange ActiveSync supports Basic authentication for on-premises deployments. This enables the Endpoint Management connector for Exchange ActiveSync to be used when the Endpoint Management connector for Exchange ActiveSync server is not a member of the domain in which the Exchange server resides.
- Click Test Connectivity to check that a connection can be made to the Exchange Server and then click Save.
- A message prompts you to restart the service. Click Yes.
-
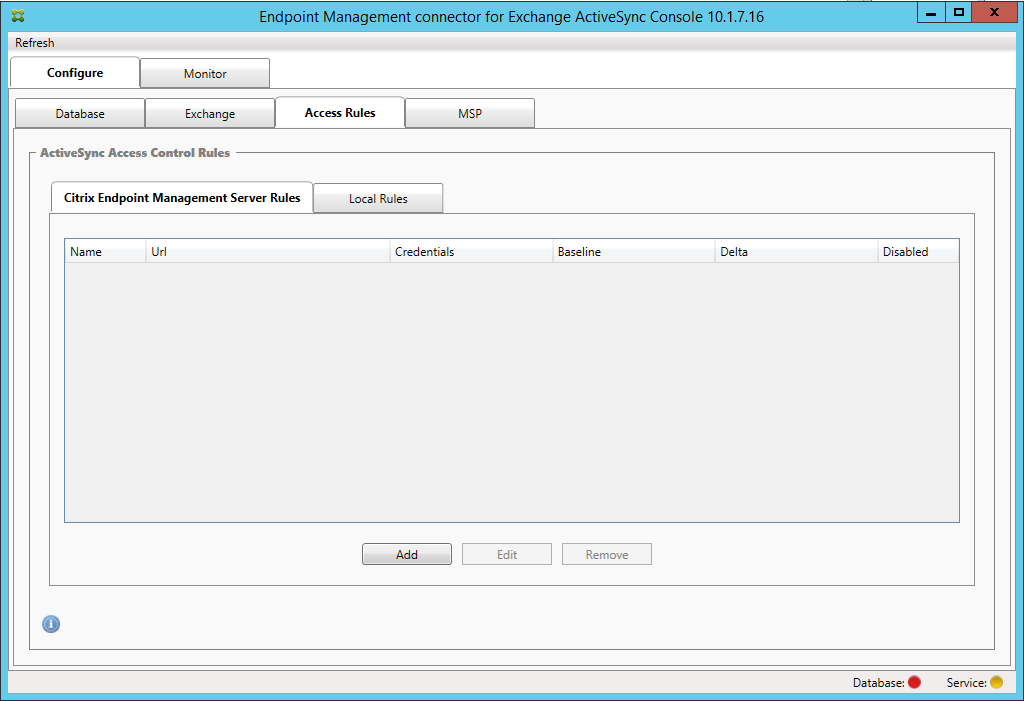
Configure the access rules: Select the Configure > Access Rules tab, click the XMS Rules tab, and then click Add.
-
On the XenMobile server Service Properties page, modify the URL string to point to the XenMobile Server. For example, if the instance name is zdm, enter
https://<XdmHostName>/zdm/services/MagConfigService. In the example, replace XdmHostName with the IP or DNS address of the XenMobile Server.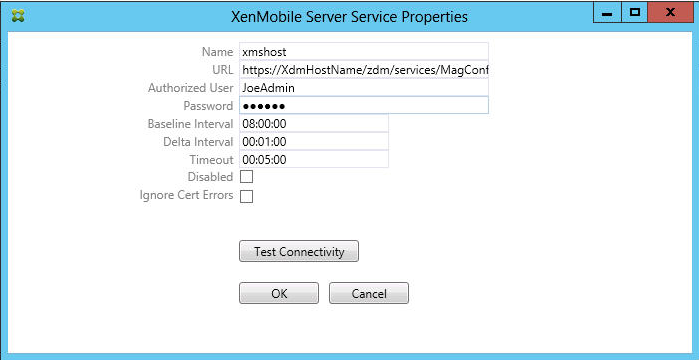
- Enter an authorized user of the server.
- Enter the password of the user.
- Keep the default values for the Baseline Interval, Delta Interval, and Timeout values.
- Click Test Connectivity to check the connection to the server and then click OK.
If the Disabled checkbox is selected, the XenMobile Mail Service doesn’t collect policies from XenMobile.
-
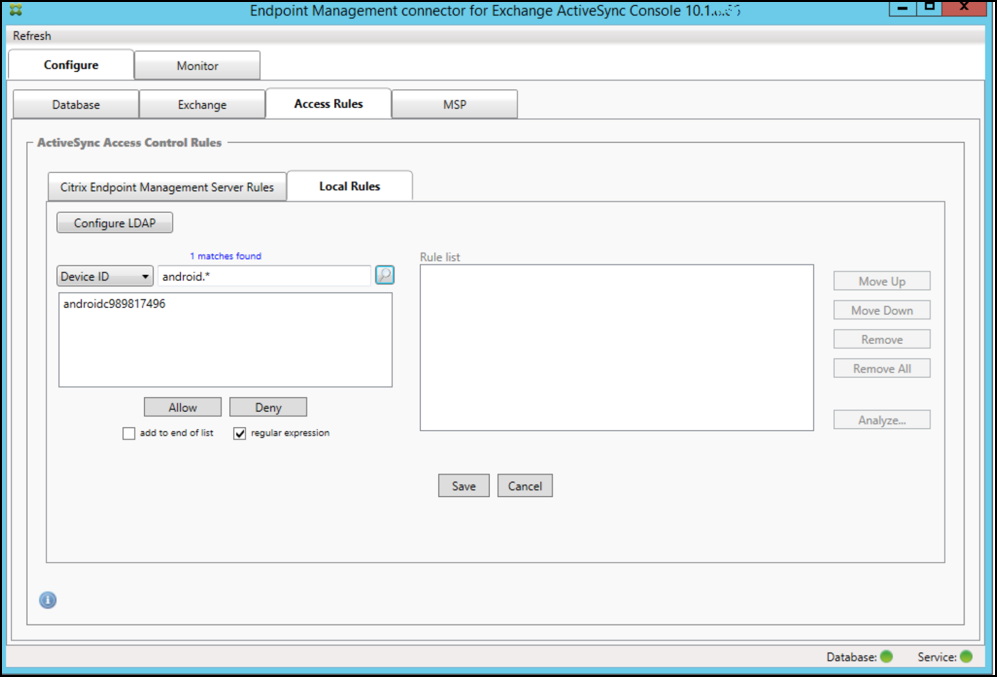
Click the Local Rules tab.
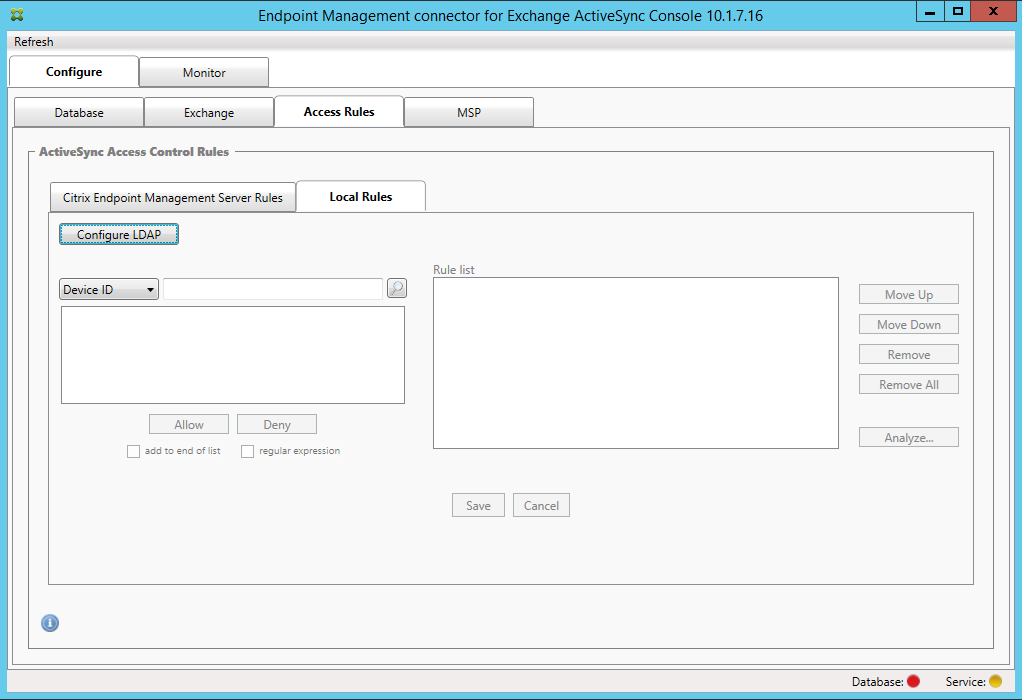
- You can add local rules based on ActiveSync Device ID, Device Type, AD Group, User, or device UserAgent. In the list, select the appropriate type.
- Enter text or text fragments in the text box. Optionally, click the query button to view the entities that match the fragment.
For all types other than Group, the system relies on the devices that have been found in a snapshot. Therefore, if you are just starting and haven’t completed a snapshot, no entities are available.
- Select a text value and then click Allow or Deny to add it to the Rule List pane on the right side. You can change the order of rules or remove them using the buttons to the right of the Rule List pane. The order is important because, for a given user and device, rules are evaluated in the order shown and a match on a higher rule (nearer the top) causes subsequent rules to have no effect. For example, if you have a rule allowing all iPad devices and a subsequent rule blocking the user Matt, Matt’s iPad will still be allowed because the iPad rule has a higher effective priority than the Matt rule.
- To perform an analysis of the rules within the rules list to find any potential overrides, conflicts, or supplemental constructs, click Analyze and then click Save.
-
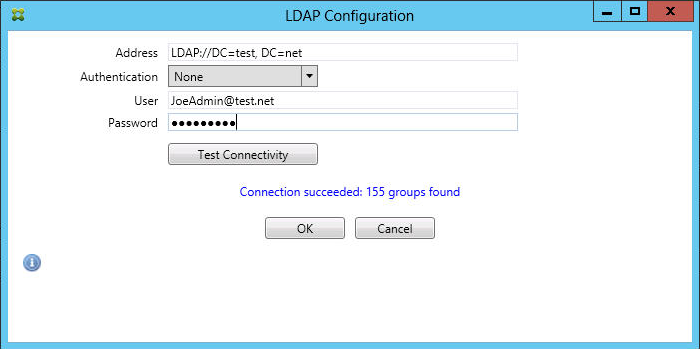
If you want to construct local rules that operate on Active Directory Groups, click Configure LDAP and then configure the LDAP connection properties.
-
Configure the Mobile Service Provider.
The Mobile Service Provider is optional. That setting is necessary only if XenMobile is also configured to use the Mobile Service Provider interface to query unmanaged devices.
- Click the Configure > MSP tab.
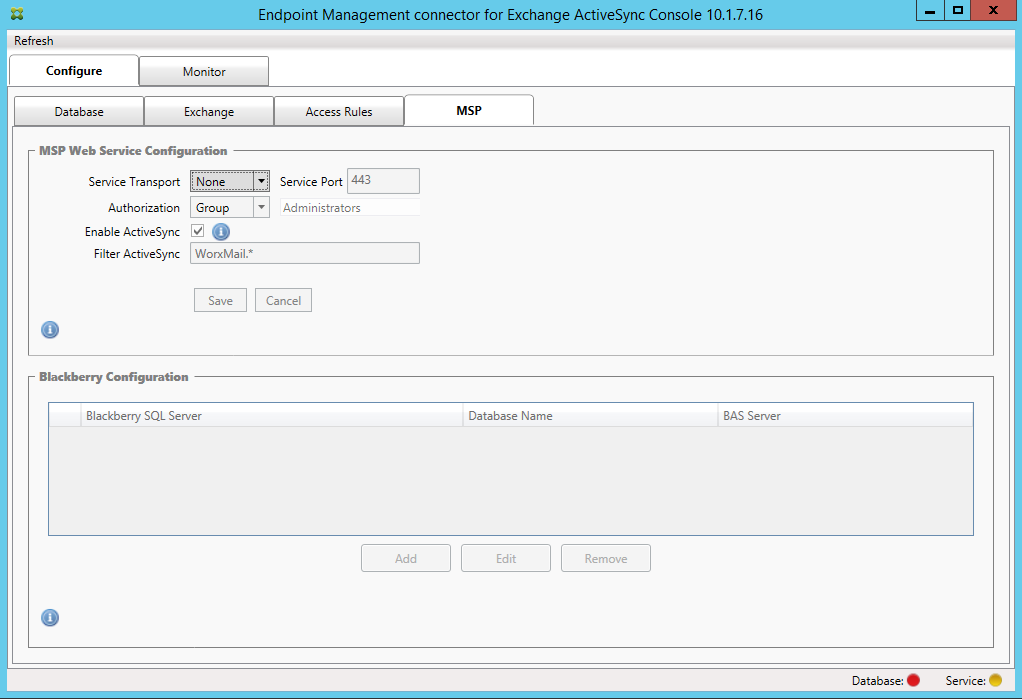
- Set the Service Transport type as HTTP or HTTPS for the Mobile Service Provider service.
- Set the Service port (typically 80 or 443) for the Mobile Service Provider service. If you use port 443, the port requires an SSL certificate bound to it in IIS.
- Set the Authorization Group or User. This sets the user or set of users who will be able to connect to the Mobile Service Provider service from XenMobile.
- Set whether ActiveSync queries are enabled or not. If ActiveSync queries are enabled for the XenMobile Server, the Snapshot type for one or more Exchange Servers must be set to Deep. That setting might have significant performance costs for taking snapshots.
- By default, ActiveSync devices that match the regular expression WorxMail.* will not be sent to XenMobile. To change this behavior, alter the Filter ActiveSync field as necessary. Blank means that all devices are forwarded to XenMobile.
- Click Save.
-
Optionally, configure one or more instances of BlackBerry Enterprise Server (BES): Click Add and then enter the server name of the BES SQL Server
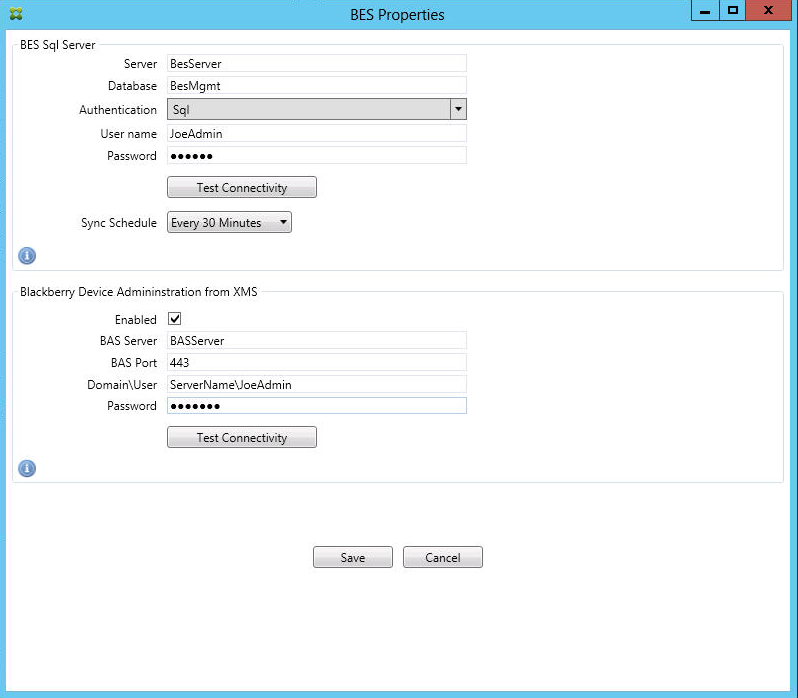
- Enter the database name of the BES management database.
- Select the Authentication mode. If you select Windows Integrated authentication, the user account of the Endpoint Management connector for Exchange ActiveSync service is the account that is used to connect to the BES SQL Server. If you also choose Windows Integrated for the Endpoint Management connector for Exchange ActiveSync database connection, the Windows account specified here must also be given access to the Endpoint Management connector for Exchange ActiveSync database.
- If you select SQL authentication, enter the user name and password.
- Set the Sync Schedule. This is the schedule used to connect to the BES SQL Server and checks for any device updates.
- Click Test Connectivity to check connectivity to the SQL Server. If you select Windows Integrated, this test uses the current logged on user and not the Endpoint Management connector for Exchange ActiveSync service user and therefore does not accurately test SQL authentication.
- To support remote Wipe and ResetPassword of BlackBerry devices from XenMobile, select the Enabled checkbox.
- Enter the BES fully qualified domain name (FQDN).
- Enter the BES port used for the admin web service.
- Enter the fully qualified user and password required by the BES service.
- Click Test Connectivity to test the connection to the BES.
- Click Save.
Enforce email policies with ActiveSync IDs
Your corporate email policy might dictate that certain devices are not approved for corporate email use. To follow this policy, you want to ensure that employees cannot access corporate email from such devices. Endpoint Management connector for Exchange ActiveSync and XenMobile work together to enforce such an email policy. XenMobile sets the policy for corporate email access and, when an unapproved device enrolls with XenMobile, Endpoint Management connector for Exchange ActiveSync enforces the policy.
The email client on a device advertises itself to Exchange Server (or Office 365) using the device ID, also known as the ActiveSync ID, which is used to identify the device. Secure Hub obtains a similar identifier and sends the identifier to XenMobile when the device is enrolled. By comparing the two device IDs, the Endpoint Management connector for Exchange ActiveSync can determine whether a specific device should have corporate email access. The following figure illustrates this concept:
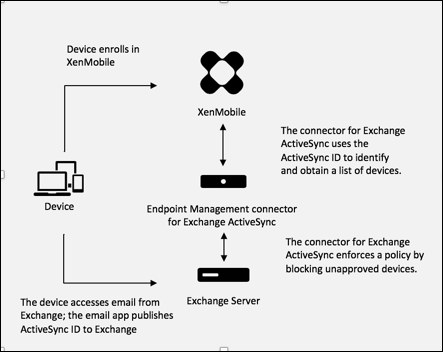
If XenMobile sends Endpoint Management connector for Exchange ActiveSync an ActiveSync ID that is different from the ID the device publishes to Exchange, the Endpoint Management connector for Exchange ActiveSync cannot indicate to Exchange what to do with the device.
Matching ActiveSync IDs works reliably on most platforms. However, Citrix has found that on some Android implementations, the ActiveSync ID from the device is different from the ID that the mail client advertises to Exchange. To mitigate this problem, you can do the following:
- On the Samsung SAFE platform, push the device ActiveSync configuration from XenMobile.
To guarantee that your corporate email access policy is enforced properly, you can adopt a defensive security stance and configure the Endpoint Management connector for Exchange ActiveSync to block emails by setting the static policy to Deny by default. This means that if an employee configures an email client on an Android device and if ActiveSync ID detection does not work properly, the employee is denied corporate email access.
Access control rules
Endpoint Management connector for Exchange ActiveSync provides a rule-based approach for dynamically configuring access control for Exchange ActiveSync devices. An Endpoint Management connector for Exchange ActiveSync access control rule consists of two parts: a matching expression and a desired access state (Allow or Block). A rule might be evaluated against a given Exchange ActiveSync device to determine if the rule applies to, or matches the device. There are multiple kinds of matching expressions; for example, a rule might match all devices of a given Device Type, or a specific Exchange ActiveSync device ID, or all devices of a specific user, and so on.
At any point during the adding, removing, and rearranging of the rules in the rule list, clicking the Cancel button reverts the rules list back to the state at which it was when first opened. Unless you click Save, any changes made to this window are lost if you close the Configure tool.
Endpoint Management connector for Exchange ActiveSync has three types of rules: local rules, XenMobile Server rules (also known as XDM rules), and the default access rule.
Local rules: Local rules have the highest priority: If a device is matched by a local rule, rule evaluation stops. Neither XenMobile Server rules nor the default access rules will be consulted. Local rules are configured locally to the Endpoint Management connector for Exchange ActiveSync via the Configure > Access Rules > Local Rules tab. Support matching is based on a user’s membership within a given Active Directory group. Support matching is based on regular expressions for the following fields:
- Active Sync Device ID
- ActiveSync Device Type
- User Principal Name (UPN)
- ActiveSync User Agent (typically the device platform or email client)
As long as a major snapshot has completed and found devices, you should be able to add either a normal or regular expression rule. If a major snapshot has not completed, you can only add regular expression rules.
XenMobile server rules: XenMobile Server rules are references to an external XenMobile Server that provides rules about managed devices. The XenMobile Server can be configured with its own high-level rules that identify the devices to be allowed or blocked based on properties known to XenMobile, such as whether the device is jailbroken or whether the device contains forbidden apps. XenMobile evaluates the high-level rules and produces a set of allowed or blocked ActiveSync Device IDs, which are then delivered to the Endpoint Management connector for Exchange ActiveSync.
Default access rule: The default access rule is unique in that it can potentially match every device and is always evaluated last. This rule is the catch-all rule, which means that if a given device does not match a local or XenMobile Server rule, the desired access state of the device is determined by the desired access state of the default access rule.
- Default Access – Allow: Any device that is not matched by either a local or XenMobile Server rule will be allowed.
- Default Access – Block: Any device that is not matched by either a local or XenMobile Server rule will be blocked.
- Default Access - Unchanged: Any device that is not matched by either a local or XenMobile Server rule will not have its access state modified in any way by Endpoint Management connector for Exchange ActiveSync. If a device has been placed into Quarantine mode by Exchange, no action is taken. For example, the only way to remove a device from Quarantine mode is to have an explicitly Local or XDM rule override the quarantine.
About rule evaluations
For each device that Exchange reports to the Endpoint Management connector for Exchange ActiveSync, the rules are evaluated in sequence, from highest to lowest priority as follows:
- Local rules
- XenMobile Server rules
- Default access rule
When a match is found, evaluation stops. For example, if a local rule matches a given device, the device will not be evaluated against any of the XenMobile Server rules or the default access rule. This holds true within a given rule type as well. For example, if there’s more than a single match for a given device in the local rule list, when the first match is encountered, evaluation stops.
Endpoint Management connector for Exchange ActiveSync reevaluates the currently defined set of rules when device properties change, or when devices are added or removed, or when the rules themselves change. Major snapshots pick up device property changes and removals at configurable intervals. Minor Snapshots pick up new devices at configurable intervals.
Exchange ActiveSync has rules governing access as well. It is important to understand how these rules work in the context of the Endpoint Management connector for Exchange ActiveSync. Exchange might be configured with three levels of rules: personal exemptions, device rules, and organization settings. Endpoint Management connector for Exchange ActiveSync automates access control by programmatically issuing Remote PowerShell requests to affect the personal exemptions lists. These are lists of allowed or blocked Exchange ActiveSync device IDs associated with a given mailbox. When deployed, the Endpoint Management connector for Exchange ActiveSync effectively takes over management of the exemption lists capability within Exchange. For details, see the Microsoft article, Controlling Device Access.
Analyzing is useful in situations in which multiple rules for the same field have been defined. You can troubleshoot the relationships between rules. You perform analysis from the perspective of rule fields. For example, rules are analyzed in groups based on the field that is being matched, such as ActiveSync device ID, ActiveSync device type, User, User Agent.
Rule terminology
- Overriding rule: An override occurs when more than a single rule can apply to the same device. Because rules are evaluated by priority in the list, the later rule instance(s) which might apply might never be evaluated.
- Conflicting rule: A conflict occurs when more than a single rule might apply to the same device but the access (Allow/Block) does not match. If the conflicting rules are not regular expression rules, a conflict always implicitly connotes an override.
- Supplemental rule: A supplement occurs when more than one rule is a regular expression rule and so there might be a need to ensure that the two (or more) regular expressions can either be combined into a single regular expression rule, or are not duplicating functionality. A supplementary rule might also conflict in its access (Allow/Block).
- Primary rule: The primary rule is the rule that has been clicked within the dialog box. The rule is indicated visually by a solid border line that surrounds it. The rule will also have one or two green arrows pointing up or down. If an arrow points up, the arrow indicates that there are ancillary rules that precede the primary rule. If an arrow points down, this indicates that there are ancillary rules that come after the primary rule. Only a single primary rule can be active at any time.
- Ancillary rule: An ancillary rule is related in some way to the primary rule either through override, conflict, or a supplementary relationship. The rules are indicated visually by a dashed border that surrounds them. For each primary rule, there can be one to many ancillary rules. When clicking any underlined entry, the ancillary rule or rules that are highlighted are always from the perspective of the primary rule. For example, the ancillary rule is overridden by the primary rule, and/or the ancillary rule will conflict in its access with the primary rule, and/or the ancillary rule will supplement the primary rule.
How types of rules appear in the Rule Analysis dialog box
When there are no conflicts, overrides, or supplements, the Rule Analysis dialog box has no underlined entries. Clicking any of the items has no impact; for example, normal selected item visuals occur.
The Rule Analysis window has a checkbox which, when selected, displays only those rules which are conflicts, overrides, redundancies, or supplements.
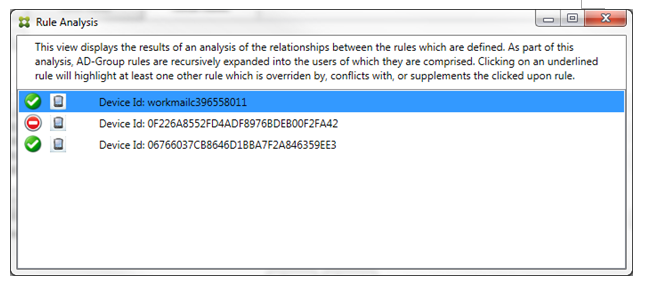
When an override occurs, at least two rules will be underlined: the primary rule and the ancillary rule or rules. At least one ancillary rule appears in a lighter font to indicate that the rule has been overridden by a higher priority rule. You can click the overridden rule to find out which rule or rules have overridden the rule. Anytime an overridden rule has been highlighted either because of the rule being the primary or ancillary rule, a black circle appears next to it as a further visual indication that the rule is inactive. For example, before clicking the rule, the dialog box appears as follows:
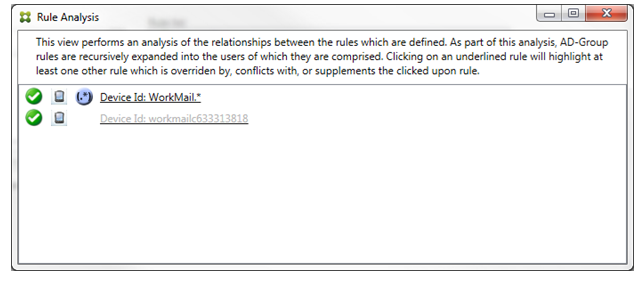
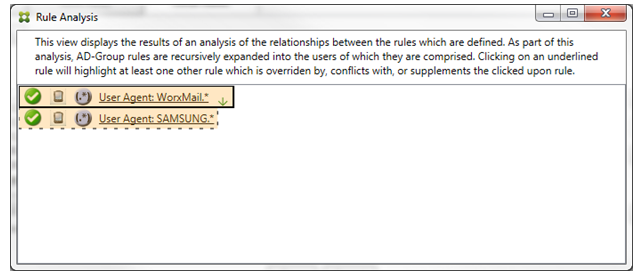
When you click the highest-priority rule, the dialog box appears as follows:
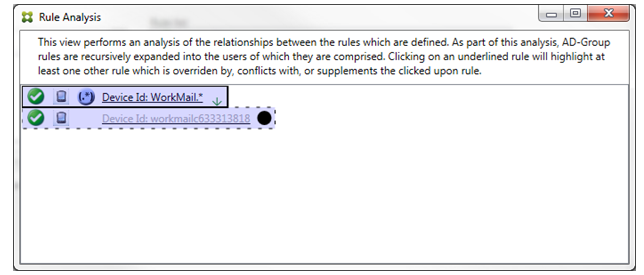
In this example, the regular expression rule WorkMail.* is the primary rule (indicated by the solid border) and the normal rule workmailc633313818 is an ancillary rule (indicated by the dashed border). The black dot next to the ancillary rule is a visual cue that further indicates that the rule is inactive (will never be evaluated) due to the higher-priority regular expression rule that precedes it. After clicking the overridden rule, the dialog box appears as follows:
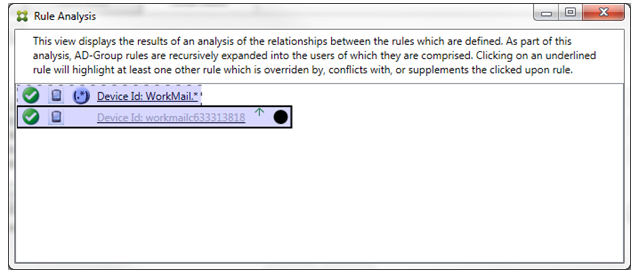
In the preceding example, the regular expression rule WorkMail.* is the ancillary rule (indicated by the dashed border) and the normal rule workmailc633313818 is a primary rule (indicated by the solid border). For this simple example, there’s not much difference. For a more complicated example, see the complex expression example later in this topic. In a scenario with many rules defined, clicking the overridden rule would quickly identify which rule or rules had overridden it.
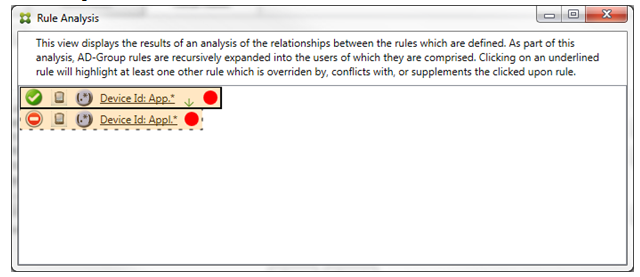
When a conflict occurs, at least two rules will be underlined, the primary rule and the ancillary rule or rules. The rules in conflict are indicated by a red dot. Rules that only conflict with one another are only possible with two or more regular expression rules defined. In all other conflict scenarios, there will not only be a conflict, but an override at play. Before clicking either of the rules in a simple example, the dialog box appears as follows:
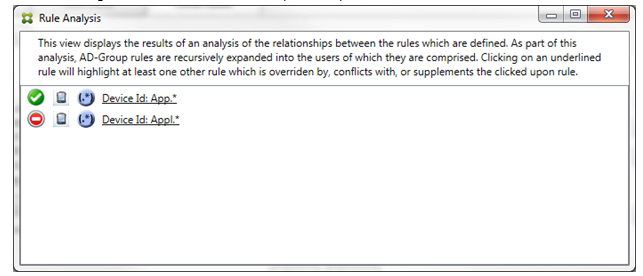
By inspecting the two regular expression rules, it’s evident that the first rule allows all devices with a device ID that contains “App” and that the second rule denies all devices with a device ID that contains “Appl”. In addition, even though the second rule denies all devices with a device ID that contains “Appl”, no devices with that match the criteria will ever be denied because of the higher precedence of the allow rule. After clicking the first rule, the dialog box appears as follows:
In the preceding scenario, both the primary rule (regular expression rule App.*) and the ancillary rule (regular expression rule Appl.*) are both highlighted in yellow. This is simply a visual warning to alert you to the fact that you have applied more than a single regular expression rule to a single matchable field, which can mean a redundancy issue or something more serious.
In a scenario with both a conflict and override, both the primary rule (regular expression rule App.*) and the ancillary rule (regular expression rule Appl.*) are highlighted in yellow. This is simply a visual warning to alert you to the fact that you have applied more than a single regular expression rule to a single matchable field, which can mean a redundancy issue or something more serious.
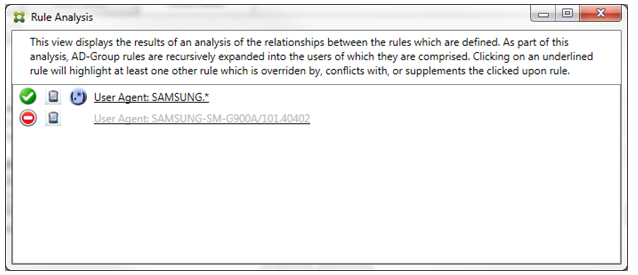
It is easy to see in the preceding example that the first rule (regular expression rule SAMSUNG.*) not only overrides the next rule (normal rule SAMSUNG-SM-G900A/101.40402), but that the two rules differ in their access (primary specifies Allow, ancillary specifies Block). The second rule (normal rule SAMSUNG-SM-G900A/101.40402) is displayed in lighter text to indicate that it has been overridden and is therefore inactive.
After clicking the regular expression rule, the dialog box appears as follows:
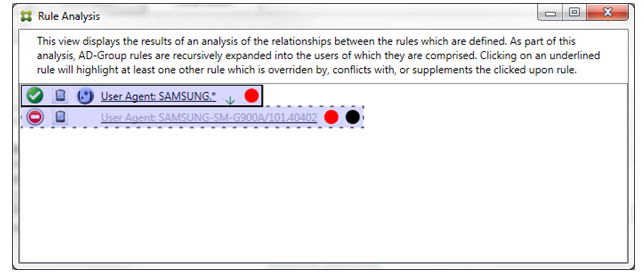
The primary rule (regular expression rule SAMSUNG.*) is followed by a red dot to indicate that its access state conflicts with one or more ancillary rules. The ancillary rule (normal rule SAMSUNG-SM-G900A/101.40402) is followed by a red dot to indicate that its access state conflicts with the primary rule. That rule is also followed by a black dot to indicate that it is overridden and therefore inactive.
At least two rules will be underlined, the primary rule and the ancillary rule or rules. Rules that only supplement one another will only involve regular expression rules. When rules supplement one another, they are indicated with a yellow overlay. Before clicking either of the rules, in a simple example, the dialog box appears as follows:
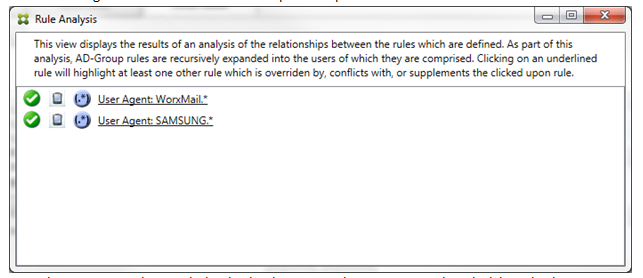
Visual inspection easily reveals that both rules are regular expression rules which have both been applied to the ActiveSync device ID field in the Endpoint Management connector for Exchange ActiveSync. After clicking the first rule, the dialog box looks as follows:
The primary rule (regular expression rule WorkMail.*) is highlighted with a yellow overlay to indicate that there exists at least one more ancillary rule which is a regular expression. The ancillary rule (regular expression rule SAMSUNG.*) is highlighted with a yellow overlay to indicate that both it and the primary rule are regular expression rules being applied to the same field within Endpoint Management connector for Exchange ActiveSync. In this case, that field is the ActiveSync device ID. The regular expressions might or might not overlap. It is up to you to decide if your regular expressions are properly crafted.
Example of a complex expression
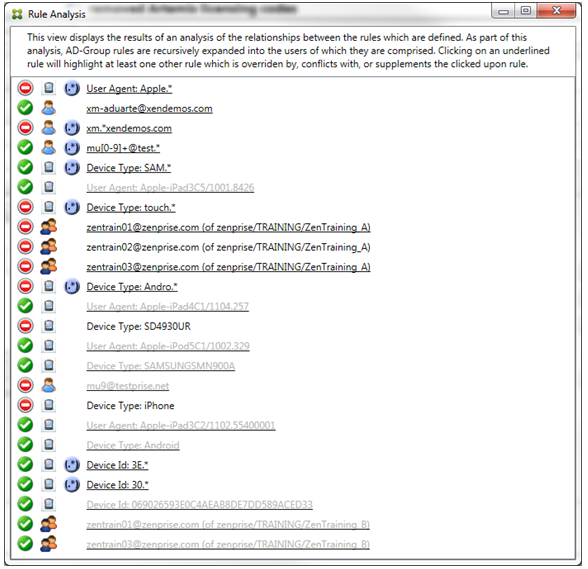
Many potential overrides, conflicts, or supplements can occur, making it impossible to give an example of all possible scenarios. The following example discusses what not to do, while also serving to illustrate the full power of the rule analysis visual construct. Most of the items are underlined in the following figure. Many of the items render in a lighter font, which indicates that the rule in question has been overridden by a higher priority rule in some manner. Various regular expression rules are included in the list as well, as indicated by the ![]() icon.
icon.
How to analyze an override
To see which rule or rules have overridden a particular rule, you click the rule.
Example 1: This example examines why zentrain01@zenprise.com has been overridden.
The primary rule (AD-Group rule zenprise/TRAINING/ZenTraining B, of which zentrain01@zenprise.com is a member) has the following characteristics:
- Is highlighted in blue and has a solid border.
- Has an upwards pointing green arrow (to indicate that the ancillary rule or rules are all to be found above it).
- Is followed by both a red circle and black circle to indicate respectively that one or more ancillary rule conflicts with its access and that the primary rule has been overridden and is hence inactive.
When you scroll up, you see the following:
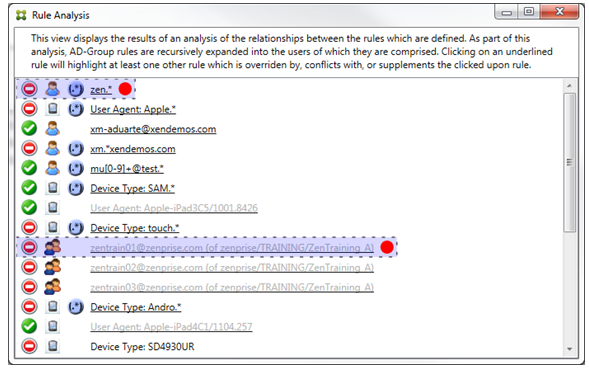
In this case, there are two ancillary rules that override the primary rule: the regular expression rule zen.* and the normal rule zentrain01@zenprise.com (of zenprise/TRAINING/ZenTraining A). In the case of the latter ancillary rule, what has occurred is that the Active Directory Group rule ZenTraining A contains the user zentrain01@zenprise.com, and the Active Directory Group rule ZenTraining B also contains the user zentrain01@zenprise.com. Because the ancillary rule has a higher precedence than the primary rule, however, the primary rule has been overridden. The primary rule’s access is Allow, and because both of the ancillary rule’s access is Block, all are followed with a red circle to further indicate an access conflict.
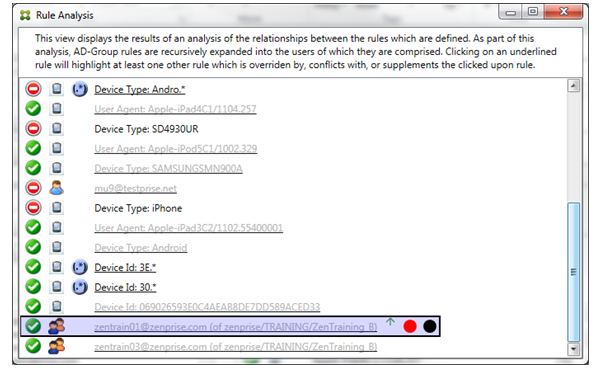
Example 2: This example shows why the device with an ActiveSync device ID of 069026593E0C4AEAB8DE7DD589ACED33 has been overridden:
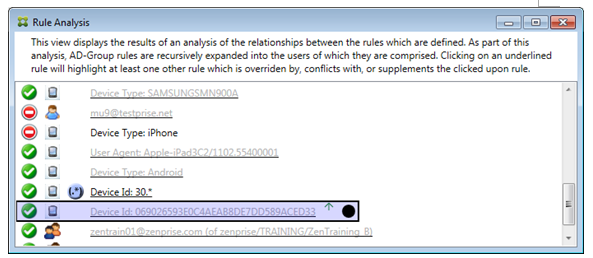
The primary rule (normal device ID rule 069026593E0C4AEAB8DE7DD589ACED33) has the following characteristics:
- Is highlighted in blue and has a solid border.
- Has an upwards pointing green arrow (to indicate that the ancillary rule is to be found above it).
- Is followed by a black circle to indicate an ancillary rule has overridden the primary rule and is hence inactive.
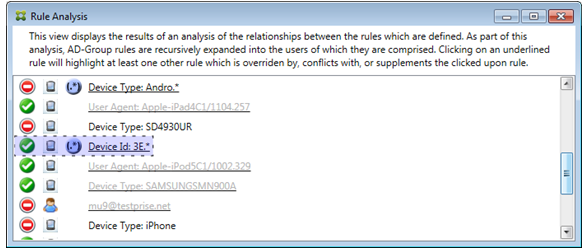
In this case, a single ancillary rule overrides the primary rule: The regular expression ActiveSync device ID rule is 3E.* Because the regular expression 3E.* would match 069026593E0C4AEAB8DE7DD589ACED33, the primary rule will never be evaluated.
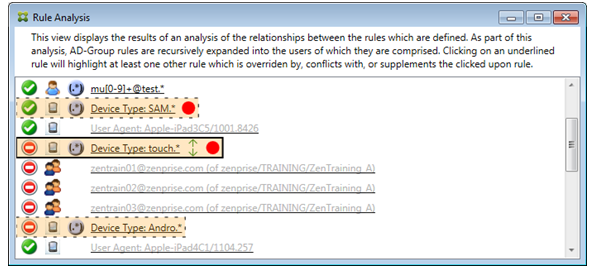
How to analyze a supplement and conflict
In this case, the primary rule is the regular expression ActiveSync device type rule touch.* The characteristics are as follows:
- Is indicated by a solid border with a yellow overlay as a warning that there is more than a single regular expression rule operating against a particular rule field, in this case ActiveSync device type.
- Two arrows are pointing up and down respectively, indicating that there is at least one ancillary rule with higher priority and at least one ancillary rule with lower priority.
- The red circle next to it indicates that at least one ancillary rule has its access set to Allow which conflicts with the primary rule’s access of Block
- There are two ancillary rules: the regular expression ActiveSync device type rule
SAM.*and the regular expression ActiveSync device type ruleAndro.*. - Both of the ancillary rules are bordered with dashes to indicate that they are ancillary.
- Both of the ancillary rules are overlaid with yellow to indicate that they are also applied to the rule field of ActiveSync device type.
-
You should ensure in such scenarios that their regular expression rules are not redundant.
How to further analyze the rules
This example explores how rule relationships are always from the perspective of the primary rule. The preceding example showed how a click the regular expression rule applied to the rule field of device type with a value of touch.*. Clicking the ancillary rule Andro.* shows that a different set of ancillary rules highlighted.
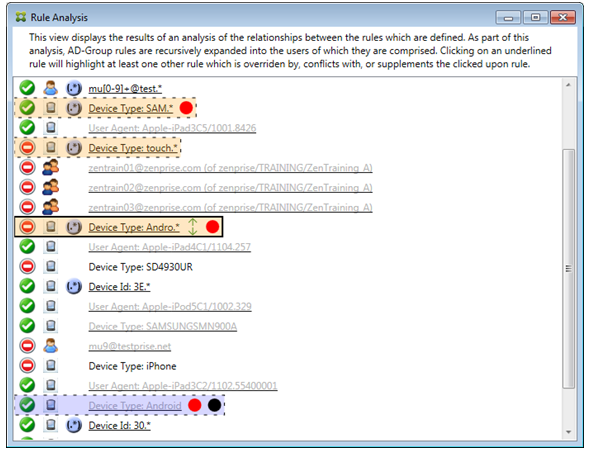
The example shows an overridden rule that is included in the rule relationship. This rule is the normal ActiveSync device type rule Android, which is overridden (indicated by the lightened font and the black circle next to it) and also conflicts in its access with the primary rule regular expression ActiveSync device type rule Andro.*. That rule was formerly an ancillary rule before being clicked. In the preceding example, the normal ActiveSync device type rule Android, was not displayed as an ancillary rule because, from the perspective of the then primary rule (the regular expression ActiveSync device type rule touch.*), it was not related to it.
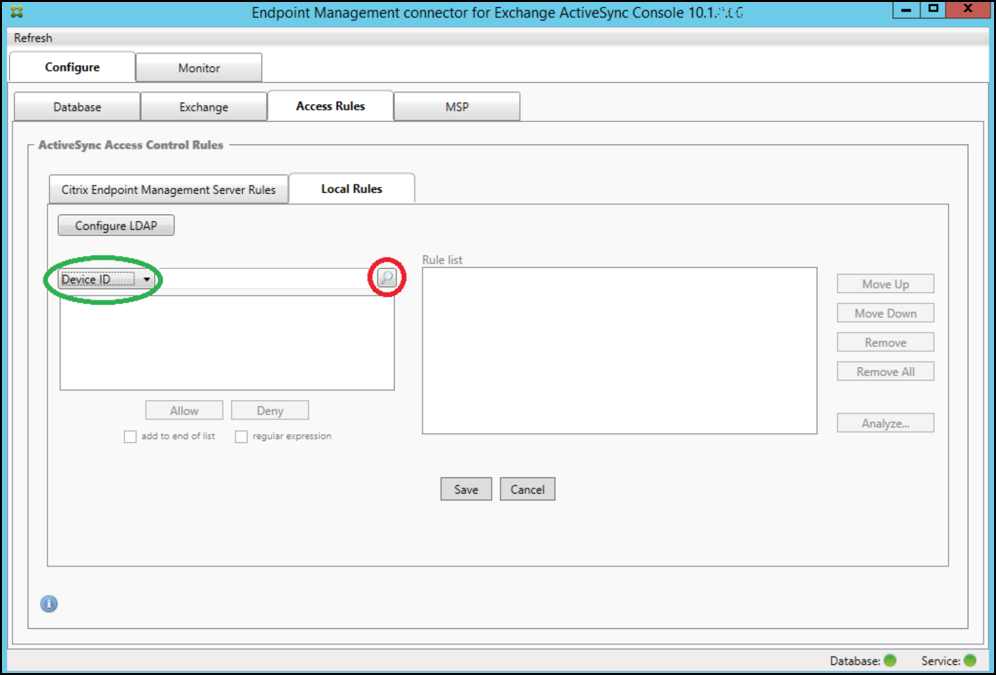
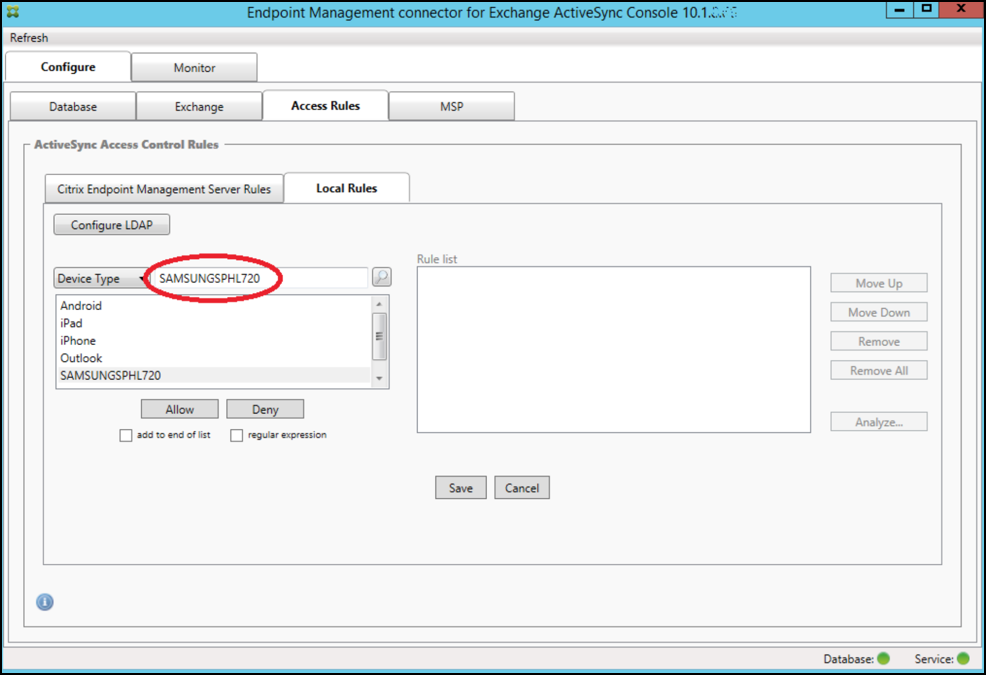
To configure a normal expression local rule
-
Click the Access Rules tab.
-
In the Device ID list, select the field for which you want to create a Local Rule.
-
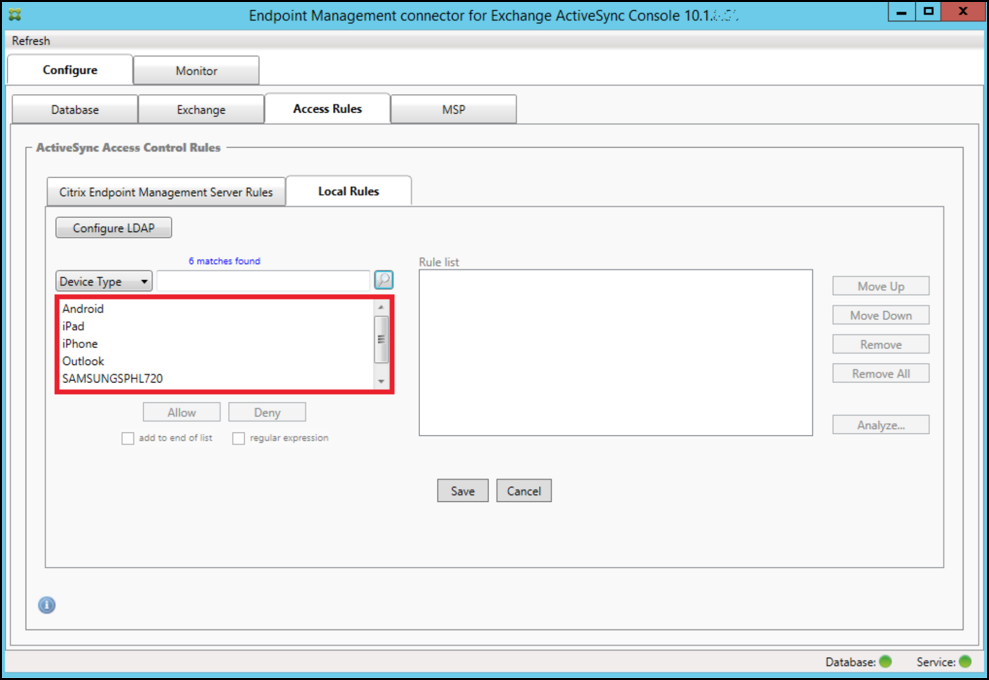
Click the magnifying glass icon to display all of the unique matches for the chosen field. In this example, the field Device Type has been chosen and the choices are shown below in the list box.
-
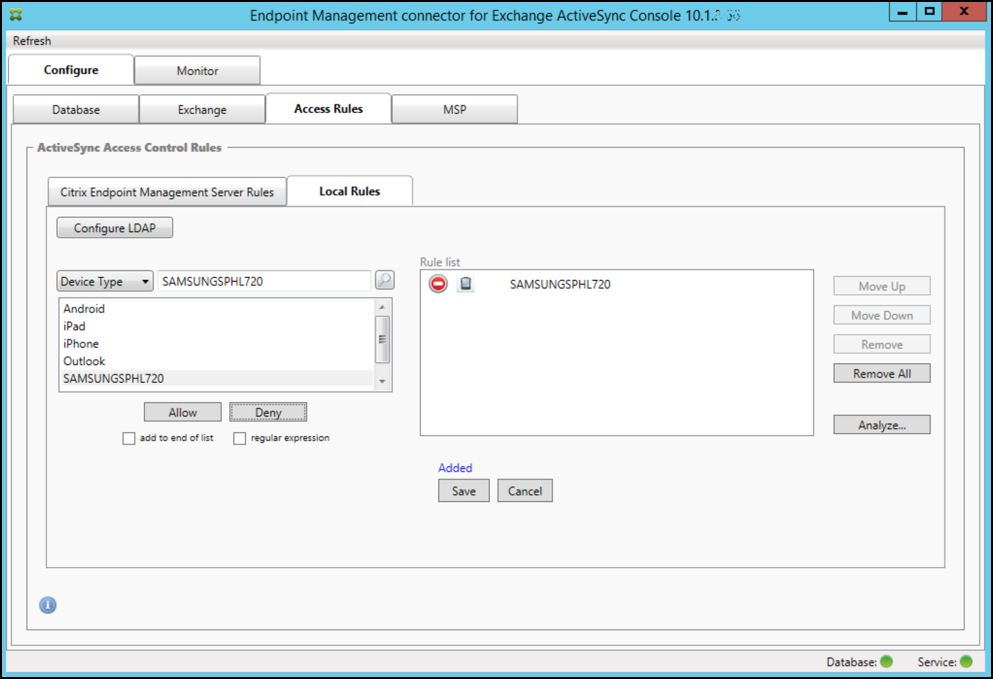
Click one of the items in the results list box and then click one of the following options:
- Allow means that Exchange will be configured to allow ActiveSync traffic for all matching devices.
- Deny means that Exchange will be configured to deny ActiveSync traffic for all matching devices.
In this example, all devices that have a device type of SamsungSPhl720 are denied access.
To add a regular expression
Regular expression local rules can be distinguished by the icon which appears next to them - ![]() .
.
To add a regular expression rule, you can either build a regular expression rule from an existing value from the results list for a given field (as long as a major snapshot has completed), or you can simply type in the regular expression that you want.
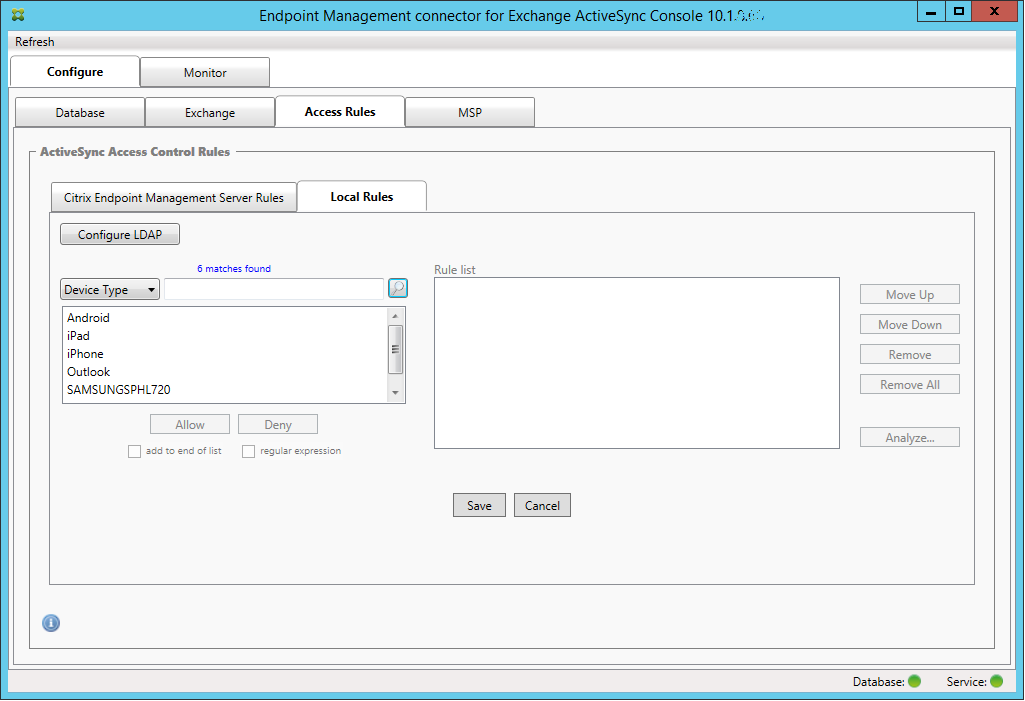
To build a regular expression from an existing field value
-
Click the Access Rules tab.
-
In the Device ID list, select the field for which you want to create a regular expression Local Rule.
-
Click the magnifying glass icon to display all of the unique matches for the chosen field. In this example, the field Device Type has been chosen and the choices are shown below in the list box.
-
Click one of the items in the results list. In this example, SAMSUNGSPHL720 has been selected and appears in the text box next to Device Type.
-
To allow all device types that have “Samsung” in their device type value, add a regular expression rule by following these steps:
-
Click within the selected item text box.
-
Change the text from SAMSUNGSPHL720 to SAMSUNG.*.
-
Ensure that the regular expression checkbox is selected.
-
Click Allow.
-
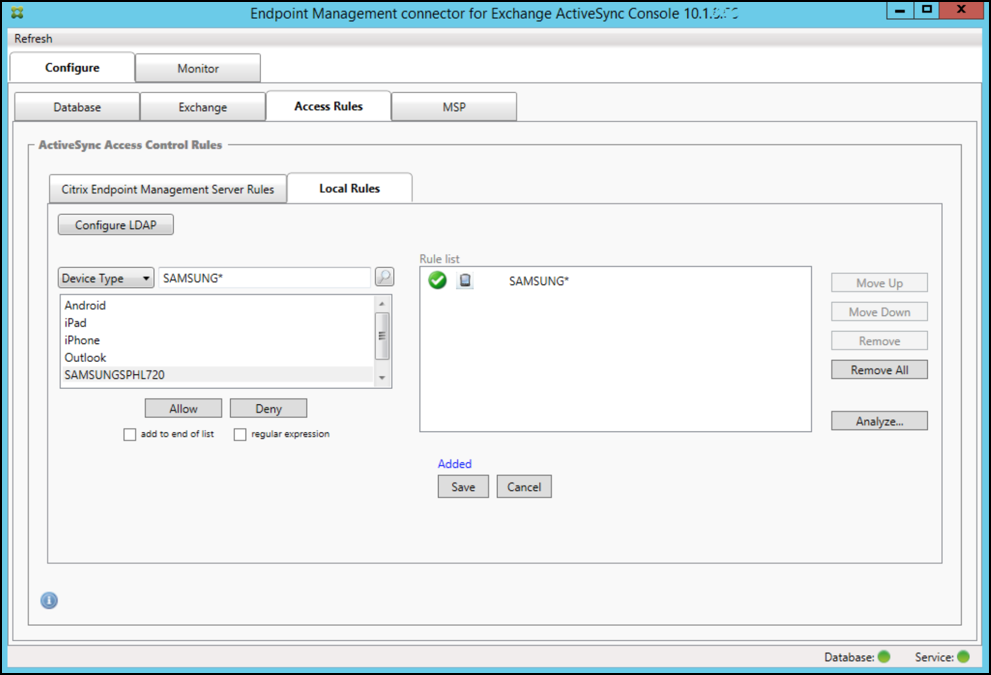
To build an access rule
- Click the Local Rules tab.
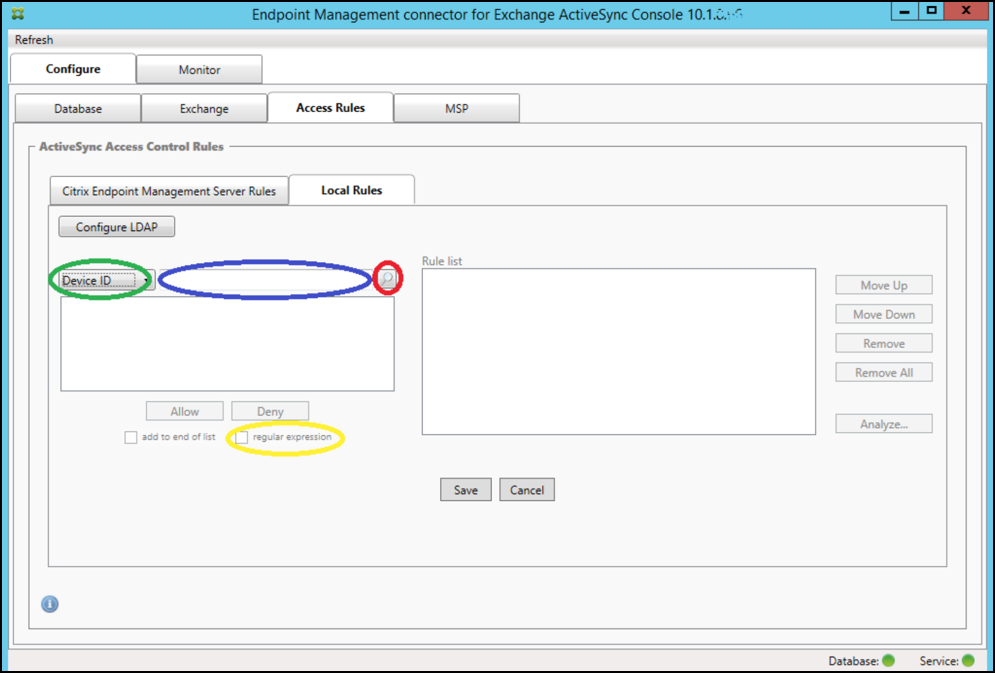
-
To enter the regular expression, you must make use of both the Device ID list and the selected item text box.
- Select the field that you want to match against. This example uses Device Type.
- Type in the regular expression. This example uses
samsung.* -
Ensure that the regular expression checkbox is selected and then click Allow or Deny. In this example, the choice is Allow. The final result is as follows:
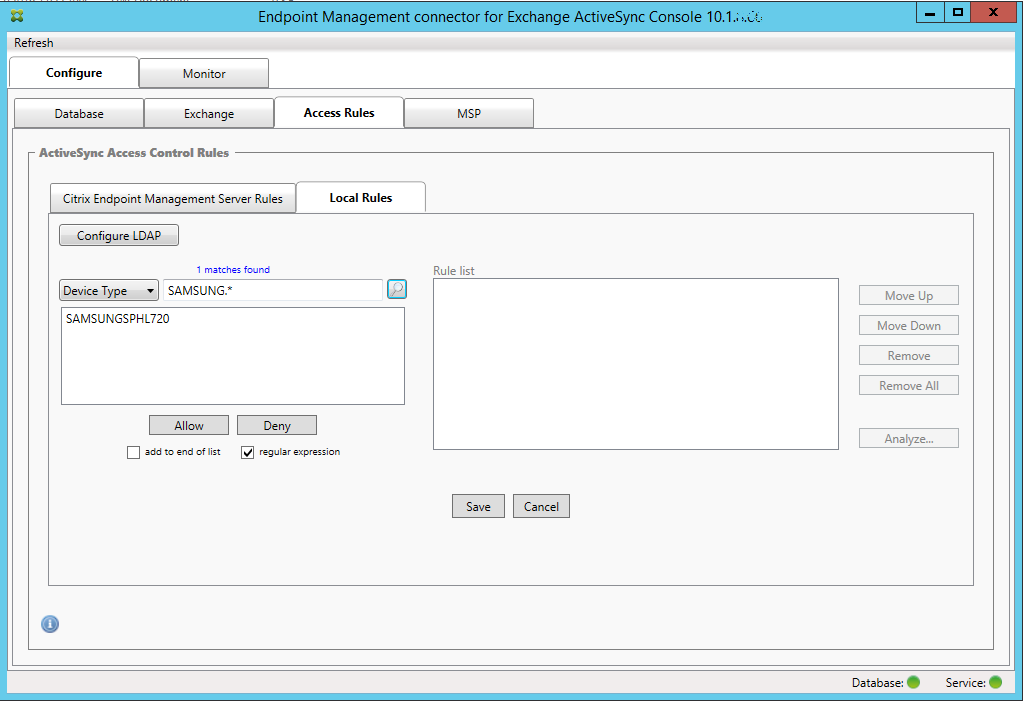
To find devices
By selecting the regular expression checkbox, you can run searches for specific devices that match the given expression. This feature is only available if a major snapshot has successfully completed. You can use this feature even if there is no plan to use regular expression rules. For example, assume that you want to find all devices that have the text “workmail” in their ActiveSync device ID. To do so, follow this procedure.
- Click the Access Rules tab.
-
Ensure that the device match field selector is set to Device ID (the default).
- Click within the selected item text box (as shown in blue in the preceding figure) and then type
workmail.*. -
Ensure the regular expression checkbox is selected and then click the magnifying glass icon to display matches as shown in the following figure.
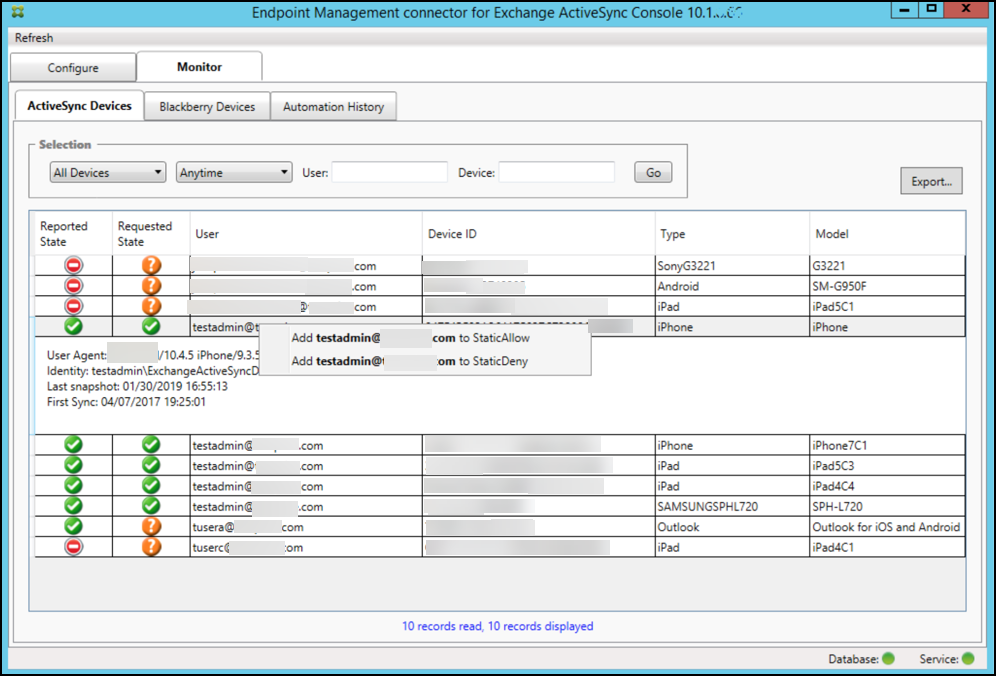
To add an individual user, device, or device type to a static rule
You can add static rules based on user, device ID, or device type on the ActiveSync Devices tab.
-
Click the ActiveSync Devices tab.
-
In the list, right-click a user, device, or device type and select whether to allow or deny your selection.
The following image shows the Allow/Deny option when user1 is selected.
Device monitoring
The Monitor tab in the Endpoint Management connector for Exchange ActiveSync lets you browse the Exchange ActiveSync and BlackBerry devices that have been detected and the history of automated PowerShell commands that have been issued. The Monitor tab has the following three tabs:
-
ActiveSync Devices:
- You can export the displayed ActiveSync device partnerships by clicking the Export button.
- You can add Local (static) rules by right-clicking the User, Device ID, or Type columns and selecting the appropriate allow or block rule type.
- To collapse an expanded row, Ctrl-click the expanded row.
- Blackberry Devices
- Automation History
The Configure tab shows the history of all snapshots. Snapshot history shows when the snapshot took place, how long it took, how many devices were detected and any errors that occurred:
- On the Exchange tab, click the Info icon for the desired Exchange Server.
- Under the MSP tab, click the Info icon for the desired BlackBerry Server.
Troubleshooting and diagnostics
Endpoint Management connector for Exchange ActiveSync logs errors and other operational information to its log file: Install Folder\log\XmmWindowsService.log. Endpoint Management connector for Exchange ActiveSync also logs significant events to the Windows Event Log.
To change the logging level
Endpoint Management connector for Exchange ActiveSync includes the following logging levels: Error, Info, Warn, Debug, and Trace.
Note:
Each successive level generates more detail (more data). For example, the Error level provides the least detail, whereas the Trace level provides the most detail.
To change the logging level, do the following:
- In C:\Program Files\Citrix\Citrix Endpoint Management connector, open the nlog.config file.
-
In the
<rules>section, change the minilevel parameter to the logging level you prefer. For example:<rules> <logger name="*" writeTo="file" minlevel="Debug" /> </rules> <!--NeedCopy--> -
Save the file.
The changes take effect immediately. You don’t need to restart the connector for Exchange ActiveSync.
Common errors
The following list includes common errors:
-
Endpoint Management connector for Exchange ActiveSync service doesn’t start
Check the log file and the Windows Event Log for errors. Typical causes are as follows:
-
The Endpoint Management connector for the Exchange ActiveSync service cannot access the SQL Server. This might be caused by these issues:
- The SQL Server service is not running.
- Authentication failure.
If Windows Integrated authentication is configured, the user account of the Endpoint Management connector for Exchange ActiveSync service must be an allowed SQL logon. The account of the Endpoint Management connector for Exchange ActiveSync service defaults to Local System, but might be changed to any account that has local administrator privileges. If SQL authentication is configured, the SQL logon must be properly configured in SQL.
-
The port configured for the Mobile Service Provider (MSP) is not available. A listening port must be selected that is not used by another process on the system.
-
-
XenMobile cannot connect to the MSP
Check that the MSP service port and transport is properly configured in the Configure > MSP tab of the Endpoint Management connector for Exchange ActiveSync console. Check that the Authorization Group or User is set properly.
If HTTPS is configured, a valid SSL server certificate must be installed. If IIS is installed, IIS Manager can be used to install the certificate. If IIS is not installed, see How to configure a port with an SSL certificate for details on installing certificates.
Endpoint Management connector for Exchange ActiveSync contains a utility program to test connectivity to the MSP service. Run the InstallFolder\MspTestServiceClient.exe program and set the URL and credentials to a URL and credentials that are configured in the XenMobile and then click Test Connectivity. This simulates the web service requests that XenMobile Server issues. If HTTPS is configured, you must specify the actual host name of the server (the name specified in the SSL certificate).
When using Test Connectivity, be sure to have at least one ActiveSyncDevice record or the test might fail.
Troubleshooting tools
A set of PowerShell utilities for troubleshooting is available in the Support\PowerShell folder.
A troubleshooting tool performs in-depth analysis of user mailboxes and devices, detecting error conditions and potential areas of failure, and in-depth RBAC analysis of users. It can save the raw output of all cmdlets to a text file.